Printrun – A Beginner’s Tutorial

The Printrun suite has been around for a long time. Read all the basics of this useful tool and how to get started with it!
Printrun is a powerful software toolchain for reading and modifying STL files, slicing them, and preparing and sending the G-code to your printer. There are three different tools that come with it: Pronterface, Pronsole, and Printcore.
Printrun allows users to simplify their model-to-print process, removing the need to move physical storage to and from your device to your printer, and making it easier to control your printer using G-code.
The free, open-source software was created by Kliment Yancev and it’s currently maintained by him and Guillaume “iXce” Sequin. It has been an important tool for 3D printer users since 2011.
Let’s take a closer look at what Printrun is, what it has to offer, and how to get started with it.
What Is Printrun?
As mentioned, Printrun is a collection of three tools: Pronterface, Pronsole, and Printcore. Pronterface is a graphical user interface (GUI) host that manages your printer and prepares files for printing, while Pronsole is a command-line version of Pronterface, and Printcore is a G-code host with no user input.
Pronterface can integrate with Slic3r, a very good, but now-outdated slicer (compared to Cura, PrusaSlicer, Orca Slicer, etc). This integration lets you access saved Slic3r print, filament, and printer settings. Pronterface can benefit from this integration, even if Slic3r doesn’t have as much to offer as similar programs, and it’s still a good option with powerful features for managing prints using a computer. It has a simple but powerful user interface that complete novices can learn in a flash.
Pronsole and Printcore are lesser-used programs that have been superseded by GUI variants, such as OctoPrint and even Pronterface itself. Pronsole can load STL files like Pronterface, but unlike Pronterface, Pronsole utilizes Skeinforge, an extremely-out-of-date slicer dating back to the early days of RepRap.
Let’s take a closer look at what Printrun has to offer.
Features
Printrun is a fully-integrated toolchain. When you install it, you get everything you need to start printing. It’s a comprehensive package of parameters you can tweak to get what you want out of it. Every parameter is accessible and has a pop-up explaining what it does.
Its GUI makes it easy to understand the different functions and tools at a glance and lets you access important shortcuts (X-, Y-, Z-, and E-axes, temperatures, filament).
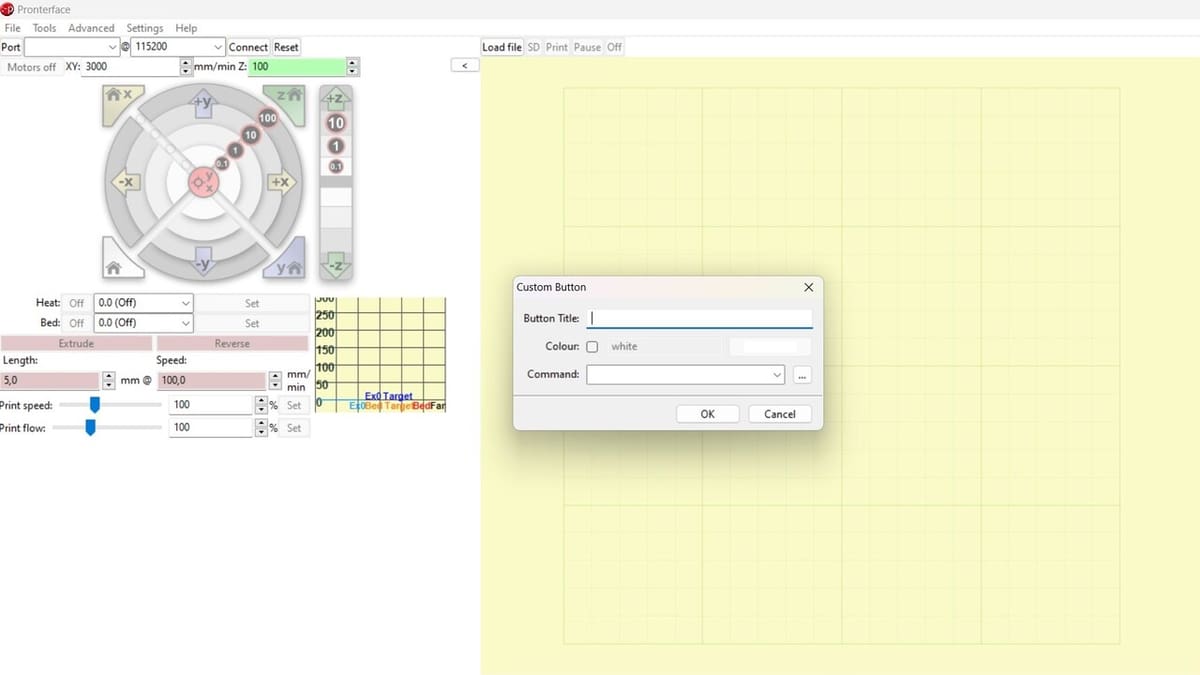
Printrun even lets you create custom buttons that send G-code command(s) of your choosing to the printer. You could create a button that sets up the printer for printing while you slice a file – it might level and preheat the extruder and bed in advance while waiting for a file to be received. You could also run a calibration routine using the buttons – the sky is the limit.
Only three file types can be opened in Pronterface: OBJ, STL, and G-code. While this might appear a bit lacking when one thinks about the main 3D printing file formats, it still covers the basics to get the job done.
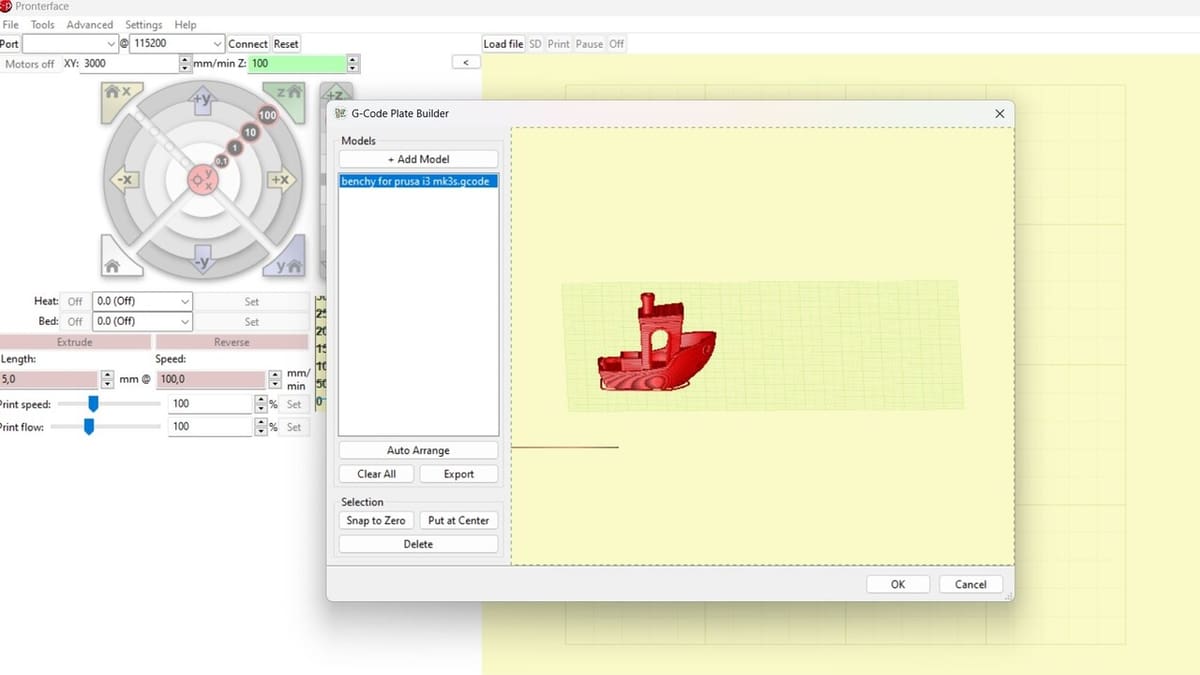
You can manipulate objects on the build plate. You can arrange models however you please and save the build plate as an STL, or using the G-code Plater, as G-code. Not to mention, Printrun is supported by every major operating system (Windows, MacOS, and Linux) with precompiled binaries for Windows and MacOS, and packages for Linux, though you can still compile the source code yourself.
It’s worth noting that Pronterface doesn’t have support for power recovery, filament runout detection, or Wi-Fi printing. But you can customize the UI to your liking. By going to “Settings > Options > User Interface”, you can opt to show or hide certain features (e.g. temperature graph, temperature gauges), and under “Settings > Options > Color”, you can change the hues for pretty much every part of the GUI.
Now that we’ve looked into what Printrun can do, let’s check out how to use it.
Getting Started
Before you can use Printrun, you have to download it. The latest release of Printrun can be found in GitHub. Select the release that has a small green tag next to it that says “Latest” for the – you guessed it – latest release.
Printrun is compatible with Windows, MacOS, and Linux.
There are two versions for Windows: x64 and x86. Download the x64 version – the x64 stands for 64-bit, which means that any program compatible with x64 can use your computer’s resources more efficiently than x86 (which is 32-bit). You’ll also want to download Slic3r (this will allow for the integration and ease of use of settings profiles).
If you’re on MacOS, download the file with MacOS in the file name and download Slic3r separately – this will let you slice files in Pronterface and load G-code, as well as access the printing settings.
If you’re on Linux, either compile the source code or use a package manager to find prebuilt packages of Printrun. See the Read Me if you want to compile it yourself.
Extract and install Printrun the way you would any other program on your computer.
Alternatively, no matter which OS you’ve got, you can run Printrun from source to access the latest features and tools, although these won’t necessarily be stable.
Once you’ve got the program, in whichever version you choose, it’s time to set it up.
To start Pronterface, click its icon. In Windows, you may get a warning that says the publisher can’t be verified. You can proceed with running it. In MacOS, you’ll get a warning saying that your computer won’t run the file because it’s unsigned. To get around this, run the command “sudo spctl –master-disable” from your command console.
UI & Layout
Before getting started with Pronterface, it’s important that we familiarize ourselves with its layout.
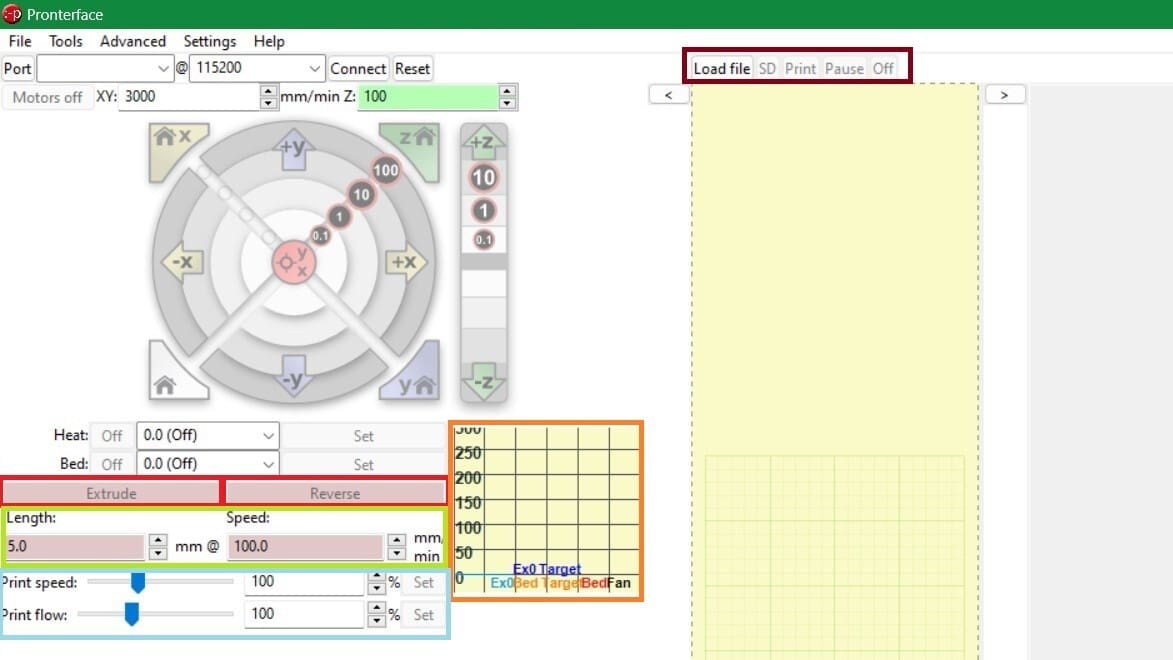
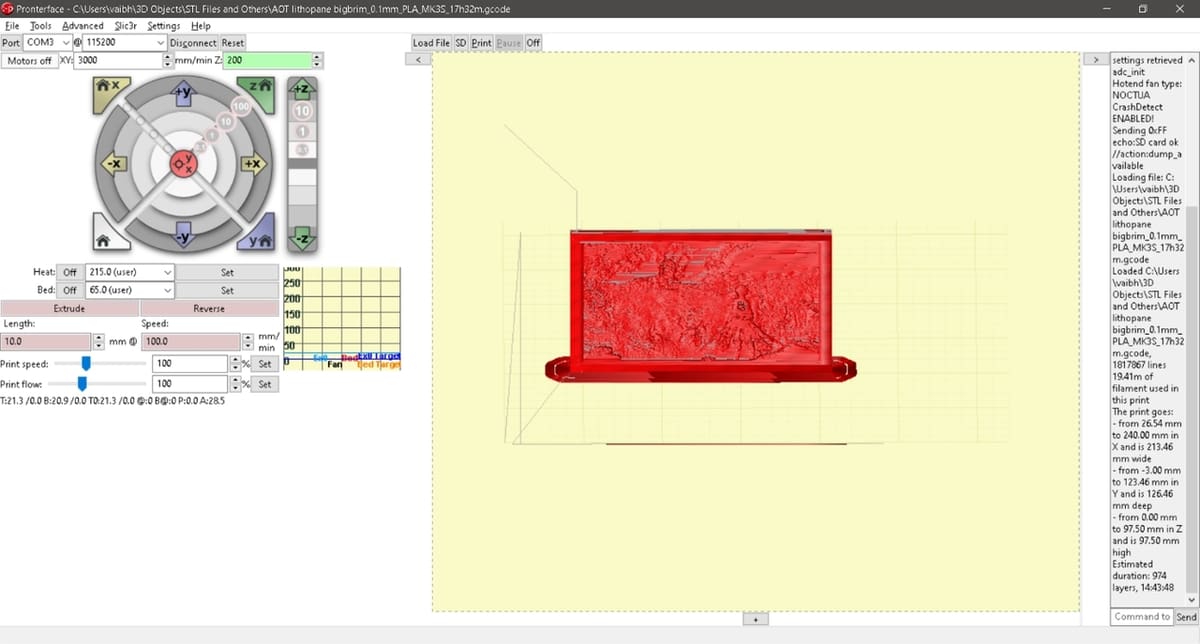
Note the left side of the screen, where the most important parts of the UI are. Each layer of each quadrant of the circle corresponds to an axis’s positive or negative direction and the numbers correspond to millimeters of movement. The Z-axis is separated but works the same as the X- and Y-axes.
You can also home the axes by clicking on the triangular buttons on each corner of the circle. Below that, there are settings corresponding to bed temperatures, the extruder (red boxes), and there’s even a graph of expected and actual temperatures for the bed and hot end (orange). You can adjust retraction speed and length on the fly (green), and even adjust print speed and flow (light blue).
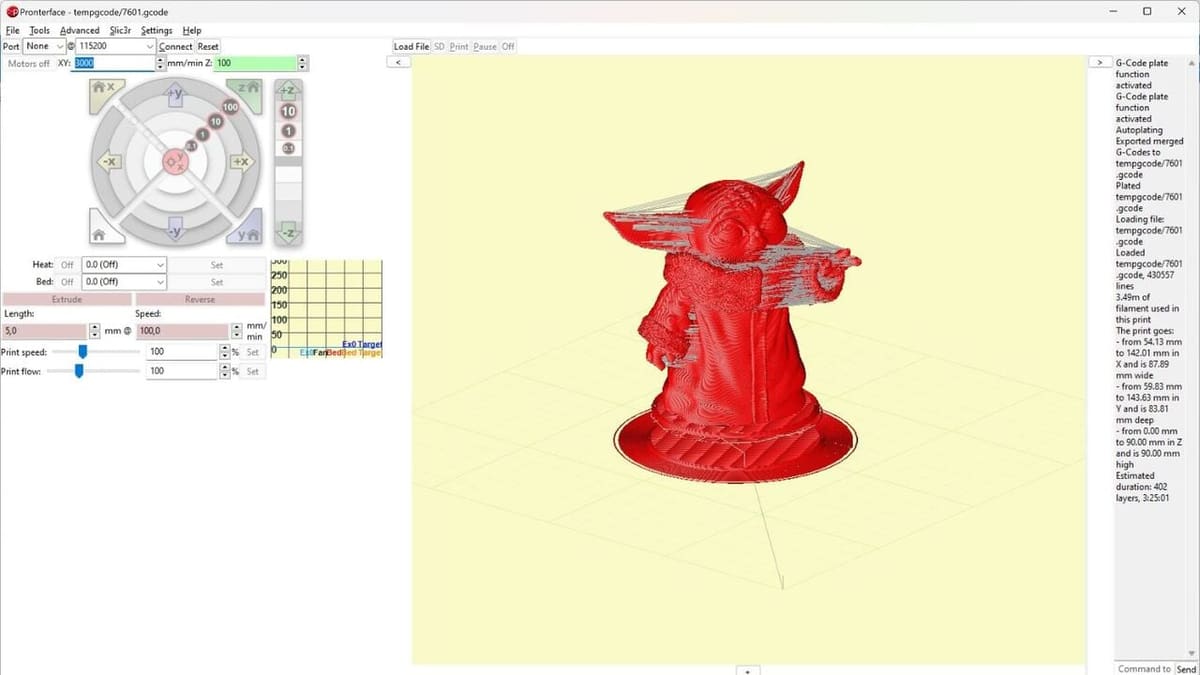
Finally, there are buttons that let you load STLs from your computer, print from an SD card, and control the state of a print (brown).
If you want to learn more about using Pronterface on its own, check out this article for more information.
You may have noticed that most of these buttons are grayed out and can’t be interacted with from the get-go. To work with them, you have to connect your printer to Pronterface.
Step #1: Connecting to Your Printer
Once you’ve got Pronterface up and running, it’s time to streamline your workflow. In a nutshell, this means connecting your 3D printer to it.
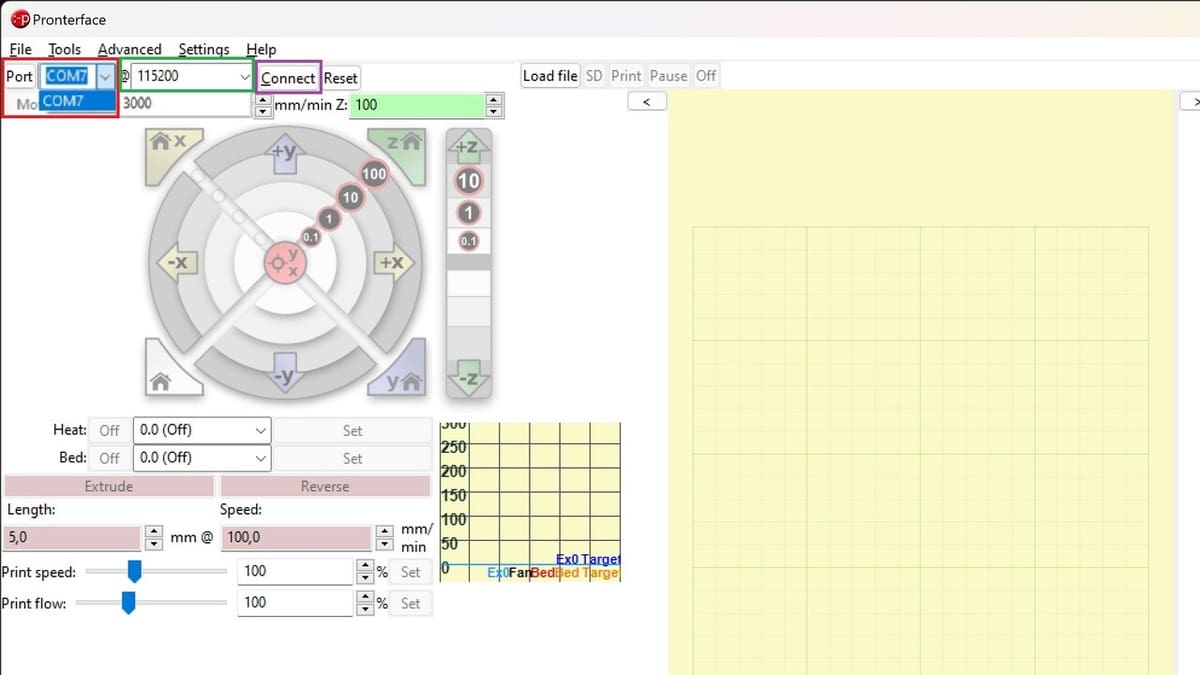
Connecting Pronterface to your printer involves setting the baud rate and the communications port.
- Prior to plugging in your printer, take a look at the list of COM ports in the drop-down options (red), and take note of which are shown. Plugging in your printer should add an additional port to this list.
- Select that port from the drop-down list.
- If that doesn’t work, click on a few ports and keep pressing the Connect button (purple). This should “reset” the list of COM ports until the new one appears. Otherwise, you may have a faulty cable or port.
- Try another USB port or another cable if it still doesn’t work. Make sure to also try different baud rates from the drop-down (green). We recommend using 115200 first, as this is the most commonly used.
Step #2: Setting Parameters
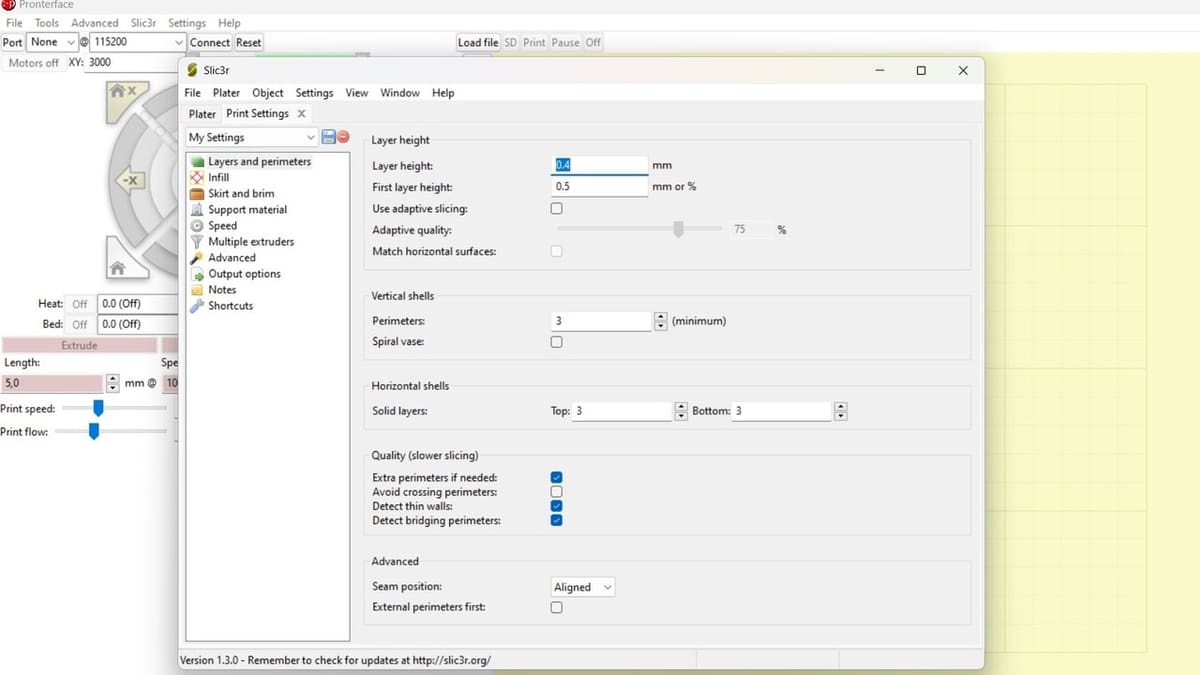
As mentioned, one of the benefits of Pronterface is that it can integrate Slic3r. To avoid being overwhelmed in Pronterface, you can opt to work in Slic3r and then integrate both.
For starters, the most important parameters have to do with the size and shape of the bed. These are found under “Settings > Printer Settings…”. You can also set other parameters to determine where you want the origin (0,0,0) to be. Slic3r is set up for a rectangular bed of 200 x 200 mm, with the origin on the bottom right. These can be changed by clicking on the pop-up menu under “Printer Settings > General > Size and coordinates > Bed shape”.
Once you’ve set the bed size and shape, go through the other parameters and make necessary changes. With your printer settings done, on the top left you can click on the Floppy disk icon and save the new profile with a name of your liking.
Next, you can look at the default parameters for the print settings, found under “Settings > Print Settings…”. From the different tabs on the left, you can change the layer height, type and percentage of infill, use of support material, and more. Again, once the settings are to your liking, you can save the new profile.
Last but not least, under “Settings > Filament Settings…”, you can change the default options (e.g. diameter, temperatures) and save the profile.
Once you’ve got all the parameters to your liking, in Pronterface go to “Settings > Options > User Interface” and check the box for “Enable Slic3r integration”. After you restart Pronterface, you’ll see that a new tab has appeared in the top ribbon. If you save new settings profiles in Slic3r, you’ll have to restart Pronterface for it to be listed.
As in Slic3r, for ease of use the settings organized into three major tabs: “Print Settings”, “Filament”, and “Printer”.
Step #3: 3D Printing
Printing with Pronterface is very easy. Assuming you’ve set up the program correctly, everything should go smoothly. You can either work with STLs (which will require a bit more of work at setup) or, if you’ve already sliced the model(s), can work directly with the G-code.
- Click the “Load File” button to select a G-code file.
- Try viewing the preview Pronterface shows you. Pronterface has a layer visualizer similar to Cura and PrusaSlicer that lets you preview the finished item. It also depicts travel moves so you can see if there may be any collisions in a multi-object print.
- Once you’re satisfied with everything, click the “Print” button to send it to your printer via the USB cable.
- Look at your printer start!
License: The text of "Printrun – A Beginner’s Tutorial" by All3DP is licensed under a Creative Commons Attribution 4.0 International License.