PreForm (Formlabs): All You Need to Know

PreForm by Formlabs is a versatile and powerful slicing software for Formlabs 3D printers. Read on to learn all about it!
A Powerful Program
Formlabs is one of the largest manufacturers of desktop SLA 3D printers in the industry. Their Form 2 and Form 3 3D printers are renowned for their exceptional print quality and relatively simple operation. In fact, a large part of this seamless experience is due to PreForm, the company’s proprietary slicing software. It’s free to download, but it’s only compatible with Formlabs 3D printers at this time.
If you want PreForm for yourself, simply select your computer’s operating system on the Formlabs website, fill out a brief form, and open the downloaded file. The package installer should guide you through the rest of the installation.
In this article, we’ll dive into all you need to know about PreForm, including the system requirements, primary features, and some worthy alternatives. Now, let’s get started!
System Requirements
PreForm can run on most modern laptops and computers, and there are both Windows and macOS versions. However, slicing intricate parts can be very computationally intensive, so we recommend a powerful machine for the best results.
Here’s a summary of PreForm’s minimum requirements:
- Windows 7 (64-bit) and up
- macOS X 10.12 and up
- OpenGL 2.1
- 4 GB RAM (Formlabs recommends at least 8 GB)
UI & Layout
One of the primary advantages of PreForm is its simple layout. Such simplicity makes it both beginner- and user-friendly, but don’t be fooled: PreForm still has a multitude of powerful features.
When you first open the program, you’re prompted to select a machine, material, and layer height in the Job Setup window. You can then open an STL or an OBJ file, which PreForm will automatically scan for vulnerabilities and attempt to repair upon import.
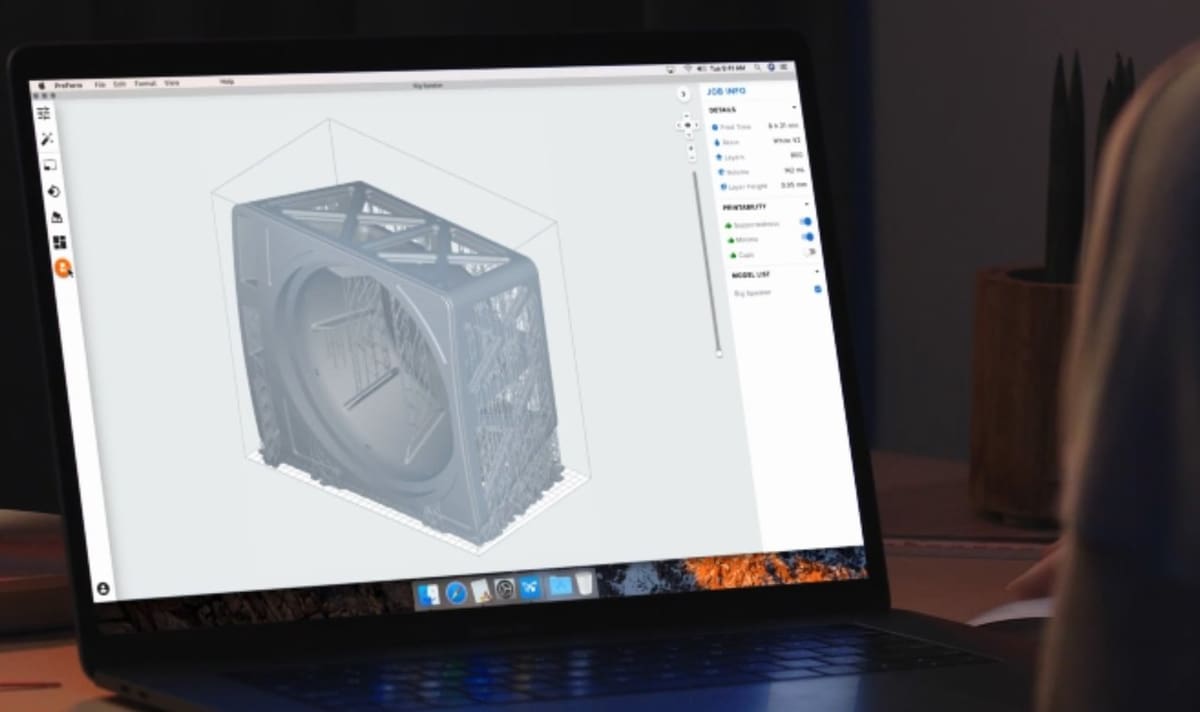
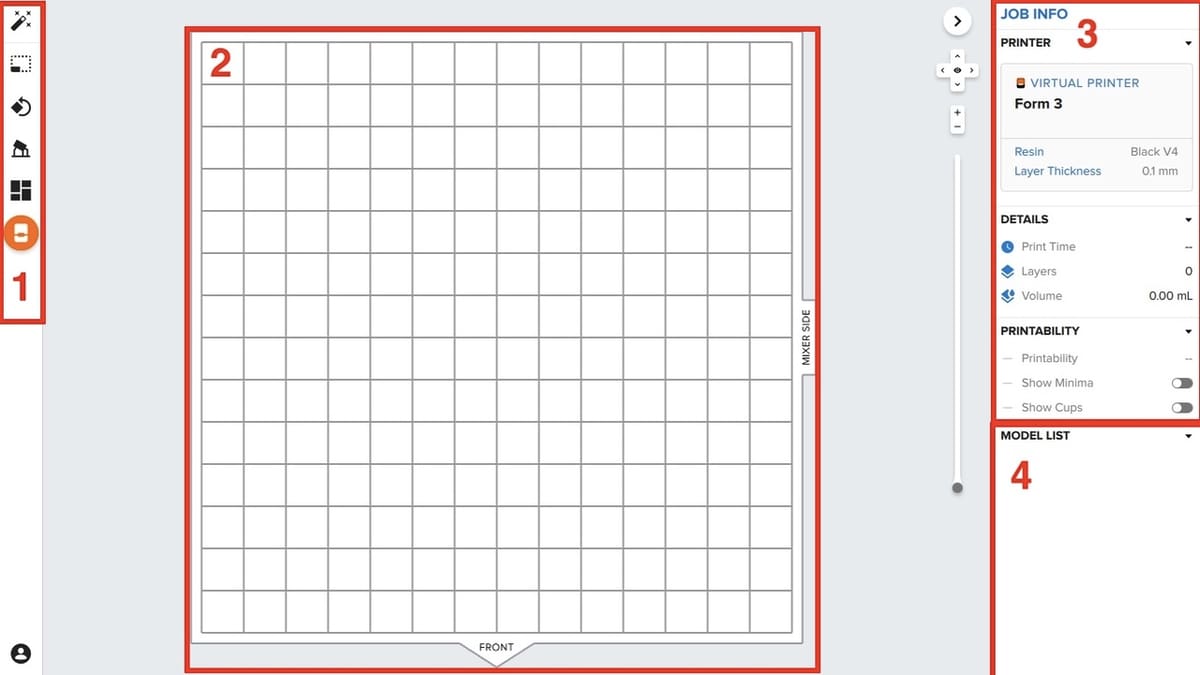
Once you’ve loaded your model, you’re ready to start slicing! Luckily, PreForm makes this a relatively straightforward process. The primary interface is divided into four main sections: the toolbar, workspace, Job Info tab, and the model list. Each of these sections provides valuable tools for preparing your model. Let’s take a deeper look:
- Toolbar: Configure the position, size, and supports of your model. We’ll go over these tools more in the next section.
- Workspace: View, position, and orient a model. It also previews any changes made by items in the toolbar, such as support modifications or changes in a model’s orientation.
- Job Info tab: Reports the estimated print time, material usage, and printability of a model. This also includes useful warnings about model features that may cause a print to fail (such as cups or unsupported minima). Be sure to check out our comprehensive troubleshooting guide to common 3D printing problems for more information on resolving any issues.
- The model list: Shows all of the models currently stored in the file, allowing you to view, group, and hide certain models. This is particularly useful for organizing projects with many parts, as you can easily prepare multiple build plates worth of items in a single file.
Features & Functions
One of the major challenges of designing SLA slicing software is balancing quality results with ease of use. On the one hand, it’s important that a program is as easy and approachable as possible. At the same time, the complexity of SLA technology necessitates advanced features capable of producing quality prints. This duality is demonstrated throughout PreForm’s feature set, which offers both automated and manual modes.
In general, PreForm’s features tend to err on the side of automation rather than customization. We’ve found that this is great for most prints, as PreForm’s automatic features are optimized to work with a majority of models. However, users looking to control every detail of their print may be disappointed by PreForm’s lack of customizability.
Now that we have an overview of this program, let’s look at some notable features!
One-Click Print
One of the flagship capabilities of PreForm is the One-Click Print function. After you’ve uploaded your model, simply click this button to have PreForm scale, orient, position, and add supports to the model. While the feature itself is not customizable, it works great for quickly and easily preparing a print.
We’ve found that models rarely fail when printed with One-Click Print. PreForm automatically optimizes the orientation and supports for minimal chances of failure, making this a great feature for prints where reliability is key. However, we also found that the feature tends towards conservative. As such, it typically places more supports than necessary and may orient the model in a sub-optimal manner. This can lead to unnecessary material waste and increases in print time.
Size
The size tool allows you to customize the scale of your model. Simply input dimensions in the X-, Y-, and Z-axes, or scale the model uniformly and quickly to your liking. In addition to using the size tool, you can also click and drag the arrow at the corner of the model to resize.
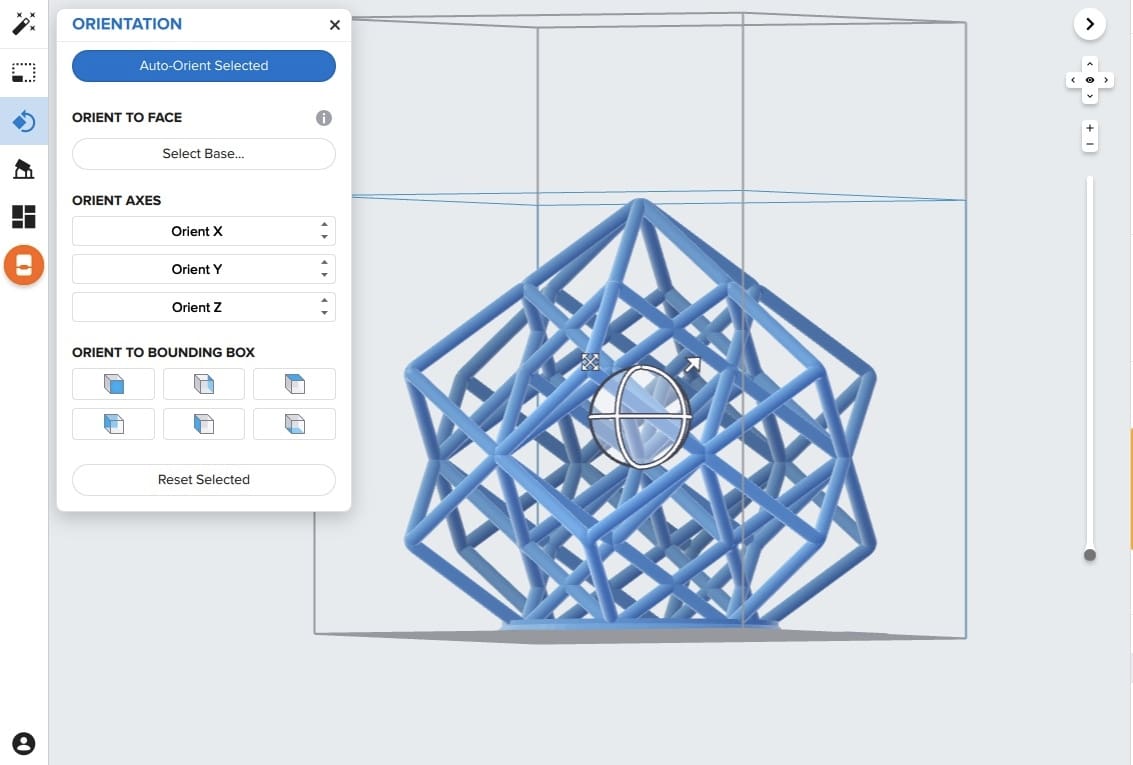
Orientation
The orientation tool allows you to rotate a model over the X-, Y-, and Z-axes. You can also orient a model to rest on a specific face or to align with the face of a bounding box. Perhaps most usefully, you can choose “Auto-Orient Selected” to have PreForm automatically orient the model for optimal printing on Formlabs machines.
Such a feature is especially important for SLA printing, as improper orientation can cause artifacting and print failure. However, keep in mind that this feature does not optimize for support placement, so you will likely need to regenerate supports after orienting. In addition to using the orientation tool, users can also click and drag the circles surrounding the model in the workspace to reorient.
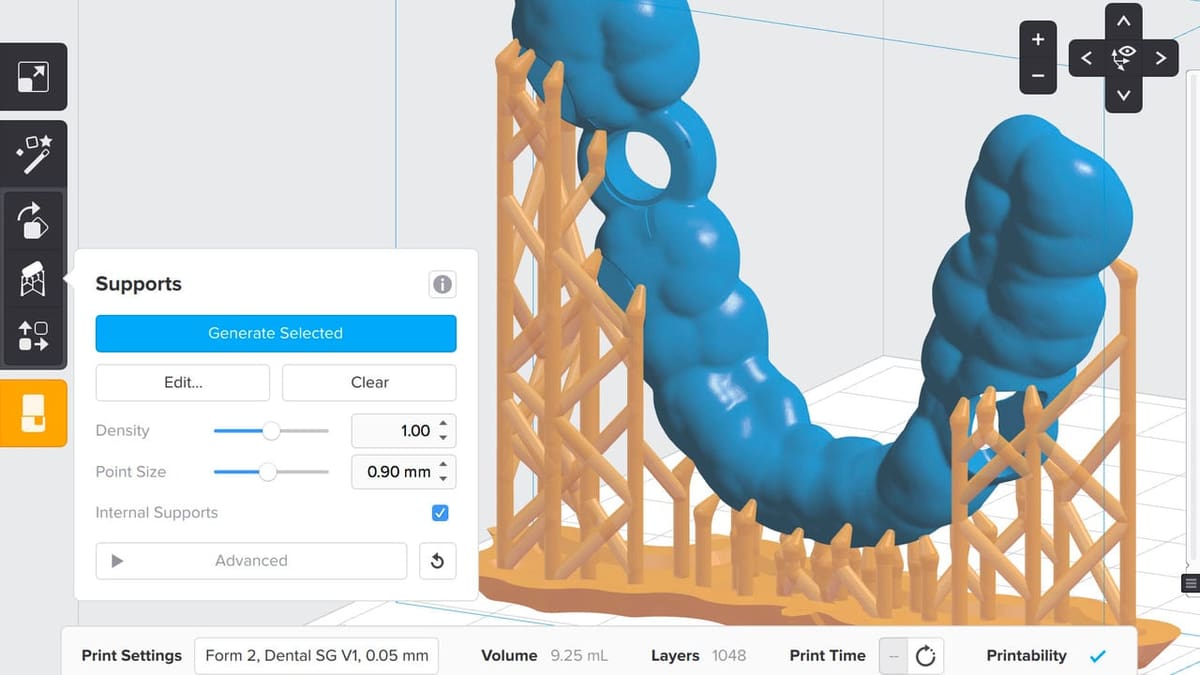
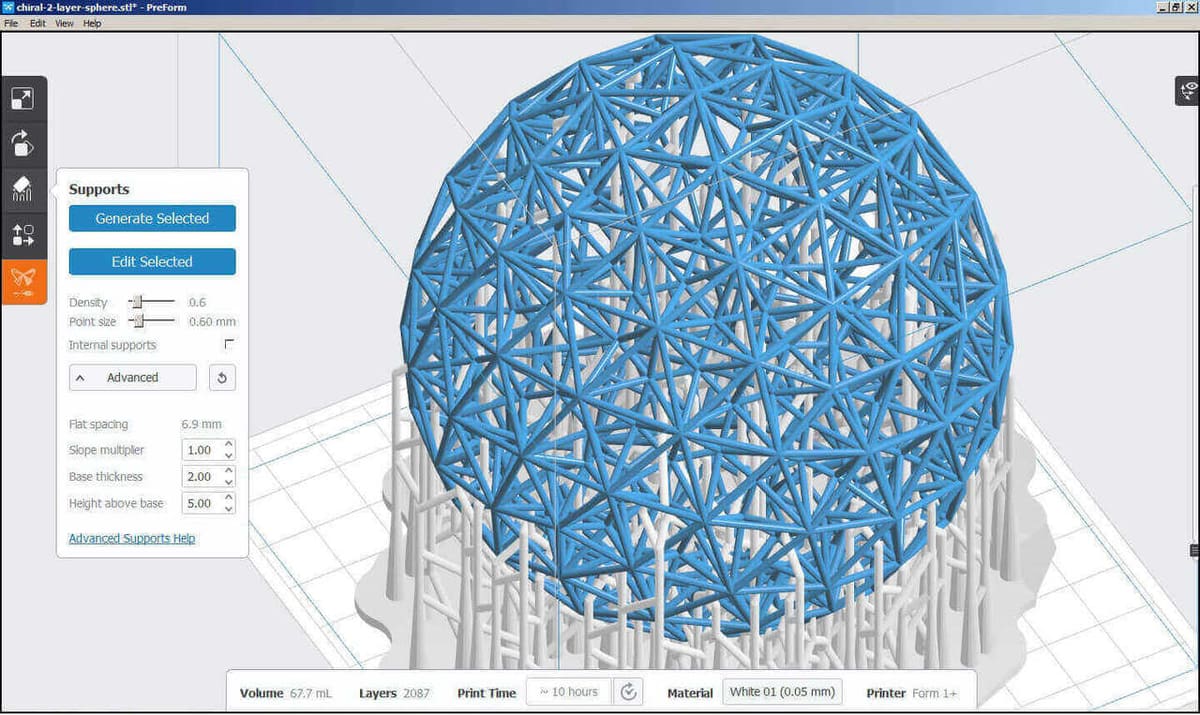
Supports
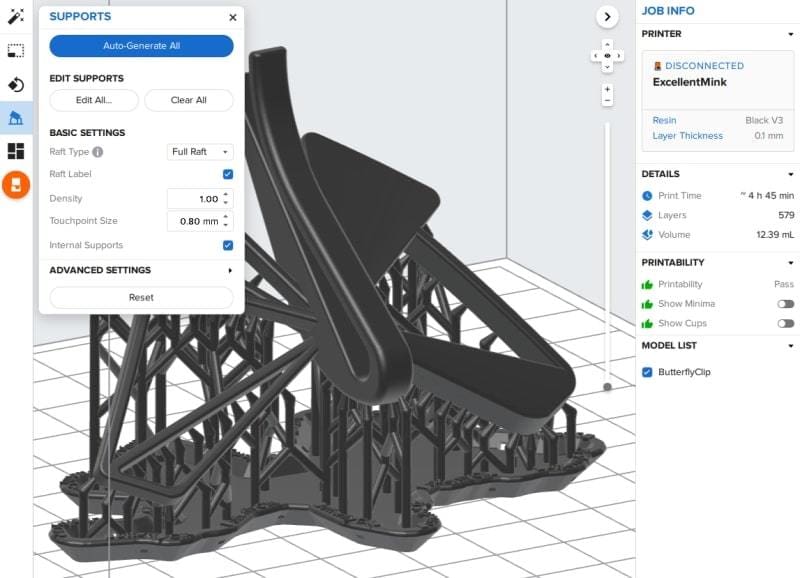
PreForm offers the ability to automatically generate supports via the “Auto-Generate Selected” button. You can also manually add, remove, and adjust the placement of automatically-generated supports via this tab.
If you want customized supports, here are a few of the most useful settings:
- Raft type: Choose whether to include a full raft (which places the model above a large base with supports), a miniature raft (which places the model on the build platform with supports), or no raft beneath the print.
- Raft label: You can include the model’s name on the perimeter of the raft. It can be useful for quickly identifying large batches of parts.
- Density: This refers to the number of supports generated per unsupported area of the model. A larger number will support the model more fully but will increase the chances of the supports damaging the model. A smaller number will decrease the risk of damage to the model but increase the chances of print failure.
- Touchpoint size: This is the area of the support that’s in direct contact with the model. A larger number will make the supports harder to remove but more likely to remain attached to the model during printing. A smaller number will make the supports easier to remove but increase the chance that they detach mid-print.
- Internal supports: You can generate supports on the inside of the model in addition to the outside. This can be useful for supporting hollow models or models with fragile inner features.
Layout
Much like with orientation and supports, PreForm offers both manual and automatic options for arranging the parts you’ve imported into the workspace. The automatic option is ideal for those looking to lay out a large number of parts, as PreForm will automatically optimize for print quality and speed. However, this feature also tends to place models towards the side of the build platform closest to the wiper. To extend the life of your build platform, we recommend manually varying the placement of your models on the bed from time to time.
In addition, the layout tab gives you the ability to customize how far apart models should be spaced, whether or not rafts of separate parts should overlap, and whether or not parts should be rotated when they are laid out. You can also duplicate or mirror models, as well as create an array of parts. All of these features can be useful for printing large batches of parts, particularly on larger resin printers such as the Form 3L.
Missing Features
It’s clear that Formlabs has made a significant effort to keep PreForm as simple as possible while still providing useful features. Unfortunately, we feel that some invaluable features were left out of the program. Let’s take a look at a few of them:
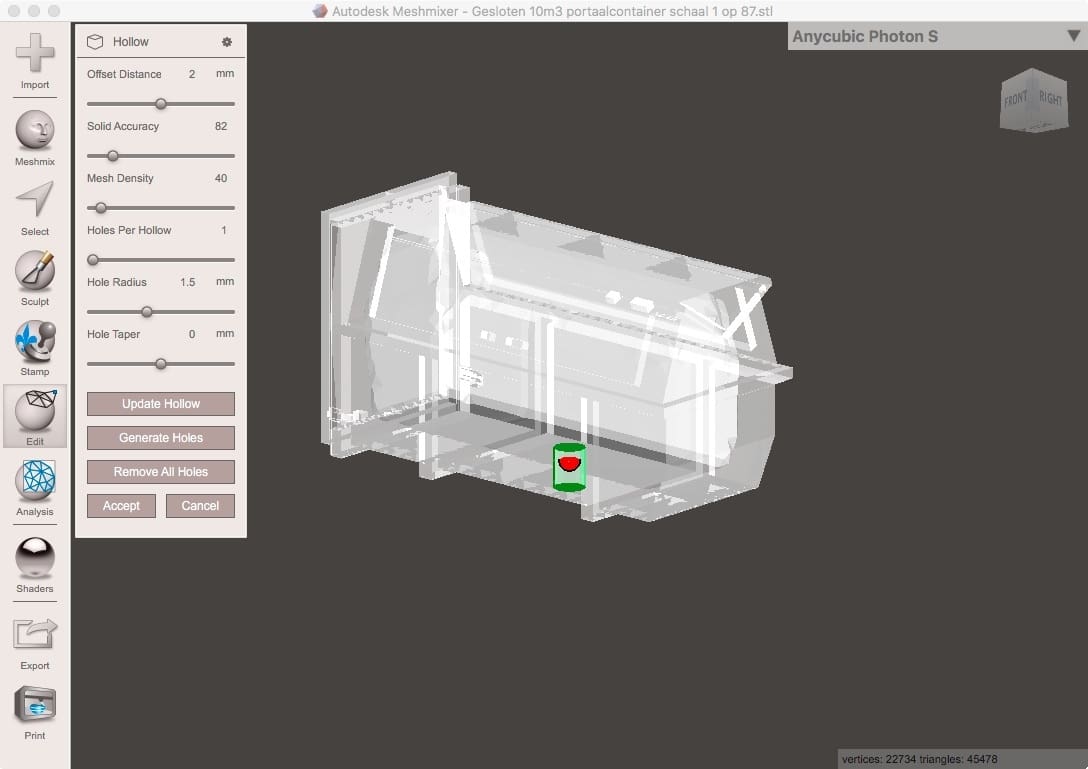
Model Hollowing
The majority of SLA slicers offer the ability to hollow the inside of a model before printing. This greatly reduces the print time and material usage of a print. Those looking to create sculptures, scale or conceptual models, or multi-piece assemblies may find this feature particularly useful.
However, this feature is not native to PreForm. Instead, Formlabs recommends loading your model into Autodesk Meshmixer, hollowing it, and then re-importing it into PreForm. However, many users find it inconvenient to introduce an additional program into their model preparation pipeline.
Drainage Hole Creation
The nature of SLA 3D printing makes printing hollow models inherently difficult. Without proper drainage, uncured resin can become trapped inside a hollow print. As such, those looking to print hollowed models may also wish to create drainage holes in their model to avoid blowout. Once again, Formlabs recommends a third-party software to accomplish this (Meshmixer also works well here), as it not a feature native to PreForm at this time.
Fine-Tuned Control
Lastly, PreForm offers no control whatsoever over the printer’s laser settings or LPU speed. Granted, most users find the material presets that come with PreForm to be more than adequate. However, extremely advanced users may wish to experiment with third-party resins or modify the laser settings to try and improve print quality. Indeed, many users have expressed frustration over the lack of control that they have over their “professional-grade” machines.
Dashboard
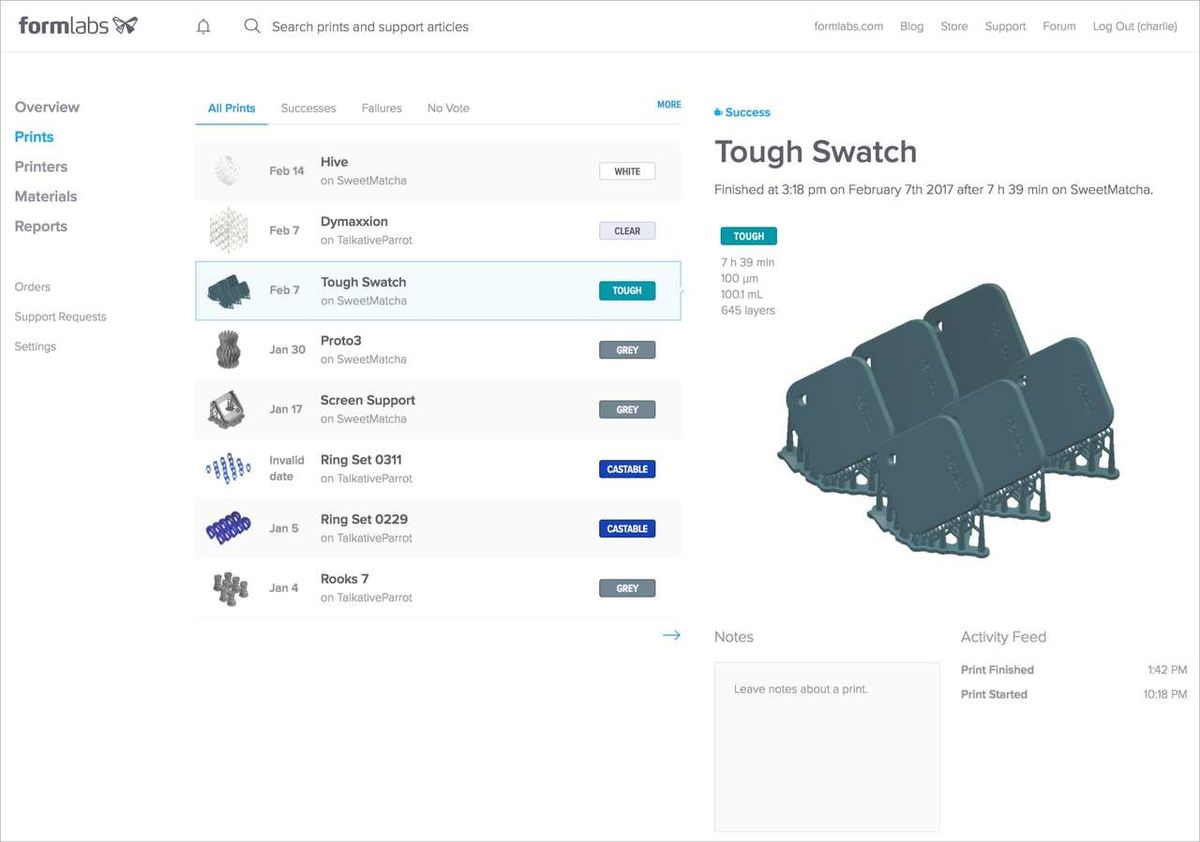
Even though it isn’t technically a part of PreForm, it’s also important to mention the Formlabs Dashboard. Also created by Formlabs, the online dashboard allows users to track the status of their printers, materials, and prints.
Once you’ve linked your printer to your Formlabs account, the printer will become visible on your dashboard. When you login, you’ll see a brief overview of each of your Formlabs machines, as well as the print jobs that have been queued, completed, or failed. You can also view the resins that you have in use and each print job’s respective details (such as print time and material usage).
This is extremely useful as a workflow tool. This Dashboard allows you to track resin and tank use and reorder both as necessary. Seeing as it’s browser-based, it’s also useful for quickly pulling up print information from anywhere in the world.
In addition, the Dashboard provides a quick, three-day overview of your printers’ uptime. For those managing print farms or businesses centered around printer uptime, this can be a useful feature. You can also configure SMS and email alerts when prints complete or fail, or when a printer runs out of material.
Ultimately, this Dashboard is a useful complement to PreForm, allowing anyone to easily keep tabs on their printers and their respective statuses.

Alternatives
As Formlabs 3D printers are only capable of printing models sliced with PreForm, there aren’t any real alternatives to PreForm.
That said, for those looking to expand the native capabilities of PreForm, Formlabs offers direct integration with Autodesk’s Netfabb. This brings a variety of features to both platforms, including:
- Workspaces: Users can load a Formlabs machine into the Netfabb workspace and connect directly to PreForm from Netfabb.
- Custom supports: Users can create and modify custom supports in Netfabb for printing on Formlabs machines.
- Lattice assistant: Users can hollow, add lattice structures, and add drainage holes to their Netfabb models to save print time and material.
In addition to Netfabb, there are also numerous slicers capable of exporting modified STL files that can then be imported into PreForm. This is useful for hollowing models, generating supports, and other features that directly impact the composition of a model.
Note that ChiTuBox, one of the most popular third-party slicers, is not currently capable of exporting STL files with supports. As such, we did not find it to be particularly useful for slicing for Formlabs machines.
Programs That Can Export STL Files to PreForm
Formware 3D slicer is one of the leading SLA slicers on the market. It offers automatic and manual support placement, automatic part orientation, mesh hollowing, drainage holes, model analysis, and complex 2D nesting. However, at around €130 (~$158) for a personal perpetual license, it may be too expensive for the average hobbyist. It also isn’t very accessible, as it’s only available for Windows and in a limited number of languages.
- Cost: Paid, 30-day free trial
Lychee Slicer is a relatively new slicer to the market. Nevertheless, it appears to be a worthy competitor. It offers advanced support placement features such as support bracing, island detection, and dynamic rafts, as well as hollowing and drainage holes. However, if you want to remove the advertisements and unlock the more advanced features (such as hollowing and variable layer height), you’ll need to pay a ~€4 (~$5) monthly fee or ~€30 (~$37) yearly fee.
- Cost: Free and paid versions, 30-day free trial for paid versions
PrusaSlicer, from Prusa Research, was originally designed to work only with Prusa 3D printers. However, they recently introduced SLA functionality and the ability to export STL files to their open-source PrusaSlicer. While the feature set certainly isn’t as advanced as Formware or Lychee, PrusaSlicer is – unlike its competitors –completely free to download. With hollowing, tree supports, and automatic part orientation, it certainly isn’t a bad alternative.
- Cost: Free
Lead image source: Formlabs
License: The text of "PreForm (Formlabs): All You Need to Know" by All3DP is licensed under a Creative Commons Attribution 4.0 International License.