Whether you’re new to 3D printing or an experienced maker, the right slicer is necessary to unlock the best results from your 3D printer. If you’re looking for a good option, you should consider Orca Slicer, which is relatively new open-source software with some useful features. Based on Bambu Studio, which is itself a fork of PrusaSlicer, Orca Slicer offers the best of both of these along with some new tools that will make your 3D printing experience more convenient.
One of the most appreciated features of Orca Slicer is its calibration tool, which includes several tests to help you tweak your slicing profiles and obtain the best possible print quality from your machine. There are plenty of tests that you can do to improve the quality of your parts, but in this article we’ll focus on pressure advance. Setting the right pressure advance value in your slicer will help you obtain sharp corners on your prints and improve their overall quality.
In the following sections, we’ll take a look at what pressure advance is and how to set it up properly in Orca Slicer. Let’s get started!
Why You Should Use It
Pressure advance, known as linear advance in Marlin, uses a formula to compensate for the forces that cause too little filament to leave the nozzle at the start of a line and too much at the end. In addition, it prevents artifacts by adjusting the flow when accelerating and decelerating near a corner. An excessive pressure advance value leads to under-extrusion, while an insufficient pressure advance value creates over-extrusion.
Your pressure advance value will vary depending on your filament, nozzle size, and hot end temperature. Tweaking the pressure advance value allows you to avoid blobs on corners and oozing during travel moves. By predicting nozzle pressure, it improves print quality through more consistent extrusion and sharper corners, which is especially useful if your model features text or slots. For this reason alone, it’s one of the most well-loved calibration tools among makers.
The Orca Slicer community seems to appreciate this tool. However, since the software is relatively new, at times there can be bugs when using this feature. For example, some Reddit users have reported that occasionally the PA Tower doesn’t show any change in pressure advance values. If you come across this issue, be sure to activate “Enable pressure advance” in the Filament profile in Orca Slicer, as this may help solve it.
How to Use It
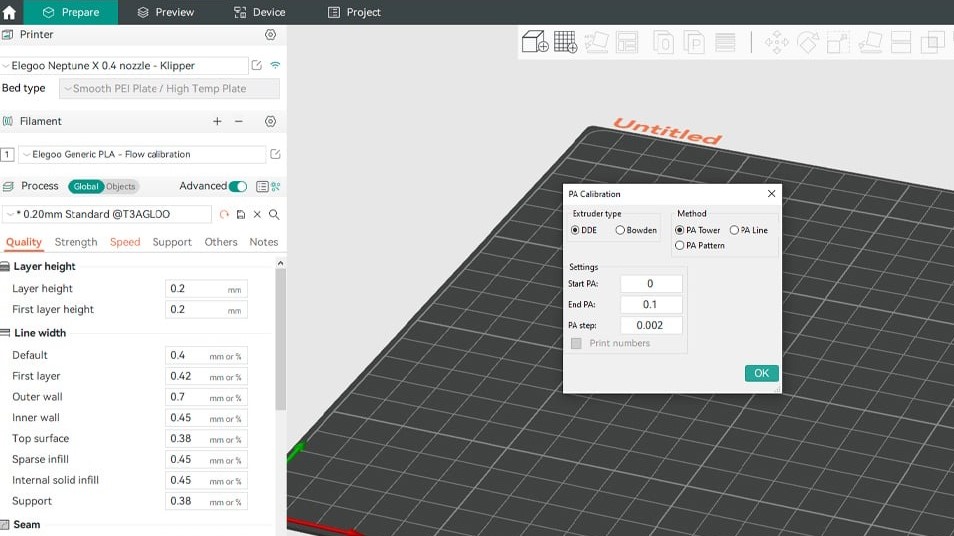
Orca Slicer offers a built-in tool for calibrating pressure advance. To access it, click on “Calibration” at the top of the slicer window and select “Pressure Advance”. From there, Orca Slicer will open a little window where you’ll set the most important parameters.
The slicer offers three test options that you can choose from, including the tower, line, and pattern. Every test model includes two versions, for direct and Bowden extrusion setups.
In this window, you’ll set the values for your test. Let’s take a closer look at them:
- Extruder type: Select “DDE” or “Bowden”, depending on your extrusion setup. The software will automatically update the pressure advance values based on your extruder type.
- Method: Here you can choose between the tower, line, and pattern options. We’ll go over each of these further below.
- Start PA: This is the initial pressure advance value that will be used in the test. You can leave it as default.
- End PA: This is the final pressure advance value that will be used in the test. You can leave it as default.
- PA step: This number determines how much the PA value will be increased with every 1 mm increase in height. You can also leave it as default.
- Print numbers: If you select the PA Line method, you can choose to print the corresponding PA values.
If you run into any issues, you can check out the instructions from the Orca Slicer team about how to use each tool. Now, let’s dive into the different types of tests!
Line Method
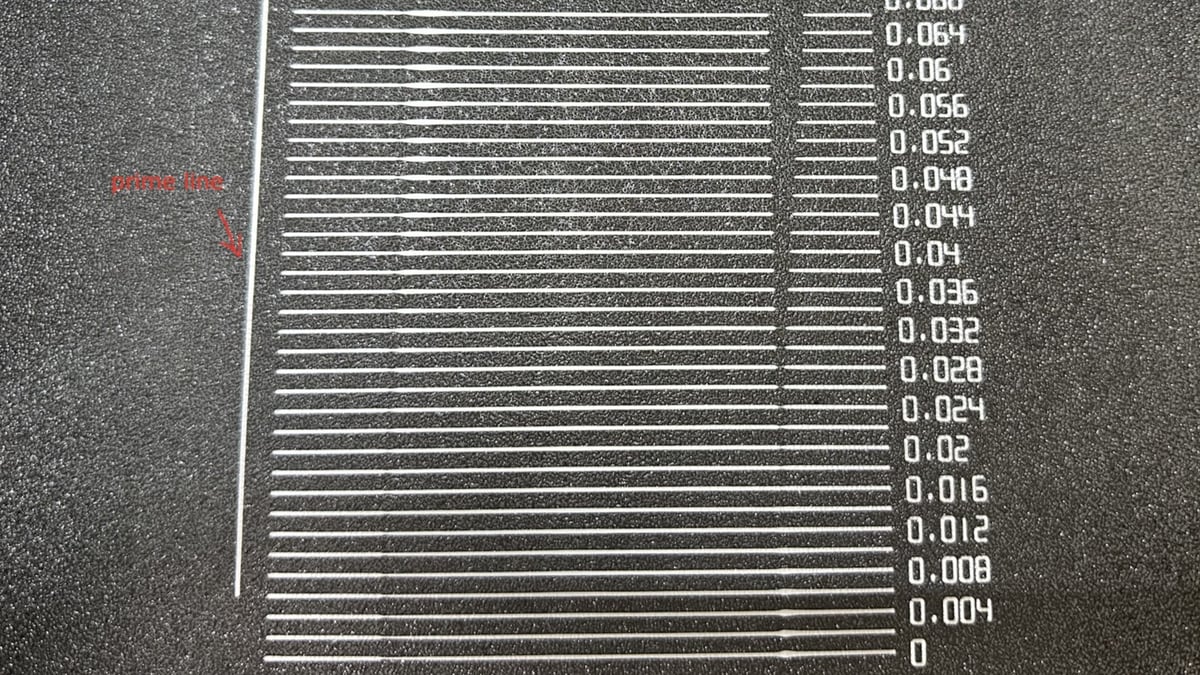
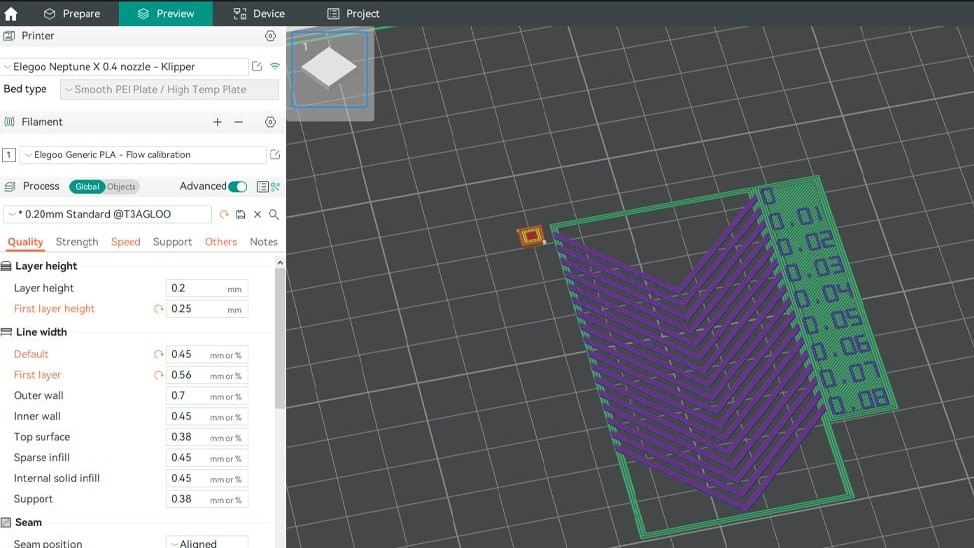
The line method is the fastest option, but its accuracy will depend on the quality of your first layer. To perform the test, simply select “PA Line” from the PA Calibration menu. The text “PA Test” will then be generated. After hitting “Slice plate”, you’ll see a series of lines that will be extruded using different pressure advance values. You can now send the G-code to your printer.
Evaluating the Test Print
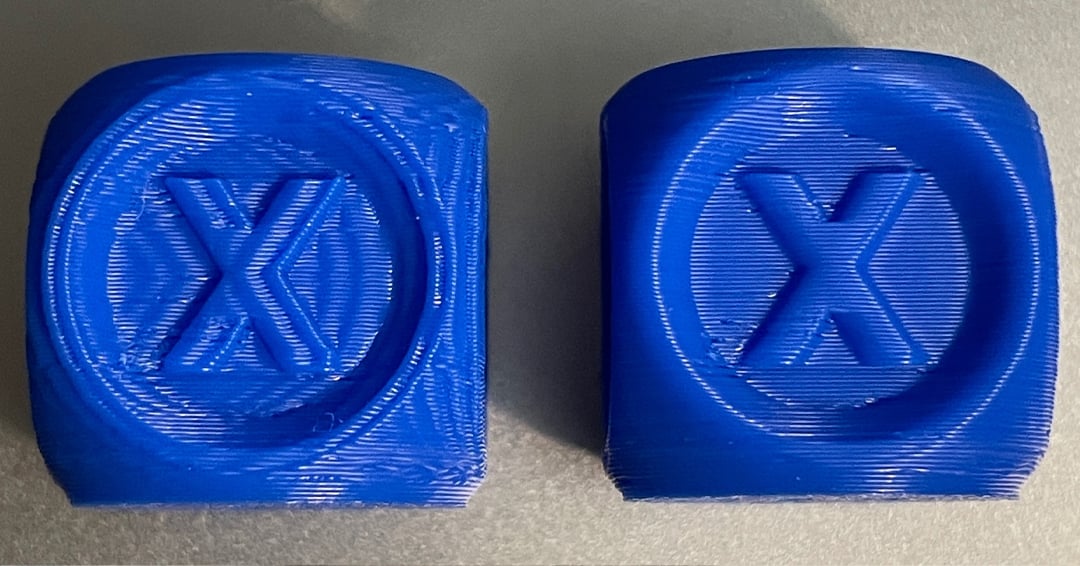
Your printer will draw a series of lines on the build plate with different pressure advance values. After printing, you should look for the line value with the most consistent extrusion. In the example image above, 0.16 is the most even line that doesn’t have any blobs or gaps, which are signs of over- and under-extrusion. This would be your pressure advance value. Keep in mind that if you have a bed that’s improperly leveled, you won’t obtain accurate results from this test.
Pattern Method
Inspired by Andrew Ellis’ pattern test, this calibration method is fast to print. It’s also more accurate than the line method since it consists of an array of angles that allow you to visualize how different values affect the corners of your print.
To use this method, select “PA Pattern” from the PA Calibration menu. A small rectangle will be generated on the plate, and you can then move it to change the position of the test. Once you slice it, you’ll be able to see a series of arrows, which will be extruded using different pressure advance values.
Evaluating the Test Print
After printing, you should look for the most consistent line and the sharpest corner to determine your pressure advance value. While it shouldn’t have gaps, bulges, or divots, keep in mind that your chosen corner may not be perfect. Ellis suggests opting for higher values, even if there’s a tiny bit of gapping present.
Tower Method
The tower method is the test that requires the most time. However, since it doesn’t depend on the quality of your first layer, it’s generally the most accurate test of the three.
To use this method, select “PA Tower” from the PA calibration menu. A pentagon should appear on the plate that allows you to test three different sizes of corners. From here, you can hit “Slice plate”.
Evaluating the Test Print
Once the print is complete, inspect all the corners. You’ll need to identify the height at which they’re printed optimally, with the least print imperfections. Measure the height from the base of the print to the indicated level with a caliper. Then, using this measurement, solve the following equation to get your pressure advance value:
- For direct extrusion: 0.002 x height = Pressure Advance value
- For Bowden extrusion: 0.02 x height = Pressure Advance value
Updating the Profile
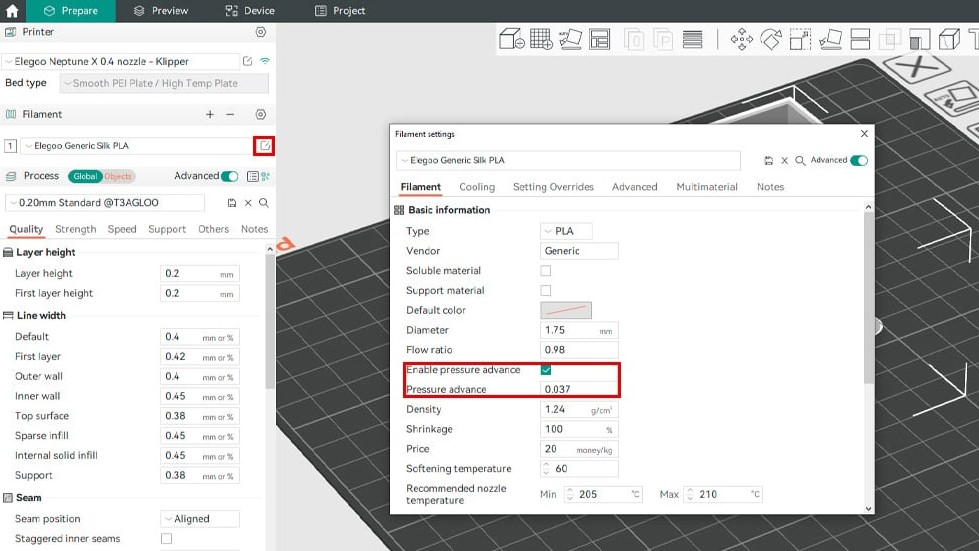
Once you’ve finished your test and found the right pressure advance value, you can update the profile in Orca Slicer with the following steps:
- Select the edit icon in the “Filament” tab, which is on the right-hand side of the filament type.
- The “Filament settings” menu will open. In the “Filament” tab, under “Basic Information”, select “Enable pressure advance”.
- Finally, enter your value in the “Pressure advance” field.
Make sure to toggle on the Advanced view in the upper right-hand corner of the menu. Otherwise, you won’t see the “Enable pressure advance” option.
And with that, we’re done! Enjoy your well-calibrated prints.
License: The text of "Orca Slicer: Pressure Advance – Simply Explained" by All3DP is licensed under a Creative Commons Attribution 4.0 International License.