The user base for Klipper, one of the most known open-source firmware options for the operation of 3D printers, has grown rapidly in the last few years. The speed and quality of printing that one can achieve as well as the vast customization options available makes this trend not much of a surprise.
Klipper runs on a single-board computer (SBC), like a Raspberry Pi or its alternatives. This offloads the heavy computations from the printer control board to a more powerful device, allowing you to print faster and more precisely.
Klipper offers lots of features that other open-source firmware, like Marlin, doesn’t support. One of these is time-lapse integration. A time-lapse video stitches together a series of photos taken while printing to create the illusion of seeing the print grow out of thin air. Such clips are popular on social media and are mesmerizing even for people outside of the maker space.
If you have Klipper installed, it only takes a few steps to get the time-lapse feature up and running so you can be on your way to creating YouTube-worthy videos in no time. Let’s get started!
What You'll Need
To create your time-lapse videos, you should have Klipper and Moonraker set up on your devices and a web interface such as Mainsail or Fluidd. The procedure will generally be the same between different interfaces.
You will also need a camera and there are many options out there. The first option is a USB web camera, which is the greatest balance between price and quality. You should consider buying one that uses at least 720p to obtain decent results.
You could also go for a Raspberry Pi camera, like the V3 module. They’re easy to configure and can shoot 1080p videos, and you can further customize your setup by printing a case to mount it properly.
The last option you can consider is a DSLR camera. While it provides the best image quality, it is obviously the most expensive option and the most inconvenient to mount.
Now that we have all that we need, we can begin with the installation process.
Install & Configure
Adding the time-lapse options into Klipper is as easy as copy and pasting. We’ll break it down step by step for you and then get into configuring settings and tips on how to make high-quality time-lapse videos to be proud of!
First, we’ll have to install the component in Klipper and allow for automatic updates. Next, we’ll configure the component by defining the G-code macro and enabling access to time-lapse settings directly in the user interface of Mainsail or Fluidd.
Installing the Component & Enable Automatic Updates
- Open the installation docs found under the GitHub page for the moonraker-timelapse plug-in.
- Log in into Putty or your preferred SSH client.
- Copy the code in the “Installing the component” section of the installation doc and paste each into your SSH client.
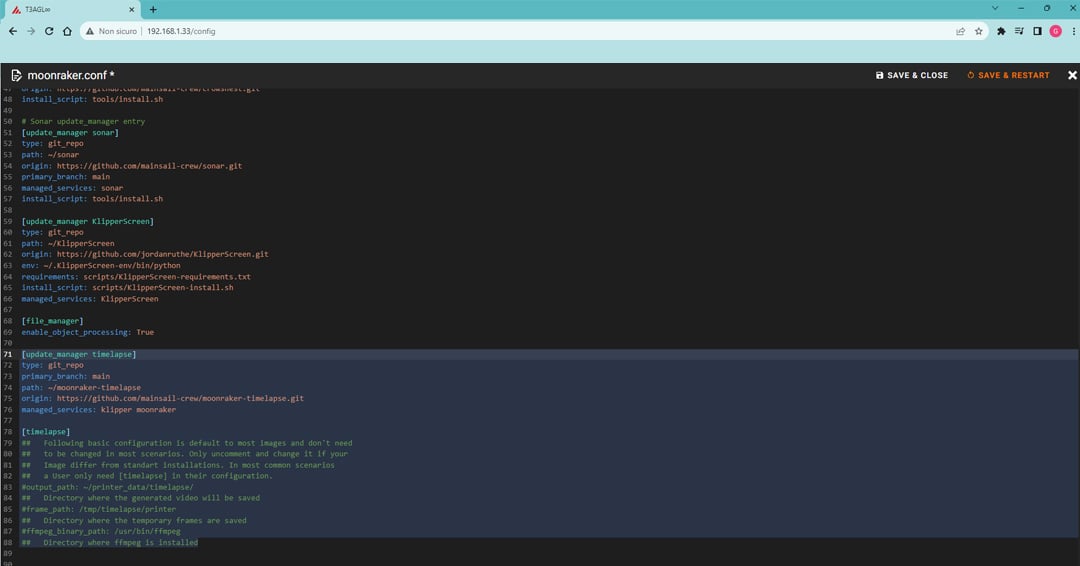
- To enable automatic updates, find your “moonraker.conf” file in your web interface. The configuration files are located in the “MACHINE” section for Mainsail or by clicking on the {..} icon for Fluidd.
- Copy the code under the “Enable updating with Moonraker update manager” section of the installation doc and paste it into your “moonraker.conf” file.
Configure the Component
- Navigate to the configuration doc of the GitHub page. Copy the code under the “Define the Gcode Macro” section.
- Find the “printer.cfg” configuration file of your web interface and paste the copied code into this file.
- Activate access to time-lapse settings within the Fluidd or Mainsail interface by copying the code under the “Activate the Component” section of the configuration doc of GitHub.
- Paste this code into your “moonraker.conf” file.
- Save and restart the interface.
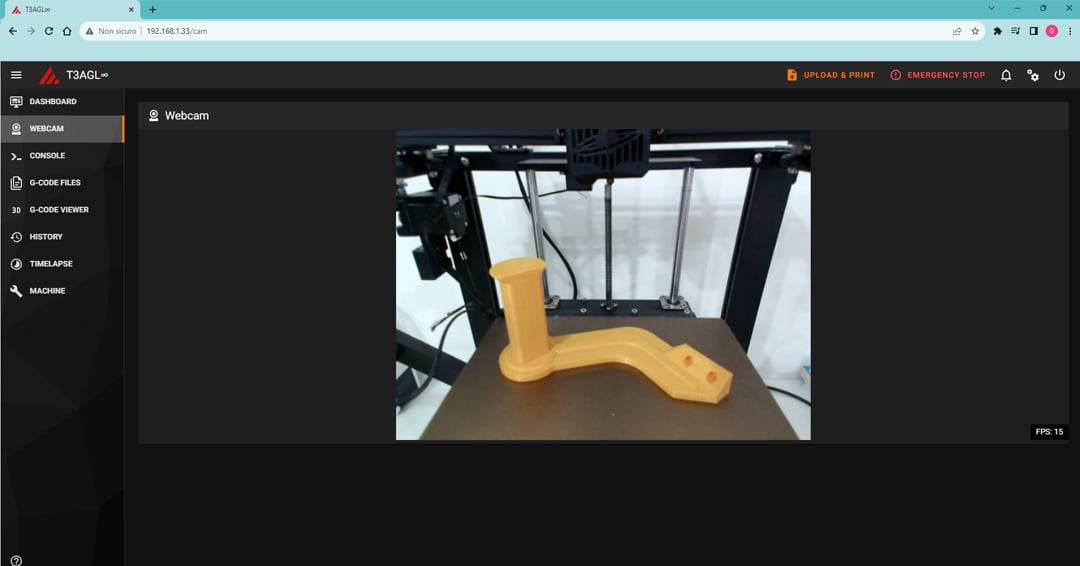
If the installation and configuration were successful, you should be able to access a new “Timelapse” tab within your web interface. We’ll go over the new settings found in that tab shortly, but first, we have a few things to do in the slicer.
Slicer Setup
Taking a peek in the time-lapse tab of your web interface, you’ll notice two options under the “Mode” setting, “hyperlapse” and “layermacro”.
The first option, hyperlapse, takes an image every n seconds, where n is the value you have set in “Hyperlapse Cycle Time” setting. If this is all you are looking to do, then you don’t need this slicer setup. You can always come back to this mode after you’ve completed the slicer setup if you would like to use a time-lapse to identify the origin of print failures, for example.
If you would like to coordinate snapping an image with events occurring in your sliced file, like at a layer change, then we’ll have to tell the slicer to add a G-code macro into the sliced file at the appropriate instances. This is “layermacro” mode and it generally produces the best results because we can include additional actions like parking the printhead in the same location for every image.
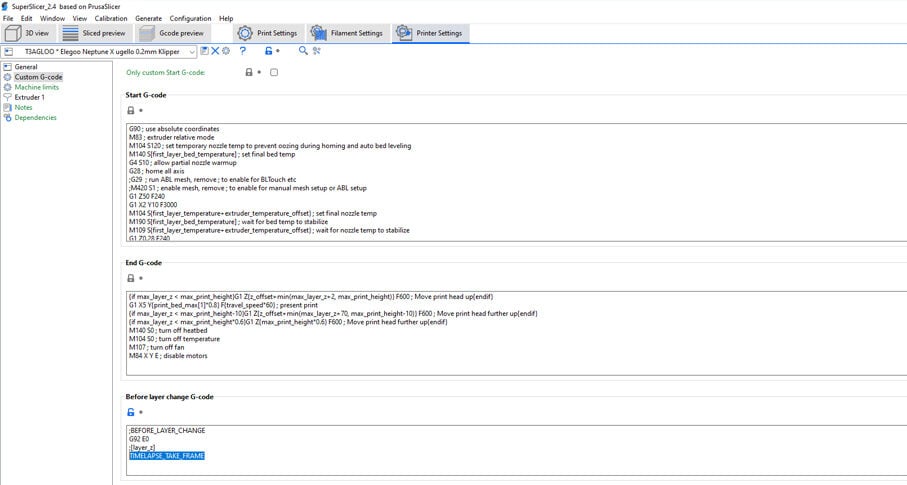
Slicer configuration will look slightly different between the different software, but the general steps stay the same. We’ll be using SuperSlicer as an example. You can always refer to the GitHub page for your specific software choice.
- Go to “Printer Settings > Custom G-code” or the equivalent setting for adding custom G-code.
- Browse instances for inserting G-code commands to locate “Before layer change Gcode”. You can also choose other instances to insert the G-code for snapping an image, but before a layer change is most common.
- Add
TIMELAPSE_TAKE_FRAME
That’s it for getting set up! Next, we’ll head back over to your Mainsail or Fluidd interface to explore the various time-lapse settings.
Settings
The new “Timelapse” tab of your web interface is where you’ll be able to find previous time-lapse videos, the option to enable or disable time-lapse creation, as well as some rendering settings. Let’s take a look at the most important ones to obtain the best results:
- Output Framerate: The framerate indicates the number of frames per second of the rendered video. The higher the value, the smoother the time-lapse.
- Save Frames: This option saves all of the individual images used for the video.
- Duplicate last frames: This number can be increased to extend the time at the end of your video showing the complete print.
- Constant Rate Factor: This option refers to the balance between quality and file size. The lower the value, the higher the quality, but also the file size. The supported values are between 0 and 51, but the default value of 23 works pretty well in most cases.
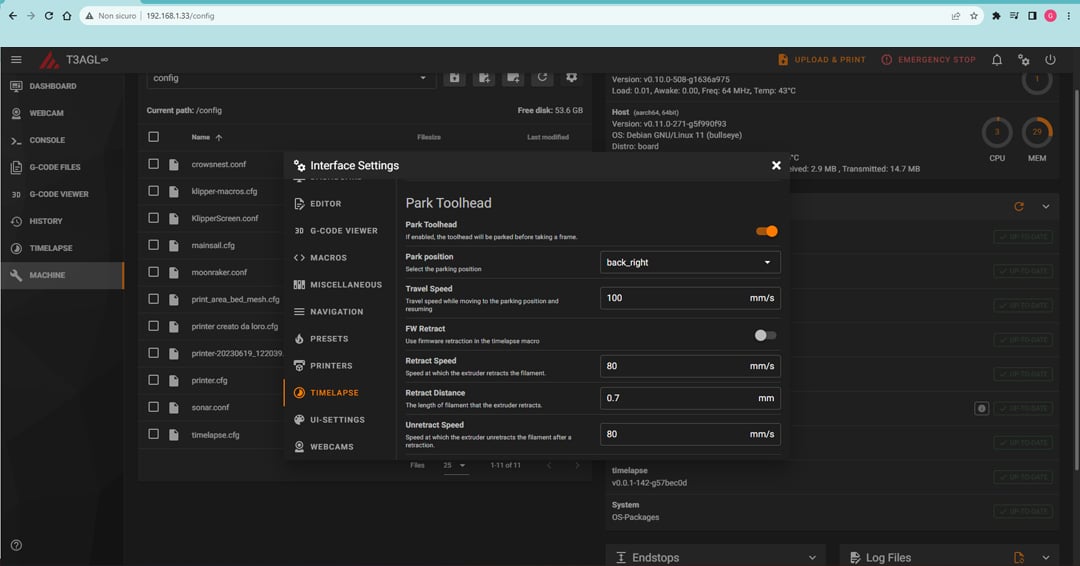
Further time-lapse settings relating to actions within the defined macro can be accessed from the “Settings” tab, or equivalent, of your web interface. Here are some of the most important options to familiarize yourself with (note that the order of the settings is slightly different between Mainsail and Fluidd):
- Park Toolhead: This option, which you can toggle, allows you to set a position that your printhead will reach before the shot is taken. Enabling this will produce cleaner results, but it also adds complications to the printing process.
- Park Position: You can choose between some predefined locations to park the printhead or set a custom one. Select a position at the back of the build plate to give the impression of the object magically growing, or choose the center option if you prefer to highlight the machine.
- Park Time: This defines how long the printhead sits at the park position. You can increase this value if you’re having issues with motion blur in your videos.
- Park Travel Speed: This sets the speed at which the printhead will travel to and from the park position. If your printer can handle it, reduce this value to save some time.
- Retract Speed: This setting lets you tweak the retraction speed which is important to prevent stringing during the toolhead parking. The values for a direct extrusion setup will need to be much smaller compared to a Bowden extrusion setup.
- Retract Distance: Similar to the previous option, you set a retraction distance specifically for parking the printhead. We will dive deeper into retraction shortly.
- Unretract Speed & Distance: These should generally be maintained equal to the retraction settings.
With our plug-in installed and our options configured, let’s dive into the art of perfecting the time-lapse!
Tips
Obtaining the perfect time-lapse will take some tinkering to find the right options for your printer and setting. However, there are a few things you can keep in mind to help you achieve the best results possible:
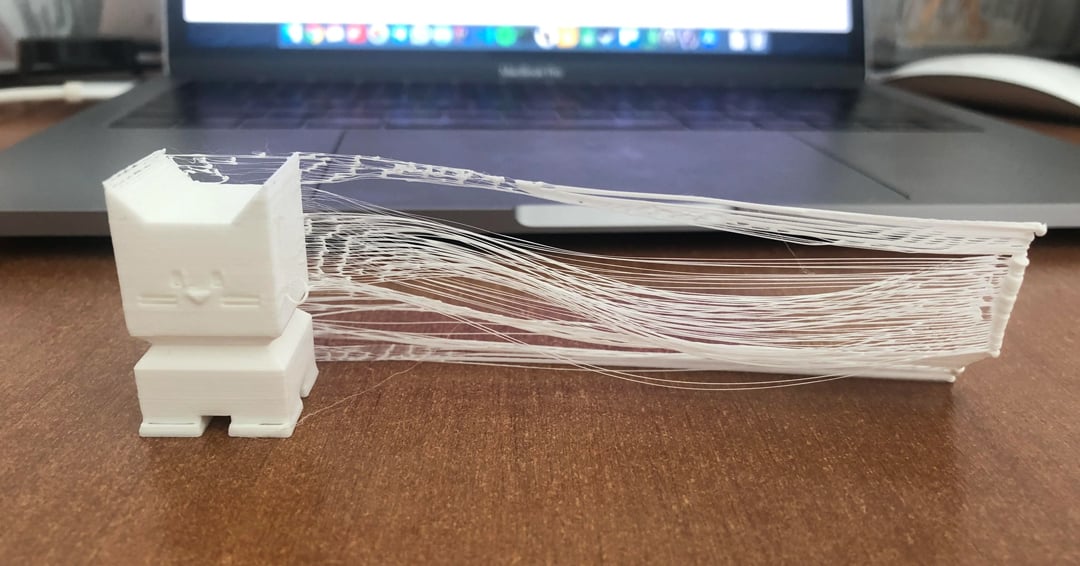
- Tweak retraction: If you plan on enabling the “Park Toolhead” option, you should definitely spend some time finding your optimal retraction values. The most common issues encountered while starting with time-lapses are stringing and blobs on the surface. While no two setups will need the same settings, you can use guidance posted on user forums as a starting point.
- Lighting: In photography and videomaking, one of the most important factors to consider is lighting. You should avoid positioning a light source opposite to the camera because this will project shadows in the direction of the lens. Opt for a diffuse light behind the camera.
- Camera Position: Where you place your camera is a huge factor in achieving captivating videos. You should adjust the camera position according to the object you are printing. For example, if you’re going to print a tall model, you should try to position the camera a little further away from your machine to be able to capture the whole object.
Alternative: Octolapse
Now that we’ve gone over the time-lapse options within Klipper, you may be searching for a bit more in terms of rendering options or video effects. If that’s the case, you might want to consider OctoPrint with the Octolapse plug-in. Let’s briefly compare the Klipper time-lapse to Octolapse to see which option may be best for you!
- Installation process: As we have seen, setting up the Klipper’s time-lapse plug-in isn’t very difficult but it does involve numerous steps to get everything configured. On the other hand, Octolapse is much quicker to install. You only have to search for it in OctoPrint’s Plugin Manager, download it, then you’re ready to roll.
- Similarities: Octolapse procedural settings are similar to the ones of the Klipper plug-in. Both of them allow you to park the printhead where you want before taking a shot and offer both time-based and layer-change modes. You can modify render settings such as the framerate of your video and the resolution. They also have an easily accessible preview of the camera perspective.
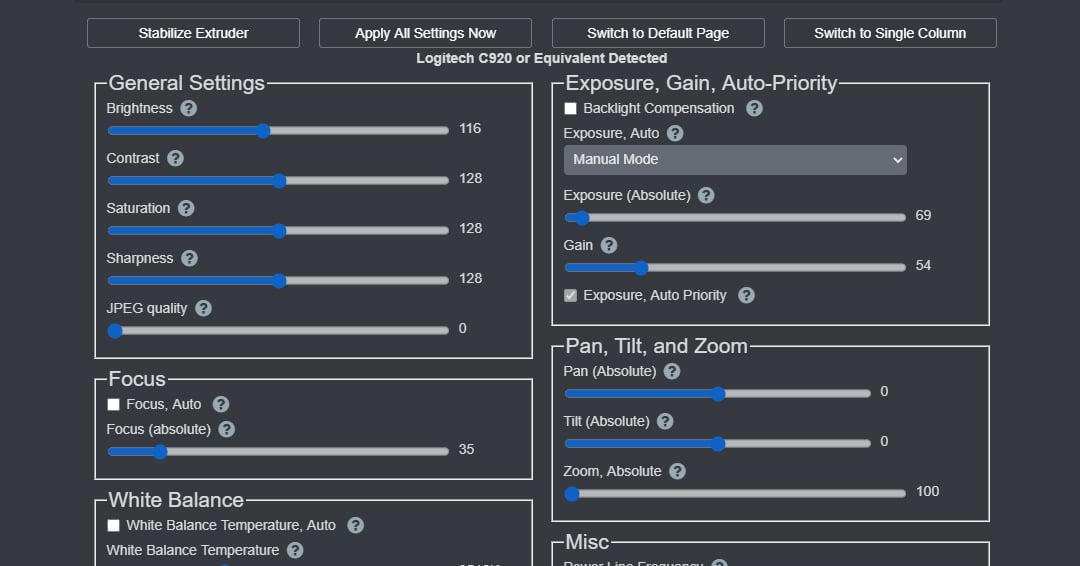
- Differences: Octolapse has several more options that you can tweak on the photography side of things. For example, you can modify the output saturation and brightness of the image, as well as the zoom and focus of the camera directly in the OctoPrint interface.
At the end of the day, if creating and tuning the highest-quality time-lapse videos that are worthy of posting to your socials is your main goal, then OctoPrint may be the right choice for you. Otherwise, the Klipper time-lapse plug-in can create perfectly acceptable videos while you enjoy the speed and precision that Klipper is known for.
License: The text of "How to Create Your Klipper Time-Lapse" by All3DP is licensed under a Creative Commons Attribution 4.0 International License.