Klipper is a firmware package for 3D printers with a unique characteristic that enhances your printer’s speed and precision. Traditional firmware programs, such as Marlin, use the printer’s mainboard to process G-code commands and control the connected hardware (e.g. stepper motors). Klipper instead runs on an additional computer, like a Raspberry Pi board, which has the sole purpose of processing G-code. This enables faster printing because the mainboard is relieved of some of its responsibilities.
Using a computer isn’t the only way Klipper differs from traditional firmware programs, though. Klipper also uses G-code slightly differently. Traditional firmware programs operate using hundreds of G-code commands of between two and five characters, such as G1 and M301, to perform certain functions. Klipper uses many of these same commands but also uses an extended form of G-code. Extended G-code commands are longer strings of text with some other characters mixed in between words.
For example, in Marlin, you can use the M119 command to check if the endstop sensors on your machine are triggered. With Klipper, you can perform the same task using the QUERY_ENDSTOPS command. Klipper has dozens of these commands for a variety of different tasks.
One of these tasks is PID tuning, a way of calibrating the heating process for the hot end and bed on your 3D printer. In this article, we’ll go over how to PID tune your 3D printer on Klipper. Before we get into the steps to do this, we’ll first review what PID tuning is and its purpose.

What Is PID Tuning?
To understand PID tuning, we first need to briefly go over PID heating and how it works. PID stands for proportional-integral-derivative, and these are the three components used in PID heating.
Essentially, PID heating is the algorithmic use of the current and requested temperature (proportion, ‘P’), historical temperature error (integral, ‘I’), and speed of heating (derivative, ‘D’). PID heating uses these three components to determine how the printer should heat a given element, generally the hot end or the heated bed.
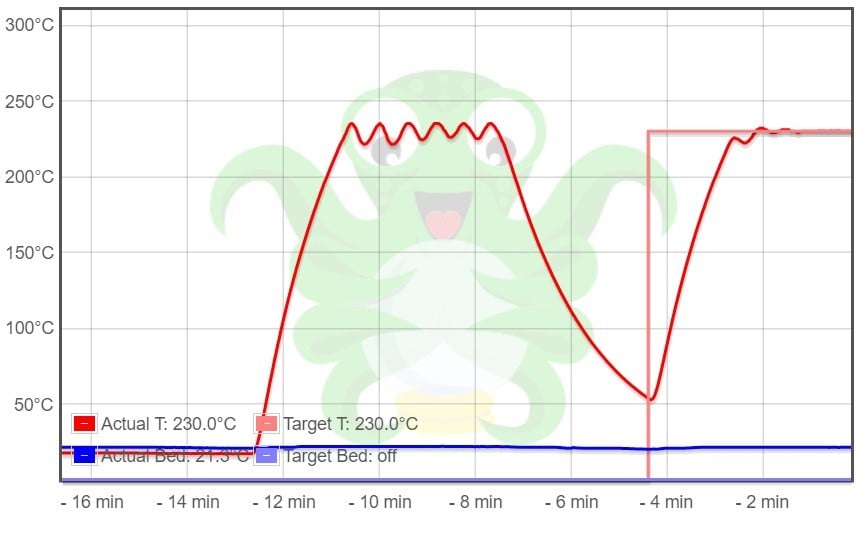
PID tuning is a way to calibrate the proportion, integral, and derivative of heating a specific element to make the heating process more efficient. This process also means a specified temperature can be maintained with less variation, preventing significant temperature changes as can be seen in the graph above (before the tuning, marked with the red straight line).
PID tuning involves running a few heating cycles where the element is heated, cooled, and heated again. This generates enough data for the printer to calculate the PID values for a specific element heated to a certain temperature.
So, now that you know what PID tuning is, let’s get into how to perform this task on Klipper!
PID Tuning with Klipper
Klipper’s extended G-code commands make PID tuning a pretty easy process, but it can be a little odd to use if you’re not used to these types of commands. You can follow the steps below to properly PID tune a heating element on your 3D printer:
- Connect your Klipper-running printer to a G-code terminal, like OctoPrint’s or Fluidd’s built-in G-code console, or even Pronterface.
- Send the
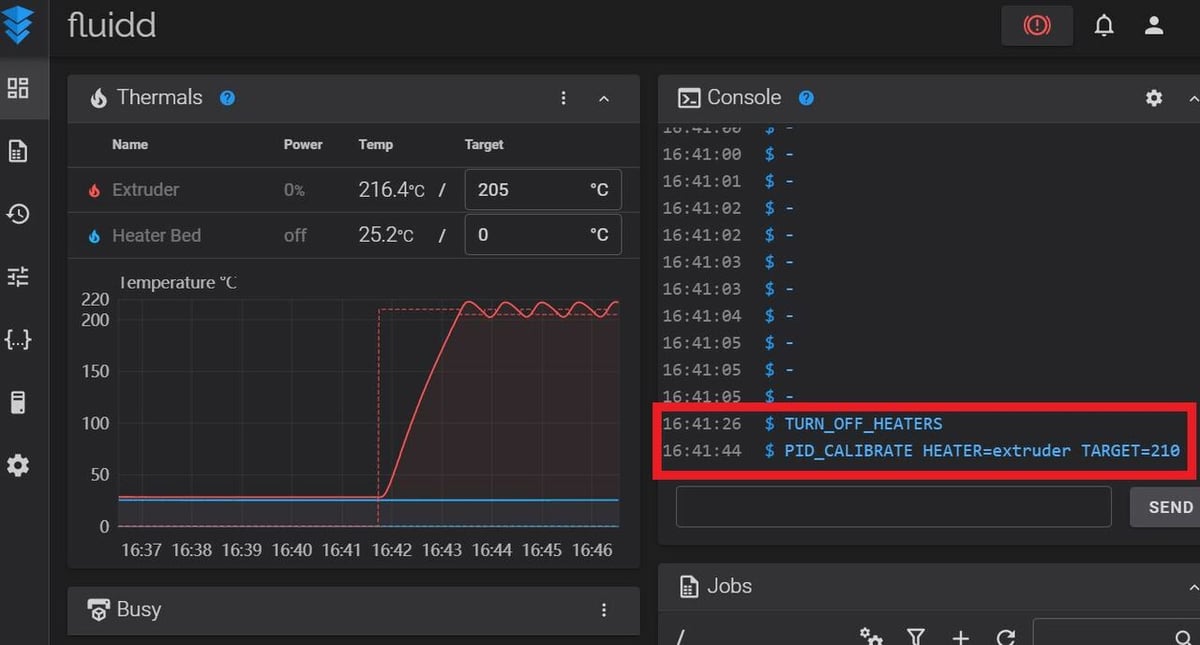
TURN_OFF_HEATERScommand and let your hot end and heated bed cool down to room temperature. - Type the
PID_CALIBRATE HEATER=<config_name> TARGET=<temperature>command into your G-code terminal, but don’t send it yet. - Insert the heating element name, as stated in your printer’s Klipper configuration file, where the command reads
<config_name>. - Insert the target temperature to PID tune your heating element to where the command reads
<temperature>. - Send the command.
- Wait for your printer to complete its heating cycles for the element.
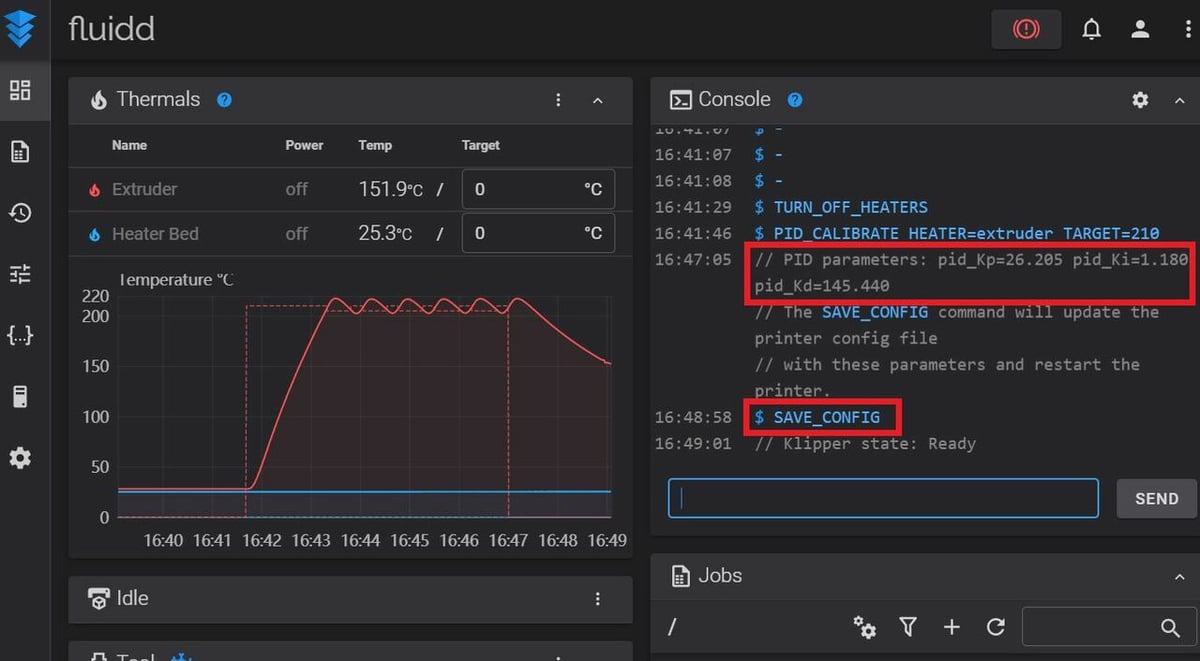
- Check in your G-code terminal that your printer responds with the
pid_Kp,pid_Ki, andpid_Kdvalues. - Send the
SAVE_CONFIGcommand to store and update your PID settings. - Restart your printer’s firmware in case the update doesn’t register.
For a working example, the PID_CALIBRATE HEATER=heater_bed TARGET=60 command will tell your printer to tune the heated bed on your machine and set the target PID temperature to 60 °C. Once the heating cycles are completed, the SAVE_CONFIG command will save the newly generated values.
And that’s all there is to the PID tuning process!
Tips & Tricks
Now that you know how to PID tune your hot end and heated bed with Klipper, there are a few other tips and tricks that might come in handy. Below, we’ve listed a few issues you might run into and solutions to fix them:
- Names of heating elements: If you’re unsure how to check the names of your heating elements in your firmware configuration files, the hot end is usually named “extruder” and the heated bed should be labeled “heater_bed”.
- PID log: If you want a log of your PID tunings, you can add the phrase
WRITE_FILE=1to the end of thePID_CALIBRATEstring. This creates a PID tuning log file labeled “/tmp/heattest.txt”. - PID tuning command not working: If your PID tuning command isn’t causing anything to happen on your printer, go into your printer’s firmware configuration files and search for “class PIDCalibrate”. The lines of code below this phrase should activate the
PID_CALIBRATEcommand. - PID values not updating: If sending the
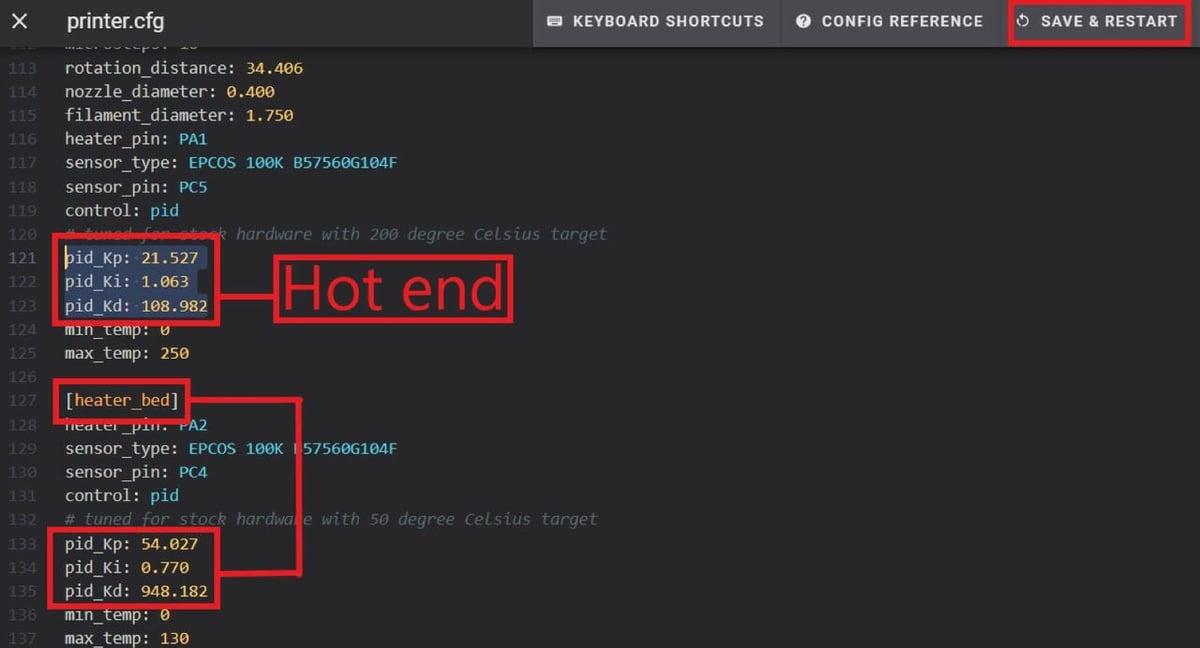
SAVE_CONFIGcommand doesn’t automatically update your PID values, you can change them manually. Open the “printer.cfg” file in your Klipper web interface and search for the “pid_Kp” line under either the “extruder” or “heater_bed” sections, depending on what values you want to change. Then, insert your new PID values, save the changes, and restart your firmware. - No PID tuning results: If you can’t find the PID tuning results from your G-code terminal, you can use the “klippy.log” file to find them. From here, you can manually update the PID values in your “printer.cfg” file.

License: The text of "Klipper: PID Tuning – Simply Explained" by All3DP is licensed under a Creative Commons Attribution 4.0 International License.