There are a lot of reasons why you may want to split a model into smaller parts. Perhaps your STL file is larger than your build plate, and you don’t want to scale it down. Maybe you want to print in different colors, but you don’t have a multicolor printer and you don’t want to pause at height. Or parts of the design, such as overhangs, can be a bit messy to deal with, and you’d rather avoid the hassle.
Sometimes, you can make it easy on yourself and see if the model you want to print has a file with pre-split pieces. When that isn’t the case, though, you can just split it yourself.
In this article, we’ll guide you through the process of splitting a model in two solid programs: Meshmixer and Blender. We’ll also provide some tips on how to assemble your print so you have the best shot of nailing it on your first try. Let’s dive in!
Which Program to Use?
There are many options available for splitting models – Cura or Tinkercad, for example. To demonstrate the range of complexity, we’ll use Meshmixer (one of the easiest options) and Blender (one of the more complex options) to split models. Before we dive into the steps to split your model, we discuss both of these programs in a little more depth, and later, we’ll present a few alternatives you might want to consider as well.
Meshmixer
Meshmixer is one of the easiest and fastest ways to split your STL files. While it’s excellent for what it was made for, it can seem to be a one-trick pony when compared to some other programs. For instance, Blender can create and edit mesh models as well as be used for animation, while Fusion 360 is known for its CAD features and now has support for editing mesh models.
Unfortunately, Meshmixer is no longer supported by Autodesk, so there won’t be any new features or security updates. This may cause some people to switch to Fusion 360, which is also from Autodesk, to keep up with newer features that may come out in the future. But until that day comes, Meshmixer is still one of the more used programs for splitting models.
If you’re a Mac user, you won’t be able to use this program without using a Mac program called Parallels, which is software that provides hardware virtualization. If you have a Mac, you’ll want to make sure that your virtual machine has enough resources to allocate at least the minimum requirements for Meshmixer.
Blender
Blender has risen in popularity over the years for being one of the more polished open-source 3D modeling programs available. It has made it easy for anyone to be able to access the tools needed for creating stunning scenes and life-like models.
It’s not all sunshine and rainbows though. One downside to Blender is that it can seem intimidating to first-time users, and there’s quite a learning curve to use most of what Blender offers. To help with that learning curve, you can find tutorials for beginners, but in this case, we’ll be using it to split your STL files – something it does quite well!
Blender is free, and a lot of people already use it. You just need to learn a couple of tools or settings, and you can start splitting your STL right away. And the best thing is that you’re not limited to splitting the whole model into horizontal or vertical angles, as you’re able to add planes, size them, and easily angle them in any direction.
Now that you know a little bit more about the tools, let’s getting to splitting.
Step 1: Find the Best Cutting Points
You have a model and you’re ready to split it, but you’re not sure where to make the first cut. We’ve been there before, so here are some strategies on where to cut your model as well as other considerations to keep in mind.
If you’re printing something with high detail, you may want to think about a couple of things first. Try to avoid cuts that go directly through those detailed areas. You also may want to try splitting your model in a way that would cause the least amount of supports.
Another thing to consider is thinking about the model’s structural integrity. This can be quite important depending on the intended use – a functional part, for instance. You may want to avoid splitting at the weakest points in a design, namely those areas that are much thinner than the rest of the model. They may not be the best place to cut, so try and stick to places with a decent amount of surface area. The more area you have to work with when assembling, the better.
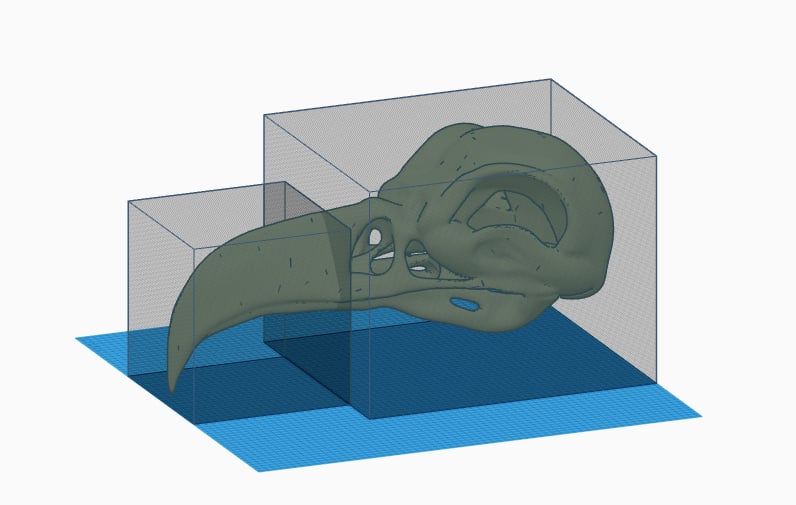
If you’re a fan of Tetris, you may enjoy the next tip for finding your cutting points. Think about how you can split the model to be able to fit the most on your build plate at once. You would be amazed by how splitting a model properly can sometimes save you hours of printing time.
The next two steps are program specific, so we’ll demonstrate them first in Meshmixer, then in Blender.
Meshmixer
Step 2: Split the Model
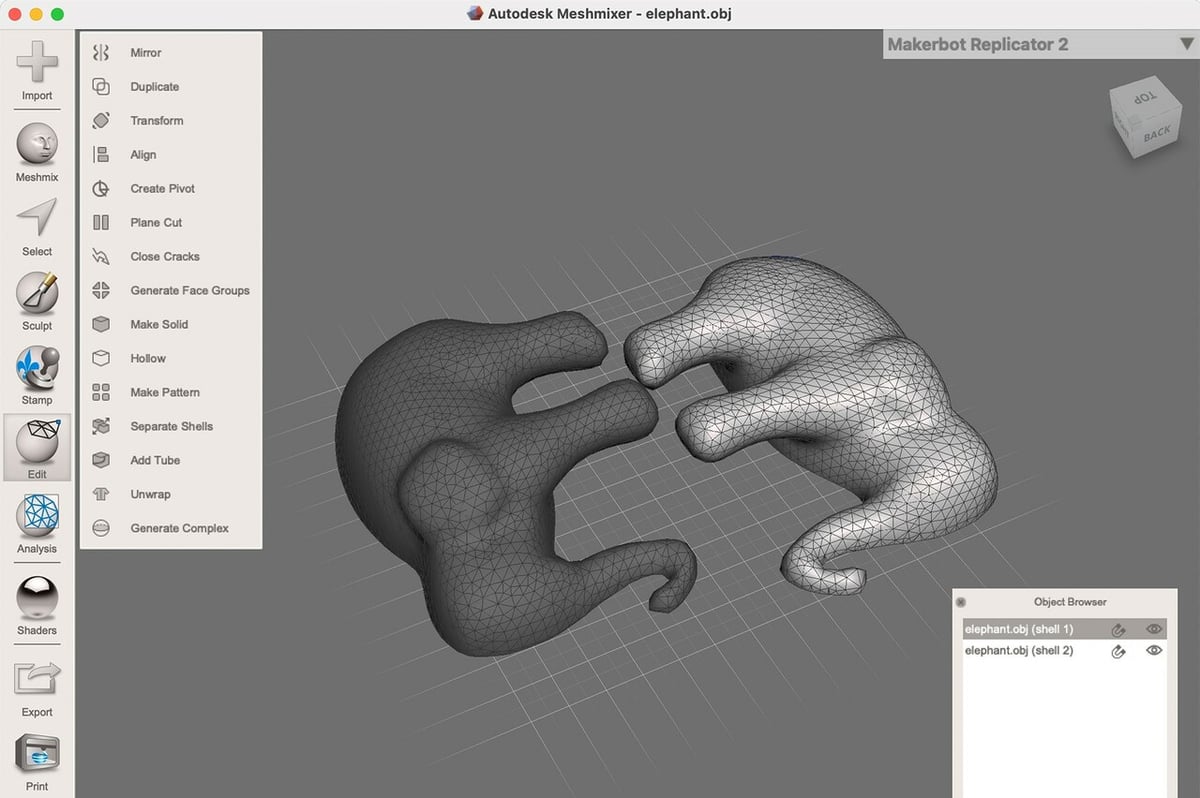
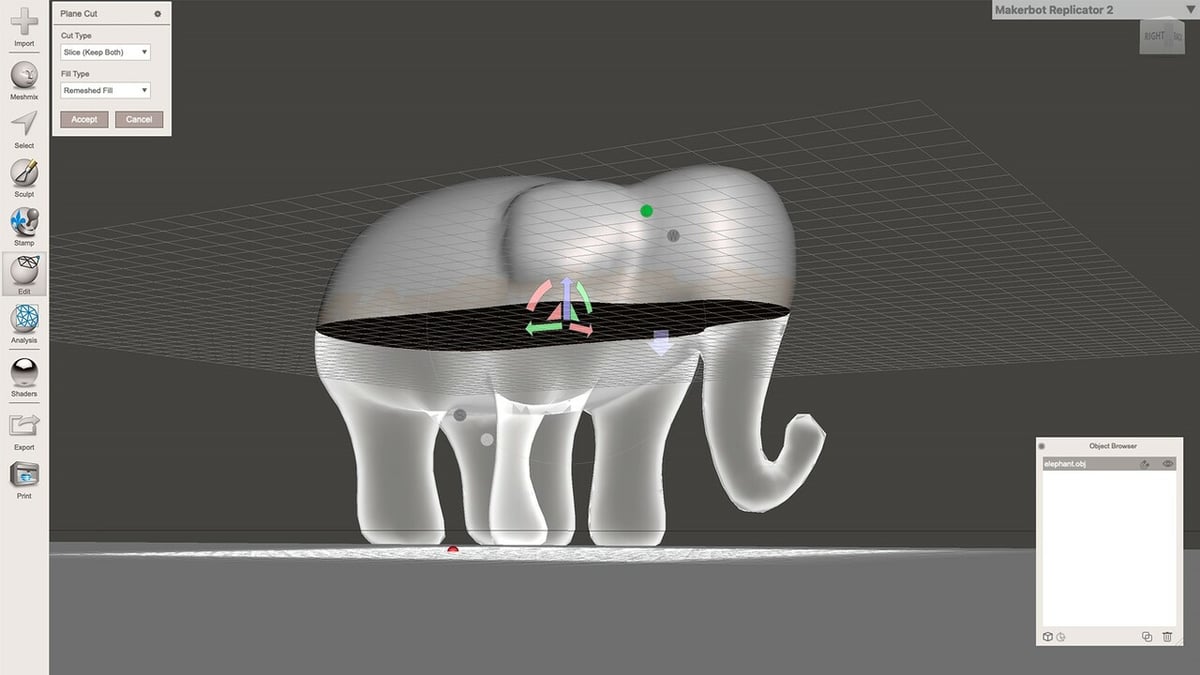
Meshmixer is easy for beginners to start with because it’s as straightforward as uploading your file, clicking on “Edit”, then clicking on “Plane Cut”. The plane that appears can be controlled with ease.
You’ll see a menu pop up that you can find in the top left section of the program. This is where you can select to keep both pieces when you split the model or just one section of the split. For our guide, we will choose to keep both.
Next, you’ll need to separate the two parts so you can move them away from each other. Go back to “Edit”, then choose “Separate Shells”. The Object Browser should pop up and show you that there are now two separated objects.
With Meshmixer you can export your model as an OBJ, STL, or a variety of other formats. All you have to do is make sure you have selected whichever piece of the split model that you want to be exported. The Object Browser will show you what’s selected. You can add more selections to export by holding the “Alt/Cmd” key and clicking on the part. If you need the file to be exported as G-code, you’ll have to look into how to modify this new file.
Step 3: Add Keying
There’s finesse involved in gluing two pieces together when you’re trying to line them up perfectly. To avoid any kind of error, locator pins are here to help you.
You won’t find any dedicated locator tools or settings for locator pins in Meshmixer or Blender. A usual trick by designers or makers is to add a cube or a cylinder to the split model to use as the locator pin, but you could use any shape that you like. It’s good to think about what makes the most sense for your project.
Locator pins are used by adding a shape halfway into one of the two parts and subtracting (inwardly recessing) the same shape from the other part. The reason for a locator pin is to facilitate lining up split parts while gluing them together. This prevents shifting or other errors.
While a cylinder may appear to be an easy shape to use as a locator pin, cubes have a better chance of not shifting during the gluing stage.
Once you’ve split the two (or more) parts of the model, make sure that they’re aligned correctly so they line up. Next, you’ll need to make one of the two split parts hidden by selecting the eye icon in the Object Browser. If you close the object browser on accident, don’t worry. You can click the “View” tab at the very top of your screen, then select “Object Browser” to bring it back.
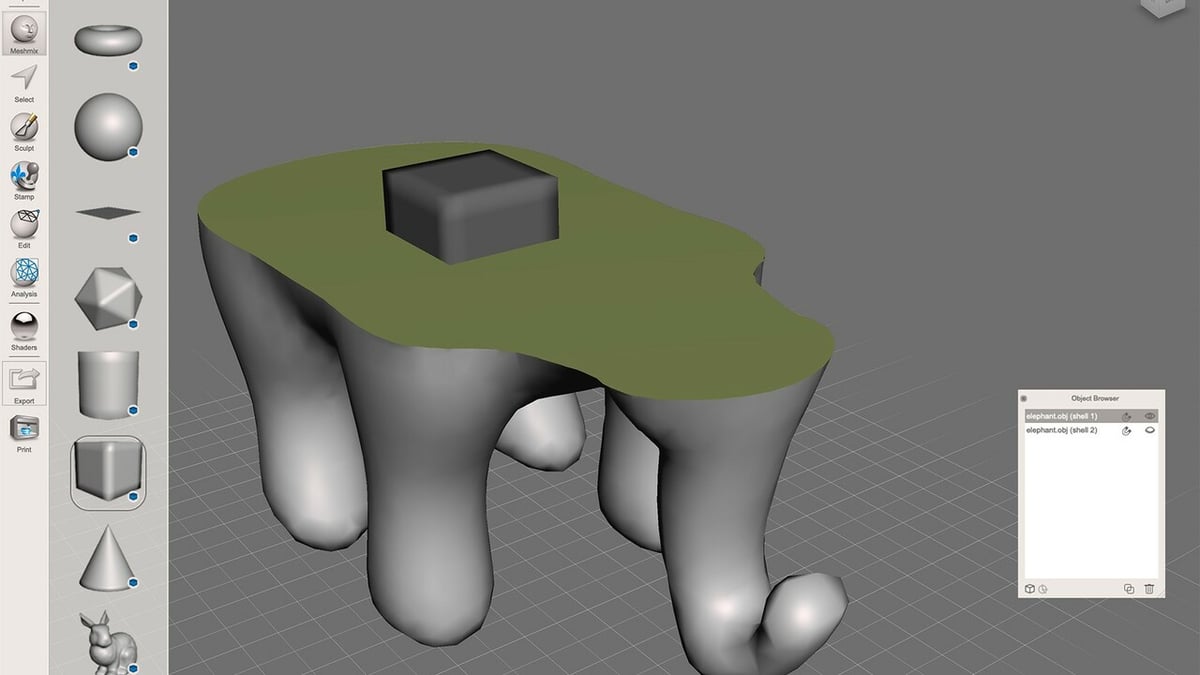
Now, it’s time to select what you’ll use as your locator pin. Click on the Meshmix button, on the top left, and it’ll let you select from multiple different shapes that you can use as your locator pin. Next, drag and drop your locator pin into the middle of the area that you split. You’ll want to resize the cube to whatever works best for your model.
A new browser will appear in the top left of the program, and you’ll want to make sure to go to the drop-down menu and change the composition mode to “Create New Object”. This will make it so the cube doesn’t merge with either part of your model.
Meshmixer will automatically put the locator pin halfway into the split part of the model, which is quite nice. Then, go to the Object Browser and select only one of the two split parts. Make sure that the locator pin is also selected by clicking on each object while holding down the “Alt” key.
All that’s left for this first part is to export your model. Meshmixer automatically inserts the locator pin into your model. Other programs aren’t always as simple: You may have to use the X-, Y-, and Z-axes to move the locator pin halfway into the split part of the model.
You might want to consider naming the STL file you exported to avoid confusion with the other parts you’ll be exporting.
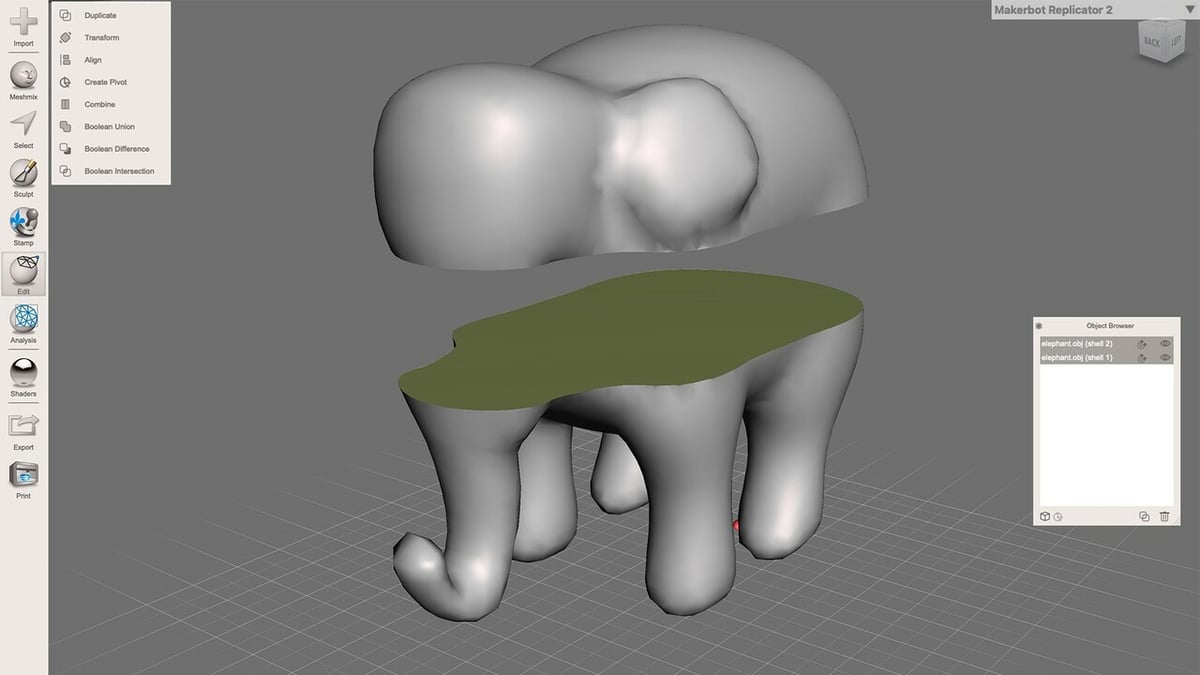
Once saved, you’ll want to swap the visibility of the two split parts in the Object Browser. The other part of the model should now be visible with the locator pin. Select the locator pin and, in the Object Browser, click the “Copy” button. Then, you’ll click the eye icon next to the original locator pin to make it hidden, and only the copied locator pin should now be visible.
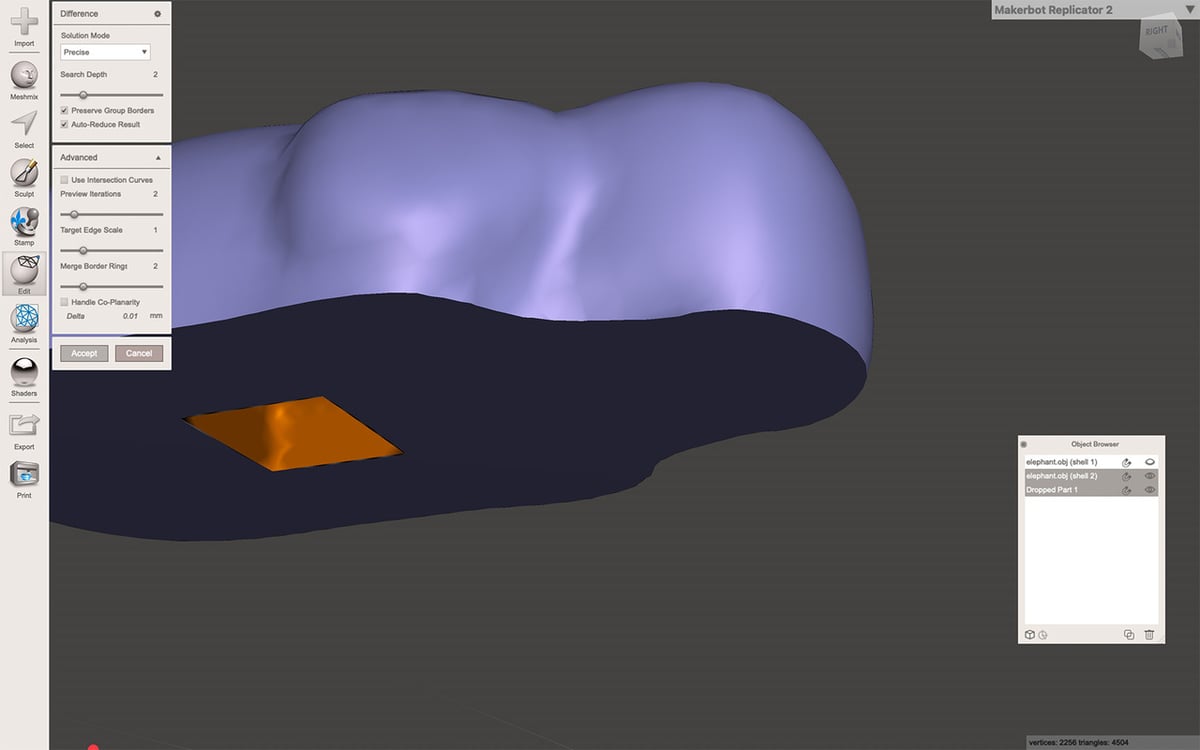
Go back to the Object Browser and try to make sure to select the main model you’re working with first, then the copied locator pin second. This is necessary because you’re about to tell Meshmixer to subtract the locator pin from the main object, which will leave a cavity – identical in shape to the locator pin – in the model. This time, when that browser pops up in the top left corner of the program, you’ll want to set the composition mode to “Boolean Difference”. This will subtract the locator pin from the part of the model that was selected, leaving a square hole on one of the parts and a cube protruding out of the other.
To facilitate assembling the models and gluing them together, the cavity – or in this case, the square hole – should be slightly larger. We’ve found the best success with using a 0.3-mm larger locator pin opening. This will leave a slight amount of room for the glue to get into the locator pin area, reinforcing the model. But you may have to experiment with the difference in size to see if you can find better results.
The last step is to export the second part of this STL file.
Blender
Step 2: Split the Model
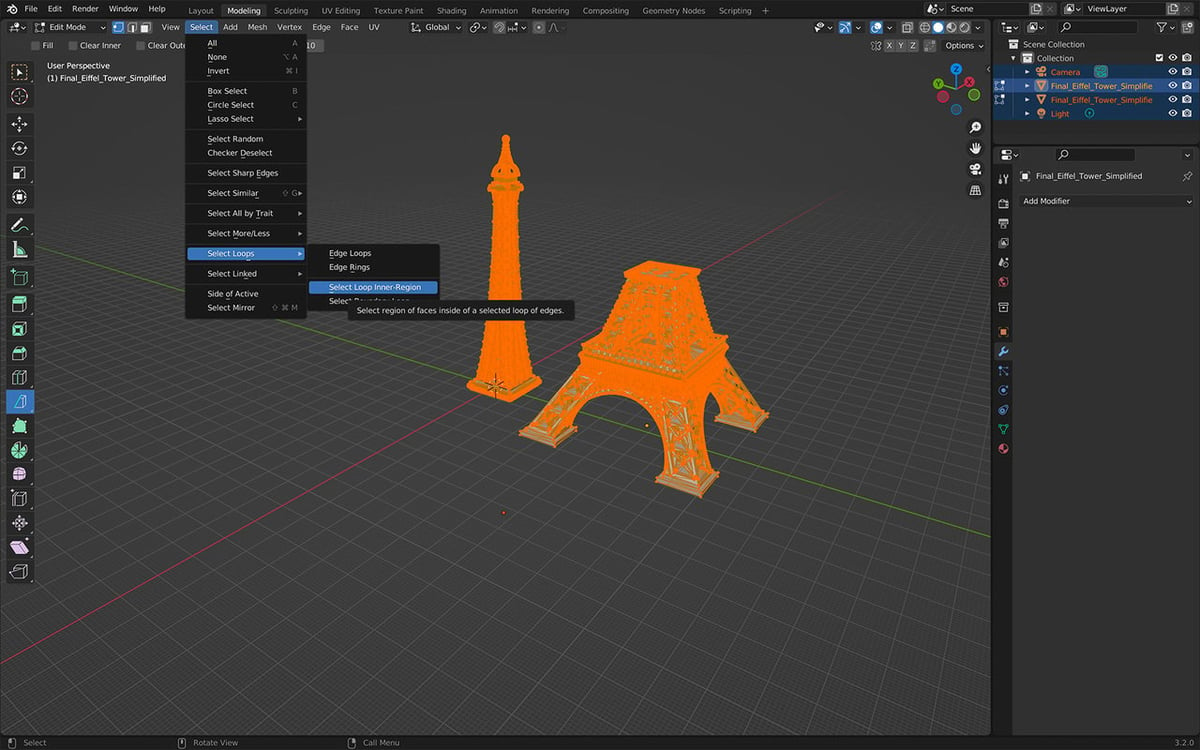
First, you’ll want to select the model and make sure to press the Tab key. This will make Blender go into Edit Mode. From there, you’ll want to find the “Bisect” tool, which is on the Toolbar with the “Knife” tool. Once you select the Bisect tool, you’ll want to find the spot where you want to split the model, then just click and hold the right mouse button to draw a cut-line where you want to create the split.
Press ‘V’ to cut the line that was made, then click the right mouse button, which stops you from dragging around the vertices. Next click on “Select”, which is located under “Layout” on the header. Once you click on Select, you’ll then want to choose “Select Loops”, followed by “Select Loop Inner-Region”. Finally, press ‘P’ on the keyboard to open up the “Separate” menu, then click on “Selection”.
You can then return to “Object Mode”, by pressing the Tab key, to move the parts away from each other and see the split.
That’s all that’s needed to separate a model, but you’ll probably benefit from searching for more advanced guides and videos to make more complicated cuts, as well as finding some tips on splitting parts in Blender that build on what we covered.
Step 3: Add Keying
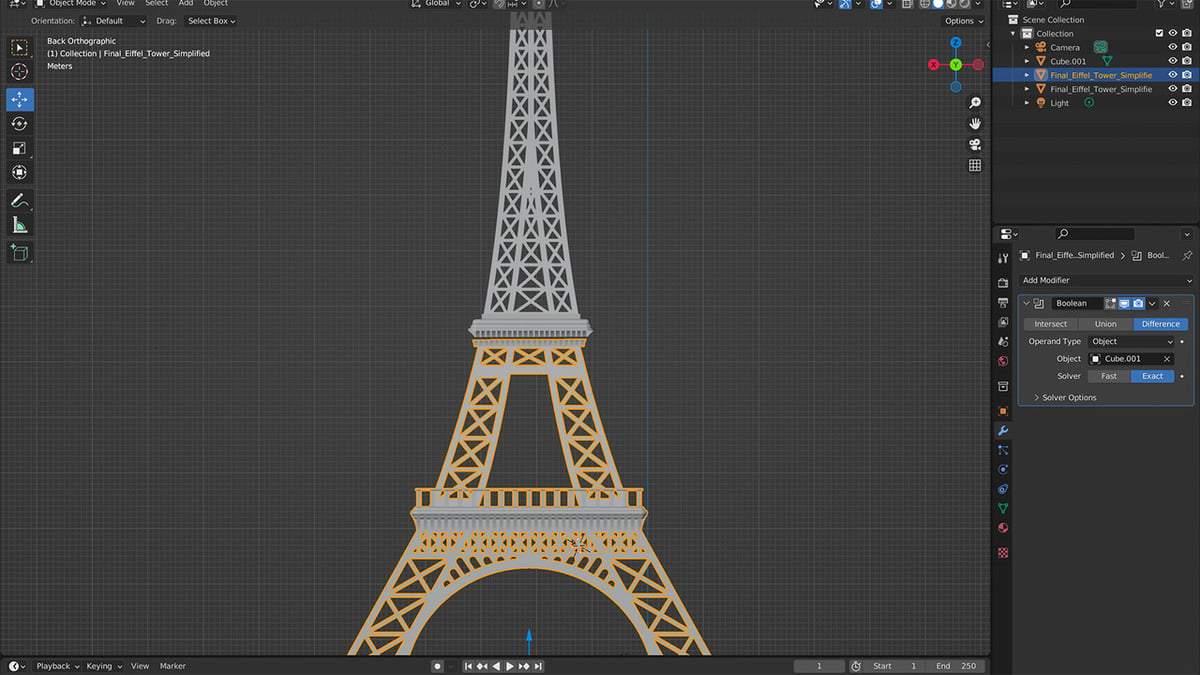
Blender has ways to add anchor points, too. In Object Mode, once the two individual parts are lined up the way you want them to be, you have to right-click on “Add > Mesh” and select the shape you want to use as the locator pin.
You can use the “Move” tool on the Toolbar to move the object into the middle of the two split parts as best as possible. Feel free to change the dimensions of the cube in any way you’d like.
Once you feel confident with your choice, it’s time to work with Boolean Modifiers.
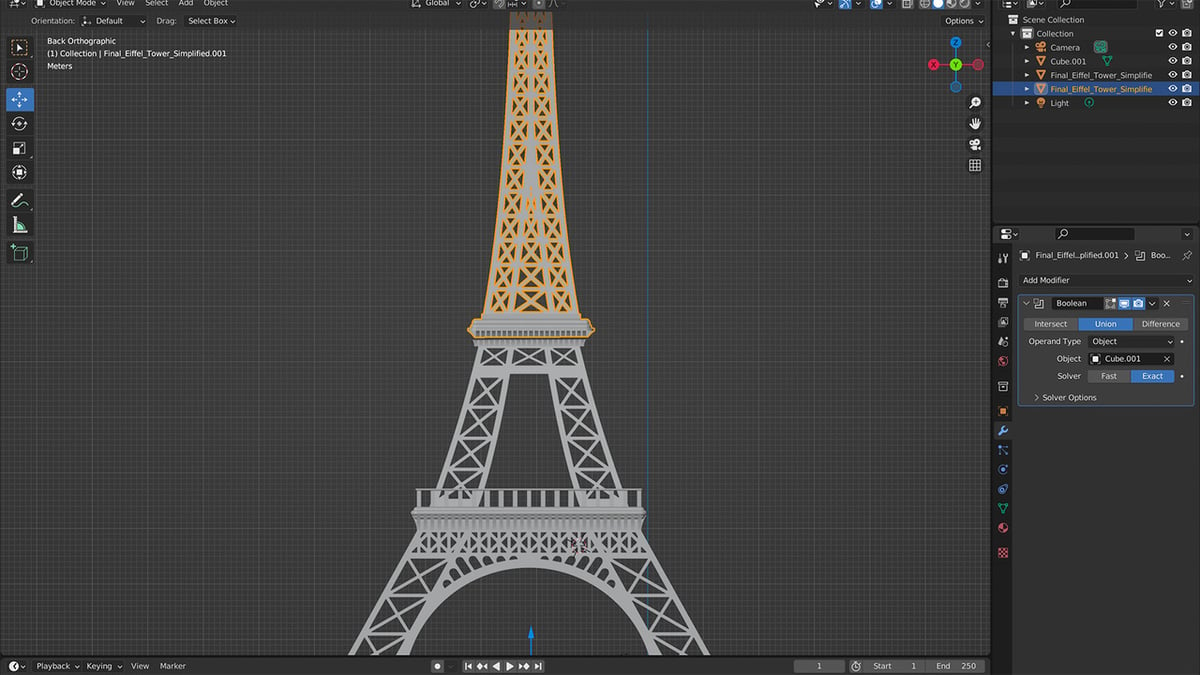
Boolean Modifiers will let us bind or subtract an object from another. Hide one of the two parts by clicking on the eye icon beside its name in the Outliner editor on the top right objects, then select the other piece.
In the Properties editor on the bottom right, click the”Modifier Properties” tab – the one with a wrench icon. Click “Add Modifier”, then choose “Boolean”. You’ll see three options: Intersect, Union, and Difference.
Choose “Difference” if it’s not already selected. Then, in the “Object” setting on the panel, select the locator pin. Now, apply the modifier by holding down “Ctrl + A” or clicking on “Apply” on the drop-down menu next to the modifier’s name. This will subtract the locator pin from the model you chose.
Next, it’s time to repeat the same steps for the other side of the split model. Reveal the hidden part and hide the part you’ve already worked on. The only difference is that you’ll have to shrink the size of the locator pin by clicking on it, pressing ‘S’, then moving your mouse towards the middle. The other place you’ll need to change is where you chose Boolean Difference. Now, you’ll choose “Boolean Union”, which will combine the two shapes into one piece.
The last thing is to line up the models for how you would want them to be saved in the STL file. Then, under “File”, choose “Export”, and select the type of file.
All of these steps bring us to the final stage: assembly!
Step 4: Assemble Your Split 3D Model
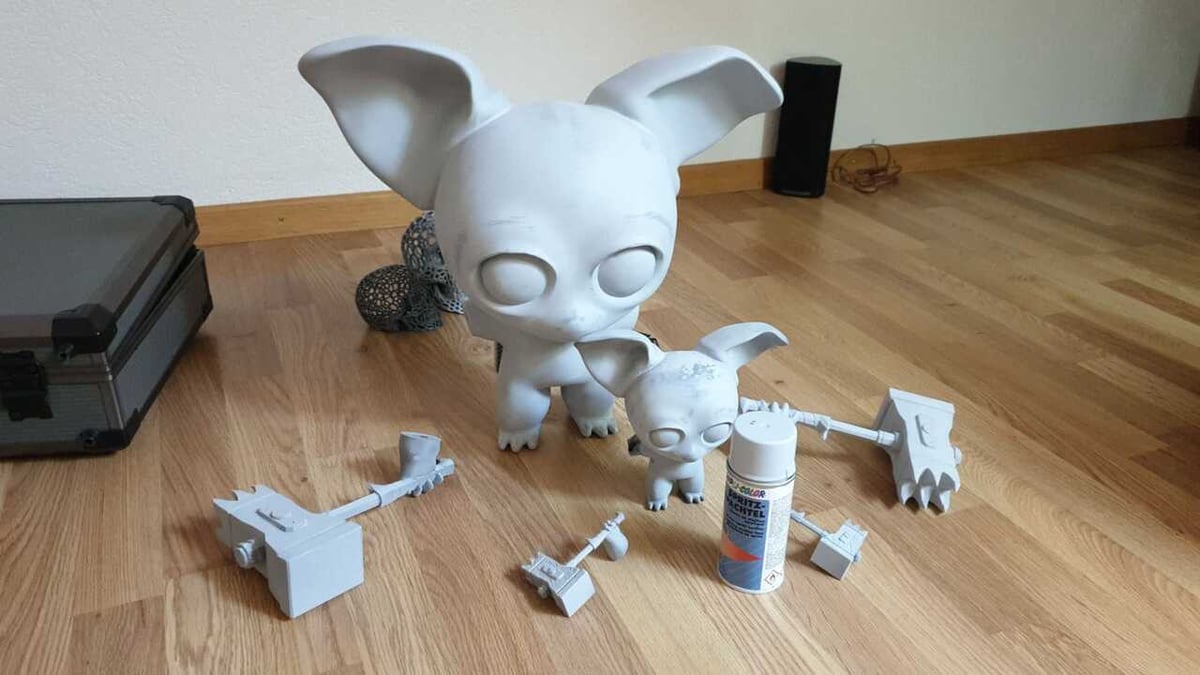
You’ve gotten this far, and now, it’s time to assemble. You may want to pick up some things to help you get the best adhesion when gluing your pieces together. Things like sandpaper, gloves, rubber bands, and some activator spray may help make things easier.
Different glues can be used for assembling printed pieces. The most common is cyanoacrylate glue, referred to as super glue, for its ease of use, but it may not always be the best option depending on what you’re working with. Other options like epoxy and even using a 3D pen can be useful during assembly.
Which Glue to Choose
It’s best to assess the main use of your 3D print to figure out what glue you need. If you want high detail as well as minimal visibility of the seams, you may want to stick to super glue. It comes in a lot of different varieties so make sure to do a little research on the material you’re using to make sure it will be compatible with the super glue you chose.
If you need the bond to be very strong, you may find epoxies to be what you’re looking for. They use equal parts epoxy resin and a hardening agent to create a chemical reaction. Usually, this is the go-to option for when you need a lot more strength. The downside is that some epoxies may leave a slight gap by the seam. Keep in mind that you’ll want to be quite cautious when working with epoxy by wearing gloves and make sure not to get it on your skin or any other surfaces. You’re dealing with a chemical reaction and should treat it as such.
The last method for assembling your 3D model is using 3D pens. They’re handy and offer very good seams, but if you only use the 3D pen, you’ll find it isn’t a very strong bond. You may only want to use this option with prints that aren’t going to be handled and that won’t hold any weight.
Alternatives
As you saw above, Meshmixer and Blender are very capable tools that can split STL files, but they’re by no means the only ones. Fusion 360 and 3D Builder are also great options worth considering. See below for more details on both programs.
Fusion 360
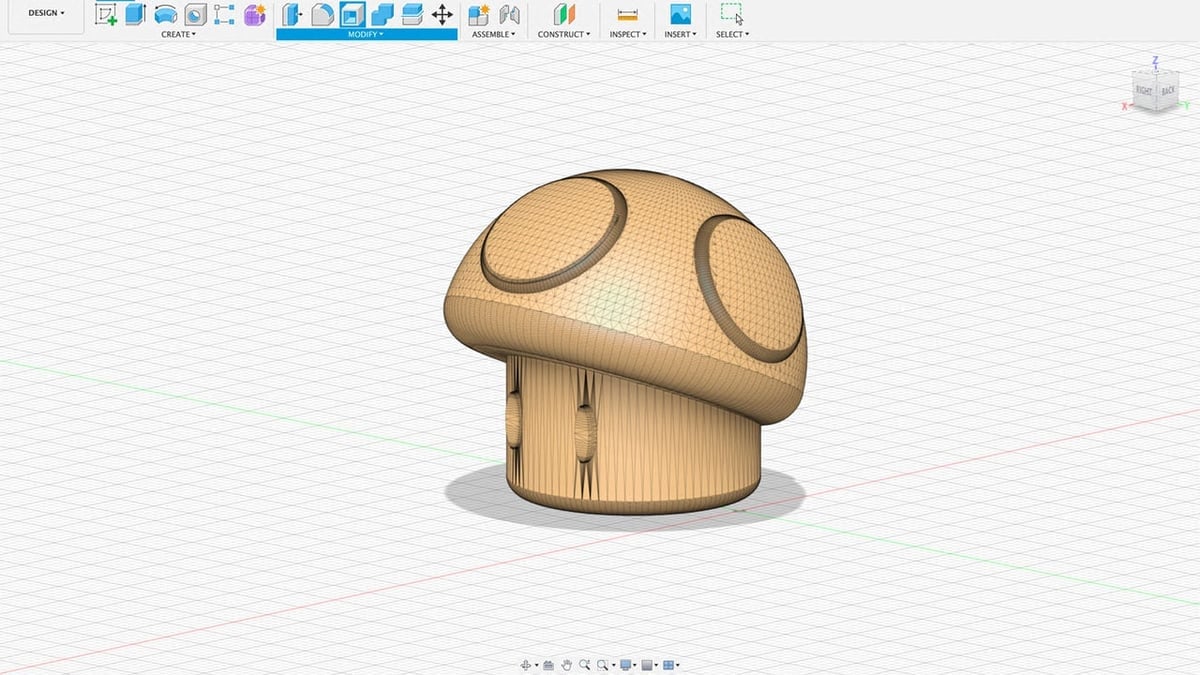
If you know and love Meshmixer, you might also appreciate Fusion 360. Back in September 2021, Fusion 360 adopted a lot of the features that were available in Meshmixer.
With Fusion 360, you’ll have a lot of options for different panes and splitting features to use when you split your model, like Plane Cut and Separate, which are probably the ones you’ll want to focus on when you first start. It’s worth noting that Fusion 360 isn’t quite as straightforward as Meshmixer and has a different structural layout as well. While there’s a considerable learning curve, Fusion 360’s YouTube channel comes packed with a lot of useful tutorials to advance your skills.
Mac users rejoice, for this will be a good alternative to Meshmixer! And with Fusion 360, you’re not limited to just splitting your STLs, as it’s a full-functioning CAD program.
3D Builder
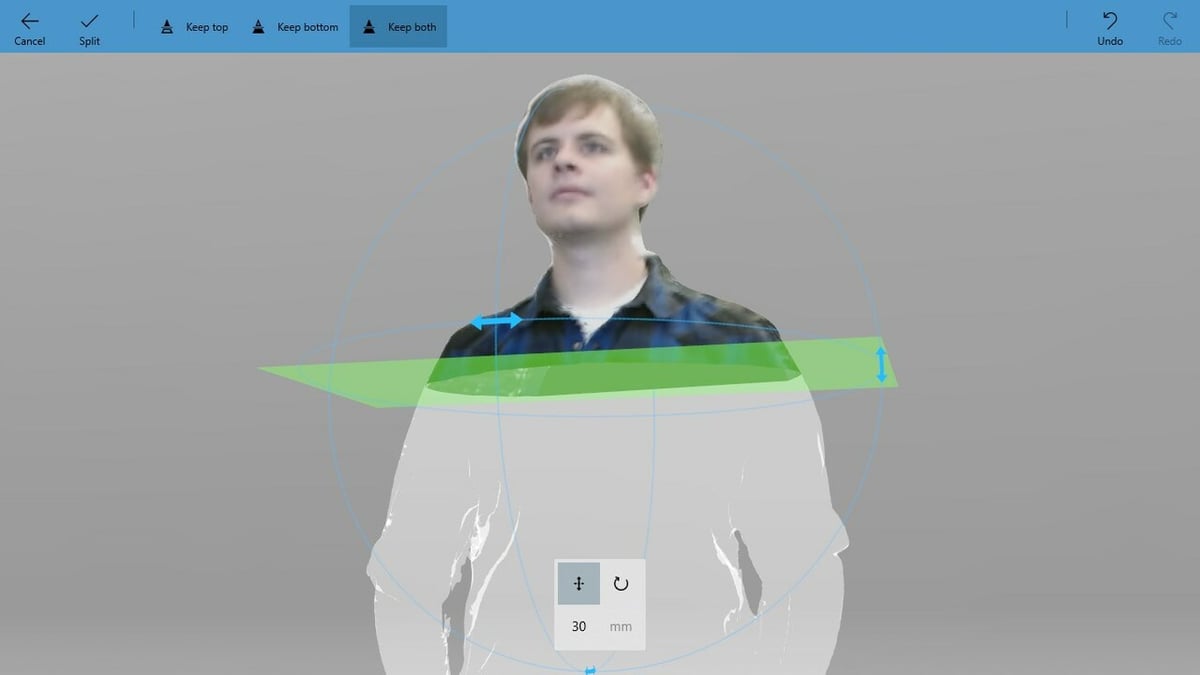
Microsoft’s 3D Builder is a 3D design tool that’s also known as one of the easiest programs to split your STLs in. In certain ways, it shares the mantle with Meshmixer for its straightforward ease of use. Anyone from professionals to beginners will find 3D Builder very useful. However, it’s also not available on Mac, so there’s limited functionality and access.
Splitting STL files in 3D Builder is very easy. Load your STL, then click the “Edit” tab followed by “Split”. You can rotate the cutting plane to where you want it to cut. Then, you’ll notice at the top of the window that there’s an option to only keep one part of the split model or to keep both parts.
The last thing to do is to click on the Split Button in the top left to cut where you requested. It really is that simple!
License: The text of "How to Split an STL File / 3D Model for 3D Printing" by All3DP is licensed under a Creative Commons Attribution 4.0 International License.

