Gravity Sketch: All You Need to Know to Get Started

3D design in actual 3D? Follow our guide to get started with 3D modeling using Gravity Sketch in VR (and iPad)!
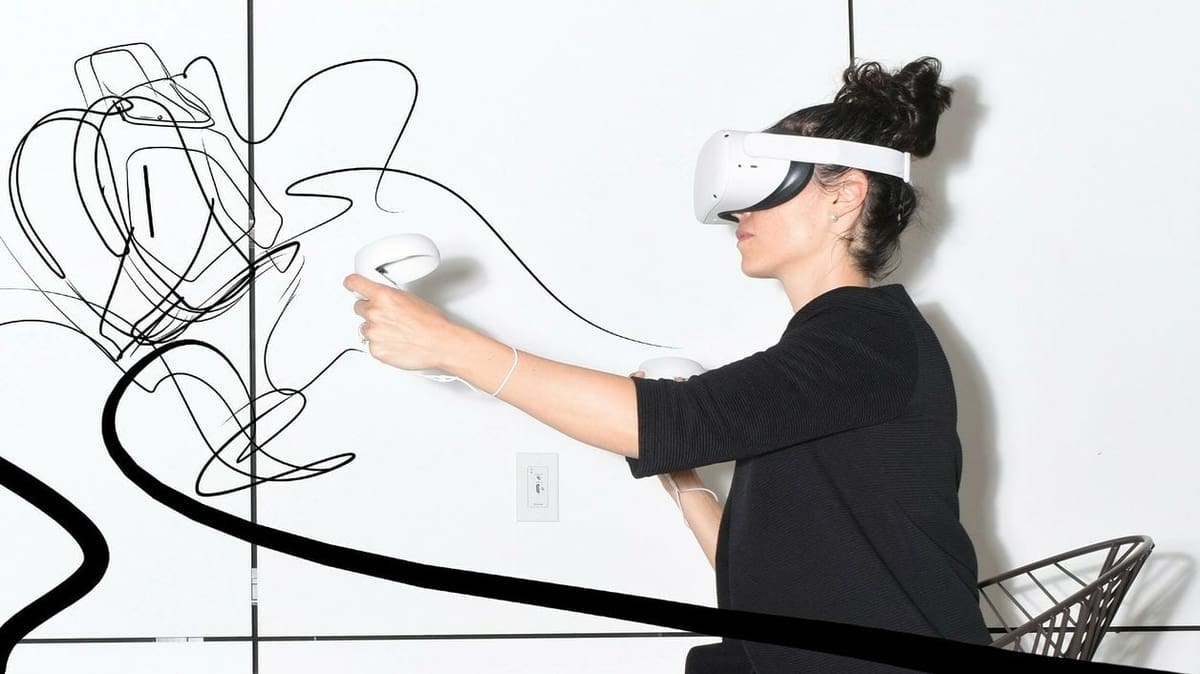
Virtual reality (VR) has opened up many new opportunities for companies to create apps that improve 3D designers’ workspaces. Gravity Sketch, one such app, is available for iPad and many compatible VR headsets, and it provides an environment where designers can make 3D objects in a 3D space almost as if they were drawing on 3D paper.
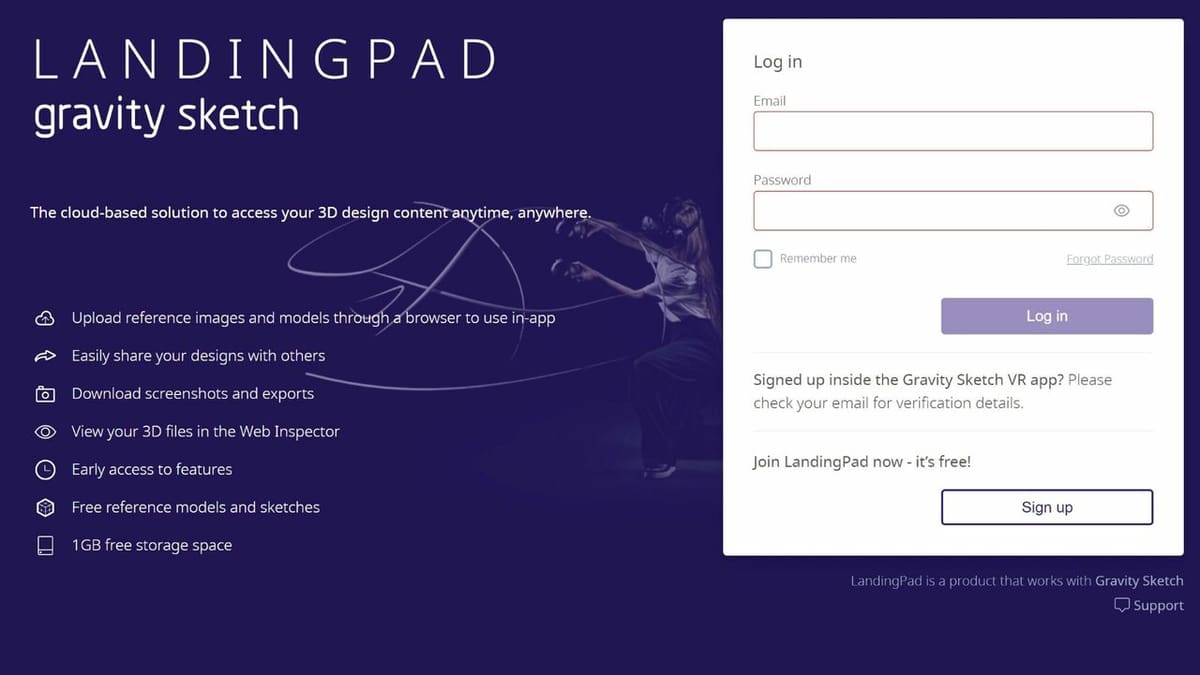
In addition to this novel method of design, Gravity Sketch hosts a comprehensive network of cross-platform file sharing and modeling collaboration through its built-in cloud-based storage, Gravity Sketch Landing Pad. Accessible from any iPad or VR headset with Gravity Sketch installed, a designer can work on sketches from anywhere with an internet connection.
While the tablet app allows users to modify Gravity Sketch sketches from an iPad, we’ll focus on the version for VR headsets.
In this article, we’ll go over what Gravity Sketch can be used for and how to get started with its VR-based, collaboration-friendly workflow, so you can see what it could add to your prototyping and designing processes.
Why Use Gravity Sketch?
For a long time, 3D modeling in 3D was nothing more than wishful thinking. Designers would have to envision their 3D designs – sculptures, buildings, and gadgets – completely in two dimensions on grid paper or a computer monitor.
Recently, though, Gravity Sketch has joined several other 3D modeling programs in providing a virtual, 3D workspace for designers to create without needing to start out in 2D. Because it’s in VR, the very pen strokes can be made in three dimensions, and designers can draw as if they were using anti-gravity 3D pens.
In Gravity Sketch, the designer isn’t limited to using a mouse cursor to rotate a scene, hoping to get an angle that allows them to see and work on their design as they imagine. Instead, they can simply move their head or physically walk to a location in their design – and even use a Banana to teleport them to somewhere else in the virtual workspace.
Who Uses Gravity Sketch?
Gravity Sketch isn’t limited to a specific industry or type of design.
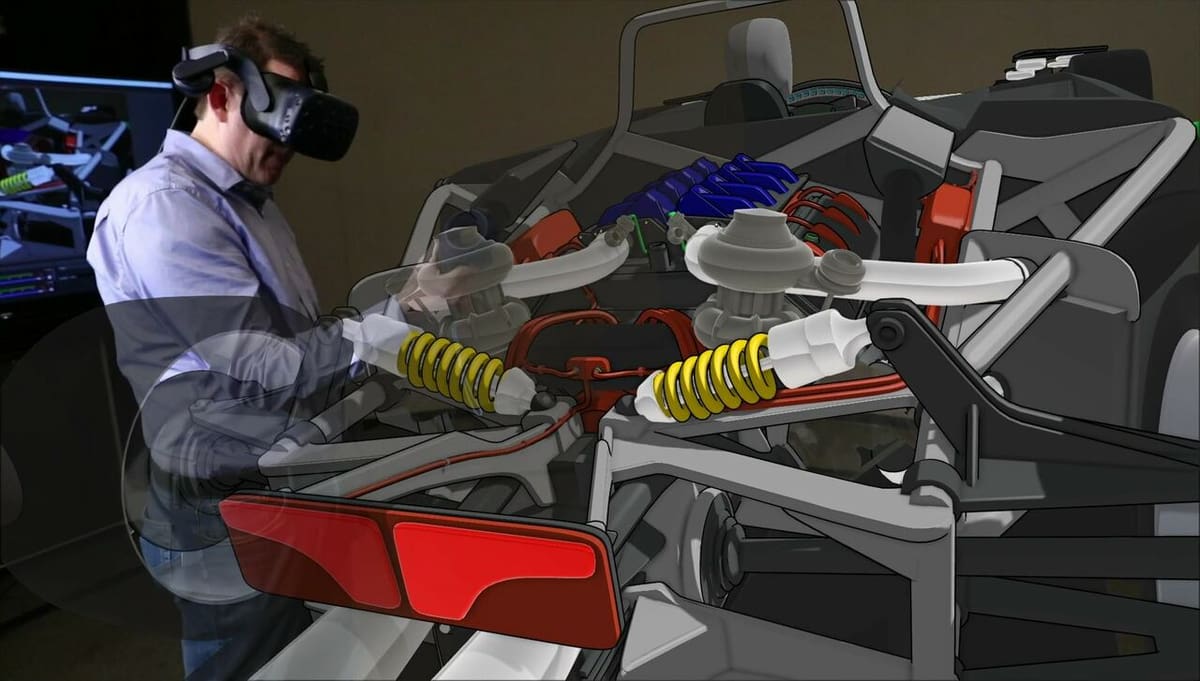
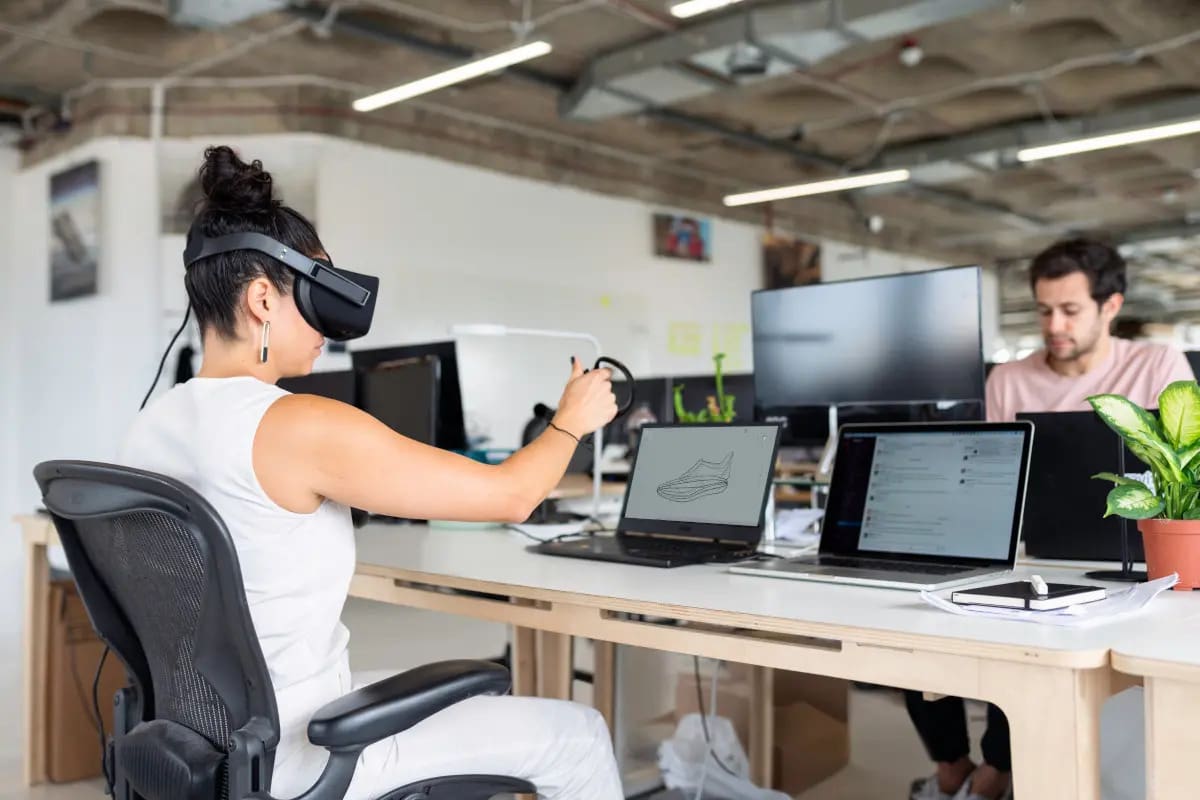
Industrial designers use Gravity Sketch to sketch ideas and design surfaces for interactive and beautiful products. Clothing and apparel designers take advantage of its intuitive surface modeling and coloring tools to design new fashion. Automotive engineers make use of its collaboration-oriented features to work on the surface model of cars from different places.
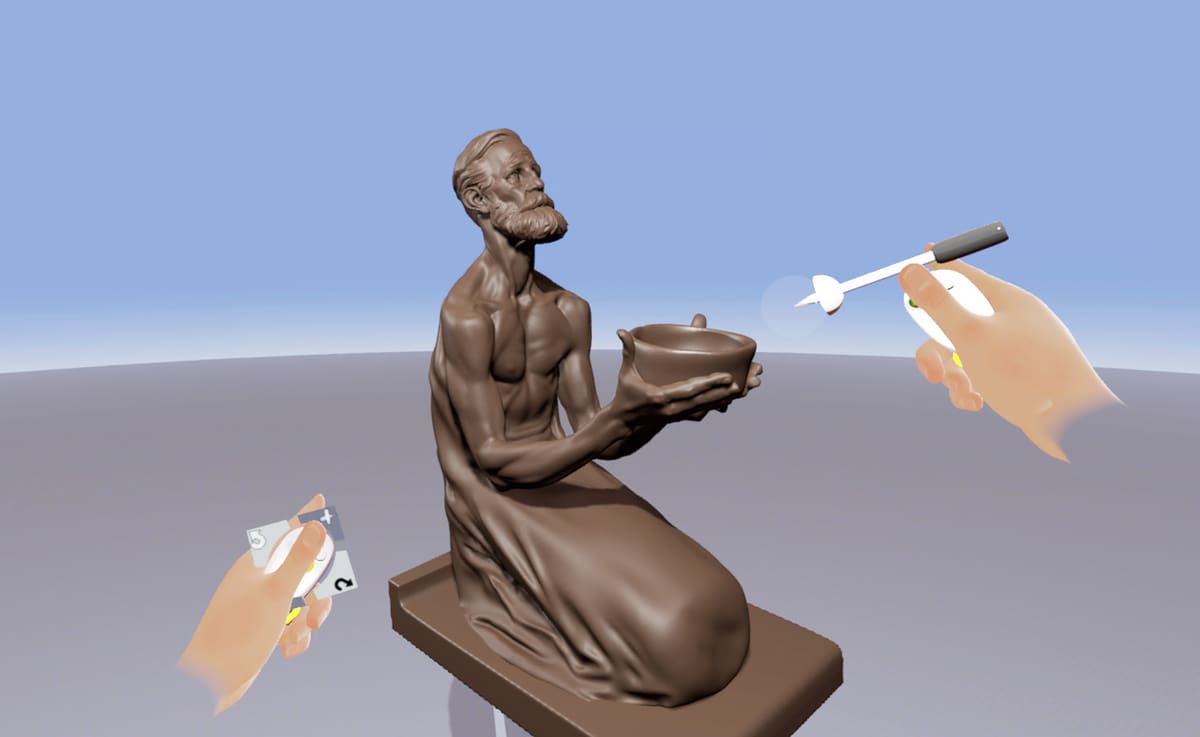
Gravity Sketch isn’t limited to an industrial environment, though. Hobbyists and makers can envision any of their ideas by sketching in 3D – either in thin air or on an imported object. Have an idea for a Dungeons & Dragons character? Gravity Sketch has all the tools necessary to bring the creation into a three-dimensional existence and in some cases can serve as a one-stop shop for all 3D modeling needs, from idea to final 3D file.
What Makes Gravity Sketch Different?

As Gravity Sketch co-founder and CEO Seyi Sosanya says, “we all think in 3D, so why not work in 3D from the onset?”
Gravity Sketch gives designers the ability to visualize designs in 3D immediately, as if the virtual object were in front of them, and share it with collaborators who also use the app without the need for cost- and time-consuming draft 3D prints.
Because it’s built for collaboration, the program has tools that make it very helpful for designers working with people in different places, as well as designers working in both virtual reality and elsewhere, like on an iPad or desktop.
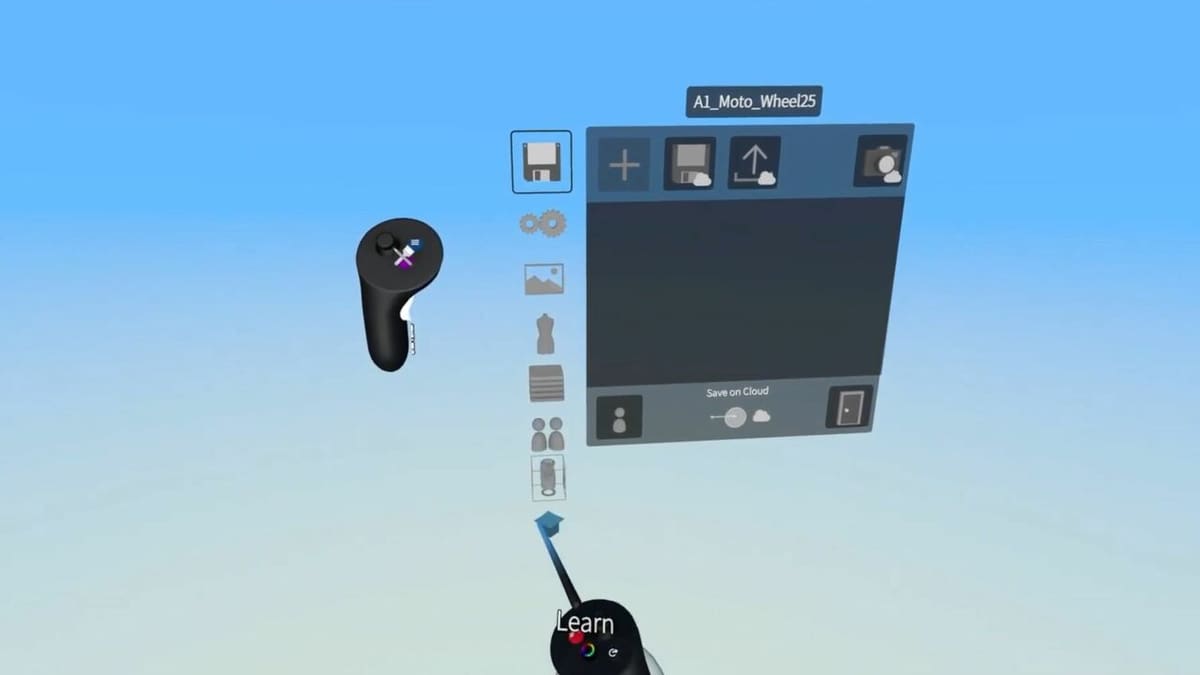
One of these features is the aforementioned Landing Pad. Users can upload and download 3D files and images, seamlessly integrating Gravity Sketch into their current suite of programs. Landing Pad also allows the import of reference images, STL files, and OBJ files into sketches. It further gives designers the possibility to export objects made in Gravity Sketch to rendering software and slicing programs.
Without a Landing Pad account, users can’t import files from outside sources into sketches, and, more importantly, can’t export Gravity Sketches to other sources. For this reason, many users make a Landing Pad account, which stores all of their files and is accessible via the Landing Pad website on any device with a web browser.
Requirements
Like all 3D modeling software, in order to be compatible with the program, a designer’s hardware needs to meet certain system requirements. These will vary depending on how you’re using Gravity Sketch:
- iPad: iOS 13.0 or later.
- VR headset: While many users opt for Oculus Rift or Quest 2, Gravity Sketch has an official guide of compatible headsets that can support Gravity Sketch when tethered to a computer with a Windows OS.
If this modeling software sounds like it would fit in with your 3D modeling workflow, keep reading to see how to start sketching on Gravity Sketch!
Getting Started
From here onward, to focus on the potential benefits of VR 3D modeling, this guide will focus on using Gravity Sketch with an Oculus Rift or Oculus Quest 2. The Gravity Sketch team has put together a comprehensive tutorial for iPad users, which can guide designers as they use the tablet to create and edit files.
To start on Oculus:
- Download Gravity Sketch (for free) through the Oculus Store or the iPad App Store. These can also be accessed through the Gravity Sketch official website.
- After the program finishes installing, navigate to the app and open it.
- Once the splash frame vanishes, you’ll see a menu that has six options and a bar across the bottom that says “Landing Pad” on the left.
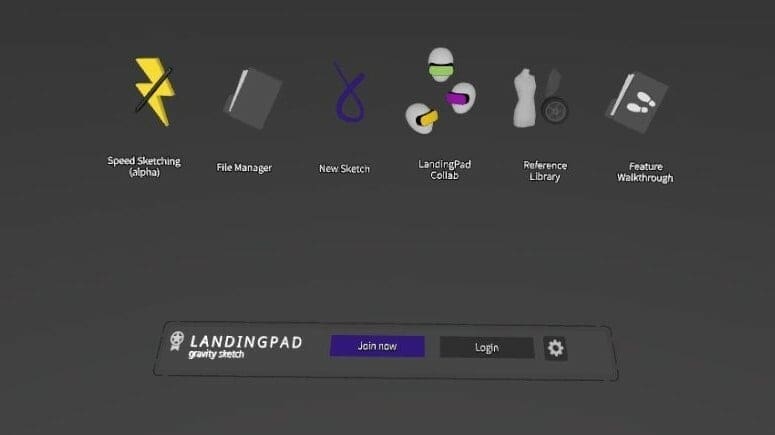
- From here, if you haven’t already, create a Landing Pad account by clicking on the purple button at the bottom of the screen. Use the stems protruding from your controllers to type in an email address and a password.
- After the Landing Pad account is set up, use the stem protruding from your dominant hand (which by default is the right hand) to click (using the trigger) on the “new sketch” option and start sketching ideas directly into 3D!
UI & Layout
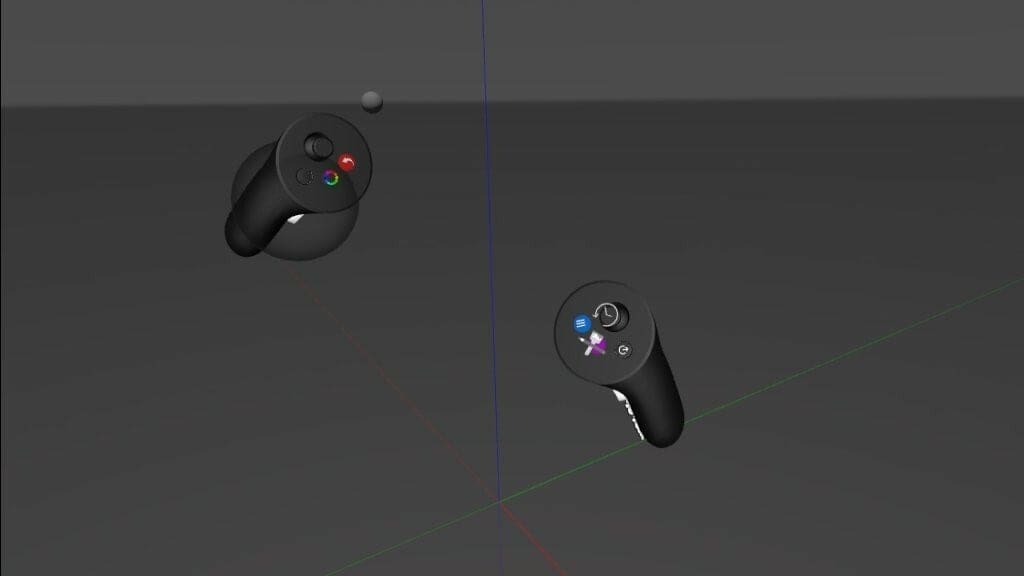
Once you’re in a sketch, you’ll be met with a completely blank 3D canvas. That’s right – the only UI that you’ll be able to see are your two controllers. From these two, all tools and menus can be accessed using the purple and blue buttons on the non-dominant hand. The tools and options can be re-hidden until they’re needed again.
Making Your First Sketch
Gravity Sketch is versatile editing software with features that allow designers to create both solid and surface models in the same sketch and even to sketch solid models on top of outlines. If you can, try some out with the intention of seeing what the software can do before beginning to use it as a tool, to get a feel for the 3D design environment.
You could also take advantage of Gravity Sketch’s built-in video tutorials, which are accessed by clicking on the graduation cap in the Options Menu. This can be opened by clicking on the blue button of your non-dominant hand.
Using Your Controllers
The handheld controllers allow a designer to do everything from modeling to modifying settings. In other words, they’re the keyboard and mouse of virtual reality.
In particular, buttons on the dominant hand control the tool settings, color, object manipulation, and, of course, the all-important undo button. The non-dominant hand is mostly responsible for the design timeline, global scaling of the scene (along with the dominant hand), and menu navigation.
Tools & Bodies
The main tools manipulate object surfaces and vertices of Gravity Sketch’s three main surface and object types in order to complete a drawing.
Accessible from the Tools menu, these are Ink (sketches edges), Stroke (draws in VR), Surface (creates sculpted, zero-thickness surfaces), Revolve (makes round objects like tires and vases), Volume (quickly generates unique solids), and Primitive (allows users to import conventional 3D shapes like cubes and spheres into their sketches).
Each tool has its own use, and you can find detailed tutorials for each one on Gravity Sketch’s official Help Centre.
Tool Belt
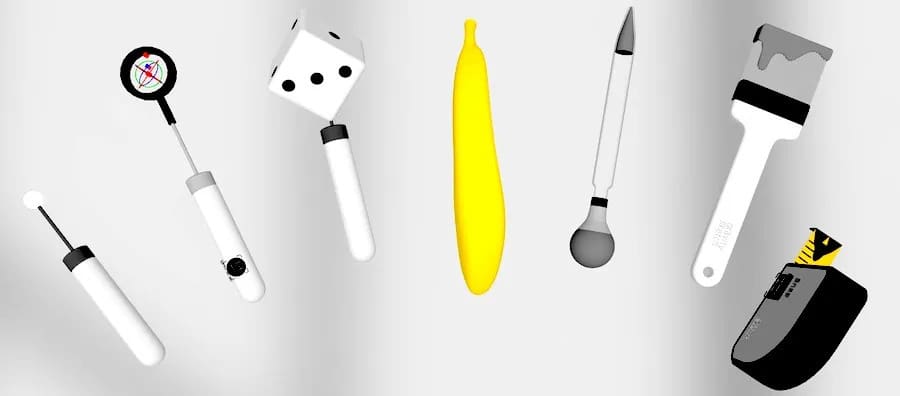
Other tools can be used by accessing the Tool Belt, a feature that, because it’s disabled by default, must be enabled in the Options menu. It has seven tools with different functionalities that are designed to make Gravity Sketch easier to use.
- Normals Flipper: The ping-pong ball-shaped Normals Flipper tool gives users the ability to invert the direction of the normal vector of any polygon. For more information about normal vectors in meshes, check out the differences between ASCII and binary STL.
- Precision Move Tool: The Precision Move Tool (which has an XYZ-axis embedded into its tooltip) allows designers to scale, rotate, and translate objects in 3D space over a particular axis of movement or rotation. This takes the guesswork out of Gravity Sketch’s conventional system of translating and rotating objects, which consists of grabbing the object with the dominant-hand controller and rotating/moving the controller in space in the manner that the user wants to move the object.
- Randomizer: Using the die-shaped tool on any object will rotate it randomly about the X-, Y-, and Z-axes, and is useful for concept art creation.
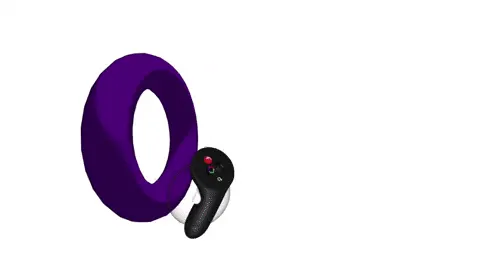
- Banana: The banana enables a designer to point to a place within the design and teleport there without having to physically move to that location. It’s useful for using Gravity Sketch in a confined area (such as sitting in a chair) and also for quickly moving great distances within the sketch.
- Color Picker and Paintbrush: These two tools are used together. Selecting an object with the Color Picker will automatically apply the color of that object to the Paintbrush. The designer can then hover the paintbrush over any object to color that object with the same color.
- Measurement Tool: The measuring tape-shaped tool (separate from the measuring object, which is a special type of Primitive) allows users to find the actual distance between multiple sets of two points in space.
You can find out more about these on Gravity Sketch’s introduction to the Tool Belt.
Bodies
There are three types of objects that can be edited using the Tool menu (purple button, non-dominant hand).
NURBS Surfaces & Quad Meshes
These are two different types of 3D objects that can be created and edited with various tools.
NURBS surfaces are surface geometries with vertices and “control points” that can be edited to alter the shape of the object. Tools such as the previously mentioned Surface manipulate NURBS surfaces. They can be irreversibly converted into mesh surfaces, which are the same type of object as imported STL files.
Quad mesh surfaces are editable objects made out of a surface of flat polygons.
For greater control over the shape of a mesh, a designer can convert a mesh object to a Subdivision (SubD) object by pressing a button on the object’s pop-up menu (opened by clicking the blue button on the non-dominant hand while grabbing the object).
Subdivision (SubD) Surfaces
SubD objects have individually editable vertices, edges, and faces, which means that users can edit every single aspect of the mesh. Surfaces created in Gravity Sketch can be converted into SubD surfaces, as well as imported objects of less than 15,000 vertices, although this might cause performance issues if the imported object has more than a few thousand vertices. More information about tools that use this editing technique can be found through Gravity Sketch’s official Help Centre.
Adapting to the VR Environment
Gravity Sketch is well-known for its pioneering of many intuitive tools (also called “Design Aids”) that make it a lot easier to work in an environment where it’s impossible to see anything other than the workspace without taking off the VR headset.
Among the most important ones to get started with, three options stand out:
- Image import: This allows designers to import images into a sketch from Landing Pad, where they can be moved around like flat surfaces. The designer can look at these images as a reference when sketching in 3D.
- Orthographic view: Accessible in the Options Menu, the orthographic view allows a user to view the whole sketch from a single direction – top, bottom, or any of four sides.
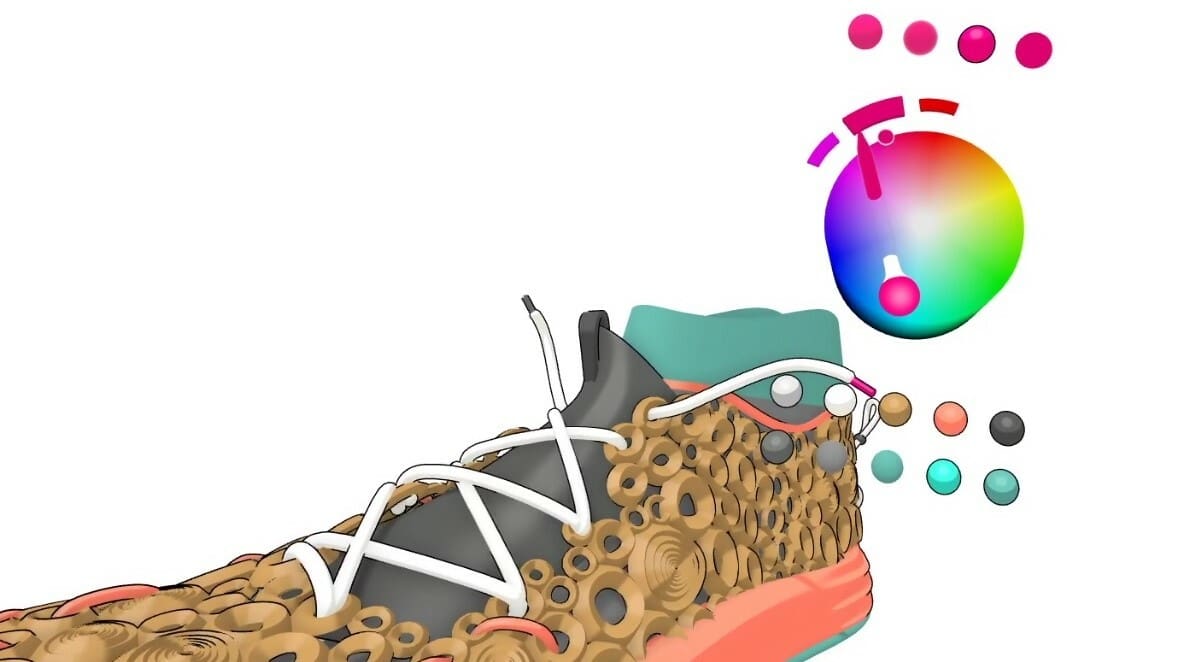
- Color wheel selector: By selecting an object and clicking a button on the dominant hand controller, a designer can assign any single hexadecimal color to a selected object using a single motion and a trigger pull. Strangely enough, the fact that this tool is 3D makes it much simpler to operate than if it were a simple, 2D menu.
In addition to these tools, there’s a multitude of different snaps, grids, and axes restrictions that designers can use to reduce the difficulty of trying to draw intricate objects with arms suspended midair. These are, for the most part, located in the Options Menu.
Workflow
Many Gravity Sketch users use a multi-layer workflow as follows:
- First, it’s a good idea to go to the Options Menu to prepare your workplace to be exactly what you’d like it to be. This is where users can choose a dominant hand, define the background of the Sketch environment, and turn on a number of the abovementioned Design Aids. These include snap grids (although Gravity Sketch’s grids are three-dimensional), the visibility of the origin, and object mirroring.
- Once the workspace is to your liking, you can import reference images (anything that you’d need to look at during design). Remember, you can’t look down at a sheet of paper or another monitor without taking off the headset!
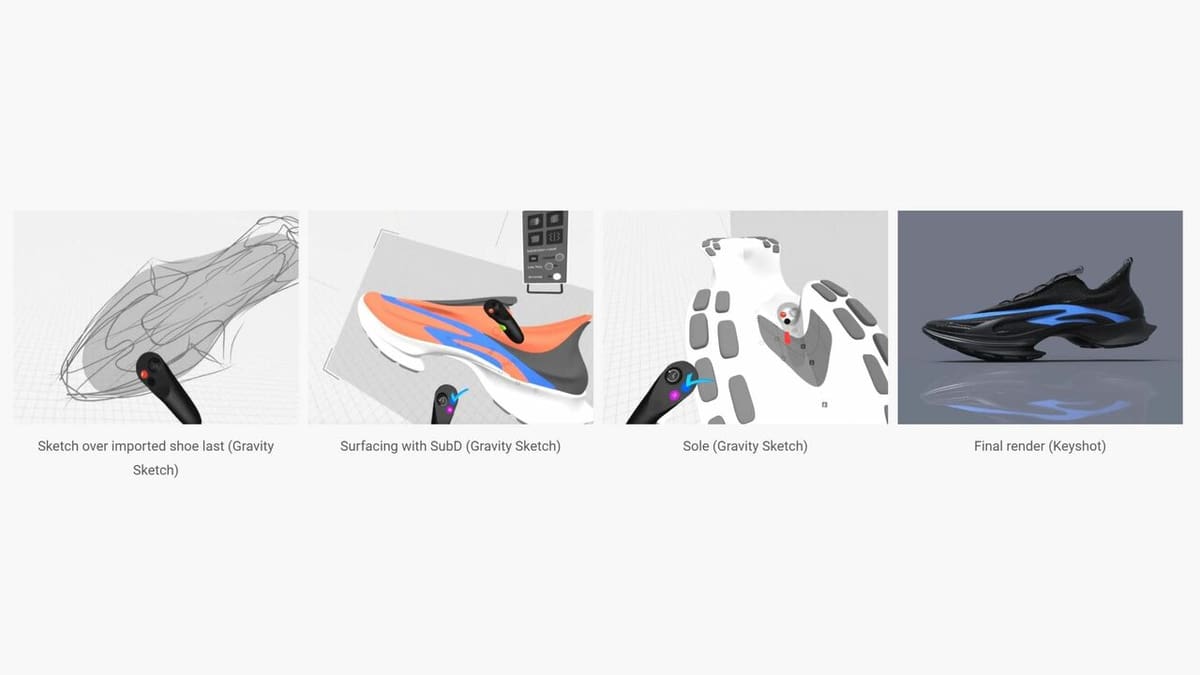
- After you’ve imported the reference images or set up the 3D files as a guide – or once you’re ready to start freely creating – you can make a 3D outline of the design using the Ink tool.
- With the 3D sketch complete, you can use tools to create solid bodies and surfaces (which can be converted into solid bodies using the thicken/offset tool). This way, you’ll turn your sketch into a virtual prototype!
- Use subdivision modeling (SubD) to adjust any and all vertices in your sketch to have complete control over the mesh model.
- Once finished, make sure to save or export the sketch. The sketch, which can be saved either locally on the headset/computer or to a connected Landing Pad account, will automatically be saved in Gravity Sketch’s proprietary sketch format. To retrieve a version of the sketch usable in other formats, export the sketch in OBJ, FBX, or IGES file format.
While there’s never a requirement to use any particular workflow in Gravity Sketch, it helps give structure and direction to a sketch while also maximizing the use of the tools available.
You can find more examples of user-developed workflows on Gravity Sketch’s official website.
What It's Not Meant For
For all of its strengths, Gravity Sketch isn’t going to be the standalone tool for every single designer. It was designed, according to its co-founder, to be a 3D sketching tool more than anything else. As such, it lacks the parametric design capabilities of AutoCAD, Shapr3D, or Fusion360. And while Gravity Sketch has smooth and crease tools, it doesn’t have many of the dedicated sculpting tools of some 3D sculpting apps, such as Meshmixer.
Additionally, owing to the fact that it’s meant to be an unrestrictive, form-focused design program, its measurement and analysis tools are somewhat limited. While length measurements can be made with the measuring tool, there aren’t that many options (other than precise movement) that incorporate measurements into the design, and there’s only one tool that can regulate the rotation of an object.
Also, unlike more engineering-oriented CAD programs, Gravity Sketch isn’t currently able to animate or simulate object operation.
Alternatives
Gravity Sketch is a strong candidate as an app for industrial designers, concept artists, product designers, and 3D modelers looking to collaborate across multiple machines and vast distances.
Other VR modeling apps are out there, though. If Gravity Sketch seems like it’s almost perfect but isn’t quite right for you, there are several alternatives that are similar with their own respective strengths and limitations.
Adobe Medium, which has to be on a tethered headset and has more sophisticated hardware requirements than Gravity Sketch, is a much more sculpting-intensive VR experience. This is because Adobe Medium has a full suite of various 3D sculpting tools, whereas Gravity Sketch typically requires a somewhat painstaking manual manipulation of groups of individual points to manipulate meshes. It’s free, and can be downloaded from Adobe.
Tilt Brush by Google is another close alternative, but it’s more focused on 3D art and surface modeling than object design. This makes it a good option for concept artists who don’t need to create physical prototypes, and it’s well-suited to making digital, non-3D printable scenes for renderings. It can be downloaded from the Tilt Brush website.
On the iPad, Forger on iPadOS is a paid alternative to Gravity Sketch for 3D sculptors. It has a similar suite of sculpting tools to that of Adobe Medium or Meshmixer, but doesn’t have the suite of subdivision editing or NURBS tools available on Gravity Sketch. Forger also has the ability to re-mesh objects but isn’t as quick at manipulating more than one object at a time. It has a limited free version that can be upgraded to a subscription-based full version, and is found on the App Store.
The Gravity Sketch Community
Gravity Sketch has an extensive community, and tons of official resources that help people understand and adjust to 3D design in VR. After all, it’s less than 10 years old and is significantly different from programs that are used on the screen of a two-dimensional desktop monitor.
Gravity Sketch has a YouTube channel with over 15,000 subscribers, where they regularly host live-streams of designers creating things and showcasing new features, to help people visualize how to successfully edit in 3D.
The Gravity Sketch team also maintains a Discord server with hundreds of members, where users can get live troubleshooting, submit feedback, and showcase work done on the program. This server is open to all former, current, and prospective users.
On their website, Gravity Sketch also curates a showcase of inspirational sketches shared by users over Instagram.
Gravity Sketch certainly has allowed its users to expand their horizons in 3D design, but while it’s a useful tool, its community rarely uses it alone. If you want to 3D print your Gravity Sketches, it’s important to have a high-quality 3D printing slicer installed on your computer. If you want learn how to turn your Gravity Sketches into impressive renders, then perhaps check out our article on 3D rendering.
License: The text of "Gravity Sketch: All You Need to Know to Get Started" by All3DP is licensed under a Creative Commons Attribution 4.0 International License.