Fusion 360: Export as STL – 3 Easy Ways to Do It

With Autodesk Fusion 360, exporting STLs is no big deal. You only need a few steps to prepare your design for 3D printing.
Fusion 360 is a comprehensive computer-aided design (CAD) software for users with different experience levels. It offers a reasonably user-friendly environment for 3D modeling, as well as tools for analyzing and preparing those designs for different kinds of manufacturing, including 3D printing.
3D printing your own designs requires converting and exporting them to a special mesh format. The STL format is the most common mesh file used for 3D printing, although far from being the only one.
There are several ways to export your 3D designs as STLs in Fusion 360. Besides the different conversion settings, you can also choose whether you want to export individual components or bodies, an entire model, or multiple bodies at once.
In the following sections, we’ll cover three different methods to convert and export 3D models in Fusion 360, as well as a cloud-based bonus. Let’s start with the simplest.
Method #1: Exporting an Entire Design
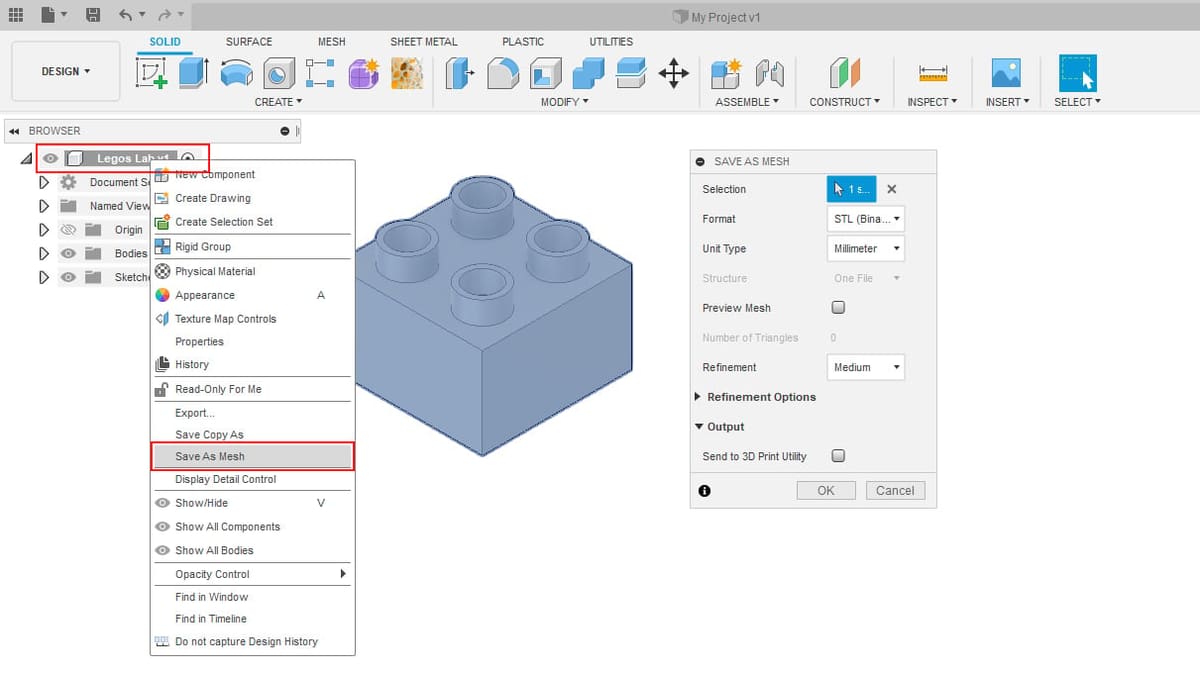
If you want to export an entire project, including all of its bodies and components, you can do so by using the model Browser tree on the left side of the screen.
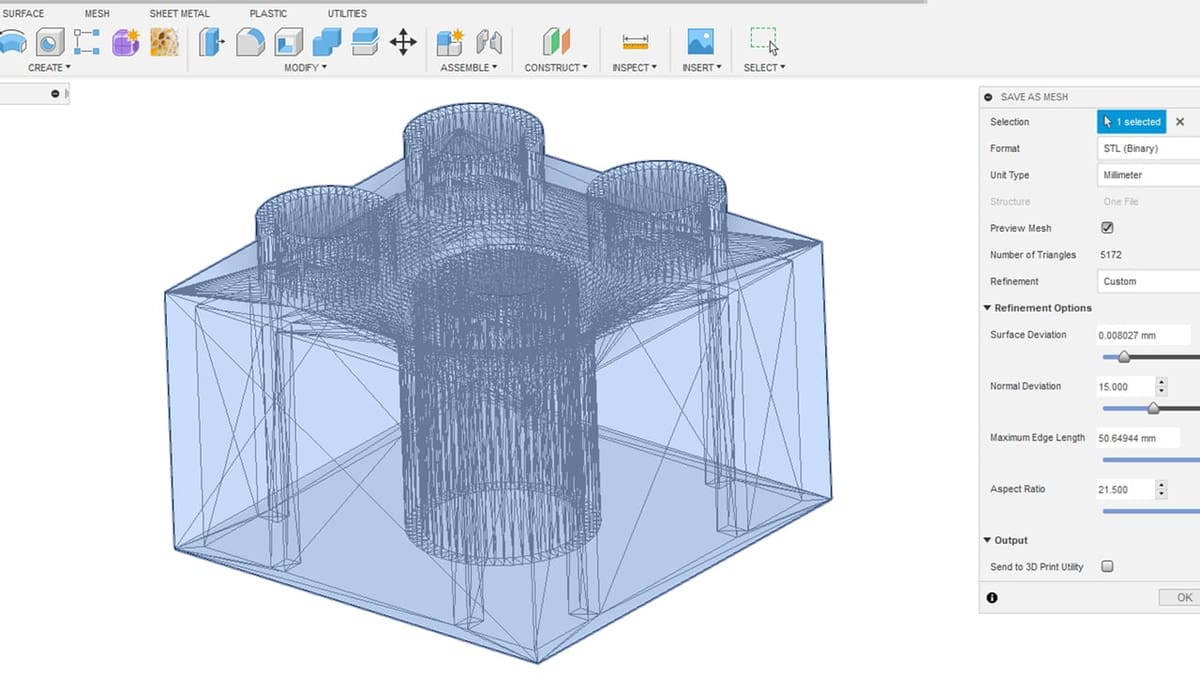
Simply right-click the top branch in the tree where the project name is and select “Save As Mesh” in the resulting drop-down menu.
Once this option is selected, a small “SAVE AS MESH” panel will appear on the right side of the screen in which you can configure the mesh settings. Let’s briefly go over the options:
- Format: determines which file format will be exported. The options here include STL, OBJ, and the newer 3MF format.
- Unit Type: sets the measurement units of the exported file. This doesn’t affect STL files in particular since this format doesn’t store unit measurement information.
- Structure: defines whether the entire design will be exported as one or more separate files (more on this later).
- Preview mesh: allows the previsualization of the resulting mesh file in Fusion’s workspace.
- Refinement: lets the user define how refined the resulting mesh will be. You can either select the presets (Low, Medium, and High) or manually set the values for deviation in “Refinement Options”.
- Output: includes the “Send to 3D Print Utility” option to send the file directly to third-party software like Cura, Meshmixer, PreForm, and other programs set up by the user.
If you choose to simply export the model in the STL format, leave the “Send to 3D Print Utility” unchecked and click on the “OK” button in the “SAVE AS MESH” window. You’ll be prompted to select the destination for your export file.
Method #2: Exporting Individual Components or Bodies
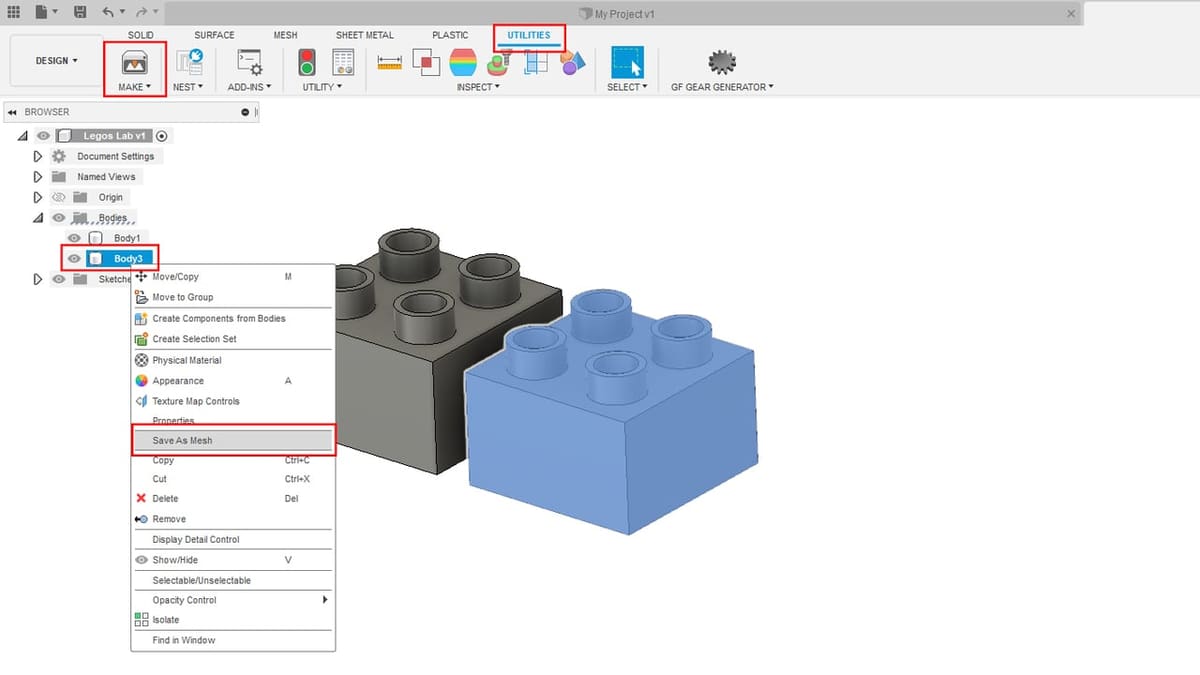
To export an individual component or body instead, simply right-click the component or body in the Browser tree, and select “Save As Mesh” from the drop-down menu. This will open the same “SAVE AS MESH” panel to configure your mesh settings as seen in the previous method.
Alternatively, you can select “3D Print” from the “Make” tool under the “Utilities” tab in the toolbar at the top of the screen to open the same panel. From here you can select the component or body you would like to export.
Method #3: Exporting Multiple Bodies as a Single STL File
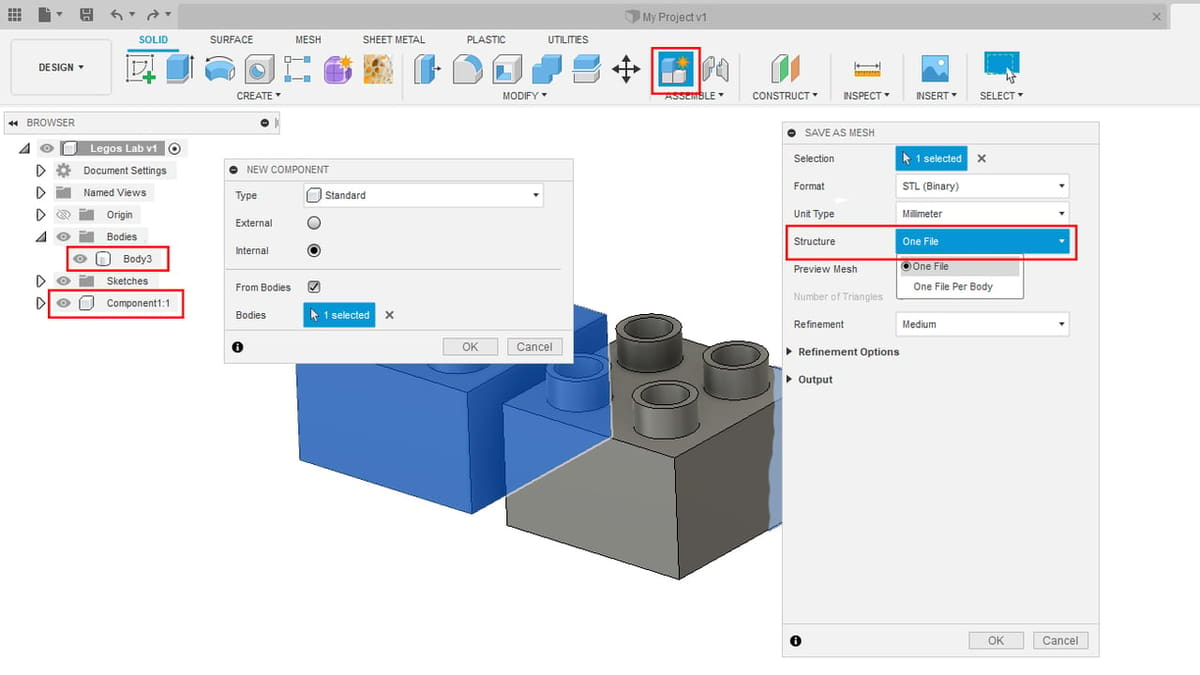
If you’d like to export multiple bodies as a single STL mesh file, you can do so by creating one single component that contains all the bodies you wish to include. This can be useful for print-in-place setups or for positioning parts on the build platform before sending them to the slicer.
So, to do this, create a new component by clicking the “New Component” icon or selecting it under the “Create” menu in the toolbar. This opens a panel on the right side of the screen, which prompts you to select one or multiple bodies from the design.
Make sure the option “From Bodies” is toggled and select only one body now. If you select multiple bodies, an equal number of components will be created, one per body, and that’s not what we want here. Click “OK”.
Once the new component is created, it will be displayed at the bottom of the Browser tree on the left. To add additional bodies to this component, simply find the bodies in the tree and drag and drop them onto the new component branch in the tree.
You can then export them all by right-clicking this component and selecting “Save As Mesh”. Make sure that the “One File” option is selected at the Structure setting, and you should be good to go from there.
Bonus: Exporting an STL File from the Cloud
There’s yet another way to convert and export an STL from Fusion 360 that doesn’t even require access to the software itself.
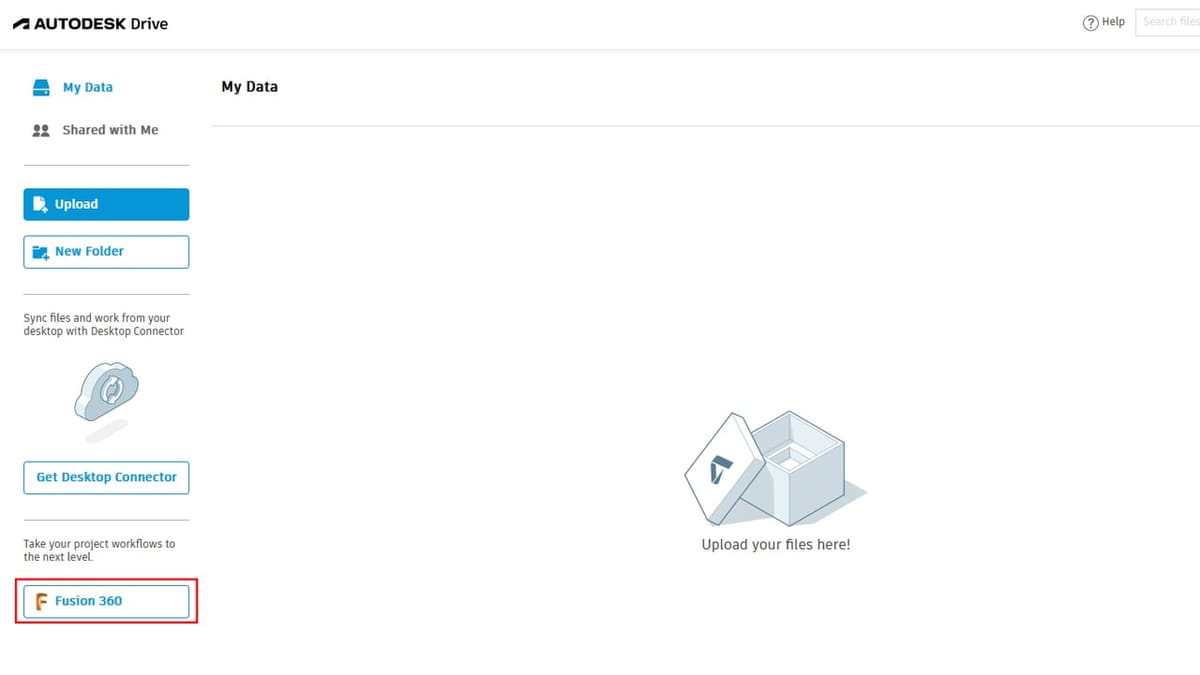
Usually, all Fusion 360 design files are saved in Autodesk’s cloud, and therefore can be accessed from any internet browser. The Autodesk Drive platform also allows users to create and download STL files from existing designs.
To do this, visit the Autodesk Drive homepage and sign in to your A360 account (the same used in Fusion 360). Once you’re in, click on the “Fusion 360” button on the left side panel.
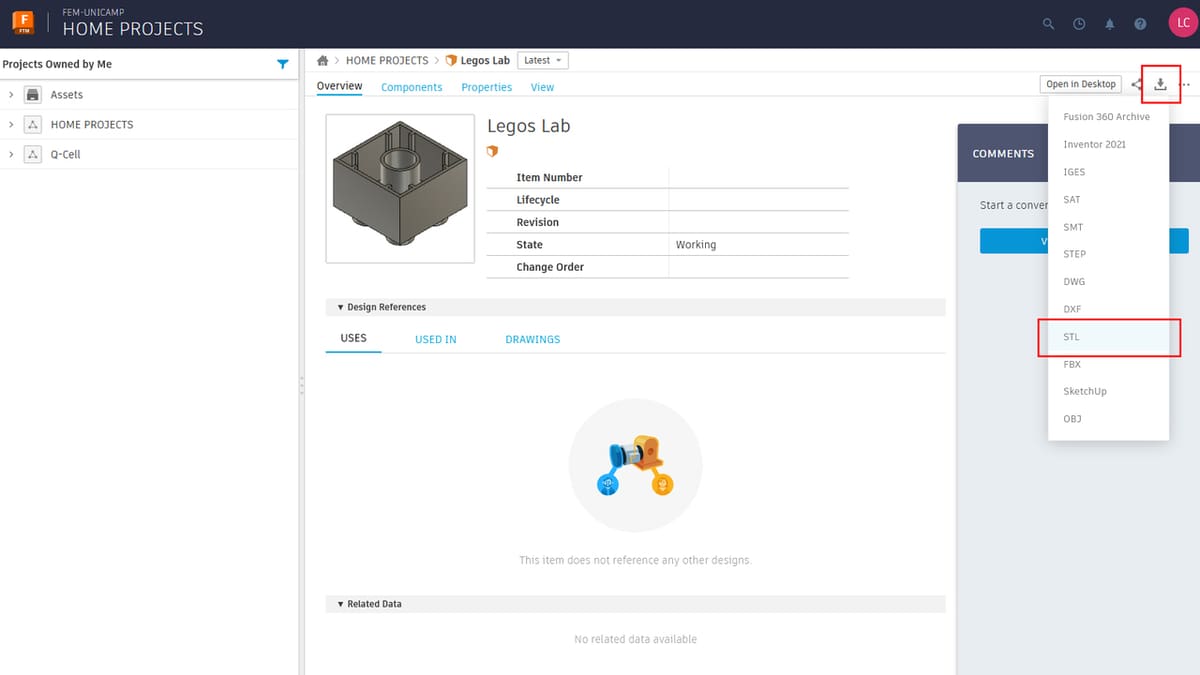
You’ll be brought to your Fusion 360 hub, where you can navigate through all your existing projects and designs. Browse through the file system on the left to find the exact design you wish to export to an STL.
Once you’ve found your 3D design, click on it to access its individual page. To export the file to STL (or other formats), click on the small download icon located at the top right. Then, select the file type you wish to export the design as from the drop-down menu
Select “STL” and your exported file will be created and a link emailed to the email address linked to this account. The download link will be active for a period of seven days, during which your STL file can be downloaded from anywhere.
License: The text of "Fusion 360: Export as STL – 3 Easy Ways to Do It" by All3DP is licensed under a Creative Commons Attribution 4.0 International License.