Cura Adaptive Layers – Simply Explained

Cura's adaptive layers feature uses varying layer heights to achieve increased detail while reducing print time. Read on to learn more!
One of the most important slicer settings for a 3D printer is the layer height, which defines the distance of each layer that makes up a model. A taller layer height means thicker layers that yield stronger prints in less time. Conversely, a smaller layer height provides more room for detail to be printed on a model (e.g. small features), but models are weaker and take longer due to the increased number of layers used.
The adaptive layers setting in UltiMaker Cura, one of the most popular slicers program for fused deposition modeling (FDM) 3D printers, allows for layer heights to vary throughout a print. In this article, we’ll go over how adaptive layers work and discuss the benefits and any disadvantages of the feature. We’ll also review the different settings associated with the adaptive layers feature in Cura and how you might adjust them.
Why They're Beneficial
One problem that can arise when using a consistent layer height is that the top can be cut short if the value of the height of a model is not divisible by the defined layer height. As such, a 1.1-mm tall model would be printed with five 0.2-mm layers because most 3D slicer programs will round off (usually rounded down).
Adaptive layers are useful for 3D printing because it’s not always beneficial to use the same layer height throughout an entire print. The feature was first released in Cura in 2017 and has since been improved so that you can now control more aspects of how it works. There are also similar features in other slicer programs, such as the variable layer height settings in PrusaSlicer and Bambu Studio.
The most apparent benefit of adaptive layers is that they can ensure that prints are more accurate and precise because the slicer won’t have to round up or down on the number of layers used for the print. Non-planar printing can also be used to prevent the height from being shortened. This process uses layers that span 3D space (not just the X- and Y-axes) and can also improve part accuracy, but it’s more complicated to set up and can’t always be used.
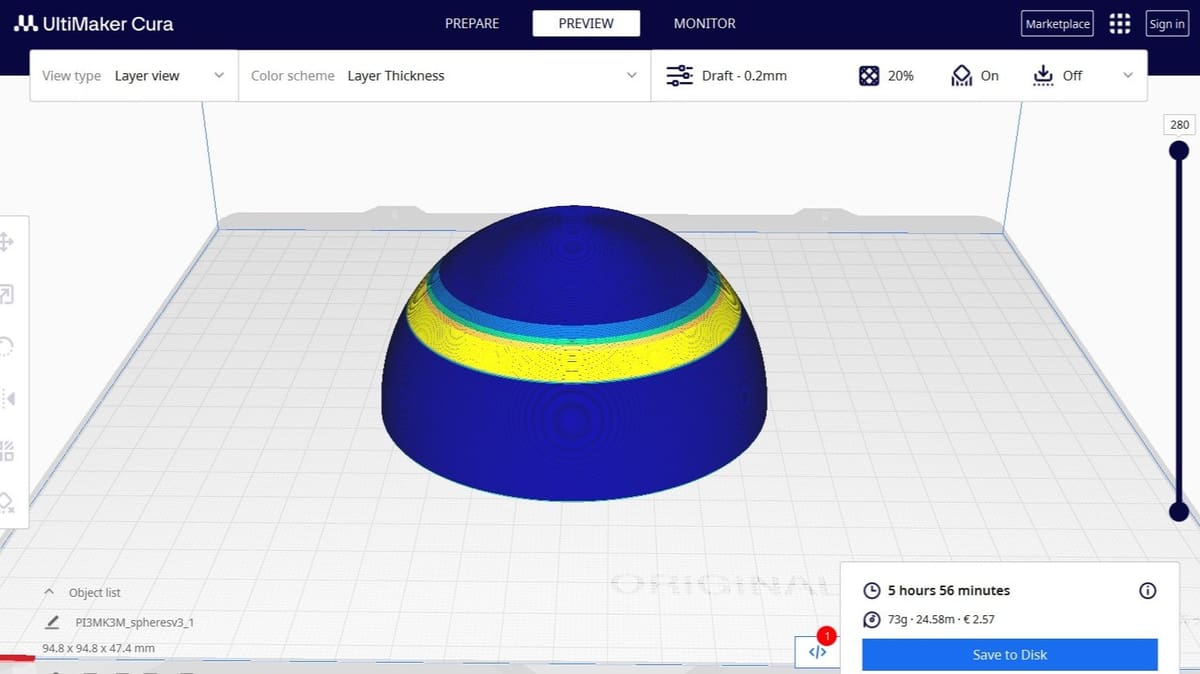
Additionally, the adaptive layers feature will use a smaller or larger layer height when it’s most beneficial in a model, so you don’t have to choose whether you want a strong or a detailed print. For example, let’s say you’re printing a lamp post. The adaptive layers setting will tell your slicer to use a large layer height for the featureless shaft of the model and a smaller layer height for the more detailed lampshade area of the part to capture all of the detail.
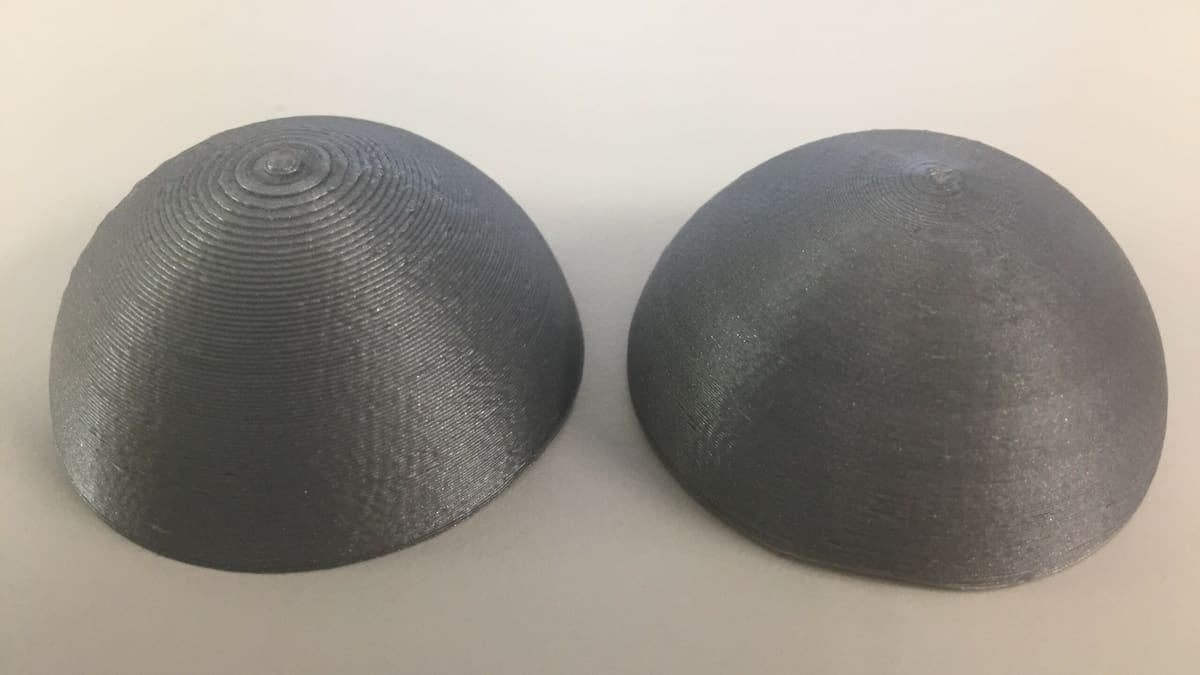
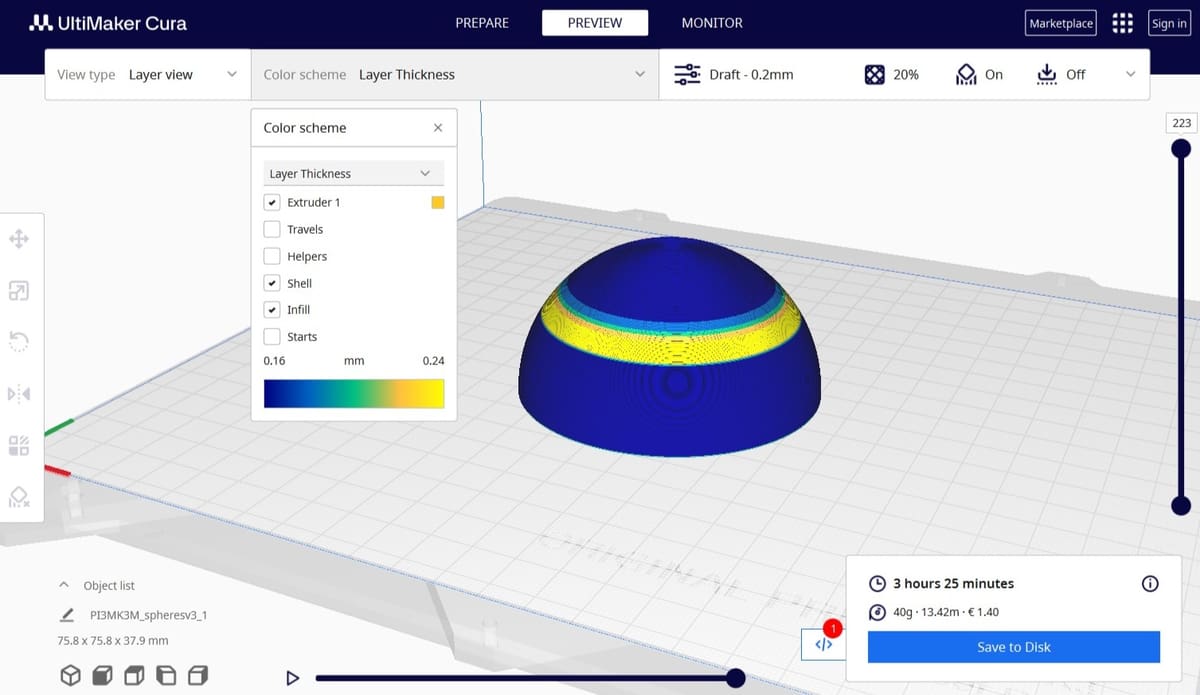
Another important advantage of adaptive layers is smoother curved features along the Z-axis of models due to a smaller layer height being used for these Z-axis details. It’s worth mentioning, though, that the quality and precision of XY-plane curves won’t be impacted by adaptive layers because layer height only affects Z-axis features.
How Does It Work?
The adaptive layers feature allows the printer to change the layer height of a model to minimize print time (i.e. by using thicker layers where possible) while maximizing print quality (i.e. by using thinner layers where needed). The feature tells the slicer to assign different layer heights based on a model’s shape and structure. The result is that a smaller layer height is used in more detailed areas of a model with small and precise features, while a larger layer height is used for the more basic areas.
According to UltiMaker, once activated, the slicer engine analyzes the imported model, measuring the slope and angle of the exterior surface. The adaptive layers feature formulaically uses the information to determine which layer height would work best to reduce print time without sacrificing the detail included in a design.
Layers of a model that make up Z-axis curves (3D curves that span the Z-axis) or other small Z-axis details are assigned a smaller layer height to ensure that the curvatures come out smoother. Essentially, this is like using more polygons when rendering a 3D sphere, as the use of a smaller layer height doesn’t change the model but makes the actual print look more like it.
On the other hand, layers that make up vertical, flat sections of a print are assigned a taller layer height. That’s because these areas of a print don’t require much detail, and using a smaller layer height wouldn’t alter the appearance of a printed model much. You can think about this as using a low polygon count to render a 3D cube; in the end, only six polygonal squares are required (or 12 triangles). If you use more polygons, the model’s appearance won’t change.
The end result of activating this feature on a typical 3D object is that a sliced model will be able to have gradually increasing or decreasing layer heights. The layer height you set in Cura is always treated as the baseline layer height, with the adjusted layer height only varying from it slightly, which we’ll talk more about in the last section.
Advantages & Disadvantages
Now that you know how Cura’s adaptive layers feature works, let’s get into how it helps!
The advantages and disadvantages of adaptive layers depend on whether you’re planning on using a small or large layer height for a print.
If you’re planning on using a small layer height, activating adaptive layers will lead to a slight decrease in the precision and detail of your print, but you’ll have a faster print with reduced material consumption. On the other hand, if you use adaptive layers on a model that you’re going to use a large layer height for, you’ll see an improvement in model precision detail, with a small increase in print time and material consumption.
Another big advantage of Cura’s adaptive layers feature is the reduced need for post-processing, like sanding, compared to if you had used only a larger layer height. That’s because smaller layer heights are used for the model’s Z-axis curves and details, so you won’t have to sand as much to achieve a smooth surface. However, this also means you’ll have to sand more compared to if you had only used a smaller layer height from the get-go.
Advantages
- Improved Z-axis curves and detail compared to using only a large layer height
- Models will be more accurate in Z-axis height
- Reduced need for post-processing compared to using only a large layer height
- Faster prints compared to using only a small layer height
- Less material consumption compared to using only a small layer height
Disadvantages
- Lower-quality Z-axis curves and detail compared to using only a small layer height
- Slower slicing time (requires more computing power, though, still not much)
- More post-processing is required compared to using only a small layer height
- Slower prints compared to using only a large layer height
- Higher material consumption compared to using only a large layer height
Overall, the adaptive layers feature in Cura is a great way to seize the benefits of both small and large layer heights when most advantageous. As the feature is useful in basically any scenario, it’s a good idea to leave the feature activated in your slicer profile and only disable it when you want consistent layer heights.
Settings
Now that you know about adaptive layers in Cura, how it works, and how it helps, we’ll go over how you can use and tune the adaptive layers feature in your slicer profile to take advantage of its benefits. The first step in this process is activating the feature:
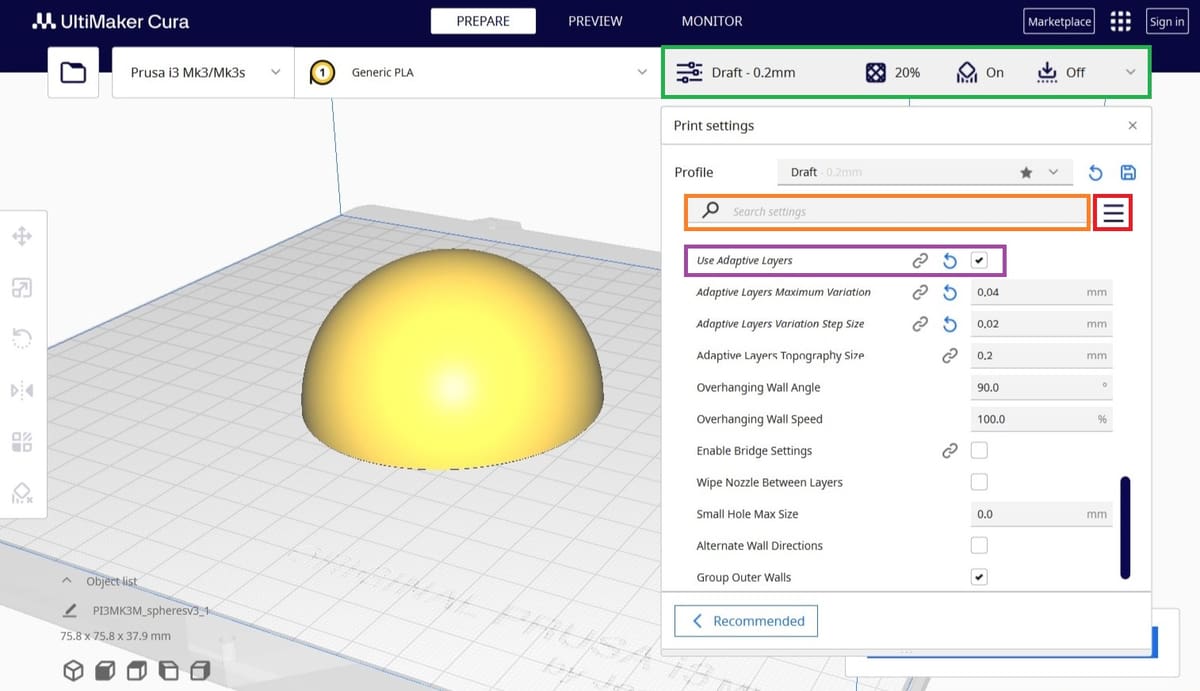
- In Cura, click the print settings box (green).
- Click the three dashed bars icon (red) and, from the drop-down menu that will appear, select “All” so you can view all settings in Cura.
- Scroll down to the “Experimental” settings section and locate the “Use Adaptive Layers” feature (purple) or find it through Cura’s search bar (orange). Activate the feature (if it’s not already).
Once activated, you should see a few related settings appear below. These settings adjust the parameters of the adaptive layers formula to allow you to control the effect of the feature on how your model is sliced.
- Maximum Variation: This defines how far from the base layer height a layer height can be set. For example, if you set a base layer height of 0.2-mm in Cura and use a 0.04-mm maximum variation, the smallest layer height used will be 0.16 mm, and the largest will be 0.24 mm. We suggest keeping this value at 0.04 mm, the Cura default setting, and only making small adjustments if you want a mix of more detailed or even faster layers on prints.
- Variation Step Size: This is the difference in layer height from one layer to the next. For example, let’s say this value is 0.02 mm and the slicer wants to increase the layer height from 0.2 mm to 0.3 mm. The slicer would increase the layer height by 0.02 mm for each layer until a layer height of 0.3 mm is reached. The Cura default of 0.04 mm should work great, but if you decide you want to adjust the setting, do so in small increments to ensure prints don’t fail.
- Topography Size: This controls the offset horizontal distance from one layer to the next. A larger topography size means sequential layers are further away across the X- and Y-axes from each other. With more horizontal distance separating the vertically-sequential layers, a larger layer height can be used, resulting in thicker layers, less detail on models, and stronger prints. The reverse is also true. You can leave this setting at the default value of 0.2 mm or increase it for thicker layers if you’re looking for stronger parts.
License: The text of "Cura Adaptive Layers – Simply Explained" by All3DP is licensed under a Creative Commons Attribution 4.0 International License.