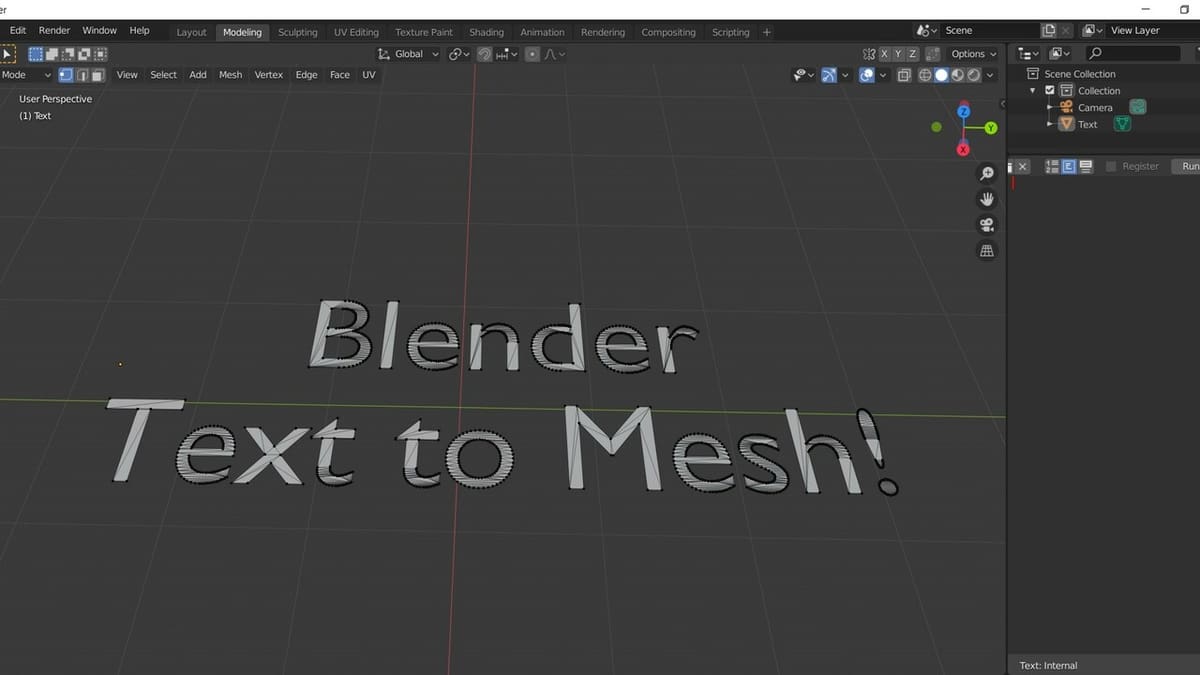
Blender: Text to Mesh – Simply Explained

In Blender, text-to-mesh conversions can be done in just a few clicks, but the results may be far from perfect. Learn how to do it right!
Blender has a lot of helpful tools, one of which is “Convert to Mesh”. This wonderful feature allows objects that don’t have true vertices, edges, or faces to be made into a properly editable mesh.
Text is one such item, and there are a couple of methods to turn text into a mesh with Blender, including making the text from scratch by editing objects or directly converting text into a mesh. Each method has its pros and cons. Modeling text from scratch can be incredibly time intensive, but it allows you to develop the mesh however you want. Since this method requires considerable effort, we’ll show you a few methods to “Convert to Mesh” for flat and extruded text.
Text Objects 101
When working on projects, at some point you may need to create text. Whether you’re making a sign for a store or creating a logo on a character, you’ll need to learn how to create letters. This is primarily achieved by incorporating a text object into the scene.
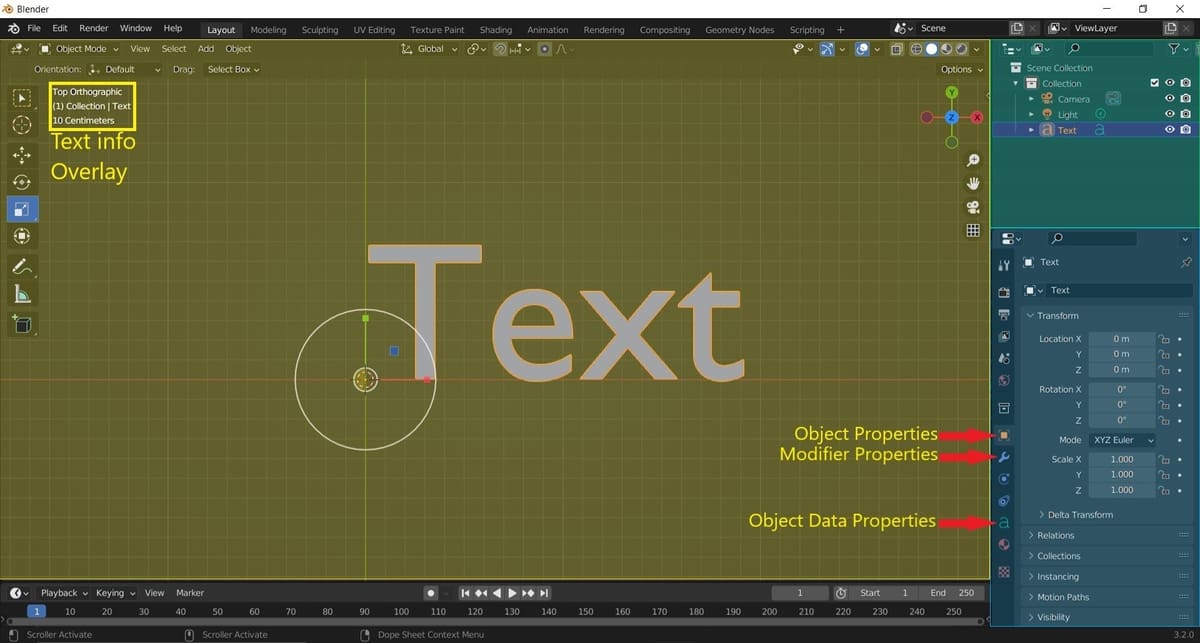
As text fonts are simply straight lines and vectorial data (curves), text objects are in the same object type family as curves and surfaces with non-manifold edges. When you first add a text object to a scene, there’s a corresponding item added to the Text Info Overlay in the top left of the 3D Viewport. A text-related data block is also added to the Outliner editor in the top right corner.
In addition, an Object Data Properties tab related to text objects (the tab with the large ‘a’ symbol) is added to the Properties editor, giving you numerous options to modify the text. For example, you’re able to alter text properties like the font, orientation, and geometry – all of which must be done before the text is converted to a mesh. The Object and Modifier Properties tabs will also come in handy. The former allows us to transform the object, while the latter allows us to add modifiers.
Some other tools we’ll focus on are going to be in the header above the Viewport workspace. On the top left of the 3D Viewport’s header, you can switch between modes by selecting from the mode dropdown menu.
- Object Mode is the default and provides the View, Select, Add, and Object dropdown menus on the header. For this tutorial, we’ll only use the Add and Object menus.
- Edit Mode will come in handy when the text is turned into a mesh. Several menus appear on the header, including View, Select, Add, Mesh, Vertex, Edge, Face, and UV. We’ll focus only on Mesh and Face, though.
With the preliminaries out of the way, let’s create some text!
Creating a Text Object
Before we do anything, be sure to check that you’re in Object Mode. This allows you to insert and transform objects such as cubes, cones, and text. If you happen to be in a different mode, simply click the mode on the left side of the 3D Viewport header, then select “Object Mode” from the dropdown menu.
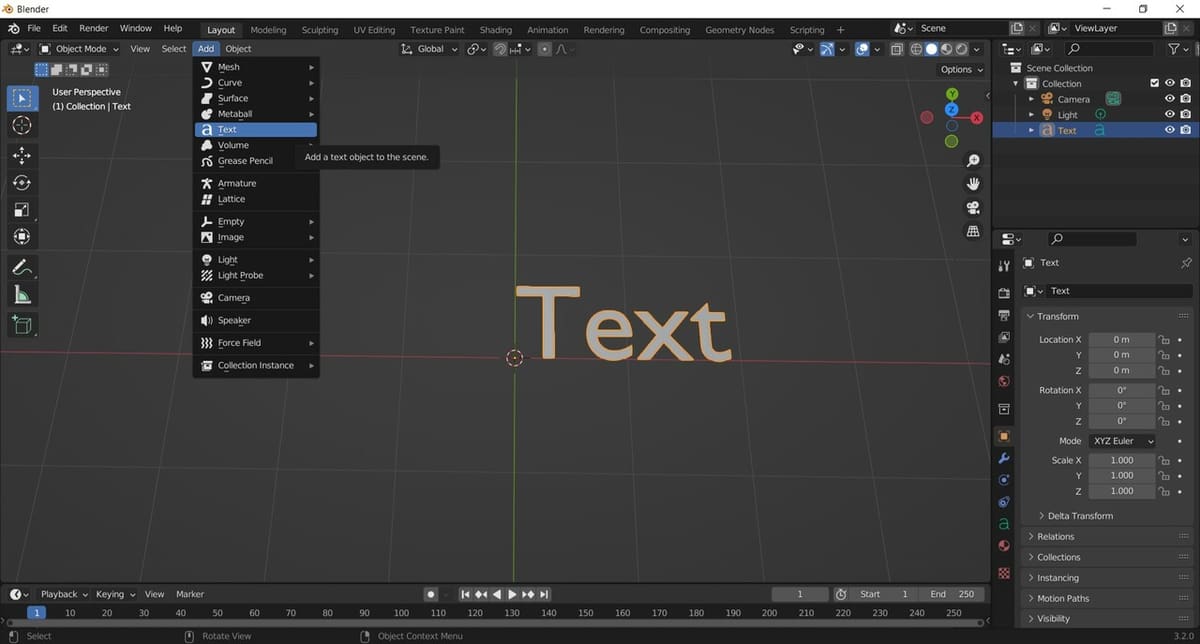
On the 3D Viewport’s header just a few selections to the right of where you chose the mode, click “Add”, then select “Text” from the dropdown menu. Alternatively, you can also hit “Shift + A”, then select “Text” from the dropdown menu that appears.
The word “Text” will be added to the scene as an object. Select the new object, then swap to Edit Mode. This mode allows you to modify the text however you’d like to simply by deleting the letters and typing in what you want instead. Before you type, you can also select a style – Bold, Italic, Underline, or Small Caps, for example – from the Font dropdown menu in the Object Data Properties tab. Once you’ve typed in the words you want, switch back to Object Mode to continue modifications.
Editing Text
Back in Object Mode, you can now fully edit your text. You can alter the size, font, resolution, geometry, styling, and much more. It’s recommended to modify the text before converting it to mesh, as this can save a lot of work down the road and prevent getting crazy vertex patterns.
Changing the font can be done in the Font panel of the Object Data Properties tab. From here, you can click the folder icon next to “Regular”, then select your preferred font.
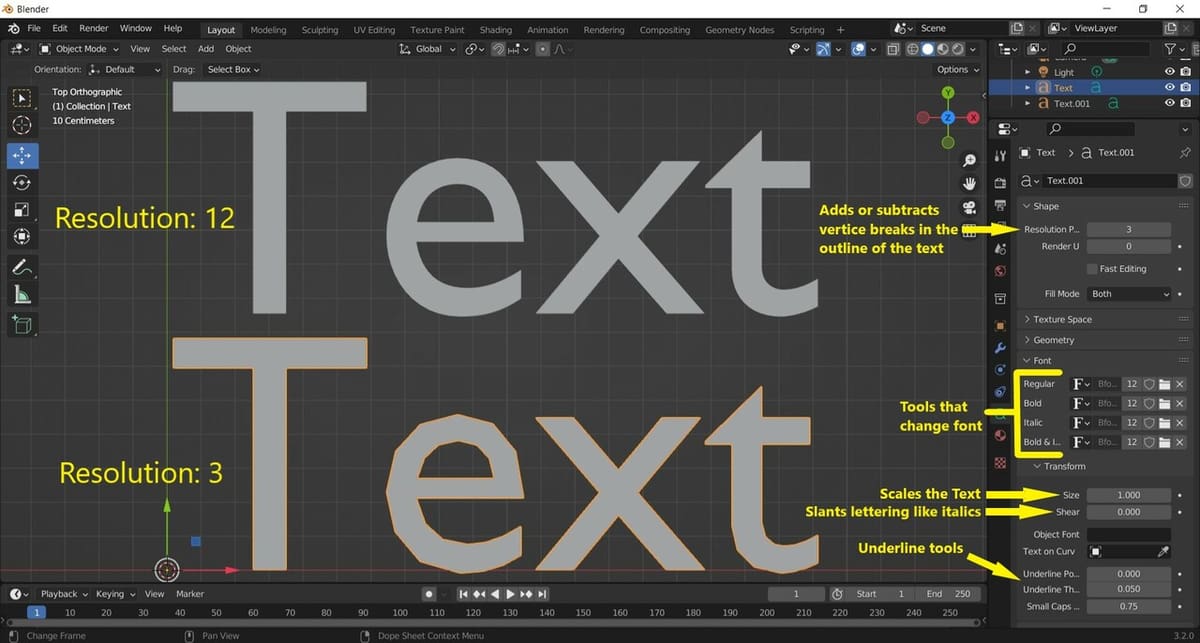
Another important pre-mesh modification is changing the resolution of the letters – in other words, reducing or increasing the number of vertices in the text object. This can be done in the Shape panel on the Object Data Properties tab. Change the “Resolution Preview U” setting to a greater number for more vertices or a lesser number for fewer vertices. For this tutorial, we’ll choose a lower value in order to get fewer faces in our mesh.
Extruded Text
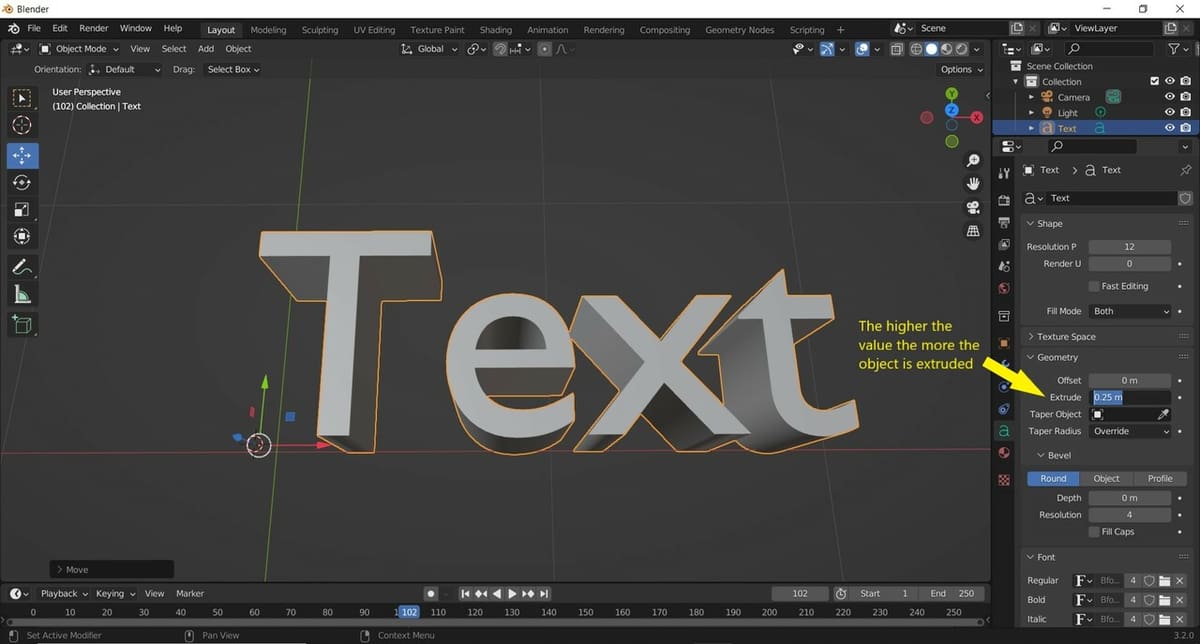
Another possible modification is extruding the text. This can be done before or after you’ve decided on the size, font, resolution, and other lettering attributes. To accomplish this, go to the Geometry panel in Object Data Properties. You’ll see a few different settings, and Extrude is the second one.
This setting can be adjusted by either clicking and dragging the value or inputting a specific value. Any value larger than zero will create an extruded text that will look like a 3D model, but don’t be fooled! It’s not an actual mesh model.
In the next section, we’ll learn how to turn your text into an editable mesh!
Converting to Mesh
To turn your text into an editable mesh, follow these steps:
- Make sure you’re still in Object Mode, then select the text object.
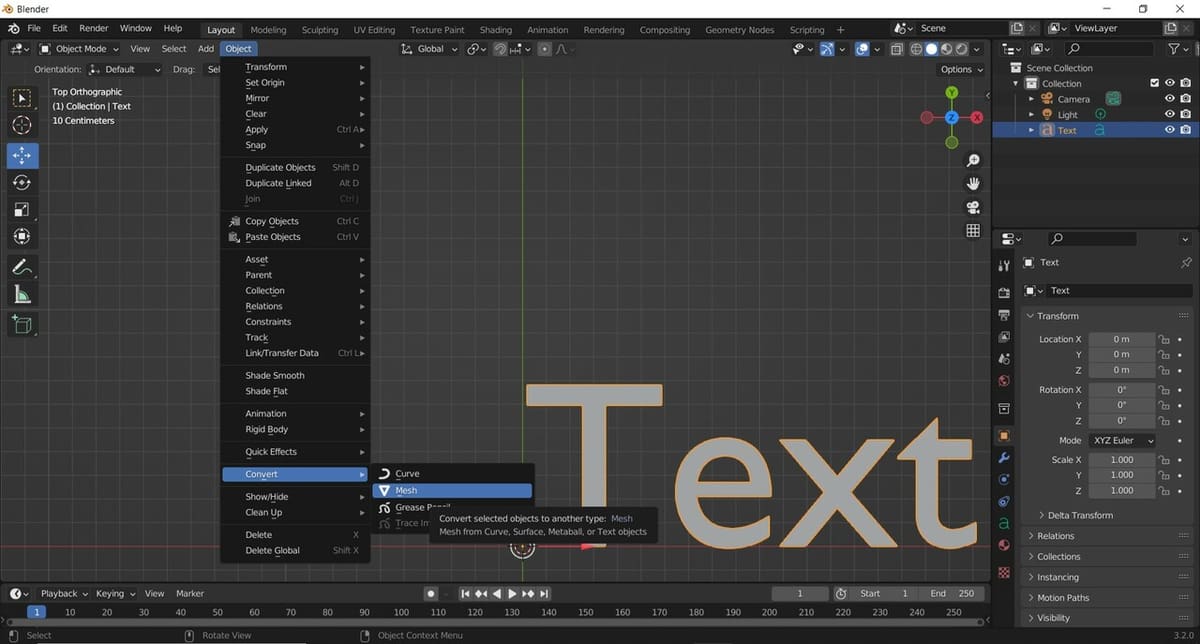
- Right-click on the object, and select “Convert to Mesh” from the context menu.
- Select “Mesh” from the expanded menu. A new “Convert To” tool window will appear in the bottom left-hand corner of the 3D Viewport.
- In the dropdown menu, choose the “Mesh” option.
- Finally, click anywhere in the 3D Viewport to close the tool window and complete the conversion.
We’ve now converted our text object into a mesh object with faces, edges, and vertices. There’s also an option of selecting “Keep Original” if you feel you might make mistakes. Doing so will keep the text object but will also create a mesh object in the exact same place. Be sure to move one away before you start editing.
You can check how your object looks by swapping over to Edit Mode. It’ll reveal what the mesh looks like. Overall, the process is pretty simple and straightforward, but there could be a few issues with our mesh that we’ll want to clean up. In the next section, we’ll discuss some strategies to do just that.
Creating a Shortcut
It’s also possible to make a hotkey shortcut for converting objects to mesh. If you hover over the “Convert to Mesh” and right-click “Mesh”, you’ll get an “Assign Shortcut” option. Many choose “Alt + C” as a hotkey.
Editing Mesh
The editing process depends on whether your text is flat or was extruded into three dimensions. There are a few considerations that’ll make flat text meshes easier to work with, especially if you’re planning to use them for animation.
Below, we’ll show you a couple of options to edit flat meshes as well as an easy way to edit meshes derived from extruded text. Let’s dive into the options.
Flat: Option 1
When working with flat text, you can imagine the text mesh acting like cut-out paper or letters made from ribbons. If the text mesh isn’t intended to move and is only being viewed from one angle, the way it acts doesn’t matter as much. For modeling and animation, however, the behavior of text meshes is very important.
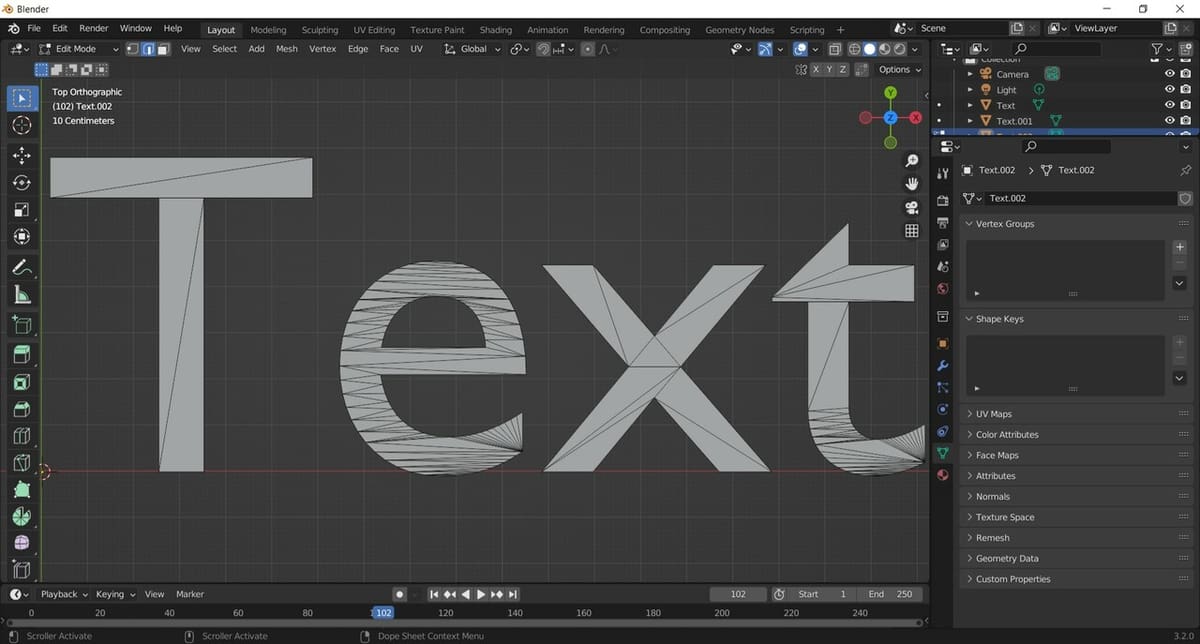
Converting flat text to mesh often yields creases in each of the letters as pictured above, making several awkward faces that make editing or using this mesh difficult. Flat text mesh is oftentimes used for UV mapping or as a texture on surfaces, such as text logos on clothes. If there are lots of creases, the text won’t conform to other models.
So, let’s clean up this mesh. There are a couple of ways of doing this. One way includes modifying the number and orientation of the faces using the vertices we already have. This is a great option for those who are just getting started with modeling and sculpting. Here’s how to do it:
- Make sure you’re in Edit Mode and select all of your mesh. This mode allows you to edit individual components rather than the whole object, which is exactly what we’re looking to do.
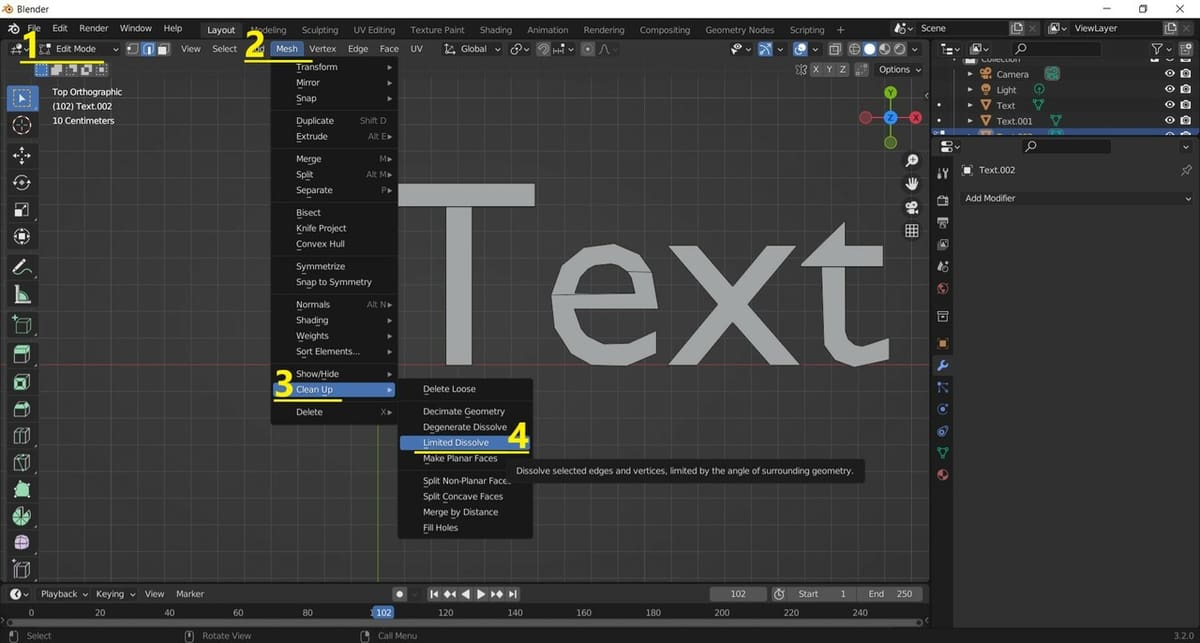
- With all the components of your mesh selected, click “Mesh” on the 3D Viewport header.
- Hover over “Clean Up” near the bottom of the dropdown menu. Another context menu with several more options will appear.
- Select “Limited Dissolve”.
This function will lower the definition of your text as well as clean up almost all of the edges running through the text as pictured above. You’ll see that nearly all the edges inside the letters have been deleted. Some letters have one or two edges left, sometimes in strange positions, but we’ll fix this and add more vertices in a cleaner way in the following steps.
- Make sure you’re still in Edit Mode, and select all the components.
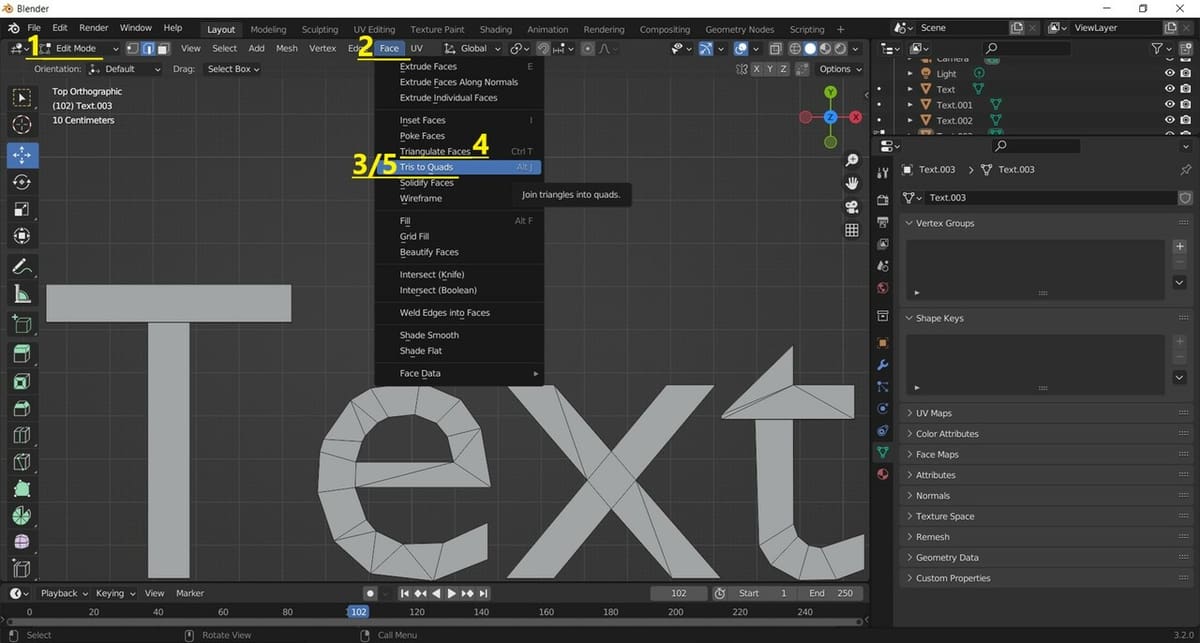
- Click on “Face” on the 3D Viewport header.
- Select the “Tris to Quads” option. It won’t do much, but the remaining edges should be rearranged into quadrilaterals.
- With the model selected, click on “Face” again, then select “Triangulate Faces”. This will add more edges but in a more organized way.
- For boxy letters, you’ll want to go a step further and select “Tris to Quads” again. This isn’t always needed for letters with lots of curves.
You should now have a text mesh that’s much cleaner than the one you started with.
As you saw, this method allows you to change little aspects of the text and can even be used to create your own font if you’d like. The primary drawback, though, is that it still doesn’t allow for text meshes that conform to the shape of other objects. If you’re interested in creating more fluid text meshes for motion, check out the next option.
Flat: Option 2
To make the flat text mesh act more like fabric rather than paper, a highly detailed mesh will be required. We need to edit the faces of the mesh in order to achieve this effect.
Right after you’ve converted the text object to a mesh, you’ll want to continue as follows:
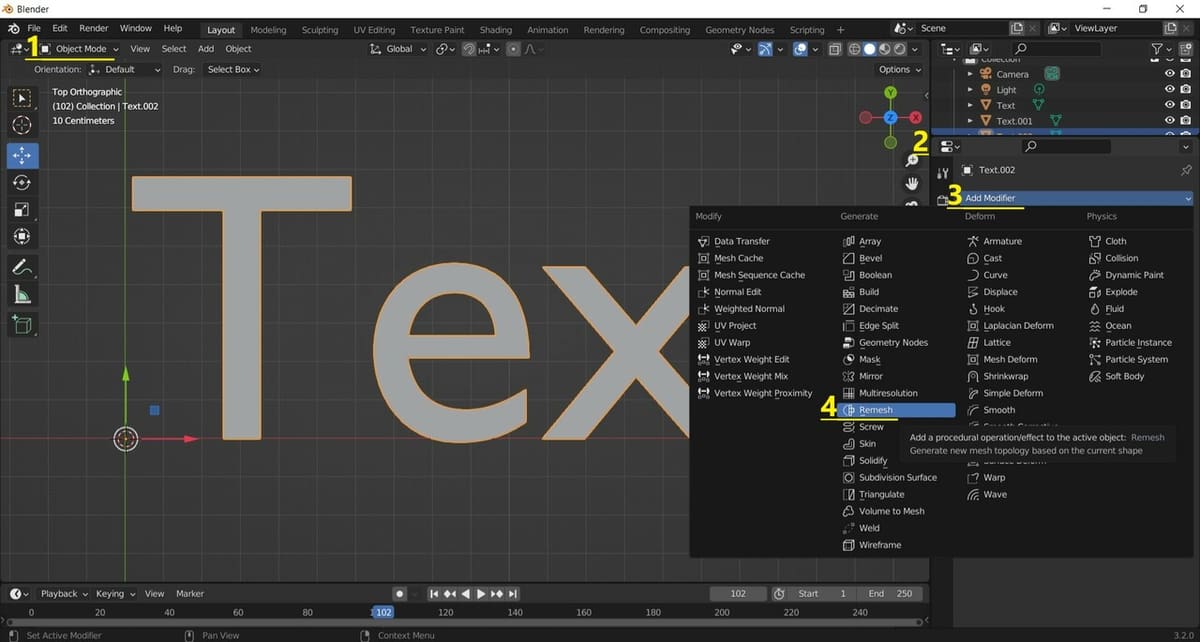
- Make sure you’re still in Object Mode.
- Select your object in the Outliner editor.
- Click on the Modifier Properties tab on the Properties editor, then click the “Add Modifier” dropdown menu.
- Select “Remesh” from the Generate column.
The Remesh modifier panel will appear in the Modifier Properties tab, and much of the flat text mesh will appear to be deleted. Not to worry, though, that’s just the preview of the Remesh settings.
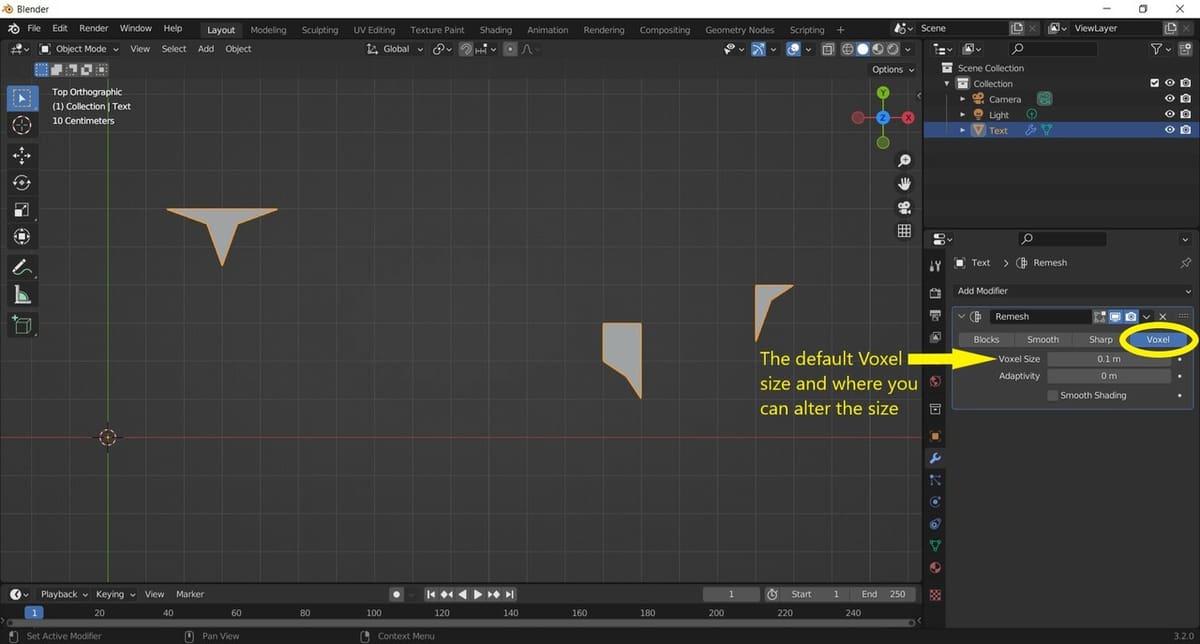
We’re going to adjust the settings to edit the mesh a bit. You’ll notice the panel has four tabs: Blocks, Smooth, Sharp, and Voxel. The latter is selected as default because our mesh is a zero thickness object, technically only a voxel thick. Choosing any of the other objects won’t work with our model, so we’ll stick with Voxel.
Voxel Size
To fix our model and make it reappear, we’ll alter the “Voxel Size” value from .1 m to something smaller. Be careful not to adjust the value too low, though, because it can crash your computer.
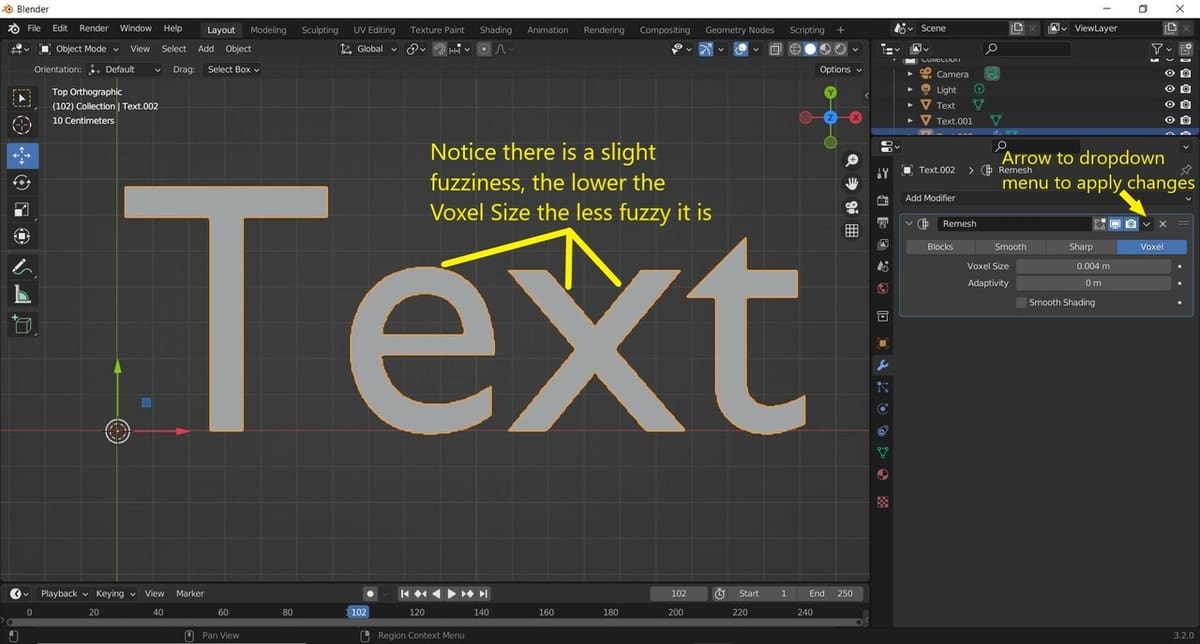
Notice that when you move the value lower, the shape becomes more accurate. This is because you’re creating smaller and more numerous faces that are able to more accurately represent your original text object’s shape.
Our model becomes pretty accurate at a Voxel Size of about .004 m. Once you’re satisfied with the modification, click the downward-facing arrow next to the ‘X’ on the Remesh modifier panel, then select “Apply” from the dropdown menu.
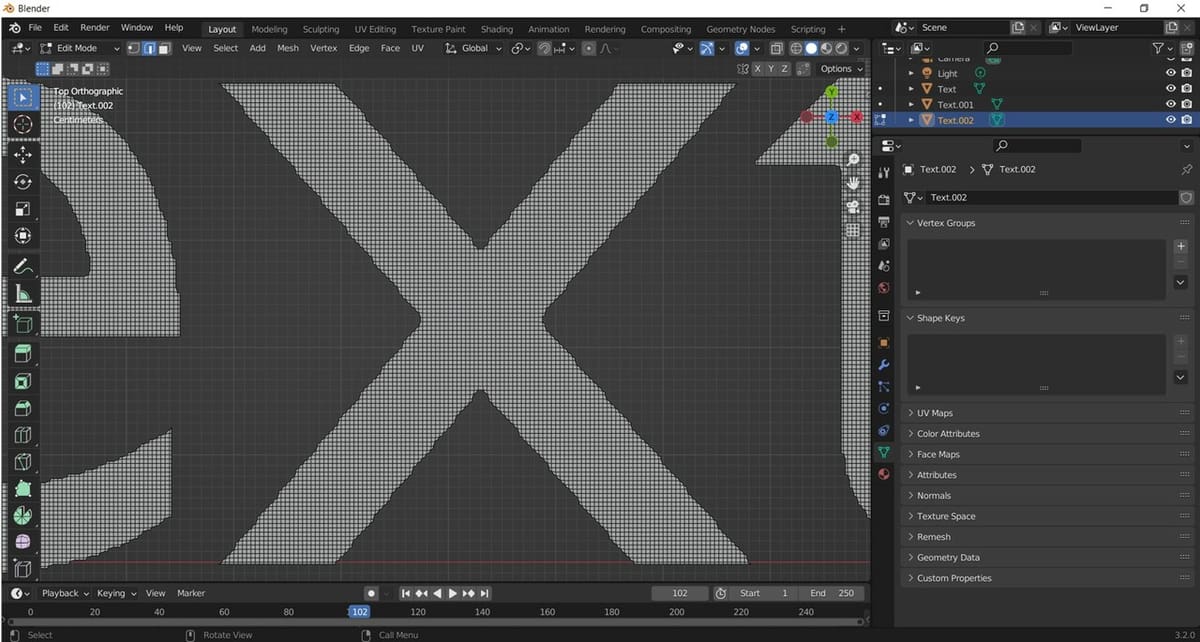
Swapping to the Edit Mode allows you to see how the Remesh modifier impacted your model. If you zoom in on your model, you’ll see that it looks almost pixelated instead of being triangulated. Because of all these little voxel faces, your model can now conform to the shape of any object or be animated with incredible precision.
Extruded
Modifying the mesh derived from extruded text is actually very similar to the previous method. We’ll also use a Remesh modifier:
- Start by making sure that you’re in Object Mode, then select the text mesh you want to modify.
- Click the Modifier Properties tab on the Properties editor.
- Select “Add Modifier”, then “Remesh” from the Generate column.
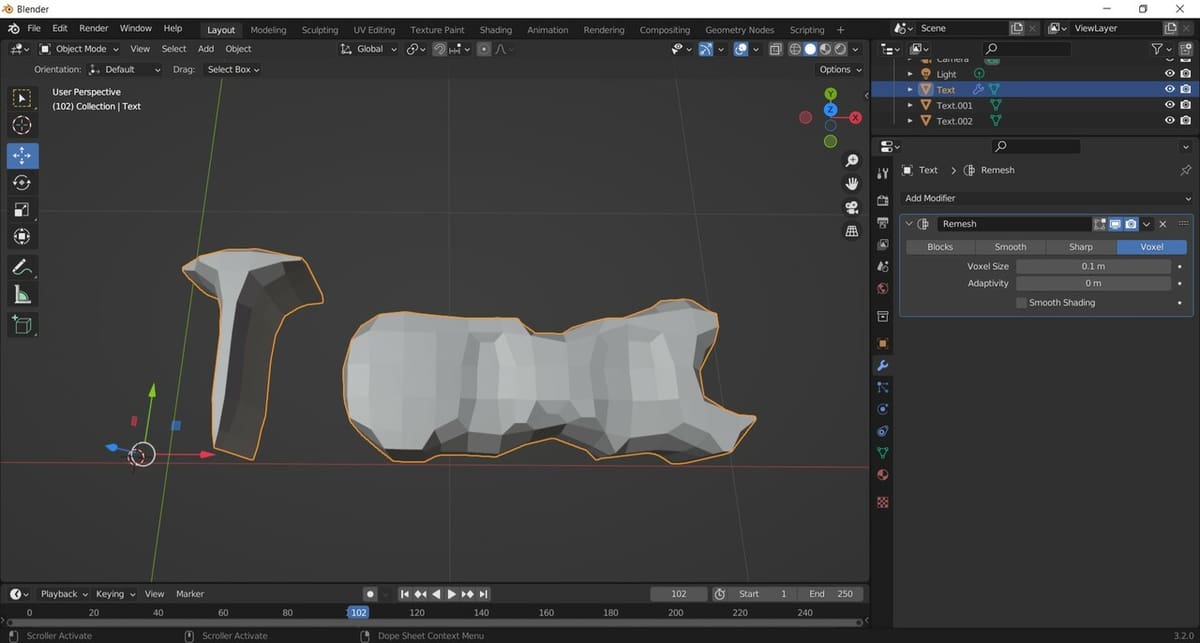
By default, the Voxel tab in the Remesh modifier panel will be selected, and your model will probably look all smashed together. Again, don’t worry. The model will get fixed and look like letters again once we adjust the settings.
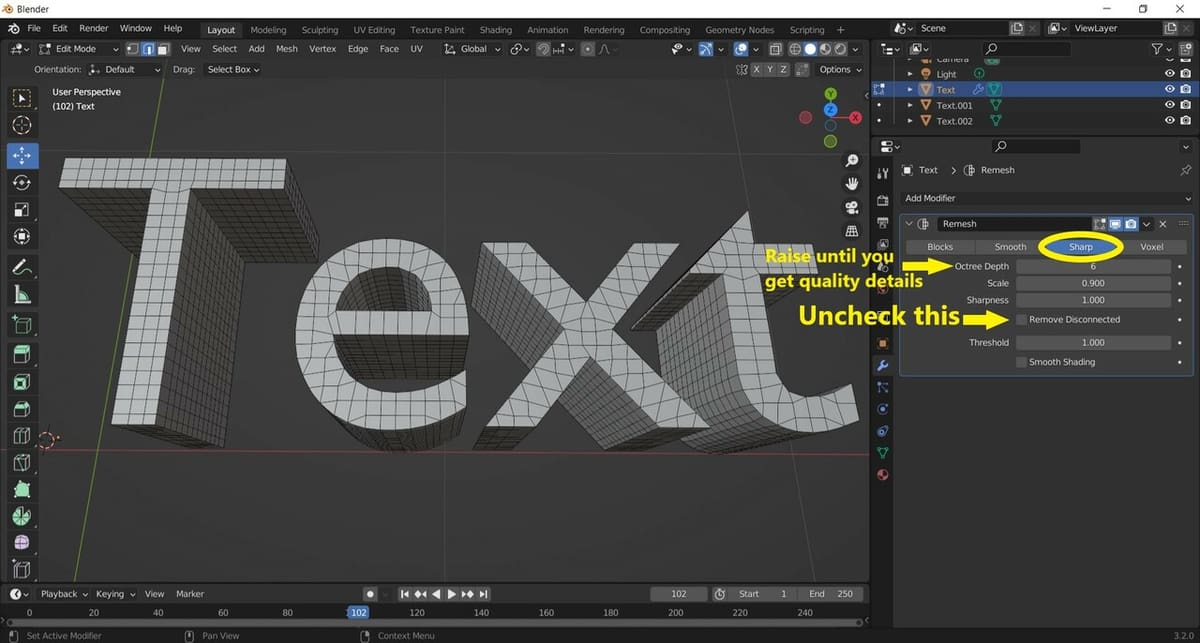
Here is where the editing differs from the flat mesh objects. At this point, you can also swap over to Edit Mode to see changes in real-time. Also, instead of keeping the Voxel tab selected, we’re going to swap over to the Sharp tab.
When Sharp is selected, much of your model will disappear again, which is usually the case with any curved objects. To get it back, all you need to do is uncheck “Remove Disconnected”, and you’ll get back your parts, somewhat; they may still not be recognizable letters.
So, to fix this, we need to change the “Octree Depth”. The default Octree Depth is usually around 4, but our model started looking accurate by moving it up to about 6, which is pictured above. Let’s move the “Octree Depth” a bit further to 8 so you can see just how much a difference there is (see below).

Similar to editing the Voxel Size of flat text mesh, if you adjust this dial too much, it could freeze or crash your computer. This is because the higher the value, the more faces, edges, and vertices are created. So, use caution when adjusting it.
This method is great if you want to make text that will be animated or if you want to skip the hassle of sculpting a high-definition mesh into legible letters. As you can see, converting text to mesh is super quick, and you have a lot of options to style the text as you wish.
So, the next time you’re using Blender, give adding text to the scene a try!
License: The text of "Blender: Text to Mesh – Simply Explained" by All3DP is licensed under a Creative Commons Attribution 4.0 International License.