
Blender Subdivision Surface Modifier – Simply Explained

Subdivision allows you to smooth complex objects with simple inputs. Read on to learn more about Blender's Subdivision Surface modifier!
An Upgrade to an Upgrade
The latest iteration of Blender, version 2.9 was released earlier this year, and it’s better than ever! This version has an improved user interface, modeling and sculpting tools, animation and virtual reality workspaces, and much more.
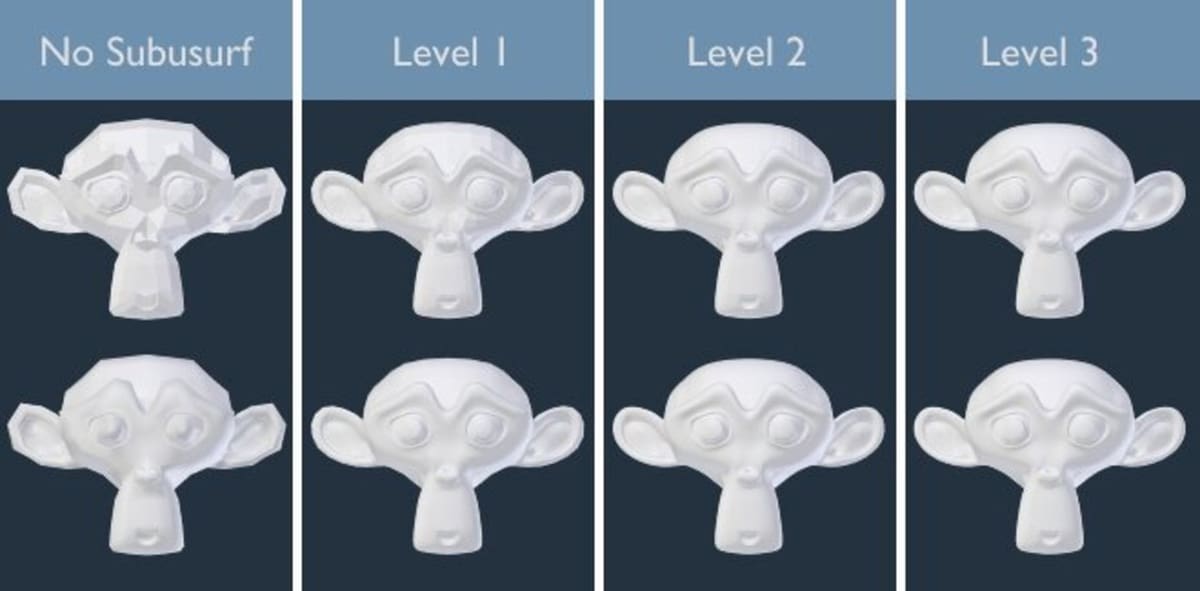
Of particular interest to some is the Subdivision Surface modifier, which splits the faces of an object into smaller faces and smooths them. This modifier helps users model an object with simpler, low-poly meshes, and then makes that object more realistic looking.
In this article, we’ll explain how the modifier is used, along with its features, options, and more. Let’s start this smooth-sailing journey!
Getting Started
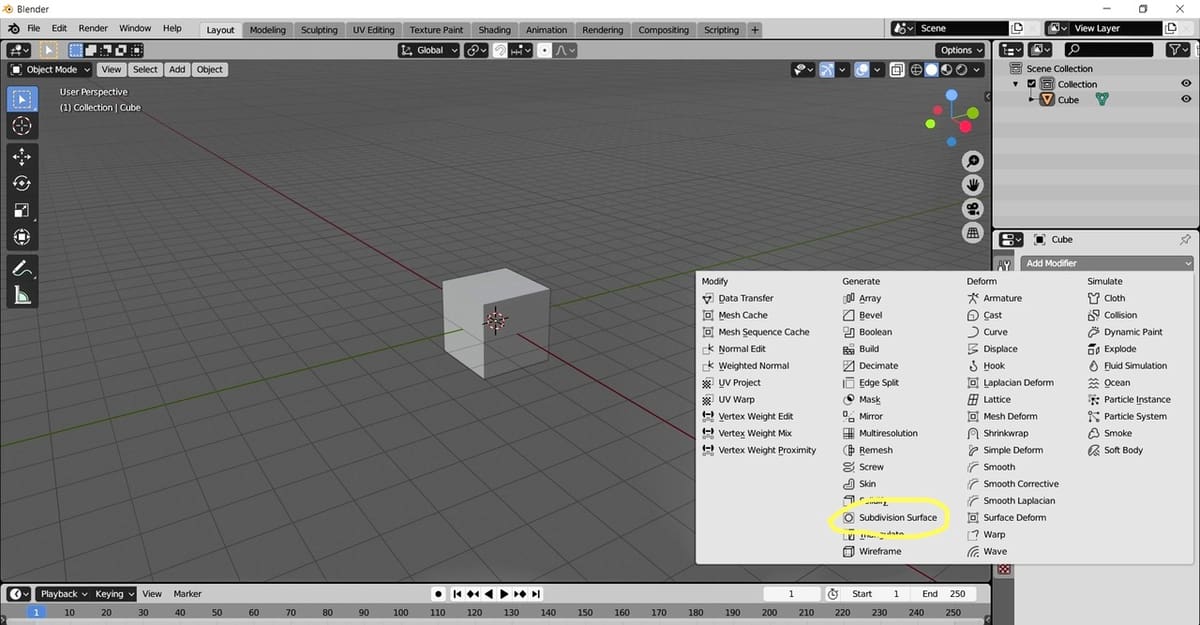
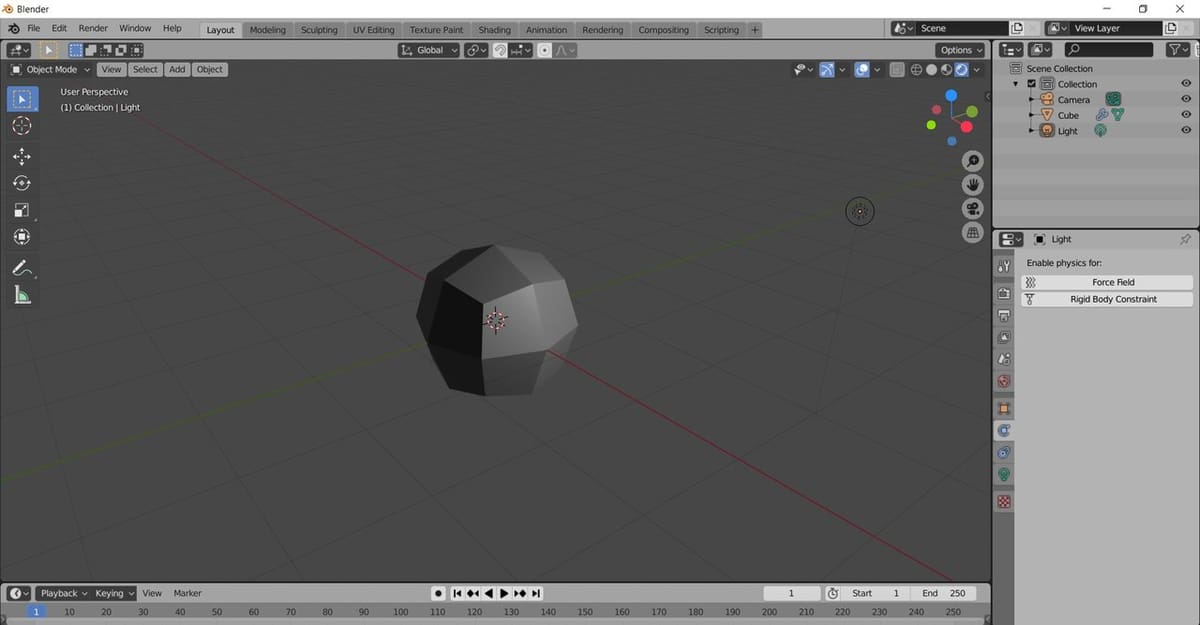
Before using the Subdivision Surface modifier, you need an object to apply it to. In this article, we’ll be using a default cube to demonstrate the usage of this modifier.
Once you have a shape, in this case a cube, to find the Subdivision Surface modifier, navigate to the sidebar that’s located on the right side of the screen. Under the “Modifier Properties” menu (the wrench icon), you’ll find it. Note that the Subdivision Surface modifier is different from and often confused with Smooth Shading.
Top Panel
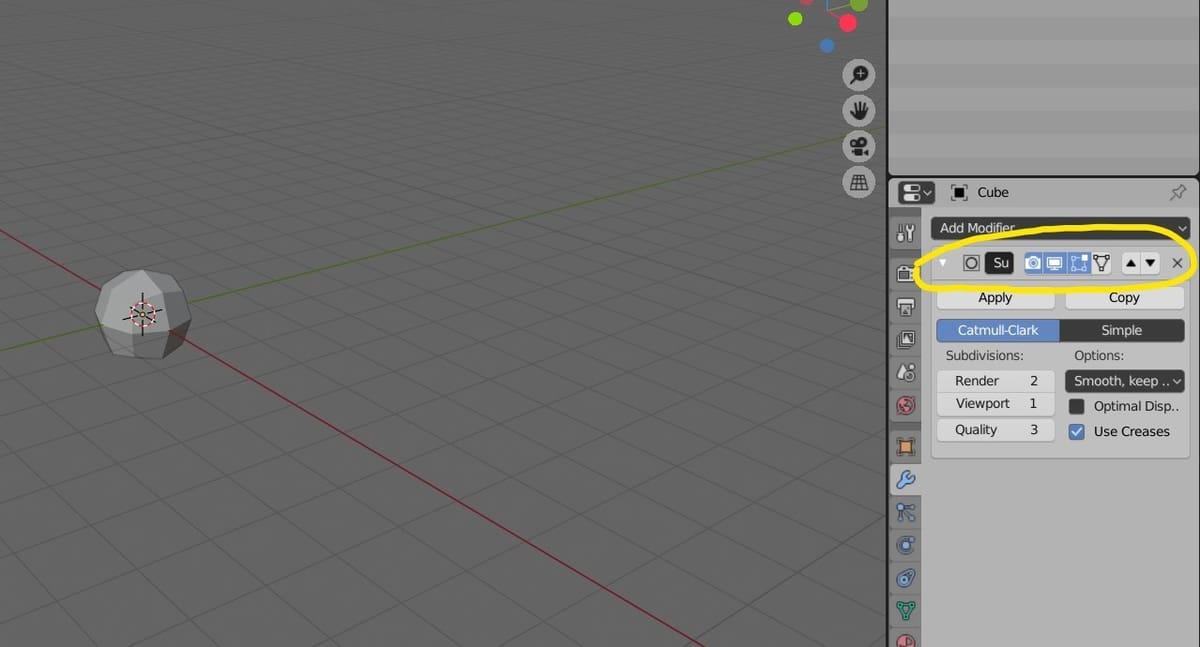
After the modifier is selected, a top panel is displayed that shows the name of the modifier, along with the following options (from left to right):
- Render shows the applied modifier during rendering.
- Realtime displays the modifier in the 3D viewport.
- Edit Mode displays the modifier in edit mode. The modeling mode can be changed to edit mode by selecting “Edit Mode” in the dropdown list at the top left corner of the screen, or by hitting the “tab” hot key on the keyboard.
- On Cage adjusts the edit cage to the modifier result.
- The up and down arrows move the modifier up and down in the modifier list if multiple modifiers are applied.
- The cross symbol cancels the modifier.
Types of Subdivision Surfaces
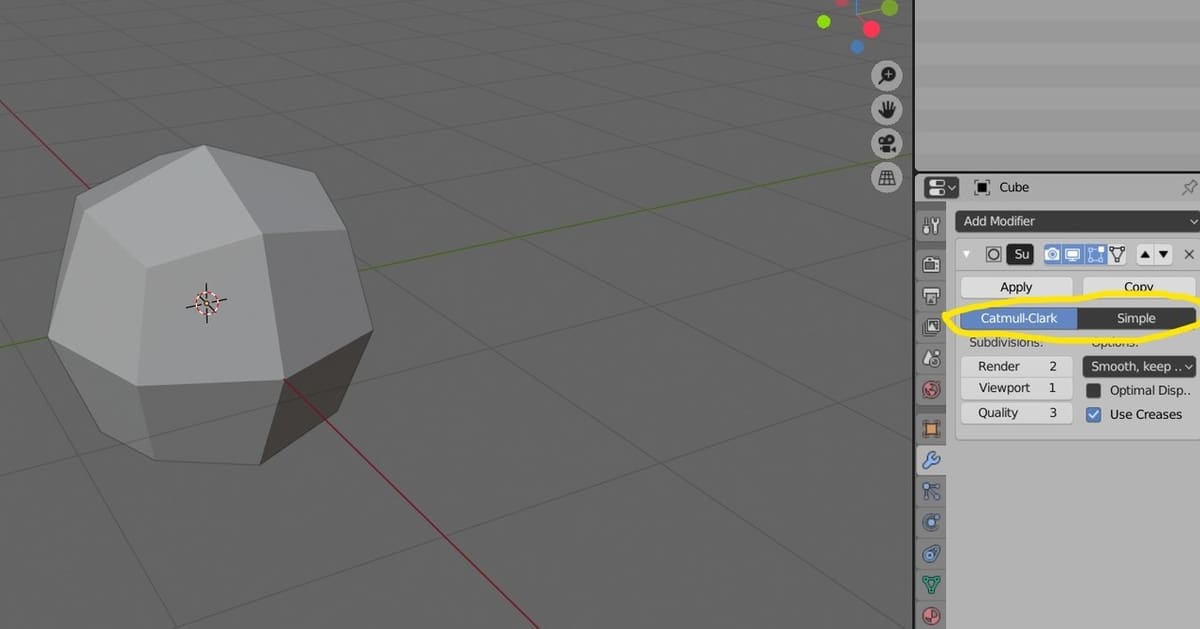
Blender 2.9 offers two types of subdivision surfaces the user can choose from:
- Catmull-Clark: Catmull-Clark subdivision takes the average points of all the faces and edges and subdivides them according to the average points. This results in a more aesthetically pleasing and smoother appearance of the object, which can be useful for things like character modeling.
- Simple: Simple subdivision plainly subdivides the surface mesh into smaller surfaces without smoothing the object.
Note that Catmull-Clark introduces additional deformation to the object when used, so the default cube loses its cubic structure as observed above. On the other hand, the Simple option subdivides the object based on mathematical derivatives, without losing the original structure.
Subdivision Column
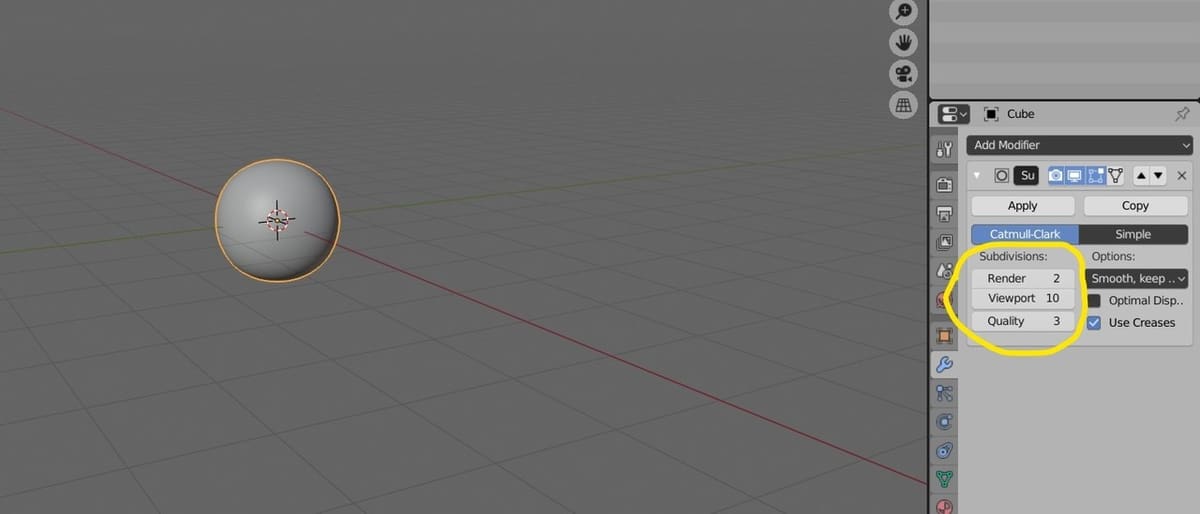
The subdivisions column displays the options to choose how the modifier will be deployed along with the quality.
- Render: Displays the value of the subdivisions in the final render. This option can be used when you want to change the subdivisions without affecting the present viewport.
- Viewport: Displays the value of the subdivisions in the 3D viewport. As can be seen in the image, the high subdivision value in the 3D viewport has converted our default cube into a smooth sphere.
- Quality: This option increases the accuracy of the vertex points while subdividing. A lower value will be faster but less precise compared to a higher value. However, the required quality result is not necessarily provided with the maximum quality value; the user may achieve the required quality before reaching the maximum quality value.
Make sure that the value of “Viewport” is not more than “Render” because that’ll result in better quality in the viewport than the render. Additionally, lower subdivisions require less RAM, so keep the subdivisions low if you don’t have much RAM.
Options Column
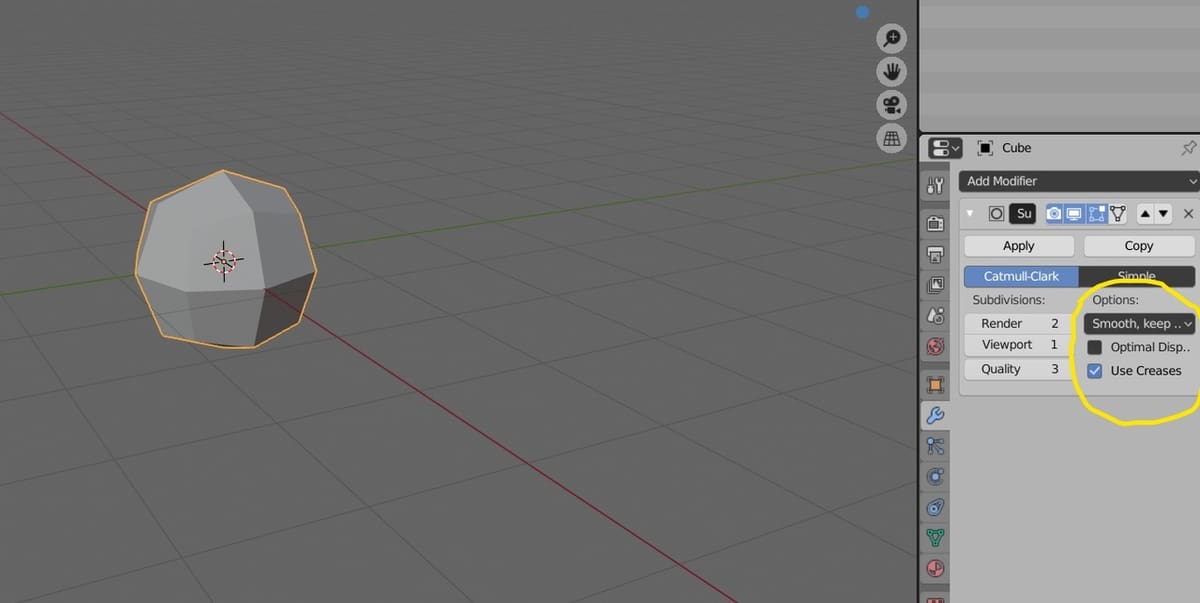
Once you’ve set the numbers in the subdivision column, there are two choices in the options column:
- Sharp UV Smooth: This option keeps the UVs and the corners sharp.
- Smooth, keep corners UV Smooth: This option smooths the UVs, but not the corners.
After one of the options is selected, you can check “Optimal Display”, which shows only the original structure’s edges. As such, it skips the edges formed after the application of the modifier in the render. In our example, if Optimal Display is selected, only the original default cube’s edges will be visible.
The other option is “Use Creases”, which controls how smooth the edges are by using the weighted edge creases values.
Tips & Tricks
Here are some common problems faced when using the modifier:
- Modifiers can’t be applied in edit mode.
- Sometimes during modeling, the surface normals become inconsistent, and so the modifier doesn’t work. Recalculating the normals might be helpful in such a situation.
- The modifier won’t work if the OpenSubdiv Library is missing, therefore it’s always advised to download Blender from its original website.
You now know how to use the modifier and its features thoroughly, whether it’s to apply the modifier during rendering or changing the viewport subdivisions. You can now create complex, realistic objects using simple meshes!
License: The text of "Blender Subdivision Surface Modifier – Simply Explained" by All3DP is licensed under a Creative Commons Attribution 4.0 International License.