Blender Tutorial for Beginners: Easy Step-by-Step Guide

Tired of depending on other people's models? Easily get into shaping with our step-by-step Blender tutorial for beginners!
What Is Blender?
Blender is a free, open-source program for modeling and animation that was initially developed as an in-house app by an animation studio called Neo Geo and was later released as its own program. It’s a competent program that in recent years has gained popularity thanks to it being free and having many features for modeling, sculpting, animating, storyboarding, and concept art. Indeed, many consider it to be on the same level as professional-level 3D modeling software, which tends to come with elevated prices.
The fact that it’s open-source makes it an attractive alternative because it means that Blender is constantly updated with official releases and augmented with independent, community-made plug-ins. Moreover, Blender offers fully rendered shorts and projects, which are free to download so that users can immediately open them, study them, and learn.
Despite the above, it’s important to note that Blender is not a web app; it must be downloaded and installed, and every time there is an update, users have to go to Blender.org to download and install the latest version. This can also be done through the program’s splash screen by clicking on “Blender website” under the links section.
So, in case we haven’t yet convinced you to start using it, let’s take a look at Blender’s core competences, user interface (UI), and some helpful tips. Hopefully, by that time, you’ll be ready to jump into our practice exercise, where we take you through how to model a Poké Ball!
Core Competences

Modeling
Modeling in Blender is the main method for achieving 3D shapes, such as people, animals, or objects. This is done using basic shapes, like spheres, cubes, cones, and prisms, which means that you modify the meshes of preset shapes, splines, or polygons to create a model. There are many methods to do this, including organic modeling, hard-surface modeling, and low-poly modeling.
Sculpting
Sculpting is a modeling method mostly used for concept modeling, like character creation. It resembles traditional clay modeling in that it starts with a clump of material – typically a ball – and with various brushes, you can add or remove material to achieve the desired shape. This simplifies the transition between the concept and the production of the final model.
Animation
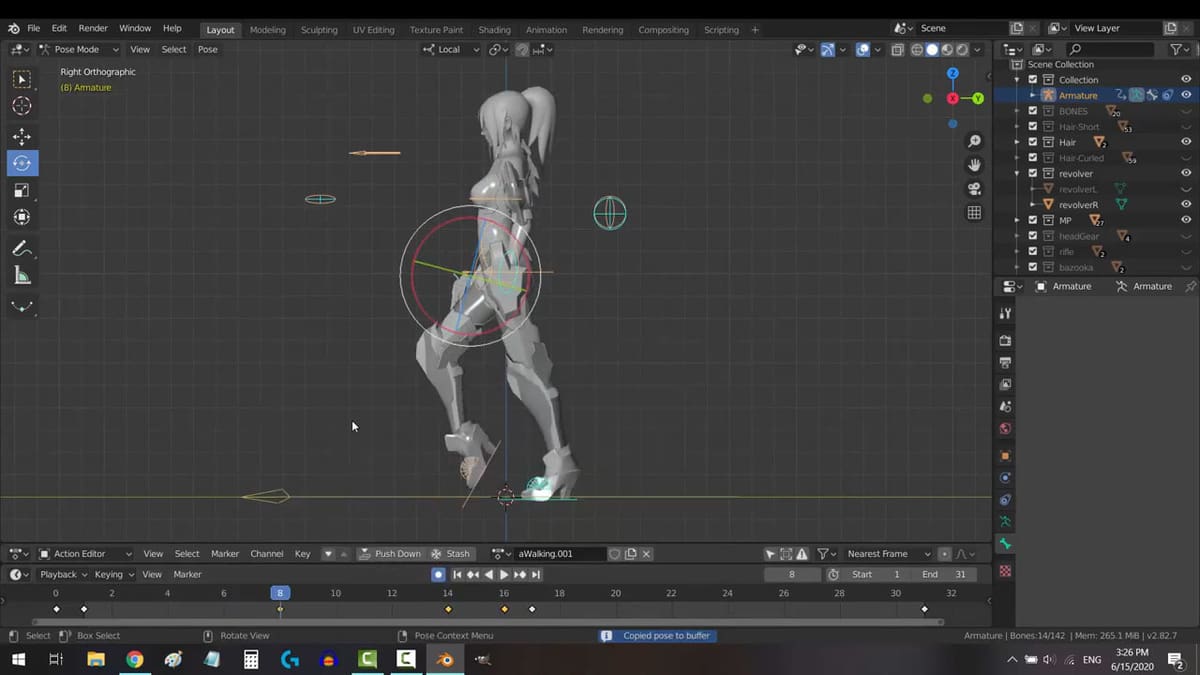
Overall, Blender is a strong and reliable 3D program for animation, offering character animation, sound synchronization, inverse kinematics (for fast poses), camera tracking, textures, and more. It also has rigging, which is what allows a user to transform a model into several articulated objects that move freely when animated.
Story Boarding
Blender is a very powerful tool for storyboarding, combining 2D and 3D features right in the Viewport. Arguably the coolest thing about the storyboarding feature is the Grease Pencil, which is a particular tool that allows you to draw in the 3D space. It can be used to produce traditional 2D animation with three-dimensional camera movement, which makes for impressive shots.
Motion Tracking
One of the program’s most attractive features is “object tracking” for the camera. This feature allows you to import raw footage, track a particular object, and reconstruct the camera movement live in the 3D scene.
Simulations
Simulations in Blender refer to the ability to work with certain particles that don’t necessarily constitute one single body, and as such, would take too much effort to create piece by piece. A good example of this is water. Physically, water particles behave like balls in a ball pit, with each moving independently of the others. To accommodate this kind of behavior, Blender can simulate fire, smoke, fluids, hair, cloth, rigid bodies, and particles – and it looks awesome.
Concept Art
Concept art is basically world creation, which often includes impressive mechanics, landscapes, or buildings. Achieving these through 2D drawing is challenging and time-consuming, which can result in an idea deteriorating before it comes to fruition. Thus, a popular method for creating concept art involves making the 3D models of the main landscape, characters, mechs, or whatever; taking a shot; and then adding the details, lighting, and other objects in traditional 2D painting software.
Rendering

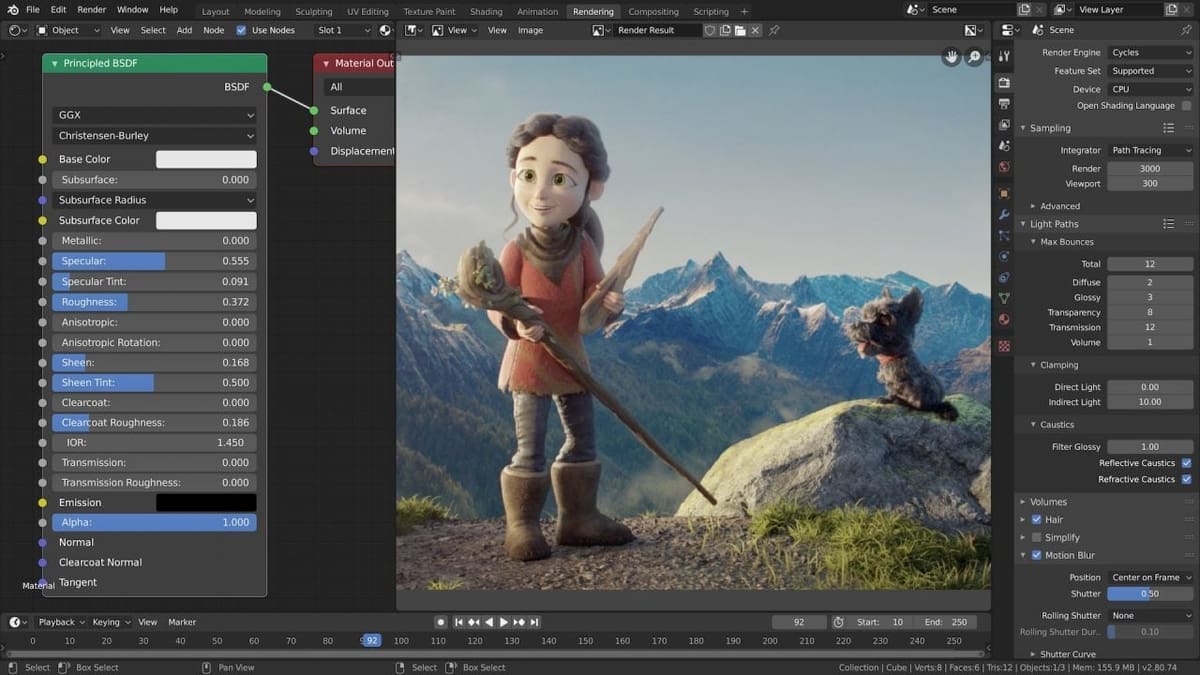
According to Techopedia, rendering is the process of generating an image (or video) from a model made in a program. Blender has two powerful built-in render engines: Cycles and Eevee. For most, these two tools should be more than enough, but you can also use third-party options like LuxRender and Maxwell, which can be integrated into Blender.
You can find more detailed information about the core features of Blender in our article What is Blender?.
User Interface
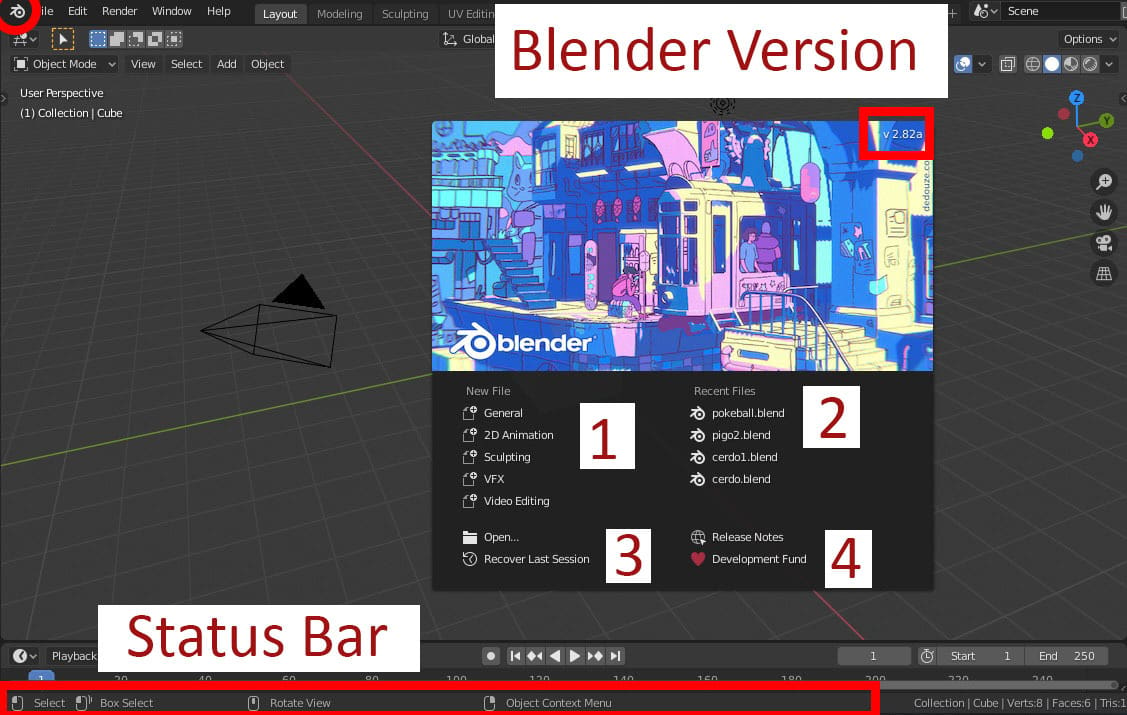
Splash Screen
The splash screen is the first thing that appears when you open Blender. Among its options, one can create a new document (1) or open a recently opened document (2). There’s also an important option that reads “Recover Last Session” (3), which, if selected, will try to retrieve the last file available within Blender’s temporary files. Lastly, there are useful links to the official Blender website (4).
To close the splash screen, simply press Esc on your keyboard, and to re-access it, click on the Blender symbol to the left of the top bar and select “Splash Screen”.
Status Bar
At the bottom of the UI is the Status Bar, which is an informative display that lets you know what each click can do in the context of your cursor at the moment. It also applies to when certain hotkeys are being held down, which can change some functionality.
Areas

Most of the UI is taken up by “Areas”, which are panels that contain various menus and informative displays about the current project, along with the editor window. Areas can be scaled by dragging the boundaries, and you can also change what’s displayed in each by clicking the button at the top left.
You can create as many Areas as you like by right-clicking a boundary and selecting “Split Area”. To delete one, repeat the process and select “Join Area”. And if you want to focus on one of these panels, you can put your mouse over it and press Ctrl + Space to enlarge it. (Doing that again will take it back.)
Workspaces
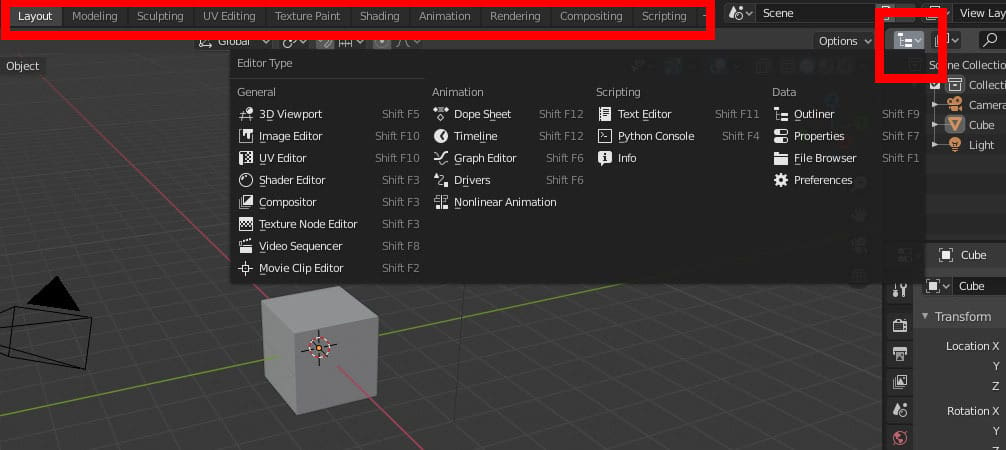
By default, certain Areas are set up depending on which “workspace” you’re in. These are indicated by the tabs on the top bar, and they include Layout, Modeling, UV Editing, and so on. You can also change between workspaces with the hotkeys Ctrl + Page Up or Ctrl + Page Down.
Layout Workspace
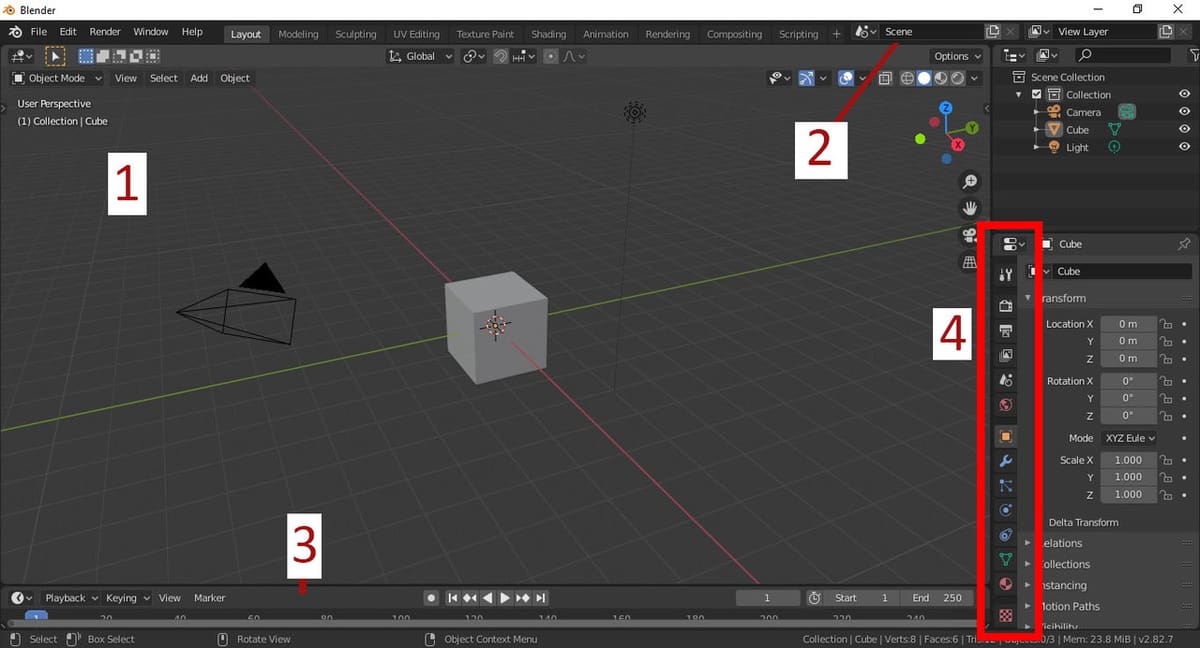
In this article, we’ll stay within the Layout workspace. Its main features include the following:
- Viewport: The Viewport (1) is where the 3D scene is displayed. It’s where you’ll perform most of the operations that interact with the scene, which consists of all objects. You can create more than one scene in a single Blender project, or you can switch between already-existing scenes (2).
- Timeline: Below the Viewport is the Timeline (3), which controls playback animation.
- Properties Editor: To the right is the Properties Editor (4), which contains several vertically-oriented tabs to display the properties of your scene, your current tools, and whatever object you have selected.
Useful Tips
Pie Menu
The Pie Menu is a wheel menu that appears around the cursor after the hotkey Shift + S is pressed. Once this menu has been accessed, there are three ways to interact with it:
- You can keep the hotkey pressed, drag the cursor over to the desired choice, and let go of the hotkey, with no clicking necessary.
- You can let go of the hotkey before moving the cursor and then left-click to select the option you’d like.
- If you change your mind, you can right-click to cancel.
Once you’re used to where each option is, using this will make your work more efficient.
Quick Menus
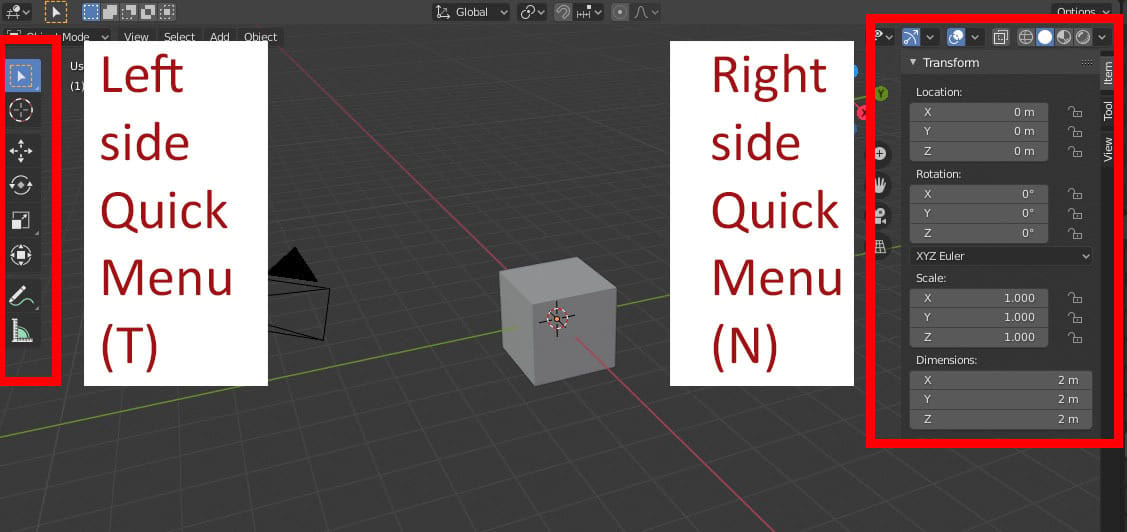
In the Viewport are two quick and useful menus:
Tools
The tools menu can be accessed in three different ways: by pressing T, by left-clicking on the arrow at the top left of the Viewport, or by pressing Shift + Space. (The latter will bring up the tools as a Pie Menu.) This menu contains the operations Select Box, Move, Rotate, and Scale.
Quick Settings
The second menu can be accessed by pressing the N key or by left-clicking the arrow at the top right of the Viewport. This menu opens additional quick settings, including your item’s transformation data (like scale and position), tool-specific settings, and other Viewport options.
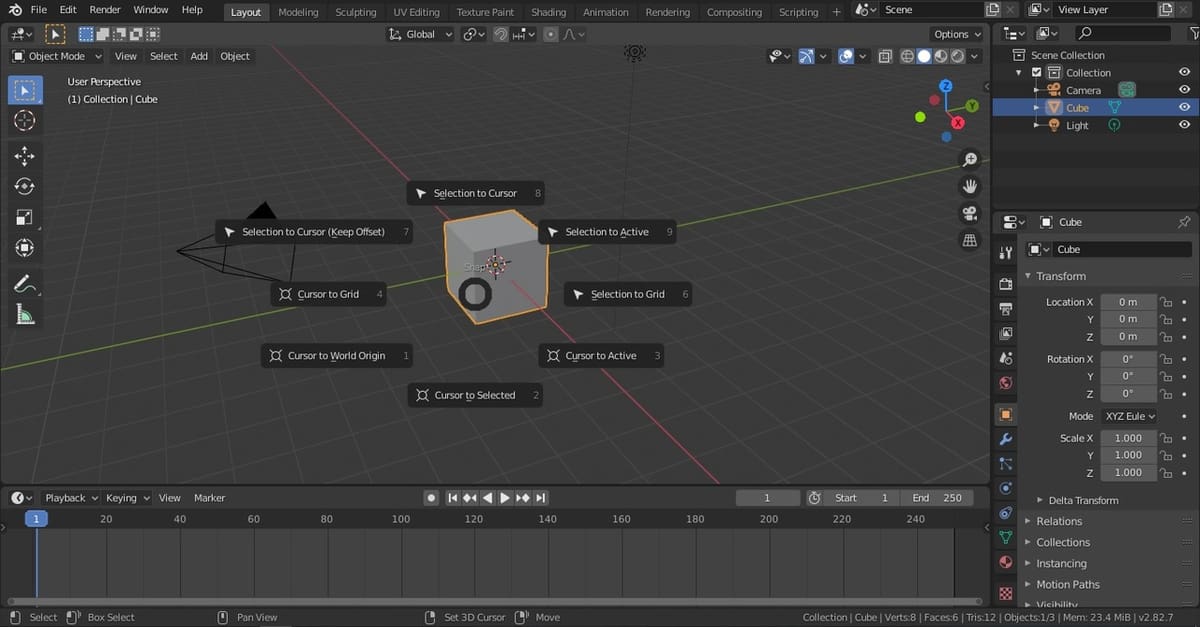
3D Cursor
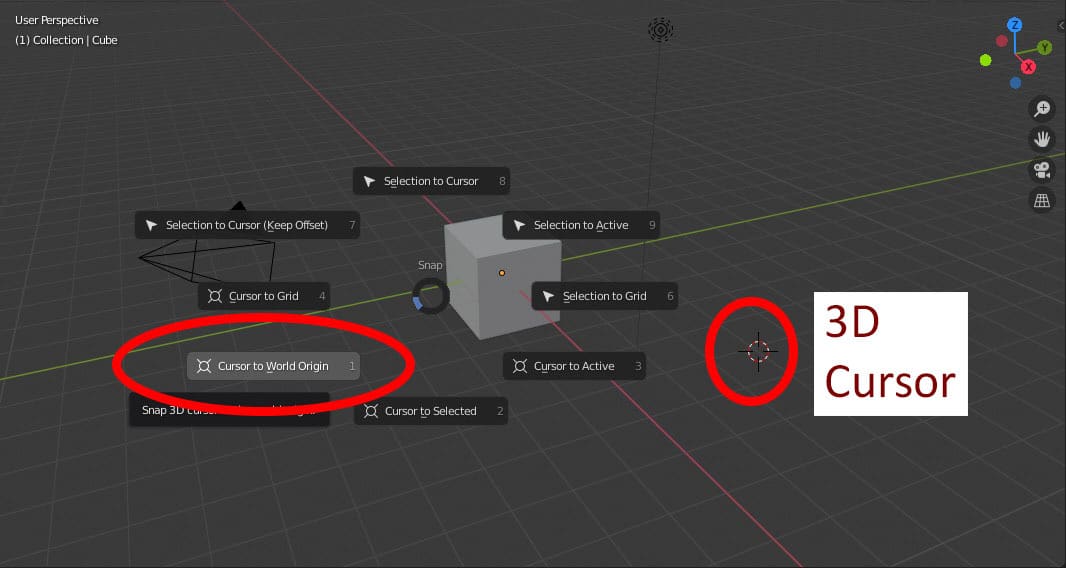
In the above quick settings menu is an option called “3D Cursor”, which looks like a red and white circle. It acts as the spawning point for any new object and is also used as reference point for pivoting.
To place it around the scene, hold down Shift and right-click where you want to position it. To re-center it, open the Pie Menu and select “Cursor to World Origin”.
Timeline
Regarding the Timeline at the bottom of the Viewport, you can zoom in and out with the scroll wheel, drag the timeline with the middle mouse button, change the start and end frames for the output and create or manipulate keyframes.
Practice Exercise: Making a Poké Ball
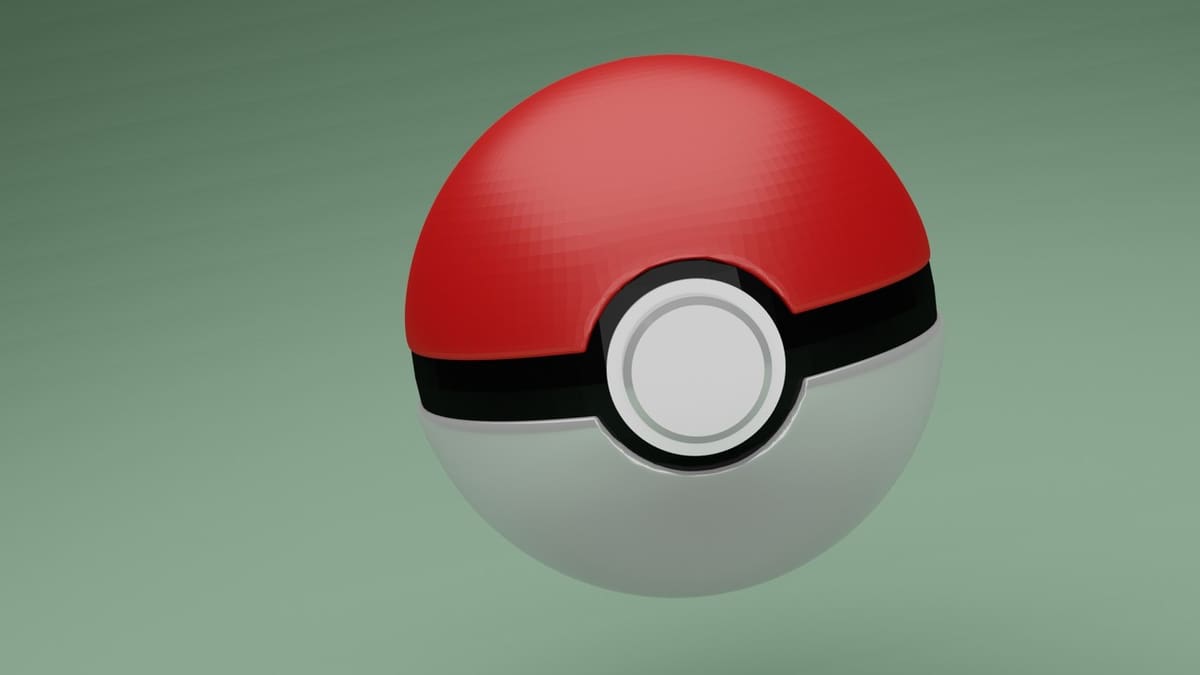
The best way to learn is by doing! So let’s put some of the above to work with a practice exercise.
At the end of this tutorial, you’ll have made the classic Poké Ball from the Pokémon universe. It’s simple enough, but it’ll help you become acquainted with the Blender interface. To get you started, we’ll cover everything from the modeling process right up to easy render settings.
As a general tip, we recommend that you constantly save your document to avoid losing work should something go wrong.
Starting a New Document
As we mentioned before, opening Blender will cause the splash screen to show up. Either exit this by pressing the Esc key on your keyboard – which will bring you to the Layout workspace – or select “New Document: General”.
Preparing Your Workspace
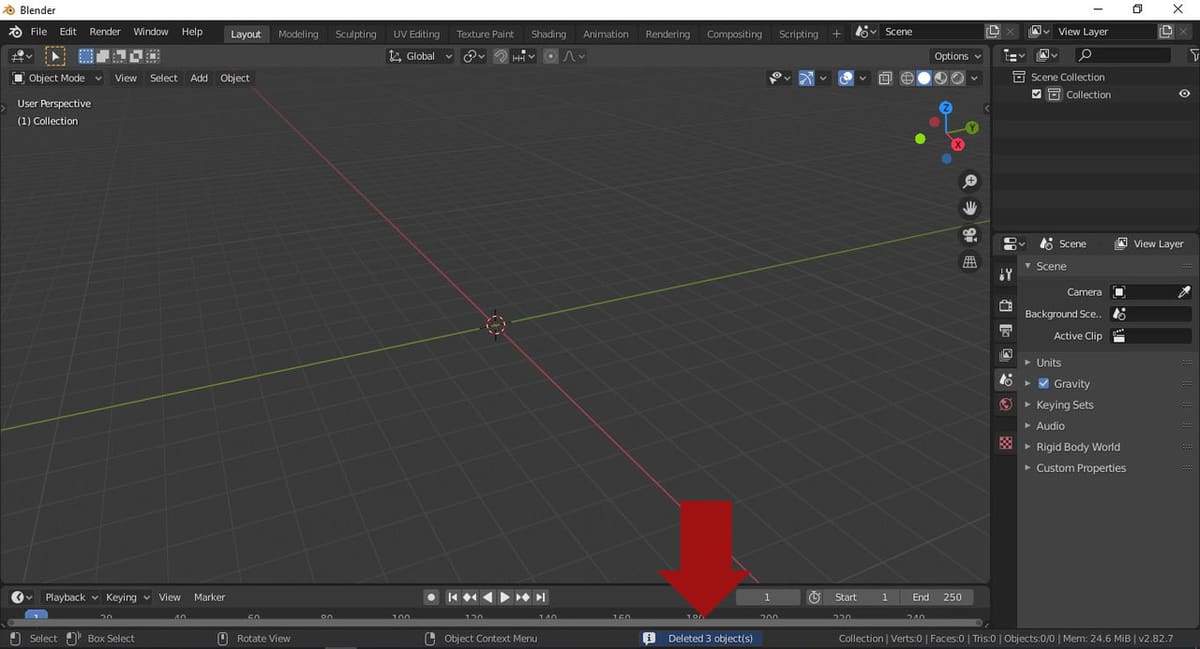
To start with an empty scene, we’ll need to get rid of all of the existing objects that appear by default in the Viewport. Note that camera and light sources are by default included in a new workspace.
- Press A on your keyboard to select all objects at once (or you can select them one-by-one by left-clicking while holding Shift). You’ll know they’re selected when they have an orange outline.
- Press the Delete key and you’ll be able to see the message “Deleted 3 object(s)”, or however many you have deleted, in the Status Bar.
Creating a Sphere

We’ll begin modeling by creating a sphere, which will be the base shape of our Poké Ball.
- Access the Add menu by doing one of two things:
- Access it directly at the top left of the Viewport.
- Access it at your current cursor location by pressing Shift + A.
- Once you’ve accessed the Add menu, go to mesh, and select “UV Sphere”. The sphere will be added at the origin because that’s where the 3D Cursor is located by default.
Switching Modes
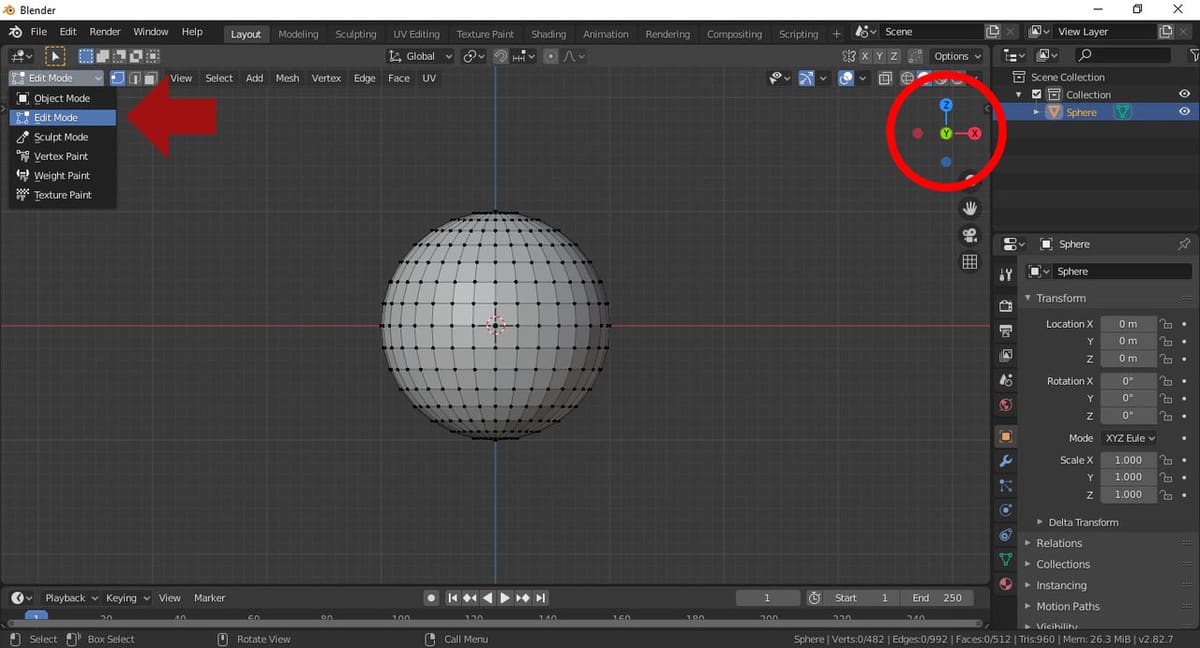
At the top left of the Viewport, there’s a field that reads “Object Mode”. Clicking on it opens the Mode select menu, which allows us to visualize different properties of our model.
- Switch over to Edit Mode, which instead of showing you a solid object as in Object Mode, will show you the mesh.
- Change your view to be normal to the Y-axis. There are two ways to do this:
- If you have a numeric keyboard (AKA a numpad), you can change the view by pressing the numbers. For example, pressing 1 will show you the “front” of the model.
- If you don’t have a numpad, you can manually select which axis you would like to be normal to in the axes display at the top right of the Viewport.
Viewport Shading & Selection Modes
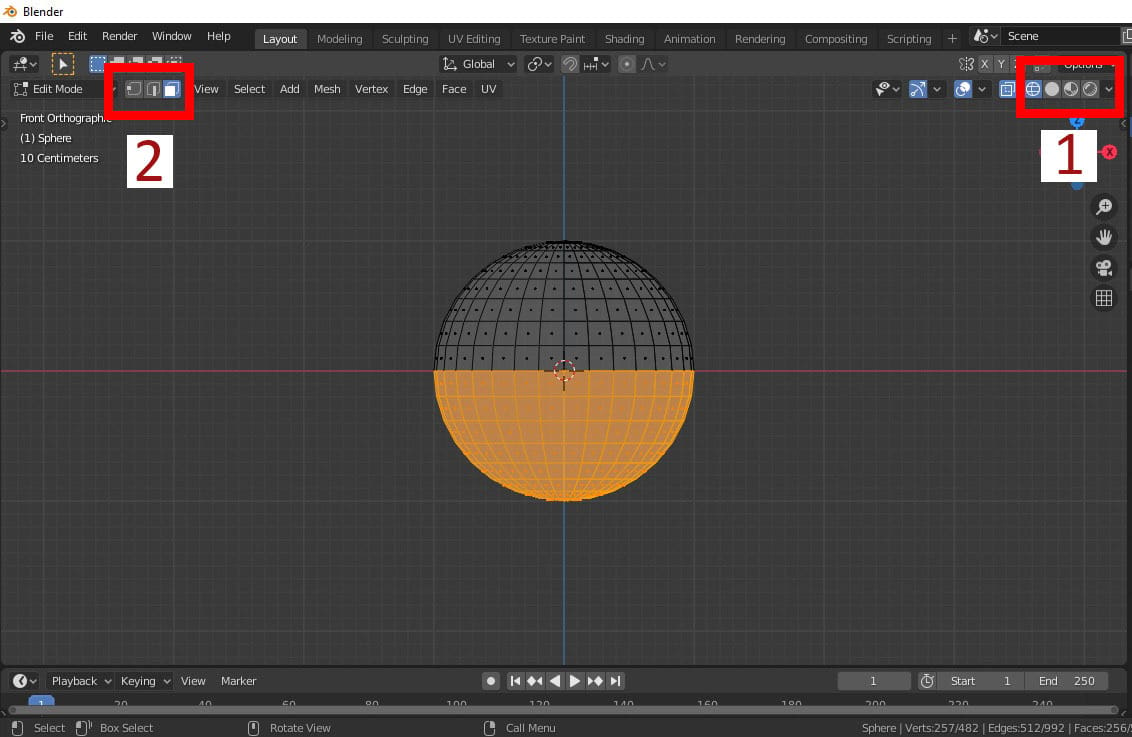
At the top right of the Viewport, there’s also the Viewport Shading menu, which determines how objects are visualized.
- Select the Wireframe option, which is on the left. This will make the object transparent, allowing you to see only the mesh.
- At the top left of the Viewport, change the selection mode to Faces, which is the option on the right.
- Now, to make sure that nothing is already selected, press A twice. (This selects all, then deselects all.)
Deleting Object Parts
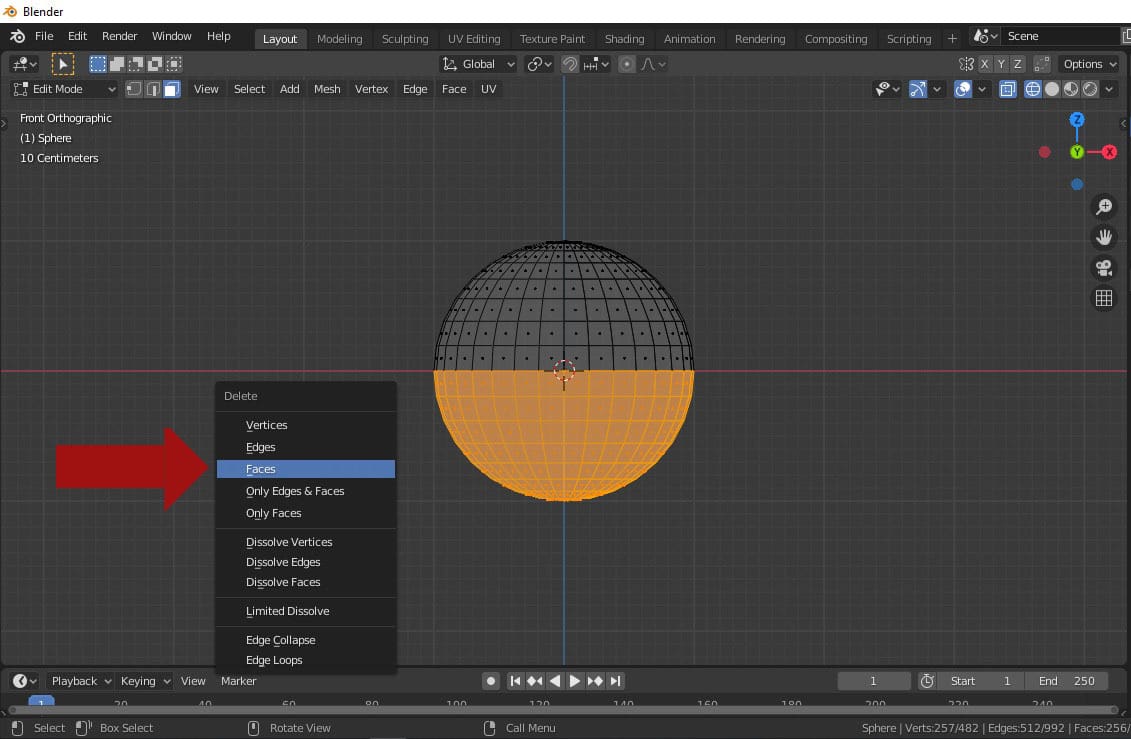
Next, we’ll need to select and delete the faces on the bottom half of the model. We’ll know if we do so correctly when they’re orange. There are two ways to delete them:
- Press the Delete key on your keyboard and a delete menu will open up at your current cursor location. Select “Faces”.
- With the faces selected, right-click anywhere in the Viewport to open up a “Face context” menu. Go all the way to the bottom and select “Delete Faces”.
Moving Vertices
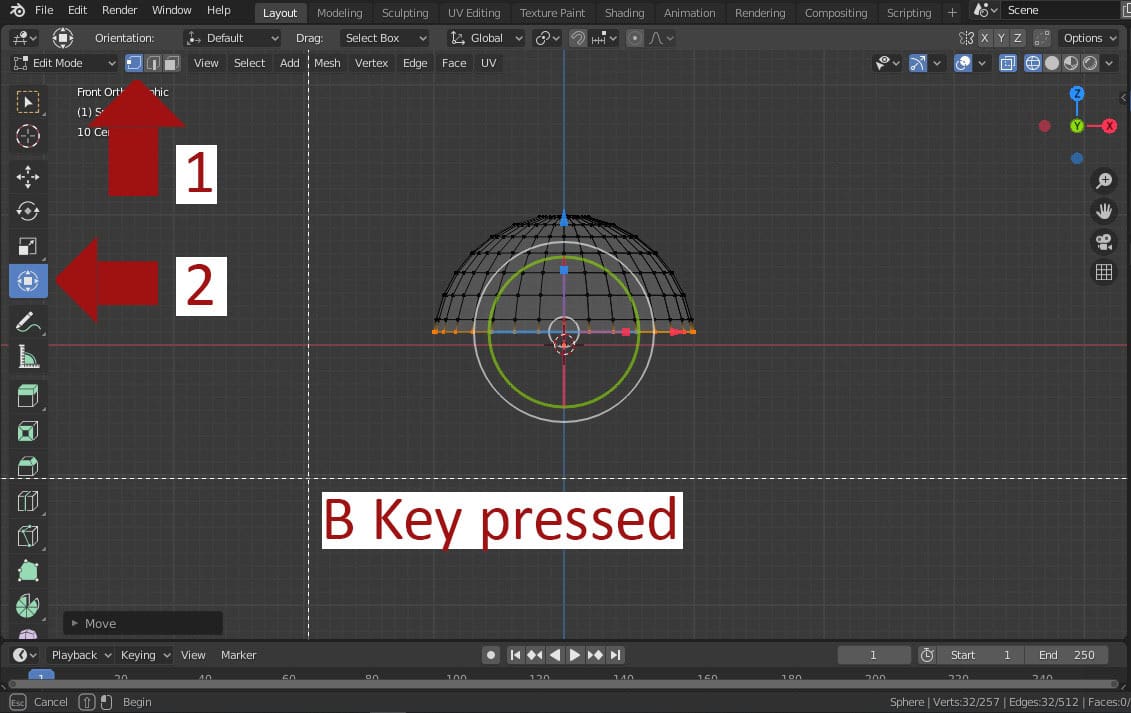
Next, we’re going to move the bottom layer of the half Poké Ball’s vertices a little way up. The entire hemisphere will constitute the top half of the Poké Ball cover, so we have to make it look as such.
- Set the selection mode to Vertices.
- While facing the XZ plane, select the bottom layer of the hemisphere. Again, you’ll know if you selected it when it’s orange.
- Once the bottom layer is selected, click the Transform tool on the quick menu to the left, and drag the blue arrow upwards about half of the way, which will move the position of the selected vertices.
A useful tip: If you press B on your keyboard before selecting, guidelines for your cursor position will appear, making it easier for you to know where to place your cursor.
Scaling Vertices
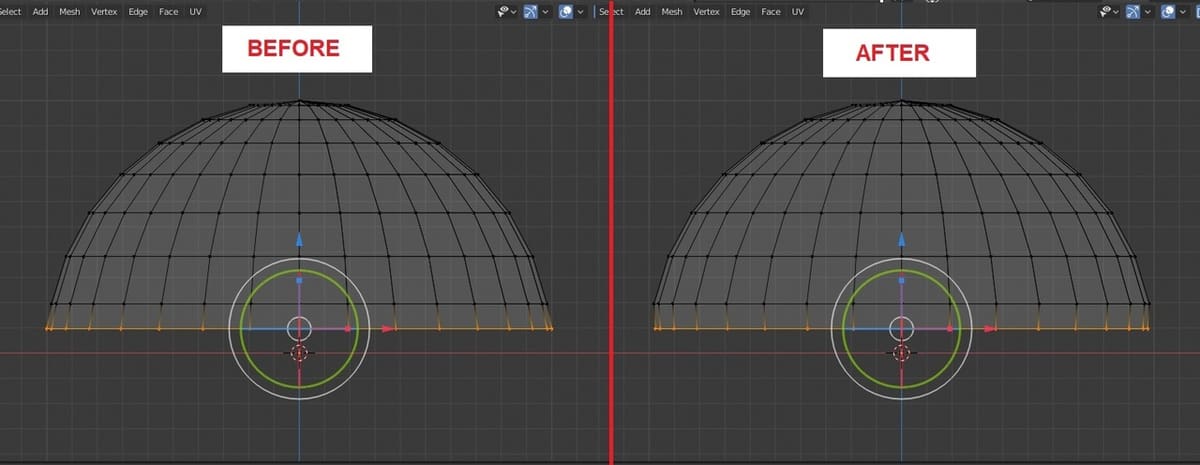
What we want to do here is make the bottom layer of vertices a little narrower so that the hemisphere isn’t curving outwards. (This is to correct for the repositioning.)
- With the bottom layer still selected, press S to scale it.
- With scaling activated, move the vertices a little way inwards so that the bottom layer is straighter.
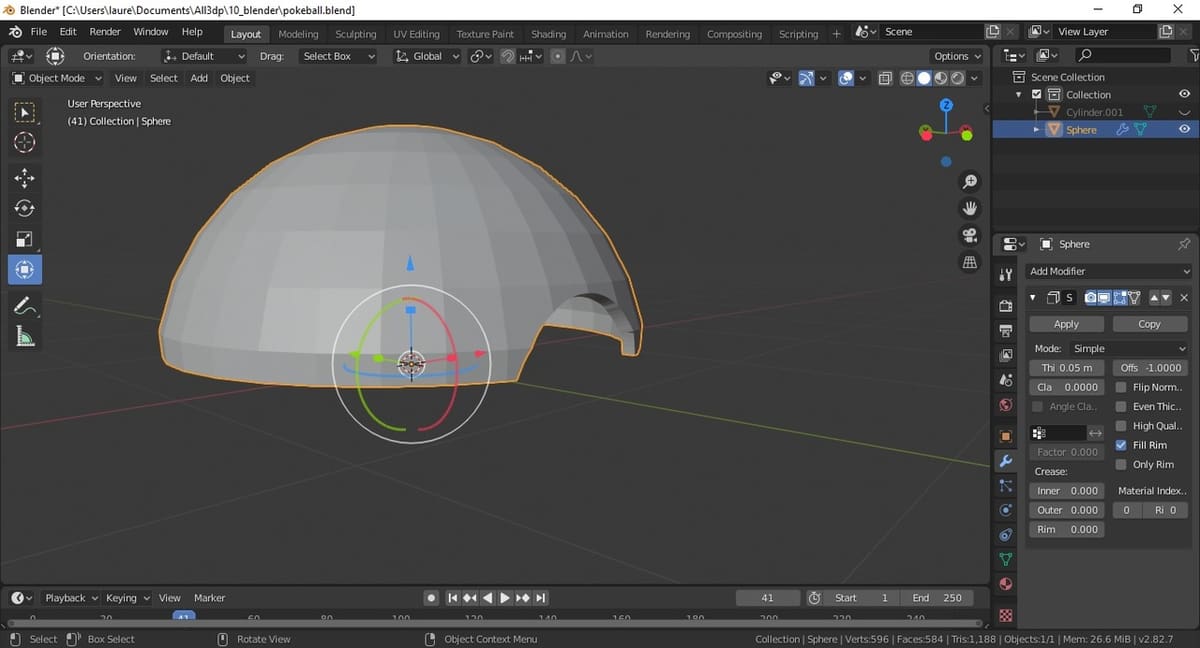
Adding a Second Object
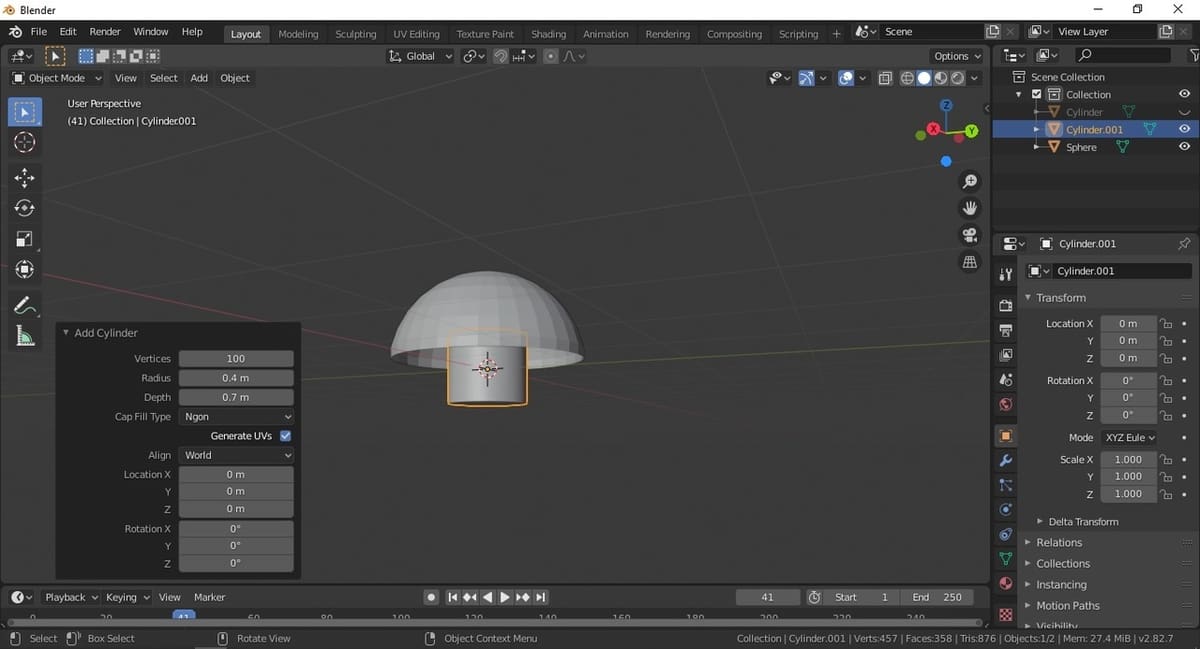
Now let’s start the process of creating the hole for the button. For that, we’ll need something that subtracts from the ball cover.
To begin, we’re going to switch back to Object Mode and solid shading. You’ll notice that the hemisphere is hollow. This is because we’re modeling with meshes (as opposed to solid modeling).
- Add a cylinder with the Add menu. When you first add it, a menu will appear at the bottom left of the Viewport with the properties of the solid you want to create.
- Set the number next to “Vertices” – which refers to the number of elements in the mesh – to 100. This will give it a smoother surface and, as such, better quality.
- Additionally, the cylinder should be smaller than the hemisphere, so scale it down as necessary.
Rotating the Object
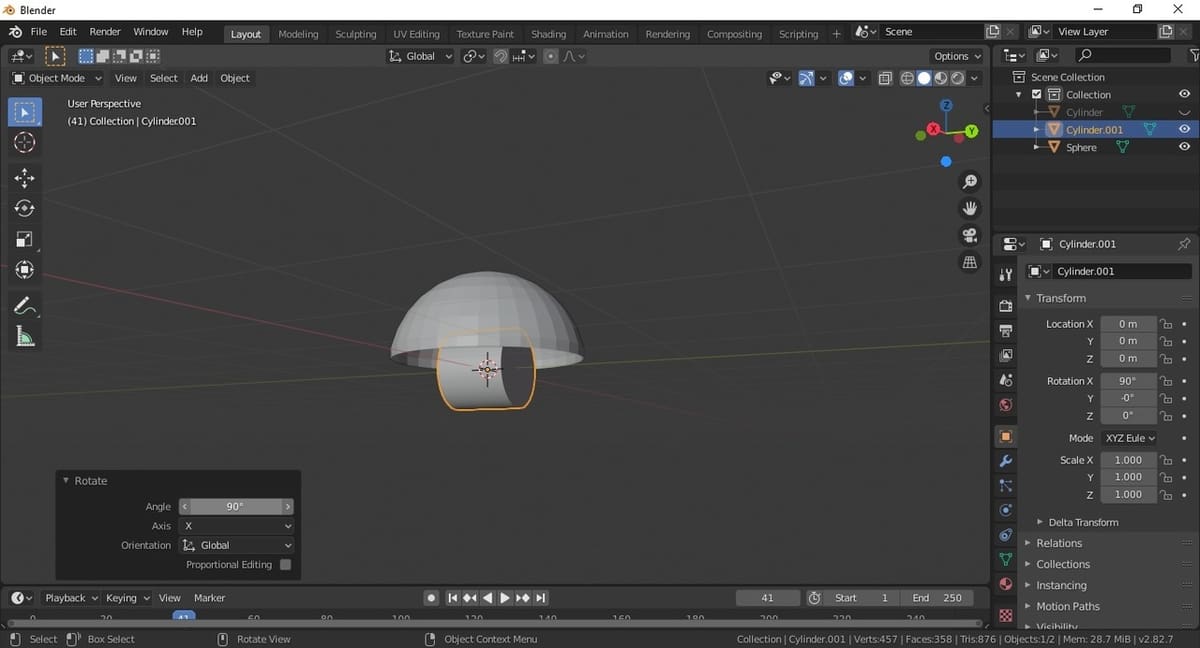
The next thing we’ll do is rotate the cylinder to have it facing the correct direction. This won’t be the actual button, but it should still face the same way. We’ll use it to remove part of the hemisphere.
- Make sure the cylinder is selected, then press the R key, which activates the Rotation tool.
- Press X, which locks rotation only to the X-axis.
- Either press Enter or, without moving the mouse, left-click. This will open the Rotate menu.
- With the X-axis already selected, set the angle to 90°.
That covers the rotation, but we still need to move the cylinder towards the bottom of the hemisphere using the Transform tool. We can also scale and adjust the object as necessary.
Extruding a Cut
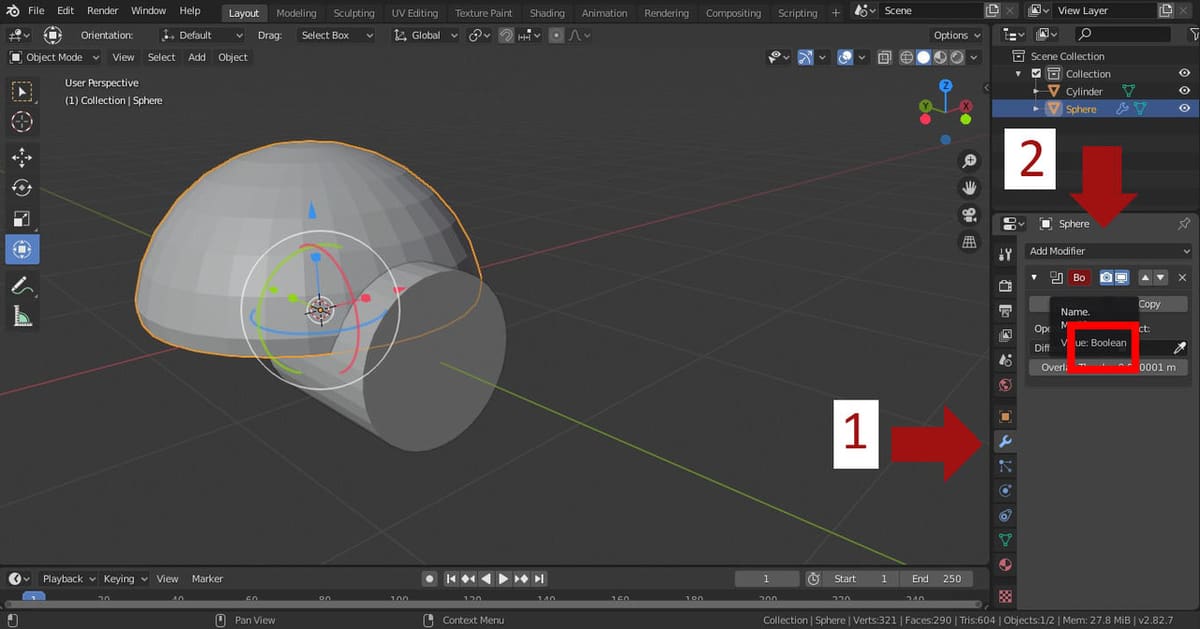
With the cylinder as a reference, we’re going to extrude a cut on the hemisphere.
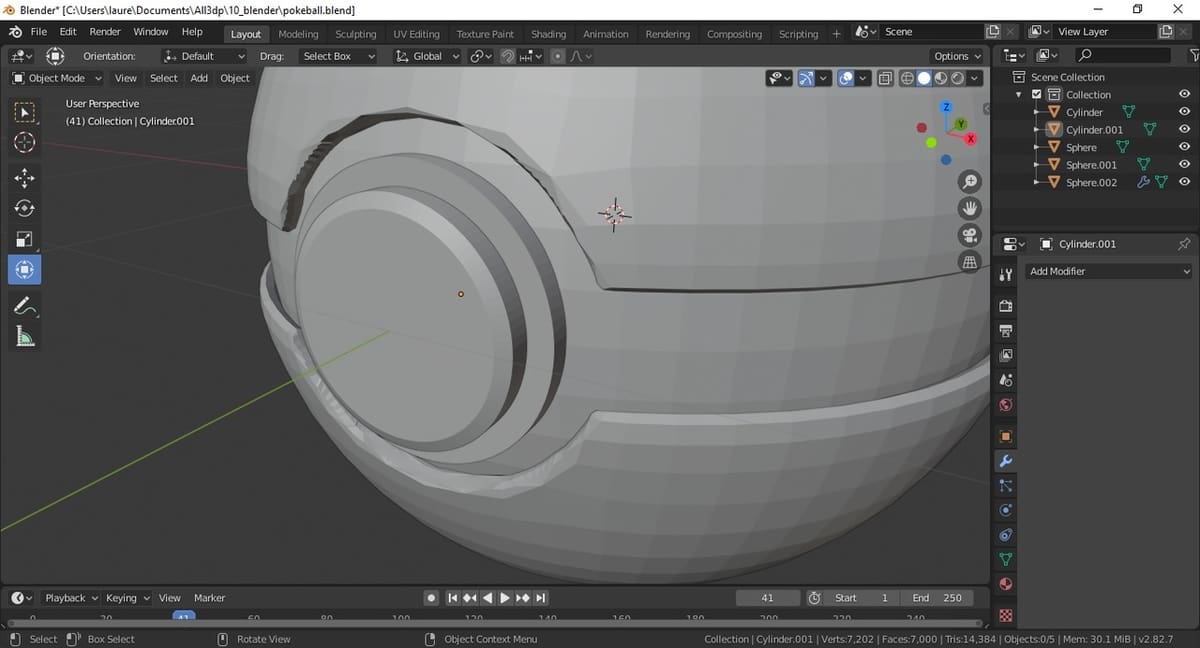
- Head to the Properties Editor and, with the hemisphere selected (indicated what we want to modify), click on the wrench symbol, which is where the “Modifier Properties” are located.
- Add a new modifier of type “Boolean”. When you do so, the name will appear in red. This is because your modifier settings are incomplete, which is normal.
- In “Operation”, select “Difference”.
- In Object Mode, if you click anywhere in the blank space, you’ll be shown a list of all the objects available in your scene to choose from. Alternatively, you can also use the dropper icon to select an object directly from the Viewport.
- Select the cylinder, and then click “Apply”, removing the cylinder’s geometry from the hemisphere.
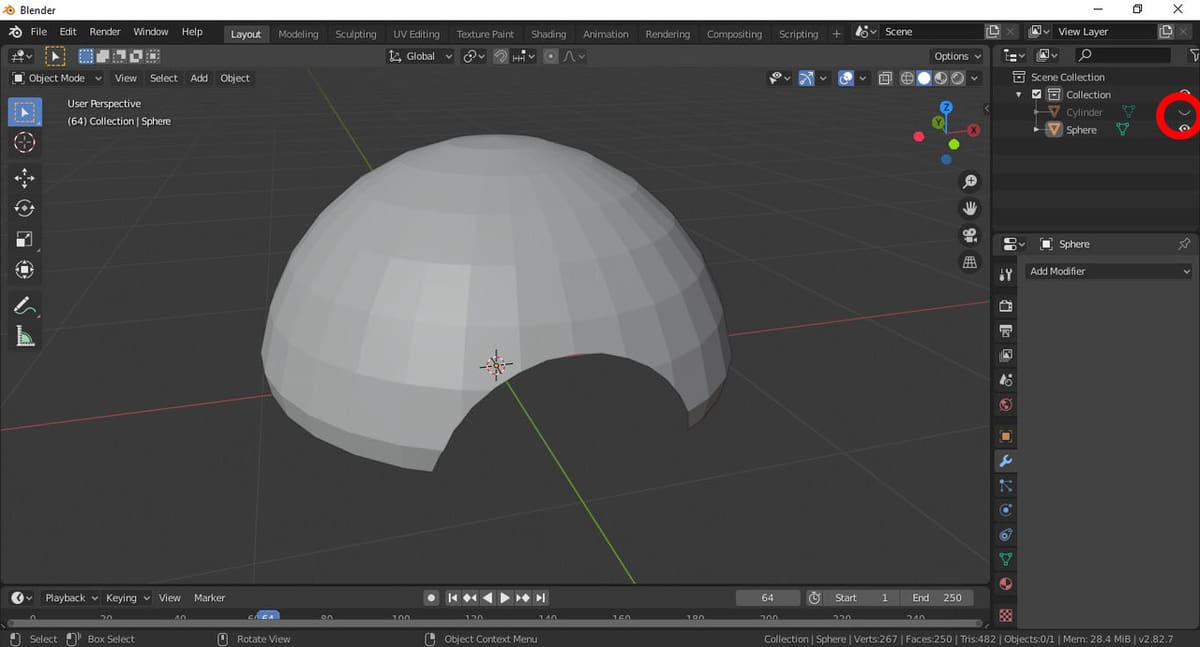
When the operation is done, you’ll still be able to see the cylinder. That’s because just the hemisphere was modified, meaning the cylinder is still intact. If you go to the Outliner (the list organizing scene data) and hide the cylinder, you’ll see that the hemisphere was indeed cut. (Just don’t delete it!)
Applying Thickness
Because the hemisphere is currently just a mesh, we need to make it solid.
- With the hemisphere selected, add a new modifier of type “Solidify”.
- You can modify the thickness as you wish, but for this example, we recommend 0.05 m. Once you’re done, click “Apply”.
Duplicating an Object
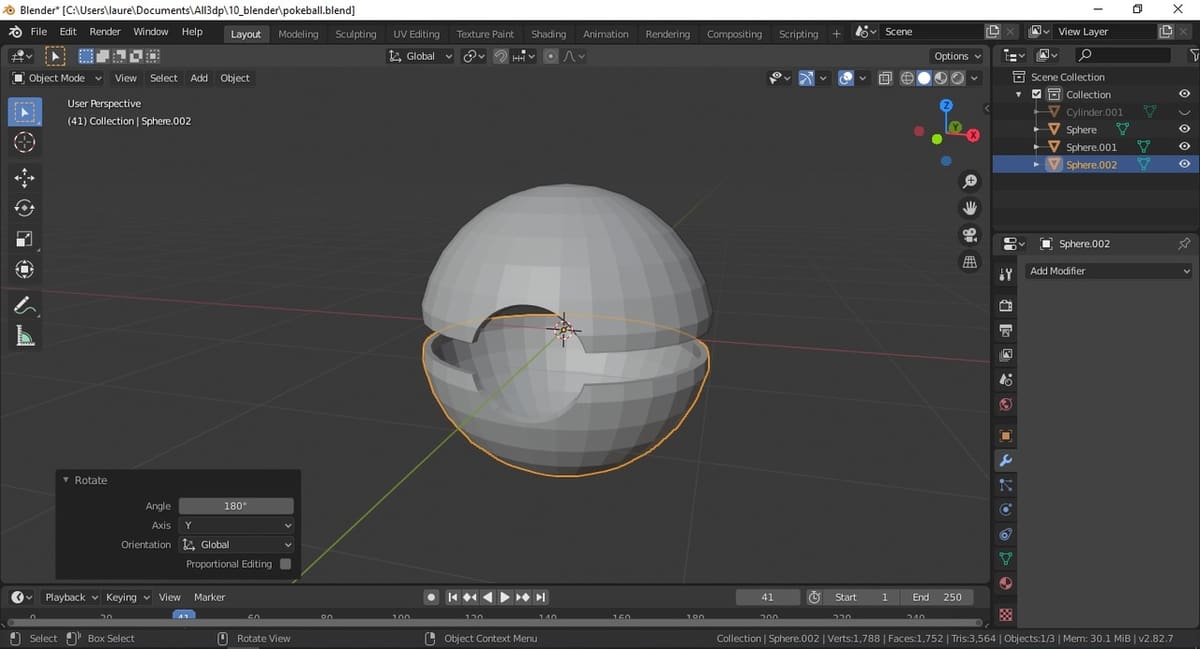
Creating the bottom of the Poké Ball will be much easier because we simply need to duplicate the top half.
First, duplicate the hemisphere using one of two methods:
- With the part selected, press Shift + D to duplicate. Then, either press Enter or left-click without moving the cursor.
- Right-click on the part and select “Duplicate Object”.
You’ll see in the Outliner that there are now two hemispheres in the scene. However, this won’t be obvious from the Viewport because both parts are located at the exact same position.
- Select the duplicated part and press R, Y, and then Enter. This will open the Rotate menu for the Y-axis.
- Provide an angle of 180°.
We now have an almost complete Poké Ball.
Improving Quality
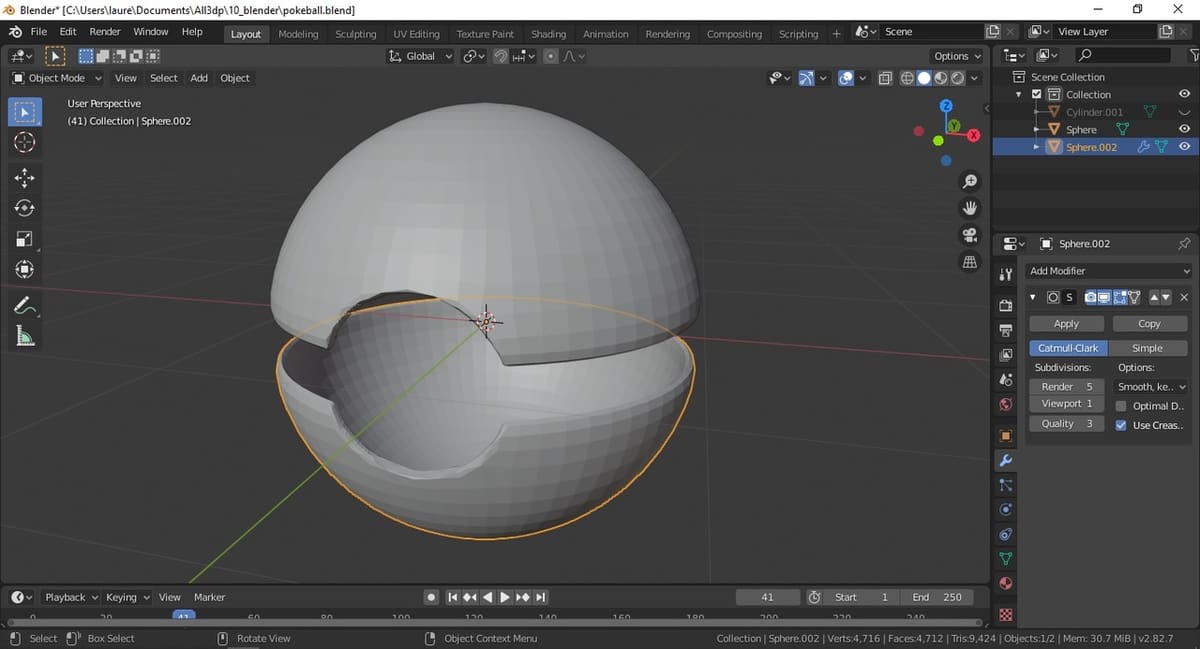
As you can see, the hemispheres aren’t that smooth. This is because the number of elements in the mesh is too low. Let’s improve this.
- Select each hemisphere and navigate to the modifiers.
- Add a modifier called “Subdivision Surface“, which works to multiply the already existing faces. For example, if an object has 40 faces and we input 4, it will end up having 160 faces.
- Directly doing this to the Viewport can take a toll on your computer, so what’s usually recommended is to add a high subdivision number to the Render Subdivision. This means that, as you work, you will see the same number of faces, but once you render the finished product, it will have many more.
- Add 1 subdivision to the Viewport, and 5 to the render.
It’s important to note that, if you’re modeling to 3D print, not to render, you should apply your subdivision directly to the Viewport (i.e. the model).
Creating the Inside
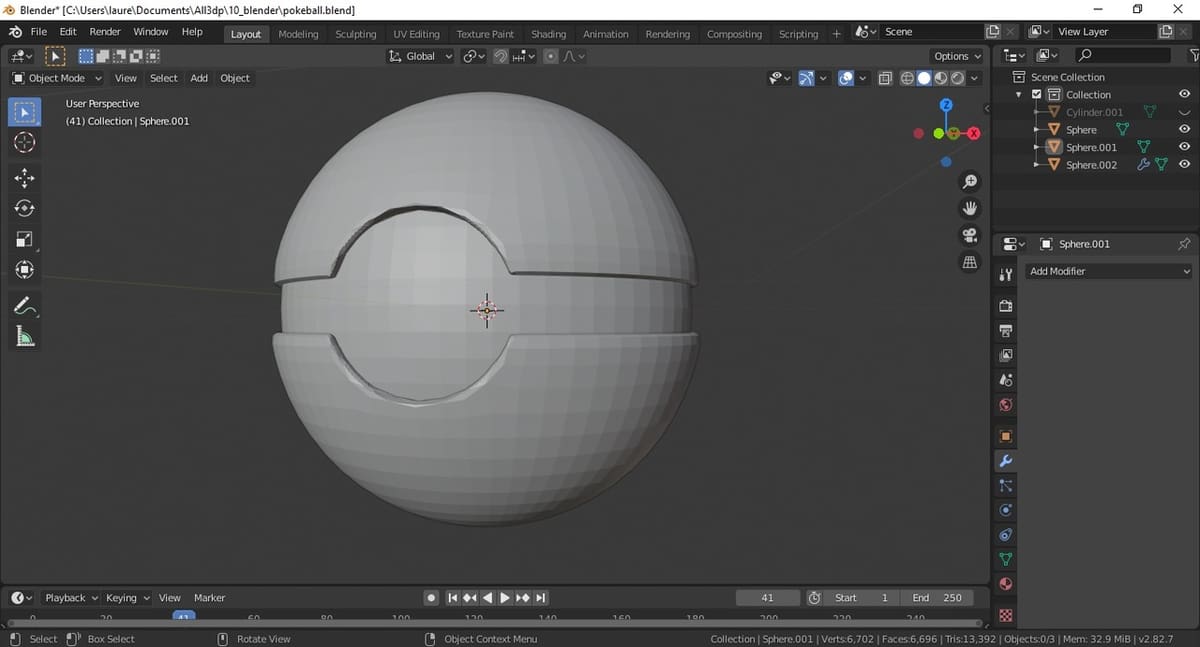
Now that we’re done with the Poké Ball cover, it’s time to fill it.
- Add a new sphere.
- Scale the sphere down so that it’s inside the shell, just touching the edges.
- Add the same mesh modifier to this sphere to ensure good quality in the renderings.
If, for some reason, your 3D cursor wasn’t centered and you didn’t notice, your new sphere might have appeared somewhere else. You can fix this by simply pressing Alt + G, which will center whatever you have selected.
If you want to make any extra modifications to your Poké Ball’s mesh, size, or anything else, now would be the time to do so.
Creating the Button

At this point, we’re almost done with modeling, after which we’ll work on the render settings. Still, we need a button for our Poké Ball.
- Add a new cylinder for the base.
- As before, change the mesh number to 100 when you’re creating it.
- Rotate the cylinder 90° around the X-axis.
- Move it to the place where the button will go and scale it up or down as necessary, keeping in mind that this should be the button’s base.
- Take the cylinder we hid earlier and make it visible again.
- Move it to the button area and scale it up or down as necessary to fit inside of the button base.
Now that we know more about modifiers, you might be wondering why we adjust cylinder meshes as we make them. This is because Blender can behave strangely when applying subdivisions to cylinders. Indeed, doing so tends to create a kind of wavy surface. Try this out for yourself if you want.
Chamfering
The last thing to do when it comes to modeling is to chamfer the edge of the button.
- Head back to Edit Mode, switch to face selection, and select the base of the cylinder.
- Press E to create a new surface, and without moving the mouse, press S to scale it down.
- With the face still selected, use the Transform tool to move it a little way out.
We’re now done modeling the Poké Ball. On to rendering!
Preparing for Rendering
At this stage, we’ll prepare the finishing touches necessary to render a good image. It’s important to note that, if you were going to use a model for a video game, these next steps aren’t recommended, as the model would become too “heavy” to use.
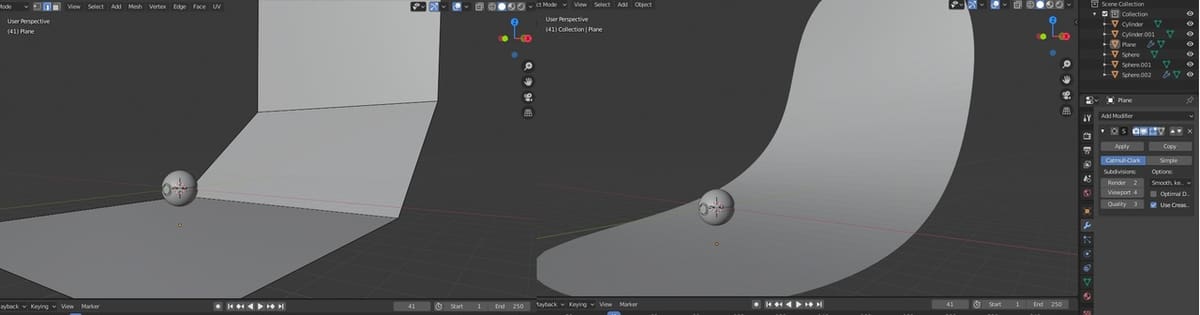
To start, let’s add a background to the Poké Ball – of the type you see in photography studios to make the floor and walls blend together. This is a technique you’ll likely find very useful for models in the future.
- Add a plane from the Add menu, and scale it to be considerably larger. Then, translate it to be below the Poké Ball, as though it were the “floor”.
- In Edit Mode with edge selection, select the edge of the plane towards the back and press E to create a new surface there.
- Move this surface so that it inclines upwards, repeating for a few planes until the angle is more-or-less vertical.
- Back in Object Mode, use the subdivision modifier to smooth out the surface and make it a curve. In this case, apply the changes directly to the Viewport.
Setting Up the Camera
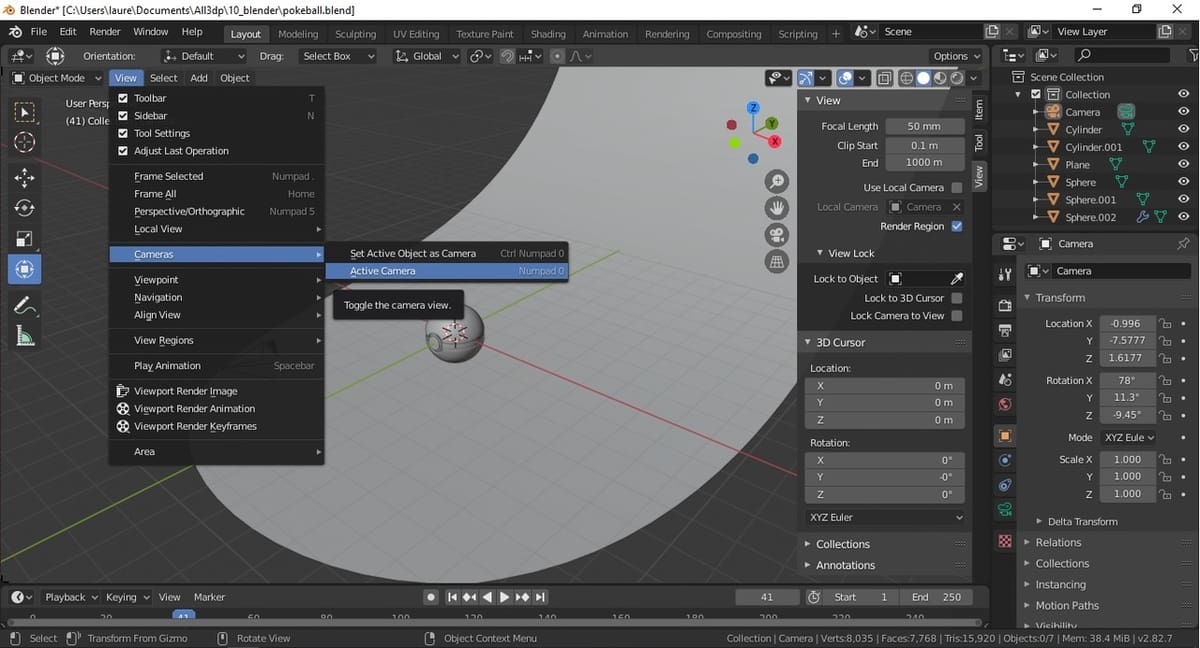
The camera is an object, and as such, it can be added from the Add menu in the same way you’ve added all the other objects. If your 3D cursor is still centered, your camera will appear there, so with the Transform tool, move it to face the Poké Ball and the wall.
Now it’s time to adjust what the camera can see. You can do this with the Transform tool, however, there’s an easier and more practical way.
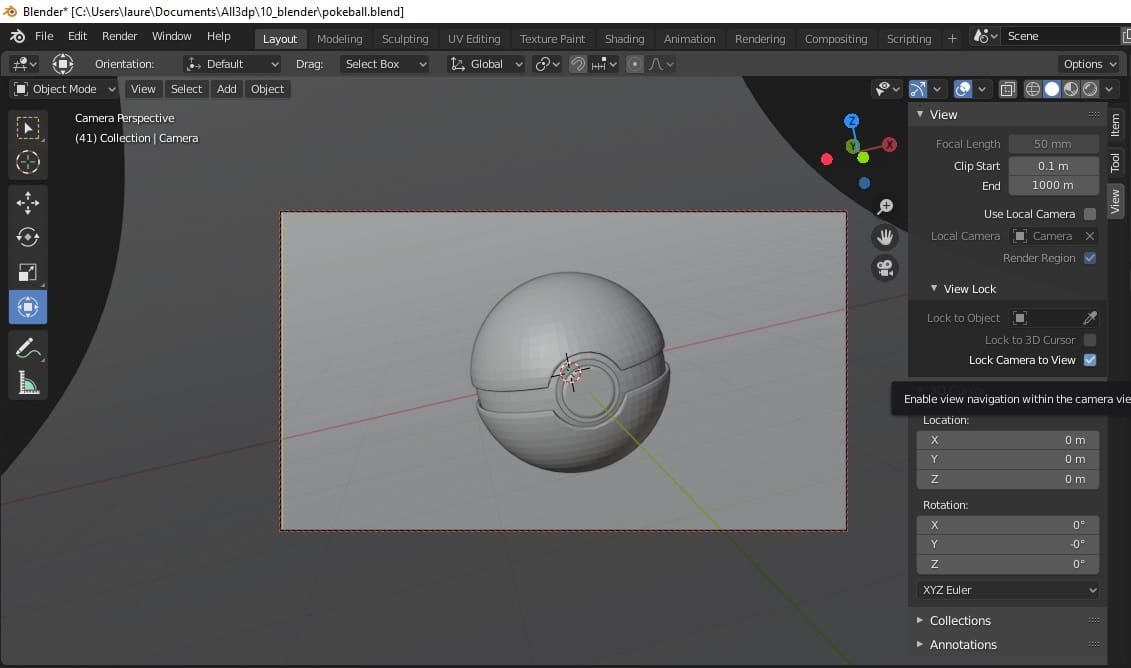
First, we need to access the point of view of the camera.
- Press 0 on your numpad. (If your computer doesn’t have a numpad, you can access this option in the View menu, to the left of the Add menu, as shown in the image.) This will take you to camera view.
- Press N to access the quick menu on the right and go to “View”. Here, you’ll find an option that reads “Lock to Camera View”. Check that box and then simply rotate your view or zoom in and out as you wish, until you’re happy with your camera angle.
Once you’re satisfied, uncheck the box and exit camera view.
Lighting Settings
To start the lighting process, we’ll set the Viewport’s shading to “Render”. Next, we have to head to “Render Properties” in the Properties Editor and make sure Cycles is selected as the render engine, as this is the engine we’ll use for this exercise. Once this is done, everything in render shading should appear pitch black. That’s because we don’t have any light sources!
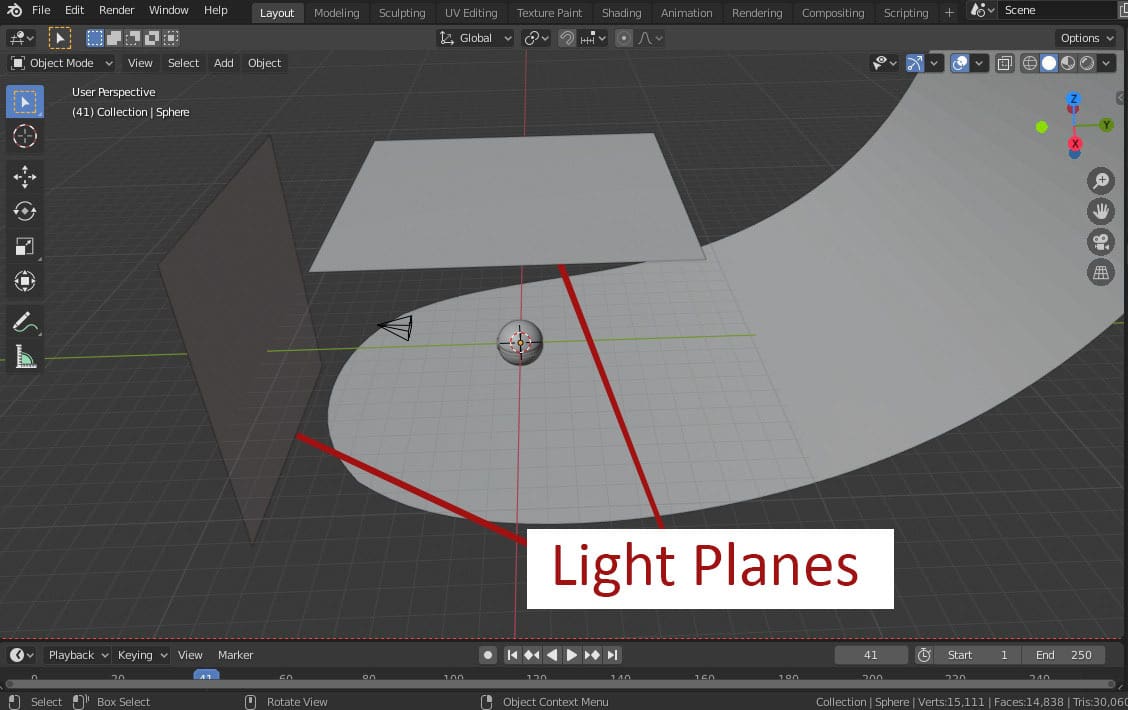
Let’s go back to solid shading and add a plane above our Poké Ball. This will act as a reflective surface for our light source. You could also add a focused light, but this way, the scene will have a more natural feel and a softer shine.
Now, let’s make that plane glow.
- Make sure that the plane is selected and go back into camera view and render shading.
- In the properties editor, select the little ball icon, which represents “Material Properties”.
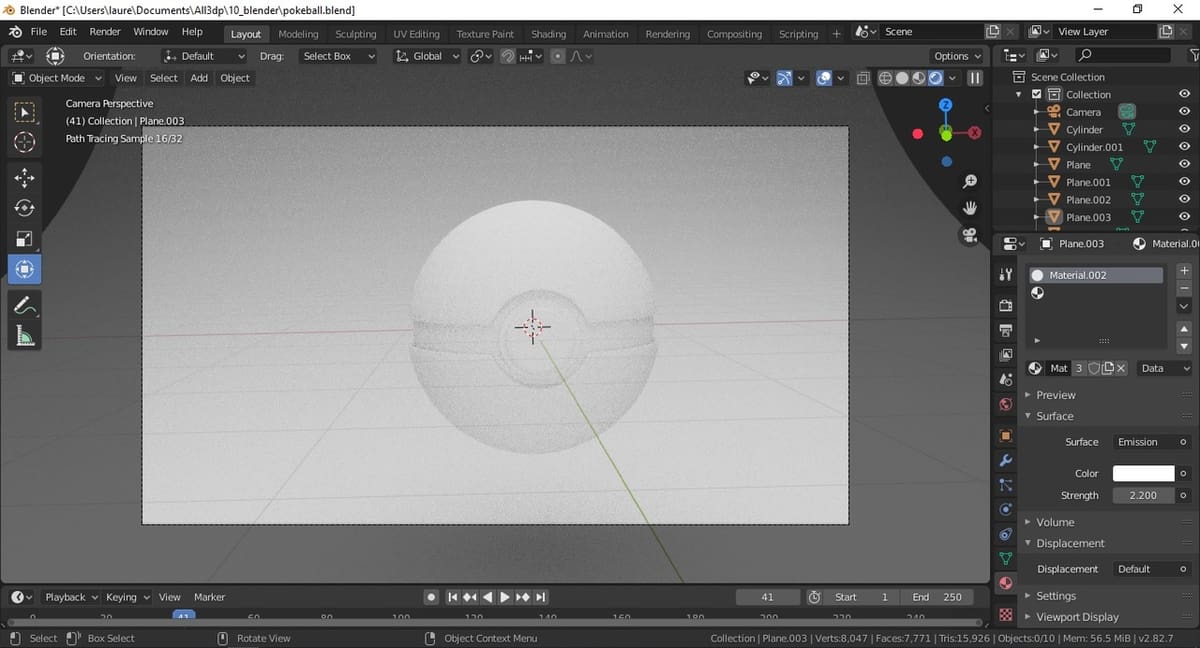
- Add a new material and select “Emission” as the type.
- Adjust the strength until you’re happy with the light level.
Finally, let’s duplicate this plane and move the copy behind the camera. This way, we’ll have two lighting planes.
Adding Color
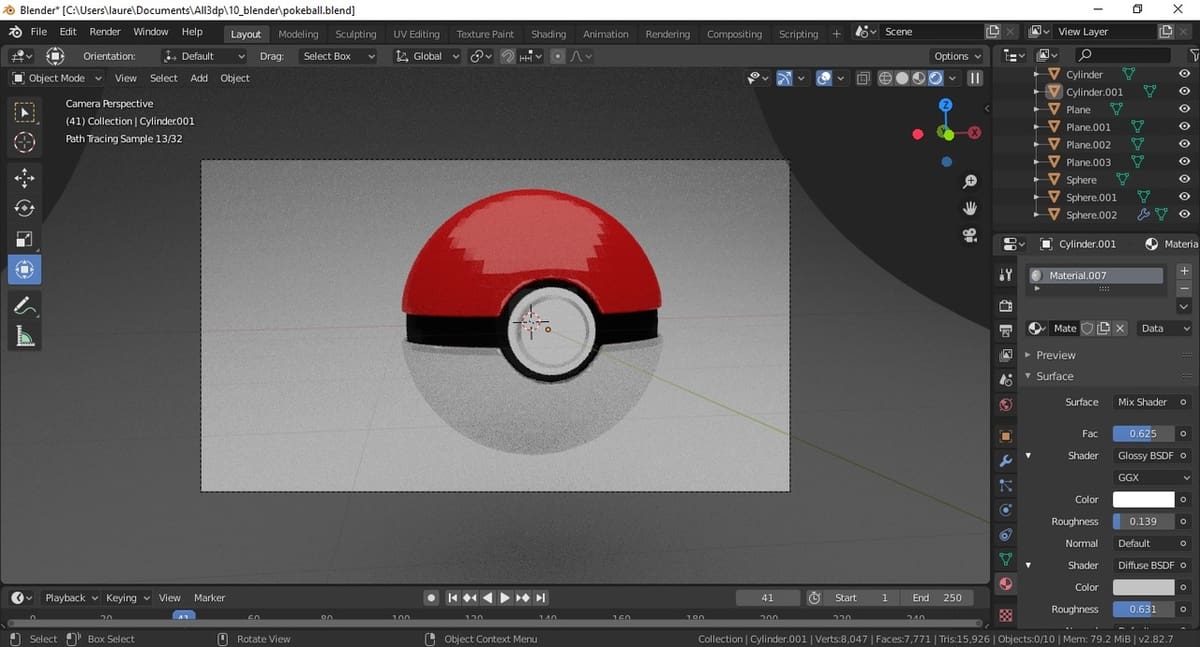
Time to add some life to this scene. For each of the surfaces of the Poké Ball, we’ll use the same material configuration to make things easy. As such, follow these steps for all of the surfaces:
- Add a material of the type “Mix Shader”.
- Select two shades: “Glossy BSDF”, which will give it a shiny finish, and “Diffuse BSDF”, which will make the surface opaque.
- Choose the colors:
- The color of the diffuse shader is the main color of the object. (In the case of the top cover, that would be red.)
- The color of the glossy shader is the hue of the shine. By default, this is white, which can make the color change look too abrupt or jarring. We recommend setting it to a lighter color than your main color (like pink for the top cover).
- Play with the roughness of each shader until you’re happy with how they look.
For the wall, although we could leave it as-is, it’s fun to set it to an opaque material, like velvet. In this case, we’ll set the color to green.
Rendering

Last but certainly not least, let’s go through a few settings to check before getting started with the rendering process.
Output Properties: In the Properties Editor are the “Output Properties”. Here, you can toggle things like resolution, which for this exercise we’ll leave as-is. If, however, you don’t have a powerful machine, we recommend lowering it so that the render process doesn’t take too long.
Samples & Tiles: In “Render Properties”, which are also in the Properties Editor, there’s an option that says “Render” in the sampling tab. This is the number of samples used to Render each pixel. The higher you go, the better the quality of your scene, but it will take longer to render. Typically, any number between 500 and 1,000 is okay.
Also in Render Properties is the performance tab. For tiles, we recommend keeping the number relatively low. 64 should be okay.
Denoising: In “View Layer Properties”, in the Properties Editor, make sure “Denoising” is checked.
Final Touches
Back in Output Properties, in the “Outputs” tab, you can select the folder where you want your image to be saved.
Go to the Blender menu at the top of the UI, and hit “Render > Image”. A new window will open up while your image is rendering. Wait a couple of minutes and it should be done.
To save your image, click on “Image” to give it a name, then save it.
And that’s it! You’ve successfully modeled and rendered a Poké Ball!
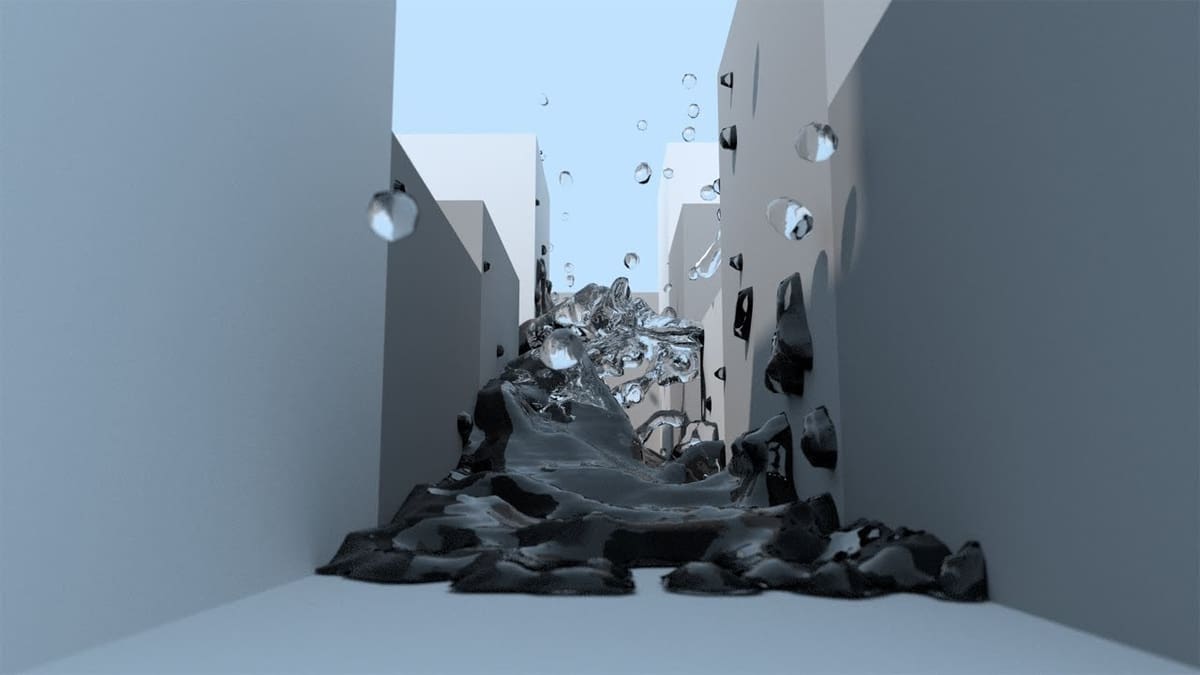
Lead image source: Blender
License: The text of "Blender Tutorial for Beginners: Easy Step-by-Step Guide" by All3DP is licensed under a Creative Commons Attribution 4.0 International License.