Many old-school computing devices came in the form of a keyboard, including the Apple II and Commodore 64. Well, don’t go feeling too nostalgic, because the Raspberry Pi Foundation has brought it back with the Raspberry Pi 400!
Measuring just over 283 x 120 x 20 mm, the keyboard contains components based on a Raspberry Pi 4, with an accessible 40-pin GPIO header along with a MicroSD card slot, two HDMI ports, two USB 3.0 ports, and a single USB 2.0 port with Gigabit Ethernet. It also improves on the Pi 4 in its clock speed, which can reach up to 1.8 GHz compared to the 1.5 GHz of the Raspberry Pi 4.
That aside, as a personal computer, this is a compact addition to your home; the keyboard housing takes up less room and keeps cables tidier. But what can you do with it, and can you expand or modify its existing design? Yes, you can!
Without further ado, let’s take a look at some of the most impressive projects available that have incorporated the Raspberry Pi 400!

Custom Modifications
Part of the fun of a project is all the customizations you can make. Want a cyberdeck that actually works but can’t find it on shelves at a store? Build your own!
Some of these projects involve 3D printing, but if you don’t have access to a printer, try a service like Craftcloud by All3DP. Now, let’s check out what else is possible!
DACBerry 400 Audio Board
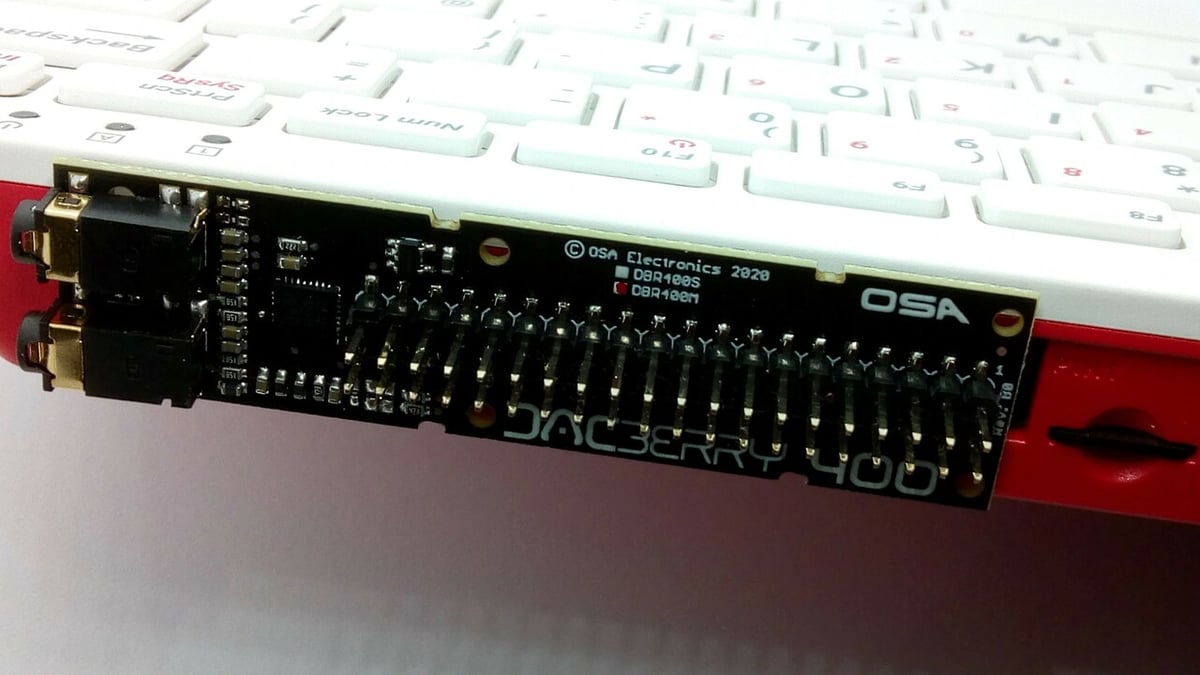
You may already have the Raspberry Pi 400 computer kit and a display monitor set up. All that’s missing is an audio device. However, the Pi 400 lacks any connectors or ports for a speaker or headphones. The DACBerry 400 can help with this, as it’s an audio output connector for the Raspberry Pi 400 that plugs directly into the GPIO pins.
The DACBerry 400 is a Raspberry Pi HAT (Hardware Attached on Top), an expansion board for the Raspberry Pi. It’s a plug-and-play board that usually sits atop the Raspberry Pi. In the case of the Pi 400, it connects to the GPIO pins located at the back of the keyboard. And there are plenty of HATs to choose from for a variety of new projects.
The DACBerry 400 has two gold-plated 3.5-mm ports that can be used to connect headphones, speakers, microphones, and audio amplifiers. With this board, you can take it to the next level by installing the packages for Spotify and Audacity onto your Raspberry Pi 400. Once the packages are ready and the audio devices are plugged in, you can stream music as well as record audio!
Note that there are two versions of the DACBerry 400 – the 400-S and the 400-M. While the former’s good for playing audio, you’ll have to go for the latter if you want to record line-in.
Portable Pi
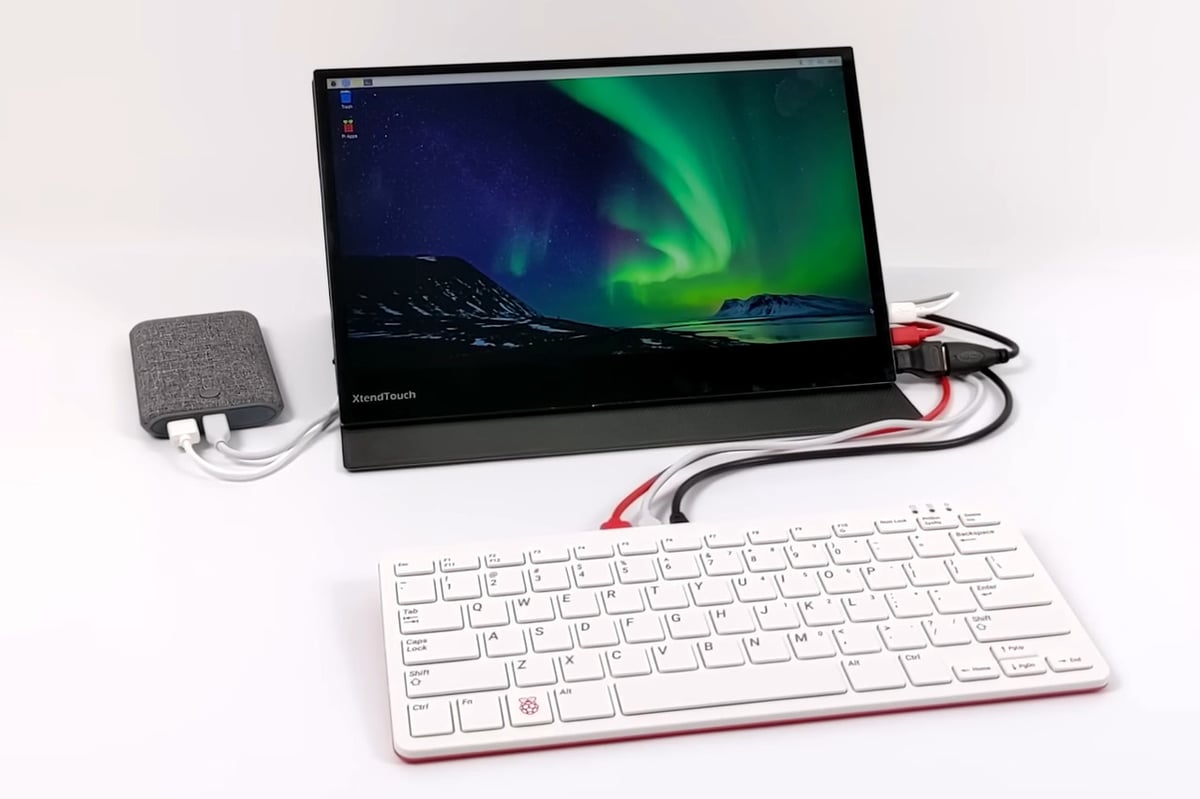
Have you ever wanted to use your Raspberry Pi 400 while traveling but weren’t able to fit an entire monitor into your pack? Well, with this plug-and-play project, you can take your Pi 400 anywhere. You don’t even need an outlet, as this setup has its own portable battery pack.
All you need is a touchscreen monitor, a power pack, and your Raspberry Pi 400. The power pack and monitor are connected to the Raspberry Pi by four cables. There’s an HDMI cable, a cable that goes from the Pi 400 to the monitor to connect the touch, and two power cables, one for the Pi and the other for the monitor. You can opt for a non-touchscreen monitor, which would allow for the use of only three cables.
After a quick assembly process, you’ll have a portable Pi that can be easily used on the go!
- Designer: ETA Prime
- Core components: Portable monitor, battery pack, USB-C to USB-C cable, two USB-C cables, Micro-HDMI to Micro-HDMI cable or a Micro-HDMI to HDMI cable (depending on your monitor port)
- Difficulty: Easy
- Project site: YouTube
Note-Taking System
This next project takes a novel approach to note-taking. With this system, you can seamlessly taken written notes just by speaking. There’s no need to disrupt ongoing activities, whether you’re on a road trip, camping, or even in the shower. There are also no distractions when taking notes, as it’s completely screen-free.
The system consists of the Raspberry Pi 400 with a paired microphone, button, and speaker. The speaker is necessary for computer navigation, as you won’t be using a monitor with this project. The button is for activating the voice transcription function. You’ll need to follow the instructions found on the GitHub page to install the programming, and then you’ll be all set to take notes.
And if you want a waterproof system for when inspiration hits when you’re in the shower, go for a waterproof speaker and keyboard with Bluetooth and pair them to the Pi 400.
- Designer: David Bieber
- Core components: Microphone, speaker, button
- Difficulty: Intermediate
- Project sites: David Bieber, GitHub
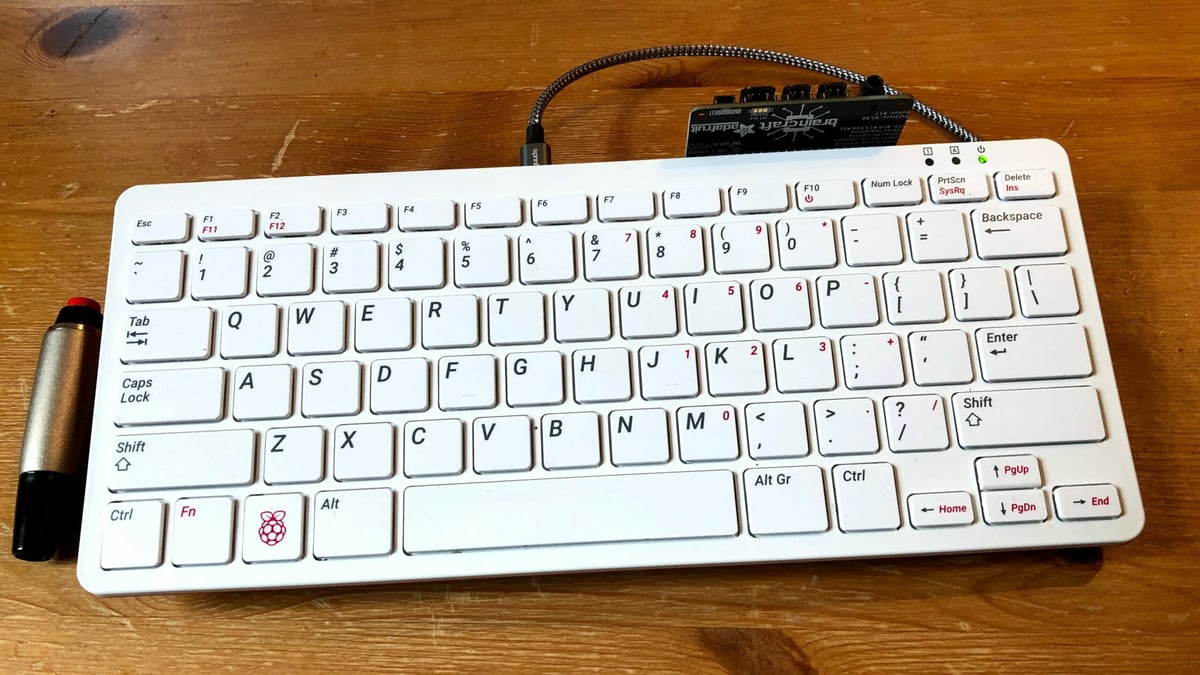
SSD Upgrade

Upgrading a Pi 400 to boot from an SSD offers several advantages over the standard SD card setup, including additional storage capacity, enhanced reliability, and significantly improved reading and writing performance. With SSD prices becoming increasingly affordable, this upgrade can be completed for less than $40, making it a cost-effective solution for maximizing your Pi’s capabilities.
For this upgrade, a Crucial BX500 240GB SSD with a SATA interface is paired with a SATA-USB adapter cable. Despite the plethora of SSD models available, opting for a premium model isn’t necessary for general tasks; the BX500, though not top-tier, proves suitable for Pi usage. The upgrade process involves verifying firmware compatibility for SSD booting, benchmarking performance using diagnostics utilities, and seamlessly copying data from the SD card to the SSD using the SD Card Copier utility.
Upon successful installation, the Pi 400 boots from the SSD, delivering significantly enhanced performance compared to the SD card setup, with sequential write speeds increasing from 26 to 306 MB/s, random write speeds increasing from 785 to 15,968 MB/s, and random read speeds increasing from 2,411 to 15,326 MB/s.
If you want to spruce things up and add functionality, use a 3D printable design to hold the SSD.
- Designer: Matt
- Core components: Crucial BX500 240 GB SSD
- Difficulty: Intermediate
- Project site: Raspberry Pi Spy
Laptop
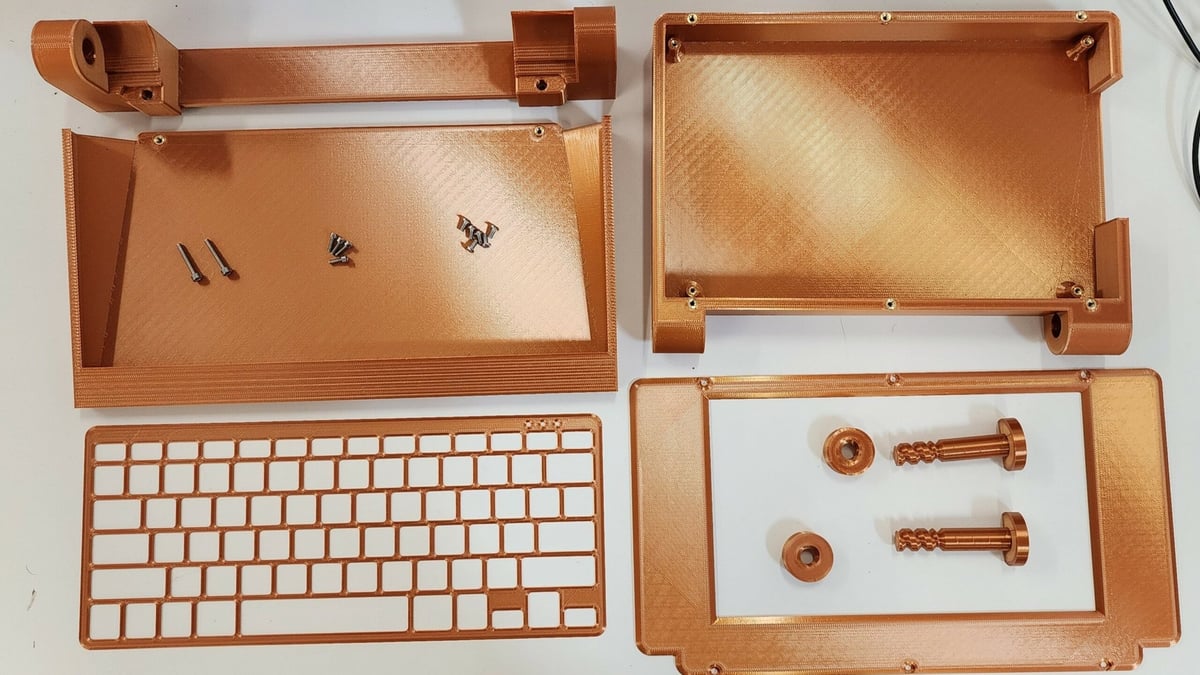
This next project offers a unique opportunity to transform your Raspberry Pi 400 into a fully encased laptop. Through the combination of carefully designed 3D printed parts and a 9-inch HDMI touchscreen monitor, this project provides your Raspberry Pi 400 with a sleek and futuristic appearance reminiscent of contemporary laptop designs.
STL files for 3D printing and the necessary components are available on Thingiverse and Printables. The creator recommends using supports, 25% infill, and four top and bottom layers. Alongside these files, assembly requires standard hardware such as metric nuts and bolts, as well as a few heat-set inserts. More comprehensive instructions and a detailed list of required parts can be found on the project pages.
- Designer: thebjtfellow
- Core components: 9-inch HDMI touchscreen or touchless monitor, 3D printed case
- Difficulty: Intermediate
- Project sites: Thingiverse, Printables
Mini Display
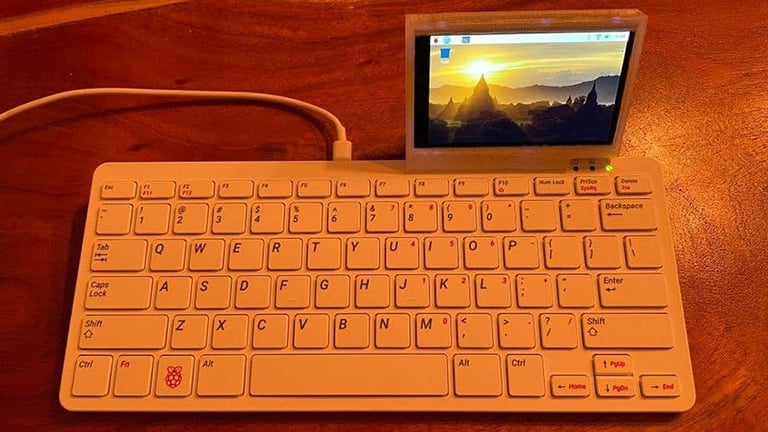
While the Raspberry Pi 400 comes in a convenient design, there’s still one drawback: Adding a display monitor drastically reduces the portability and requires the use of a mess of cables that add a lot of clutter. This project solves that problem with the addition of a custom screen. Specifically, it uses a Pimoroni HyperPixel touchscreen and a 3D printed case.
According to the maker, you should use the included headers with the HyperPixel. Also, make sure you check the alignments of the pins between the HyperPixel and the Pi, as there’s no guiding connector. (Having it aligned incorrectly may damage your Pi or the display!) Finally, printing the parts with supports is recommended.
- Designer: jwktje
- Core components: TFT display
- Difficulty: Intermediate
- Project site: Reddit, Thingiverse
Foldable Screen
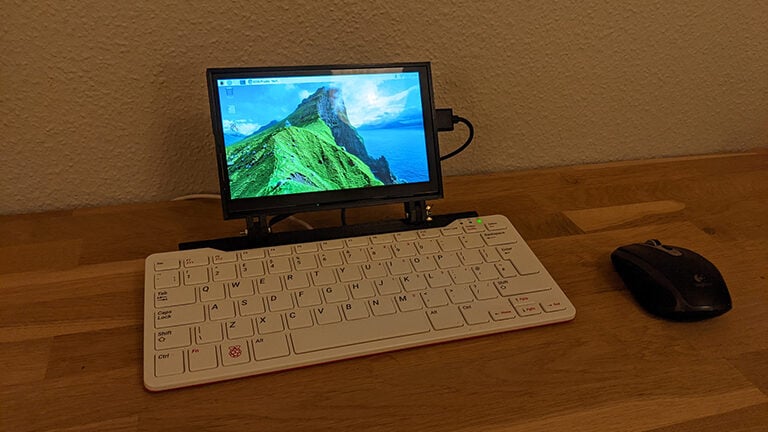
Want to attach a bigger display to your Raspberry Pi 400? This is another display add-on project that gives you a 7-inch display instead. With this screen, your Pi 400 becomes an all-in-one computer with a foldable TFT display.
The project includes a 3D printed mount to attach the display to the Pi 400. When printing, it’s recommended to fill the walls up to 2 mm or to print it 100% solid. Otherwise, the tab in the GPIO will break off.
- Designer: vman81
- Core components: 7″ display
- Difficulty: Intermediate
- Project site: GitHub
Ortholinear Mechanical Keys
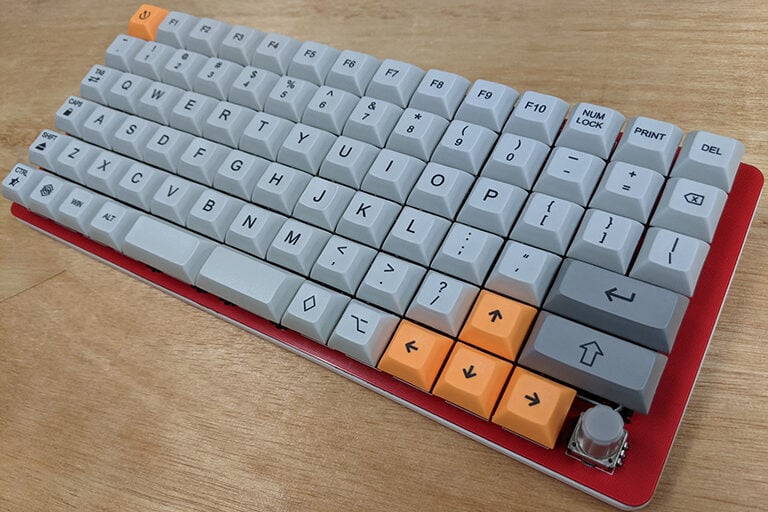
The keyboard on the Raspberry Pi 400 is sufficient for most tasks. However, for those who prefer the tactile feeling and experience of a mechanical keyboard, this project is for you. It turns the Pi 400 into a mechanical keyboard with the addition of a rotary encoder.
All the switches are PCB-mounted Gateron clears, which fit very snugly. Alternatively, you could always 3D print your own classic keycaps (there are also hundreds of remixes) or these Cherry MX keycaps.
- Designer: KB
- Core components: Ortholinear mechanical keyboard PCB including PCB mount, Gateron clear key switches
- Difficulty: Intermediate
- Project site: 40% Keyboards
Cyberdeck
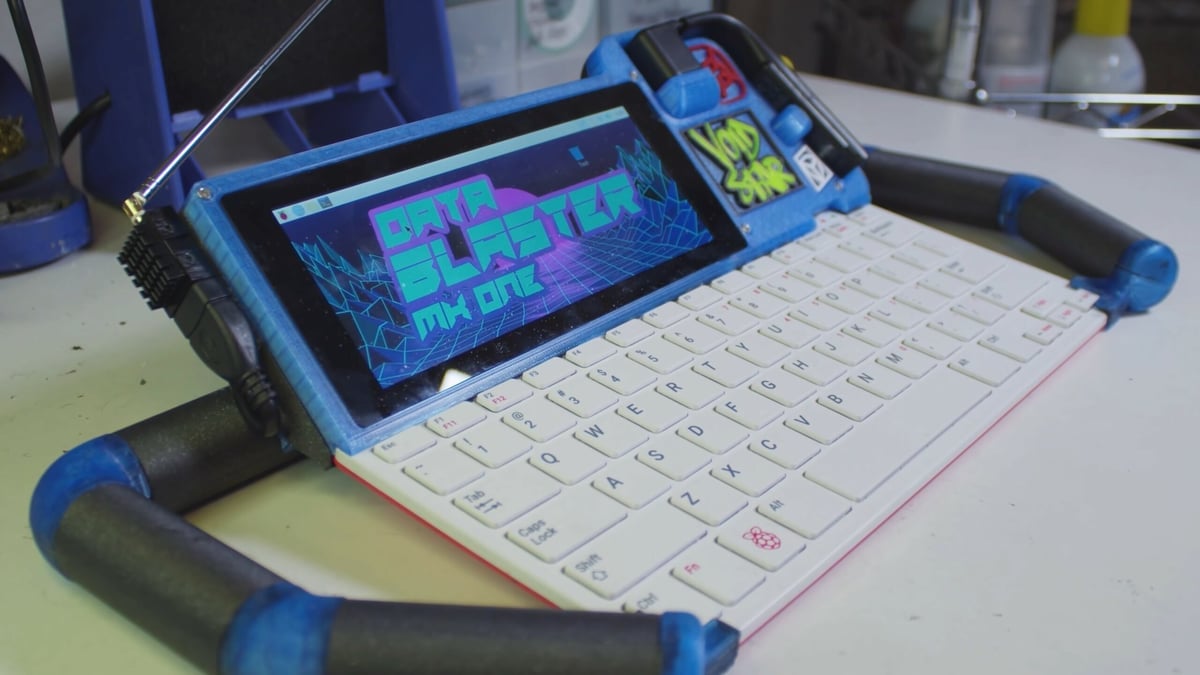
Imagine a detachable, wearable display with 3D printed handles! This Data Blaster is a cyberdeck based on a Raspberry Pi 400.
For those who don’t know, the concept of a cyberdeck came about when personal computers were still exclusively big, chunky desktop computers. Back in the day, many people were trying to figure out a way to create a fully portable computer. Then there was the merging of a keyboard and a computer, as seen in the Apple II, Commodore 64, and the Atari.
Cyberdecks were also featured in the 1984 cyberpunk novel Neuromancer. The idea of a cyberdeck was that a hacker would take these unique designs and improve them in new ways. Now you can make your own with the Pi 400! While this is a prototype, there are 3D printable parts available for download.
- Designer: Zack Freedman
- Core components: Wearable display, Micro-USB ribbon cable, USB-C ribbon cable, slim Micro-HDMI cable, Nano 3, Micro-HDMI to HDMI adapter, Anker PowerCore Speed 20,000, illuminated momentary pushbutton
- Difficulty: Advanced
- Project site: YouTube
OS Options
The above projects have covered some hardware modifications for the Pi 400. In terms of software, you can also customize the Raspberry Pi 400’s operating system.
Raspberry Pi OS by itself already provides much functionality for personal computer use, but there are also other options available.
Let’s take a look!
Pop!_OS
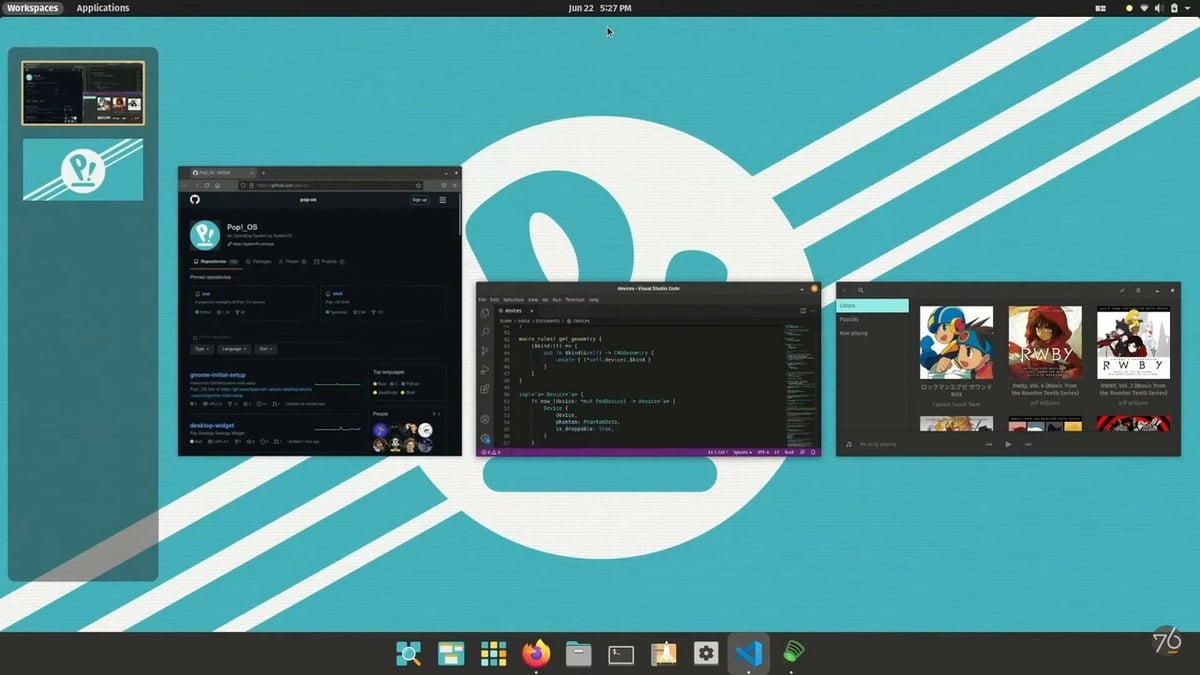
Pop!_OS is one of the best Ubuntu-based Linux distributions available. It has full support for GPUs, which is why it’s great for gaming, along with robotics and other applications.
If you’re a person who multitasks and likes to keep various windows and tabs open, you’ll absolutely love the auto-tiling feature, as it takes out the hassle of dragging and moving your windows to arrange them. Apart from auto-tiling, it also comes with a stacking feature.
All in all, Pop!_OS has many things to optimize your workspace. As a result, it’s an ideal operating system for beginners using Raspberry Pi 400. And there’s a useful YouTube tutorial if you need help installing Pop!_OS on the Raspberry Pi 400, although it’s worth noting that the tutorial is for the beta version.
- Designer: System76
- Core components: Micro-HDMI to HDMI cable, MicroSD card, USB mouse, display
- Difficulty: Easy
- Project sites: GitHub, System76
Ultimate Amiga
Back in the late 80s to early 90s was the golden era for the Amiga. The Amiga is a family of computers by Commodore with 16- or 32-bit processors and 256 KB or more of RAM. (Back then, these were significant improvements over 8-bit systems!)
This project pays tribute to this history by turning your Pi 400 into the “Ultimate” Amiga emulation machine. (Your Pi’s enclosure and physical form are retained.) All you need is a MicroSD card, a Micro-HDMI to HDMI cable, a USB power source, a power supply, and a display. The OS in this project allows users to boot the Raspberry Pi into the Amiga workbench.
A lucky few of you might have previously played with the Amiga 600. You may have learned to program Assembly with it or to play really old-school games. In addition to having fun, learning to write programs on the Amiga can be educational. Its simple environment is conducive to learning low-level programming languages. And despite having simpler hardware architecture, there are features still used in modern computing, such as interrupts.
- Designer: ETA Prime
- Core components: Micro-HDMI to HDMI cable, MicroSD card, USB mouse, display
- Difficulty: Easy
- Project site: YouTube
DOS
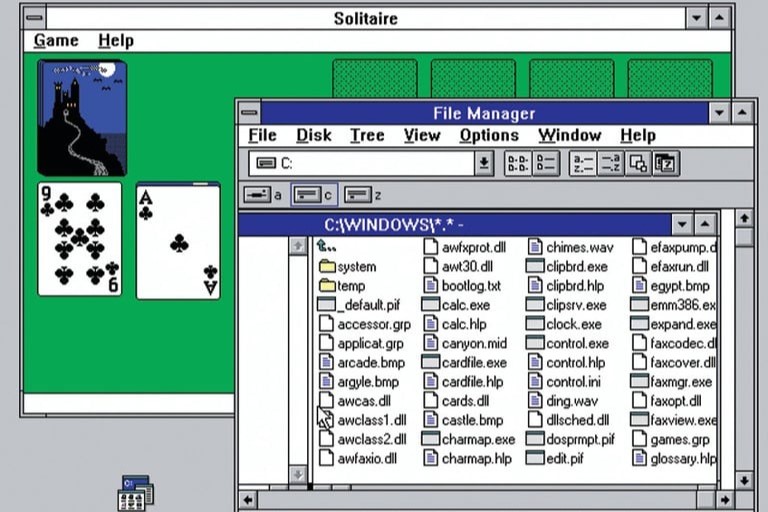
For those who fancy the Windows operating system, you could turn the Raspberry Pi into a DOS emulator. With just a few standard parts (a Micro-HDMI to HDMI cable, MicroSD card, USB mouse, and the official power supply), you’re good to go. Then, the powerful DOSBox-X emulator boots the Raspberry Pi to DOS and can run anything from Windows 3.11 to classic games.
- Designer: MagPi
- Core components: Micro-HDMI to HDMI cable, MicroSD card, USB mouse, display
- Difficulty: Intermediate
- Project site: MagPi
Windows 11
While Raspberry Pi OS is the default choice in most starter kits, some people are looking for familiarity. All you need are those standard peripherals for the Raspberry Pi 4: a Micro-HDMI to HDMI cable, a MicroSD card, a USB mouse, and the official power supply.
So far, Windows has been used for robotics , such as in this rover, air hockey playing, and even home automation. You can also find helpful tutorials on YouTube if you aren’t sure how to install Windows 11 on the Raspberry Pi 400.
- Designer: Botspot
- Core components: Micro-HDMI to HDMI cable, MicroSD card, USB mouse, display
- Difficulty: Intermediate
- Project site: GitHub
RISC OS
The Acorn Archimedes is an ARM-based system with a 32-bit CPU running at 8 MHz. Released in 1987, this was a significant upgrade from 8-bit computers. It also utilized the RISC operating system.
Imagine being able to use that RISC OS now, but an upgraded version! That’s actually possible on the Raspberry Pi. You just need the standard peripherals you’d connect to a Raspberry Pi 4: a Micro-HDMI to HDMI cable, a MicroSD card, a USB mouse, and the official power supply.
Benefiting from the Pi 400’s faster speed, you can expect an ultra-light and fast OS that comes with modern features like internet connectivity and networking.
- Designer: MagPi
- Core components: Micro-HDMI to HDMI cable, MicroSD card, USB mouse, display
- Difficulty: Intermediate
- Project site: MagPi
Entertainment
For more entertaining projects that can add functionality to your Raspberry Pi 400, check out these options. From creating music to managing your smart home devices, including adding some gaming ideas, you’re unlikely to be bored.
First, you’ll learn to build the circuit and customize the design of its case. Building on that, you can create your own retro games or modify open-source designs. With the Raspberry Pi running RetroPie, there are plenty of ways to start playing. For example, you could build a BMO, a Gameboy, or arcade machine. Without further ado, let’s look into these gaming projects with the Pi 400!
RetroPie
RetroPie’s name is fitting: It’s a front-end management application for playing all your favorite arcade, home-console, and classic computer games. And the good news is that it’s now playable on the Pi 400 with RetroPie 4.7!
RetroPie is built upon Raspbian (now Raspberry Pi OS), EmulationStation, RetroArch, and a few other projects, so minimum setup is required. With the peripherals you’d connect to a Raspberry Pi 4, you’re ready to go. What’s nice about using the Pi 400 is that it already comes with a full enclosure and buttons!
Optionally, you can also add additional game controllers. Taking it a step further, you could even create your own custom controller like this Raspberry Pi-powered Nintendo Switch.
- Designer: Madlittlepixel
- Core components: Micro-HDMI to HDMI cable, MicroSD card, USB mouse, display
- Difficulty: Easy
- Project site: YouTube
Box86
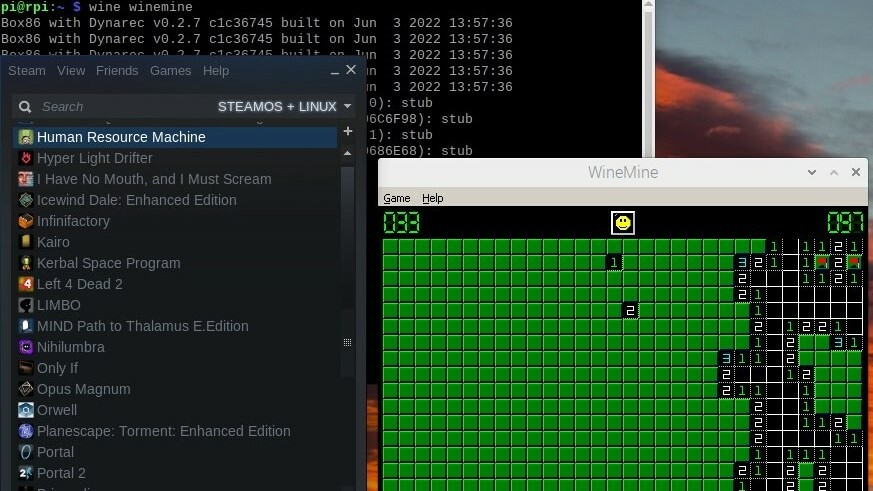
Box86 is a Raspberry Pi emulator similar to RetroPie, but instead of running retro arcade games, it can run x86 Linux binaries.
This means that you can bring your Steam library over to the Box86 and play your games. It may not be able to run all of them perfectly from the get-go, as some will need some tweaking, but there should be plenty for you to be entertained with.
This project by Adafruit shows you how to build Box86, run Linux binaries, and use Wine to run Windows x86 binaries, all of which is done on the Raspberry Pi 400.
- Designer: Matt G
- Core components: Micro-HDMI to HDMI cable, MicroSD card, USB mouse, display
- Difficulty: Easy
- Project site: Adafruit
Joystick Interface
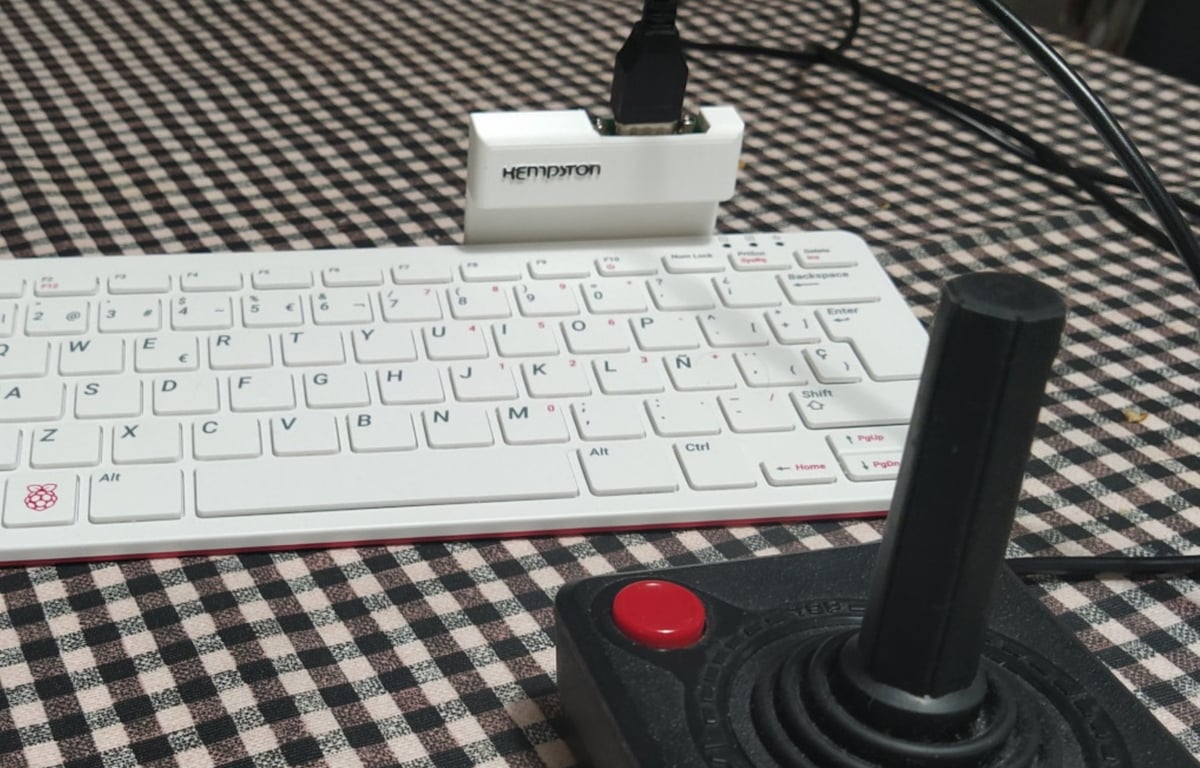
This project adds a simple ZX-Spectrum-styled joystick to the Raspberry Pi 400. Within the board, a DB9 connector for the joystick can be connected to the Pi’s pins so you just need a DB9 cable to play all your arcade favorites!
The maker recommends printing the joystick interface with a 0.15-mm resolution and 25% infill, with no need for rafts or supports.
Perhaps you already have a retro joystick lying around? You can also use a retro DB9 joystick with your Pi 400 through a free Unix spectrum emulator.
- Designer: carlesoriol
- Core components: DB9 cable
- Difficulty: Easy
- Project site: Thingiverse
Synthesizer
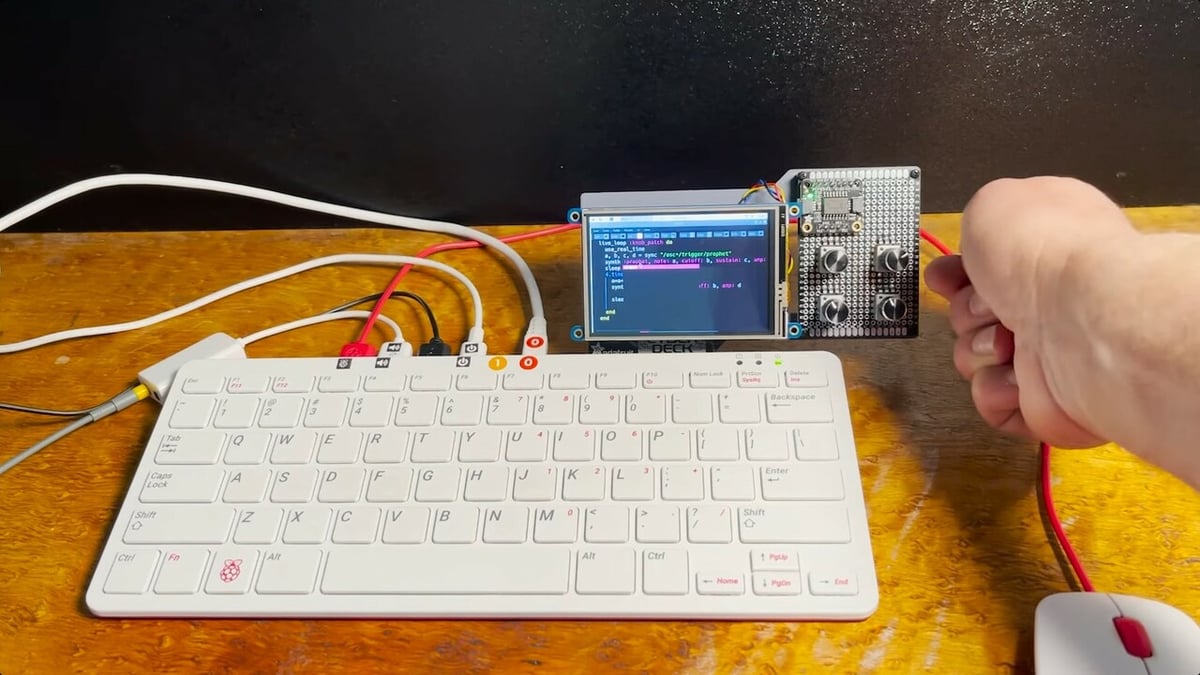
We’ve all heard of a synthesizer, if not in music, then surely in movie soundtracks – one of the best examples is probably Blade Runner. On the other hand, back in the 80s, “synth-pop” was all the hype in the world of music. This was due to the fact that synthesizers became affordable and compact in size.
This synthesizer project from Adafruit is a mini musical instrument on a Raspberry Pi 400. For this, you’ll need to gather some components, many of which are available at Adafruit. Some of the essential components needed are potentiometers with knobs, a Cyberdeck HAT, 8-bit ADC/DAC, and a display unit.
In addition to the components, you’ll need to 3D print a mounting plate that you can find on Thingiverse. After assembly, download and run your Python scripts and the synth is ready. Just twist the knobs to compose your music.
- Designer: John Park
- Core components: Cyberdeck HAT, PiTFT Plus display, 8-bit ADC/DAC, potentiometers
- Difficulty: Intermediate
- Project site: Adafruit
Smart Device Control
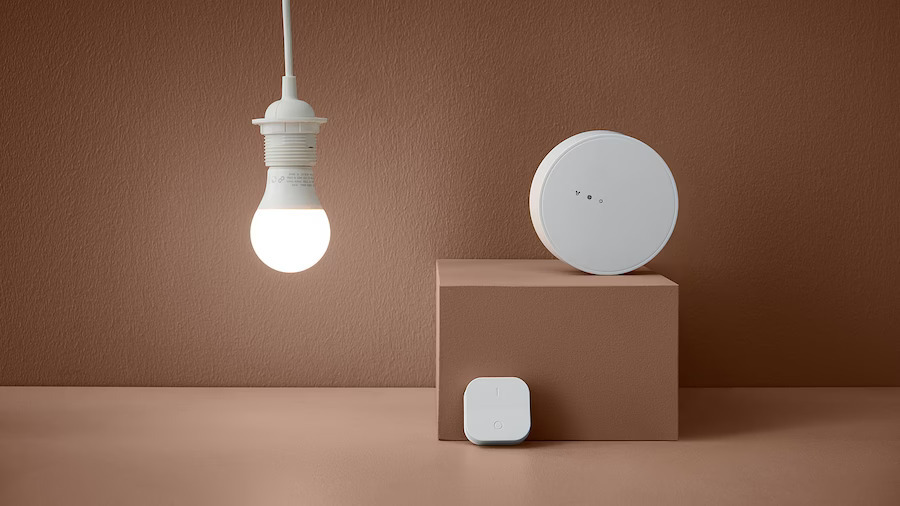
Those familiar with Ikea Trådfri smart products know that they can be controlled via remote control or a mobile app. Among these products, there’s the Trådfri gateway, which acts as the main hub for smart devices. These may include your light bulbs, blinds, and speakers.
An alternative to controlling the devices is using Node-RED software (a programming tool) with the Raspberry Pi 400. Node-RED, as the name suggests, is visual editing software used to wire nodes together, which manage the devices. This tool gives you more customizable control over your smart products. Node-RED comes preinstalled with Raspberry Pi OS – all you need to do is set it up.
First, you can try to get the hang of connecting these Ikea devices and controlling them. Next, you can challenge yourself to connect other smart devices along with other sensors, Arduinos, and Raspberry Pis. Additionally, you can connect a number of Trådfri bulbs and create custom special lighting effects. The sky’s the limit!
- Designer: OKdo
- Core components: Ikea Trådfri Gateway kit
- Difficulty: Intermediate
- Project site: OKdo
Docking System
This DIY docking station addresses two key features: battery power and a real-time clock (RTC). The Raspberry Pi 400, although a compact and efficient personal computer integrated into a keyboard, lacks these functionalities out of the box. The docking station provides seamless switching between battery and AC power, akin to a laptop, ensuring uninterrupted usage, even in scenarios where AC power is unavailable.
It also incorporates an RTC circuit to maintain accurate date and time information, which is crucial for various applications, especially when offline. All of these parts are packed into a 3D printed case.
The project employs several readily available breakout boards and components. Firstly, a PCF8563 breakout board ensures accurate timekeeping for the Raspberry Pi 400. Secondly, a TP4056 Li-ion charger combined with an MT3608 boost board enables seamless power management between battery and AC sources, powered by a 5000 mAh LiPo battery for extended usage. Furthermore, an INA219 current sensor measures battery voltage and current, and a custom-designed battery-level indicator widget integrated into the Pi’s interface offers a real-time battery capacity display.
- Designer: Jan Dolinay
- Core components: PCF8563 breakout board, TP4056 Li-ion charger, MT3608 boost board, single-cell LiPo battery, INA219 current sensor, battery-level indicator widget, 3D printed case
- Difficulty: Intermediate
- Project site: Code Project
License: The text of "The Best Raspberry Pi 400 Projects in 2024" by All3DP is licensed under a Creative Commons Attribution 4.0 International License.
CERTAIN CONTENT THAT APPEARS ON THIS SITE COMES FROM AMAZON. THIS CONTENT IS PROVIDED ‘AS IS’ AND IS SUBJECT TO CHANGE OR REMOVAL AT ANY TIME.