
The 30 Best Creality Ender 5 (Pro) Upgrades & Mods

The Creality Ender 5 and Ender 5 Pro are great 3D printers that can be made even better! Check out the best Ender 5 Pro upgrades and mods.
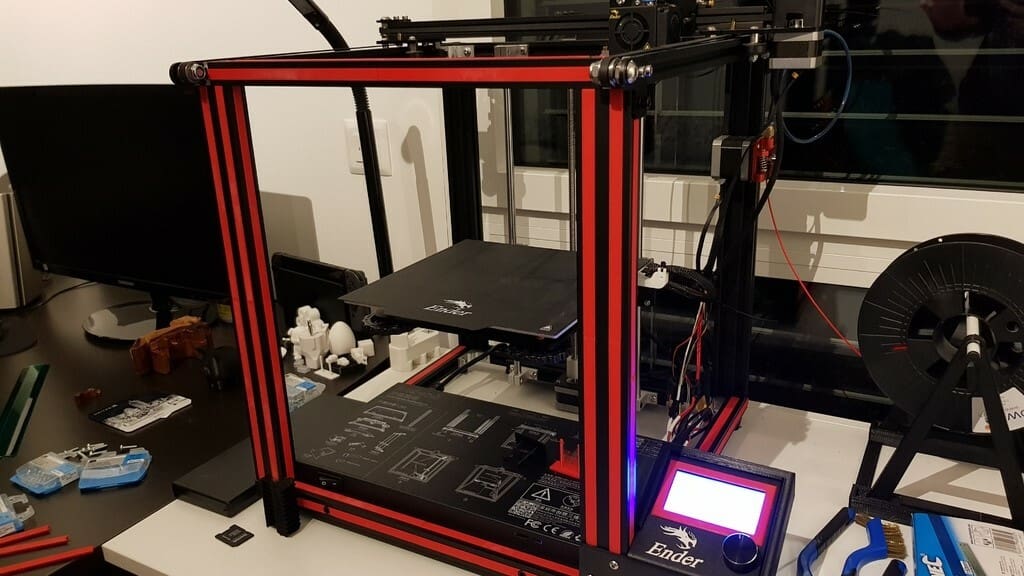
Creality’s Ender 5 and Ender 5 Pro build on the immense success of the company’s earlier 3D printers, including the CR-10 and Ender 3 series. With a formidable build volume of 220 x 220 x 300 mm and surprisingly quick print speeds, the Ender 5 and Pro are ideal 3D printers for budget-conscious consumers looking for impressive print quality at a low price.
Like their popular predecessors, the Ender 5s are capable of highly detailed prints, but there’s always room for improvement! To help you upgrade your Ender 5, we’ve found the best mods available to purchase or 3D print. The selections featured on this list will add new features or improve the overall functionality or safety of your Ender 5.
The specs and frame design of the Ender 5 and Pro are essentially identical, so most of the following upgrades are compatible with both models. Whichever model you have, let’s see what’s out there!
To Buy
If you’re looking for mods and upgrades that can be purchased ready to use, here are our top picks to get you up and running as fast as possible.
Build Plate
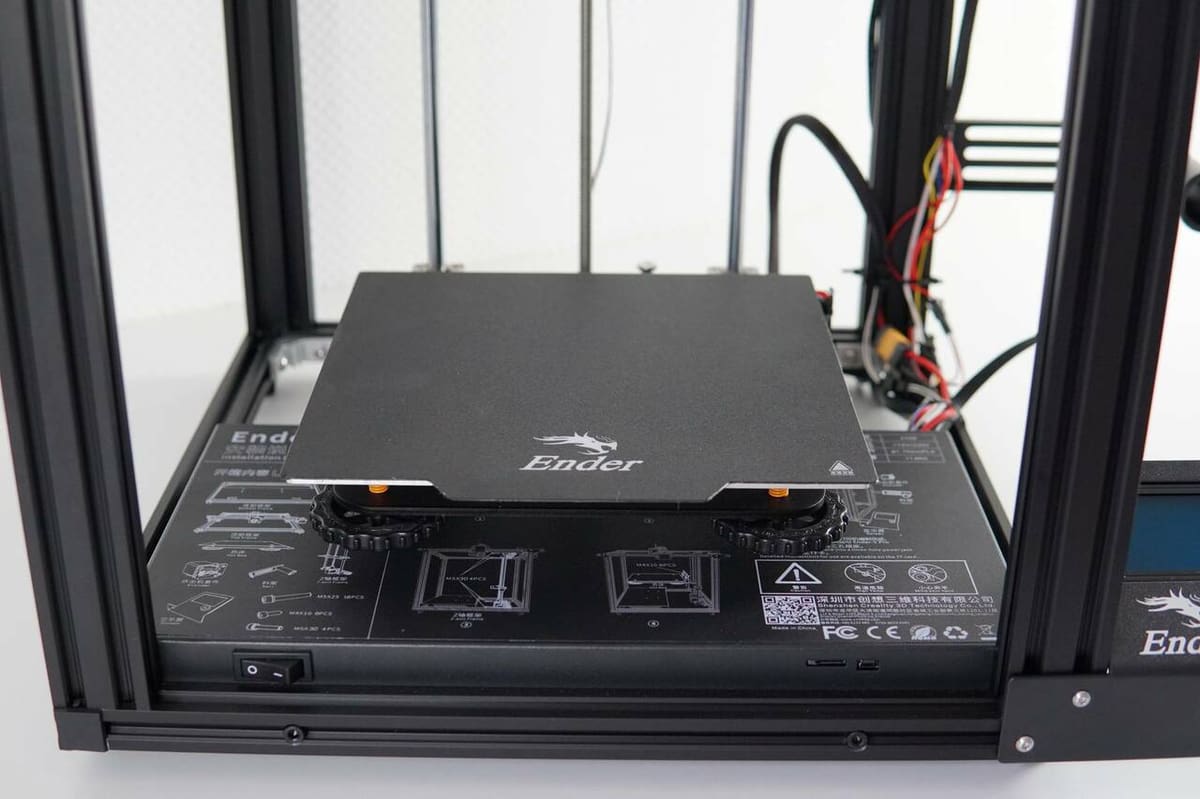
It’s no secret that your choice of print surface is a crucial (and often contentious) decision to make. The Ender 5’s magnetic build plate will work out of the box, but will inevitably lose grip with time, resulting in more and more failed prints. If you’re experiencing adhesion issues or your trusty plate of choice has simply worn out from the use, these mods will help you get consistent results.
The simplest and most affordable upgrade is to add a PEI sticker to the stock magnetic build plate. This will give you excellent bed adhesion while retaining the convenience of the magnetic option. Just don’t use a scraper or a razor to remove your parts from the bed as the surface is easily damaged!
Alternatively, a polypropylene build plate offers improved adhesion for materials like ABS, PLA, and others – even when the build plate is a bit dirty – and prints can be removed by hand. Mounted with clips or tape, Creality claims that its polypropylene build plate is lighter and stronger than glass and also less prone to breakage.
If you’re after something even more durable, Creality also sells a tempered glass build plate. Made with a carbon and silicone build surface, it’s a major improvement over the stock print bed, with a hardness of 8 Mohs and heat resistance up to 400 °C. You can flip the plate to the bare glass side if you prefer a smooth finish for your bottom layers, just be careful not to use a scraper on the textured surface!
Finally, if you want a single build plate to rule them all, Garolite is the way to go. Also called G10, this material is made out of glass fibers pressed together with resin to form a sturdy and resistant sheet. You can print pretty much anything on it, from PLA and PETG to nylon, POM, and PC, so it’s worthy as a long-term investment in your Ender 5.
- Skill level required: Beginner
- Cost: $15-40
- Where to find it: PEI, polypropylene, tempered glass, Garolite
Enclosure
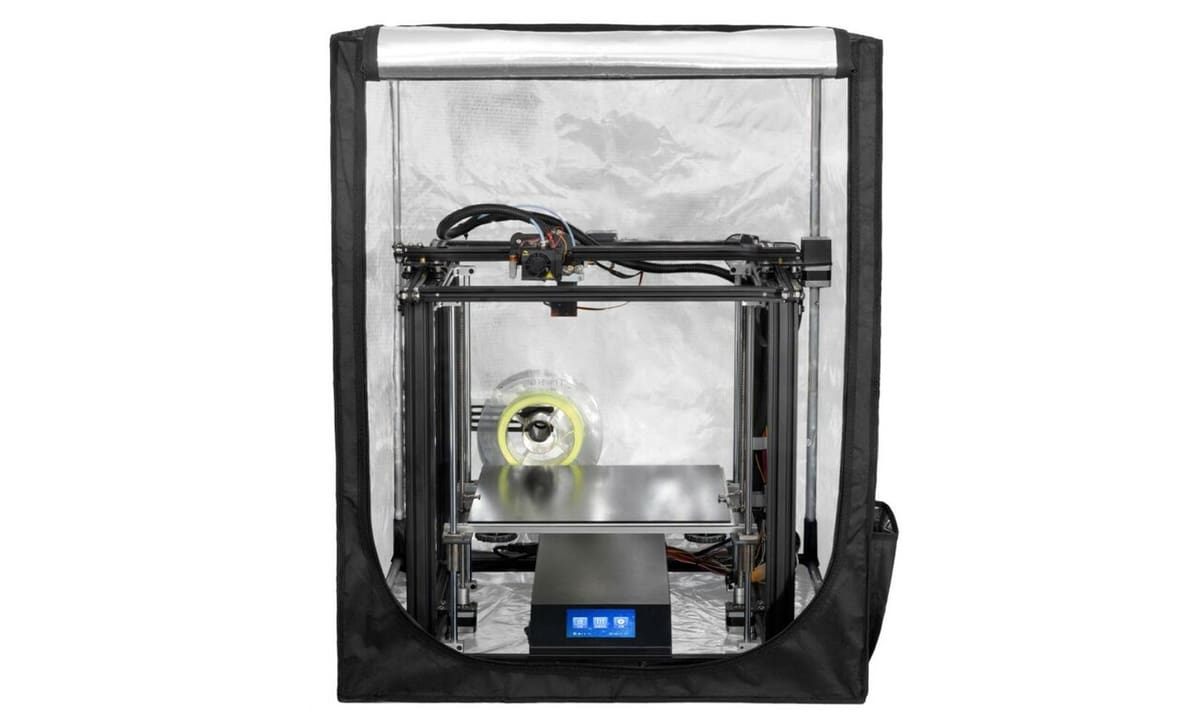
One downside to the Creality Ender 5 is that the frame is completely open, making it susceptible to any temperature changes or other external factors. Thankfully, Creality has created this easy-to-assemble 3D printer enclosure to improve the overall printing experience – both for you and the machine itself. This upgrade is easy to install, can be folded for efficient storage, and is even equipped with pockets to hold necessary tools. You can easily access the printer by unzipping the front or side of the enclosure, and there’s a see-through panel for full-time monitoring.
The benefits of this 3D printer enclosure are twofold. Not only does it help maintain a constant temperature inside the print chamber, but it can also keep the external environment out. This will help improve print quality and stability, keep out dust, and reduce the sound emanating from the 3D printer. The enclosure also has an interior made from flame-retardant aluminum film, preventing any potential fire from spreading outside of the enclosure. Just remember to check the dimensions before purchase, as only the medium and large sizes will fit the Ender 5.
Alternatively, if you’re looking for a fun DIY project, you can always build your own enclosure.
- Skill level required: Beginner
- Cost: ~$90-$105

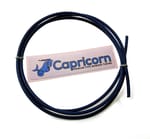
Capricorn Tubing

It may just look like a sleek blue filament passageway, but the Capricorn PTFE tubing is an Ender 5 upgrade that will make a noticeable difference when printing with exotic and professional materials. The Ender 5 Pro already comes with a Capricorn Bowden tube, so this upgrade will help get the original Ender 5 up to snuff.
This low-friction Bowden tubing is made out of high-grade PTFE to cause less friction. This means that fewer and smaller retractions are needed, resulting in more accurate and good-looking prints. It will also reduce filament clogging when working with more unstable materials, such as wood- or metal-filled filaments.
You can choose between two variants: the classic TL and the ultra-low-friction, “high-temp” XS. While the XS can sustain higher temperatures, remember to follow safety precautions and don’t exceed the recommended temperature range of your filament.
- Skill level required: Beginner
- Cost: ~$12-$30
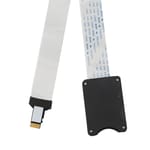
SD Card Extension Cable
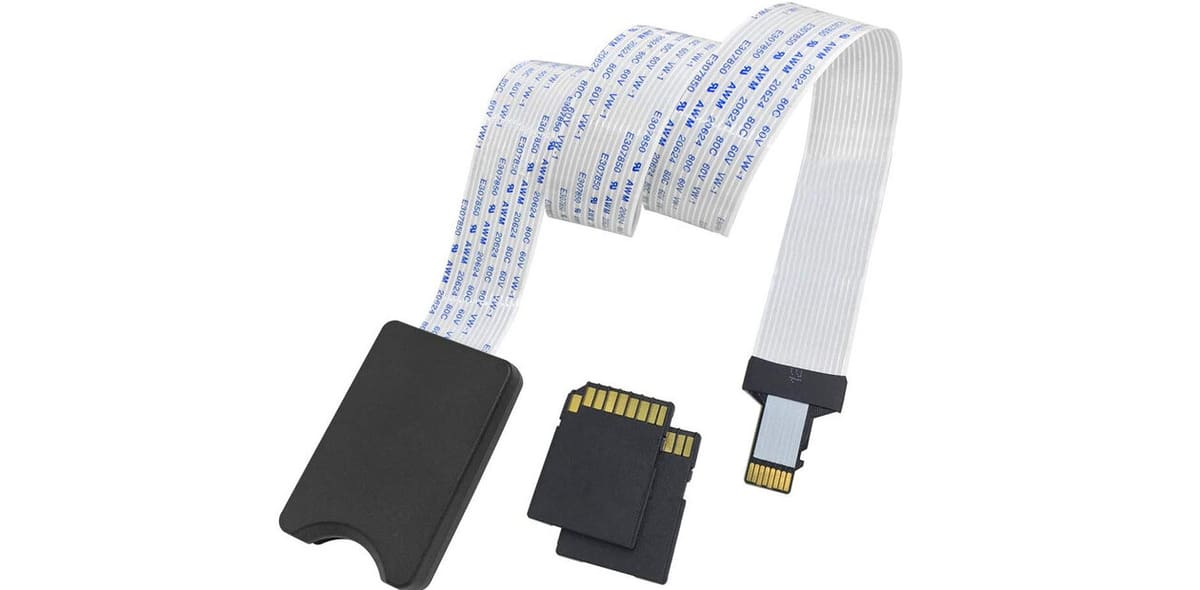
If you want some more flexibility when it comes to loading an SD card into your Ender 5, check out this SD card extension cable. It’s easy to install and use, and you can 3D print a case to make it easier to insert a MicroSD card. Because MicroSD cards are tiny, it can be a frustrating experience trying to insert them into the stock SD slot.
As you’ll see in 3D printable mods and upgrades later on in the list, there are other DIY approaches you can take as well. However, if you want to spend a few bucks for an official SD card upgrade for your Ender 5, this might be exactly what you need.
Just be aware that the flat cable is very thin and not shielded against interferences, which has the potential to lead to data corruption (particularly relevant in the case of SD firmware flashes), and overall printing issues. The very thin cable is also not meant to be folded, just lightly flexed. But when handled with care, this can be a huge upgrade, especially if you use an enclosure that limits access to your printer.
- Skill level required: Beginner
- Cost: ~$10
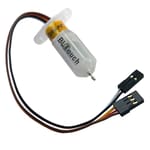
BLTouch Auto-Leveling Sensor
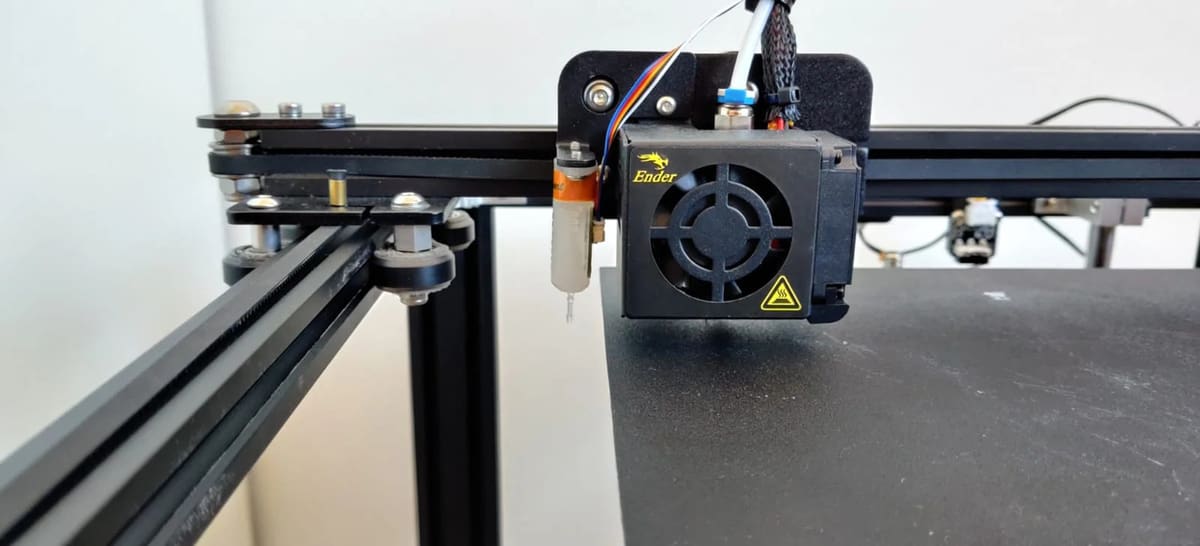
There are several reasons why the Ender 5 is beloved by budget-minded consumers, but ask any of them if they’d like to see auto-bed leveling integrated into this machine, and you’ll be greeted by a resounding “yes.” A popular option for many 3D printers, the BLTouch auto-leveling sensor will make 3D printing with your Ender 5 much more enjoyable.
As many of us know, manual calibration can be time-consuming and tiring, but with the BLTouch, you can add automated bed leveling to your Ender 5. It comes with a bunch of intuitive features, including self-testing techniques, alarm, alarm release, and test mode. The installation process may take a bit of time and patience, but it’ll be well worth the effort once you start printing without the need to constantly recalibrate.
Check out Teaching Tech’s installation guide if you want to learn more about hooking up the BLTouch to your Ender 5. And for an alternative, Creality has also released the CR Touch, their take on the BLTouch, and the two sensors are comparable in every aspect.
- Skill level required: Intermediate
- Cost: ~$40
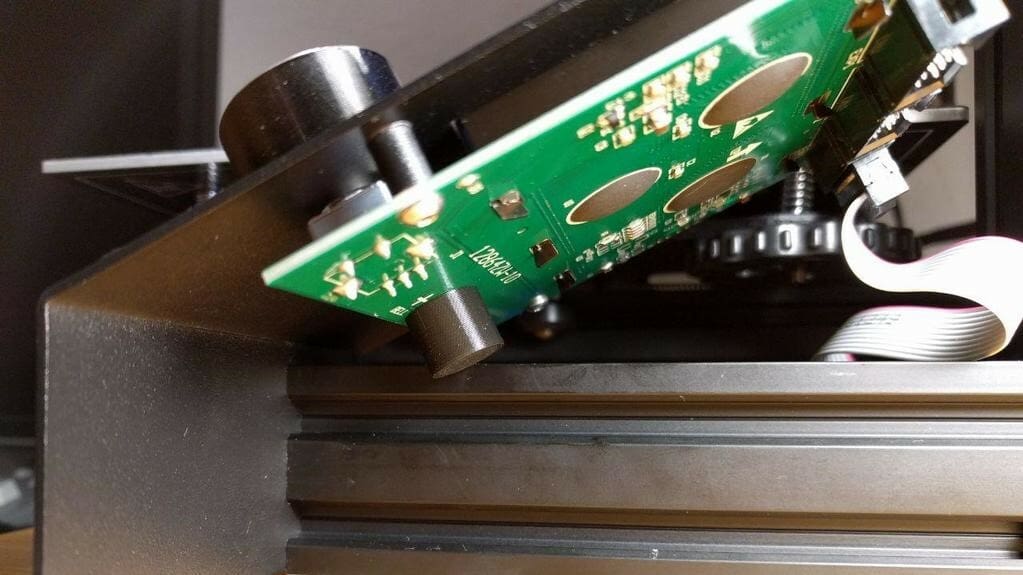
Mainboard
One of the most popular improvements on the market for an Ender 5 is a silent controller board. Thanks to more advanced stepper drivers and motor control techniques, the annoying whining and chirping are eliminated without impacting print quality. Silence is only one of the many characteristics: newer boards often feature more dedicated connectors (e.g. for a BLTouch or Wi-Fi module), improved safety features and fuses, and more powerful 32-bit microcontroller units.
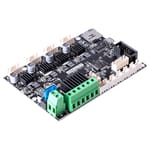
Creality offers the V4.2.7 silent board that’s compatible with most of the Ender and CR series printers as a drop-in replacement for the stock control board. Installation is as easy as unplugging all the connectors, removing the old motherboard, inserting the new one, and plugging everything back in. You can then flash the appropriate firmware for it.
The v4.2.7 has a modern 32-bit ARM MCU that won’t stall on more complicated prints and probe connectors for an easy BLTouch installation. On the downside, it’s quite expensive for what it offers: The integrated TMC2225 drivers don’t support sensorless homing, and there are no additional fan headers, power loss detection, or LED support. That said, it’s still an improvement over the stock mainboard.
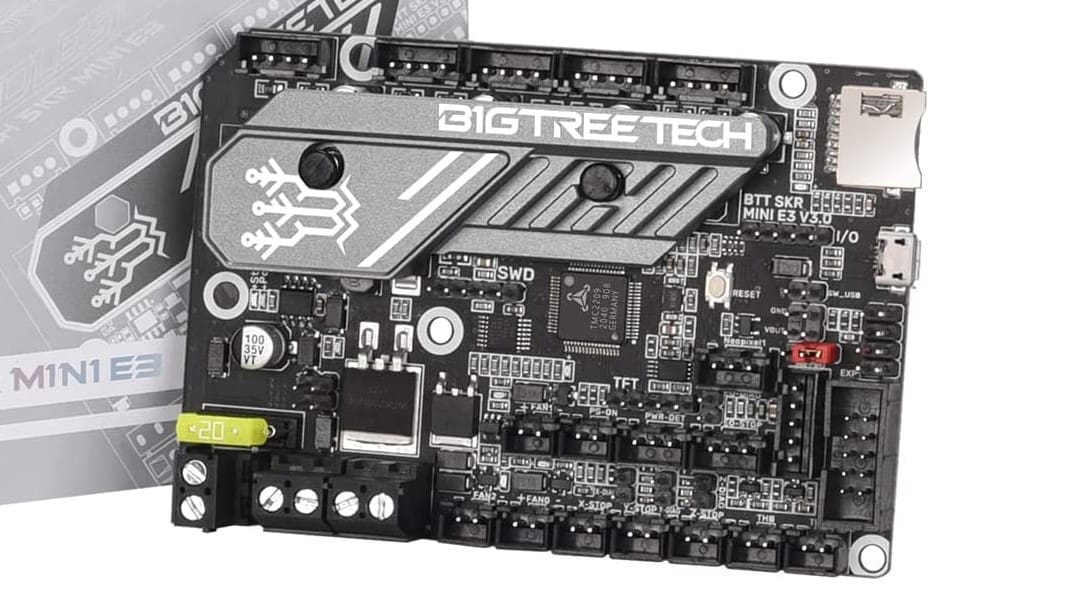
For even more features, BigTreeTech’s SKR Mini boards are often mentioned when talking about Creality board upgrades. They’re open-source, widely adopted, and most importantly, they pack a mighty set of features at an affordable price point. The latest revision, the SKR Mini E3 V3, packs 4 TMC2209 drivers connected via UART, enabling firmware control of many settings that would otherwise require hardware adjustments. A massive metal heatsink cools the drivers down, allowing for more efficient operation as well as a higher current supply to the motors. It also has headers for the increasingly popular Neopixel RGB LEDs, power-loss detection and PSU control, auto-bed leveling, sensorless homing support, and plenty of additional non-allocated I/O pins. The firmware, schematics, and documentation are available for download on their GitHub page.
- Skill level required: Advanced
- Cost: ~$50
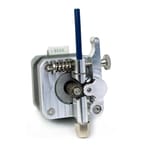
Direct Extruder
The Bowden-style extruder of the Ender 5 isn’t an all-rounder setup. Some filaments, especially flexible materials like TPU, can be difficult to print with due to the distance between the extruder and the hot end. Here’s where direct extrusion comes into play. As the name suggests, the extruder is mounted directly on top of the hot end, minimizing the need for long retractions. This configuration reduces the stretch that occurs in flexible filaments when they’re pushed and pulled repeatedly during printing. On the other hand, moving the motor and extruder on top of the X-axis carriage increase the weight, and might introduce printing artifacts.
Replacing the extruder with a new system like the E3D Titan Aero will give your machine a major boost. This extruder combines the benefit of a V6 hot end in an incredibly lightweight and rigid system. On top of that, due to the compact size, it provides an additional 25 mm of build volume on the Z-axis. The Titan Aero has a tight filament path, making it better suited to print with flexible and other specialty filaments, and it includes great features that make it effortless to load and unload filament, manually extrude material, adjust idler tension, and clean out debris. It’s definitely on the expensive end of the spectrum, but once purchased it’s easy to install onto the Ender 5 and Ender 5 Pro.
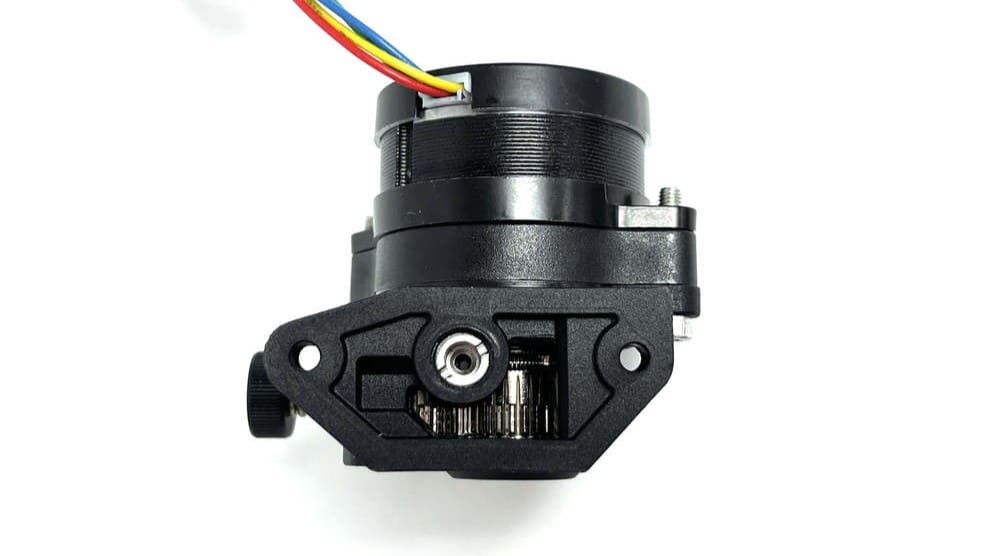
For a more affordable alternative, the DDE Orbiter 2.0 is a light direct extruder setup that uses a pancake motor to drive a planetary gear reduction. This design allows for very fast acceleration and pushing forces without impacting the dimensions or weight. At only 135 grams, this compact extruder can be mounted on the Ender 5 with an adapter plate. Coming after the open-source DDE Orbiter 1.0 and 1.5 versions, this revision was developed in collaboration with LDO Motors, but unlike its predecessors isn’t open source. If you want to adopt a DIY approach, you can find the older designs on the author’s Thingiverse profile.
Another popular option to consider is the Sprite Extruder. This Creality offering may be small, but it packs a punch. In addition the extruder, motor, and hot end, the Sprite includes two cooling fans that facilitate heat dissipation and decrease the likelihood of therman runaway. Since it reaches temperatures of up to 300 °C, you can print with a variety of filament types, including PETG and carbon fiber. Plus, it’s compatible with the entire Ender 3 line.
- Skill level required: Intermediate
- Cost: ~$90-$110
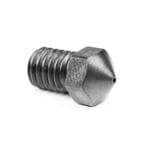
Hardened Steel Nozzle
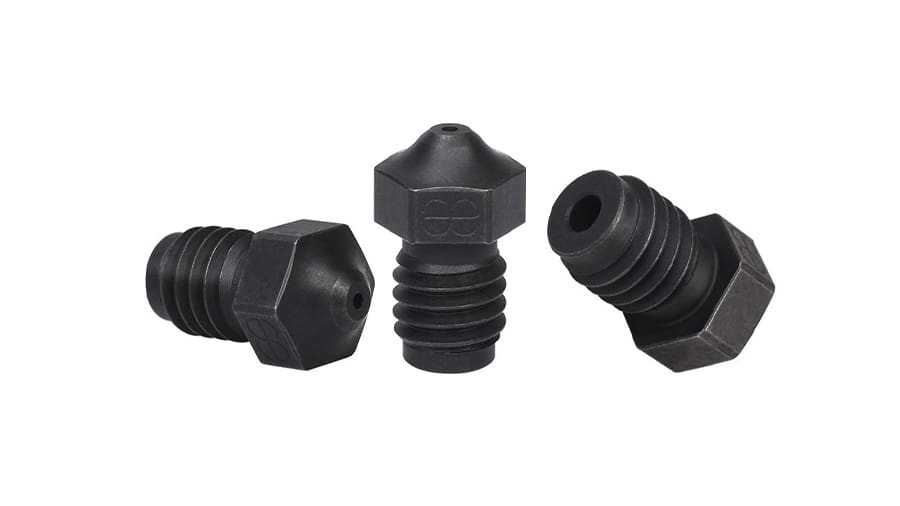
For those who want to up their printing game with abrasive filaments like carbon fiber, metal, or wood, upgrading your nozzle will ensure that your Ender 5 can handle the job. One popular option is the A2 hardened tool steel nozzle plated with TwinClad XT, a nickel composite that’s both hard and corrosion-resistant.
This will greatly improve the longevity of your nozzle, so it’s especially worth investing in for those who constantly push their 3D printer to the limit.
- Skill level required: Beginner
- Cost: ~$20
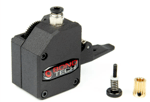
Dual Gear Extruder
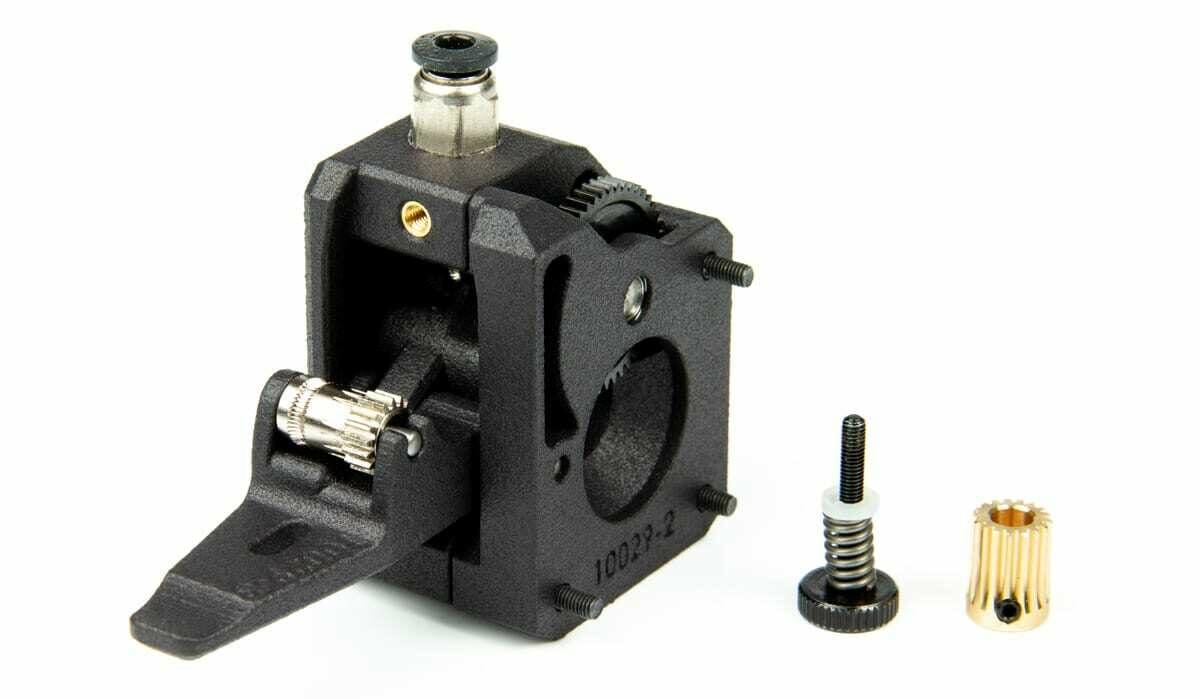
It’s not uncommon for Ender 5 users to encounter under-extrusion issues, as well as filament escaping from the extruder, and cracks in the tensioning arm. The stock extruder, especially on early units, is known to be the culprit of many problems.
If peace of mind is what you’re looking for, then the upgrade to a dual gear extruder is what you need. The dual drive will get rid of the idler wheel and grip the filament directly from both sides. This mod works flawlessly on flexible filaments thanks to the adjustable spring tensioner. Since the path is constrained from all sides, filament change is as easy as loosening the tension arm and inserting the new material.
If you want to increase the maximum torque that the motor can apply, consider a geared reduction like the one on the Bondtech BMG. Or if you prefer the open-air design of the stock model, consider the Micro Swiss Dual Gear Extruder instead.
- Skill level required: Beginner
- Cost: ~$50-$105
Bed Leveling Nuts & Silicone Spacers
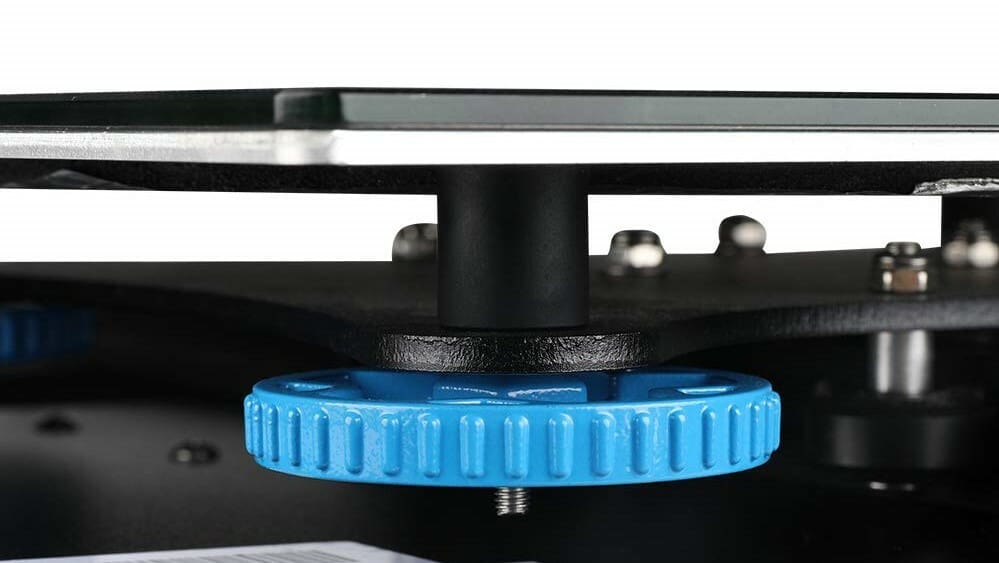
If you’re suffering from ringing on your prints and can’t figure out why, chances are your bed spring has come loose. Besides the need to relevel the bed every time, it’s also an annoyingly unpredictable behavior. The stock springs on the Ender 5 are great to offer support for your bed, but they still translate a lot of vibrations to the bed carriage and knobs underneath it. This will eventually lead to them coming loose and un-leveling your bed.
Silicone bed spacers are great at dampening vibrations while supporting the weight of the bed. Being made of a rubber-like material, they don’t risk scratching the bed heater and will resist higher temperatures while acting as thermal insulators. You can simultaneously upgrade the bed-leveling screws with some aluminum nuts that are easier to adjust.
- Skill level required: Beginner
- Cost: ~$15
Hot Ends
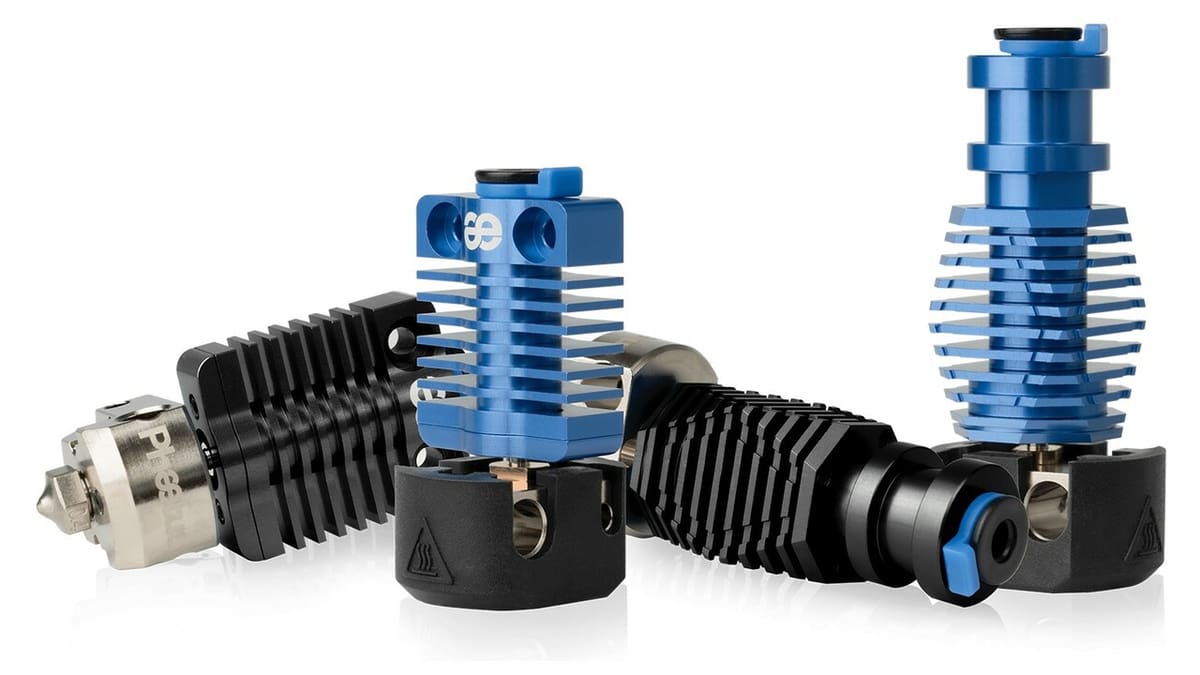
The Ender 5 stock extruder is known to be prone to clogging, especially in the gap between the heat break and heatsink. This issue will ultimately cause under-extrusion and nullify retract moves.
The Dragonfly BMS is a drop-in replacement for the stock unit. Being an all-metal hot end, it can sustain higher temperatures (up to 500 °C) and print even the strongest thermoplastics like PEEK and Ultem. The heat break is designed to have a low coefficient of friction to let the filament flow without drag, and the whole assembly revolves around dissipating heat efficiently to prevent heat creep. Installation is as easy as removing the old hot end and installing the new one.
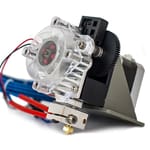
If you can handle the heat, Creality’s Spider Hot End reaches temperatures of up to 300 °C. It also boasts lightning-fast print speeds of 250 mm/s, which beat out standard hot ends. In terms of design, there’s a well-crafted aluminum alloy heat break, a durable nozzle, and a well-defined Bowden connector. Plus, it’s easy to install on most Creality printers.
- Skill level required: Beginner
- Cost: ~$60-$70
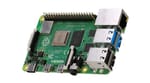
Raspberry Pi with OctoPrint or Klipper
OctoPrint is a free remote control utility that runs on a Raspberry Pi connected via USB to the Ender 5. From any browser, you can remotely start and stop a print, monitor temperatures, see a live webcam stream, and much more. This upgrade is ideal for long prints or for when the machine is not easily accessible. With a few tweaks, you can also control OctoPrint outside your home network. This way, keeping an eye on the Ender 5 will be possible everywhere, and you can make use of the dozens of free plug-ins available to expand your printer’s capabilities.
Some Ender 5 users have reported having issues with the stock firmware and USB connections, so having access to a Raspberry Pi also gives you the chance to try out the Klipper firmware. This free and open-source project features innovative kinematics and motion algorithms that will reduce ringing and achieve higher print speeds. It includes many if not all the perks of Marlin, so switching won’t be a living nightmare.
- Skill level required: Intermediate
- Cost: ~$125-$220
To 3D Print
Why buy something when you can fabricate it yourself? Here are some more mods that will upgrade your experience for just the cost of filament (and perhaps some screws).
Bed Strain Relief
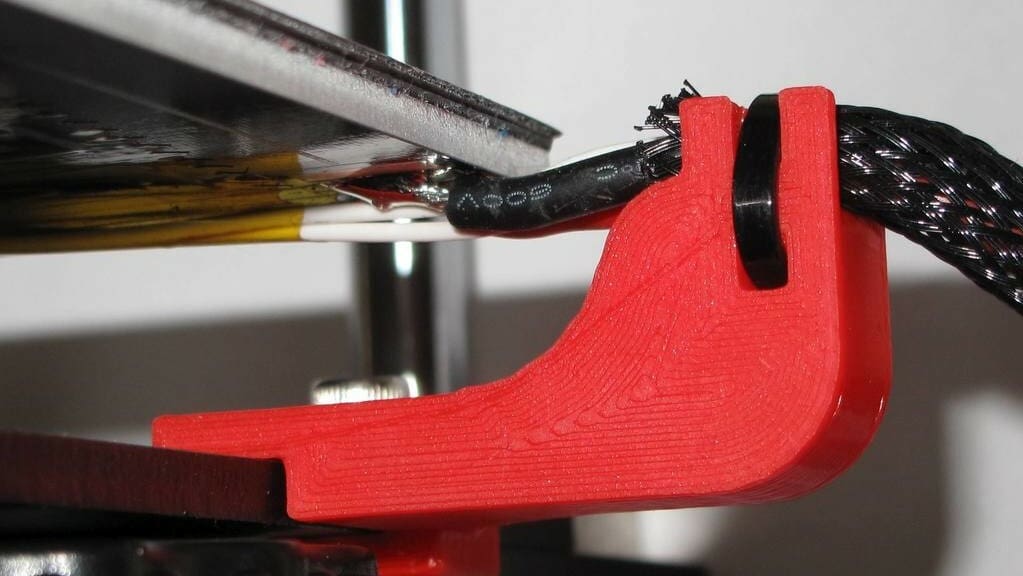
In countless discussion forums, Facebook groups, Reddit posts, and the like, when asked what the first print should be on an Ender 5, this mod is mentioned. The heated bed cables on the Ender 5, like the CR-10, are left dangling without any support. Over time, as the bed is moved up and down, this can cause the wires to rub against the bed frame and fray, which is an electrical and fire hazard.
By printing this Ender 5 mod, you can easily support the cables and greatly reduce the risks. Depending on the print speed and quality settings, it can take between 45 minutes and 2 hours to print but makes for a good addition to any Ender 5. Aside from the safety risks, it also provides a base to use for cable management on the printer.
- Who designed it: derandi3d
- How printable/popular is it: With 90 makes, it’s clear how safety is a priority for many. The model requires minimal supports to print, and not much else.
- Where to find it: Thingiverse
Bed Support
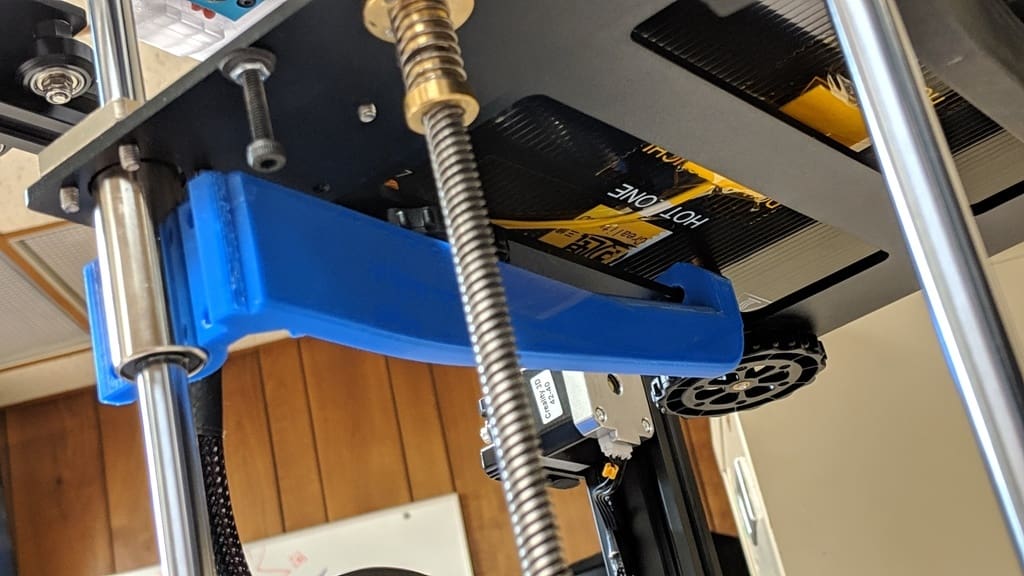
The Ender 5 has a rigid extruded aluminum cube frame, making it very sturdy when assembled properly, which goes a long way to increasing print quality. That isn’t to say there aren’t problems with the frame in certain areas, including the build platform. While it is rigid, if you’re printing anything that takes longer to complete, it may shift slightly. This is where the bed support arm comes into play.
This Creality Ender 5 mod stabilizes the print bed. It involves printing arms that clip on underneath the bed and clamp around the bearing socket in the back.
There are several designs for this, and what we looked at was being able to fit the print on the bed of the Ender 5 itself. While some designs could be printed in one part, almost all need extra parts added to them. The model pictured above only needs screws and nuts easily purchased at a local hardware store.
- Who designed it: jumpshoutmedia
- How printable/popular is it: The print itself isn’t complicated, but as the author points out, the material choice here is crucial, and PETG seems to be the best option. It has over 100 makes and counting.
- Where to find it: Thingiverse
Cable Chain Adapters
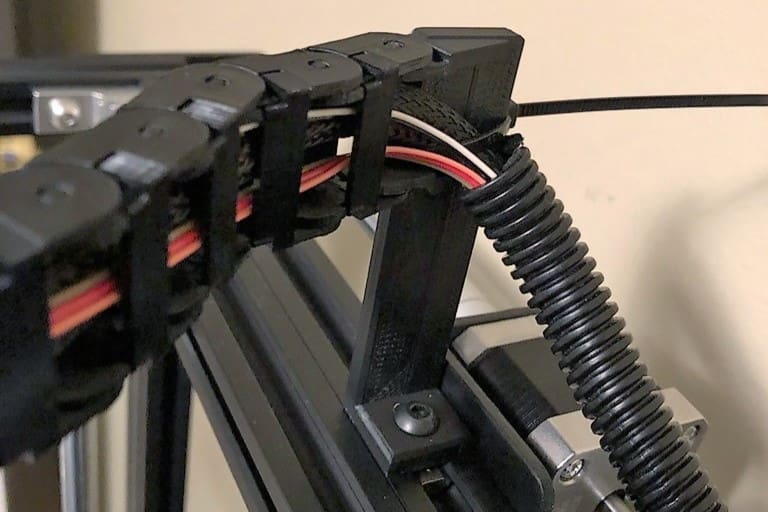
The cabling on the Creality Ender 5 is one of the machine’s major downsides. Out of the box, several cables are just a bit too short to hide away, and there’s no built-in management system. The cable path has several places that can be zip-tied, but they still hang out in the open, being unsightly at best or, at worst, getting caught on something during print jobs.
With this Creality Ender 5 mod, the cables are tucked away into 3D printed chains. The chains allow movement and protect the cables from catching on parts of the printer during operation. This adds a bit of safety, but is also an aesthetic mod, keeping the cables neat and tidy.
- Who designed it: Cr6surfs
- How printable/popular is it: A few comments point out how short the stepper motors’ cables are and that in some cases an extension is needed.
- Where to find it: Thingiverse
Control Panel Back Cover
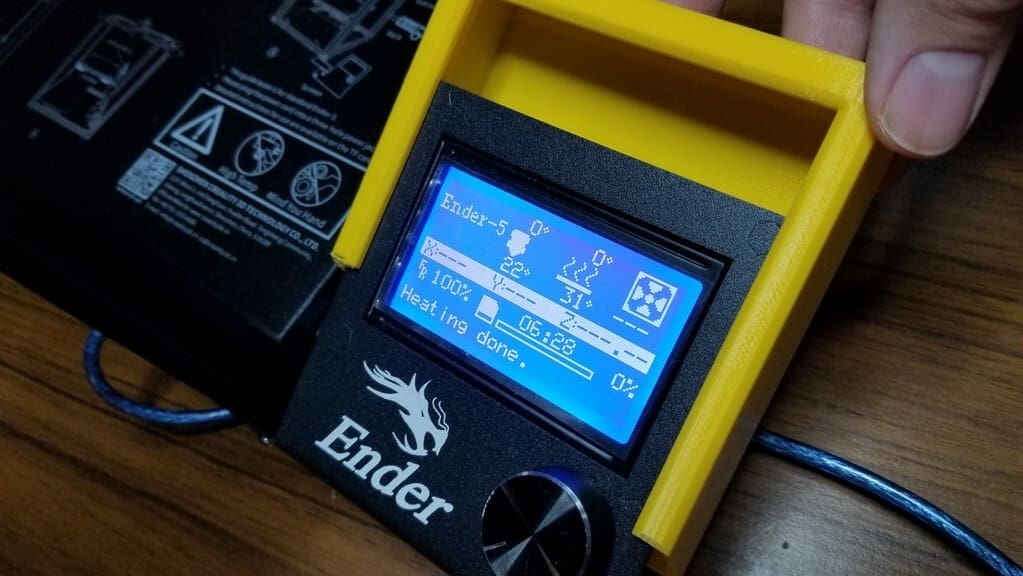
An easy and aesthetically pleasing Ender 5 upgrade, this 3D printed control panel back cover will take the edge off of the 3D printer’s display panel. Set on the side of the frame, the LCD screen of the Ender 5 almost seems like an afterthought, tilted at a 45-degree angle and propped up with no backing or support.
Thankfully, this upgrade is designed to slide right behind the LCD screen. You don’t need to worry about adding any support structures, this control panel back cover can be printed upright without any assistance. Feel free to choose a vibrant color to add some flair to your Ender 5.
- Who designed it: kilroy01
- How printable/popular is it: The designer recommends using a 0.2-mm layer resolution and 25% infill, while some makers recommend scaling the model up by a few percentage points in order to achieve a better fit.
- Where to find it: Thingiverse
Ender 5 Tool Clip
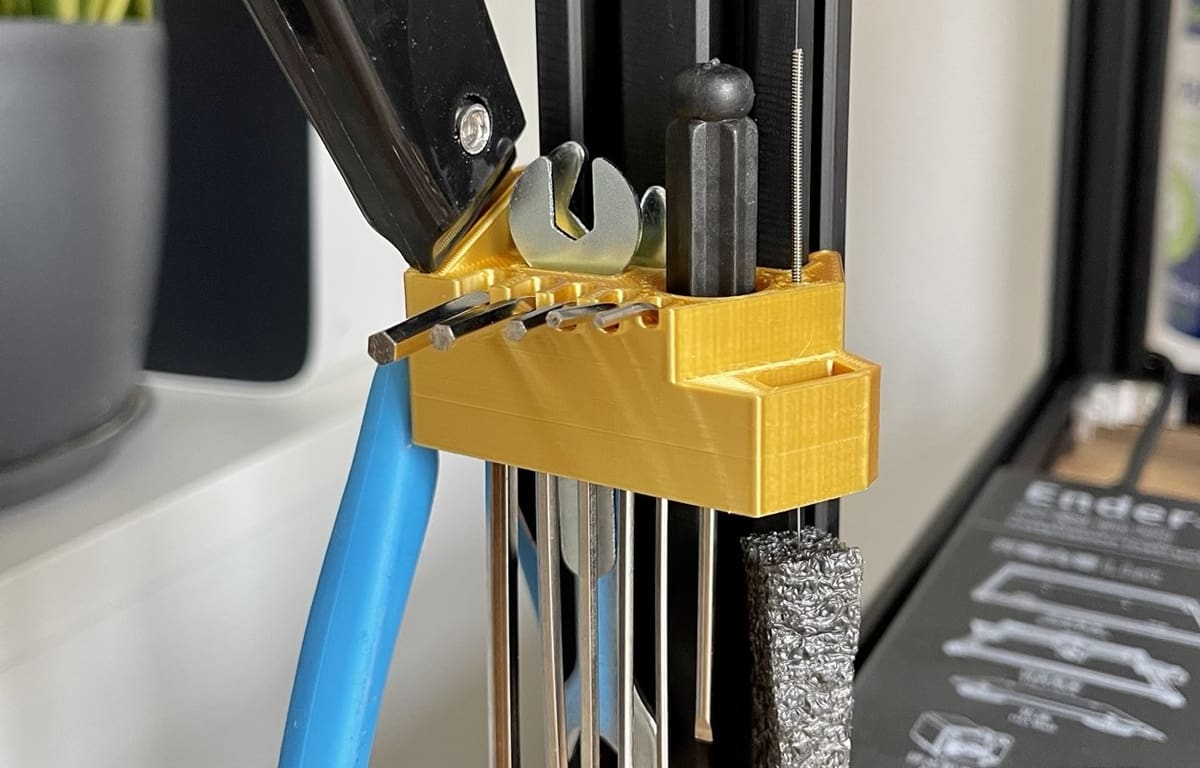
What good is a maker without their tools? When using your Ender 5, it’s good to keep a few things within reach of your 3D printer at all times. This Ender 5 upgrade is designed to clip right onto the frame, and made to hold flush-cutters, tweezers, Allen keys, and other tools.
The designer of this 3D printed tool clip has also provided some customizability to this tool, so it can be remixed to create your own custom tool holders. There’s also a version made to hold your print bed scraper, ensuring that you don’t have to scramble for tools once your print is complete.
- Who designed it: TrigoKlei
- How printable/popular is it: Many users recommend softening the plastic with an air dryer (and wedging the tool in, widening the slot) if the fittings aren’t wide enough.
- Where to find it: Thingiverse
X-axis Belt Cover
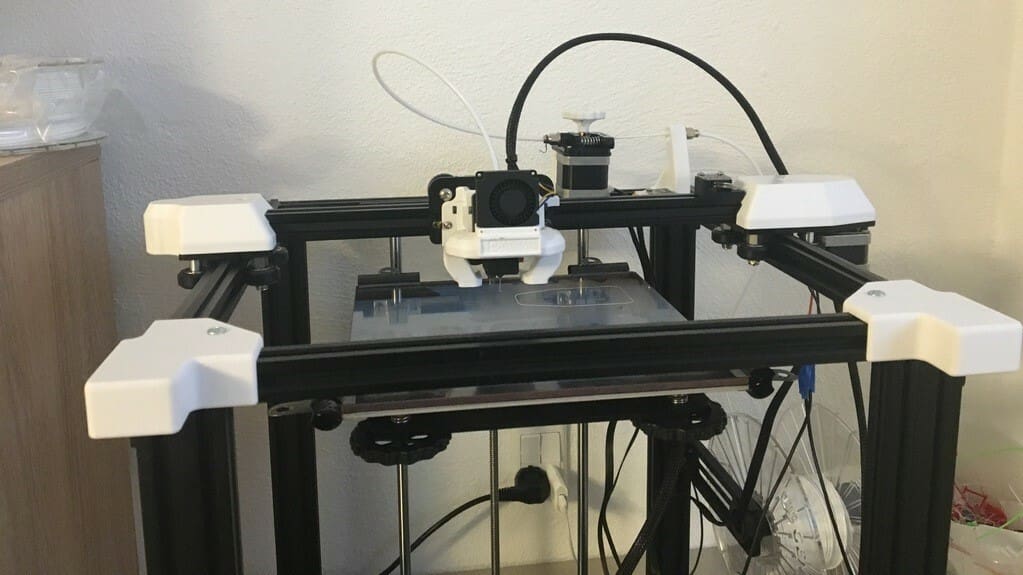
Looking to provide some cover for the belts that are positioned on top of the Ender 5 3D printer’s open frame? This 3D printed X-axis belt cover is a great upgrade that will add some additional security and a personal touch to your machine. You’ll need to 3D print four of these covers, one for each corner of the Ender 5. Therefore, you can mix and match colors, or even create a theme with other 3D printed upgrades.
To mount the X-axis belt cover, you’ll need an M4x10 screw and t-nut for each corner (so, four in total). The designer of this Ender 5 upgrade suggests using 20% infill and a .24-mm layer height when preparing the model on your slicer of choice – no support structures are necessary.
- Who designed it: D_jespersen
- How printable/popular is it: No supports are needed, but make sure to level your bed to get an aesthetically pleasing bottom layer.
- Where to find it: Thingiverse
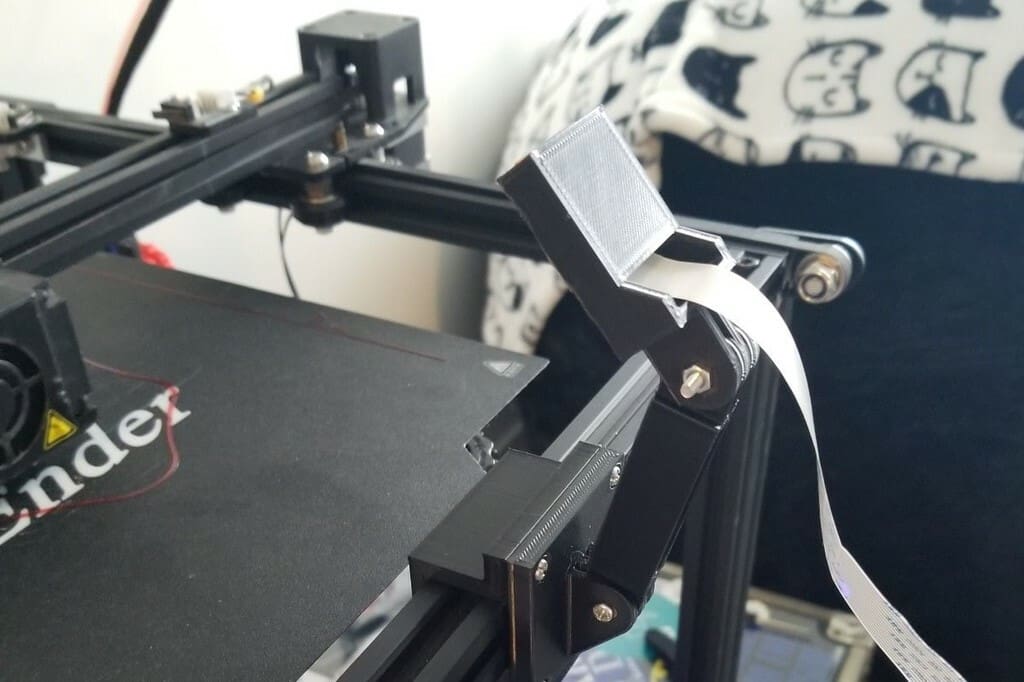
SD Card Adapter Housing
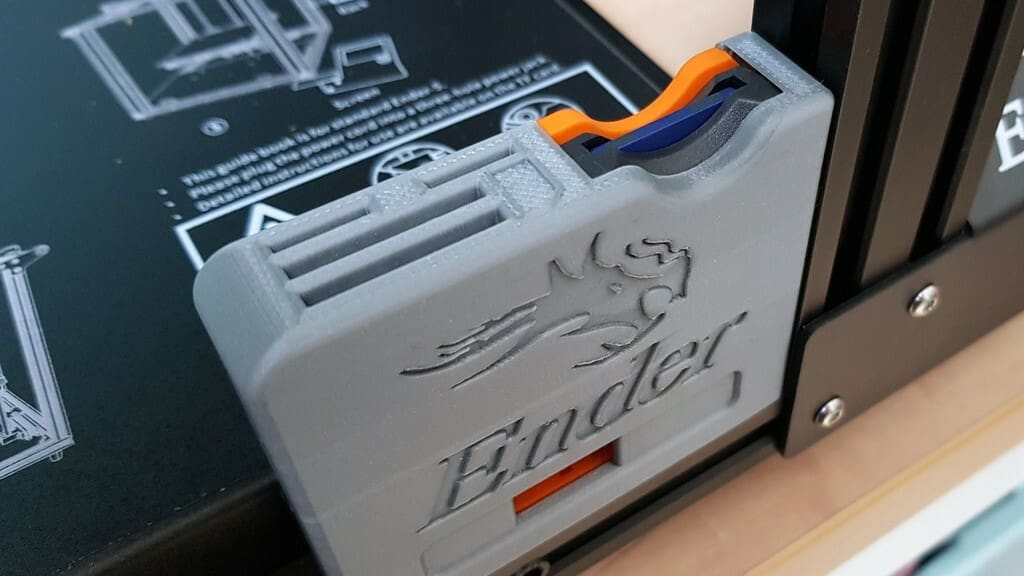
The SD card that holds all of your 3D models is important, and thus deserves nice housing to ensure its safekeeping. Integral clips have been incorporated into this housing for an SD card adapter, allowing it to mount onto the extrusions without needing any screws or fixings. It also has holes for you to insert cable ties and keep the ribbon tucked away.
This SD card adapter housing may be a 3D printed upgrade, but it has the look of an official Creality accessory. The designer made sure to etch the Ender logo into the side of it, along with additional storage slots for both SD and MicroSD cards. While the two 3D models don’t require any support, the designer does recommend using rafts, along with 20% infill and a 0.2-mm layer height.
- Who designed it: BoothyBoothy
- How printable/popular is it: There are 31 makes and more than 130 comments, all pointing out how this model fits perfectly right off the build plate.
- Where to find it: Thingiverse
Filament Guide
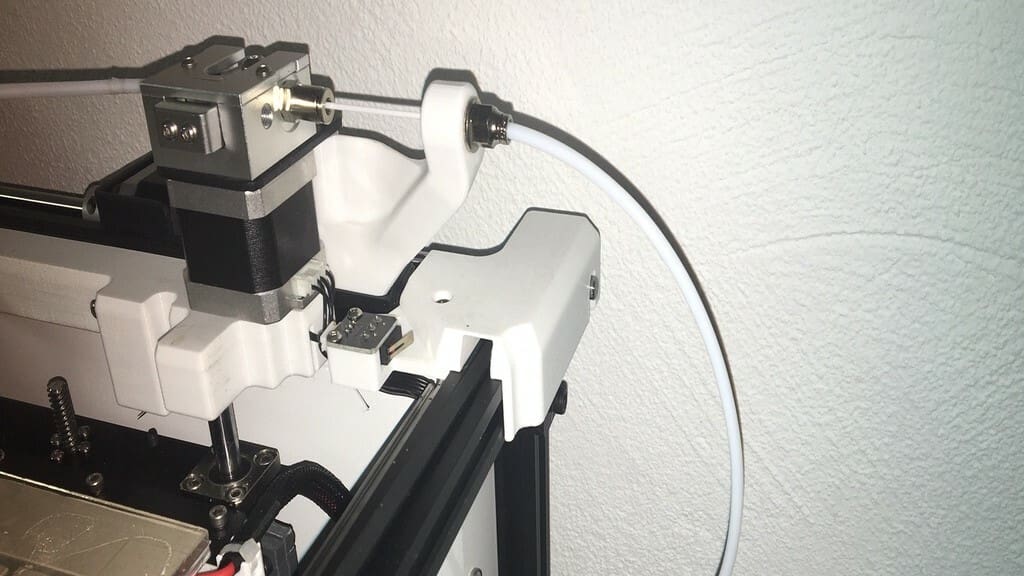
The way your filament flows will have a major impact on how your 3D printed model comes out. Make sure your materials have a convenient path to the heated nozzle by 3D printing this filament guide. By adding this Ender 5 upgrade to your machine, you’ll prevent any material from hanging outside of the filament tube, ensuring no tangles or other hiccups interrupt your 3D print.
If you decide to 3D print this filament guide, there are a number of other components you’ll need to get your hands on, including two M4x50 screws, one M4x30 screw, 2 M4x20 screws, a couple of t-nuts, two PTFE tubes (470 mm and 300 mm), and two fittings for the tubing. It may seem like a lot of parts for a simple filament guide, but this mod will likely lead to less hassle and more successful prints.
- Who designed it: D_jespersen
- How printable/popular is it: Assembly might get a bit tricky, so the author provided different clearances and dimensions for each piece, as well as a ton of photos.
- Where to find it: Thingiverse
Silent Auto-Home
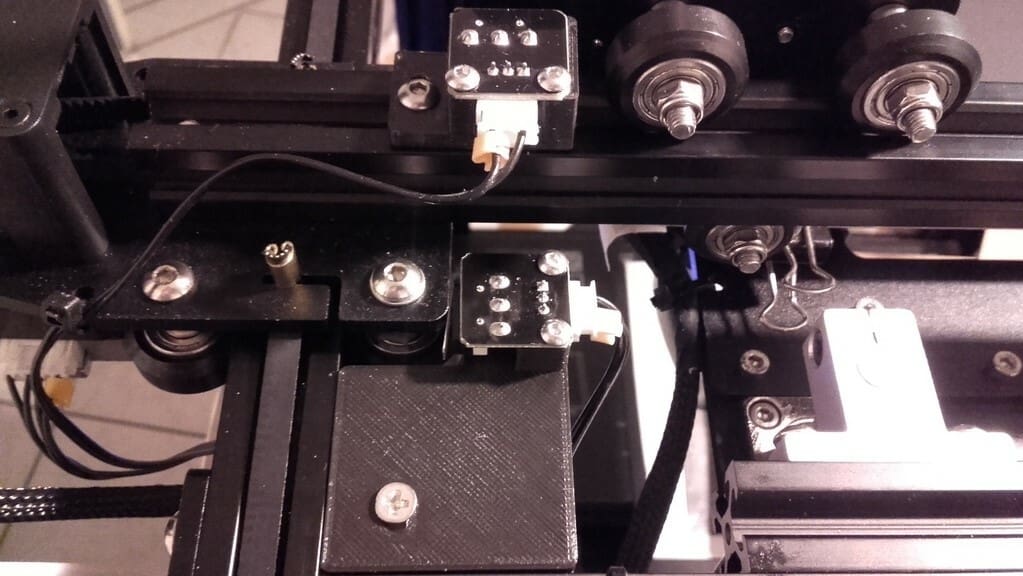
One frustration that some users have reported experiencing with Ender 5 is that the auto-home limit switch fails to prevent the X and Y cars from colliding with the frame. Thankfully, one Thingiverse user set out to solve this issue – resulting in this 3D printed silent auto-home component.
This X- and Y-axis endstop switch holder can be swapped out for the stock switch holders and mounted onto the frame with the M3 screws that are already there. After the print is complete, simply place the switch on it, turn the 3D printed holder at a 90-degree angle, and fasten it onto the Ender 5 frame. The designer recommends using a 20% infill and 0.2-mm layer height.
- Who designed it: lgaga
- How printable/popular is it: Coming in at almost 20 makes, this mod is reported to work flawlessly (at the cost of losing 1-2 mm on each axis).
- Where to find it: Thingiverse
Cooling Duct
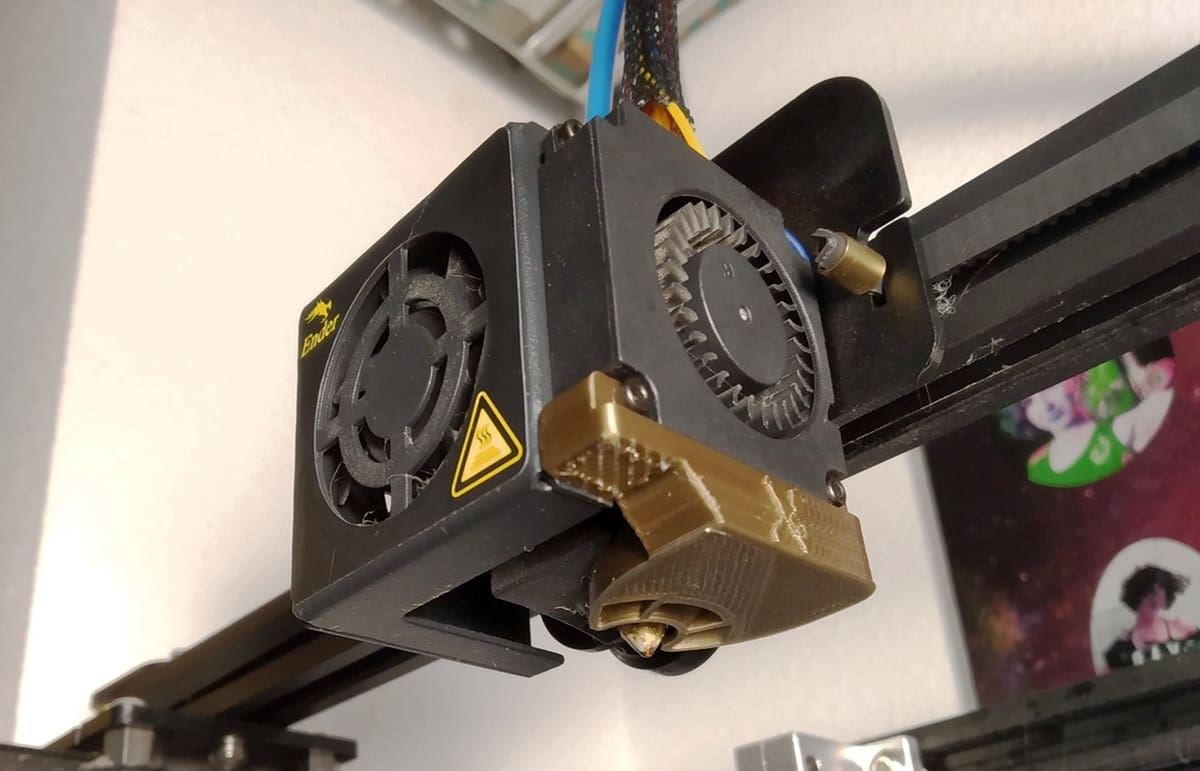
Cooling your freshly extruded layers will go a long way in ensuring optimal print quality, so why not upgrade the Creality Ender 5’s stock fan with this 3D printed cooling duct? This Ender 5 upgrade has been consistently refined and tested to see how it deals with issues like warping and cooling.
This cooling duct can be mounted underneath the fan on the bottom carriage of the extruder, but don’t worry, the measurements will prevent it from colliding with your print. The designer of this Ender 5 mod recommends using PETG, although they have still had success using good old PLA filament.
- Who designed it: McGybeer
- How printable/popular is it: Some users report the cooling duct not being compatible with the Ender 5 Pro fan, so this is mostly recommended for those with the original Ender 5.
- Where to find it: Thingiverse
Snap-On LCD Cover
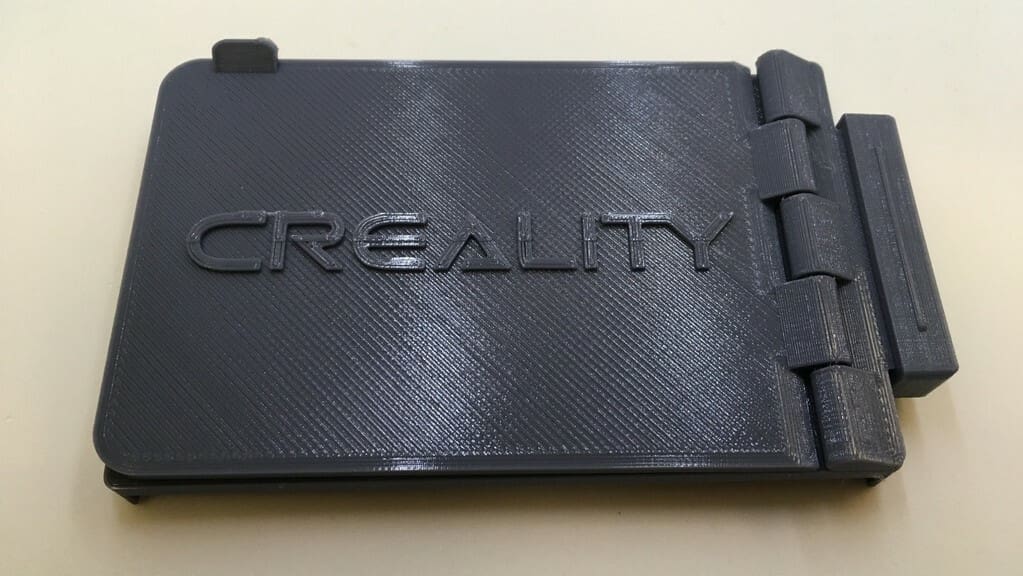
Is the bright LCD screen on your Creality Ender 5 distracting or keeping you awake at night? Perhaps you just want an aesthetic way to cover it during a long print. Regardless of your reasoning, this 3D printed snap-on LCD cover is an awesome design that’s easy to mount onto your LCD display.
Using a simple hinge mechanism, this Ender 5 upgrade snaps right onto the screen – no glue or screws required. It even has a Creality logo ingrained into the design, so it looks as legit as it feels. The designer recommends printing this model in two pieces to avoid needing supports. Simply clip them together and mount them onto your Ender 5. You can also play around with the infill percentage to adjust the transparency of the model.
- Who designed it: wolfganghsu
- How printable/popular is it: To get a perfectly cylindrical hinge, orient the cover vertically and add a brim.
- Where to find it: Thingiverse
Spool Clamp
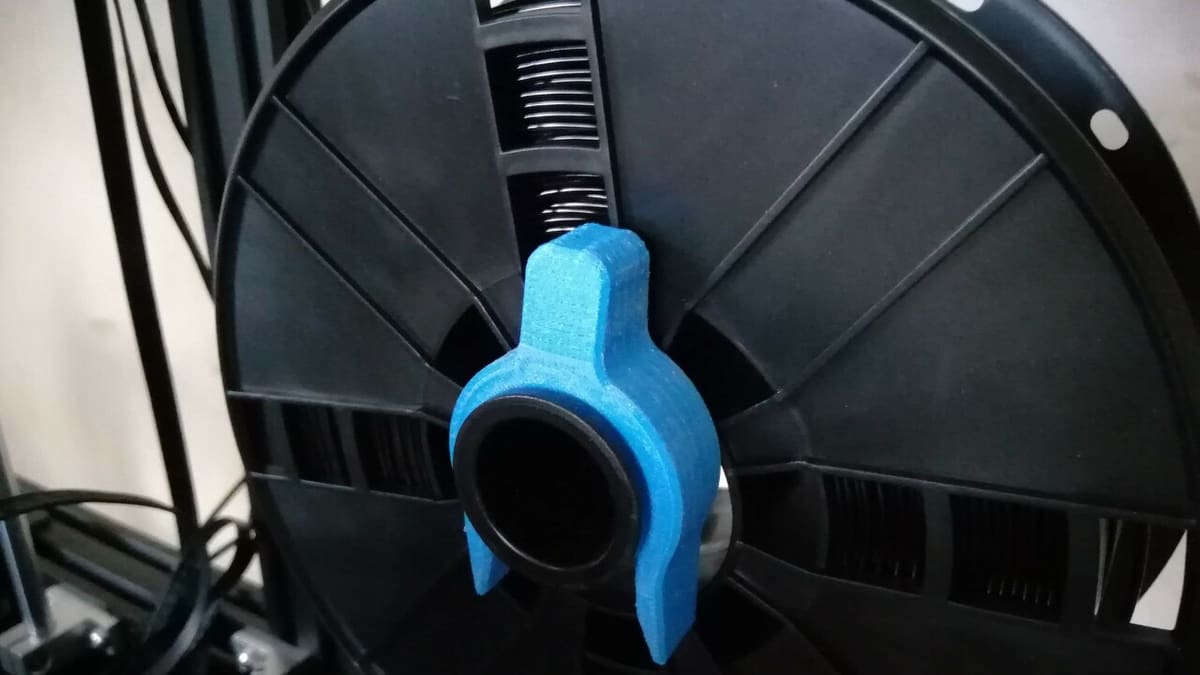
There’s nothing worse than encountering filament issues in the middle of your print. The last thing you want is your spool slipping or getting yanked off of the spool holder and messing everything up. Thankfully, there’s a quick and easy fix that you can 3D print on your own.
This 3D printed spool clamp is designed to snap right at the end of the spool holder, preventing any funny business from happening while your Ender 5 is hard at work. This single-piece print requires no supports and can be printed in less than an hour. Why not get creative with the color of your spool clamp?
- Who designed it: D_jespersen
- How printable/popular is it: The 25-mm size is reportedly the best for the Ender 5 spool holder.
- Where to find it: Thingiverse
Extruder Arm
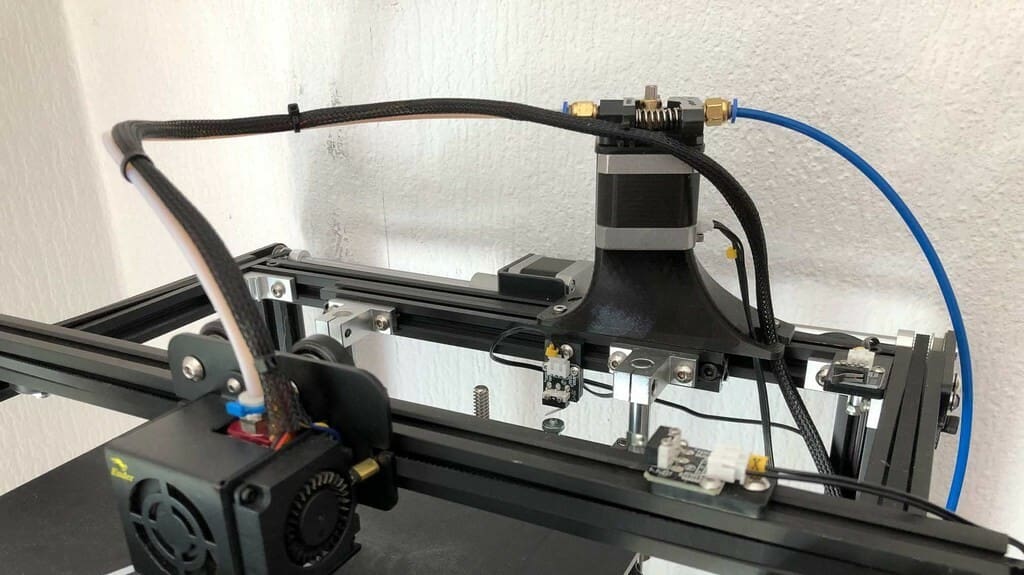
You know what they say: the shorter the Bowden tube, the shorter the retraction! Okay, so maybe no one says that, but the point still stands: this 3D printed extruder arm will drastically improve the performance of your Ender 5 without fully replacing the extrusion setup. This attachment was designed to shorten the distance between the extruder and the hot end while reducing the weight that the extruder puts on the printer’s moving parts. It also allows users to reduce retraction settings and increase the overall printing speed.
You can attach this device to the printer with the original extruder screws, while the extruder itself can be mounted with two wood screws. According to the designer, to properly feed the filament through this reimagined extruder assembly, you’ll need to turn the original spool mount around so that it’s facing backward.
This upgrade might seem a bit confusing or difficult, but it’s easier than it sounds! Check out the video below to see it in action, and also check out the project page to get a better idea of what you’ll need to make this Ender 5 upgrade.
- Who designed it: IamSLy
- How printable/popular is it: According to one Thingiverse commenter, this 3D printed extruder arm allowed them to take 6 inches off of their Bowden tube. This mod also helps with motor heat build-up, but remember to solve the issue at the root and tune your Vref.
- Where to find it: Thingiverse
LED Mount
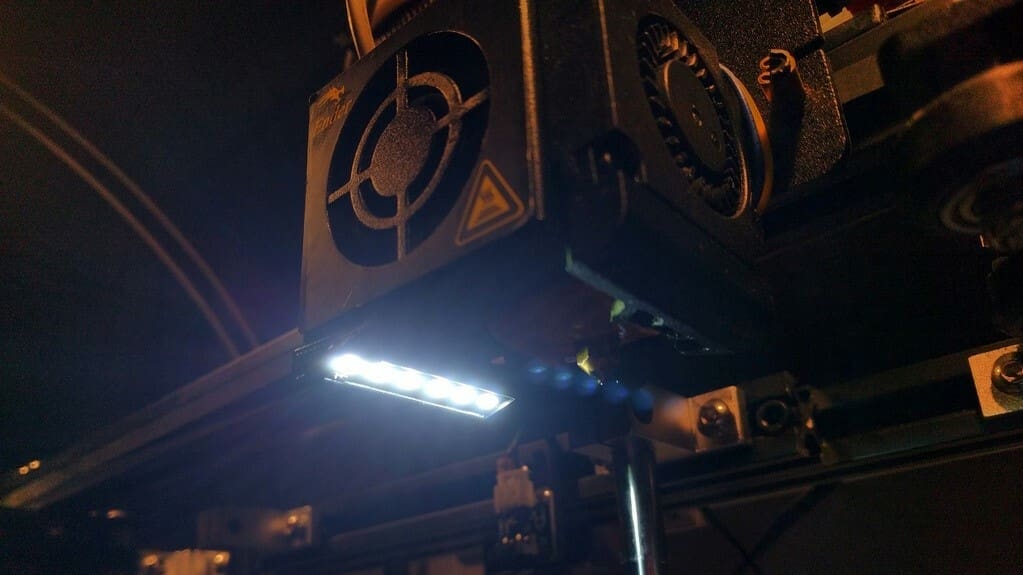
Want to get a better look at what your Ender 5 is printing? Why not mount an LED strip to the extruder to illuminate your creations as they’re being extruded! To do so, you’re going to need to 3D print an LED mount. This mount is designed to snap into place, using an LED strip from a cheap, flexible USB light.
The designer cautions that this upgrade is still a work in progress and that the light might be a little too bright. So, this Ender 5 upgrade may be best suited for more experienced makers willing to tinker around to find the optimal setup. To hook it up, the creator used an old USB mouse cord and zip-tied it along with extruder wiring and a Bowden tube, plugging it directly into a USB charger.
- Who designed it: pquijal
- How printable/popular is it: The design has been downloaded over 7,500 times; when opting for it, make sure to match the LEDs strip’s voltage with the printer’s power supply.
- Where to find it: Thingiverse
Cable Protection
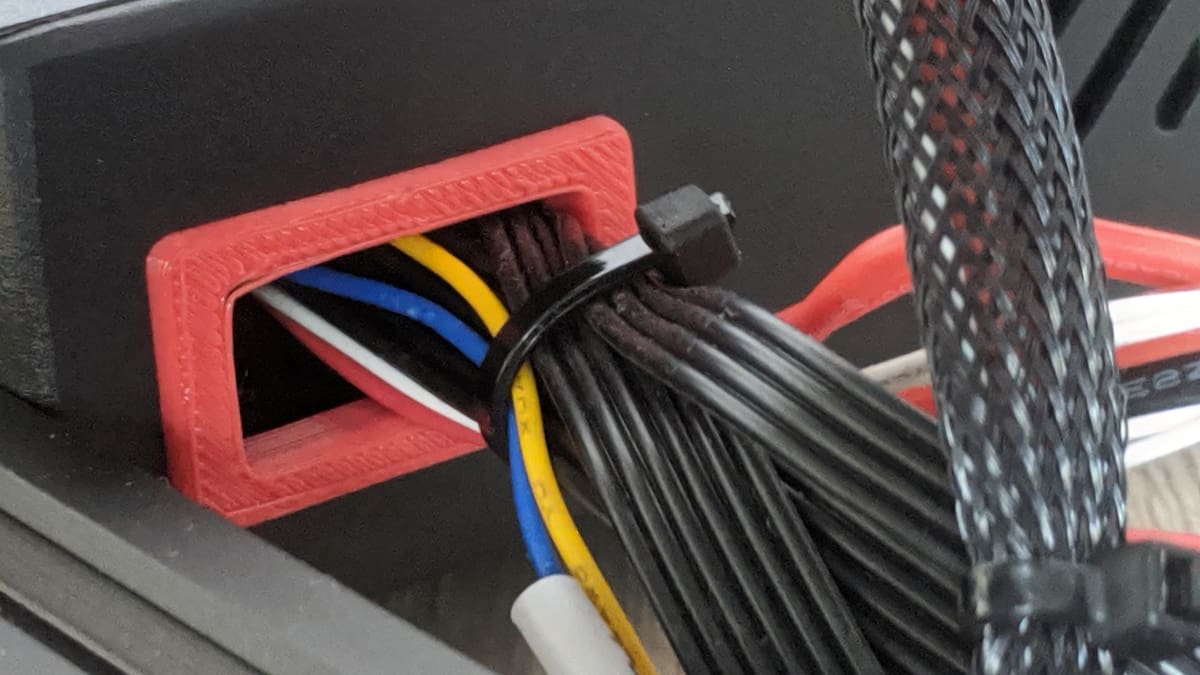
It may look like a simple and relatively silly upgrade, but this 3D printed cable protection can go a long way in protecting the wires that make your Ender 5 function. As you’ll find at the base of the printer, the slot where all of your cables are fed has no safeguard against the aluminum frame. A sharp edge could potentially nick your bundled cables, causing major problems for the printer.
This simple cable protector is designed to soften the edges surrounding that slot, ensuring that your wires are safely housed and won’t encounter any damage.
- Who designed it: lgaga
- How printable/popular is it: Many users report it fitting without hassle, but the same can’t be said about undoing all the cables.
- Where to find it: Thingiverse
Beeper Silencer
If you find your beeper too loud and would love to muffle it without disabling it completely, this neat little cap will get the job done. Printing it is also super easy: it’s literally just a cylinder. You can scale it up 1-2% if you’re having a hard time fitting it to the buzzer. Installing it is as quick as popping it over on the back of the screen.
Keep in mind that the buzzer acts as a safety alarm too: it emits a steady tone in case of thermal runaway or other failures. So be careful not to make it too silent!
- Who designed it: MHprints
- How printable/popular is it: With more than 45 makes, the model seems to fit and work flawlessly.
- Where to find it: Thingiverse
Pressure Fitting Fix
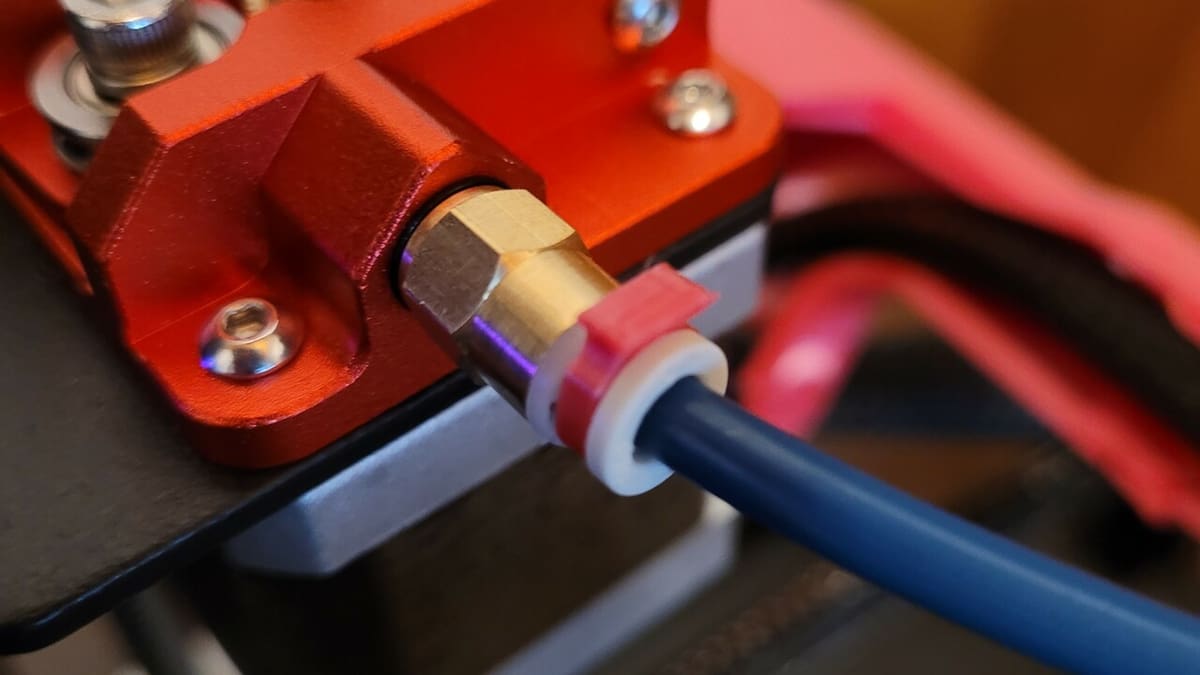
It’s not news that the Bowden coupler on the Ender 5’s stock extruder is prone to breakage. When stressed too much (like during frequent retractions) it gives up and lets the tube loose, negating all the extrusion moves. This will likely make the print fail.
This clip will prevent the fitting from unlatching on its own. It’s speedy and easy to print and will be ready in a couple of minutes. A plethora of thicknesses are provided to fit different couplings. The 15-mm one is reported to be the perfect one for the extruder coupling, while the 20-mm one is great for the hot end fitting.
- Who designed it: Redsalamander
- How printable/popular is it: If none of the thicknesses available seems to fit your coupling, scale the model up on the Z-axis only.
- Where to find it: Thingiverse
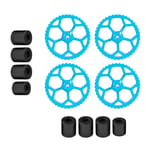
V-slot Covers
A simple and inexpensive way to pimp your printer is using these colored V-slot covers. The purpose they serve is purely decorative, but they give the machine a less sterile look. If you’re not into CyberPunk aesthetics or you are simply looking for something more vibrant, grab your favorite PLA and customize it as you please.
- Who designed it: JeffTheShark
- How printable/popular is it: The covers must be printed in multiples of 200 mm to fit the bed, and they snap into place with no need for disassembling the frame.
- Where to find it: Thingiverse
License: The text of "The 30 Best Creality Ender 5 (Pro) Upgrades & Mods" by All3DP is licensed under a Creative Commons Attribution 4.0 International License.
CERTAIN CONTENT THAT APPEARS ON THIS SITE COMES FROM AMAZON. THIS CONTENT IS PROVIDED ‘AS IS’ AND IS SUBJECT TO CHANGE OR REMOVAL AT ANY TIME.