The 9 Best Arduino Simulators to Save You Time and Money

It's always nice to be able to try something out before doing it for real. Read on to learn all about some great Arduino simulator options!
For hobbyists and engineers alike, Arduino remains the gold standard for open-source hardware boards. What started in 2010 with the humble Arduino Uno has expanded into a broad ecosystem of miniature, IoT- or AI-ready boards. While the hardware is easier to use than ever, the interplay with external components can still be tricky.
This is where Arduino simulators shine. They let you prototype virtually. You can drag, drop, and code your way to a working circuit, testing your logic and component choices in a safe, free environment before you ever heat up a soldering iron, buy components, or order PCBs.
Before choosing a tool, you need to understand the fundamental trade-off between Online (browser-based) and Offline (desktop, app) simulators.
- Online Simulators (like Tinkercad or Wokwi) run entirely in your browser. They are perfect for collaboration, require no installation, and allow you to share your project with a single URL. However, they rely on a steady internet connection and may struggle with very complex, heavy simulations. They can also be off-limits if your company has a strict internet security policy.
- Offline Simulators (such as Crumb or Proteus VSM) are installed directly on your computer, tablet, or phone. They offer reliable performance without an internet connection and can generally handle more complex, professional-grade engineering tasks, but they often lack the “click-and-share” ease of their cloud-based cousins.
In this article, we’ve analyzed the best simulators, from beginner-friendly educational tools to professional engineering suites. As of early 2026, we recommend checking TinkerCAD Circuits for beginners and the classroom, Crumb for prosumers, and Proteus VSM for professional applications.

Online
To start with, let’s look at the options that are available online. That’s to say, you’ll need a modern browser and a good internet connection – no need to download any programs.
Tinkercad Circuits
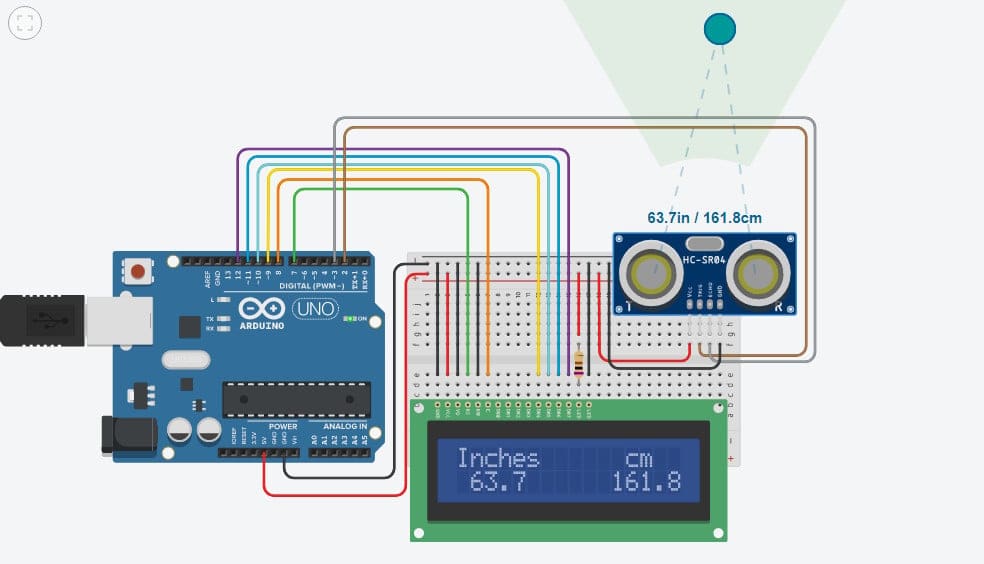
Since 2017, Autodesk’s Tinkercad Circuits has cemented itself as the undisputed king of beginner simulators. It is colorful, very intuitive, and runs entirely in your browser. Its “Block Coding” feature lets beginners build logic without worrying about syntax errors, while the split-screen view lets you see the generated C++ code in real time.
Tinkercad is the definition of “plug and play.” You don’t need to install drivers or configure libraries. Simply drag an Arduino Uno and a component from the sidebar, drag virtual wires with a few clicks, and hit “Start Simulation.” The Arduino Uno simulation is robust, handling not just code but also interactions with sensors, LCDs, and servo motors smoothly. A newer addition is the Schematic View, which automatically generates a professional wiring diagram from your breadboard layout – a fantastic tool for learning how to read real circuit diagrams.
However, some limitations remain. You cannot add custom components to the library, and Arduino board support is sparse. While it handles the Arduino Uno class perfectly, it completely lacks support for modern 32-bit Internet of Things or AI boards. Also, if your project requires Wi-Fi or Bluetooth, you will need to look elsewhere.
Unlike professional tools that require you to compile code and load .hex files manually, Tinkercad handles everything in the background. While it lacks the raw power for heavy engineering, the user experience is unmatched for getting a simple project running in under 5 minutes.
- Developed by: Autodesk
- Best for: Beginners, STEM classrooms, and quick prototyping with Arduino Uno and compatible boards
- Special features: Seamlessly switching between visual blocks and C++, circuit diagrams, and STEM courses
- Compatible with: Most modern browsers
- Price: Free
- Link: Tinkercad Circuits
Wokwi
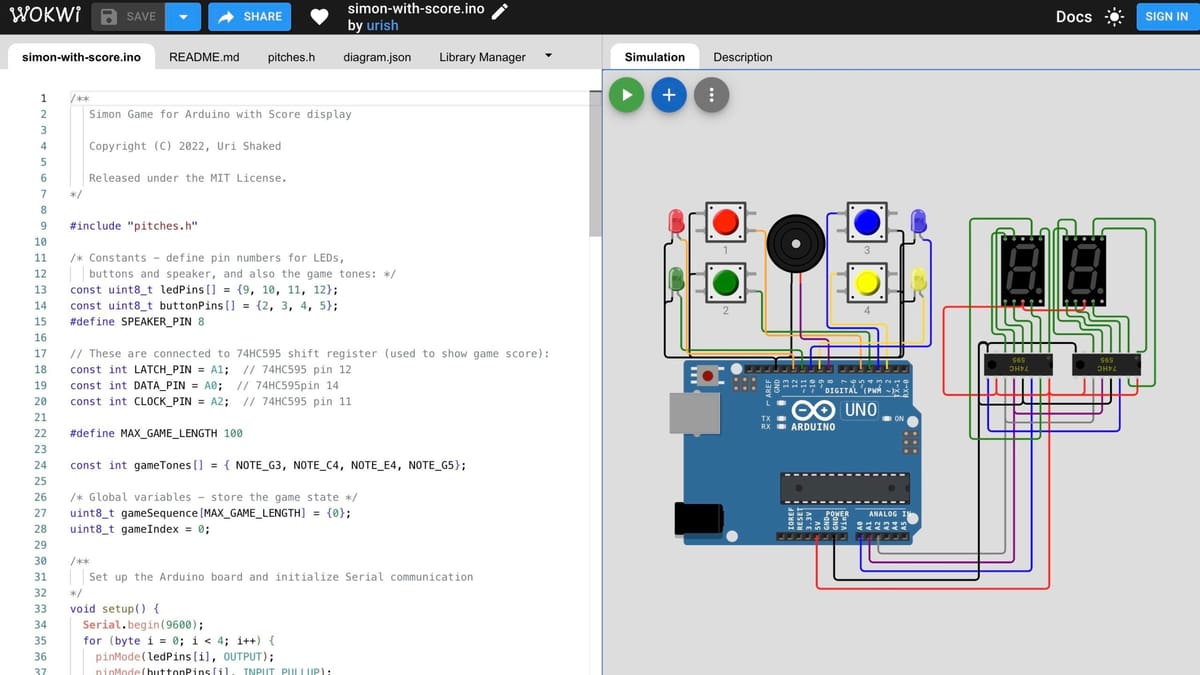
Wokwi has exploded in popularity, becoming a go-to solution for makers. What started as a simple AVR microcontroller simulator is now the go-to platform for IoT development, supporting powerful boards such as the ESP32, STM32, and Raspberry Pi Pico. Wokwi is sleek, fast, and runs entirely in the cloud.
One of its superpowers is connectivity. Wokwi simulates Wi-Fi and MQTT traffic, allowing you to connect your virtual ESP32 to the real internet. You can query a real weather API, sync time from an NTP server, or control your simulated project via a smartphone browser. For developers, the VS Code extension is a game-changer, allowing you to run simulations locally on your machine (offline) alongside your actual source code – though this is now a paid feature.
However, Wokwi is built for coders, not drag-and-drop beginners. There is no “block coding” for the advanced boards; you write C++, MicroPython, or Rust directly. Additionally, the free tier forces all your projects to be public. If you want to keep your code private, upload custom libraries, or use the VS Code extension, you will need to upgrade to a paid “Hobby” or “Club” plan.
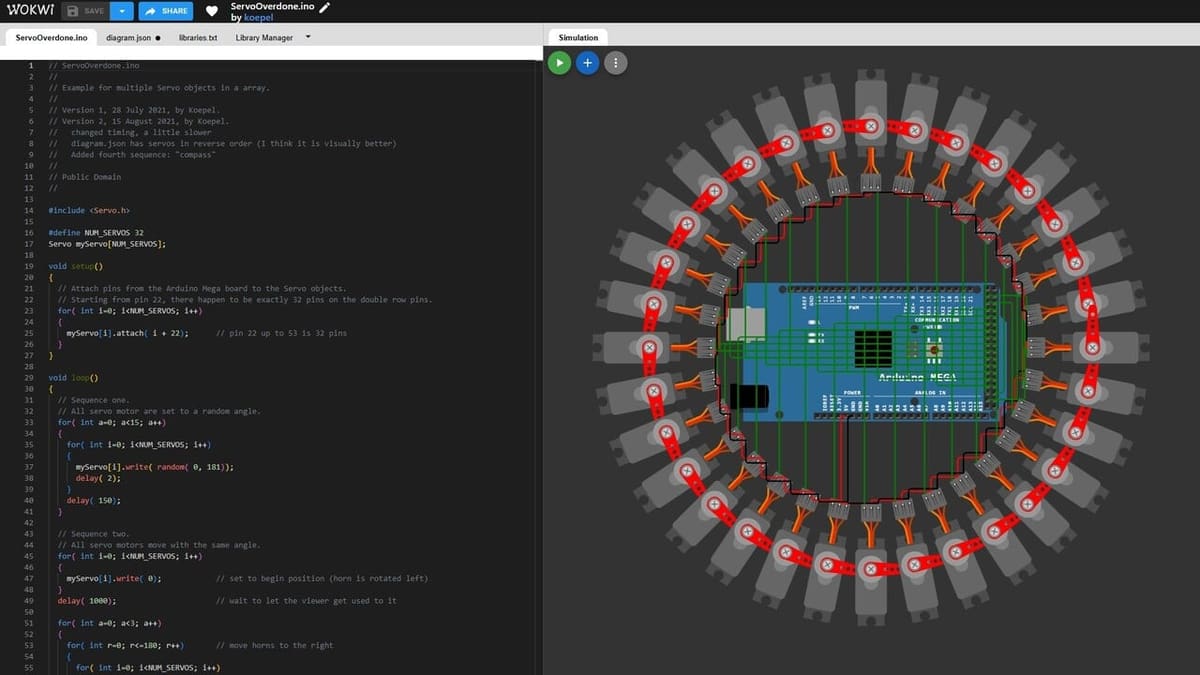
Wokwi does not require you to install toolchains or drivers. You simply select a board (e.g., ESP32-DevKit), and the environment loads in seconds. Adding components is done by pressing “+” and selecting from a massive library of sensors, displays, and neopixels.
For complex wiring, Wokwi uses a clever diagram.json file to define connections, though you can still drag wires visually in the editor. Compiling is nearly instant, and you can share your working simulation with a single URL – perfect for asking for help on forums.
The developer and the community are very active, and Wokwi has evolved quickly thanks to its open-source model, which fosters a collaborative environment. In the Discord channel and LinkedIn group, you can ask questions and receive support, including from the developer.
One could say that Wokwi is the “GitHub of Simulators.” It is less approachable than Tinkercad, but way more powerful for anyone building smart/connected devices.
- Developed by: Uri Shaked
- Best for: IoT developers and ESP32/Pico users
- Special features: Wi-Fi simulation, logic analyzer, and signal visualization (I2C, SPI, UART), VS Code integration (paid tier)
- Compatible with: Web Browser (Free), Windows/Mac/Linux (VS Code Extension)
- Price: Free (public projects), $7/mo (private projects & IoT Gateway), $12/mo (VS Code support)
- Link: Wokwi
Microsoft Maker Code
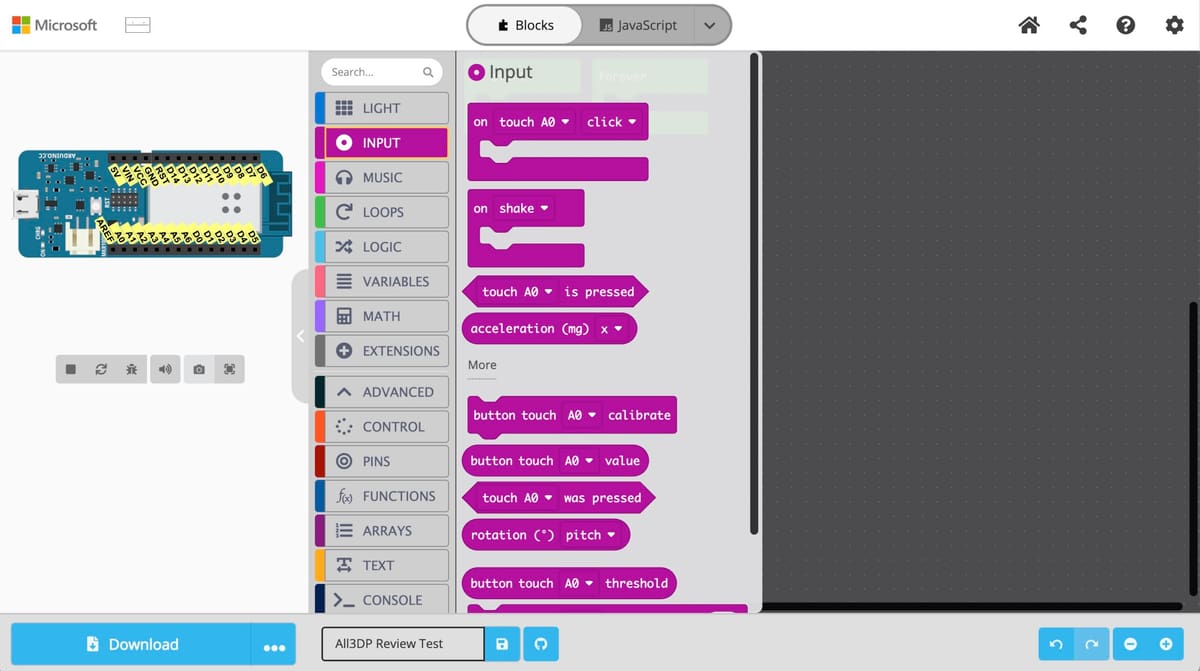
Microsoft MakeCode brings a colorful, snapping-block interface to the world of hardware. The interface is polished and intuitive. Like Tinkercad, it lets users drag-and-drop logic blocks to create complex programs, which can be instantly converted to JavaScript or Python for those who want to peek under the hood.
The simulation environment is excellent for interactive projects. You can simulate buttons, shake gestures, and light sensors. An extension library is available, allowing you to add support for joysticks, servos, and displays with a single click. It is widely used in schools because it handles the “scary” part of coding, so students can focus on the logic.
When it comes to Arduino models, there is a major catch: MakeCode requires 32-bit processors. It works beautifully with the Arduino MKR series, Arduino Zero, or Adafruit Circuit Playground, but it does not support the classic Arduino Uno, still the most common board beginners own. If you have a standard starter kit, you cannot use this software. It is strictly for the newer, more powerful generation of boards. If you have a compatible board (like a micro:bit or Arduino MKR), the workflow is great. You connect the board via USB, and the browser recognizes it immediately (WebUSB). You click “Download,” and the code flashes directly to the board – no drivers, no COM ports, no fuss.
MakeCode is arguably a great educational software, but it is effectively a different ecosystem. If you are a beginner using a micro:bit, or any modern Adafruit board, this should be your choice. If you are using a standard Arduino Uno, skip this and go to Tinkercad.
- Developed by: Microsoft
- Best for: STEM Students, Teachers, and users of 32-bit boards
- Special features: WebUSB, dual editor for JavaScript and Python, retro game engines, and animations.
- Compatible with: Web Browser (Chrome/Edge recommended for WebUSB)
- Price: Free
- Link: Microsoft MakeCode Maker
Offline
Here are some options you can download and use without staying connected while you simulate. Most of these programs go deeper than their online cousins.
Crumb
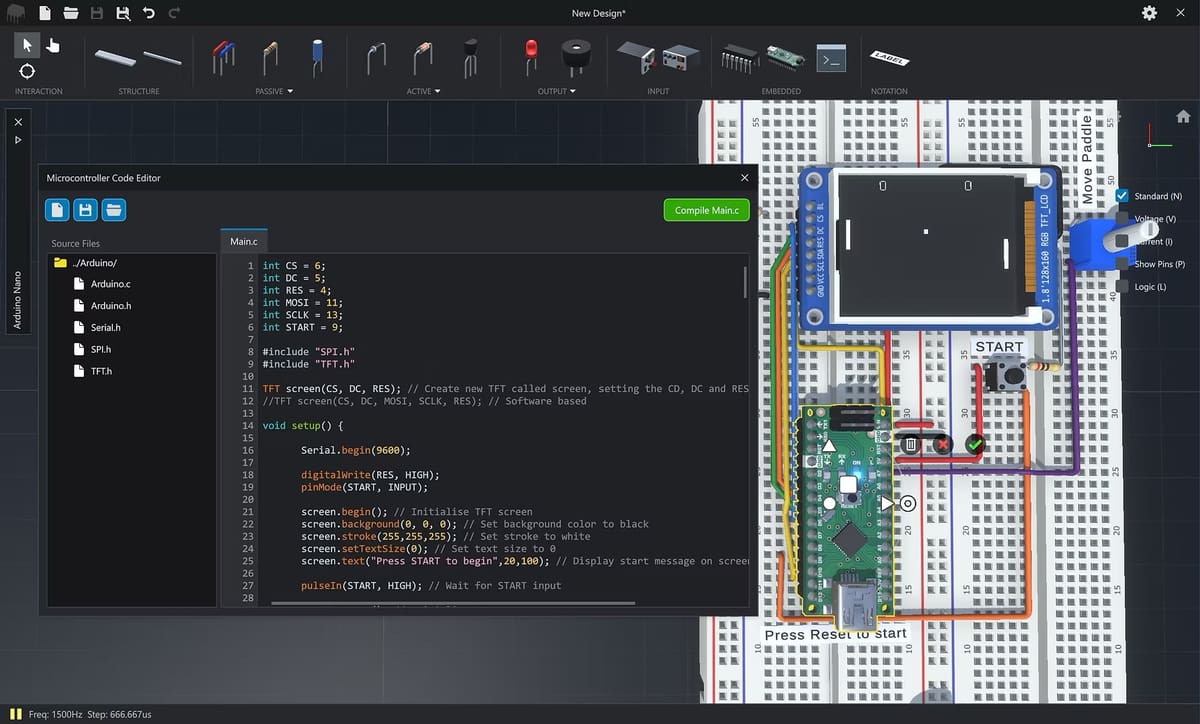
If video games and an electronics lab had a baby, it would look like Crumb. This is easily the most visually stunning simulator on the market. Unlike the flat, 2D vector graphics of Wokwi or Tinkercad, Crumb drops you into a fully realized 3D workbench. You can rotate the breadboard, zoom into pinholes, and watch LEDs glow with realistic lighting effects.
Its primary strength is visualization. It replicates the actual physical frustration (and joy) of breadboarding – managing messy wires, placing components into specific holes, and reading resistor color bands. It currently includes a fully programmable “Arduino Nano” clone, allowing you to write code and watch your 3D creation come to life. It also features a surprisingly capable oscilloscope and logic analyzer that you can probe onto any wire in 3D space.
The experience is immersive. You select components from a 3D shelf and place them onto the breadboard. Wiring feels tactile – you click a hole to start a wire and click another to end it, with the software automatically routing the cable realistically. Code is written in a built-in editor that mimics the standard Arduino IDE. Once you hit “Program,” the virtual USB cable plugs in, and the code uploads. It’s less about “efficiency” and more about the “experience” of building.
However, Crumb is a paid tool (a one-time purchase, thankfully) and is developed by a solo creator. This means the component library is significantly smaller than what you would find in community-driven tools like Wokwi. It is excellent for basic analog circuits and logic gates, but if you need specific niche sensors or advanced IoT modules, you likely won’t find them here.
Crumb is the “Flight Simulator” of Arduino tools. It is the best choice for visual learners who struggle to translate 2D schematics into real-world wiring. If you want to know exactly what your project will look like on your desk, this is the tool for you.
- Developed by: Mike Bushell
- Best for: Visual learners, iPad users, and breadboard practice
- Special features: Full 3D environment, cross-platform (PC, Mac, and mobile), interactive probes
- Compatible with: Windows, macOS, iOS, Android
- Download: Crumb
Proteus VSM
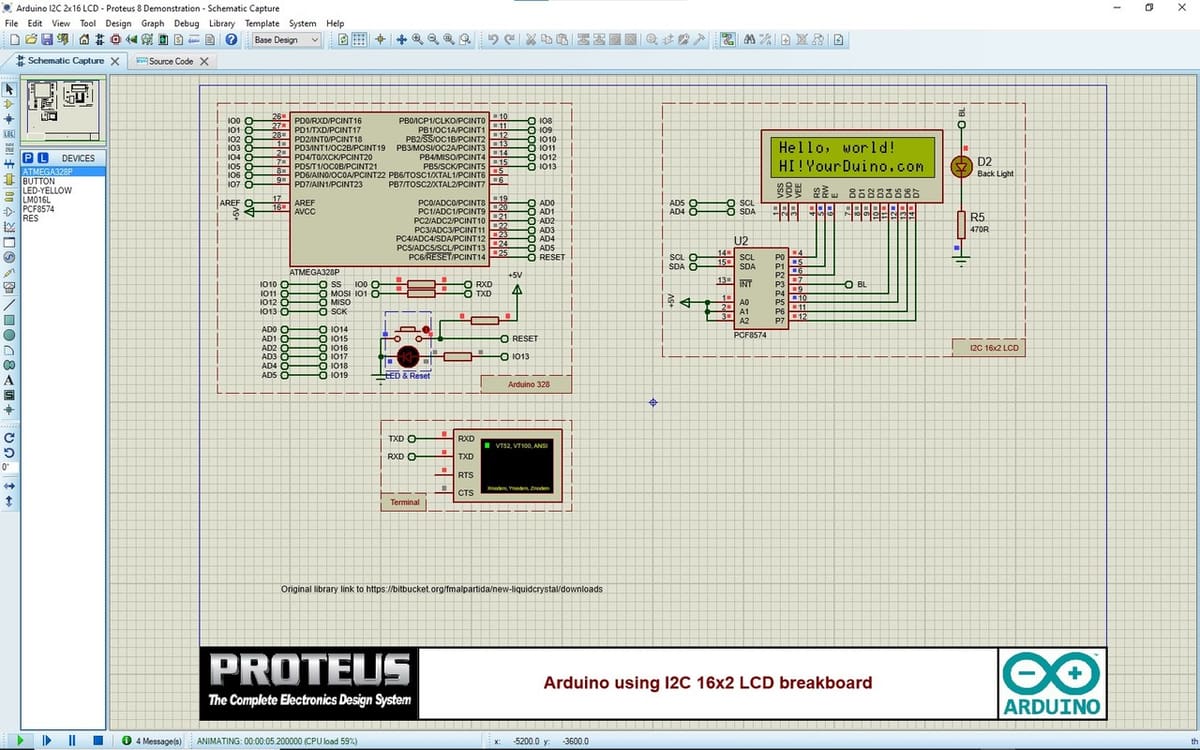
While tools like Tinkercad are designed for learning, Proteus is a full Electronic Design Automation (EDA) suite. It’s often used by professional engineers to design actual commercial products. Proteus doesn’t just simulate the Arduino code; it simulates the entire circuit’s physics, including the interaction between the microcontroller and analog components such as motors, amplifiers, and LCDs.
Its library is massive. You aren’t limited to a few generic parts; you have access to hundreds of specific component models. If you need to test how your code handles a specific power supply or a display driver, Proteus can do it. A standout feature is the Visual Designer, which lets you program your Arduino using flowcharts instead of writing C++ code – a great option for rapid logic testing.
Proteus is a traditional engineering tool. You draw a schematic by placing components from the library and wiring them manually. You then link your Arduino component to a compiled .hex file (from the Arduino IDE) or write code directly in its built-in editor. When you hit “Play,” the simulation is rigorous. You can attach virtual oscilloscopes, logic analyzers, and voltmeters to any wire to see exactly what is happening in real-time.
If you are a professional engineer or a university student needing to validate a complex design before manufacturing a PCB, Proteus is the industry standard. For everyone else, the price and complexity are likely overkill.
This power comes with a steep price tag and an even steeper learning curve. The interface can be intimidating for beginners. Additionally, while user-created libraries exist for modern boards like the ESP32, the official “VSM for Arduino” package is primarily focused on the classic AVR architecture (Uno/Mega/Nano).
- Developed by: Labcenter Electronics
- Best for: Engineers, university labs, and PCB designers
- Special features: Simulation of digital logic and analog physics simultaneously, visual designer, virtual instruments
- Compatible with: Windows
- Price: ~$322 USD (for the specific Arduino AVR starter license), rising to $1,000+ for full professional bundles.
- Download: Proteus VSM
SimulIDE
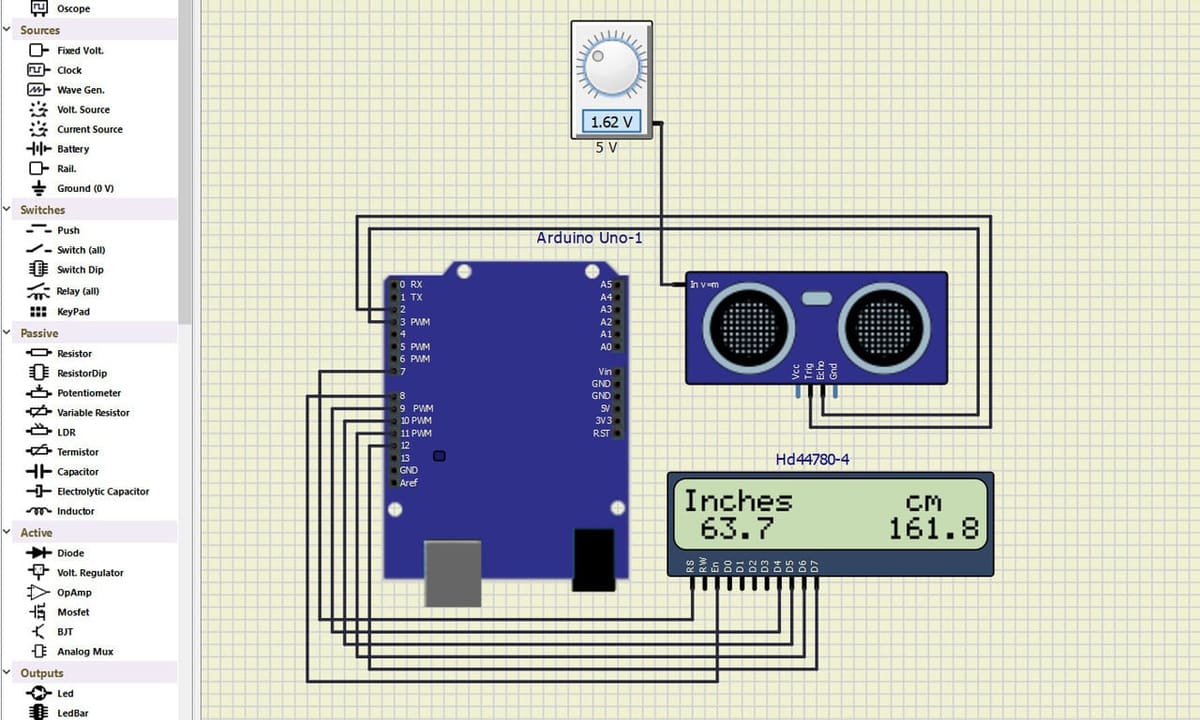
If Proteus is a heavy-duty factory, SimulIDE is a Swiss Army knife. It is a lightweight, real-time simulator that prioritizes speed over flashy graphics. The interface is spartan, looking a bit like an old Windows XP utility. But this simplicity means it runs smoothly even on older laptops that would choke on heavier software.
SimulIDE is unique because it supports a wide range of non-Arduino chips, including PIC, AVR (the chips on Arduino boards), and 8051 microcontrollers. It features a built-in code editor and debugger, allowing you to watch variables and registers change in real-time as your code executes. You can create custom components using the “Subcircuit” or “Scripted” features, though the process is more technical than in other tools.
However, it remains strictly a “classic” electronics tool. It lacks support for modern IoT boards like the ESP32, and it lacks Wi-Fi simulation features. It is also not a PCB design tool; once your simulation works, you will need to redraw it in KiCad or Eagle to manufacture it.
SimulIDE is flexible but manual. You drag components from the left sidebar onto the canvas and wire them up. To run code, you have two options: write it in the built-in editor (which supports basic Arduino sketches) or, for better reliability, compile your code in the official Arduino IDE and load the resulting .hex file into the simulated chip.
SimulIDE is the best friend of Linux users and anyone with an older computer. It is fast, free, and creates reliable simulations for standard microcontroller projects, even if it isn’t the prettiest tool in the shed.
- Developed by: Santiago Gonzalez, Popov Alexey
- Best for: Linux users, low-end PCs, and AVR/PIC enthusiasts
- Special features: oscilloscope, real-time simulation
- Compatible with: Windows, Linux, macOS (experimental)
- Price: Free
- Download: Simulide
Flowcode
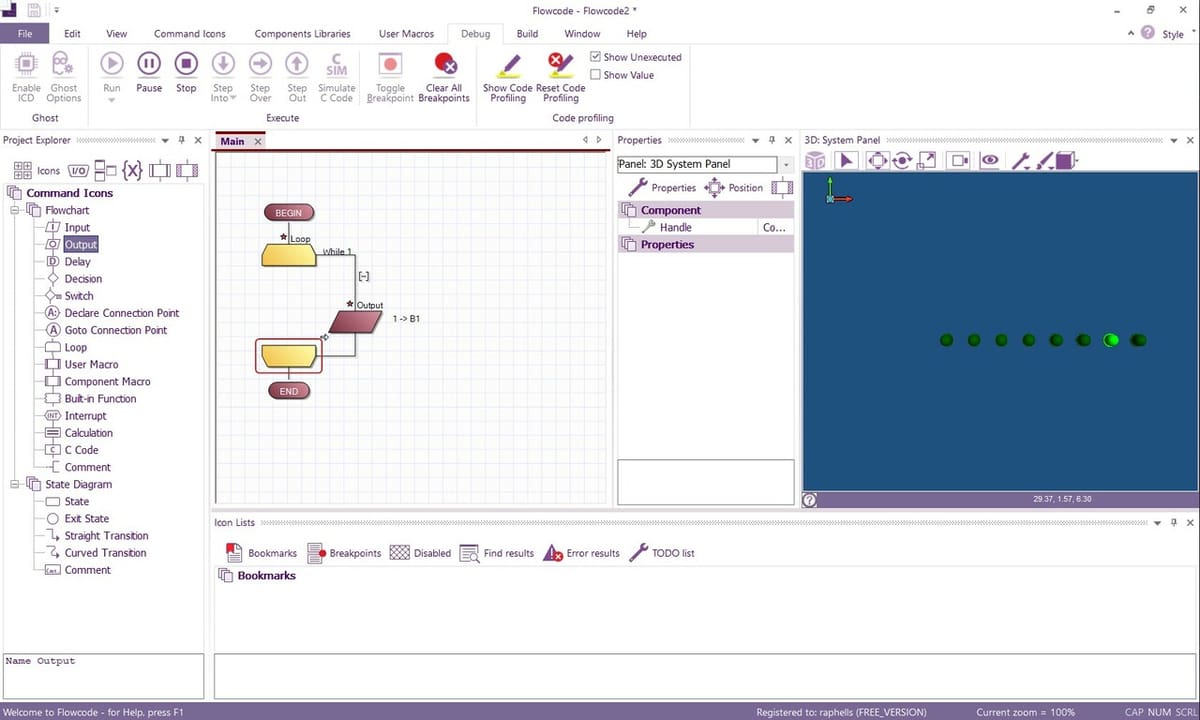
Flowcode is often misunderstood as just another “beginner block coder,” but it is actually a professional engineering tool in disguise. While Tinkercad uses blocks to teach logic, Flowcode uses industry-standard Flowcharts to program complex control systems. It is widely used in vocational schools and engineering firms to develop firmware for PIC, AVR, ESP32, and even Raspberry Pi controllers without writing a single line of C++.
Its “Killer Feature” is the 3D Simulation Panel. Unlike other tools that just blink a 2D LED, Flowcode allows you to import full 3D CAD models (STEP/OBJ files). You can simulate a robotic arm, a conveyor belt, or a wind turbine, and watch your Arduino code control the 3D mechanics in real-time. It bridges the gap between software and mechanical engineering.
However, this power comes with a “Windows-98 style” interface that feels dense and complex. It is not a “breadboard” simulator where you wire up loose components; it is a system simulator. You focus on the logic and the peripherals (motors, displays) rather than the individual jumper wires.
If you are a student moving into mechatronics or an engineer who prefers visual logic over syntax, Flowcode is unmatched. It is the best tool for simulating mechanisms, not just circuits.
- Developed by: Matrix TSL
- Best for: Mechatronics, industrial control, and visual thinkers
- Special features: 3D CAD files import, debug hardware, and multi-chip support.
- Compatible with: Windows
- Price: Free (for Makers/Hobbyists – New in v10/v11), Paid (Professional/Commercial licenses)
- Download: Flowcode
Arduino IO Simulator

Despite the name, this is not a traditional simulator – it is a simulator interface. Unlike Wokwi or Tinkercad, which simulate the Arduino chip itself, this software requires a real, physical Arduino connected to your computer.
The concept is clever. You write code for your Arduino, but instead of wiring up real LEDs or expensive sensors, you connect the board to the software. The software then visualizes the outputs (like turning on a virtual motor) and feeds virtual sensor data back into your real board. It acts as a “Digital Twin” for your workbench. It is excellent if you have the board but don’t want to buy a $20 LCD screen just to test a 5-line code snippet.
However, it depends on Java and specific libraries. It also defeats the “travel-friendly” purpose of a simulator, since you still need to carry the physical microcontroller.
This is a niche tool. It is perfect for classroom settings where schools have Arduino boards but cannot afford buckets of loose components. For general users, a fully virtual simulator (like Wokwi) is usually more convenient.
- Developed by: Xevro
- Best for: Education; testing expensive peripherals
- Special features: free Pro version, drag & draw
- Compatible with: Windows & macOS (Requires Java)
- Price: Free
- Download: Xevro
Online & Offline
The following simulator is available both online and offline, so different needs can be met.
PICSimLab
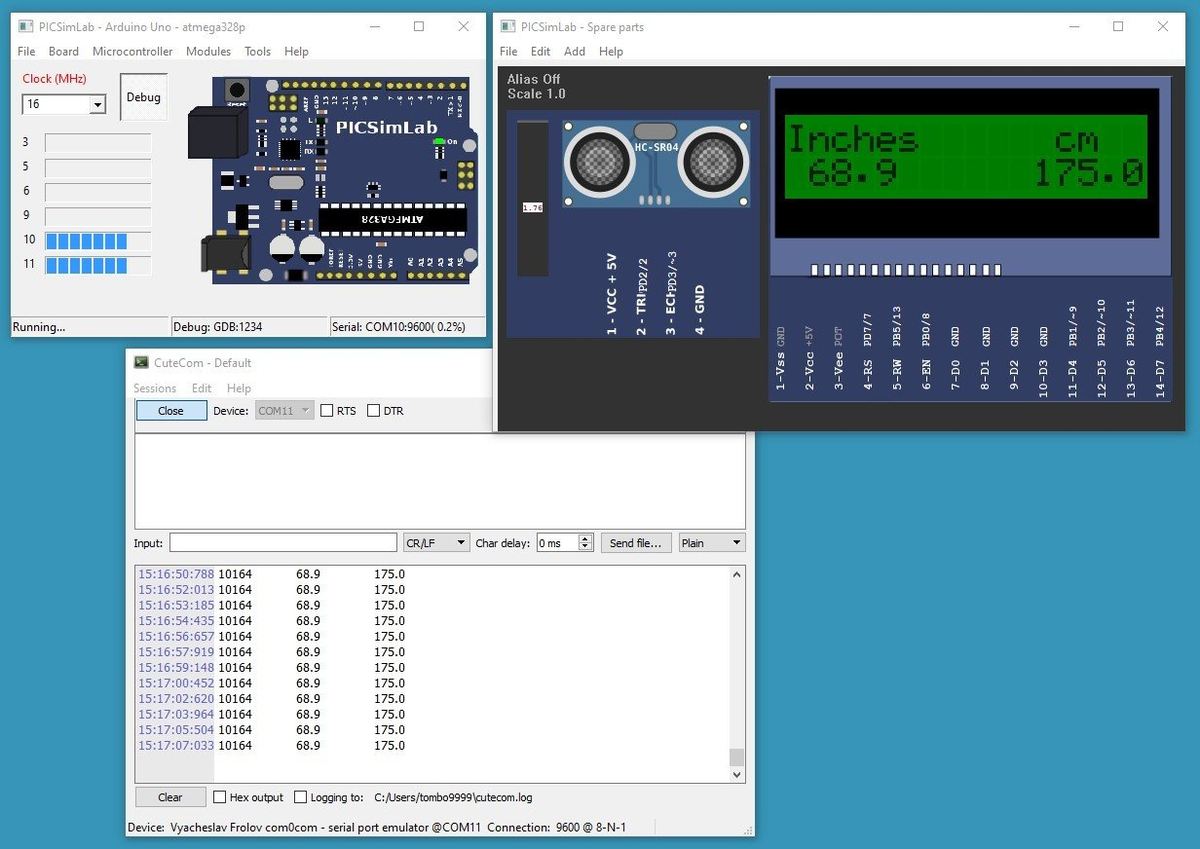
PICSimLab is a hidden gem for users who need serious emulation power without the bloat of professional EDA suites. Originally designed for PIC microcontrollers, it has evolved into a multi-architecture powerhouse that now supports Arduino (AVR), STM32, and even the ESP32. Unlike “visual” simulators that just focus on wiring, PICSimLab focuses on the chip. It uses powerful emulators (like QEMU and Simavr) under the hood to run your code with high fidelity.
Its strongest selling point is its integration with professional tools. It can connect directly to MPLAB X or the Arduino IDE for debugging. This means you can use GDB to step through your C++ code line-by-line while watching the virtual microcontroller execute it—a feature rarely found in free tools. The “Spare Parts” window lets you connect common modules, such as SD cards, Ethernet shields (W5500), and color LCDs, to your virtual board.
However, the interface is strictly utilitarian. It feels like a lab tool, not a game. You cannot design custom PCBs or drag-and-drop complex wiring diagrams like in Tinkercad. It is designed to simulate specific development boards (like the Arduino Uno, Blue Pill, or ESP32-DevKitC) with a fixed set of peripherals attached.
PICSimLab assumes you know what you are doing. You don’t write code inside it; you write it in your favorite IDE (VS Code, Arduino, MPLAB), compile it to a .hex or .elf file, and load it into the simulator.
If you are a computer engineering student or an embedded developer needing to debug ESP32 or PIC code without hardware, this is unmatched for the price (free). If you just want to learn basic Arduino wiring, stick to Tinkercad.
- Developed by: Luis Claudio Gambôa Lopes
- Best for: Engineering students, PIC/STM32 developers
- Special features: Multi-Arch support, debugger integration
- Compatible with: Windows, Linux, macOS (via Wine)
- Price: Free (Open Source / GPL)
- Download: Github
How to Pick the Right Simulator for Your Needs
With simulators, we need to keep our expectations in check because they’ll never be as smooth and reliable as real hardware. With that being said, an ideal simulator should still have the following:
- Simulation Fidelity & performance: The runtime performance is critical for a smooth workflow, since a laggy or glitchy simulator can be frustrating to work with. Moreover, a problematic simulator can also mask hidden issues in the circuit or code.
- A modern, expandable library: Most simulators handle the basics (LEDs, buttons, and LCDs) just fine. Simulators with smaller libraries often don’t include components that aren’t frequently used. This can be a serious limitation for your project.
The components library should also include at least popular Arduino boards and its commonly used components. Should the library omit a specific part, does the software allow you to import custom components, or write your own? If not, you might hit a wall halfway through your project. - Active development & community: Tutorials, active forums, and developer support can make a user’s experience wonderful or miserable. Users will benefit from an active community that can answer questions and share knowledge, helping each other get the most out of the simulator.
- Free or affordable pricing plans: For students and hobbyists, “free” is often the only option. However, for advanced users, a paid license can be worth it if it unlocks professional debugging tools (such as a virtual oscilloscope) or allows private projects.
License: The text of "The 9 Best Arduino Simulators to Save You Time and Money" by All3DP is licensed under a Creative Commons Attribution 4.0 International License.