3D Printer Gantry: All You Need to Know

A 3D printer's gantry can provide a stable platform for components to move along. Read on to learn everything about them!
Fused deposition modeling (FDM) 3D printers can be quite varied, especially when it comes to their frame and motion system. Although FDM machines often have unique features in these two areas, one element that most FDM 3D printers have in common is a gantry.
A component of a printer’s frame, the gantry allows for movement along a horizontal axis. In other words, a gantry is the structure on a 3D printer that supports a sliding component. Most typically, the term is used to refer to whatever supports the printhead.
In this article, we’ll go over the different configurations of gantries and how they work on different styles of FDM 3D printers. We’ll also go over some maintenance and repair tips to help you fix any gantry problems you may have.
But first, we’ll cover a bit of background information.

Motion Systems & Gantries

Often discussed alongside gantries are motion systems, and for good reason: The two are related! Technically speaking, a “motion system” is any component responsible for a specific movement, such as a lead screw or a timing belt. However, the term is more often used to refer to the entire apparatus used to facilitate printing within a three-dimensional space, and this is the definition we’ll be using in this article. In this sense, the gantry is part of a printer’s motion system.
On any FDM printer, a firm element is required to support and stabilize the printhead. While gantries are certainly effective in achieving this, other structures also work. For example, delta printers use extension arms, which aren’t a type of gantry.
Furthermore, while most FDM printers do have gantries, not all support motion across the same axes (X and Y). And finally, gantries aren’t configured the same way across all printers; different motion systems require different arrangements.
With that settled, let’s look at the configurations.
Motion Systems & Gantry Configurations
Gantries can come in many different forms, with the following being the three most common configurations:
- Aluminum V-slot extrusion: This is an aluminum bar with grooves for wheels to move across.
- Sliding rods: These are stiff cylindrical bars that components can slide across.
- Linear rails: This is the most expensive option, involving a stiff track with small grooves for a carriage with ball-bearing spheres to fit on.
Besides these types of gantries, there are others meant to accommodate different motion systems. Moreover, gantries vary in their location and the components attached to them.
To begin to untangle how they work and how they differ, let’s go over some of the most popular motion systems, which as we just learned, gantries are parts of. In other words, the following sections identify and discuss general modes of operation. These aren’t gantries per se, but they do influence and are influenced by specific types of gantries.
i3-Style Cartesian-XZ-Head

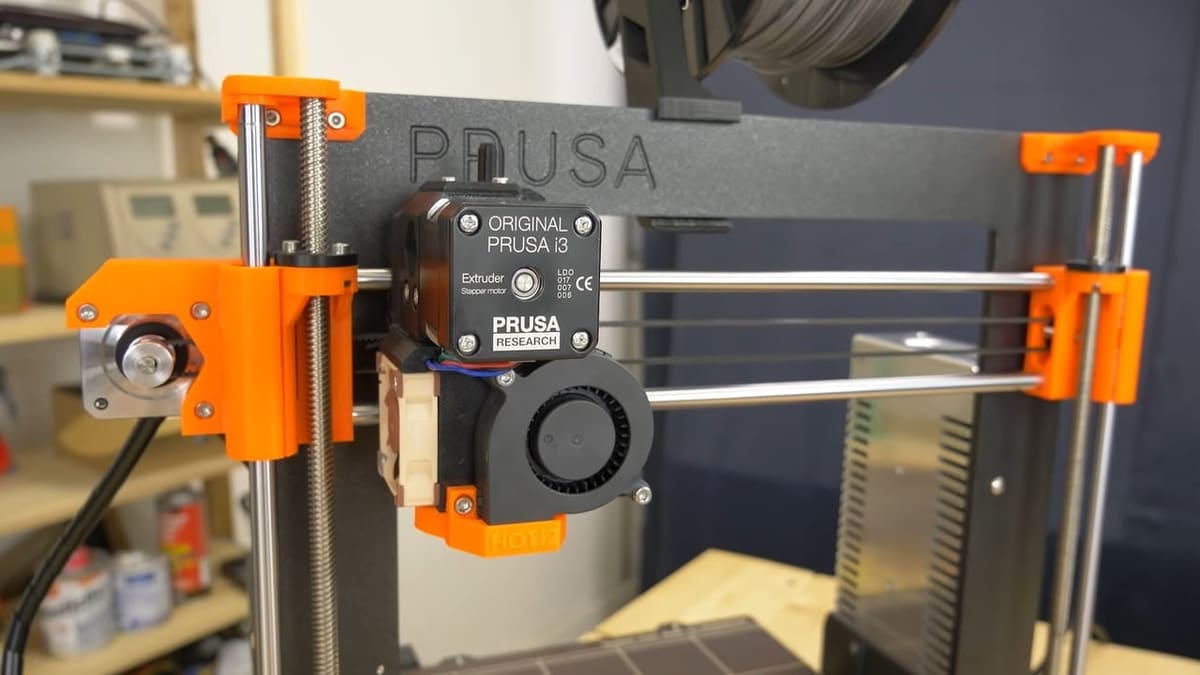
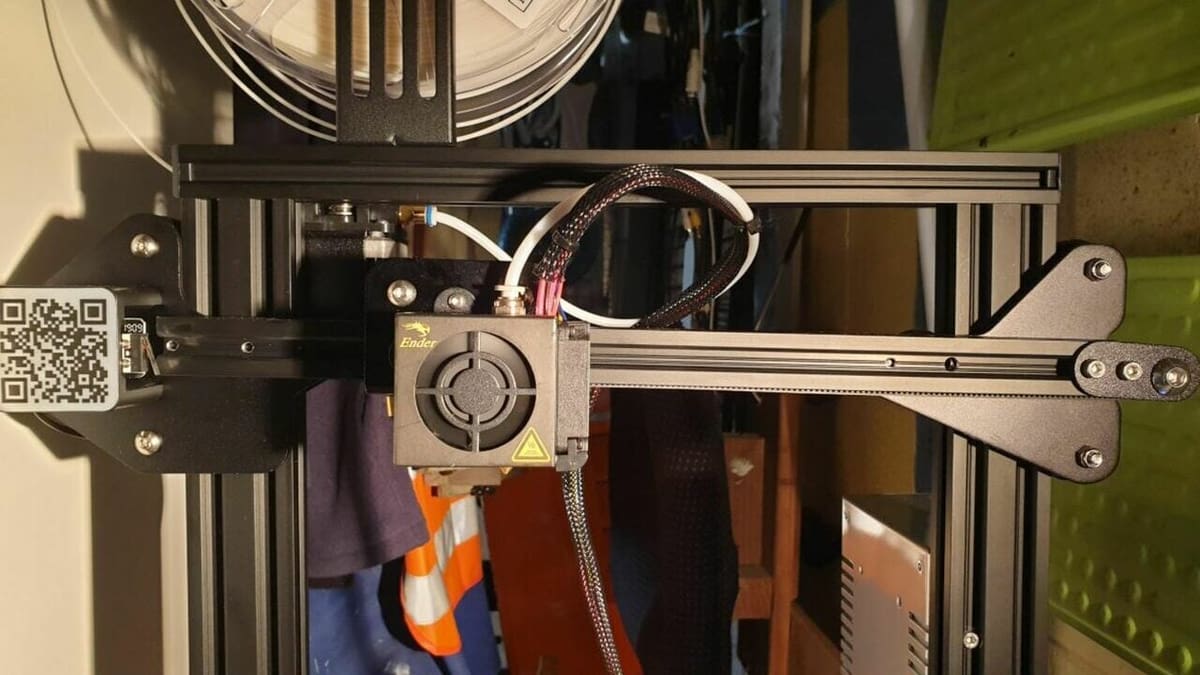
First up, the Cartesian-XZ-head motion system, also called “i3-style”, is perhaps the most common nowadays. This format, present on the Prusa i3 MK4 and the Ender 3 V3 printers, appears very right-angle oriented from the front, with a solid (usually more cluttered) base structure and a protruding gantry.
The XZ-head motion system involves Z-axis rods that raise and lower an X-axis gantry, where the printhead moves side to side. The printhead therefore moves in the X and Z directions, hence the name, while Y-axis rails or rods move the print bed backwards and forwards.
This motion system is simple and common, which has led it to be popular and have a large supporting community. It’s also one of the least expensive 3D printing motion systems to build given that the main components are ubiquitous. The downside is that it requires a relatively large frame for a moderately sized build volume.
More recently, an XZ-head subvariant has become popular: the cantilever. It’s especially common with “mini” versions of printers, like Bambu Lab’s A1 Mini and the Prusa Mini+, but it’s still effectively an XZ-head motion system only with a different frame.
UltiMaker-Style Crossed
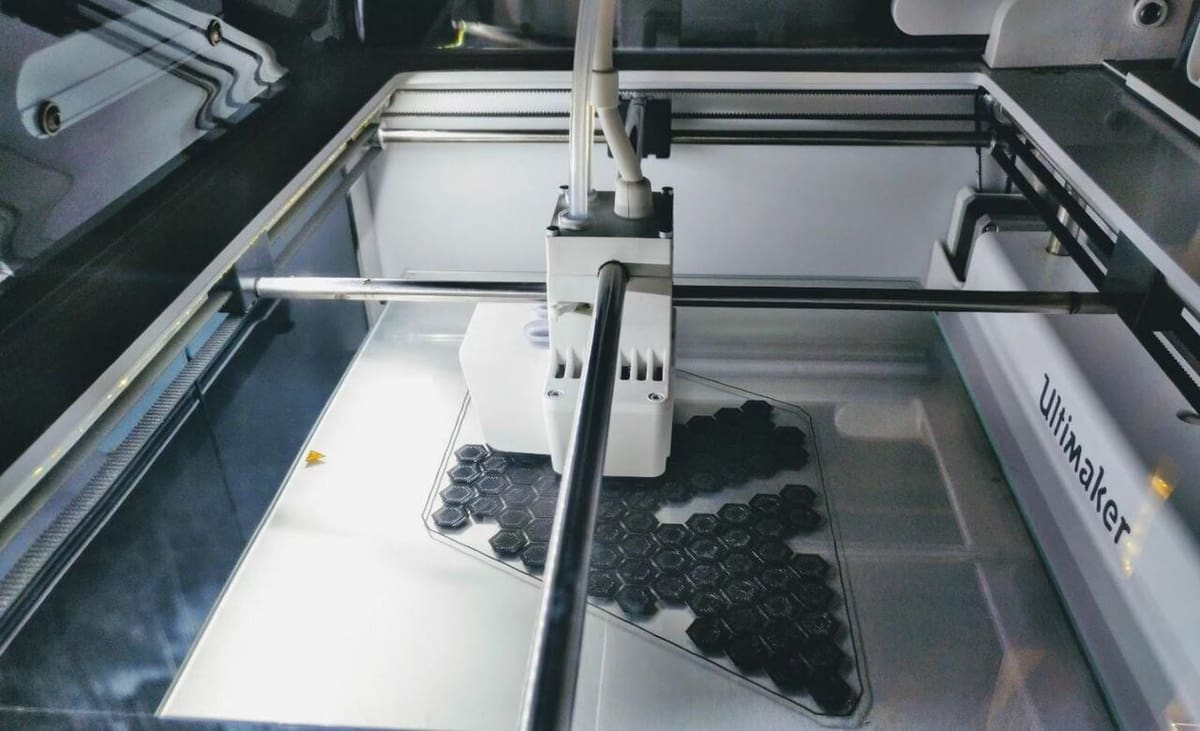
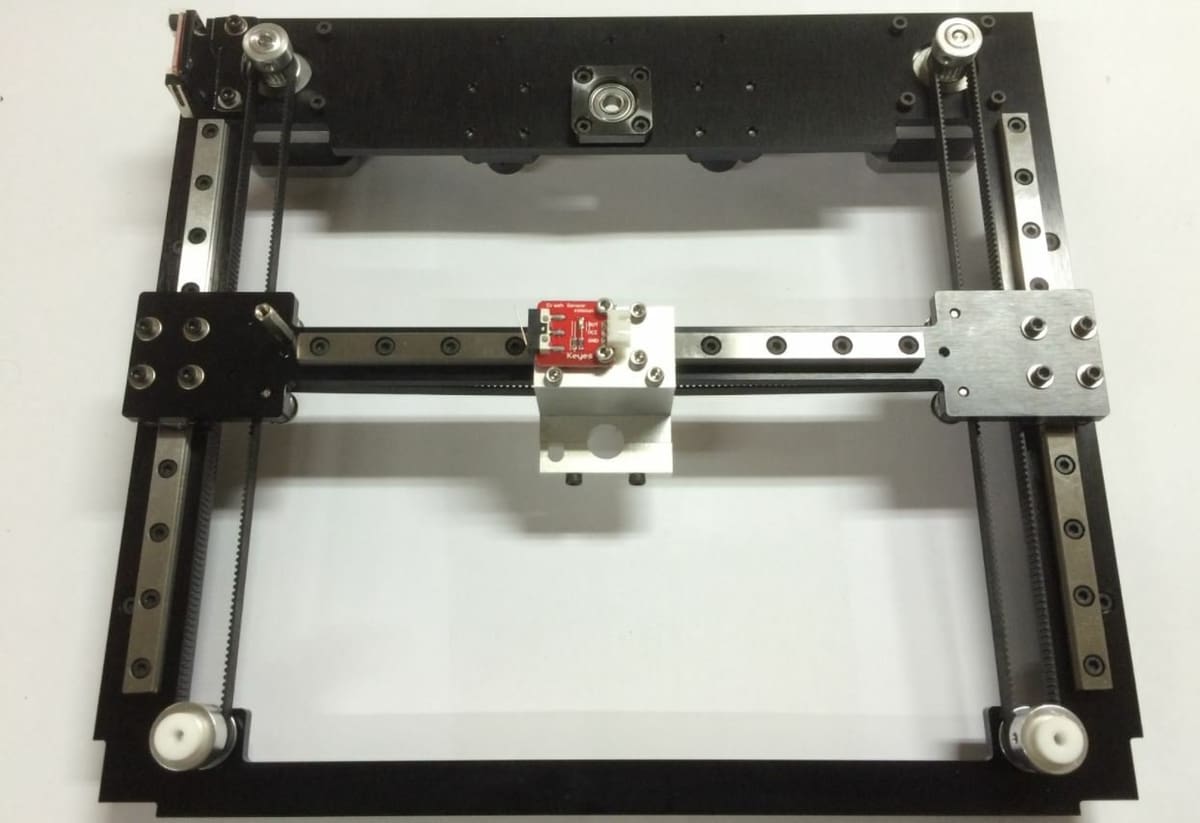
As you might expect, the so-called UltiMaker-style crossed-gantry motion system is a style most commonly used on UltiMaker 3D printers, such as the UltiMaker S7. Viewed from the top, this motion system looks like a set of shifting crosshairs moving inside a box-like frame.
This motion system includes a square-shaped construction composed of four outer gantries. Two X and two Y carriages move in their respective directions along the perimeter of the square, and each pair supports an additional crossing gantry that goes across the box in a single direction.
The printhead is located where these two crossing gantries intersect, meaning that when a carriage moves along one of the outer square gantries, the intersection point changes, and so does the printhead’s location. While this apparatus provides very stable X- and Y-axes printhead motion, Z-axis rods are responsible for moving the build plate up and down and away from the printhead.
In total, then, there are six gantries, four of them supporting the two that support the printhead. This means that, for this motion system to be truly effective, the gantries must be almost perfectly aligned. A stress test can help ensure proper functioning.
CoreXY
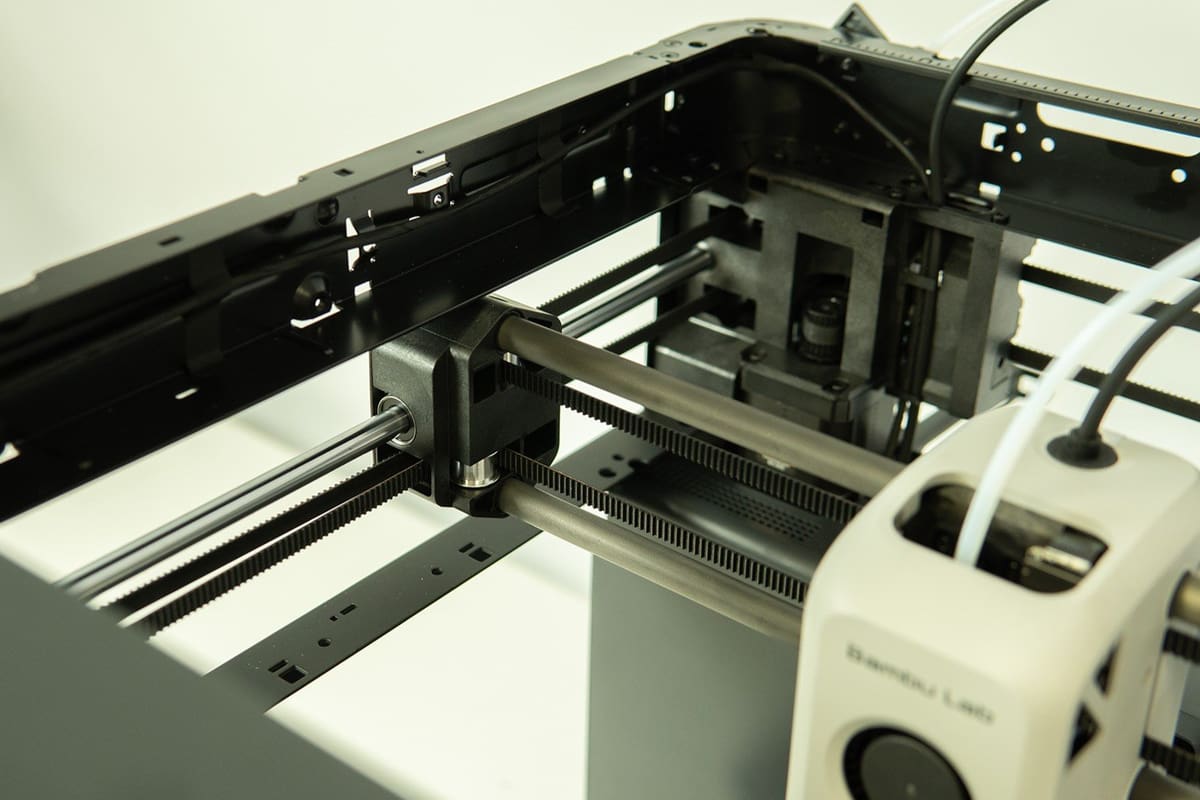
For many, the CoreXY motion system is one of the coolest. From the top, it looks like a rectangular frame with a crossing element. This system is common in DIY printer builds, like the Voron 2.4 printer, but also exists in manufactured machines such as Bambu Lab’s X1 Carbon and Creality K1.
Although it may look simple at first glance, the CoreXY motion system is pretty complex, using a special configuration of two belts for the printhead’s XY motion. The two belts follow paths along the top of the printer, looping through the two XY stepper motors and a handful of pulleys. Important for their function, the two belts actually cross at one point along the perimeter.
Regarding the gantries involved, CoreXY printers have two on each of the Y sides, and these support a third that crosses. Each end of the two belts is connected to a corner of the carriage on the crossing gantry, where the printhead is located and by which it moves in the X direction.
The result of this setup is that the combined operations of the two stepper motors can move the printhead in any XY direction (sort of like with the two knobs on an Etch A Sketch). It’s sort of like a four-way tug of war, where the gantries coordinate and force the tugging to push and pull the printhead in specific directions. Meanwhile, as with the UltiMaker-style motion system, the printbed is moved up and down thanks to Z-axis rods.
Although building a CoreXY system may be more difficult and expensive than other motion systems, one should be able to achieve fewer vibrations, which can negatively affect print quality. Another benefit of the CoreXY system is its relatively small footprint – that is, you can achieve a greater build volume for a specific frame volume.
Cartesian-XY-Head
This motion system, seen in printers like the Creality Ender 5 S1, resembles a “flipped” version of the Cartesian-XZ-head setup. That is, the Z rods have been rotated and converted into Y-axis gantries, and the bed is left to fend for itself (with its own Z rod or rods).
As a result, the structure looks similar to that of a CoreXY printer, with a boxy frame and a crossing element. And indeed, the gantries of an XY-head printer are located in the same places, with two Y-axis gantries and a single X-axis crossing gantry. Yet, the two motion systems differ in how they move the printhead.
Instead of using two crossing belts, an XY-head machine uses individual and disconnected motion for each axis. The printhead rides the X-axis gantry thanks to a belt driven by one stepper motor, while the X-axis gantry rides the Y-axis gantries thanks to belts driven by another stepper motor.
While this motion system isn’t performance-wise better than a CoreXY system, it’s cheaper and much less complicated to build. The main drawback is that it tends to be slower than most other motion systems, including CoreXY printers.
H-Bot
Finally, H-bot is a motion style that resembles the letter ‘H’ viewed from the top, hence the motion system’s name. There aren’t really any popular H-bot 3D printers out there, for reasons we’ll get to soon, but you can find smaller H-bot 3D printer projects on OpenBuilds.
H-bot printers are similar to CoreXY machines in a few ways, the most obvious being their gantry arrangement. Like in a CoreXY system, H-bot printers have three gantries, with one crossing and connecting the other two. The printhead moves along the crossing gantry in the X direction, which moves along the other two in the Y direction.
Another similarity to the CoreXY motion system is that H-bot printers rely on a complex belt system to move the printhead in the XY directions. However, only one long belt is used in the H-bot motion system instead of two shorter, crossing ones.
While this system may sound efficient, in reality, the H-bot motion system performs poorly. That’s because the motion system requires nearly impossibly perfect alignment as well as a very rigid belt and frame setup to perform well and avoid incorrect movements (like twisting and a lagging X-axis). As achieving this perfection is challenging and often impractical, the H-bot style printer has more-or-less faded out of view.
Maintenance & Repair
Now that you know about the different gantry configurations on different types of FDM 3D printers, it’s time to get into the maintenance and repair of gantries. Like any other part on a 3D printer, especially those involved with the machine’s motion, gantries don’t last forever.
Over time and after extended use, gantries can get worse at providing smooth motion to components on your 3D printer. Below, we’ve listed a few different gantry problems that can occur on an FDM 3D printer and a solution.
Dirty Gantry
Whether you see it or not, dirt, grime, and other unwanted particles can attach themselves to the gantry. This can cause unsmooth motion along the gantry, especially if the particles are large. The solution is to gently run a damp cloth, soaked in water or IPA, through the motion path on the gantry.
Slow or Rigid Motion Along a Gantry
If you’re experiencing unusually rigid motion when you try to move a component along a gantry, it’s probably due to a lack of lubrication. Most purchasable printers (not DIY builds) come with pre-lubricated gantries, so it’s normal to have to re-lubricate every so often. To lubricate the gantry, apply a light amount of a lubricant, such as WD-40 or mechanical grease, along the motion path of the gantry.
Misaligned Gantry
A misaligned or sagging gantry is where the start and end positions of a gantry aren’t aligned. Depending on what axis the gantry is located along, this issue might make it hard to level a bed, skew the motion of a component, or appear like other print quality issues. To fix this, loosen the gantry fasteners, align the gantry using a level, and tighten them again.
Dents in Gantry
If you have dents in your gantry, it shouldn’t usually be a problem; however, too many or too large dents can cause some issues with the motion. If this is the case, there’s really no solution other than to replace the gantry. Some alternative solutions that might work include sanding the dent down and applying a lot of lubricant around the dent.
Bent Gantry
Finally, the worst problem is if your gantry is bent, as the only fix is to get a new one. A bent gantry can cause significant issues with print quality, such as large, repetitive bulges on prints. As you wouldn’t want to make an unnecessary repair, before concluding that your gantry is bent, make sure to check that it’s not misaligned.
If you’ve determined that you need a new gantry, note that not all gantries are the same. Some manufacturers use slightly different dimensions than the industry norms, so we recommend trying your best to purchase an official or manufacturer-approved gantry replacement.

License: The text of "3D Printer Gantry: All You Need to Know" by All3DP is licensed under a Creative Commons Attribution 4.0 International License.