Elegoo Jupiter: First Look

The Elegoo Jupiter is scheduled to be released in early 2022, and we've gone hands-on with a pre-production version. Read on to find out what we've got to say.
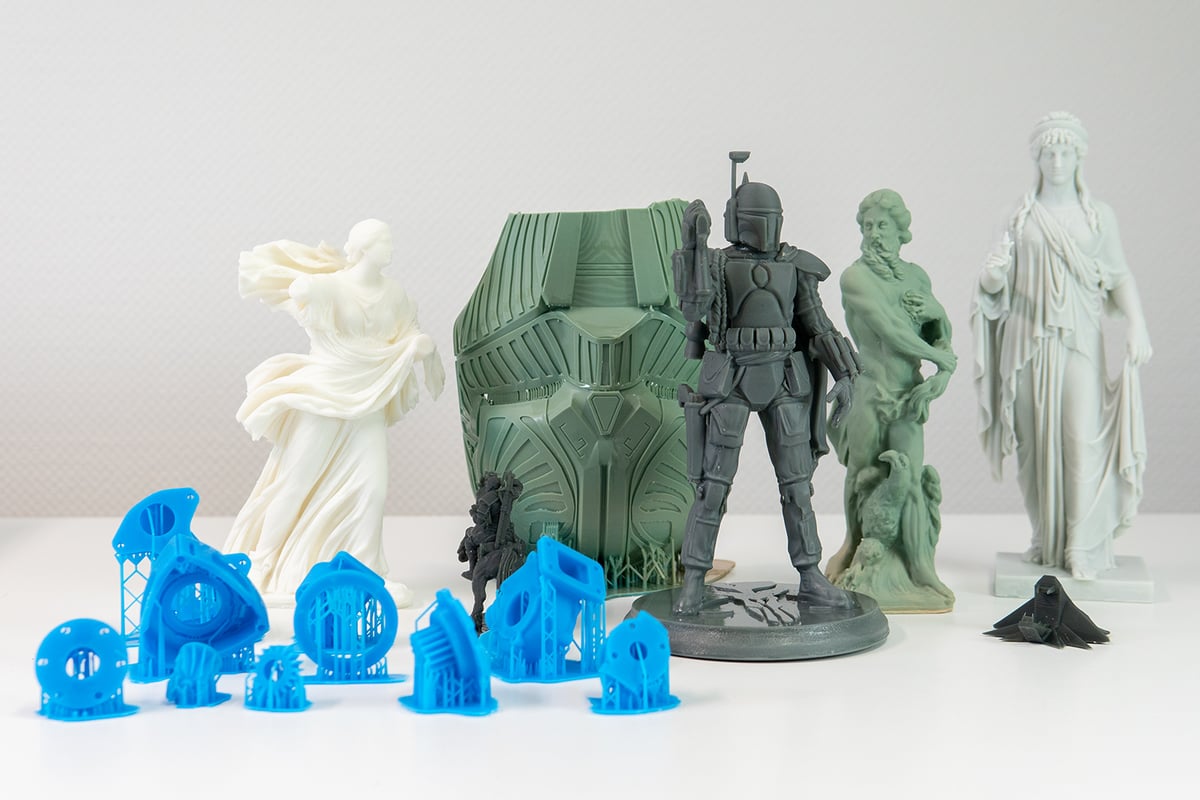
It’s been a year and a half since Elegoo’s initial tease of its largest resin 3D printer to come. From the company that already re-branded half the solar system, think Mars and Saturn, now (finally) comes its largest and highest definition 3D printer yet, the Elegoo Jupiter. After inevitably smashing its Kickstarter campaign goal and raising over $4.7m in the process, the 6K, mono screen housing black box, is now close to release. And we’ve gone hands-on with a pre-production unit.
No updates have been put on the Kickstarter page since November 8, 2021, now, but that update states “… all orders from the Kickstarter campaign will be shipped on time as scheduled.” meaning some Kickstarter super early birds should be getting a package imminently. With shipping supposedly rolling out over the next few weeks and months, we’ve given the still pre-orderable Jupiter’s pre-production unit a spin and our test printer seems to be putting out quite the finished-product-vibe.
Keep in mind this isn’t the finished product, but it already feels like it’s hitting close to home. So, without further ado, let’s get right to it.
Update – January 28, 2022: This article states that Jupiter will ship in two parts for you to put together. Elegoo has informed us that this is no longer the plan and that the Jupiter will instead arrive fully assembled.
Size And Appearance
Two Boxes?!
It’s true, we’ve only got a pre-production unit here, but at least it arrived in one piece. According to Elegoo, the final version of the Jupiter will arrive on the doorsteps of buyers in two boxes. Typically resin 3D printers, even the most budgety ones, ship fully assembled. Not so the Jupiter, however.

Elegoo claims the assembly should take about 30 minutes and is said to be “even easier to assemble than an FDM printer.” Obviously we haven’t been able to put that to the test yet, but we’re expecting to see the solid base unit needing to be topped off with the Z-axis rail and the enclosure. Nothing too tricky.
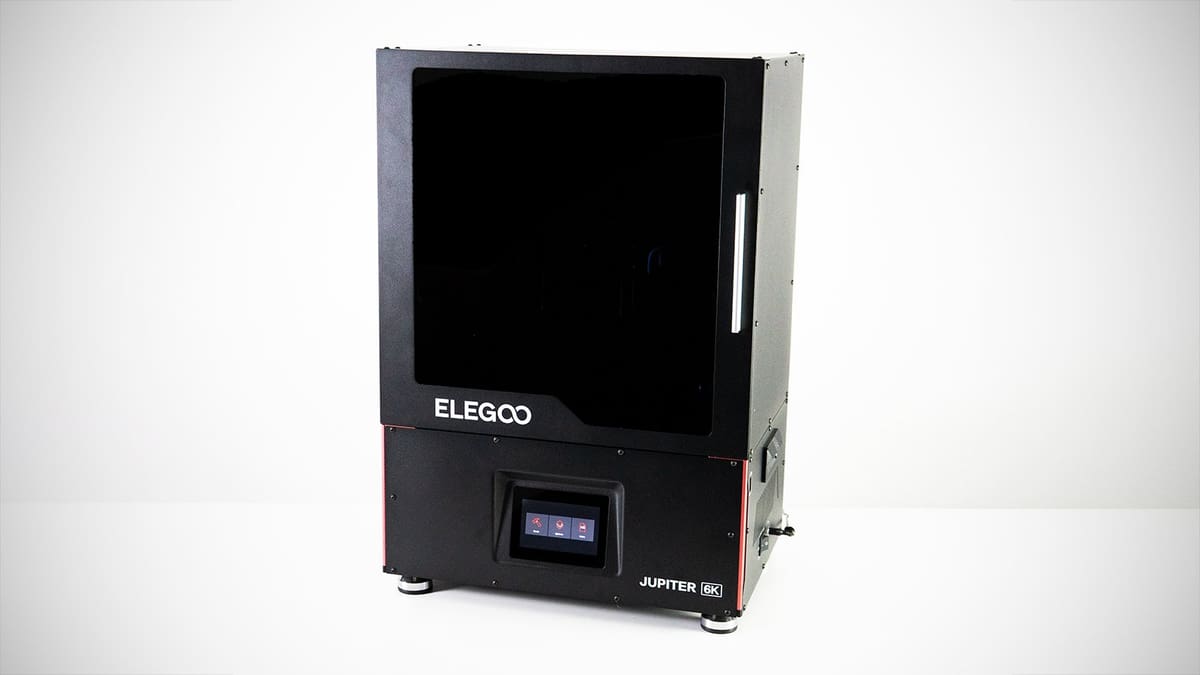
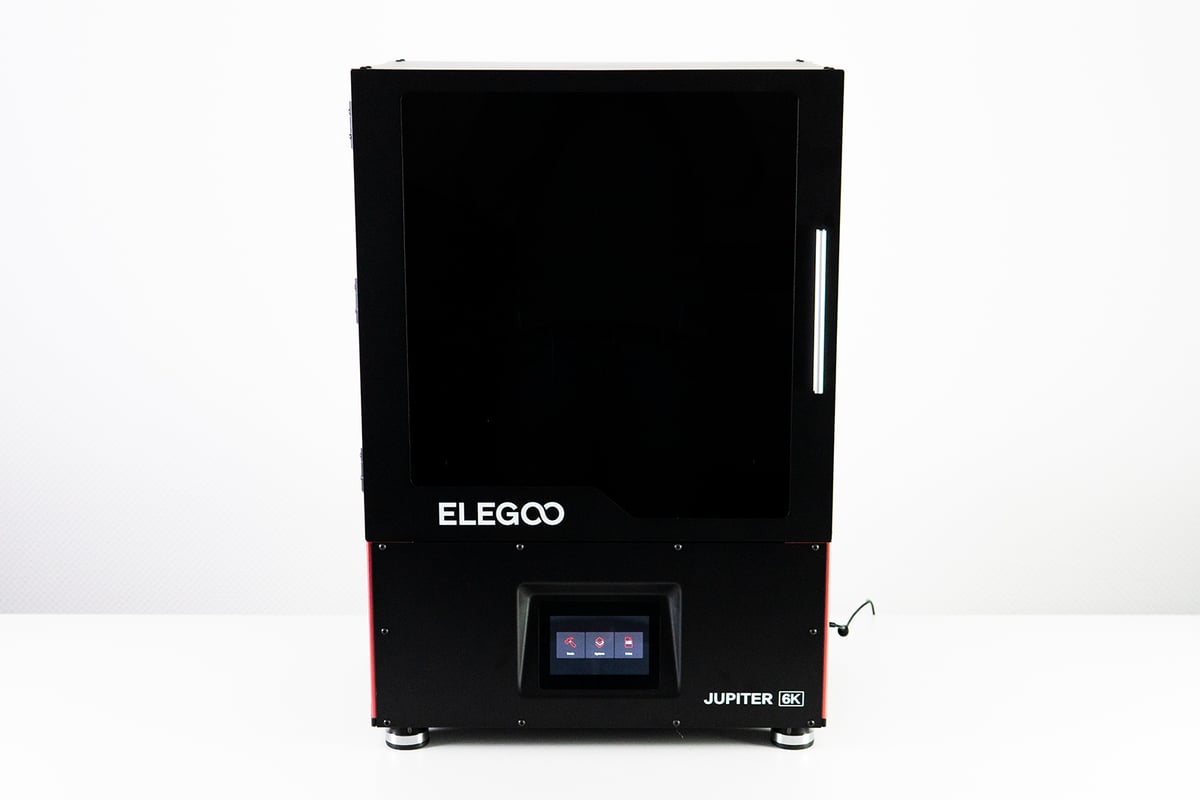
Black Box
At 498 x 358 x 750 mm in stature, it’s large machine. The body and chassis are made of sheet metal, with a tinted glass front door. Our version seems to be already somewhat outdated, with its door opening to only about 90°. That’s arguably sufficient for decent access to the print chamber, but as Elegoo stated in its latest update, on the finished version, you will be able to swing the door back all the way (180°) for even better access.
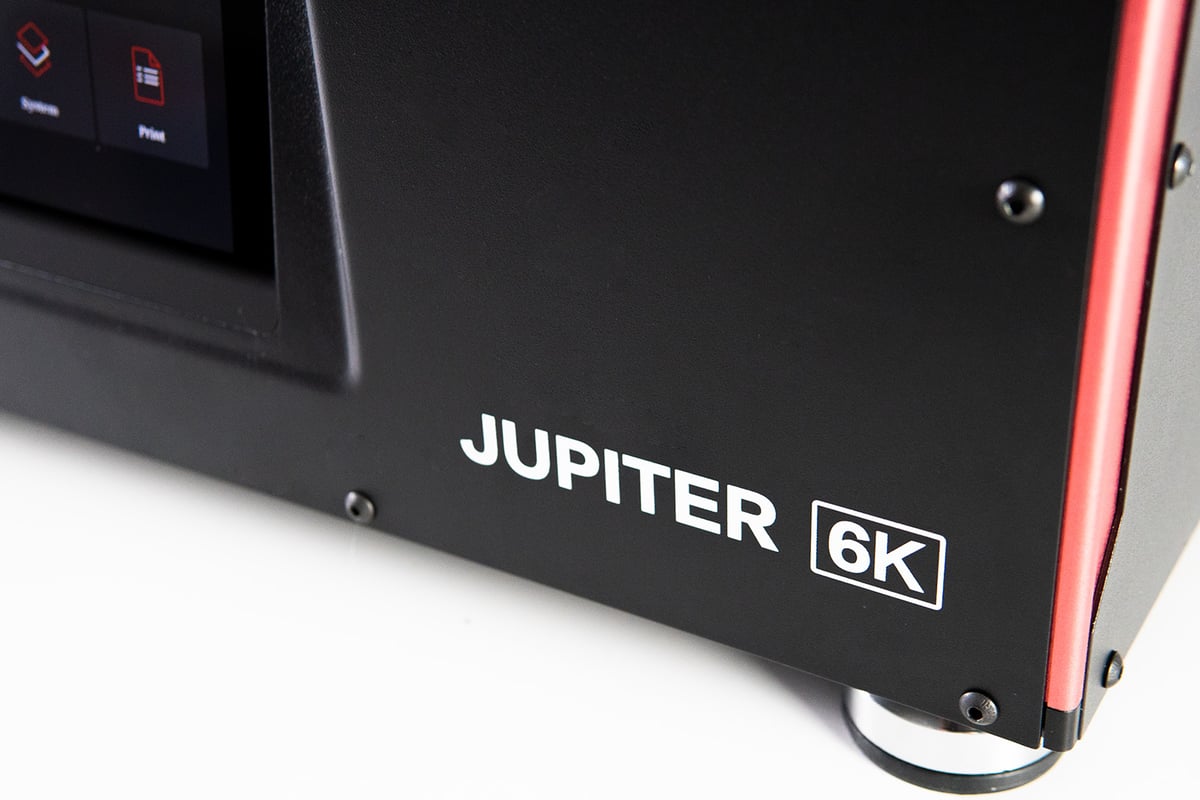
The Jupiter attempts to break up its all-black scheme with some red highlights, a silver aluminum alloy handle for the door, and aluminum handlebars on the side for lifting. In the back, you have two fans, which, later on we will discover to be very, very quiet. In the front, you have a large 5-inch touchscreen that comes with a re-designed UI, sporting more of the black and red look.
Modular Tallness
Under its black gown, the Jupiter holds a 277 x 156 mm sized print plate and 300 mm height on the Z-axis. Interestingly, Elegoo has hinted at providing a 500 mm Z-axis upgrade at some point in the future, which could make the Jupiter one of the tallest commercially available resin 3D printers around.

It’s particularly big if you compare it to its popular sibling – the Elegoo Saturn. The Jupiter has almost twice the build plate size and a lot of added extra height over the Saturn. In other words, if you have been 3D printing with small to medium-sized 3D printers up until now, the Jupiter will seem crazy large.

Features And Usability
New Leveling system
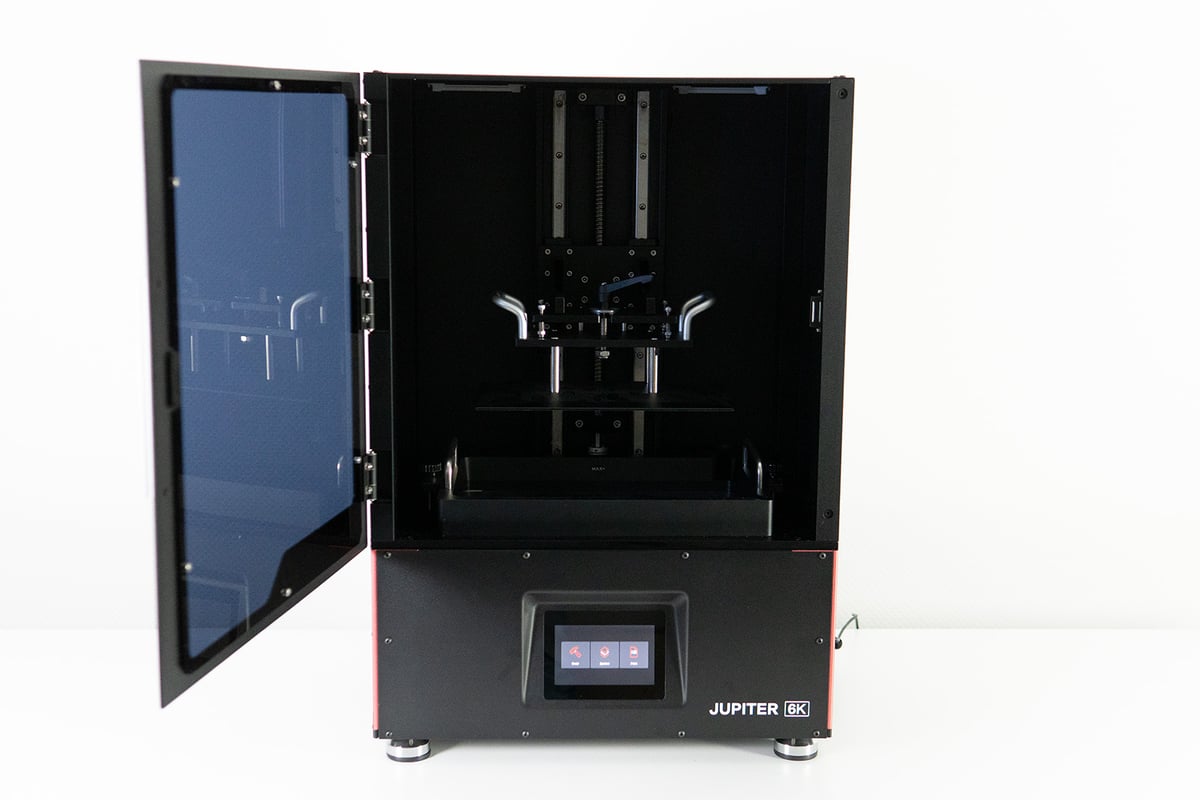
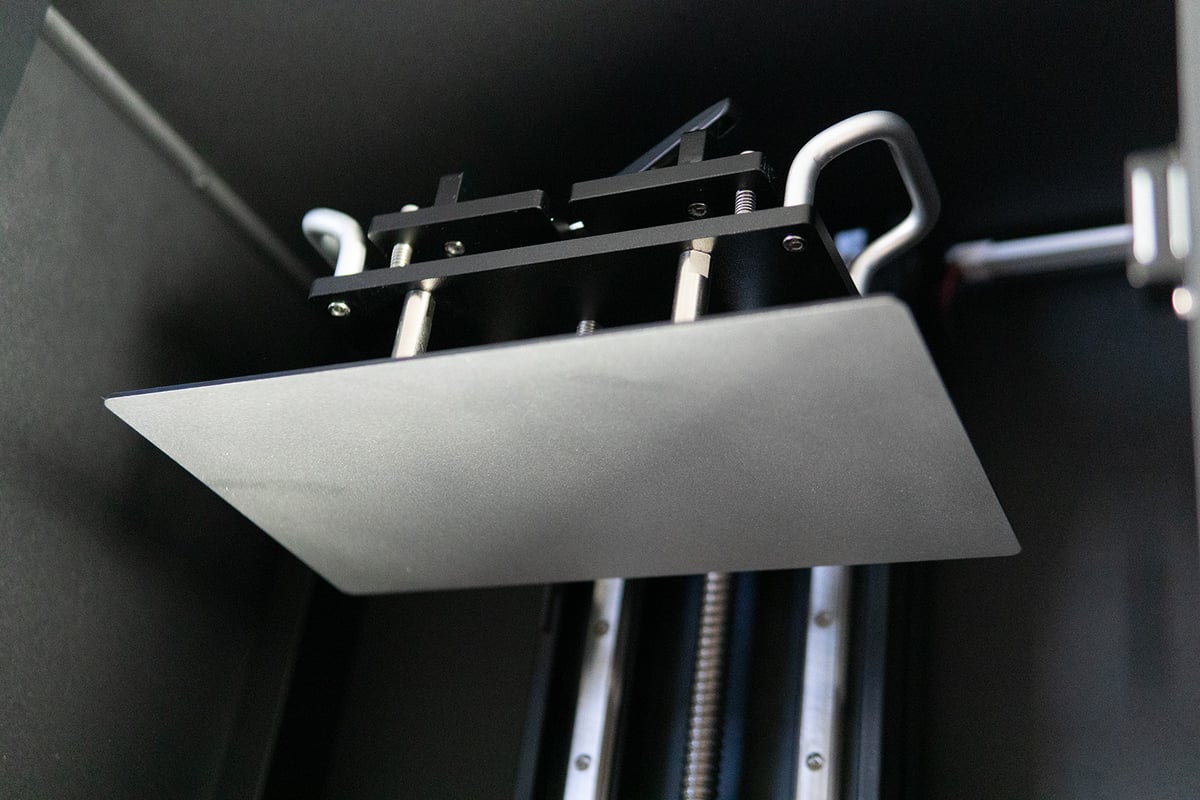
One of the most eye-catching new features on the Jupiter is the leveling system, or, should we say, bolt system, which we had a few run-ins with when trying to first set up the machine. We are talking literal run-ins, as the print plate would constantly ram into the screen. Luckily, the stepping motors do skip when hitting a roadblock, so no damage (with the exception of our nerves) was done, but we ended up needing a few attempts to get it right.

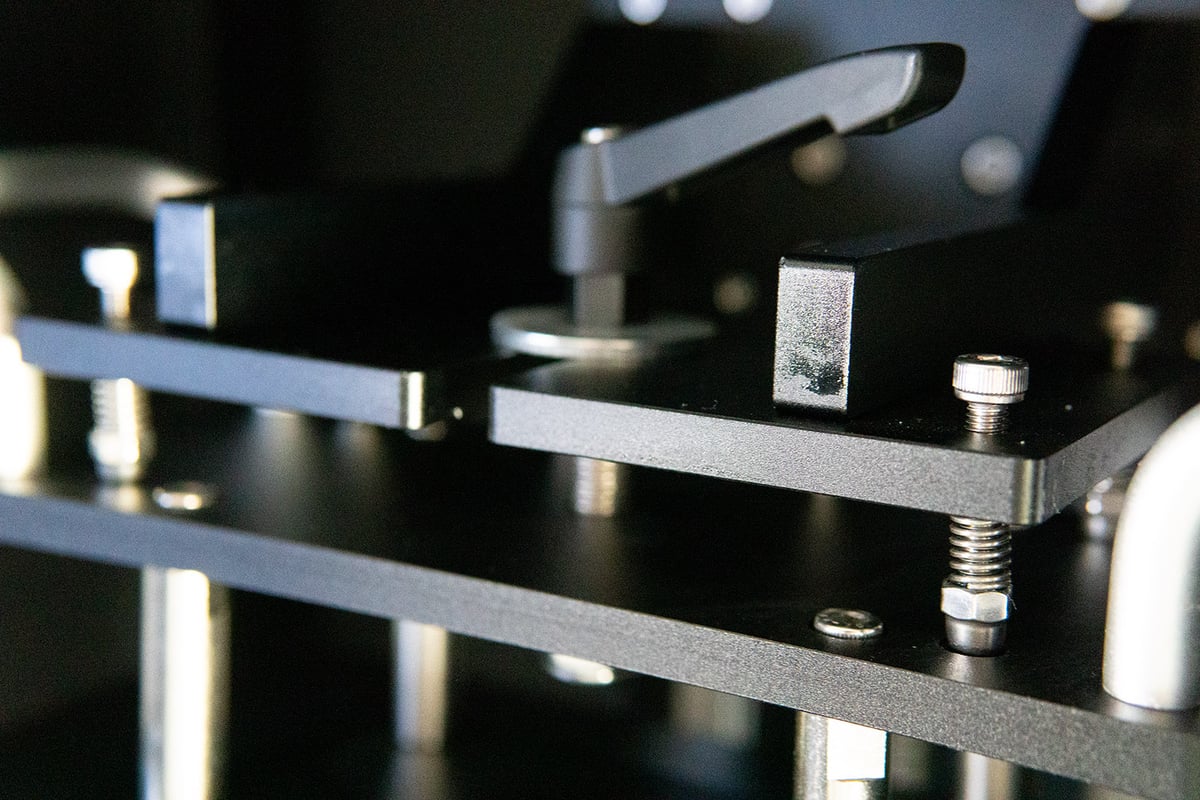
Instead of a ball-jointed build plate suspension that was screwed tight in place by two Allen screws, the Jupiter comes with four spring-loaded bolts for leveling, two bolts in the back to hold the plate in place, and a large bolt and washer to hold down the plate.
To level the print plate, you need to loosen the spring-loaded bolts and the large screw-down bolt, home the plate onto a sheet of paper, then diagonally tighten the spring-loaded bolts into the notches on the print plate, and finally the large bolt to fix the print plate in place.
Elegoo was kind enough to include leveling instructions (there was no manual provided with our pre-production unit), but with no indication of how tight those spring bolts should be, we ended up getting too tight, essentially bending the cantilever. Plus, unlike previous printer homing procedures, re-setting the Z-axis to a new zero is apparently not required. The result was the print plate whacking into the screen every time we started a print after leveling it. A few plate cleaning moments and re-leveling attempts later, we managed to get it level by only slightly tightening the spring-loaded bolts and, just to be sure, re-calibrating the Z-axis.
Naturally, the larger and heavier a build plate is, the sturdier you want it suspended. As such, we get the switch in suspension design, and once we had it leveled, it proved to be precisely that: sturdy with no need for tweaking. But in comparison to some truly big resin printers and their leveling approach, it wasn’t that intuitive. We leave the Mega 8K out of this because it comes factory leveled, but take Peopoly‘s or Epax‘s approaches for comparison.
If you fight your muscle memory to screw it as tight as you can, you might get it right on the first try. Leave a little note in the instructions would you, Elegoo?
Print Plate
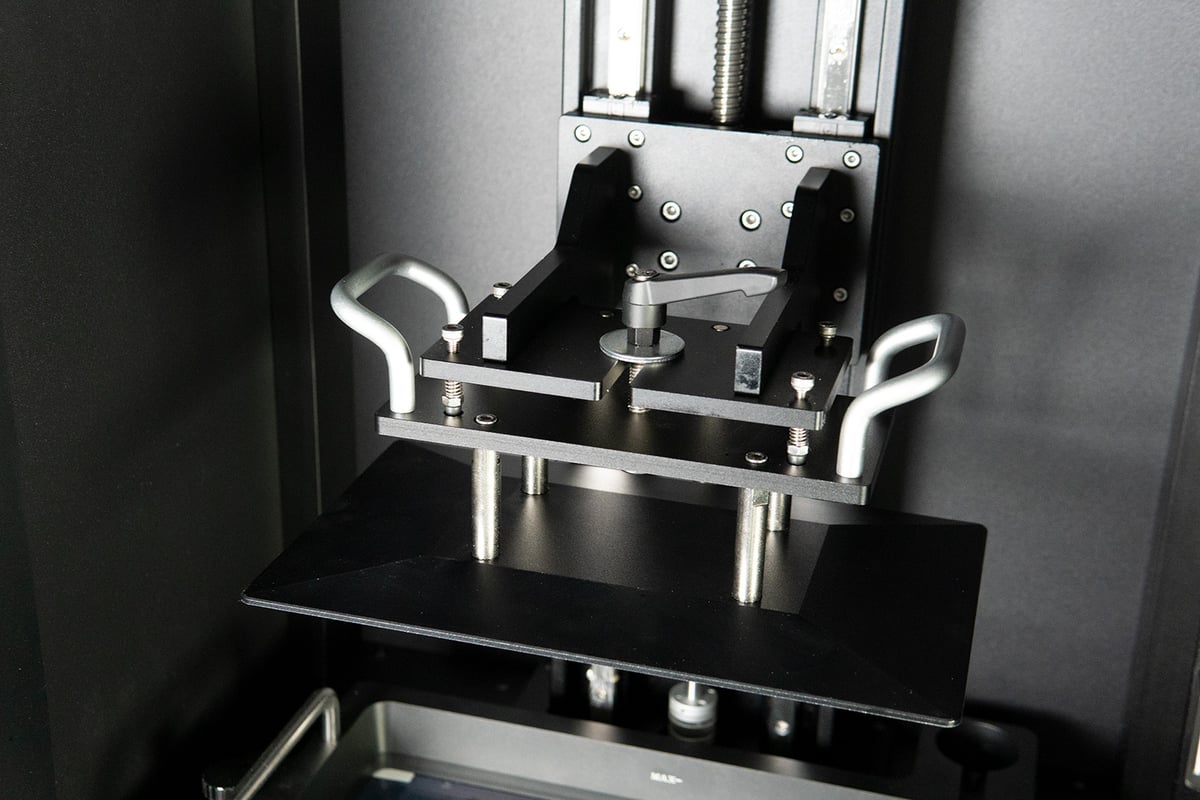
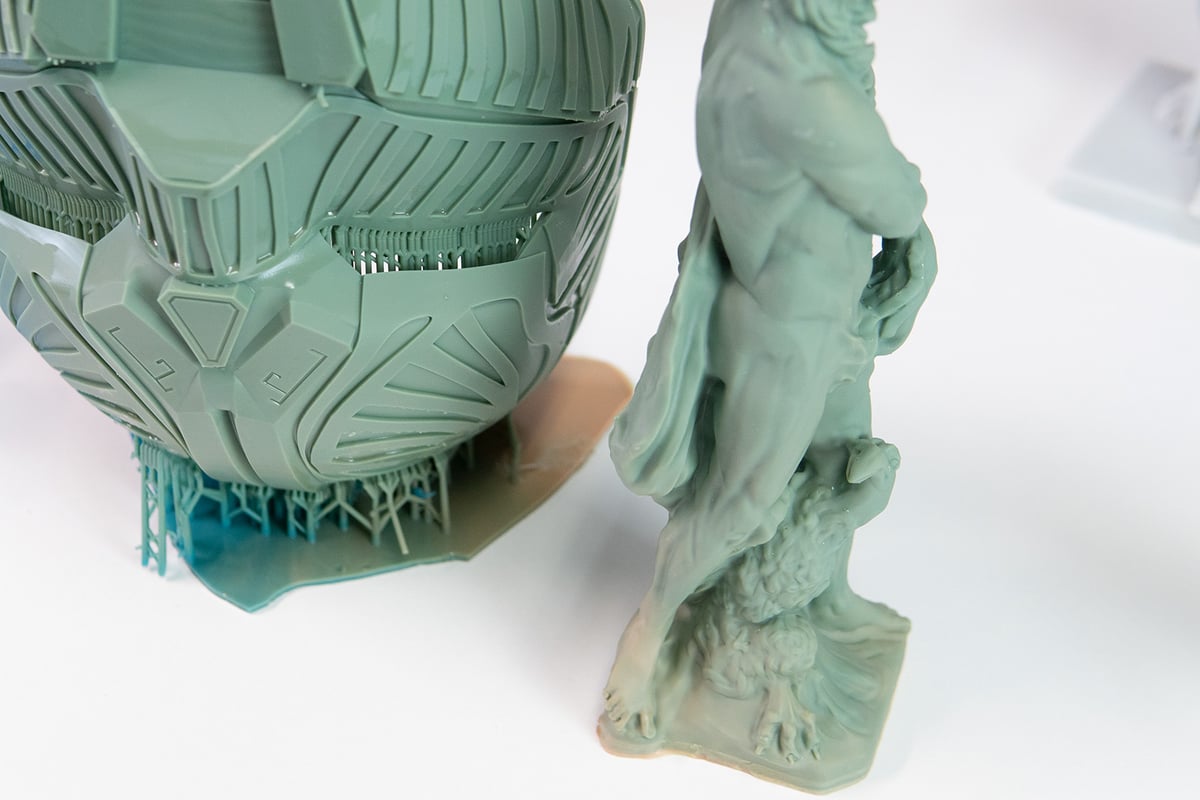
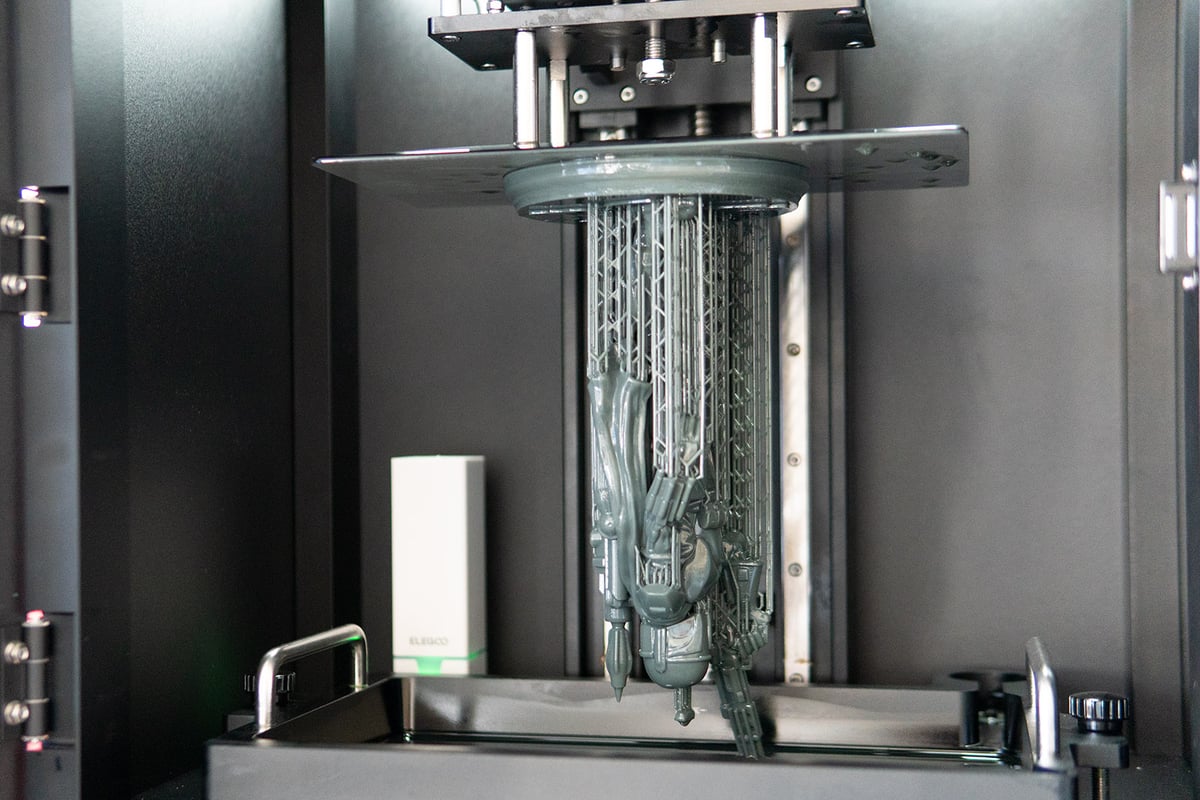
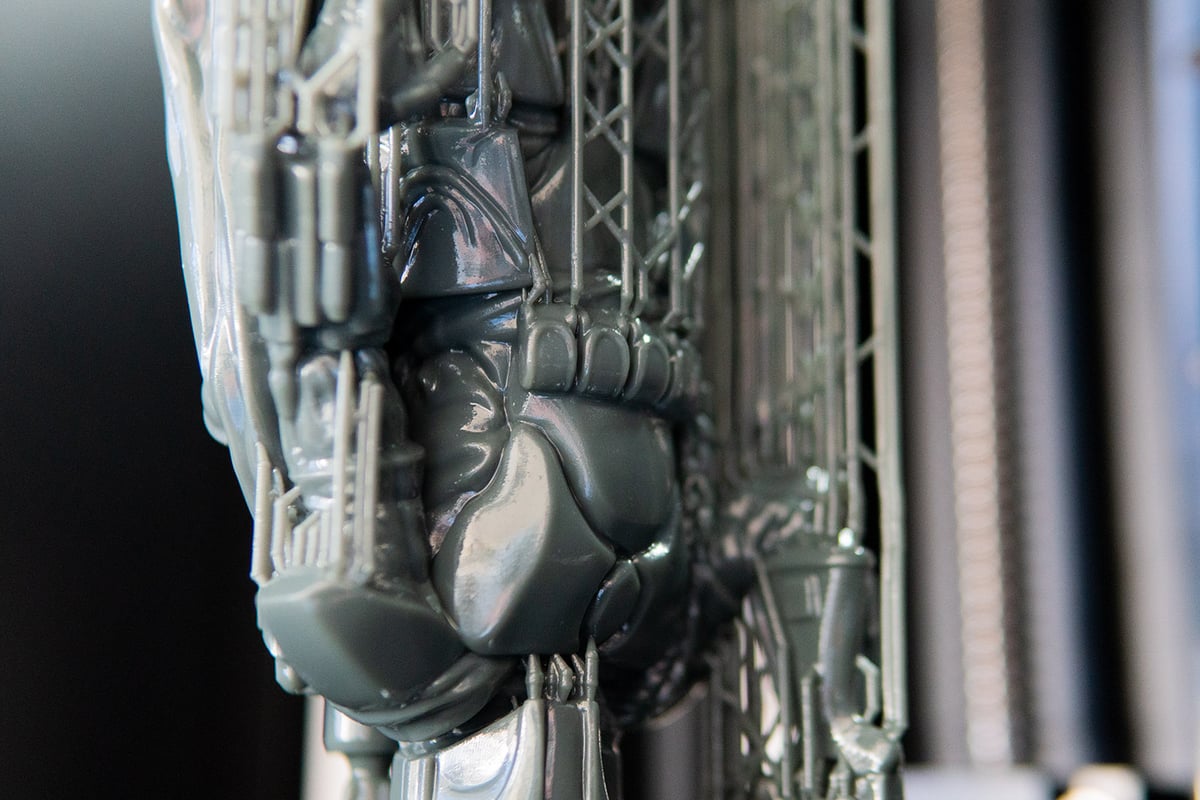
The 277 x 156 mm-sized print plate itself weighs in at about 1.7 kg, but rides smoothly up and down the Jupiter’s dual linear rail backbone. Keep in mind that the larger a print plate is, the more resin will flow on top of it every time it is submerged in the vat. That means more weight to be lifted after each layer, and therefore more physical forces exerted on the print.
Some large-printer manufacturers, such as Phrozen with its Mega 8K, try to counter this by filling print plates with holes to simultaneously decrease the weight of the plate and allow excess resin to flow off. Not so the Jupiter. It keeps with the impervious but angled design tradition of its forbearers. Personally, we prefer the latter as resin really does flow off and not just where the holes are, resulting in considerably less mess when working with the plate outside of the printer, but there is something to be said about the potential physical forces. The Jupiter seems to get away with it, though.

The switch to a hilt instead of a knob to fix the plate in place is a nifty improvement that allows for easy tightening, especially when you have your gloved hands covered in resin – an inevitable state to find yourself in when resin 3D printing. It has a downside though, the washer slides halfway down the bolt and gets in the way when trying to fit the plate back in.
6K Screen
The print plate size obviously stems from the 12.8-inch mono LCD screen the Jupiter houses. Unlike earlier pre-production units that could be seen on the web, which had a raised screen (and, as a result, a slightly different vat design as well), our version already came with the monochrome 6K screen fitted flush. Print-wise it shouldn’t make a difference, but it adds a little extra ease to taking it in and out with less chance of knocking your vat and spilling resin all over the place.
Having a monochrome screen means fast layer curing times, and with it housing 5448 x 3064 pixels, you can do so at an accuracy of 51 microns, which is essentially the same resolution you would get on medium-sized 4K printers such as the Saturn or the small 2K ones such as the Mars 2.
We already wondered if the Jupiter’s K amounts will be enough come release, especially as Phrozen’s Mega 8K, which will be released around the same time, has two more K’s (equals to a 43-micron resolution). However, having printed many and more 50-micron resolution prints on various machines, and from the looks at our first Jupiter prints, we never felt it was grainy, even after having recently reviewed near-pristine 8K precision.

If super-detailed (and super-large; the Mega 8K also has the larger build volume) prints is what you’re wanting, the Jupiter already lags behind a bit. But really, spotting the difference in resolution on your day-to-day prints can be close to impossible, especially when making full use of the build volume. Numbers don’t lie though, and for a business looking to invest in a large resin 3D printer, this could prove the tipping point.
With Elegoo emphasizing modularity for the Jupiter, there could be a chance to upgrade the screen to a more K’d-out version in the future, but for now, you will be “stuck” with 50 microns. Not bad for its size, but certainly not revolutionary.
Resin Feeding system
One of the more interesting highlights of the Jupiter is its new automatic resin feeding system – a feature generally found on professional resin 3D printers of the Formlabs Form 3 caliber.
But, instead of coming up with a whole resin tank feeding system, Elegoo has made it look stupidly simple by just adding a different resin bottle cap. Well, yes, okay, and the little vat extension that serves as the inflow.
Swap out the bottle caps, pop the sealed(!) bottle upside down into its fixture, and the spring-loaded cap will gradually release more liquid should the tank’s resin fall below “sea level.”
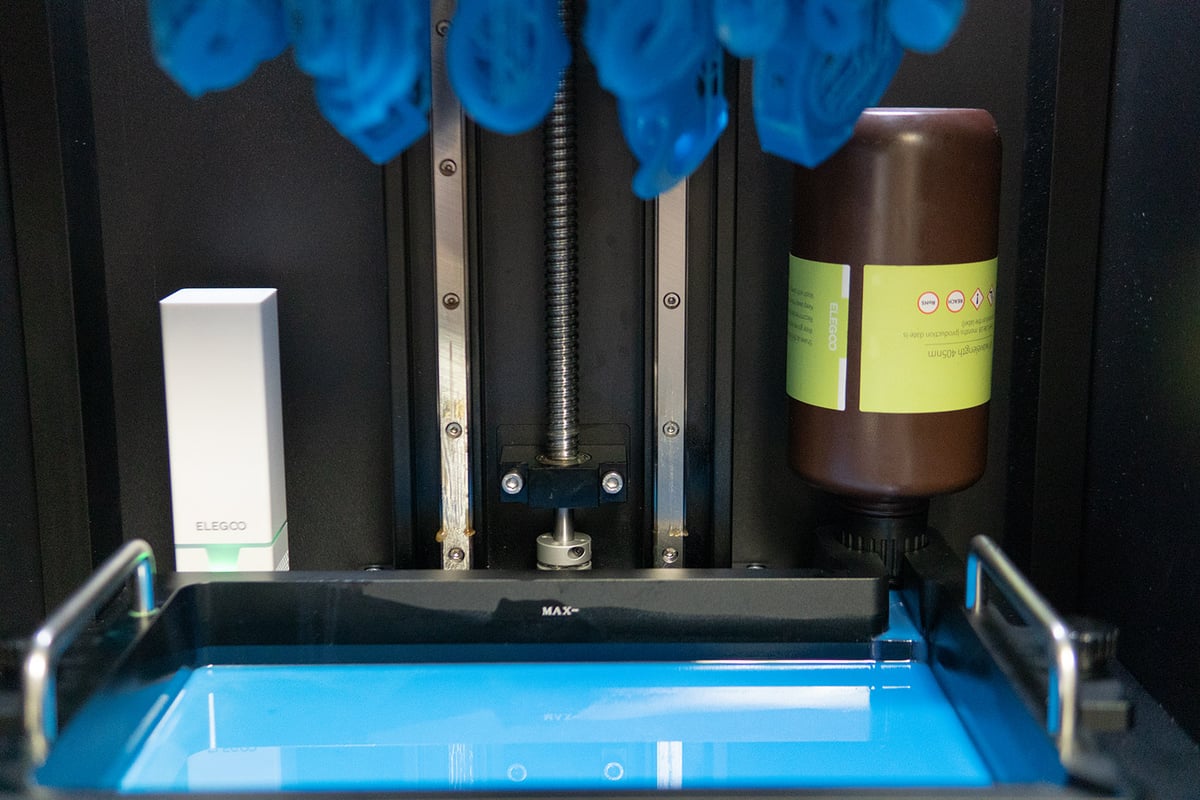
Two things to note, though. First, the bottle will completely empty itself should your resin level be below the caps outlet, which means this feature really only comes into play when you have a print, or, more likely, multiple prints on the platform that will need more than a full vat of resin (about two liters). Otherwise, you will just have a lot more excess resin in the vat that you will probably need to siphon off afterwards. After spending time with it, we can safely say the vat’s resin capacity already should be enough for most of your prints. Then again, there is that Z-axis upgrade potentially looming in the future…
In case your print job does require an extra tank, the mixing of resins just got a whole lot more complicated too. No more blending different colors directly in the vat with a good old stir: you will instead need half a kitchen’s worth of equipment if you plan to mix different blends and colors. Prepare for a barkeeper-like setup with multiple pods and beakers to mix resins, shake em up, and fill some in the vat and the tank.
If your vat isn’t topped off (and, as such, the tank will emit resin from the beginning) you can even use two different resin colors without blending them beforehand. Testing it out, we found that the prints had a mostly uniform color except for the first layers. In case you plan on coating your prints anyways, spare yourself the Dale DeGroff setup.
If you do plan to use the tank system, you will get a handful of bottle caps, and you can use them not only on Elegoo resin bottles but on a bunch of third-party bottles as well.
Lights, Action

The Jupiter illuminates its printing chamber like a stage via two LED strips in the top corner of the enclosure. It adds a bit of visibility to your print chamber should you wish to set up your printer in a dark corner, though regular lighting in your room should provide enough visibility, so it is a bit of a gimmick in reality. You can turn it off in the settings if you wish. We didn’t mind it.
Carbon Filtration
Lastly, there’s the activated carbon filter, a hybrid of Elegoo’s previous filtration efforts of sorts. Some Elegoo printers, such as the Mars 3 or Mars 2 Pro had one built into the base; for others, Elegoo provided a battery-powered removable filter. Mix those together, and you get a removable, USB-powered carbon filter that sits inside the back of the printing chamber and is synched with the printer’s cooling fans.

If you let some time pass between finishing a print and opening the chamber, you can actually smell a difference, as in you won’t smell that much resin stench. Naturally, opening the door during a print, while the resin is sloshing back and forth, particles will be dispersed, and you will be greeted with a waft, but it gets considerably less the longer you let the finished print hang.
Keep in mind, though, these activated carbon filters mainly filter out the smell, not particularly the harmful particles, so when post-processing your prints, or really anytime you spend some time with the printer open, you’d better wear a mask.
Working With The Jupiter
Now that we taxed the Jupiter’s looks and inner values, it is time to put it to the test to see if it also prints and behaves as handsome as it looks.
Speedy One
Printing with the Jupiter had us quite surprised. Having recently spent time with the Phrozen Sonic Mega 8K, we would have expected the Jupiter to move/print in a similar sloth-like fashion. In general, the larger a print plate is, the slower it moves, as each time the print gets pulled off the FEP foil, the so-called peel effect can cause the print to detach. In short, printing large comes with its own set of problems you wouldn’t encounter, to that degree, on a smaller print bed.
Turns out it doesn’t. In fact, the Jupiter is even faster than the much-smaller Saturn. For comparison, the same print on the Jupiter takes about 7,5 hours, 9 hours on the Saturn, and a whopping 26 hours on the Mega 8K. The curing time was the same for all three default profiles, 2.5 seconds per layer. It is the difference in lift speed and distance that adds up. Granted, the Mega 8K’s print plate (and overall build volume) is considerably larger, but it looks like Elegoo might just have hit the sweet spot between largeness and speed on the Jupiter. If you don’t need uber-large prints, you will probably have a speedier and easier time on the Jupiter.
Naturally, you can alter each profile to shave off a few millimeters in lift height or crank up the speed a bit, but that probably will get you only so far. There is a reason these super large printers move so slow. Bigness isn’t always bestness.
Slicer
Speaking of slicer profiles: the Jupiter is housing one of CBD-Tech’s LCD control boards. The parent company behind ChiTu Systems is the leading control board OEM, supplying popular printer manufacturers such as Elegoo or Phrozen. With CBD-Tech encrypting its latest boards in 2021, users of these printers were restricted to using the company’s ChiTuBox Basic or ChiTuBox Pro slicers.
As a little goodie to sweeten the deal, the Jupiter comes with a one-year subscription to the Pro version ($169) that offers some handy print preparation features over the base version, but you can operate the printer with the basic version just as well.
However, that goodie might not be needed after all, as Mango3D stated in its recent Lychee 3.6 slicer release, that an agreement has been reached, essentially allowing the no-less popular Lychee Slicer to use the encrypted CTB file format. Furthermore, Elegoo has also stated that the Jupiter will be compatible with the Lychee software.
Well, if that isn’t the best of both worlds. You can try out the ChiTuBox Pro version for a year, use ChiTuBox Basic, or opt for Lychee and its free or subscription-based pro version. You choose.
New UI

With the control board comes the ChiTu firmware, only for the Jupiter the ChiTu brand-color blue got replaced with red to play nicely with the Jupiter’s overall dress code. Besides the switcheroo in colors, we couldn’t spot any difference, though. Not that it needs many, the interface is as comprehensive as ever for you to tap away at it.
There are a few features that would make life a little bit easier from our experience, but these should really be addressed to CBD-Tech producing the boards, rather than Elegoo and the Jupiter. Suffice to say, having 10 mm as a maximum raise distance and with no raise-to-top button, you will have to jab at the screen quite a few times to reach the top. At least thanks to its large 5-inch screen you will hit the right button even after the 23-rd time.

The other thing would be to add the set Z-axis-to-0 function to the leveling submenu instead of its own, but it really only is a two-click detour and with the slick-looking, Darth Maul vibe like UI, you might as well take the scenic route.
Speaking of the scenic route, to transfer the files, you will have to make do with the tried and true USB stick. For what it is and costs, we would have hoped for some wireless connectivity (if we dare to dream, maybe even remote control), but it looks like that won’t be an option. It will come with an Ethernet port, though (has anyone ever used that?!).
Printing
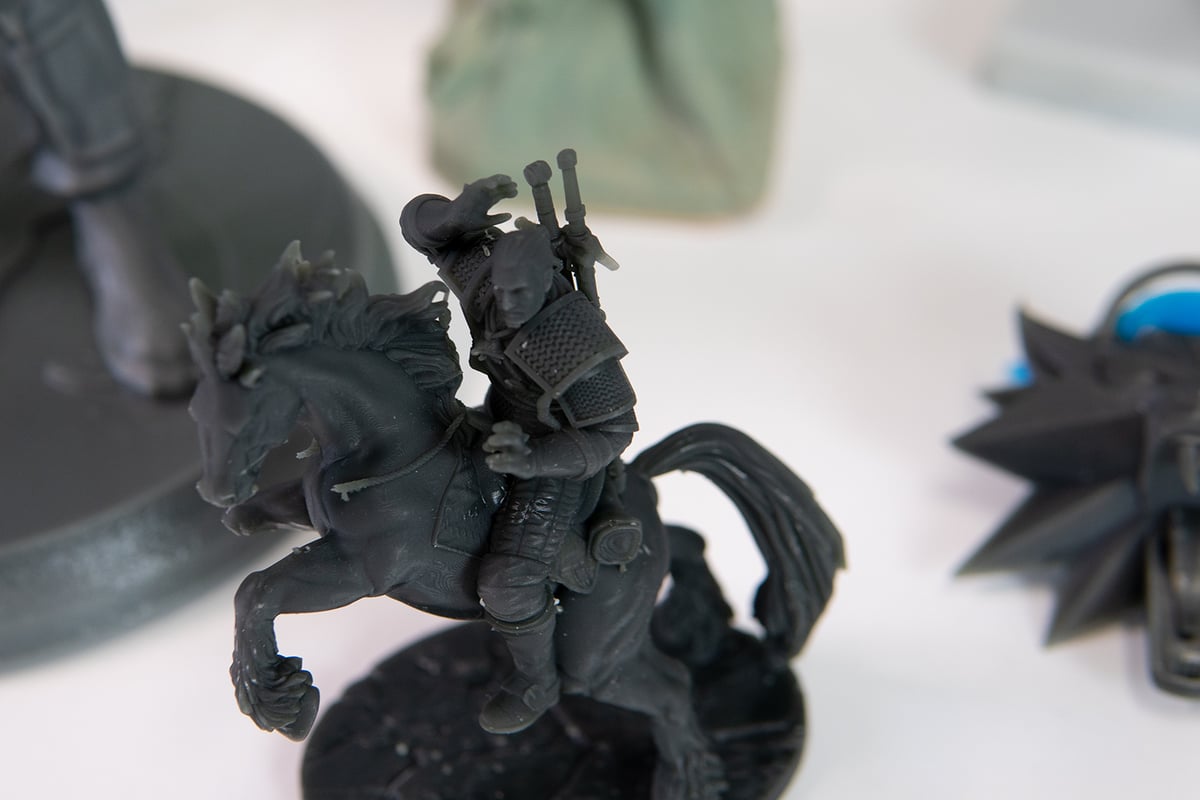
Let’s get to the juicy part: printing with the Elegoo Jupiter. We’ve already touched on the speedy prints thanks to its Porsche-like acceleration set with the provided print settings. There is no official profile for the Jupiter in ChiTuBox yet, but we doubt much will change in that regard for the final version. The reason is, it just works. In fact, we had to double-check after slicing our first print (a large statue) as we were accustomed to much longer estimations, and we thought we had some numbers wrong. Turns out they weren’t, and that and all our following prints turned out great with no adhesion problems.
You have heard it before, with printing large models upside down, physics is no joke, and the even larger resin 3D printers do well to factor that in. For the Jupiter, though, we surprisingly encountered none of the potential results, which really leaves you with a Saturn-like experience when printing with it. With the big plus that, you got about two and a half times the volume of its predecessor.
Precision-wise, the Jupiter behaved as you would expect from a 50-microns resolution printer, producing large and small models with great precision and detail.
What We Make Of It
After having put the Jupiter through its paces for a good few days, we can say the printer already looks and feels close to what we would look for in a finished product.
Overall, printing with the Jupiter was a treat. We’ve spent time with some truly large resin 3D printers recently, and we would have expected the Jupiter to show similar traits in its printing behavior; only it didn’t. In its handling and printing, it felt much more like one of the medium-sized printers, showing little to no susceptibility to the pitfalls that inevitably crop up the larger your print plate gets. From our experience with it, the Jupiter could well be on track to hitting that sweet spot between ease of use and largeness.
With 277 x 156 x 300 mm, it offers a decent print volume that is more than double that of the medium-sized Saturn-like printers while retaining the same accessibility. Even though we only played around with a pre-production unit, we found it to be a well-rounded up and thought-through machine. Yes, we had a little run-in with the leveling system at first, but overall there was little to groan about.

It is currently available for pre-order for $1,300. If you were one of the early backers on Kickstarter and secured yourself a unit for as little as $600, you may have made yourself quite the bargain, providing the final unit isn’t a mess.
If you weren’t one of the early backers, though, forking out $1,300 is a lot of money, especially for tinkerers and hobbyists, and would get you about 3 Saturns instead. Stacking build volumes next to each other is not the same as combining it under one hood of course, but if truly large prints are what you are going for, the Jupiter might be a little restrictive from the get-go.
277 x 156 x 300 mm in build volume really is neither fish nor fowl, especially as the $1,600-prized Phrozen Sonic Mega 8K and its 330 x 185 x 400 mm canvas is stated to debut around the same time. It is by no means the only large resin 3D printer, but it will come with an even finer resolution of 43 microns compared to the “standard” 50 microns the Jupiter can produce.
In other words, we have a bit of a hard time imagining a customers base for the Jupiter. It is considerably faster, but if you want to print big, you probably want to print really big and not just “halfway”; speedy or not.
With Elegoo planning to ship out the super-early backer units in January 2022, we are interested to see if there are any 180° turnaround changes on the finished product, but besides the door angle, we highly doubt it.
What do you make of the Jupiter? Are you one of the super-early backers and awaiting yours in the mail as we speak? Will you have to wait till (presumably) March for yours to arrive, or are you going to sit this one out and wait till it hits the market?
Let us know in the comments below.
License: The text of "Elegoo Jupiter: First Look" by All3DP is licensed under a Creative Commons Attribution 4.0 International License.