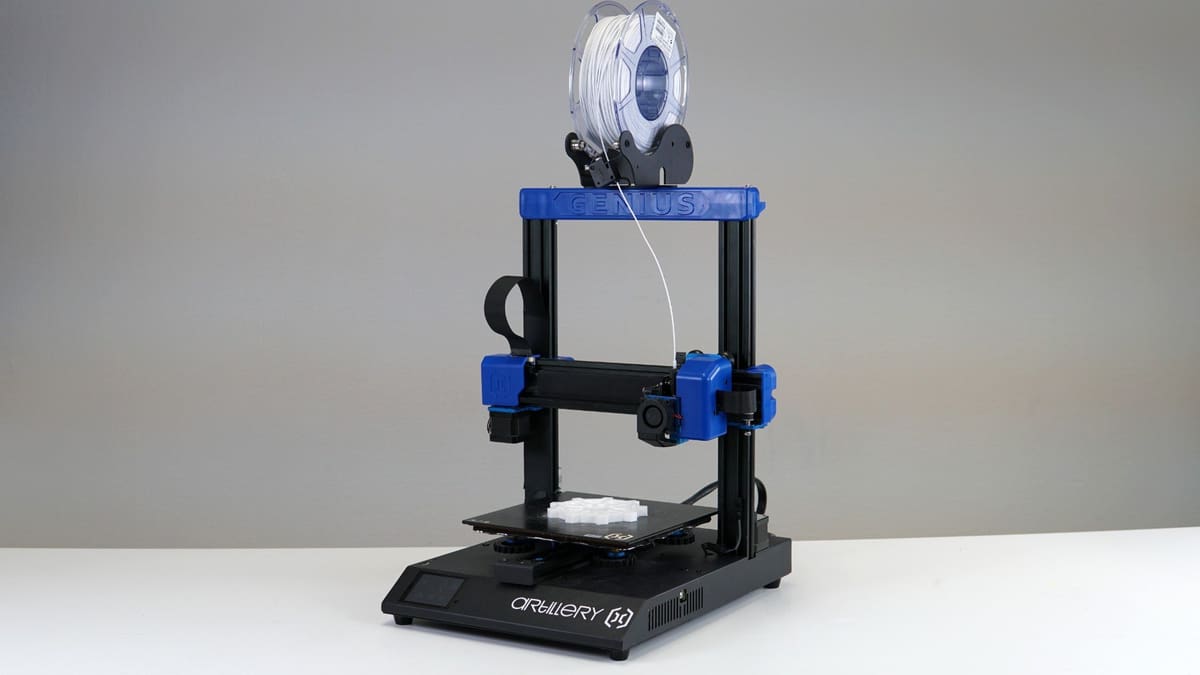
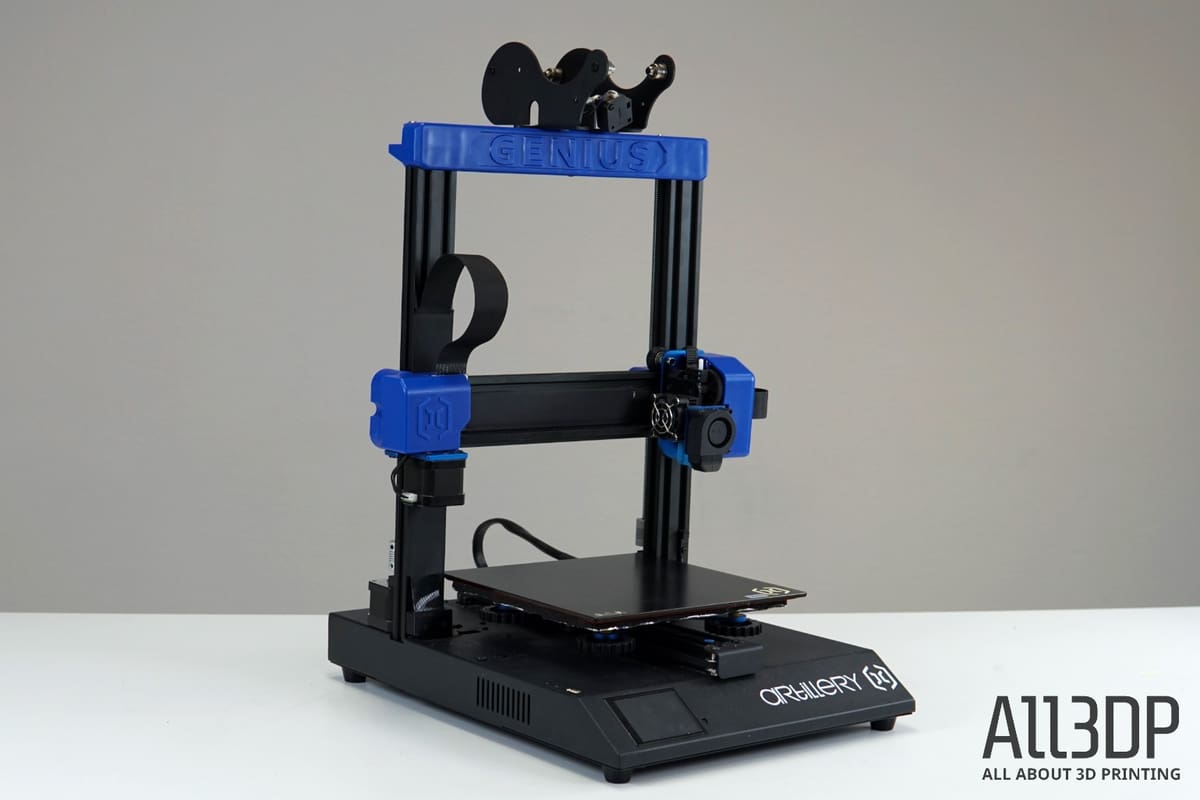
Artillery Genius 3D Printer Review: 10-Hour Testing

Artillery throws its second budget 3D printer in the ring. But can the Artillery Genius beat the competition? Here’s what we found in our 10-hour review.
The Shenzhen based company Artillery was founded just recently in October 2018, but with the release of its first printer, the Artillery Sidewinder X1, they already managed to put out a worthy contender to the Creality CR-10, right off the bat.
Artillery is always very keen on improving its printers based on community feedback. Their new and smaller model, the Artillery Genius, was released in mid-October 2019.
Join us as we dive headfirst into its specs and find out if it lives up to the expectations.

Feature Check
After the community voiced their missing needs on the Artillery’s former bet, the Sidewinder X1, the Chinese-based manufacturer has raised the expectations for improvement on its Genius model. But does it really comply with its name? Let’s find out what the latest iteration brings to the table.
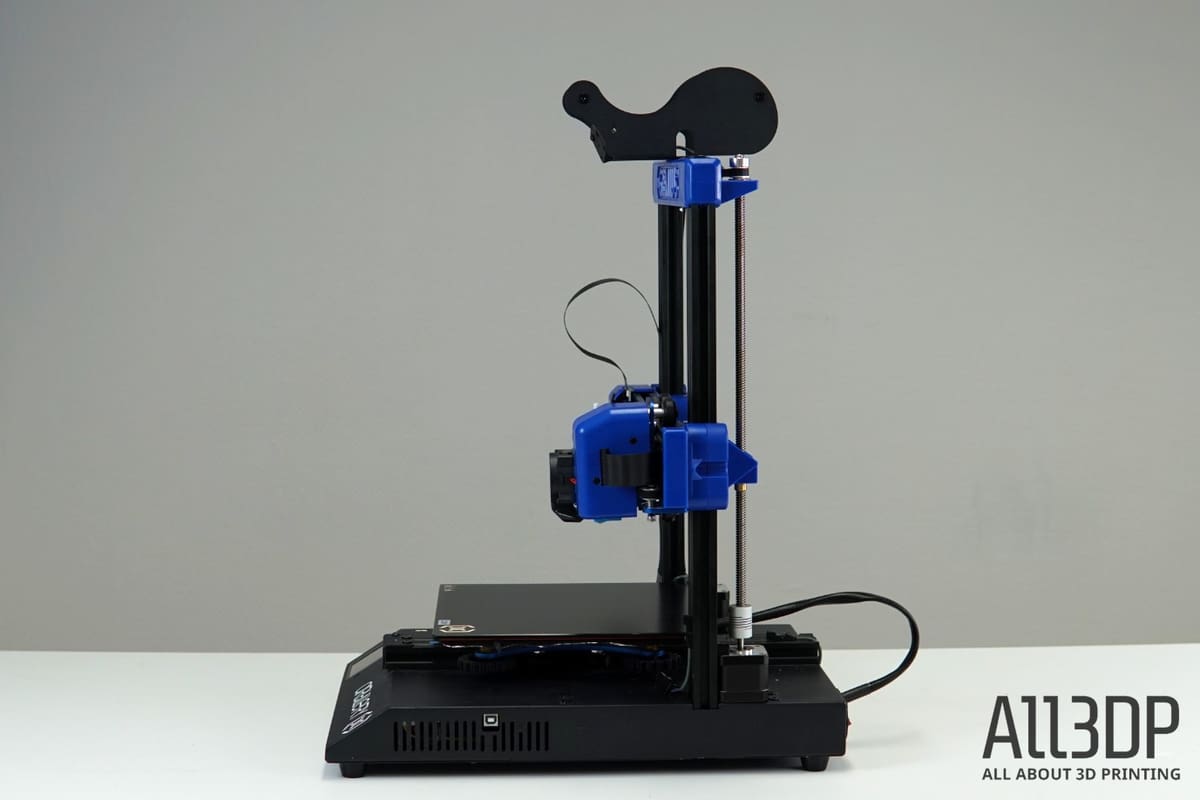
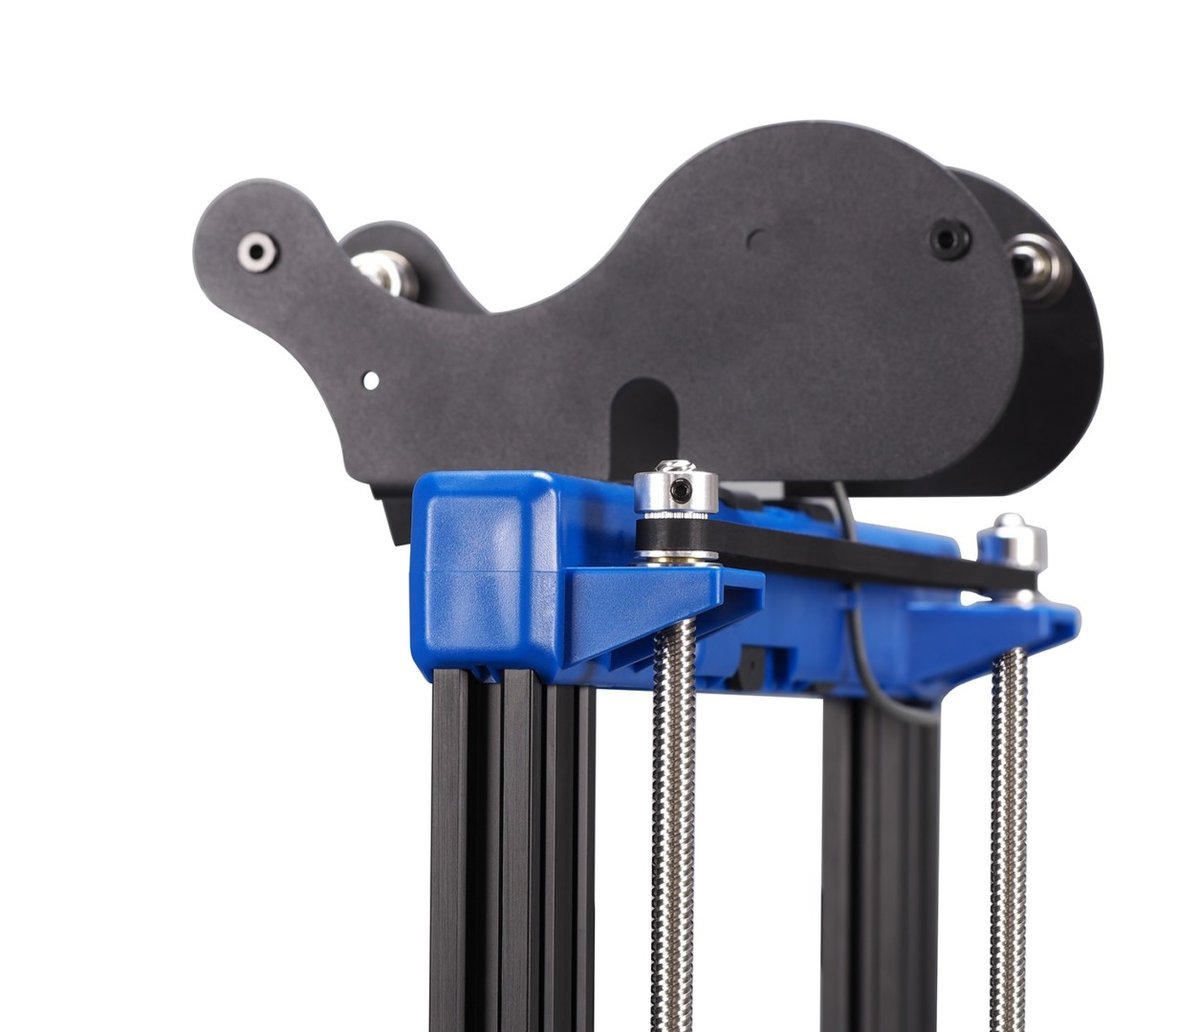
Patented Z-axis Coupler

When it comes to FFF prints, Z-banding is always an issue. Artillery seems to have taken further measures to improve the accuracy of its newest model and invented a proprietary nut coupler system. According to the manufacturer, this should resolve the slight layering problems the company’s predecessor, the Artillery Sidewinder X1, had to struggle with. We can say after testing the Genius that we are underwhelmed with the Z-axis alignment. Results may be comparatively better than former Artillery releases, but not quite to a consistent level (see Benchmarking).
“Improved” Belt Pulley System
Some users have printed out DIY Z-tensioners for the Sidewinder X1. We expected Artillery to address all the feedback and concerns voiced back from the community when designing the Genius, improving the z-axis belt pulley system, which should result in an overall more stable printing experience. However, after testing the Genius we cannot back up Artillery’s claims. The belt pulley system had a loose belt and additional tensioners are still needed.
Fast Heating Print Bed
Yet another feature Artillery upgraded is the (even) faster heating print bed.
While the Sidewinder X1, equipped in its 4th iteration with an Ultrabase, instead of the previously used glass bed, was already heating up to 80 °C in just under two minutes. However, Artillery has now gone further, and the Genius’s Ultrabase-equipped bed is now capable of reaching up to 100 °C in about the same amount of time.
We’ve found this feature greatly satisfying. We can also add that we’ve perceived a high speed in the nozzle heating, which we loved.
Auto Bed-Leveling Ready
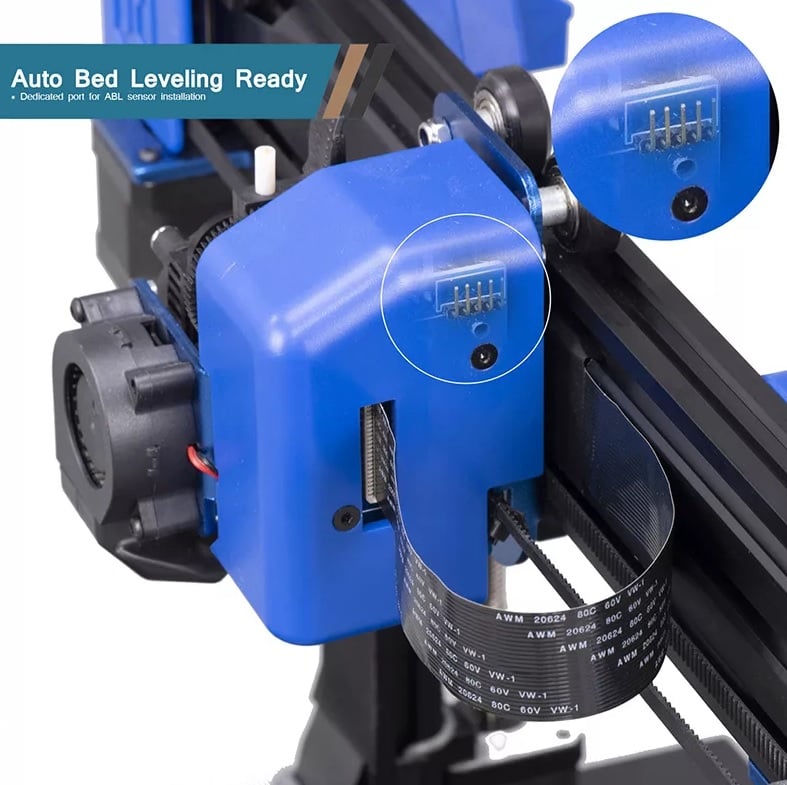
In its vanilla state, the Artillery Genius only features manual bed leveling. However, Artillery left some room for DIY improvements. The machine now reserves bed-leveling connectors, allowing the user to easily upgrade the printer. To find out more, check out our guide to BL-Touch sensor systems.
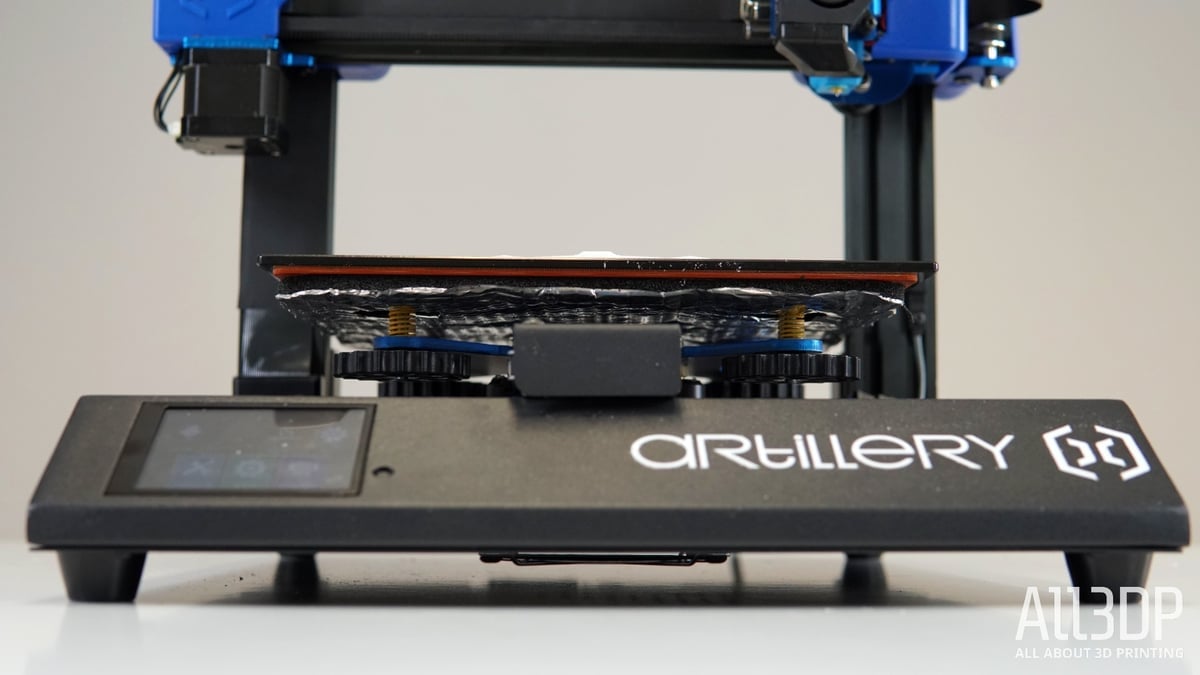
Direct Drive Extruder
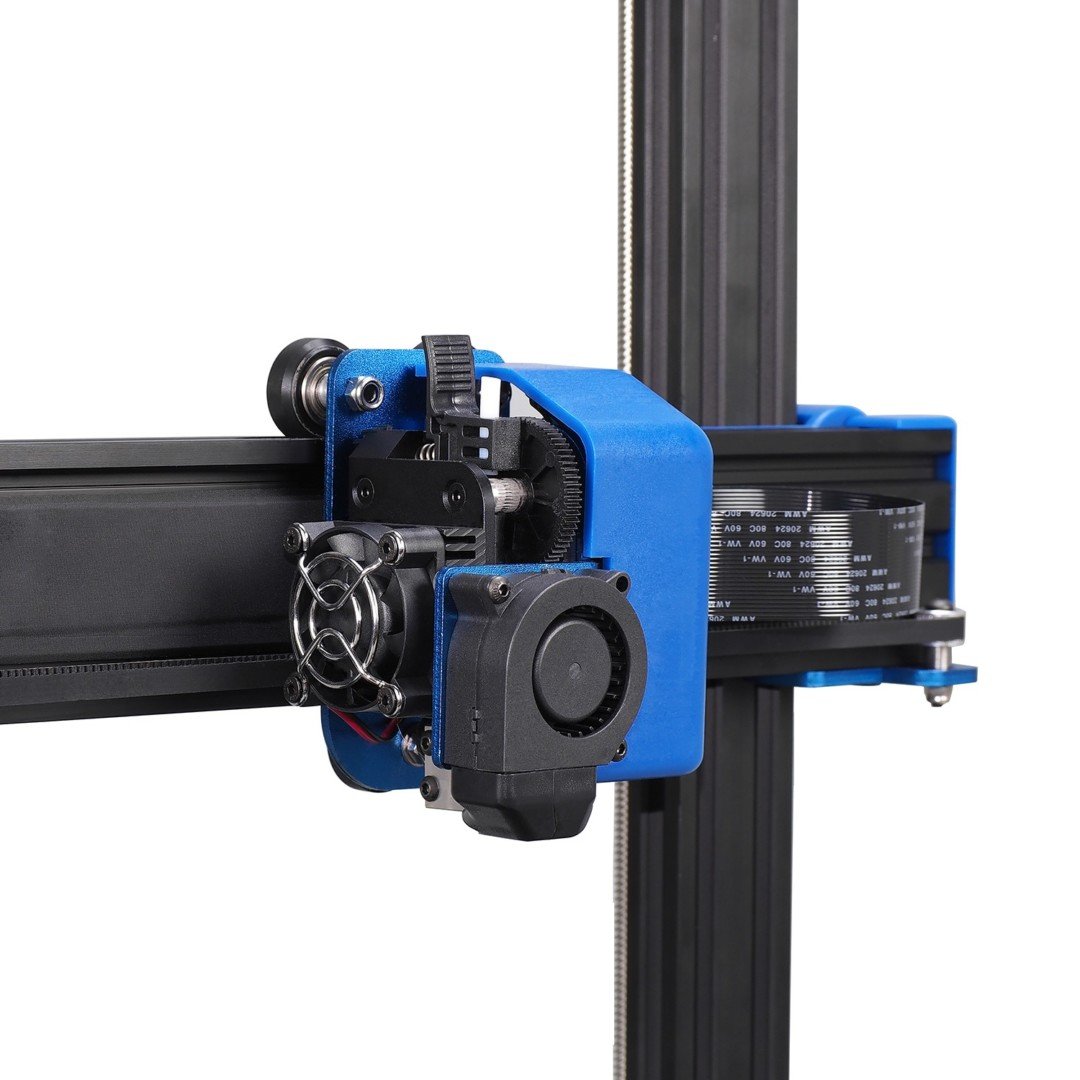
To handle the wide variety of materials, the Artillery Genius is said to do; a direct drive system is indispensable. In some ways, a direct drive extrusion system can be superior to a Bowden mechanism, especially if you handle flexible or intricate filaments, such as TPU.
Silent Stepper Driver
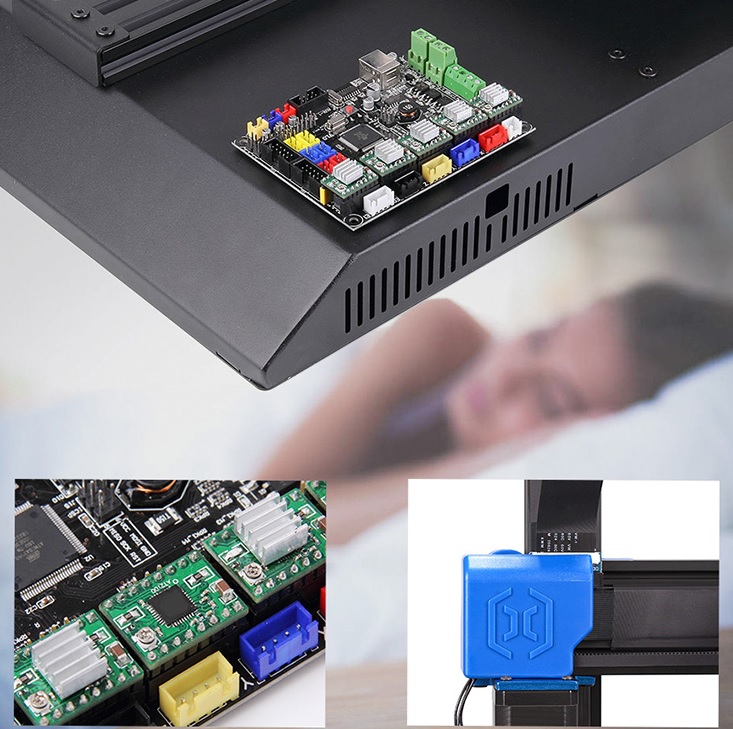
Being silent is undoubtedly an advantage for any FFF 3D printer (better yet, any machine). According to Artillery, their previous printer, the Sidewinder X1, was already quieter than most enclosed 3D printers, which we found to be partially true in our 10-hour review of the Sidewinder X1.
We were interested in figuring out whether Artillery managed to tone down the operating noise with their new Genius. After printing with it, we can say that the Genius is at least as quiet as a Prusa i3 MK3S in silent mode – a commendable achievement.
Further Features
Additional features of the Artillery Genius include:
- TFT Color Touch Screen
- Resume print function after power loss
- Filament runout detection
- Inductive Sensor Endstops
Benchmarking
To get a good first impression for our Artillery Genius review, we printed the two torture tests on a new, freshly unboxed and unaltered machine, using PLA filament and averaged slicer settings for the ranges specified for the material.
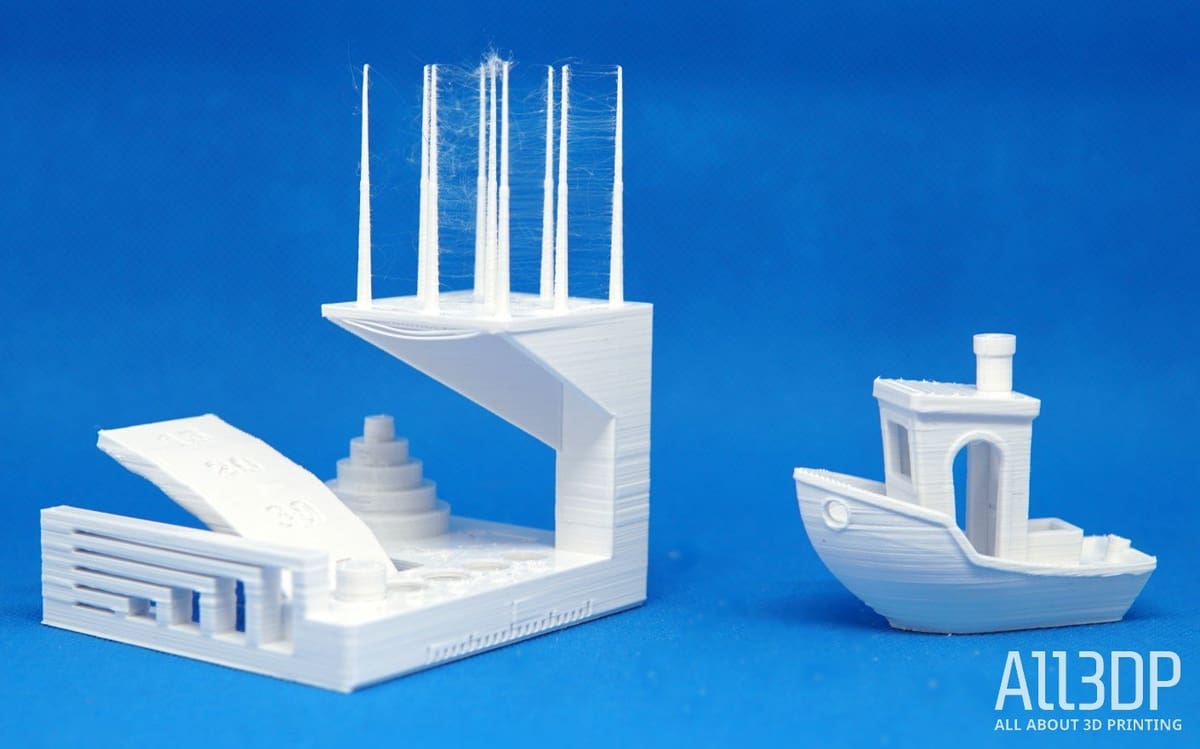
Benchmarking Object 1: Benchy
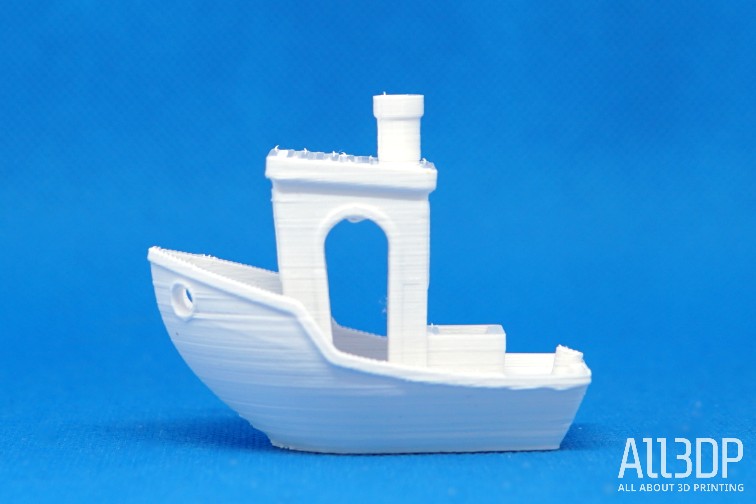
We used white eSun PLA+ filament. For preparing the needed G-code, we used the slicing software Repetier Host V2.1.3 included on the provided SD card. The memory drive also includes a Slic3r configuration bundle that needs to be loaded into Repetier’s Slic3r engine (or alternatively, directly into your favorite variant of Slic3r itself). While not as straightforward as loading a Cura profile, it works well enough, and the process is laid out in the included instructions.
We set the hot-end temperature to 215 °C and the bed to 60 °C for the benchmarking process.
It took us 1 attempt to 3D print a Benchy after loading the Slic3r config.
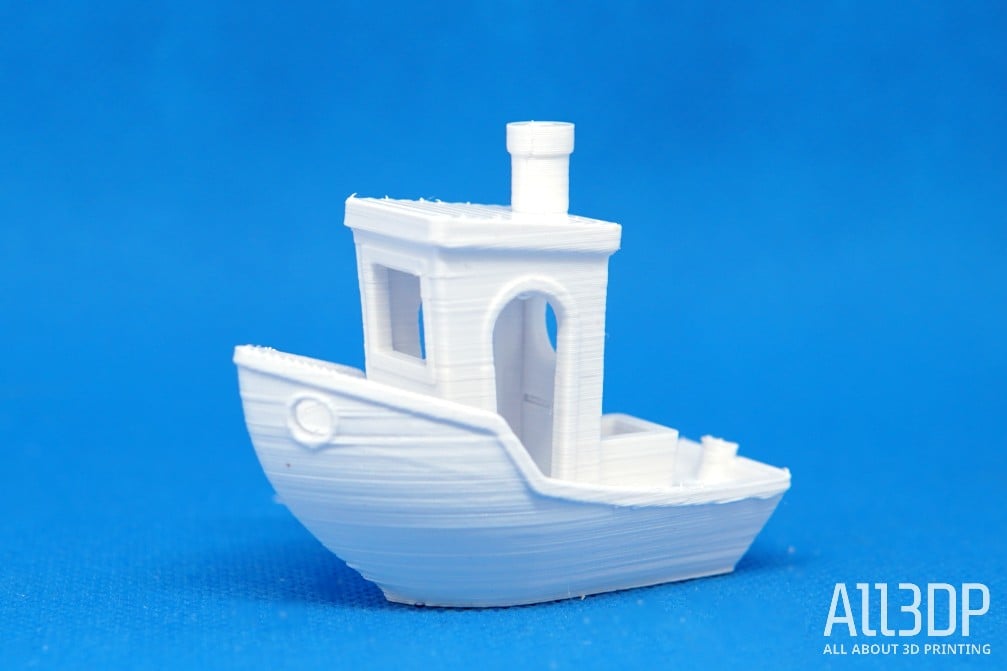
We measured the physical dimensions of the print. The Artillery Genius achieved 14 out of 15 points. Yet we found several problems at the visual inspection.
- Surfaces: The surface’s results were not overly pleasing at the visual inspection. To begin with, we found some under extrusion in the print. We also found a poor Z-alignment. The bow’s overhang displayed as well inconsistent layering.
- Details: The results were somewhere passable. The helm was under extruded and the front window frame had a variable width on the vertical axis. However, the chimney and the box were nicely printed and kept their relative proportions.
- Overall consistency: The overall consistency was passable, but far from excellent. Some of the main aspects to tackle are the inconsistent layers and the under extrusion at different points in the print.
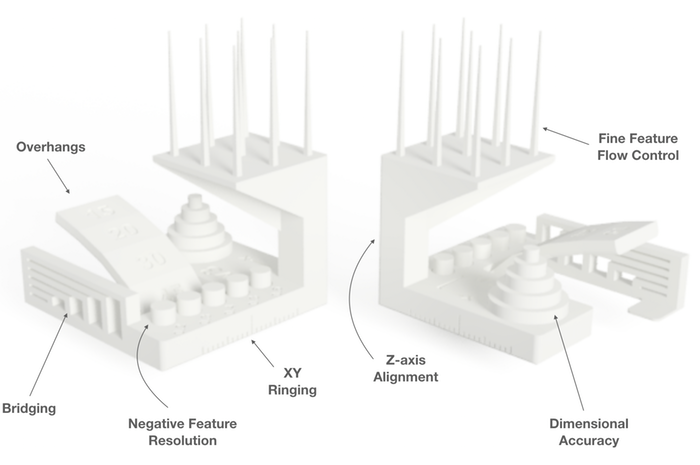
Benchmarking Object 2: Kickstarter Autodesk Test
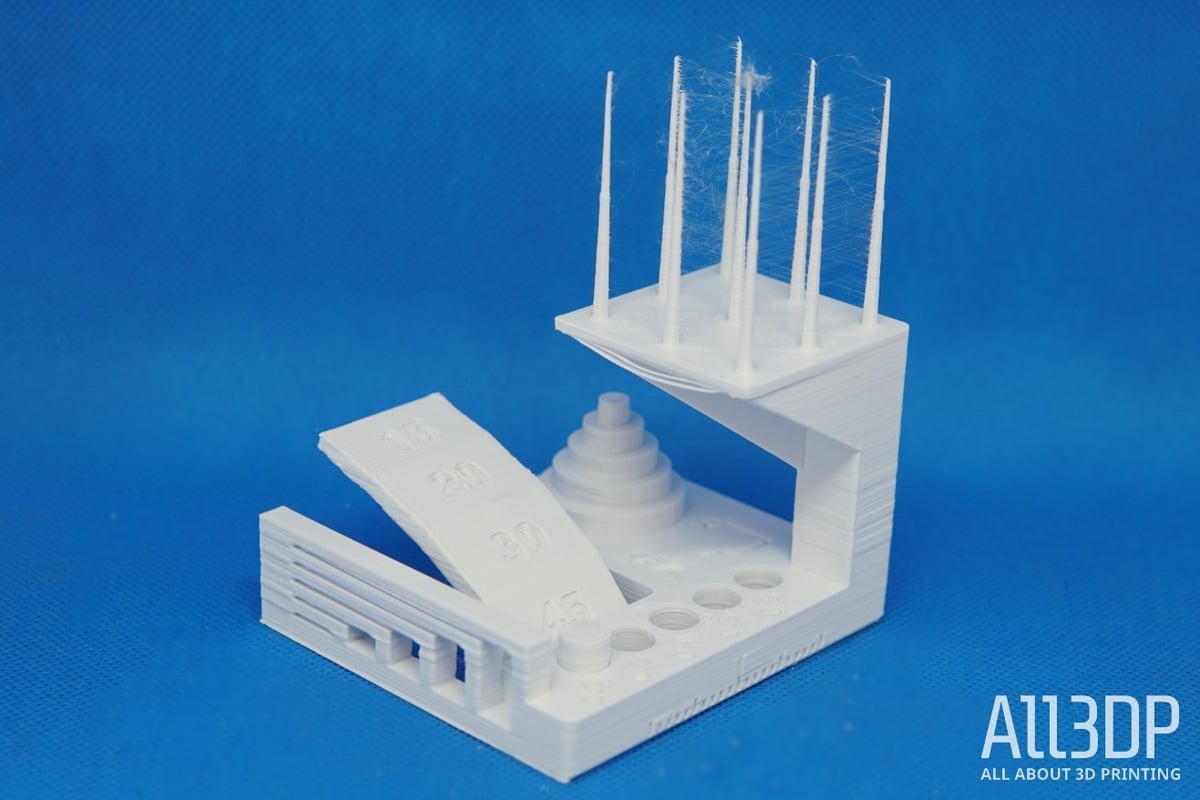
The Autodesk Kickstarter test model looks at an FDM printer’s precision. We used the same white eSun PLA+ filament and the same temperature settings (215 / 60).
With a score of 18 of 30 points, the Artillery Genius delivered only mediocre results. While inspecting the test visually, we found several problems:
- Surfaces: The main problem that we could identify was the poor Z-axis alignment, which was consistent through the benchmarking. A secondary problem was seen in the numbers accompanying the fine negative features. Additionally, the surface had small spikes left by the melted plastic upon completing the details.
- Details: The Genius did well on the fine negative features. However, the other details were generally poor, and we found the numbers to be slightly diffused. We also found some messy layers in the targets, in particular on the ~10 mm one, which showed some over extrusion. This problem can be minimized (and possibly eliminated) by lowering the printing speeds. Yet, with the vanilla state, this inaccuracy messed with both the dimensional accuracy and visual inspection.
- Consistency: The overall consistency was poor.
Benchmarking Verdict
The Artillery Genius is a promising printing platform, but be aware that as a user you may need to spend some time tweaking your slicer settings to get the best possible quality out of the machine. After approximately 10 hours of printing, we can say that the results are definitely decent, but could use some polishing as well.
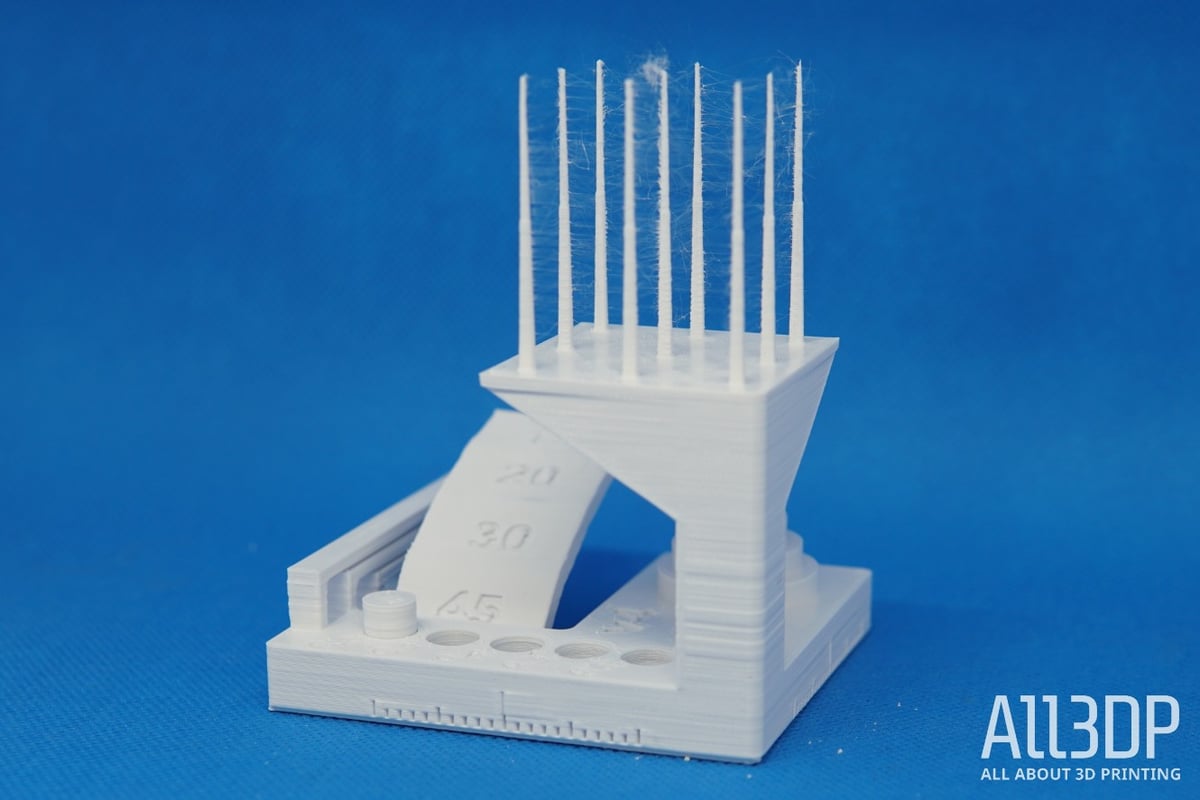
An additional test print (see above) exhibits excellent details and quality. There were only two observable issues, the first being some slight banding in the Z-axis. The second issue, while more subtle, is that fine details parallel to the y-axis were not as well defined. We believe this to be an indication that the default printing speed is too high, as the weight of the bed has not been compensated for.
We did like the fast heating bed and the speed at which the nozzle heats up. We were also positively impressed with cable management, which was excellent. Yet, you will need to have some patience to get the optimal settings running on this machine.
Technical Specification
GENERAL SPECIFICATIONS
- Technology: FFF
- Year: 2019
- Assembly: Pre-assembled
- Mechanical arrangement: Cartesian Style
- Manufacturer: Artillery
3D PRINTING PROPERTIES
- Build volume: 220 x 220 x 250 mm
- Feeder system: Direct Drive
- Print head: Single nozzle
- Nozzle size: 0.4 mm
- Max. hot temperature: 240 °C
- Max. heated bed temperature: 130 °C
- Print bed material: Steel
- Frame: Aluminum
- Bed leveling: Semi-Automatic
- Connectivity: USB, TF-Card
- Print recovery: Yes
- Filament sensor: Yes
- Camera: No
MATERIALS:
- Filament diameter: 1.75 mm
- Third-party filament: Yes
- Filament materials: PLA, ABS, TPU, Flexible, Wood, PVA, HIPS
SOFTWARE:
- Recommended slicer: Cura
- Operating system: Windows, Mac
- File types: STL, OBJ, AMF
DIMENSIONS AND WEIGHT:
- Frame dimensions: 430 x 390 x 510 mm (590 mm with spool holder)
- Weight: 8.9 kg
Where to Buy
You can pre-order the Artillery Genius from the following retailers.
Benchmarking Results
Here you find the detailed results for the Artillery Genius test prints. For our benchmarking procedure, please click here.
Benchy
- Overall length (60 mm ±1 % tolerance): 60.25 mm, 1 point given
- Overall width (31 mm ±1 % tolerance): 31.07 mm, 1 point given
- Bridge Roof length (23 mm ±1 % tolerance): 23.11 mm, 1 point given
- Chimney roundness inner diameter (3 mm ±10 %): 2.68 mm, 0 points given
- Chimney roundness outer diameter (7 mm ± 5 % tolerance): 6.96 mm, 1 point given
- Vertical overall-height (48 mm ±1 % tolerance): 47.86 mm, 1 point given
- Box depth (9 mm ± 5 % tolerance): 9.02 mm, 1 point given
- Box inner length (7 mm ± 5 % tolerance): 6.71 mm, 1 point given
- Box outer length (10.81 ± 5 % tolerance): 10.77 mm, 1 point given
- Box outer width (12 mm ± 5 % tolerance): 12.06 mm, 1 point given
- Box inner width: (9 mm ± 5 % tolerance): 7.8 mm, 1 point given
- Hawsepipe inner diameter left (4 mm ±10 % tolerance): 3.97 mm, 1 point given
- Hawsepipe inner diameter right (4 mm ±10 % tolerance): 3.80 mm, 1 point given
- Bridge front window width (10.5 mm ±5 % tolerance): 10.33 mm, 1 point given
- Rear window inner diameter (9 mm ±5 % tolerance): 8.81 mm, 1 point given
Kickstarter Autodesk Test
- Dimensional Accuracy: 3 of 5 points (24.94 / 20.08 / 15.105 / 10.395 / 5.685)
- Fine Flow Control: 2.5 points (all spires were printed without too much stringing)
- Fine Negative Features: 4 points (four pins were removable)
- Overhangs: 3 points (dropped loops began at the 20-degree overhang)
- Bridging: 3 points (2 bridges contacted the surfaces beneath them)
- XY Resonance: 2.5 points (no ringing detectable)
- Z-axis alignment: 0 points (layer registration effect was visible)
Overall, the Artillery Genius scored 32 out of 45 points.
How we Benchmark
For the benchmarking element of our review, we use the following guidelines:
Unbox the printer: We unbox the printer and assemble it according to the manufacturer’s instructions. Deficiencies and errors are noted and build around according to the consensus online for the printer.
Filament: We use white eSun PLA+ filament. Temperature settings are 215 °C for the nozzle and 60 °C for the bed.
Printing: We print two test models — Benchy and the Kickstarter x Autodesk FDM 3D Printer Assessment — using the manufacturer-provided/recommended slicer and settings. If the printer ships without a dedicated slicer and profile, we generate a generic Cura profile using the essential information of the printer.
After the first print, we inspect the object for easily fixable problems (i.e., a loose belt or a poorly leveled print bed) and then print again. If the printer can’t provide a decent result after three attempts, we stop. Printers that fail to produce a test object receive zero points for the respective test object.
1. Benchy
The Benchy 3D printer torture test is one of the world’s most popular prints. It helps to measure the dimensional accuracy capabilities of your printer and helps highlight other visible print nastiness.
We measure our best Benchy print using digital calipers, scoring 15 criteria against their target value. A total of 15 points are available.
- Overall length: 60 mm
- Overall width: 31 mm
- Bridge Roof length: 23 mm
- Chimney roundness inner diameter: 3 mm
- Chimney roundness outer diameter: 7 mm
- Vertical overall-height: 48 mm
- Box depth: 9 mm
- Box inner length: 7 mm
- Box outer length: 10.81
- Box outer width: 12 mm
- Box inner width: 9 mm
- Hawsepipe inner diameter left: 4 mm
- Hawsepipe inner diameter right: 4 mm
- Bridge front window width: 10.5 mm
- Rear window inner diameter: 9 mm
To accommodate the difficulty and inaccuracies when measuring small features, we have implemented a sliding scale of tolerance in our scoring. The smaller the feature, the greater our allowance for deviation:
- 60 mm to 23 mm: 1 percent tolerance allowed
- 23 mm to 7 mm: 5 percent tolerance allowed
- 7 mm to 0 mm: 10 percent tolerance allowed
Finally, we do a visual inspection.
2. Kickstarter x Autodesk FDM 3D Printer Assessment
The Kickstarter x Autodesk print exposes an FDM printer’s precision via six distinct tests in one object.
By pushing a printer’s hardware and software the system to the point of failure, the print reliably visible imperfections that can be used to assess the performance of the slicer, the extruder, and the motion system together.
Here’s what’s getting measured.
- Dimensional Accuracy
- Fine Flow Control
- Fine Negative Features
- Overhangs
- Bridging
- XY Resonance
- Z-axis alignment
The tolerances and measurements are very detailed. You can find the exact measuring procedure on Github. The highest possible score is 30, indicating a very well-calibrated system.
It’s worth noting that these benchmarking tests are not a definitive measure of a printer’s worth. More an indication of a printer’s state out of the box with no-tinkering, it’s only after a full evaluation and in-depth review that we fully judge a 3D printer.
License: The text of "Artillery Genius 3D Printer Review: 10-Hour Testing" by All3DP is licensed under a Creative Commons Attribution 4.0 International License.
CERTAIN CONTENT THAT APPEARS ON THIS SITE COMES FROM AMAZON. THIS CONTENT IS PROVIDED ‘AS IS’ AND IS SUBJECT TO CHANGE OR REMOVAL AT ANY TIME.