Every slicer program is a pre-processing tool that converts digital 3D models and printing process parameters into instructions for a 3D printer to perform. It’s an essential step for any 3D printing procedure, regardless of the technology (FDM, SLA, SLS, and so on).
Most people associate slicing with the G-code generation, which is fair since FDM is the most popular 3D printing technology out there. This format, unfortunately, doesn’t work with resin 3D printers due to its entirely different nature.
This is why specific software for these 3D printers is necessary. While most printers are shipped with proprietary slicers, that doesn’t mean they’re good. Chitubox is a third-party tool that’s compatible with the most popular resin 3D printers on the market. In this article, we’ll provide an overview of this slicer and cover its most important aspects and features.

Accessibility
Chitubox Basic and Pro are both available for download on Windows, MacOS, and Linux devices, with beta versions available for users who want to test out the latest features in development.
Chitubox supports the use of most resin 3D printers and is the go-to third-party software for most users, similar to what Cura is for FDM 3D printing. Chitubox is one of the most popular slicer alternatives to a given resin printer’s proprietary software. It offers great control over printing settings while keeping a simple interface that’s easy to use.
Chitubox has become the official slicer provided with the Elegoo Mars series of resin printers, often packaged with a one-year free subscription to their Chitubox Pro version. You can visit their website to get a look at all of the 3D printers that are officially supported as of now.
Chitubox Basic vs. Pro
There are currently two versions of Chitubox available, Chitubox Basic and Chitubox Pro. Understanding the differences between these options is key to getting the version that best suits your workflow and needs.
Chitubox Basic is the free-to-download version, giving you access to everything you need to slice your models and prepare them for your resin printer. You’ll have access to many necessary tools, such as automatic support placement, support editing, manual support placement, model hollowing, and a few more key tools.
Chitubox Pro requires an annual subscription of ~$170. For this price, you will be getting a slew of advanced features and tools that make your time spent slicing models much more convenient. These include tools for editing your model inside the slicer, additional model repair tools, manual support placement of every support type, and model measurements. You can find a complete comparison of the two versions on Chitubox’s website.
If you’re new to resin 3D printing, it’s safe to start with the Basic version and see how you like it. If you enjoy using Chitubox and want more advanced settings, the Pro version is always there.
In this article, we’ll focus primarily on Chitubox Basic, but we’ll also mention some of Chitubox Pro’s expanded functionality in relation to the basic version’s features.
UI & Layout
Although it’s a powerful slicer, Chitubox isn’t complicated – even for first-time users. This is due to its simple and clean interface, which we’ll briefly describe in this section. For more in-depth information about all its tools and settings, be sure to check the official software manuals and the Support Center on the Chitubox website.
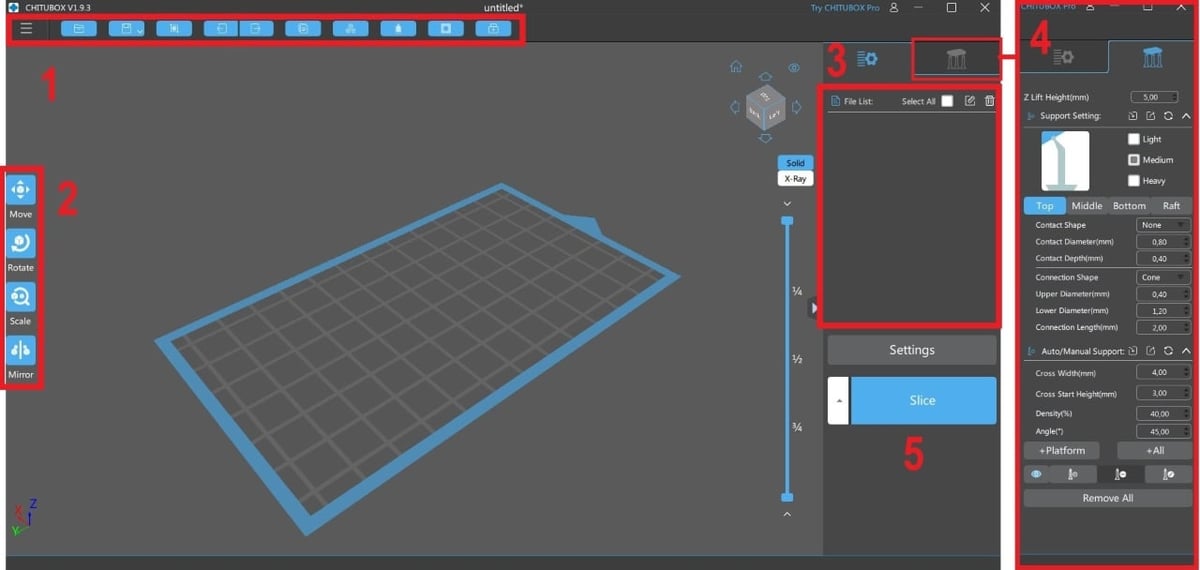
- Main interface: When opened, the user is greeted with the Chitubox main interface. The Menu Panel is located at the top of the window just below the Title Bar, along with some frequently used tools.
- Basic tools: The positioning and editing tools are located on the left side in the center. This is where the user can translate, rotate, scale, and mirror the imported models on the build plate, which is in the center of the screen.
- Model list: Speaking of imported models, they’re all displayed in a list on the right. A model needs to be selected for positioning and editing, and this can be done by clicking on its name in this list or directly on the build plate. Just below the model’s list is the settings button. This will take you to the printer settings window, where printing parameters like layer height and exposure time can be manually adjusted.
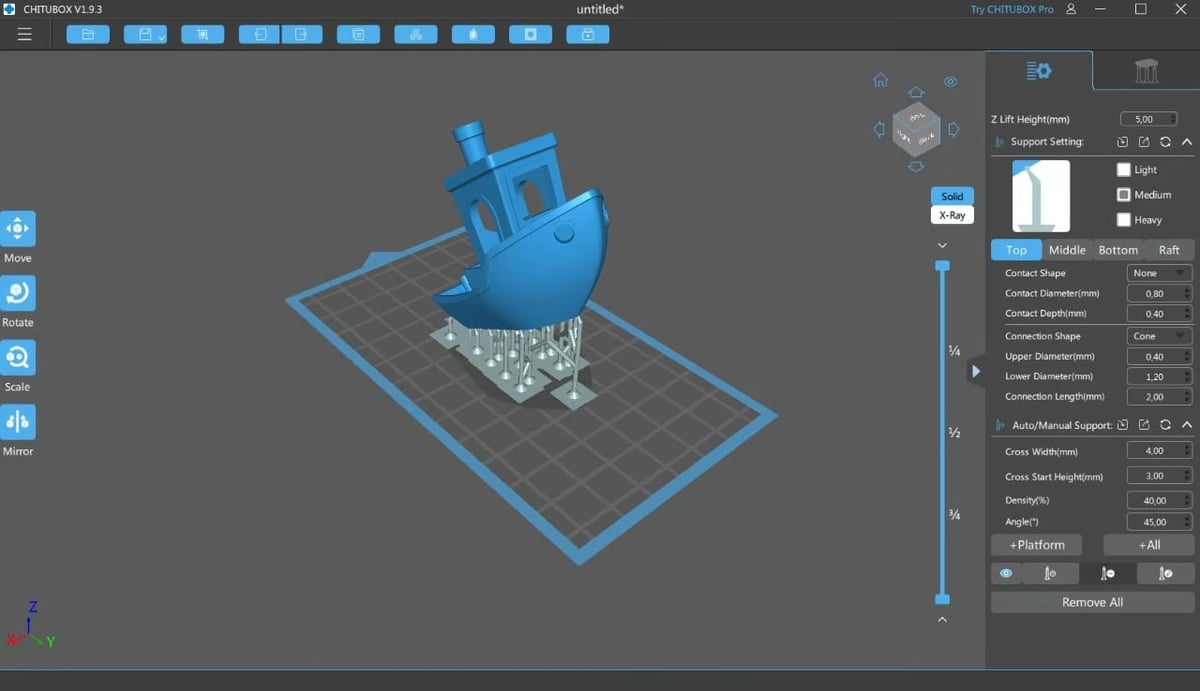
- Support settings: Chitubox is also known for its support structures control. An entire tab is dedicated to this feature, which allows for the automatic or manual placement of these structures.
- Slice button: Last but not least, the “Slice” button will prepare the models for printing. It will show a preview, which displays the individual slices for all the layers.
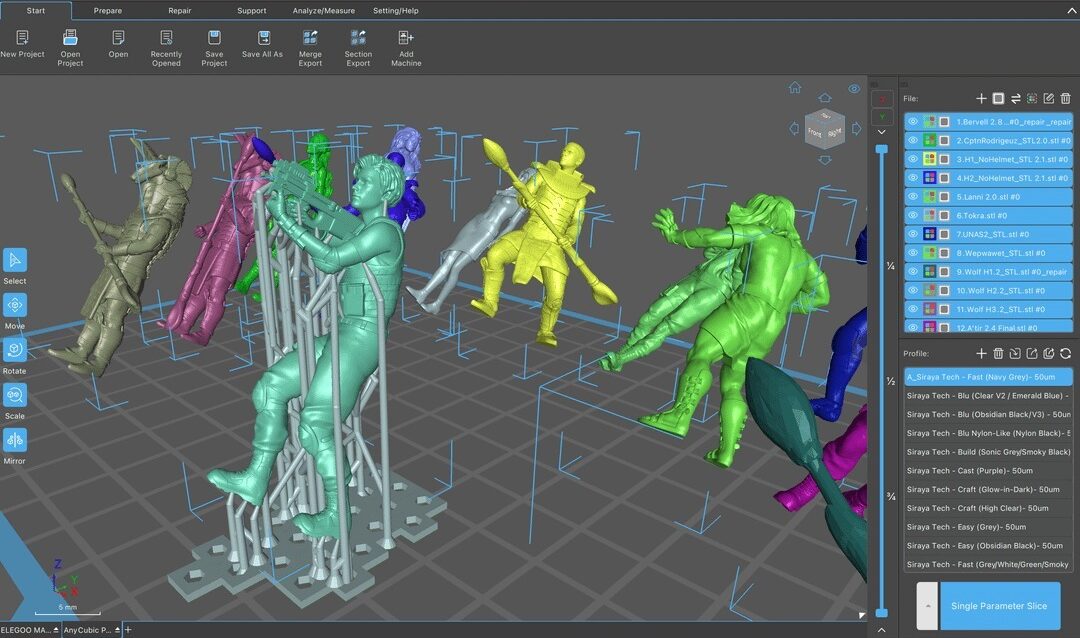
The most substantial difference in Chitubox Pro is the design of the Menu Panel. Instead of a bar with buttons, the Pro version’s Menu Panel is broken into six tabs: Start, Prepare, Repair, Support, Analyze/Measure, and Setting/Help. Each tab includes various tools and operations. In the next section, we’ll discuss a few of these in more detail.
Features & Functions
The Chitubox slicer is a resourceful program that offers plenty of tools. As mentioned before, it provides the user with a great deal of control over the printing process. It’s possible to adjust and tweak several printing parameters, such as the unusual settings of “Lifting Speed” – the speed at which the build plate is lifted from the resin vat between layers – and “Light-off Delay” – the total amount of time that the UV light is off between layers (thus allowing the new resin to settle in properly).
Profiles
The software also allows for the creation of separate print profiles, a feature similar to that of Simplify3D. These profiles can be imported and exported, making them easier to be shared.
Auto Layout

Besides the usual positioning tools mentioned in the previous section, Chitubox has an Auto-Layout tool that automatically arranges multiple parts on the build plate while optimizing space. The slicer’s support structure allocation is also worth noting since automatic placement is very reliable and efficient. The remaining manual placement tools are also very intuitive.
Chitubox Pro offers users more parameters to control the placement of models, including defining the area of the build plate where models will be placed. In Pro, Auto Layout is one of a number of model preparation tools that are subsumed under the Prepare tab. Other tools include Split Model and Auto Orientation.
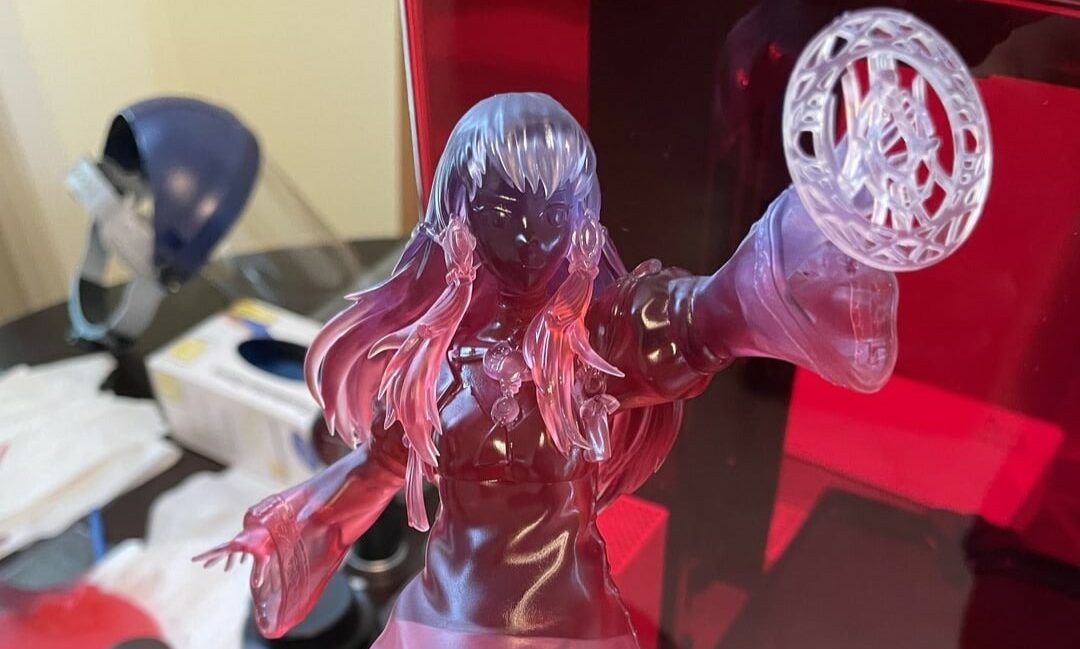
Hollowing
One of the most popular features of Chitubox is the ability to hollow out the imported models and make drain holes. This process is very common in resin 3D printers for saving on material since photocurable resins are quite expensive.
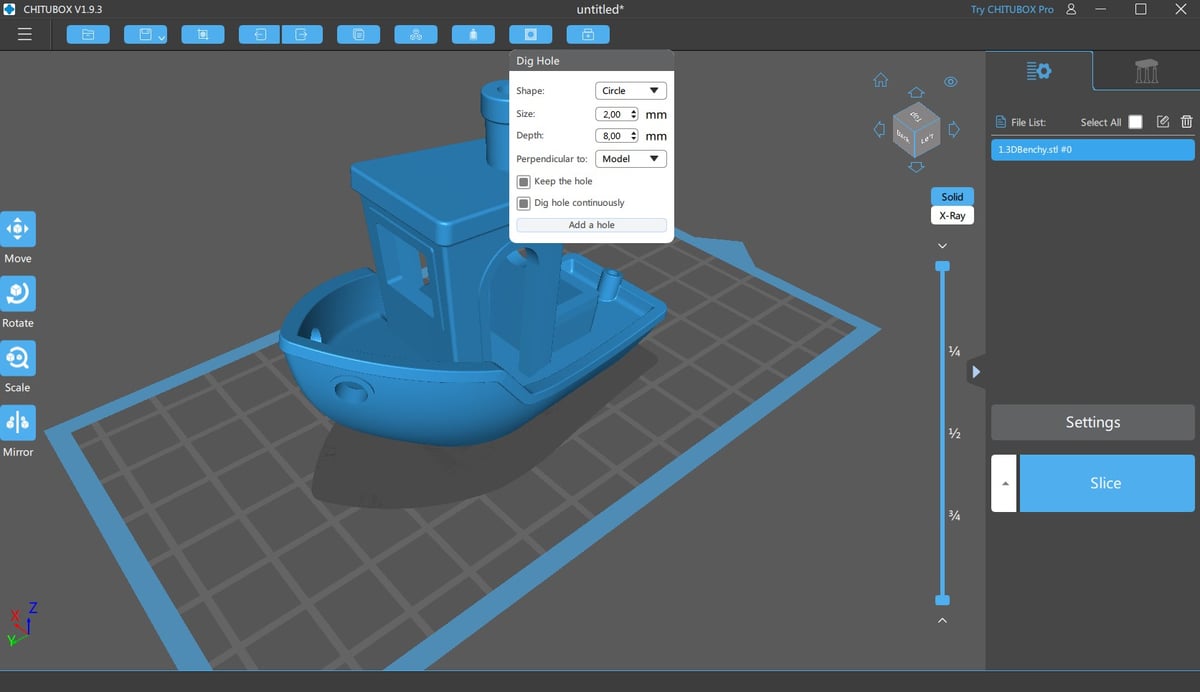
With the Hollow tool, overall wall thickness is defined, and the entire core of the model is emptied of material accordingly. The drain holes, on the other hand, allow the resin inside to flow out during printing, leaving only the cured shell of the model.
With the Dig Hole tool, you can specify the size and manually locate the drain holes. With Chitubox Pro, users can play with a few more parameters than those included in the basic version of the software. Pro users have the ability to define the number of edges of the hole as well as the angle between adjacent edges and the distance between perpendicular edges. The holes can be rotated, and the angle at which they’re dug into the model has different options.
Sometimes, a hollowed part might become too fragile, especially for applications that require some rigidity. To prevent this, Chitubox can generate infill patterns, very similar to what FDM slicers do. This is quite an unusual feature for resin printing slicers. Here the user can choose the infill percentages and wall thickness together.
Repair
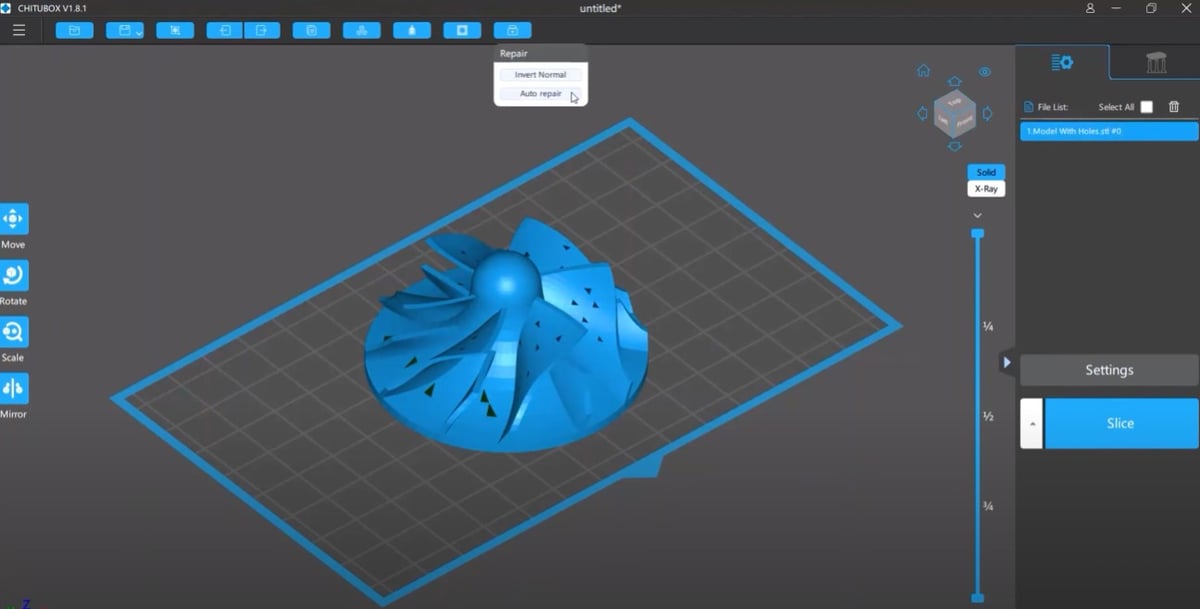
Chitubox’s Repair features allow you to fix issues with the 3D model’s geometry. In the basic version of the software, there are two tools: Invert Normal and Auto Repair.
The Invert Normal tool flips the normals of the model’s faces. Normals are basically perpendicular reference points that define the orientation of a model’s planes, namely whether they’re facing inwards or outwards. In order for the slicer to recognize a solid printable volume, a 3D model’s normals must face the correct direction.
The Auto Repair tool automatically detects and repairs problems with a model’s geometry. These may include non-manifold edges and flipped normals, among other issues.
The Pro version gives users a more extensive palette of tools. It’s possible to detect and display errors by model or by error type. A set of selection tools available on the left Tool Bar gives users a few options to select areas of the model that need repair. Users are then able to close holes, repair the orientation of the model’s triangular planes, and refine the outer surface of the model. Granular-level edits to individual triangles are also possible, thanks to the ability to add, remove, and reverse triangles.
Recording
Another unusual feature of Chitubox is the built-in screen recording tool, located in the top toolbar. It allows an actual video to be recorded, which is automatically exported as a GIF. The user can also take a single screenshot of the main interface and edit it with this tool.
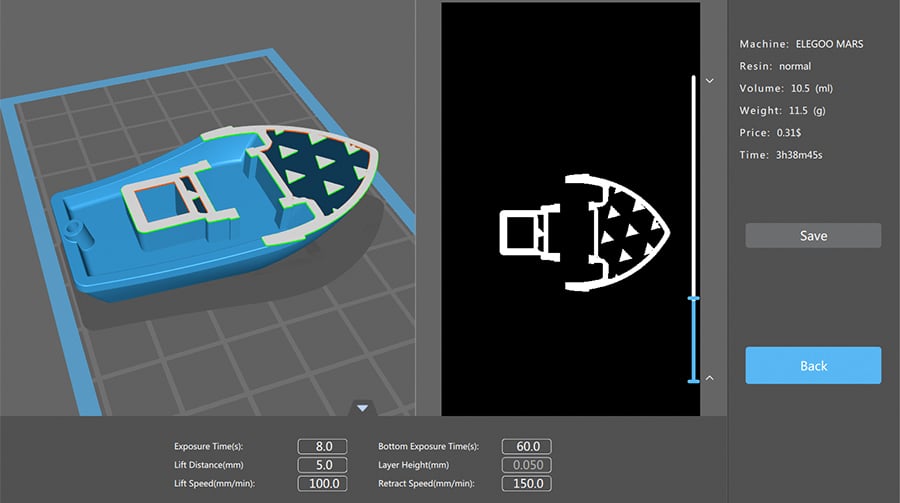
Preview
Once all the settings are configured and the slicing is processed, Chitubox will display a preview, which is a simulation of the actual print. The vertical leveler controls the height (hence the printing progress) of the simulation that’s displayed in a split-screen, with the 3D model on the left and the single 2D slice that’s being cured at a specific time.
The slicer also shows preview information, such as estimated build time and material quantities (volume and weight).
User Experience
Chitubox is known for being a beginner-friendly slicer that has plenty of advanced features for those who need them, with even more useful tools in the form of the Pro version. The automatic support placement and UI make Chitubox a fairly approachable slicer for beginners. With tooltips that explain some of the more advanced features, users can begin taking advantage of these features as they become more familiar with the software.
At the time of writing, Chitubox is available in 19 languages, and it has a massive community of users. Chitubox also supports a great number of file formats, including .stl, .zip, the native formats of supported 3D printers as well as its own formats (*.chitubox and *.cbddlp) if one wants to keep a slicing project for later. One of the perks of Chitubox Pro is the ability to import CAD files, including .3ds, .step, and .fbx, among many others.
Some users have encountered version-related problems that the availability of beta versions seems to fix. Aside from that, and some other minor issues, many users are happy with Chitubox and use it as their daily slicing software for all of their resin 3D printers.

Company & Community Support
Whether you’re just getting started with Chitubox or are an experienced user facing a new issue, there are plenty of great resources for support. The official support page would be a good place to start followed by the official forums where users are constantly helping each other out. You can visit the Chitubox Facebook page for updates and information directly from the source.
Be sure to join the Chitubox Subreddit for fast assistance and answers from veterans of the community. If you’re more comfortable using Discord for all of your questions, answers, and community engagement, you can find an active Chitubox channel there as well.
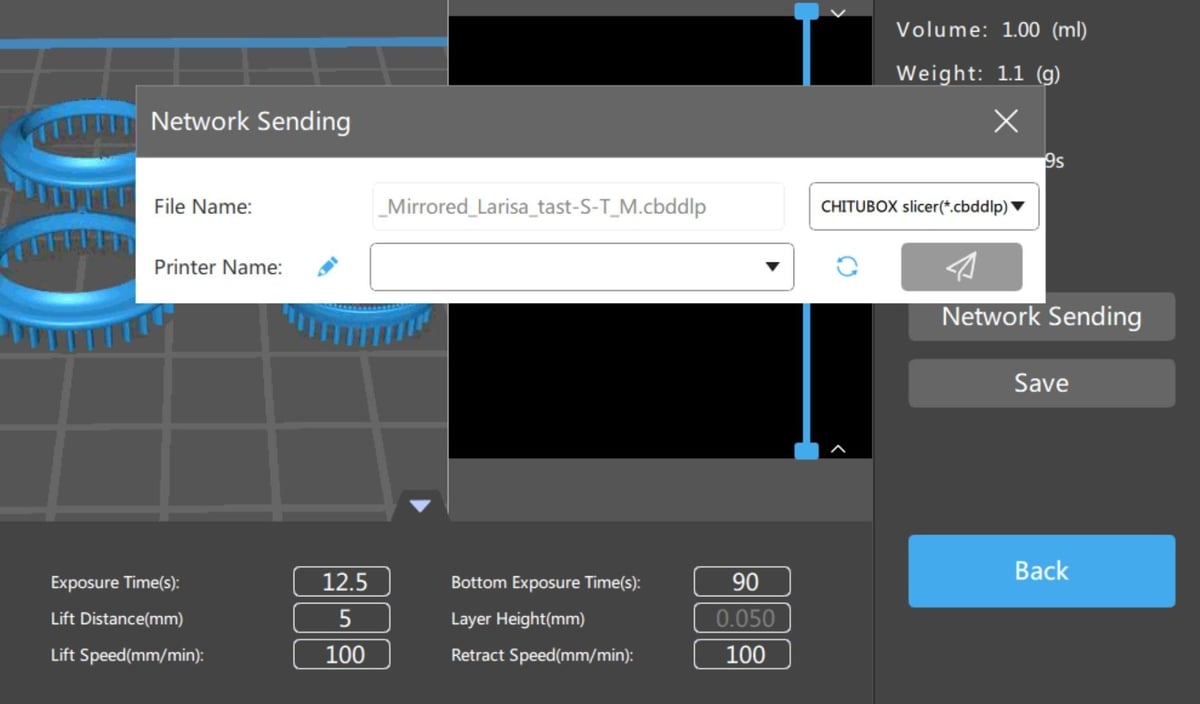
Chitu Systems, the company that makes both the slicer and motherboards for many well-known resin printers, did score some unfavorable points when they locked access to new features such as wireless file transfer to the Chitubox software only, not allowing competitors such as Lychee to take advantage of them when using a printer that comes with a ChituSystem board. After community backlash, they unlocked Wi-Fi functionality for other slicers to use as well, so it’s safe to say the developers behind the program are listening for community feedback!
Alternatives
It’s no accident that Chitubox is the most-used third-party slicer software for resin 3D printers. The amount of control and built-in features can really speed up the slicing workflow while maintaining a high-quality output file. As good as it is, Chitubox does have competition. There are only a few notable alternatives.
- Lychee: From Mango 3D, Lychee is increasingly popular, with many of the same features that Chitubox has to offer. There are free, pro, and premium versions of the software available. The paid versions are available through monthly or annual subscriptions. Be sure to check out our article on Chitubox and Lychee to get a sense of how they compare.
- Photon Workshop: Anycubic Photon’s own slicing software is a great place to start when getting into resin 3D printing with a Photon printer. The slicer is made to be plug-and-play with their own lineup of printers. While this slicer doesn’t offer a ton of advanced features, it will have everything you need to get started.
- PrusaSlicer: PrusaSlicer is a community favorite FDM slicer. Many are more than satisfied with its resin printing capabilities. Those familiar with the slicer may choose to stick with it when getting their first resin printer as the interface and controls are all the same. They have automatic profiles generated for more than 180 resin printers, so compatibility shouldn’t be an issue for most users.
- Formware: Formware 3D Slicer is the slicing software to consider when looking for more advanced features that come with a premium. Foreware 3D is constantly being updated with features that resin printer owners request and is compatible with a long list of devices. A Personal perpetual license comes in at just under ~$140, making it slightly cheaper than a Pro license of Chitubox. It’s definitely worth a look for those who want to take their resin 3D printing to the next level.
License: The text of "Chitubox (Resin 3D Printing Slicer): All You Need to Know" by All3DP is licensed under a Creative Commons Attribution 4.0 International License.