How to 3D Print Glass-Like Parts With Your FDM Printer

Anyone who has bought "transparent" filament will confirm maker Gluck's feeling that the resulting prints are translucent at best. Rather than making do, Gluck decided to find the perfect print setting to create truly transparent prints.
The reason that most transparent filaments produce translucent prints isn’t necessarily due to being misled by the company as to the functionality of a filament but often because of 3D printer settings.
Gluck, a maker and author for website Fennec Labs, has been working on how to create transparent parts since buying a 3D printer. In a recent blog post, it’s explained that translucency and transparency are different due to a material’s tendency to diffuse light.
When printing with normal settings, small bubbles are left inside the print which acts as a lens and scatters light. Therefore, the resulting prints are translucent.
But, Gluck points out that plastic is “inherently transparent” and bubbles are the “only thing” stopping us from creating truly clear prints. The next step was to find a print setting to create parts which are truly transparent.
How to Create Transparent 3D Prints
If you want to create your own transparent prints, it’s well worth following Gluck’s lead and trying this process out for yourself. Firstly, Gluck outlines the basic settings on 3D slicing software Cura for a transparent print. They include:
- Layer Height: 0.05 mm
- Infill Density: 100%
- Infill overlap percentage: 6%
- Flow: 108%
- Print Speed: 24 mm/s
- Enable Print Cooling: OFF
- Printing Temperature: 255 °C (on the highest end of the recommended range, using Prusa’s ABS). Adjust for PLA accordingly.
- Build Plate Temperature: 100 °C
- Nozzle Diameter: 0.4mm
Gluck also explains that it’s essential to ensure the hotend is clean. This is because leftover material can damage a print’s “purity”. Next, after a first layer is complete, ensure the hotend is close to the build plate but not close enough to scratch it.
Gluck adds that this “sweet spot” on the Prusa MK3/2 is found by adjusting the “live Z” to “the point where the air gap between the tip of the hotend and the build plate just disappears. This rule of thumb ensures that the plastic is forced into any gaps between the first layer lines and the build plate.”
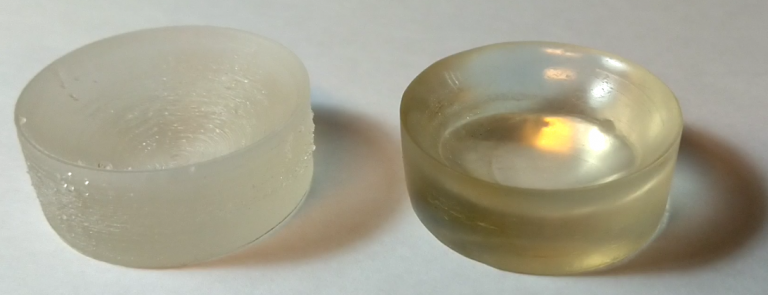
An over-extrusion will print a “plano-convex spherical lens” and the hotend will scrape the last layer, causing a chunk of excess material. But, Gluck explains that this can easily be removed with a knife after printing is complete.
Further post-processing steps include turning the rough printed surface into a smooth one. Gluck recommends using sandpaper ranging from 600 grit to 4000.
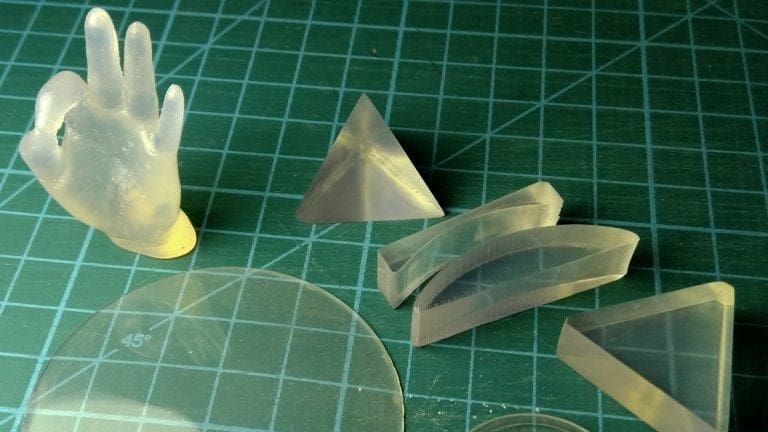
All of the prints produced by Gluck are “flat-bottomed” to avoid having to remove supports and to make sanding easier. The resulting lenses are “quite pleasing” if not good enough for imaging.
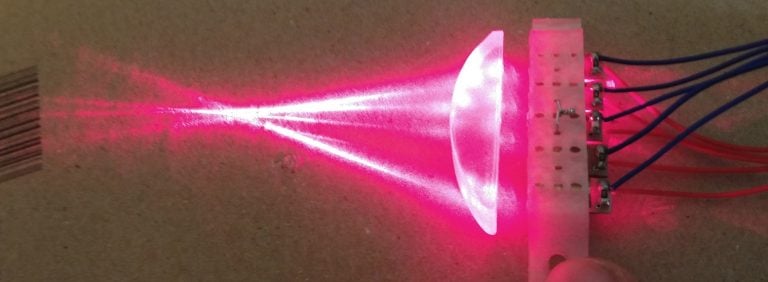
However, Gluck had some fun with the lenses, using them to focus light and developed lasers using a plano-convex cylindrical lens and a mount. The lasers are then held parallel to each other and the beams are focused into one spot.
Gluck came up with a second unique idea which was to place Mario and then a snowflake shape into a transparent cube, producing a laser-engraved result which isn’t perfect but works surprisingly well and looks cool.
Learn more about this process by visiting the Fennec Labs website.
License: The text of "How to 3D Print Glass-Like Parts With Your FDM Printer" by All3DP is licensed under a Creative Commons Attribution 4.0 International License.