Sometimes playing classics is just perfect. Remember the joy of completing Ocarina of Time? Getting scared out of your mind while playing Resident Evil? Endless hours of fun with your friends and Mario Kart? Or do the games The Last Ninja, Elite, or GoldenEye 007 ring a bell?
It turns out, you don’t really need the old consoles and computers to play the greatest classic games again. With just a Raspberry Pi, you can create a retro gaming station using an emulator to access classic arcade games.
Of course, a Raspberry Pi doesn’t look like the real thing. To improve the aesthetic of your Pi-powered gaming station, you can 3D print a retro-style case that protects your delicate Pi board and makes it look like a real arcade system.
In this article, we’ve listed some of the best RetroPie cases and accessories that you can use to turn your computer board into a fun mini gaming station. If your RetroPie is ready to go but you don’t have a printer on hand, try Craftcloud by All3DP to get your new console professionally printed and shipped to your door!
Handheld
Here we’ve gathered some RetroPie cases with integrated screens and buttons so you can play games on your Pi on the go.
Game Boy Nano
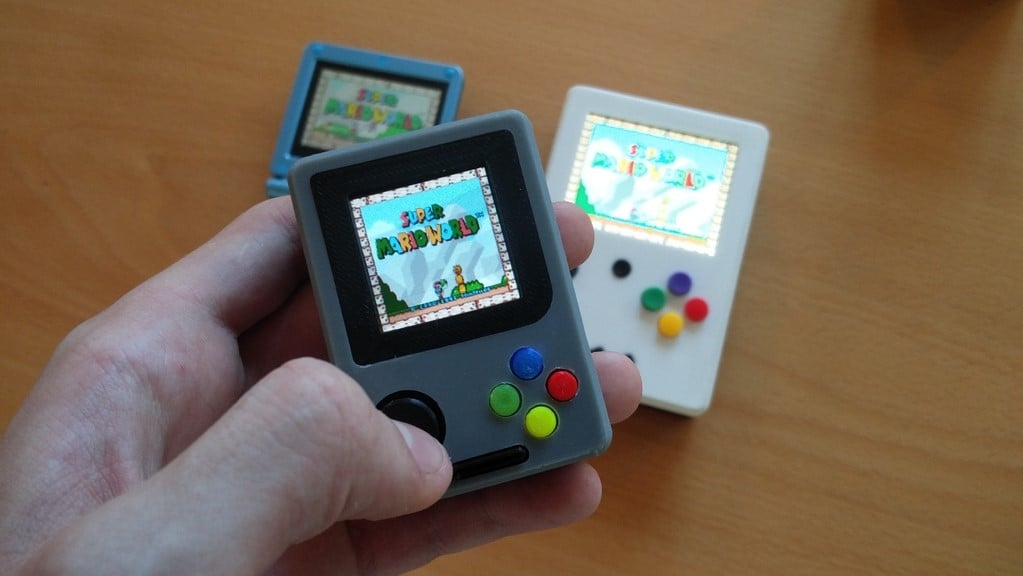
First up, the Game Boy Nano is one of the cutest designs on this list, capable of fitting in your pocket due to its small dimensions of just 6.9 x 4.8 x 2.7 cm. The handheld gaming device runs on a Raspberry Pi Zero and uses a 1.5-inch Adafruit OLED screen with a small controller. For better visibility, you can connect the internal Pi board to an external TV or monitor with an HDMI port.
- Who designed it? Rasmushauschild
- How popular/printable is it? This Game Boy Nano design has 5 recorded Makes, 3 Remixes, and over 27,000 downloads!
- Where to find it? Thingiverse
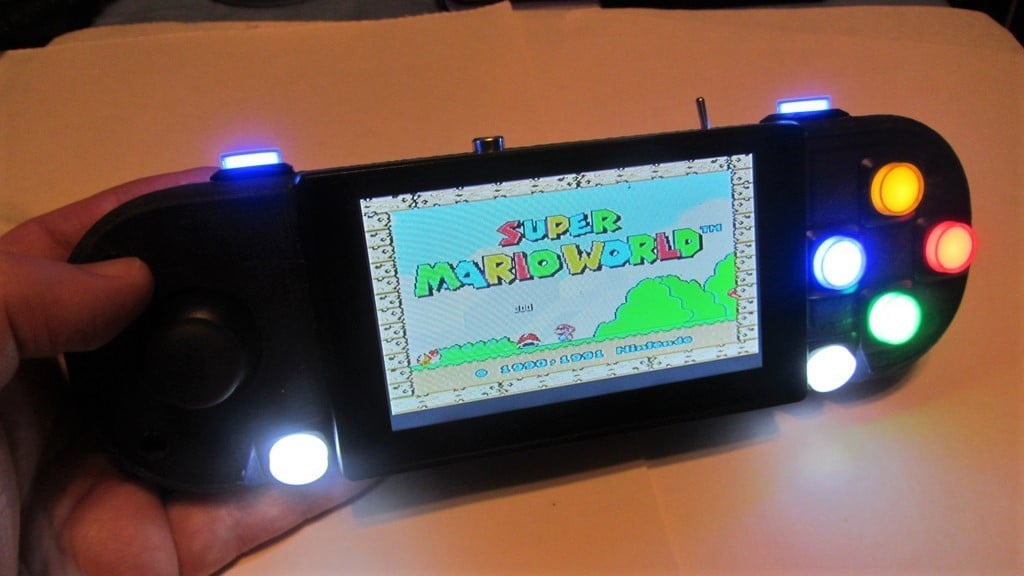
PiGRRL 2
From the image above, you may be wondering if the PiGRRL 2 is the classic Game Boy? Not quite; the PiGRRL 2 uses a Raspberry Pi board to give you a better gaming experience and it’s capable of emulating almost every classic console, from NES, SNES, Sega Master System, and more. The project is the successor of the original, popular PiGRRL case, with a bigger screen, a better layout for the buttons, an easier build process, and a few other improvements.
- Who designed it? adafruit
- How popular/printable is it? This PiGRRL 2 design has 76 recorded Makes, 21 Remixes, as well as almost 50,000 downloads!
- Where to find it? Thingiverse, Adafruit
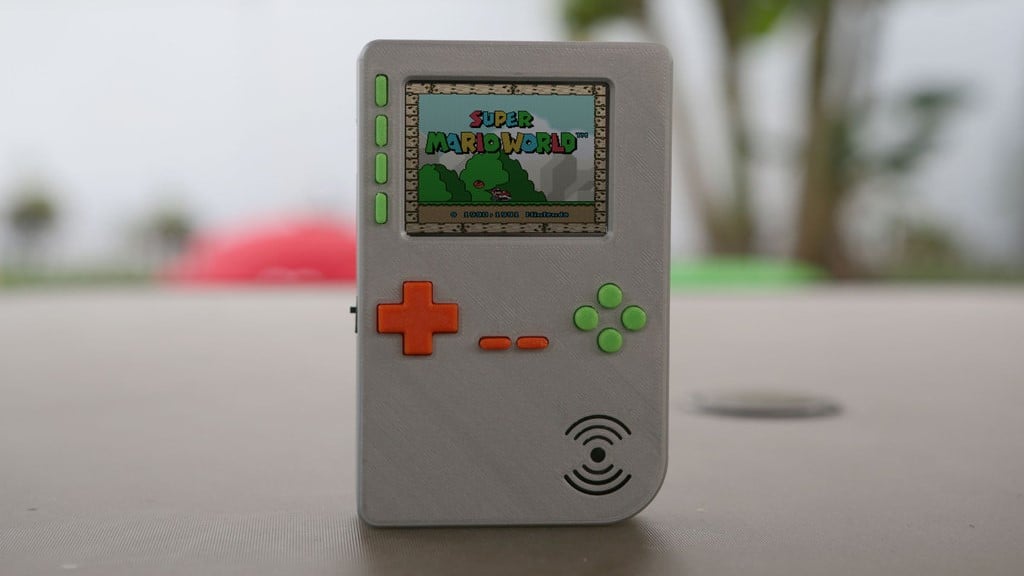
Game Station
This portable game station is a modern interpretation of the classic Game Boy Case, perfect for your retro gaming. With a 6,000 mAh battery for a playing time between 4 and 5 hours, this handheld device is the perfect option for retro gamers who are always on the go. The case uses 12 3D printed parts to fit a Raspberry Pi 2 board, and the design has open areas to fit the controller buttons as well as the important ports on the Pi board.
- Who designed it? Rasmushauschild
- How popular/printable is it? This portable game station has 3 recorded Makes, 2 Remixes, and over 21,000 downloads!
- Where to find it? Thingiverse
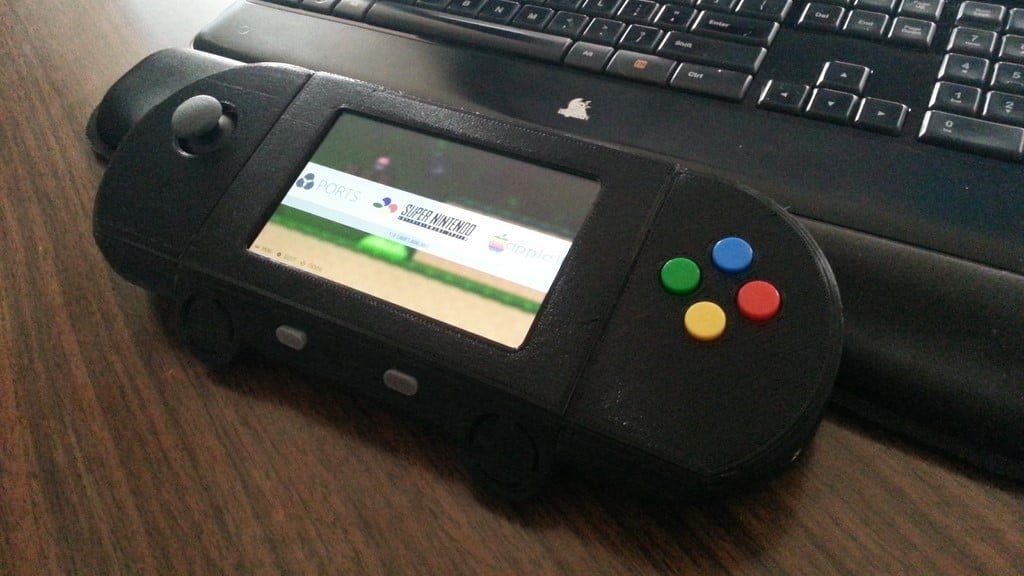
Raspberry Pi Portable
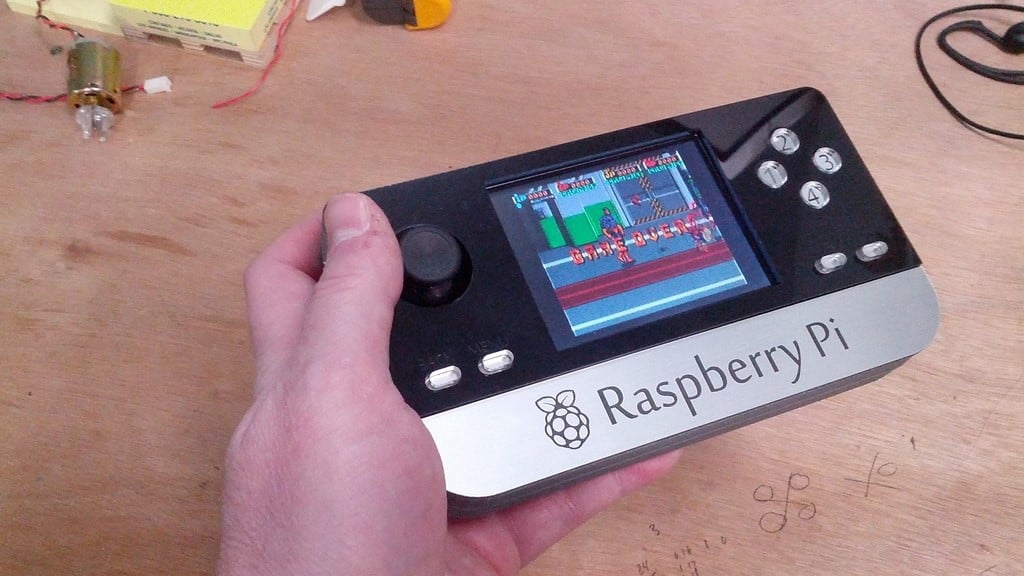
This on-brand portable console is another handheld Pi-powered gaming station. While it might not have a super creative name, the device is a great option and uses a small LCD monitor with a split-in-half battery and a Teensy controller. The designer provided a few versions of the 3D models for this project, and from the image above, it’s also clear that they laser cut the device’s front plate (2D vector files also included).
- Who designed it? benheck
- How popular/printable is it? This portable Raspberry Pi case has 5 Remixes and over 18,400 downloads.
- Where to find it? Thingiverse
PiStation Portable
This handheld device is called the PiStation Portable, which, of course, is a throwback to the great PlayStation Portable (PSP). This handheld retro game console can emulate a bunch of video games, of course, from Super Mario World to Pac-Man and everything in between. The layout of the buttons makes it a great emulator for consoles like the Lynx or even the PSP itself!
- Who designed it? Ellindsey
- How popular/printable is it? This PiStation Portable design has 1 recorded Make and almost 8,000 downloads.
- Where to find it? Thingiverse
Super Game Pi

The Super Game Pi is another RetroPie project from the popular DIY electronics manufacturer, Adafruit. The device looks a bit heavy, packed with 12 buttons, an analog joystick, stereo speakers, and a 5-inch HDMI-compatible display, all running off of a Raspberry Pi A+ board. The case is made of five 3D printed parts, and Adafruit has a full tutorial for making the Super Game Pi on their website.
- Who designed it? adafruit
- How popular/printable is it? This Super Game Pi case has 4 recorded Makes, 8 Remixes, as well as close to 8,500 downloads!
- Where to find it? Thingiverse, Adafruit
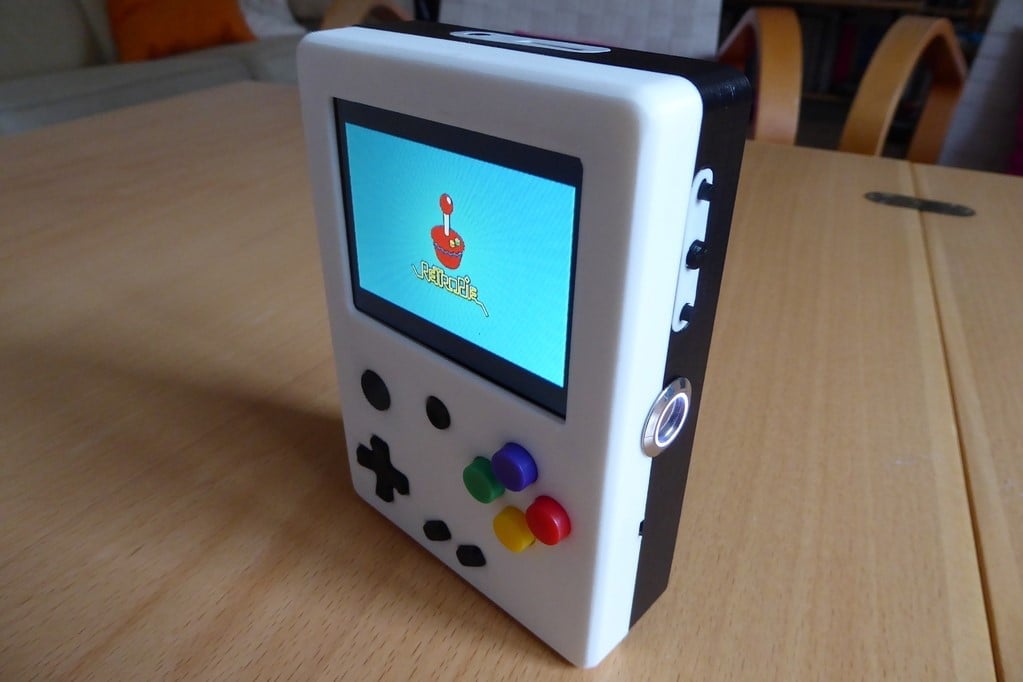
PortaBerry Pi Ultra
The PortaBerry Pi Ultra is another great handheld gaming emulator case, and, as seen in the image above, it uses a mix of laser cut and 3D printed parts for its frame. The device also uses a Raspberry Pi 2 with attached speakers, a 5-inch screen, and a controller, consisting of two analog joysticks, four buttons, and more. It relies on a 4400-mAh battery that can be charged with a Micro-USB cable and will allow you to play your favorite retro games for 4 to 5 hours, according to the designer.
- Who designed it? 3Derp
- How popular/printable is it? The PortaBerry Pi Ultra case has 9 recorded Makes and 4 Remixes, with almost 15,000 downloads.
- Where to find it? Thingiverse
PieBoy
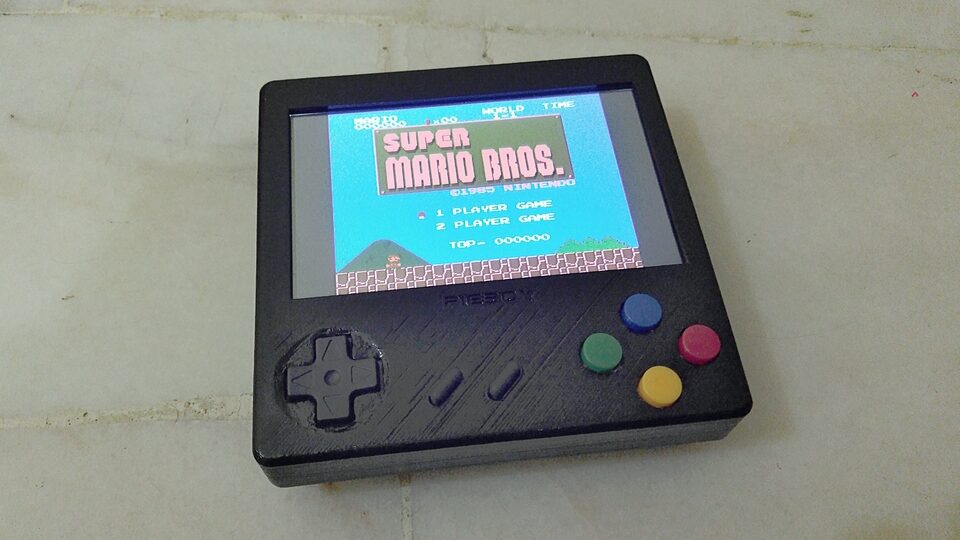
This portable retro game console isn’t complicated to build and it just consists of two 3D printed parts. The PieBoy works using an old SNES gamepad connected to a Raspberry Pi 2 B, along with some other hardware, such as a pro battery pack, amplifier, and speaker. The finished product allows you to play games from SNES, Game-Boy Advance, and other systems on a 5-inch screen whether you’re at home or on the go.
- Who designed it? melawis501
- How popular/printable is it? This PieBoy model has 3 recorded Makes, 1 Remix, as well as over 12,200 downloads!
- Where to find it? Thingiverse
RaspBMO
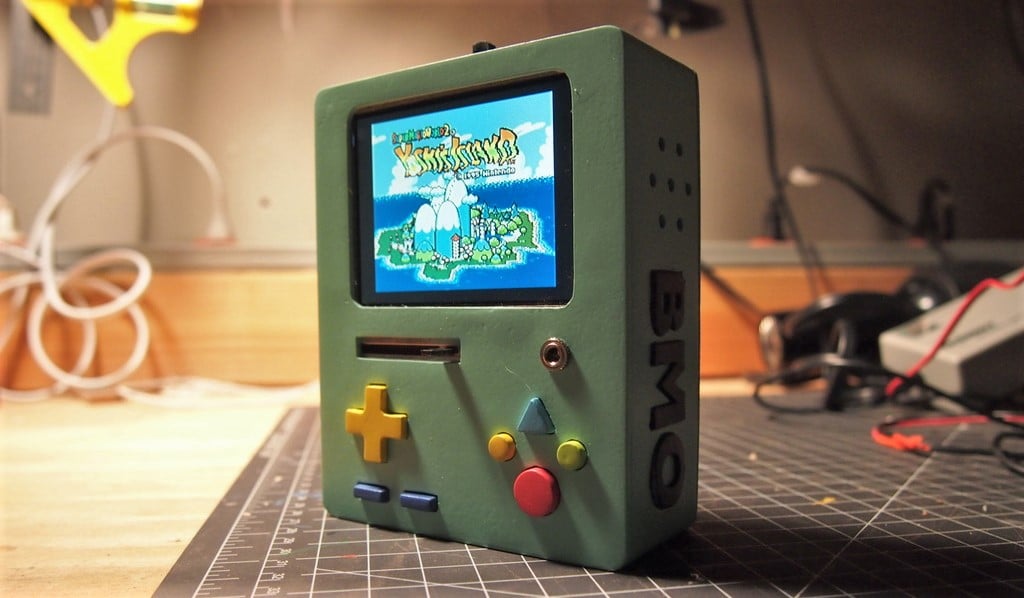
The RaspBMO is another handheld retro gaming device, remixed from a few similar projects. The RaspBMO has a nice big screen, a powerful battery pack, stereo speakers, all contained in a fully 3D printed Raspberry Pi case made of over 20 frame pieces (even the buttons are printed).
It’s worth mentioning that this project is pretty complicated with some wiring and soldering required; luckily, there’s a lot of instruction and documentation on the project page.
- Who designed it? 3Derp
- How popular/printable is it? The RaspBMO case has 11 recorded Makes, 3 Remixes, and close to 27,000 downloads!
- Where to find it? Thingiverse
Super Game PiSP
The Super Game PiSP is another 3D printed retro gaming Raspberry Pi case inspired by the PlayStation Portable (PSP). The project is a remix of a few Pi-powered handheld devices and incorporates a few changes that the designer wanted, such as a more rounded design and compatibility for the Raspberry Pi B+. The project uses seven 3D printed parts and is a little complex given the amount of assembly, but, luckily, the designer went into a lot of detail for the build instructions.
- Who designed it? Carasibana
- How popular/printable is it? The Super Game PiSP case has 10 recorded Makes, 6 Remixes, and more than 9,000 downloads.
- Where to find it? Thingiverse
Arcade
Next, you can find some classic RetroPie cases that have screens and controllers but aren’t portable.
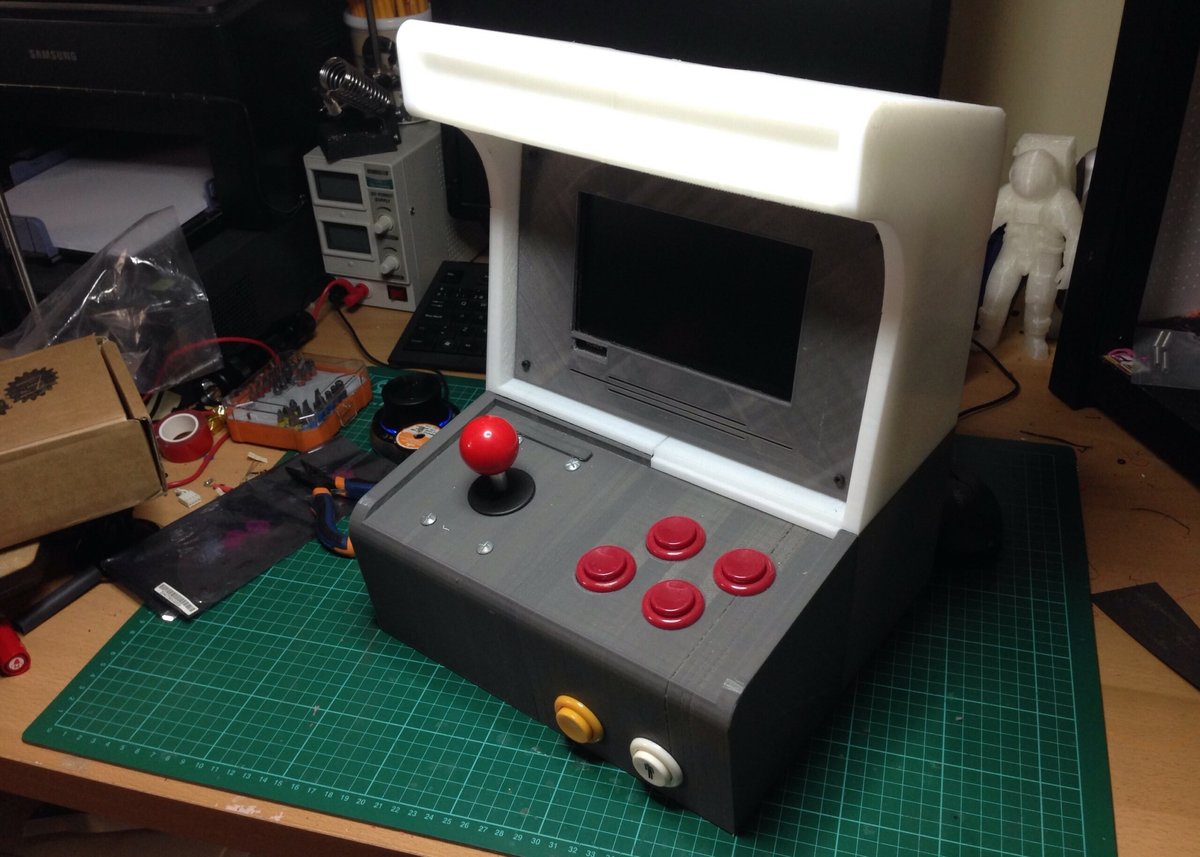
Mini Arcade
This mini arcade machine is the gadget you probably always wanted as a kid. The project was designed to look like the star of an old Radio Shack catalog from the 80s but is equipped with the (slightly) more modern Raspberry Pi 2 to provide the ultimate retro gaming experience.
The Mini Arcade uses a 7-inch LCD display and a suitable shield for button management on the Pi 2 board. The electronics are powered by a 5V/2A power supply and the arcade’s frame is made from an assortment of 3D printed parts.
- Who designed it? GabrieleDaghetta
- How popular/printable is it? This Mini Arcade project has 2 recorded Makes and 1 Remix, with over 8,600 downloads.
- Where to find it? Thingiverse
Pi-Boy Classic
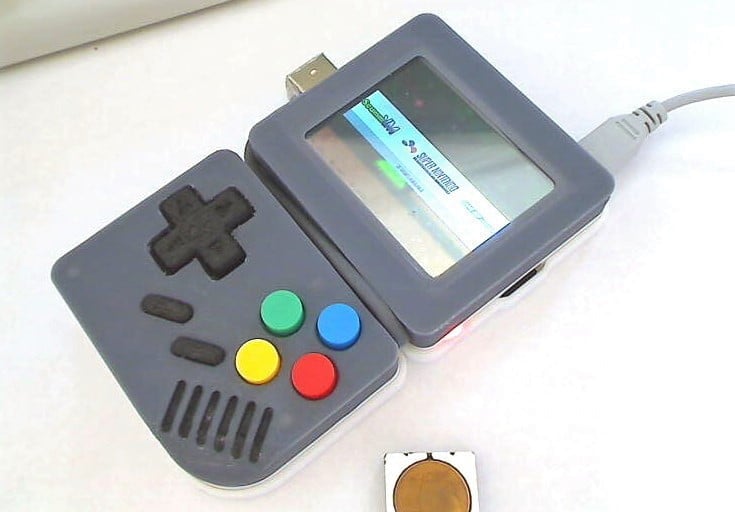
The Pi-Boy Classic, while not handheld, is still pretty small for an arcade design and is wall-powered (no battery). Similar in function to a flip phone, the Pi-Boy Classic has an unusual two-part GameBoy design and it’s meant to fit a Raspberry Pi board with a controller. Make sure to also print the screen enclosure, though, because you’ll need it to comfortably play your favorite retro games on this arcade.
- Who designed it? Jooxoe3i
- How popular/printable is it? This Pi-Boy Classic case has almost 4,000 downloads.
- Where to find it? Thingiverse
Cabinet
This classic arcade cabinet is not nearly as portable as some options on this list, with a larger frame design made up of nine 3D printable parts. The project is meant to fit a Raspberry Pi B board with a 7-inch LCD screen and includes eight buttons with a joystick for the controls. While building the arcade cabinet on your own may be a difficult task, you can use the designer’s tutorial page for more information regarding the build process for the project.
- Who designed it? malopezn
- How popular/printable is it? This arcade cabinet project has 5 recorded Makes, 1 Remix, with almost 10,000 downloads!
- Where to find it? Thingiverse, 3DRC
StarOne
The StarOne is designed with a spaceship theme. The battery-powered arcade features six buttons with a joystick and it uses a fairly small screen, all powered by either a Raspberry Pi 2 or 3. Although not much information was provided for the electronic configuration or assembly of the project, if you’re interested in this project, there’s a full bill of materials and build tutorial (in French) from Game Makers.
- Who designed it? Game-Makers
- How popular/printable is it? The StarOne arcade machine has 274 downloads.
- Where to find it? Thingiverse, Game Makers
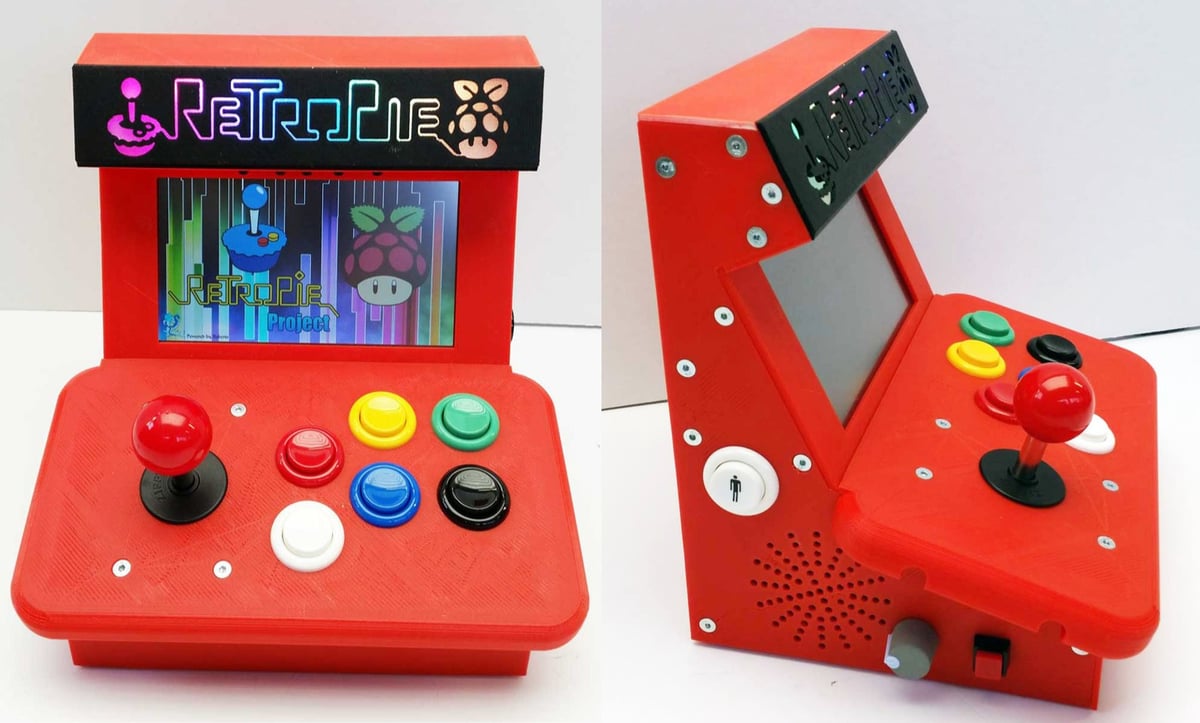
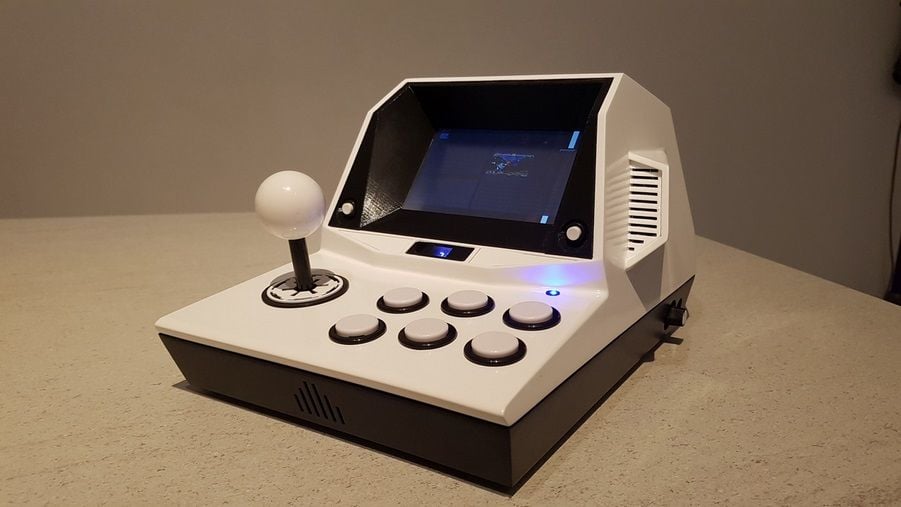
The Pi-Cade
Next, the Pi-Cade is a completely 3D printed arcade cabinet built for the Raspberry Pi 2. With a 7-inch screen, real arcade controls, an amplifier, and 3-inch stereo speakers, this cabinet is the perfect size for a desktop arcade!
Making the Pi-Cade shouldn’t be too difficult either as the maker of this project provides detailed instructions for assembling the 15 3D printed frame components and configuring the electronics used for the project.
- Who designed it? belch
- How popular/printable is it? The Pi-Cade has 6 recorded Makes, 7 Remixes, as well as over 8,700 downloads.
- Where to find it? Thingiverse
Hoodie
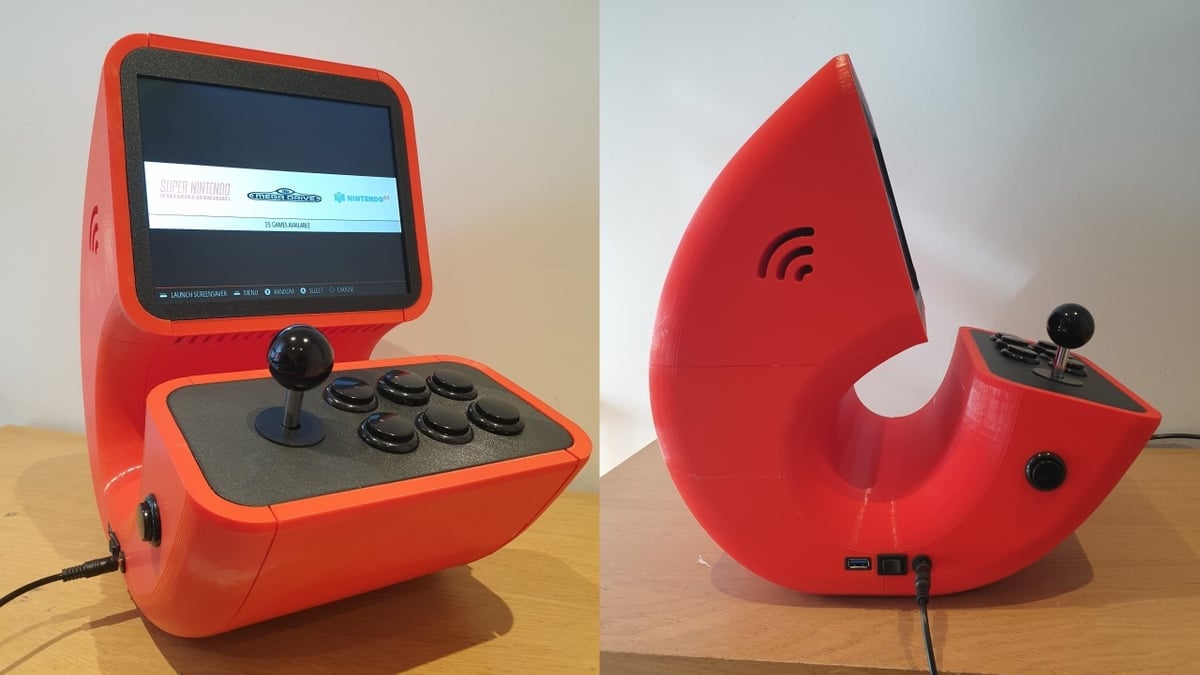
The Hoodie is another arcade cabinet project, but it’s housed in a curved case, an atypical approach to an arcade cabinet frame that will make your device stand out. Unfortunately, not much other information for the Hoodie was provided on the project page, but the downloadable instructions sheet on Cults should help you build the arcade.
It’s worth mentioning that the designer listed that they used a 20% infill density to print the over 20 3D printed parts in PLA.
Console
In this section, you’ll find an assortment of RetroPie cases that don’t have a screen or a controller, but store just your Pi board.
PiStation
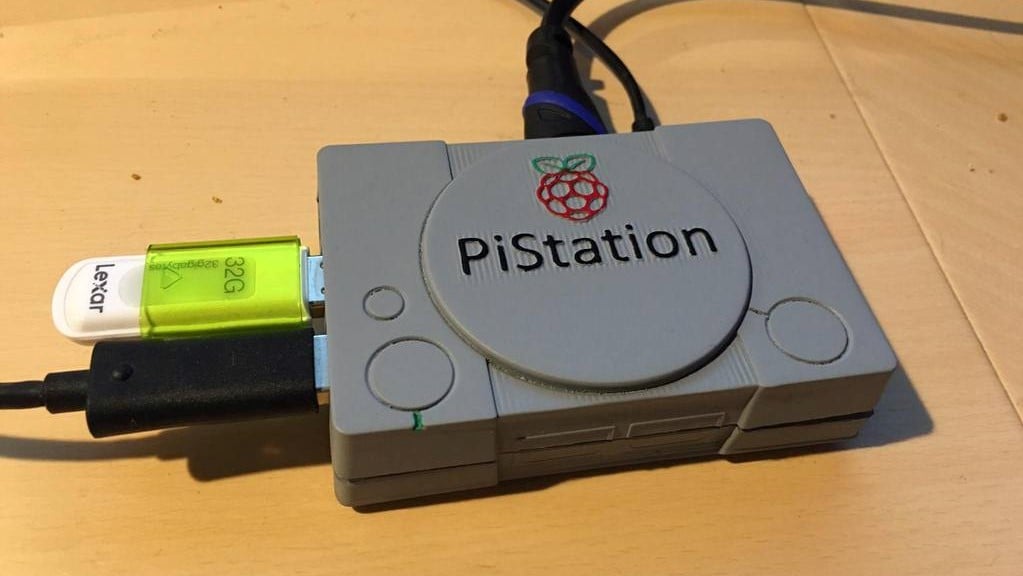
Give your RetroPie gaming console a unique styling with this PlayStation-inspired case, known as the PiStation. This classy console should look perfect beside your TV, and the project is a remix of a similar console case, but with a modified logo. Besides the Raspberry Pi board that fits in the case, all you need to make the PiStation suitable for playing retro games is a good controller and an emulator.
- Who designed it? jhample
- How popular/printable is it? This PiStation console has 19 recorded Makes, 6 Remixes, as well as 25,000 downloads!
- Where to find it? Thingiverse
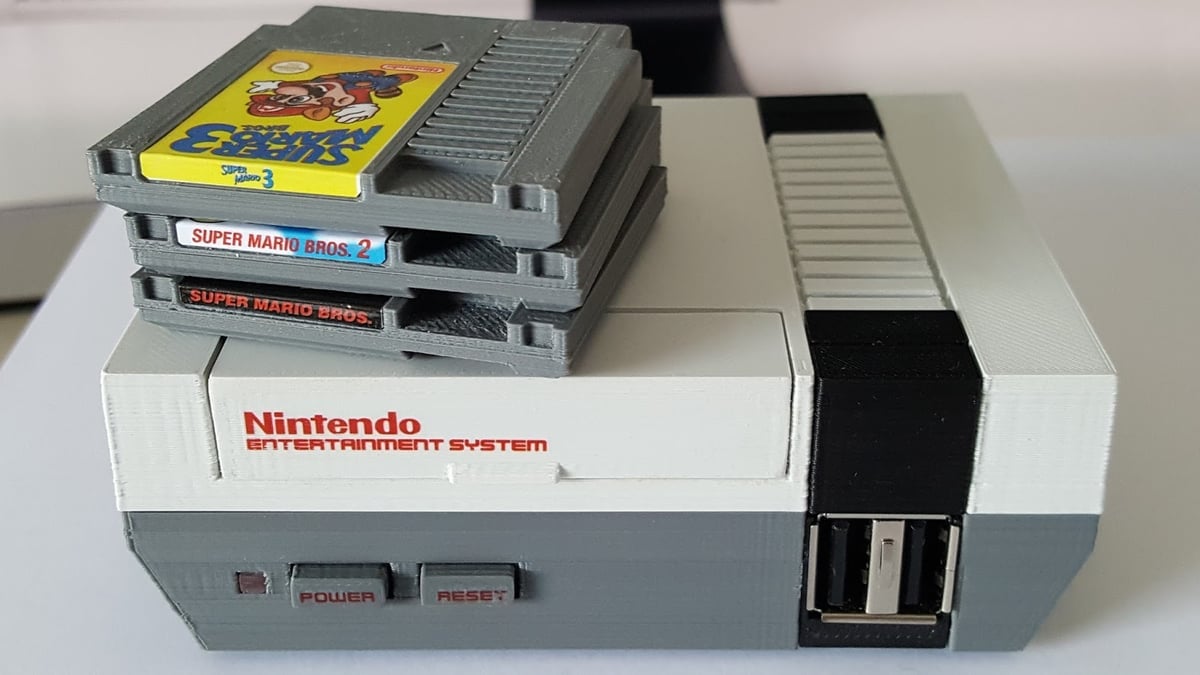
NinTastic
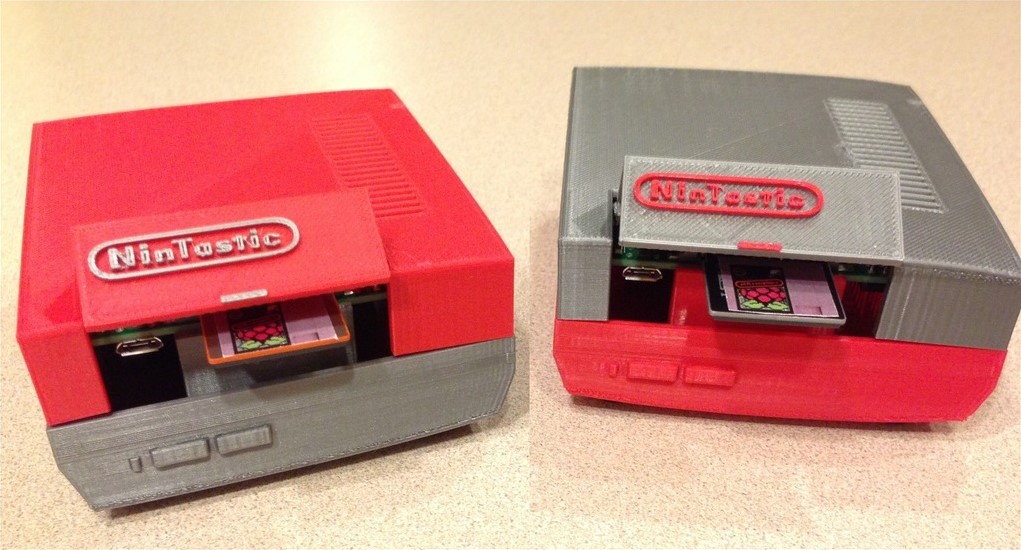
The NinTastic is a pretty easy-to-make option, comprising just three 3D printable components that snap together easily. While it doesn’t look exactly like Nintendo’s NES classic edition, it’s a great option for housing your Raspberry Pi board and should fulfill your retro gaming needs. The designer also provided a lot of information regarding printing, assembly, and setting up your gaming station, so the build process should be very straightforward.
- Who designed it? tastic007
- How popular/printable is it? The NinTastic console case design has 37 recorded Makes, 11 Remixes, and over 45,000 downloads!
- Where to find it? Thingiverse
Gaming Station
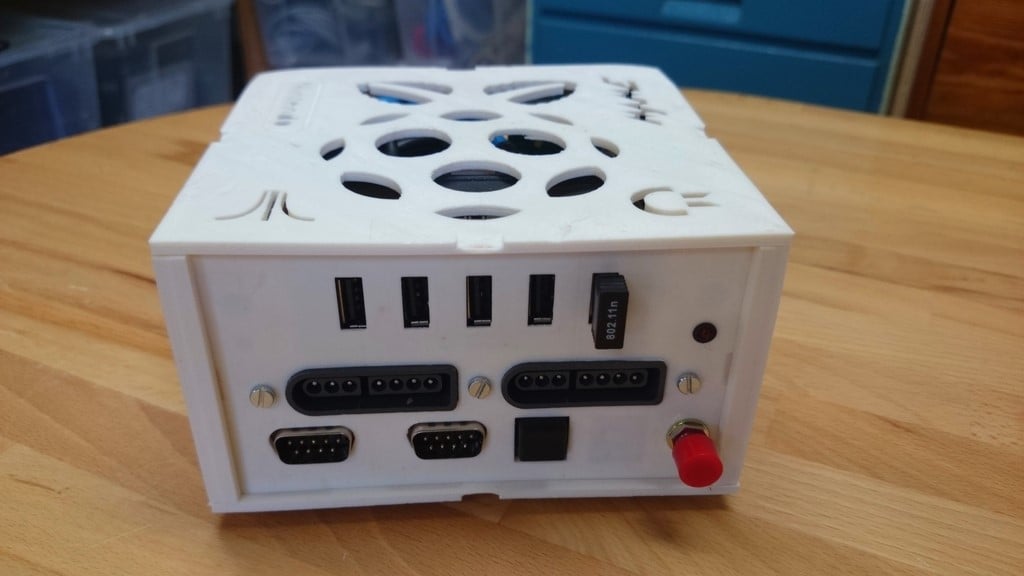
This RetroPie gaming station is one of the large projects on the list, and it’s roughly the size of a GameCube. With this 3D printable RetroPie Case, you have enough space to connect several controllers, a keyboard, joysticks, and a lot more, allowing you to connect whatever hardware you want for a great gaming weekend. The project comes in two flavors, with one version for the original Raspberry Pi and one for the Raspberry Pi B+.
- Who designed it? Snille
- How popular/printable is it? This gaming station project has 1,830 downloads.
- Where to find it? Thingiverse
BabyNES
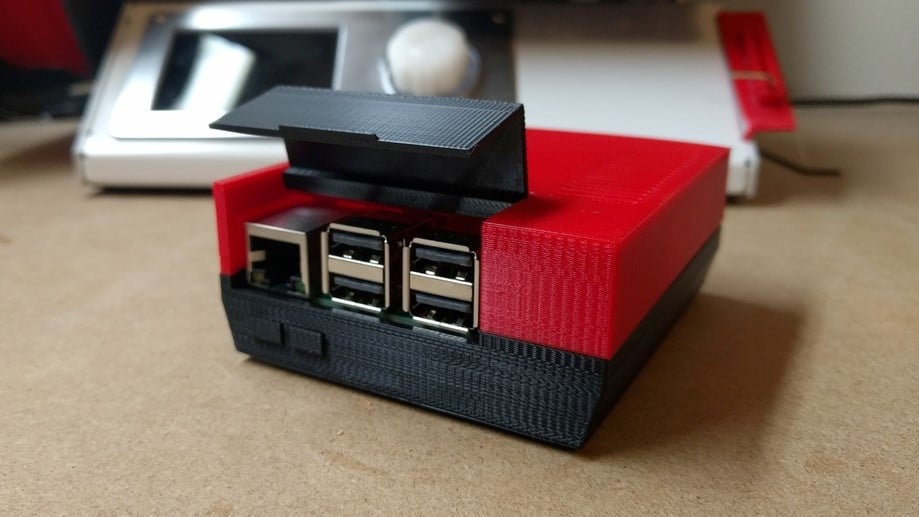
This stylish Raspberry Pi NES console is meant for the Raspberry Pi Model B and B+. Its design was inspired by the NinTastic print, but according to the designer, it was re-modeled from scratch.
This case is a pretty easy build; you only need the electronics and the three required 3D printed parts. It’s also worth mentioning that you can use it with wired controllers, as well as with models like the Xbox 360 or PlayStation 4 wireless controllers.
- Who designed it? jrebeiro
- How popular/printable is it? This BabyNES design has 88 recorded Makes, 18 Remixes, as well as almost 57,000 downloads!
- Where to find it? Thingiverse
Pi64
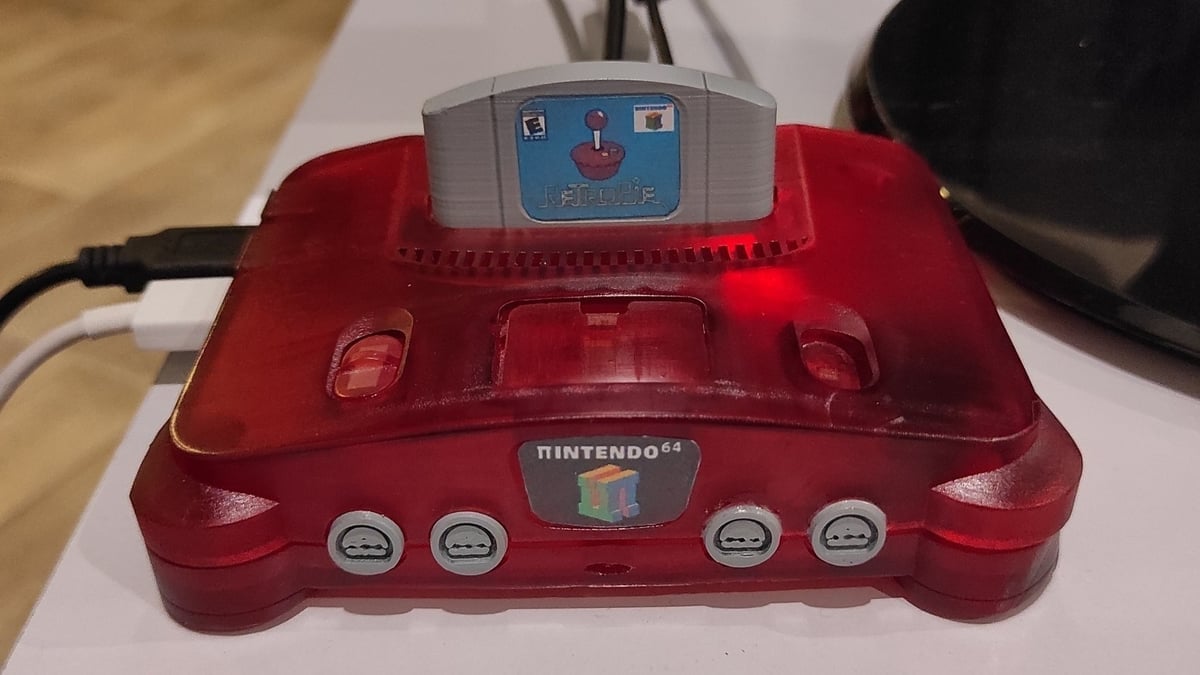
The Pi64 is an excellent-looking representation of the classic N64 case, built to house a Raspberry Pi 3 Model B. One nice detail of the project is that you can insert SD cards into the top of the console to play different games, just like you would insert different game modules on the real N64. After 3D printing, assembling, and painting the case, you can start your emulator and venture into the blocky realms of 16-bit gaming history.
- Who designed it? elhuff
- How popular/printable is it? This Pi64 case has 23 recorded Makes, 4 Remixes, with close to 19,000 downloads!
- Where to find it? Thingiverse
NES Controller
This RetroPie console is made from a classic NES controller, some additional 3D prints, and a Raspberry Pi Zero. The console was designed in Tinkercad and is pretty small but has openings for the Pi Zero ports necessary to play retro games. For printing, you can follow one Maker’s settings and use a 0.04-mm layer height with a 25% infill density.
- Who designed it? bfesser
- How popular/printable is it? This NES controller has 24 recorded Makes, 5 Remixes, and close to 14,000 downloads.
- Where to find it? Thingiverse
Pac-Man Ghost
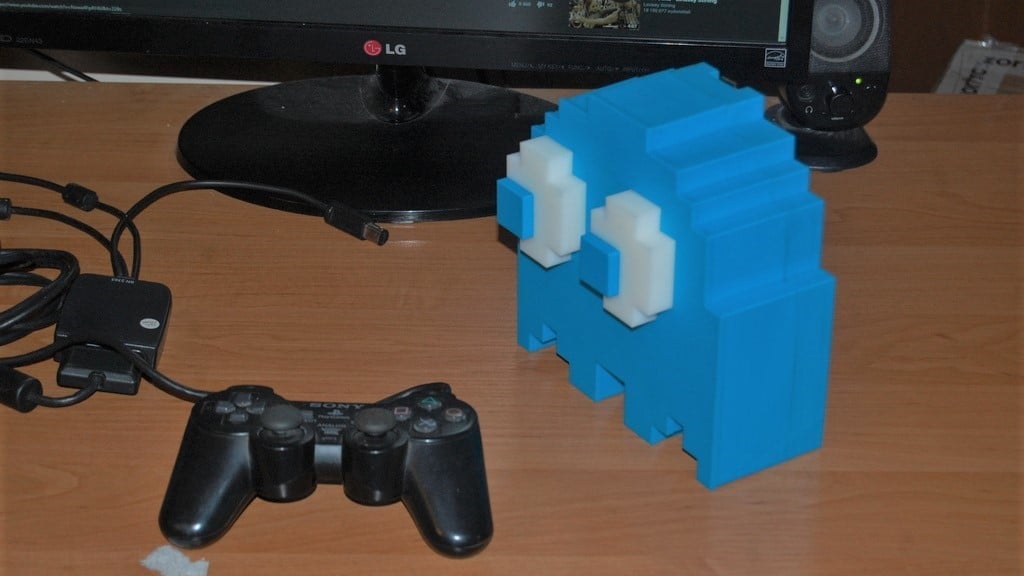
Next, if you love to play Pac-Man on your RetroPie setup, then this case is perfect for you. The case was designed as a ghost from Pac-Man in an aesthetic 8-bit style, and it holds a Raspberry Pi 3 board with accessible ports. You can change your filament when printing the seven pieces of the case to make the model resemble either Inky, Pinky, Blinky, or Clyde.
- Who designed it? solidcinu
- How popular/printable is it? This Pac-Man Ghost console design has 2,187 downloads.
- Where to find it? Thingiverse
MiniNES
This Raspberry Pi NES case gets pretty close to the real Nintendo “NES Classic Edition” case. It even has a flip-top lid for 3D printed cartridges with NFC chips. If you insert a cartridge in the Raspberry Pi NES case, the computer starts the game accordingly, which is pretty nifty.
- Who designed it? DaftMike
- How popular/printable is it? This MiniNES project has a long list of comments on the project page, indicating it’s pretty popular.
- Where to find it? DaftMike’s Blog
Sleeper PC Tower
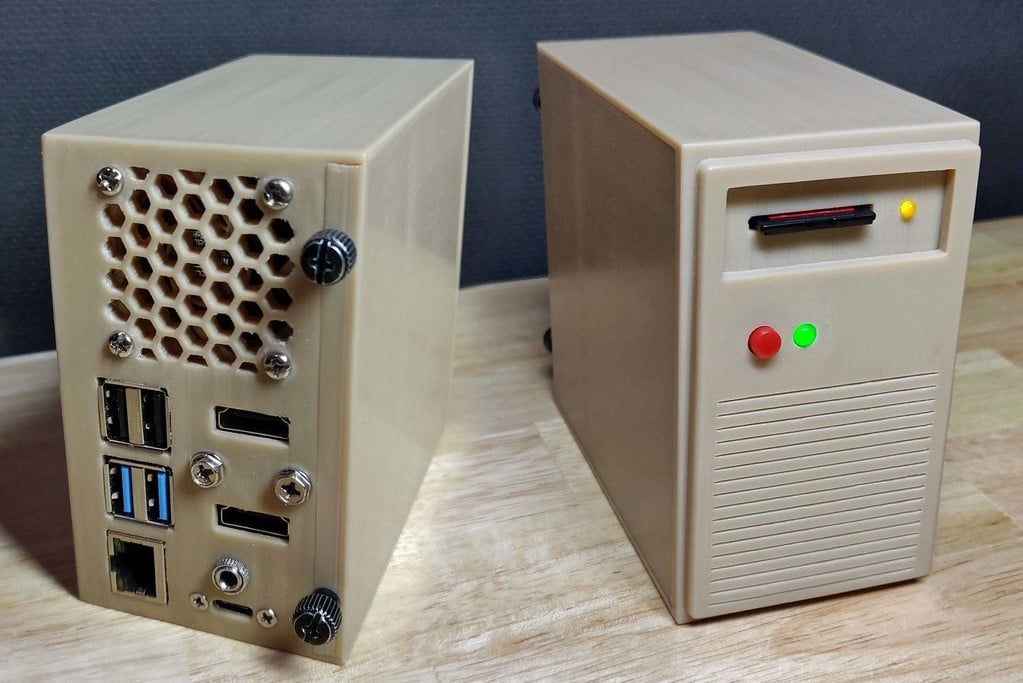
A sleeper PC is usually a term given to powerful desktop computers housed in an old and vintage PC case, giving the impression that the PC isn’t very powerful. This Raspberry Pi case was designed after a generic early-2000s-era PC case and fits a Raspberry Pi 4.
For usability, the case has a few openings to allow you to use your Pi board’s interface ports, which you can use to connect to a display and a controller to play your favorite retro video games. It also makes a great case if you’re running your Raspberry Pi as a PC!
- Who designed it? Xavior93
- How popular/printable is it? This old PC Raspberry Pi case has 1 Remix and around 600 downloads.
- Where to find it? Thingiverse

Tribute Joystick
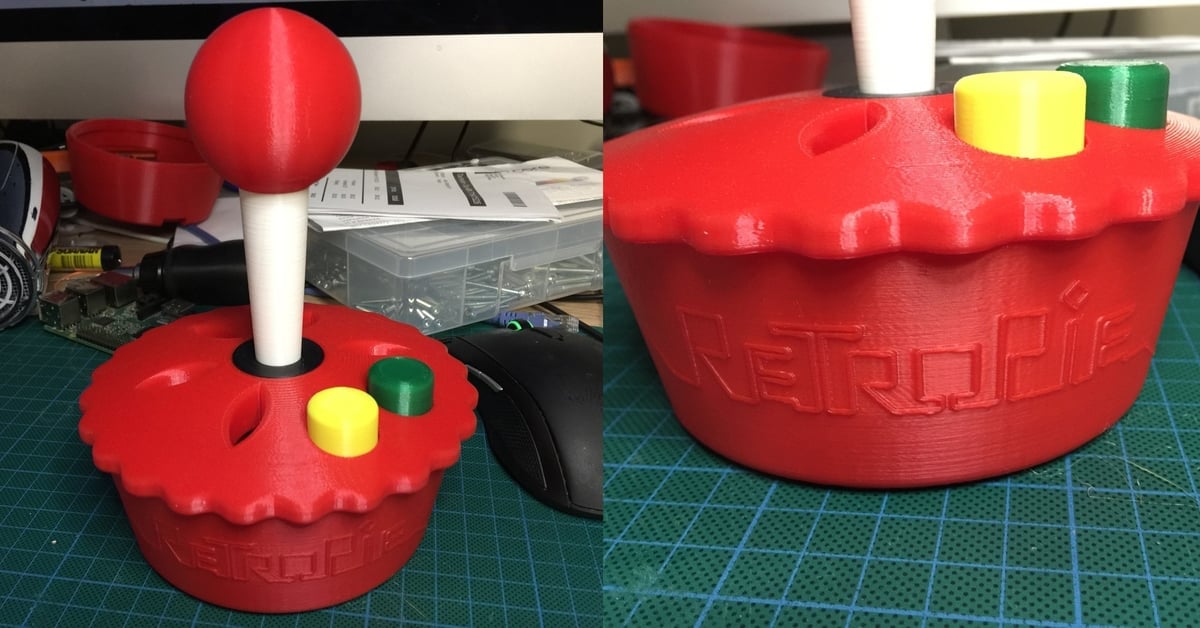
This project will hold your emulator while emulating the RetroPie logo! While the joystick doesn’t function, the two buttons act as shutdown and restart controls.
The controller has a long joystick with two buttons in a large 3D printed frame, made of nine 3D printed parts. On the project page, the designer provided the necessary electronic components for the controller as well as some configuration instructions you can use to make the device.
- Who designed it? iClint
- How popular/printable is it? This RetroPie tribute case has been built by one maker other than the designer.
- Where to find it? Thingiverse
Accessories
Lastly, in this section, you can find attachments and other accessories, like joysticks, for your RetroPie ecosystem.
Arcade USB Stick
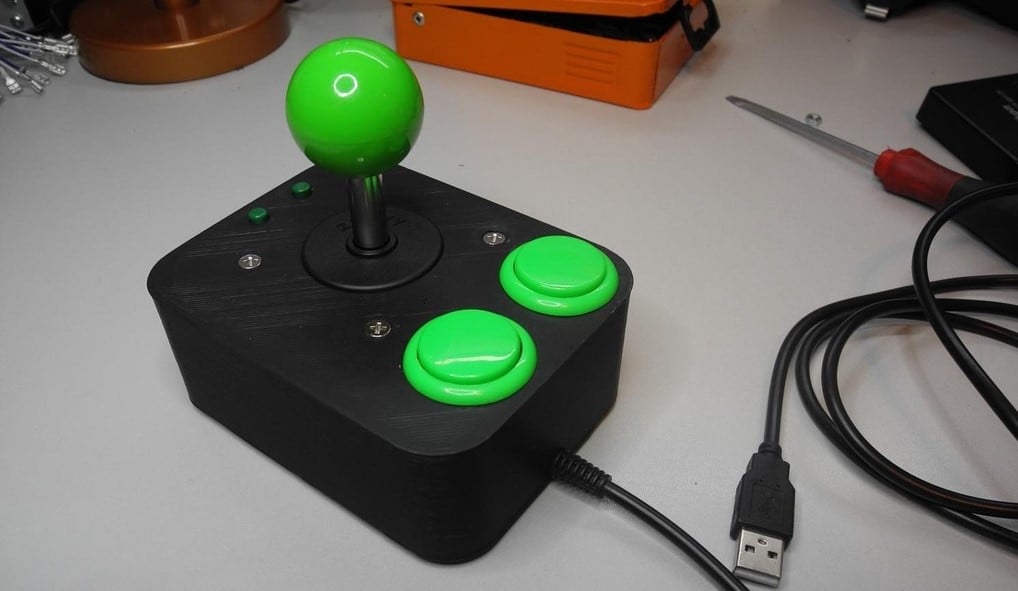
This arcade-style joystick controller features a typical retro video game joystick and two buttons. The device can connect to the Raspberry Pi device you’re using to run RetroPie games through a USB cable. The entire assembly uses three 3D printed components as well as a few electronic pieces, all specified by the designer on the project page.
- Who designed it? xxABJxx
- How popular/printable is it? This arcade accessory has 2 recorded Makes as well as over 4,200 downloads.
- Where to find it? Thingiverse
RetroPi TV
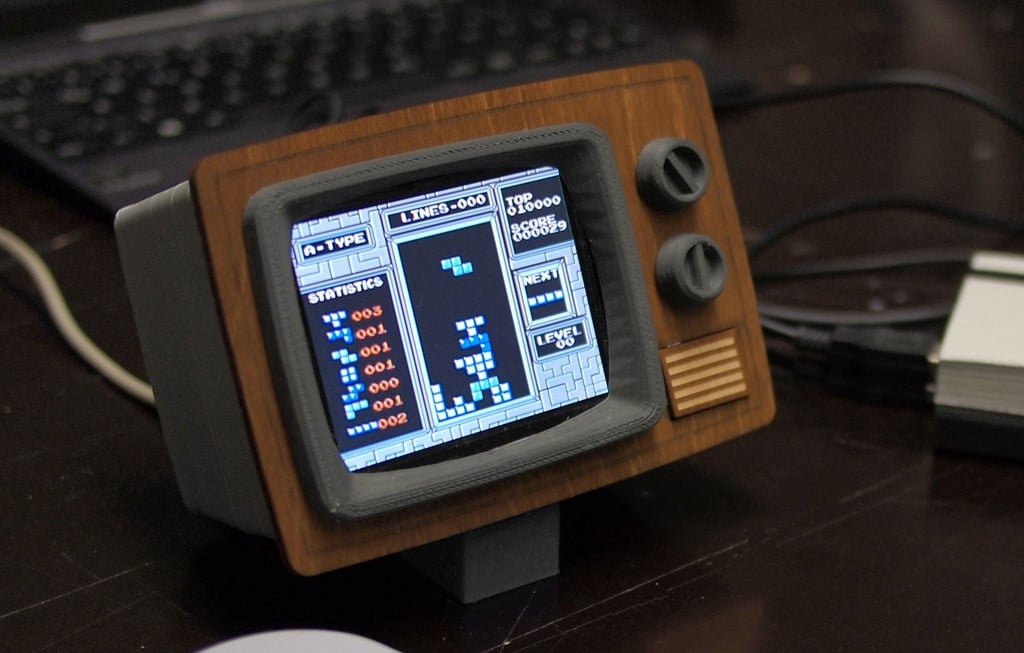
Looking for a retro-themed way to house an LCD screen, like the one you might use to play games off of a Raspberry Pi board? The RetroPi TV is a stylish 3D printable case for a 3.5-inch LCD screen. Its adorable design will keep you glued to this tiny screen while you keep trying to beat your high score in Tetris.
The pictured frame was laser-cut from stained birch, but you can also 3D print it. The rest of the case is made of five 3D printed parts, and one recorded Maker listed that they used a 0.5-mm layer height with no supports nor a raft to print the components.
- Who designed it? joo
- How popular/printable is it? This RetroPi TV has 4 recorded Makes and 1 Remix, with around 7,000 downloads.
- Where to find it? Thingiverse
Nintendo R.O.B.
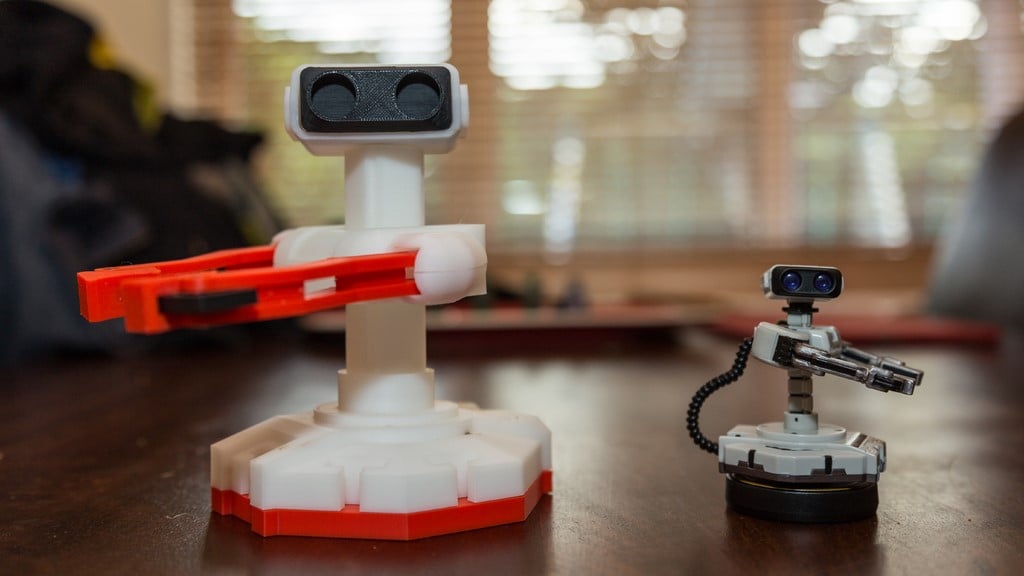
Nintendo’s “Robotic Operating Buddy”, commonly referred to as R.O.B., is one of the most sought-after NES accessories. The gyro-operated robot was published in 1985, but only the two games (“Gyromite” and “Stack-up”) supported R.O.B.
This little model is posable and you can adjust the shoulder height, head angle, and swivel the arms. Print it out in the US or Japanese colors, or get creative!
- Who designed it? RabbitEngineering
- How popular/printable is it? This R.O.B. model has 15 recorded Makes and over 12,000 downloads.
- Where to find it? Thingiverse
NeoPixel Arcade Buttons
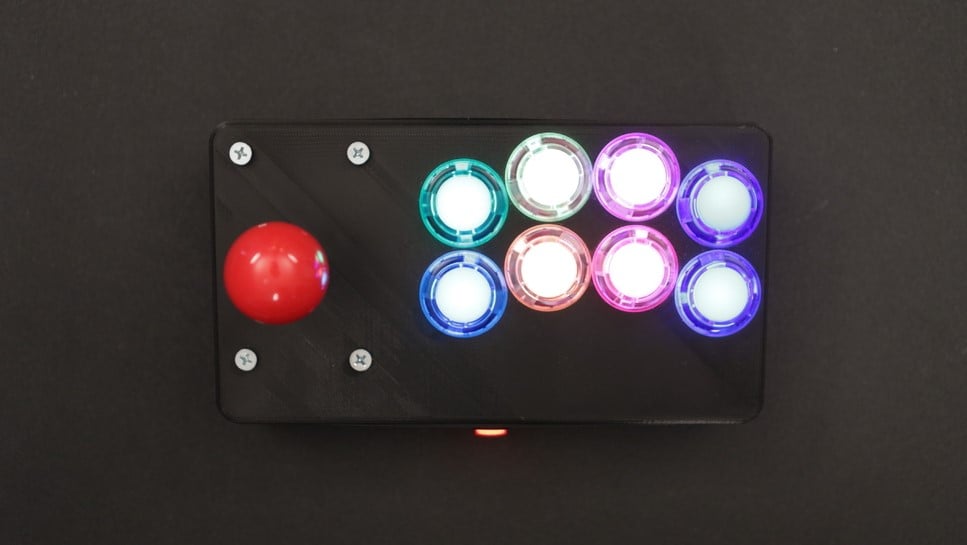
This arcade button project is another from Adafruit, the manufacturer of consumer DIY electronics. The device makes for a great controller for playing retro video games and it features eight buttons and a joystick, with a frame of 3D printable components screwed together. The most exciting part of this project is that the buttons have individually controllable RGB lights under each cover!
- Who designed it? adafruit
- How popular/printable is it? This NeoPixel arcade button project has 4 Remixes and almost 4,000 downloads.
- Where to find it? Thingiverse, Adafruit
License: The text of "RetroPie 3D Print: The Best Cases & Accessories" by All3DP is licensed under a Creative Commons Attribution 4.0 International License.