Paint 3D: Transparent Background – How to Do It

In Paint 3D, a transparent background is easy to achieve. Learn how to isolate image elements and add a transparent background in Paint 3D!
Paint 3D is Microsoft’s default graphic design program for creating and editing images and 3D models. The raster designing platform offers a decent array of tools for both 2D and 3D digital creations, like brushes, 2D and 3D shapes, stickers, text features, and more.
While Paint 3D isn’t considered as professional as more feature-heavy applications like Adobe Illustrator, the platform comes pre-downloaded on most Windows-running devices, making it a very convenient choice. Paint 3D also includes the tools that satisfy most users’ basic designing needs, like drawing over an image, adding text, or changing an image’s dimensions, making it popular among non-professionals.
A very useful feature of Paint 3D is the ability to give an image a transparent background. In this article, we’ll go over why having a transparent background is useful as well as how you can achieve it in this program.

Why Do It
A transparent background is very useful for isolating an element in an image, like a logo or product. For images where you want to focus on one object or area, non-transparent backgrounds can distract from the object. Transparent backgrounds provide a clear field for your focus object to be in and give the option for images to be layered.
If an image is set on a white (or other colored) background, that color is transferred between platforms and exists with the other objects in the image. On the other hand, a transparent background maintains an image’s defined dimensions, but it isn’t a component of the image so it can be changed, overlapped, and so on.
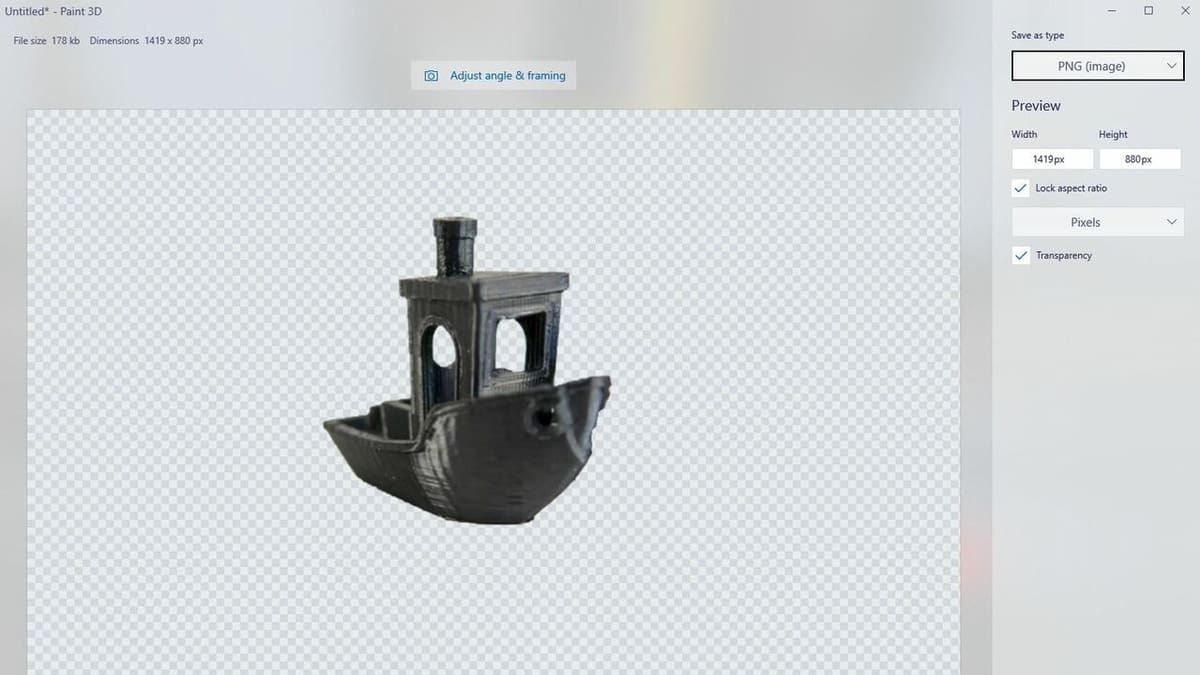
Moreover, transparent backgrounds are, well, transparent, and take on the color and effect of the image behind them. For example, if you upload an image of a 3D printer with a transparent background into Google Chrome, the background will appear in the default white color, automatically generated by Chrome. Other times and on other platforms, a transparent background will appear as a white-and-gray pixelated pattern that surrounds the object.
Overall, transparent backgrounds make it easy to work with images where the focus object is the only relevant content. Additionally, as the name suggests, transparent backgrounds don’t obstruct your designing workspace, and any new elements created will always be visible.
How to Do It

As you now know, a transparent background for an image can be a useful feature that showcases a specific element of the image. In this section, we’ll go over the super easy process to generate a transparent background for your images in Paint 3D.
First, you have to open Paint 3D and import or create your desired element on the platform. Make sure it fits completely within the canvas, and, if it doesn’t, adjust your canvas dimensions to fit the element.
To make the background transparent, simply click the “Canvas” tab at the top of the screen, make sure “Show canvas” is selected, and turn on the “Transparent canvas” setting. If the image was formatted such that the background could be made transparent, all you have to do is save the model by clicking the “Menu” button, clicking “Save as”, and choosing “Image”.
When saving the image in Paint 3D or viewing it in certain applications, you’ll notice that the image has a white and gray, pixelated background. This is an automatically generated background that indicates the 2D element’s background is transparent.
You can now upload your image to different platforms, and only the element in front of the background will be shown, unless the program generates a white box the size of the canvas.
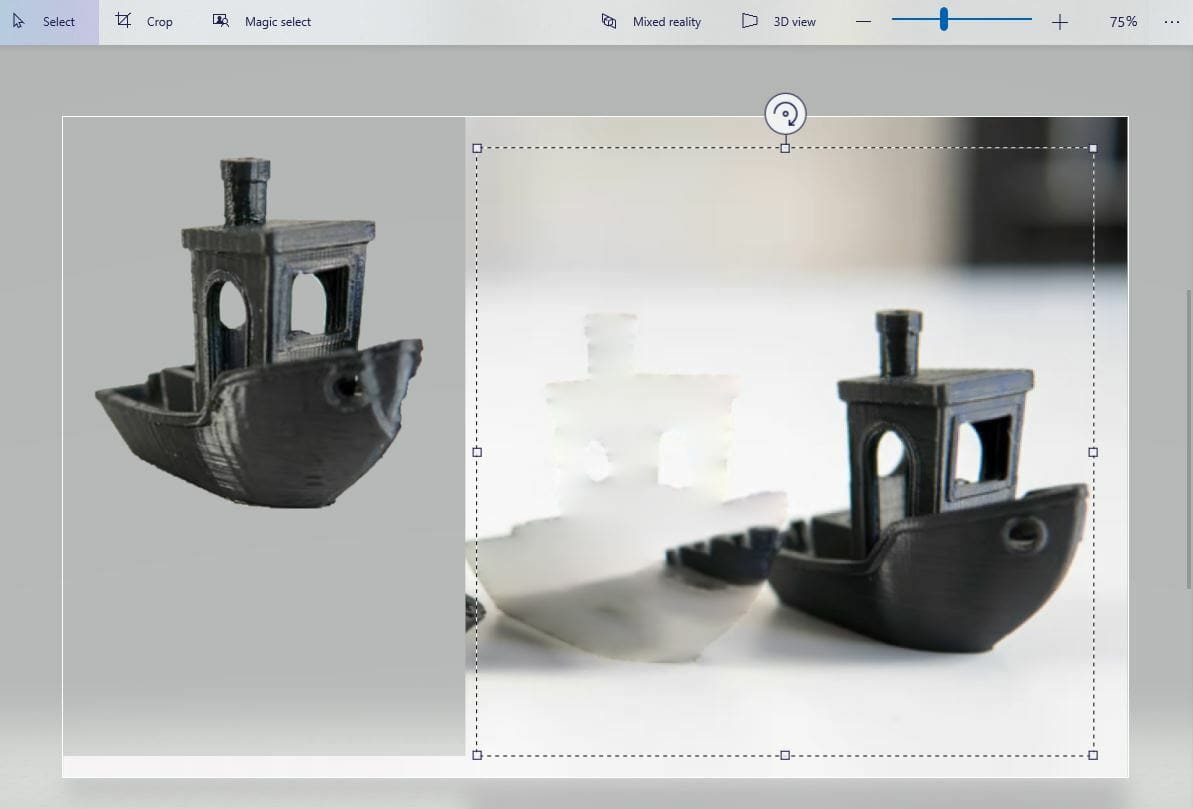
If an imported image includes an opaque background, this will not automatically become transparent with this process. However, if sections of the opaque background are deleted, you’ll see that the canvas behind is indeed transparent. In order to isolate an element from a non-transparent image and place it on a transparent background, we need to use the “Magic select” tool.
Using "Magic Select"
As we mentioned, the steps to adding a transparent background to an object recognized by Paint 3D are super simple. However, you may want to add a transparent background to an object that’s part of a photo or not properly formatted for transparency.
Manually isolating a specific object in a picture is a very long process as you normally have to go pixel-by-pixel, outlining the object with a brush to create a border. Luckily, Paint 3D has a super useful tool for making the process much quicker.
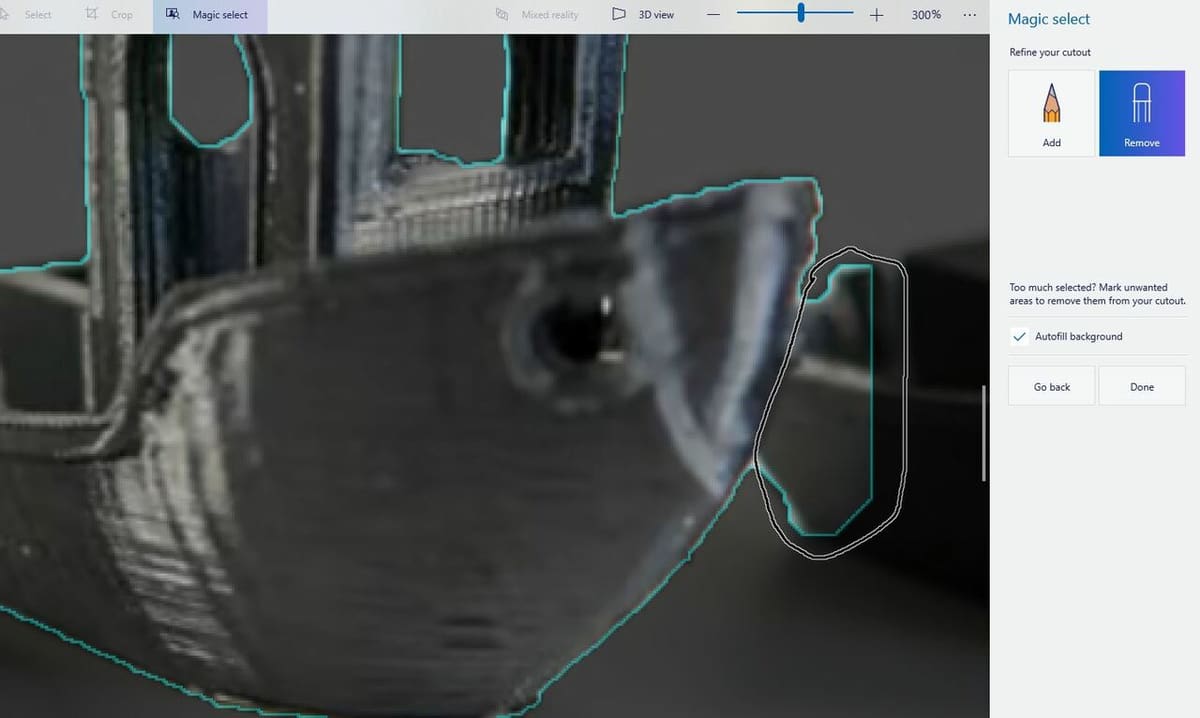
The “Magic select” tool is a feature in Paint 3D that can fairly accurately detect an object in an imported picture that you want to isolate. The feature allows you to give Paint 3D an area to focus on to isolate an object, and then you can use the “Add” and “Remove” brushes to adjust what areas are included in the isolated object.
You can use this tool to essentially grab your object out of a picture and then make its original background transparent. You can follow the steps below to do this:
- Open your image in Paint 3D.
- Click the “Magic select” tool in the top-left corner.
- Adjust the focus area of the tool to fit just around your target object and click “Next”.
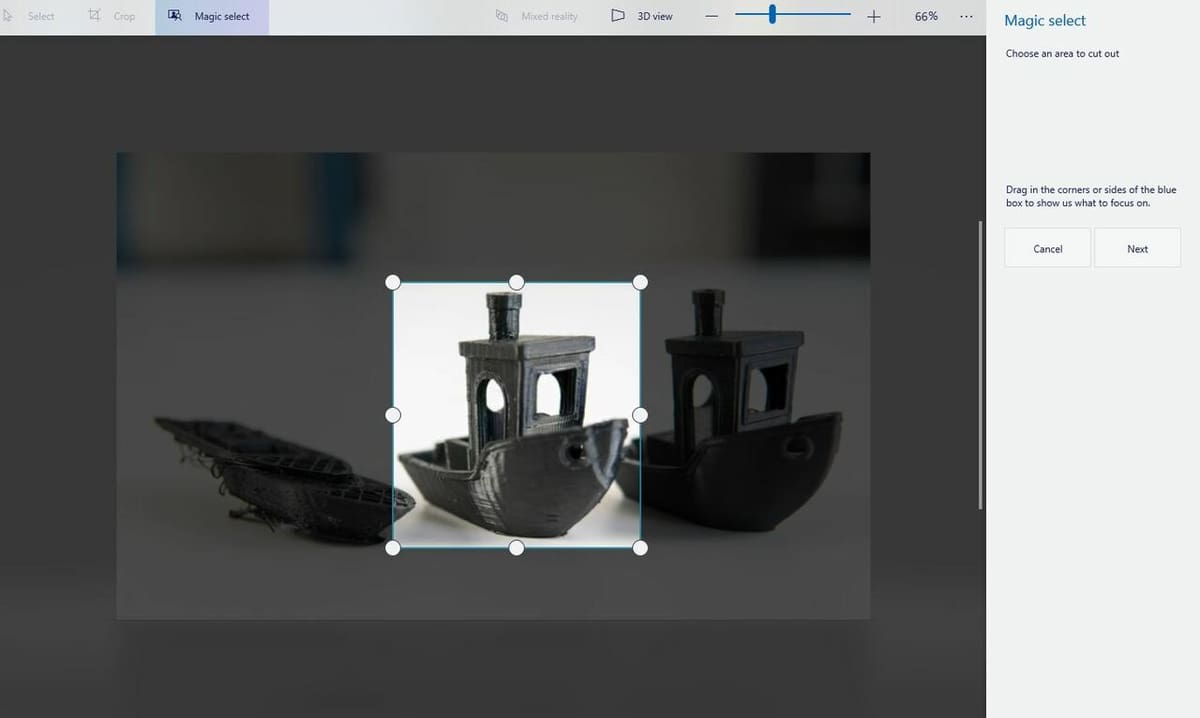
- Zoom in on your target object and check if the “Magic select” tool accurately isolated your object. If it didn’t (it’s usually not perfect), use the “Add” and “Remove” brushes located in the top right of the “Magic select” section to change what areas are isolated by the tool. You can use the brushes normally (with strokes) or circle areas to add or remove entire sections.
- When you’re satisfied that only your focus object is selected, click “Done”.
- Note that “Autofill background” means that Paint 3D will fill the gap left by your selected object with its best guess at a matching color. If this box is not checked, a white space will be left by your selection – but as we’re about to delete the rest of the photo, it doesn’t matter for our purposes.
- Now that you have your magically selected object, clear everything else from the canvas. You can do this by moving your object out of the canvas area and then dragging your mouse across the screen (in select mode) to delete what remains.
- Open the “Canvas” settings menu at the top of the screen and turn on “Transparent canvas”.
- Move your object back within the canvas area, and resize the canvas if desired.
- Click “Menu”, then “Save As”, and then “Image” to see your final image.
And that’s it! Paint 3D offers an incredibly simple way to isolate part of a photo or image and save it with a transparent background.
License: The text of "Paint 3D: Transparent Background – How to Do It" by All3DP is licensed under a Creative Commons Attribution 4.0 International License.