Orca Slicer: Fuzzy Skin – Simply Explained

In Orca Slicer, fuzzy skin is one of the easiest tool you can use to add texture to your prints. Read on to find out why and how to use it!
Orca Slicer is an emerging slicer in the 3D printing world. It was released in August of 2022, and at the time of writing, it’s in version 2.0.0, thanks to community development. Although Orca Slicer provides many tools and settings to obtain the best out of your machine, it still keeps an organized interface so that even beginners can easily get their bearings in the software.
Being a fork of Bambu Studio, which is also a fork of PrusaSlicer, Orca Slicer has inherited all the best features of these two programs. That hasn’t stopped it, however, from adding new tools that no other slicer offers and improving existing ones.
One of these improvements is fuzzy skin, a tool that has gained much popularity in the last few years. In this article, we’ll tell you all about this feature and how to use it to obtain the best results possible. And to illustrate it, we’ll use the cuddly rabbit 3D model from Printables’ user Alexander. Let’s dive in!
What Is It?
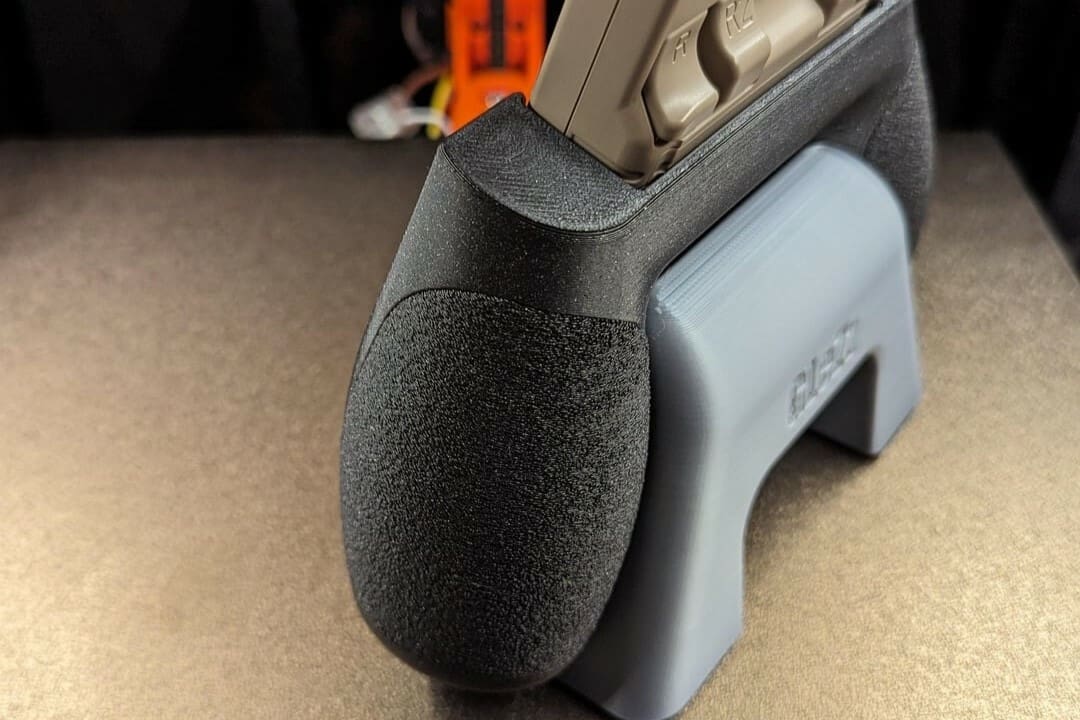
Fuzzy skin is a cool feature that generates a rough, fiber-like texture on your part. To achieve this texture, the slicer creates a wobbly pattern that the nozzle follows as it extrudes filament, producing the fuzzy skin effect. This effect has proved to be one of the most effective methods to hide the layer lines that are produced by the FDM 3D printing process.
Additionally, fuzzy skin hides printing imperfections, like seams and ghosting, as some Reddit users have noticed. Not only that, lots of people use this tool to imitate animal fur or to increase the grip of certain areas of a print – joysticks, for example.
Disadvantages
When using this feature, there are a few things that you should keep in mind. First of all, you need to consider the desired dimensional accuracy for your piece. The texture will alter holes and features that require precise dimensions, so you should avoid fuzzy skin in those areas.
Furthermore, fuzzy skin consumes a bit more material. Even though the difference isn’t much on small objects, printing larger models with fuzzy skin can increase the weight by some grams.
Since fuzzy skin adds lots of small movements to the print, the printing time will drastically increase: A four-hour print can stretch to seven hours. But don’t worry! There’s a way to mitigate that. Keep reading to find a solution in our section on tips and tricks.
Use
Enabling fuzzy skin is simple:
- Open Orca Slicer. The version doesn’t make any difference because Fuzzy skin has been included since the first release.
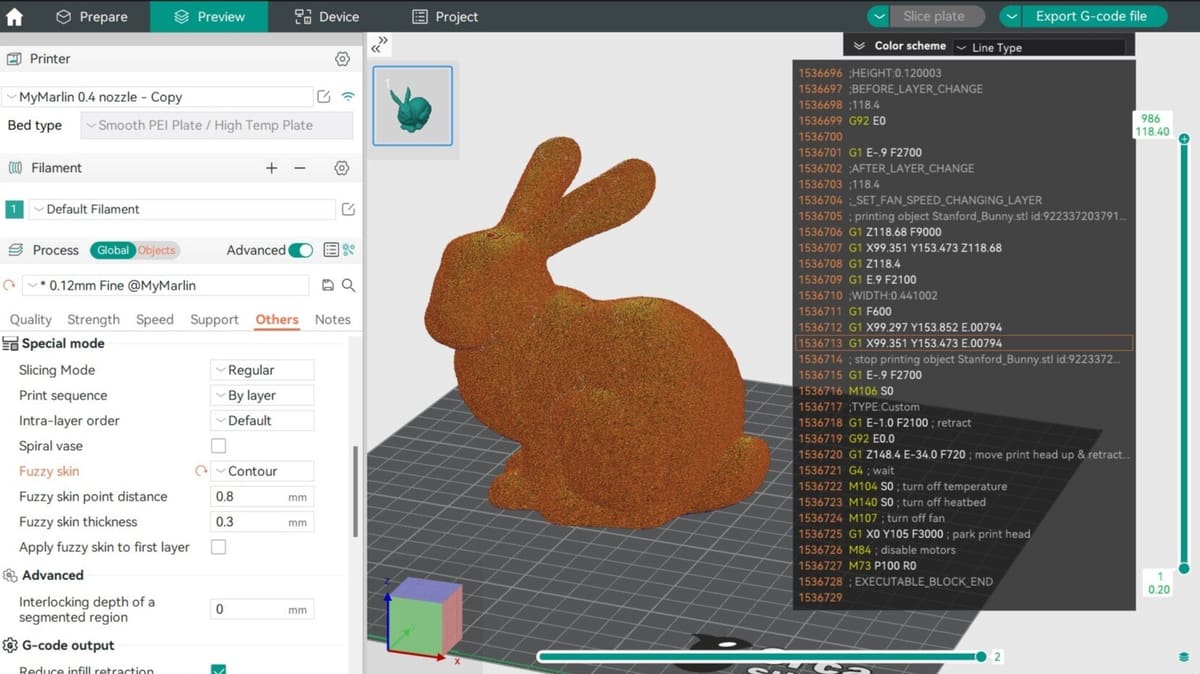
- Under the “Process” section of the left-side panel, select the “Others” tab.
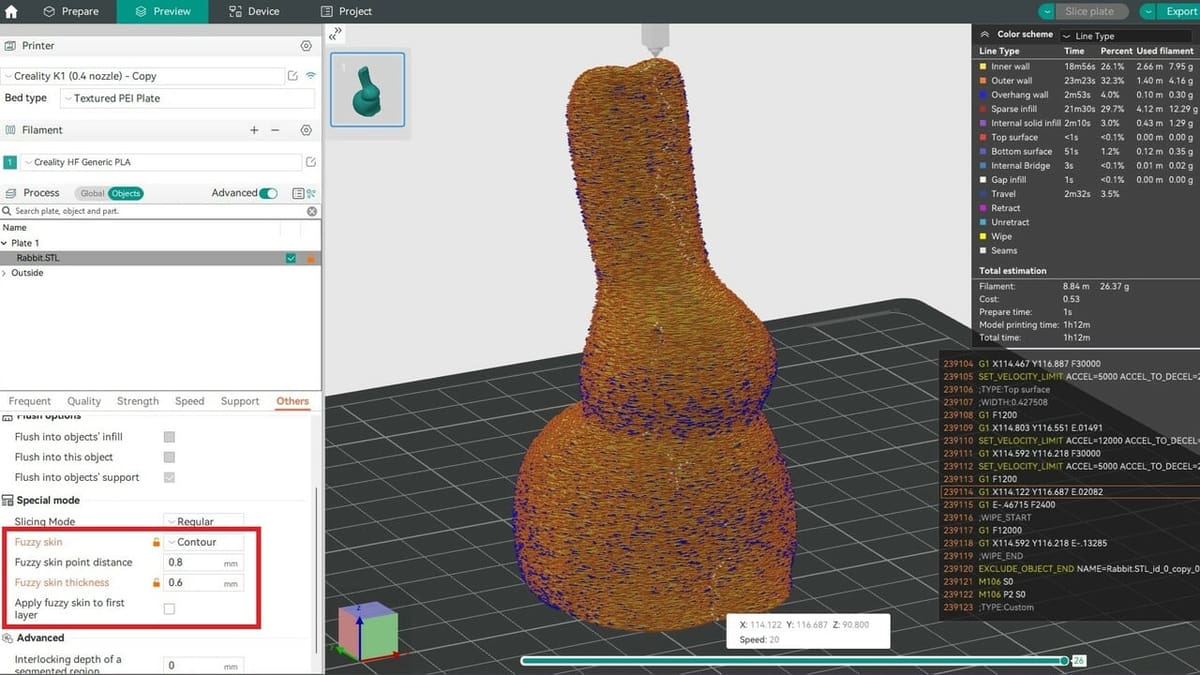
- Scroll down to the “Special mode” category. You’ll find the “Fuzzy skin” setting there.
- Enable it by choosing one of the modes in the drop-down menu. “None” keeps the feature deactivated.
Settings
First of all, you need to decide where to enable fuzzy skin. You have three options:
- Countour enables fuzzy skin only on the outer wall.
- Countour and hole enables fuzzy skin only on the outer wall and any holes.
- All walls enables fuzzy skin on all the walls, both the inner and outer ones, together with the holes.
Now that you have chosen where to enable it, you can tweak the desired effect by modifying the available parameters:
- Fuzzy skin point distance: The fuzzy skin effect is generated by randomly shaking the printhead while it’s printing the model’s walls. This value determines the average distance between the points introduced to create the noise effect at a certain layer. A smaller distance between the points creates a rougher surface.
- Fuzzy skin thickness: This value determines the distance of the printhead shaking while printing the texture. Increasing it will make the surface more uneven. You have to ensure, however, that the setting doesn’t exceed the wall thickness. This may introduce overhangs and make it difficult for the machine to keep up.
- Apply fuzzy skin to first layer: This setting lets you decide to add fuzzy skin on the first layer, too. Keeping it disabled won’t make a huge difference in the appearance, but it will allow the print to adhere better to the build plate.
Tips & Tricks

As always, there are some tips and tricks that you can use to obtain the best results possible. Let’s take a look at them.
Print the Fuzzy Skin Parameters Test
Imagining the effect of the settings on your model can be a little challenging, especially when using fuzzy skin for the first time. To have a preview of how different values will show up on the part, you can print the Fuzzy Skin Parameters Test first. This model consists of a grid with little squares that are set with different values.
However, if you’re very excited and eager to try fuzzy skin as soon as possible, you can use the suggested settings from Reddit user Technical_Raisin_246.
Mitigate Increased Print Time
As mentioned, fuzzy skin adds quite a bit of time to the print process. This could discourage people from using it, but don’t worry, there’s a solution! You can increase your wall speed without worrying about print quality, since fuzzy skin is noise and doesn’t need to be precise.
Depending on your machine and material, you can raise the print speed by 5 mm/s increments, but keep in mind that the limit is your volumetric flow rate. In Orca Slicer, this is called the “Max volumetric speed”, which is among the filament settings.
Use Modifiers
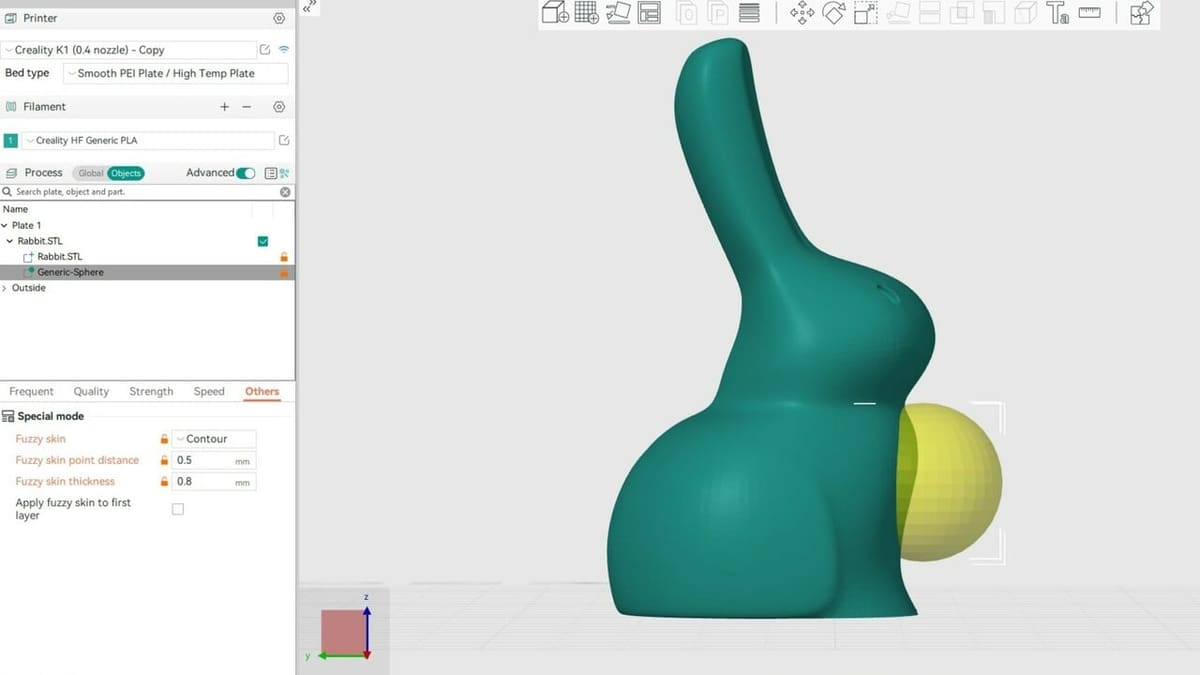
In some cases, you may not want the whole piece to have a fuzzy skin texture. So, for more control over it, you can use the modifiers. With this tool, you can use another shape to define a region on your model that will get different settings.
Orca Slicer includes some built-in shapes as well as text. You can even upload another model or an SVG file to use as a modifier. Once you’ve selected your preferred shape, you can place it wherever you want on the model, and the intersection between the two will be subject to different settings.
If you haven’t used a modifier before, here’s how to do it:
- Select the model in the viewport and right-click on it.
- From the context menu, hover over “Add Modifier” and choose the shape that suits your needs the best. This will add the shape to the list of objects in the Process section of the left-side panel.
- Position and scale the modifier until you’re satisfied.
- In the Process section of the left-side panel, toggle the switch from “Global” to “Objects”.
- Select the modifier among the list of objects, then click the Others tab below the list.
- Enable fuzzy skin by selecting “Contours” from the drop-down menu.
That’s it! Of course, you can modify the settings on the objects however you’d like. For example, you can enable fuzzy skin on the whole object but hide it in the modifier area. Alternatively, you can enable fuzzy skin everywhere, then make the texture more extreme in just the modified area – as we did with our hairy chest bunny model.
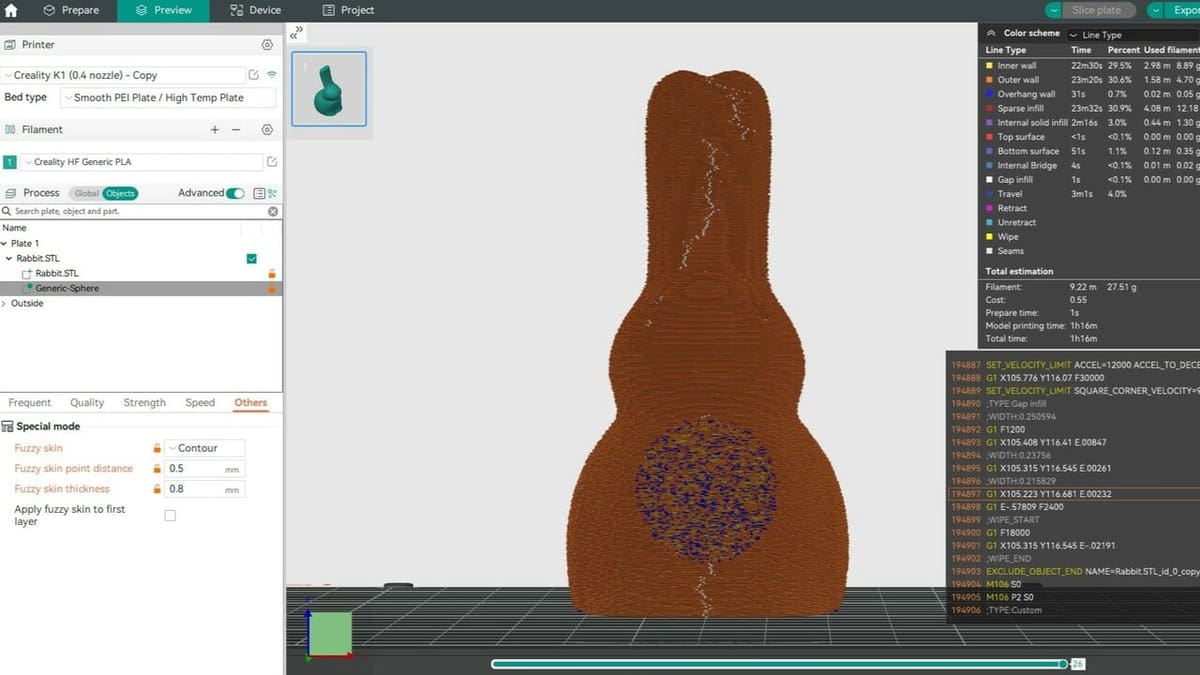
Using a modifier may, however, introduce some challenging geometry to your model, as a Reddit user has observed. Orca Slicer automatically creates walls where the modifier intersects the object, which means you’ll have fuzzy skin on part of the print’s interior. Unfortunately, there isn’t a solution for this yet.
When using modifiers, check whether the inner walls will impact the functionality of your piece. If not, the inner fuzzy skin will only be a minor inconvenience.
License: The text of "Orca Slicer: Fuzzy Skin – Simply Explained" by All3DP is licensed under a Creative Commons Attribution 4.0 International License.