OpenSCAD Modules: Setting Up the Workspace
The following tutorial assumes you have the most basic concepts of OpenSCAD under your belt. You should be comfortable with the interface as well as understand both the basic syntax of the OpenSCAD language and how Objects and Variables work. If you’re completely new to OpenSCAD, check out our OpenSCAD tutorial for beginners.
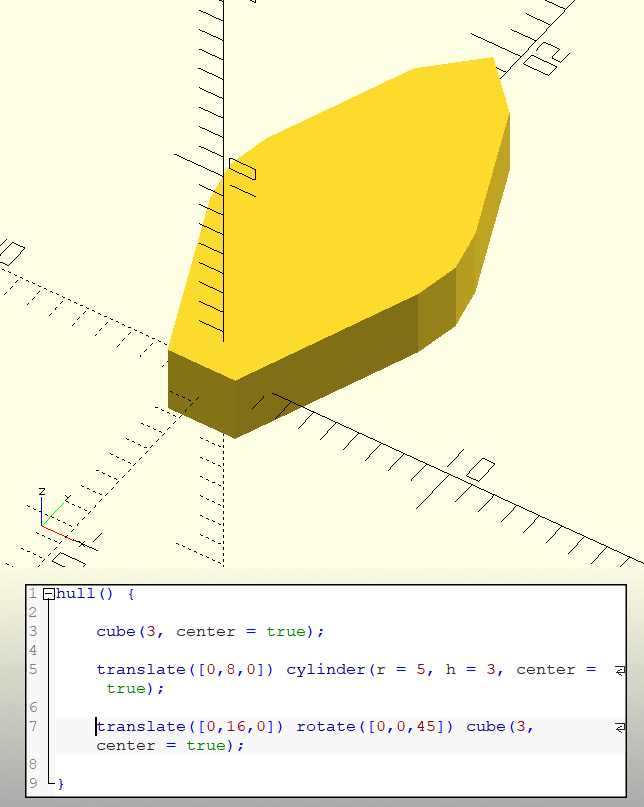
In this OpenSCAD tutorial, we’ll be making a parametric model of a flower (which we’ll define as a bunch of petals arranged in a regular fashion). Let’s start by modeling an individual petal. To begin, open a new OpenSCAD file, then copy and paste the following code to make a simple petal shape:
hull() {
cube(3, center = true); //Petal base
translate([0,8,0]) cylinder(r = 5, h = 3, center = true); //Petal middle
translate([0,16,0]) rotate([0,0,45]) cube(3, center = true); //Petal tip
}
As a quick refresher, the hull() operator takes all of the objects inside of it and wraps them up in a “hull”, like taking a piece of cloth and tightly wrapping it around all of your objects. This makes it great for covering up gaps and making complex shapes!
Also, remember that two forward slashes indicate a comment. Comments don’t affect the code, but they’re great for explaining what each part of your program is doing, and marking important information.
In case the indentation doesn’t appear in your browser, feel free to add in the indents after pasting the code into your OpenSCAD window. (The code should work perfectly fine without the indents, but it’s a lot easier to read when everything is nicely spaced!)
OpenSCAD Modules: Defining a Custom Action for a Custom Object
This is a good start, but this starting block of code presents a few initial problems. It would be tedious to copy and paste this chunk of code for each and every petal on our flower. A good rule of thumb in programming is to never directly copy-and-paste a piece of code more than once. If your code needs to do something more than twice, you need to find a way to make the task repeatable!
The best way to make an Object within an OpenSCAD model repeatable is by turning it into a Module. A Module is a special type of OpenSCAD Operator that lets you define a special Action for making a custom Object. Once a Module has been defined, it works just like an Object-generating Action statement, like cube() or cylinder().
OpenSCAD modules are defined using the Module statement, a name for the new module, and braces to define what we want in our Module. We can use any name, as long as it doesn’t match the name of any other Module or built-in Actions or Operators. If you name your module “cylinder” or “hull”, you’ll just confuse OpenSCAD and get an error message, so keep your names unique.
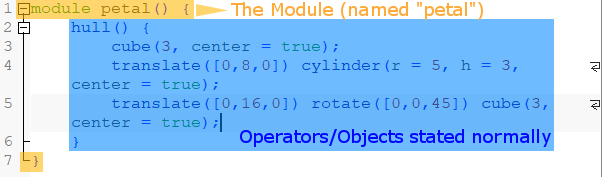
Let’s turn our petal into a Module named “petal()”:
module petal() {
hull() {
cube(3, center = true); //Petal base
translate([0,8,0]) cylinder(r = 5, h = 3, center = true); //Petal middle
translate([0,16,0]) rotate([0,0,45]) cube(3, center = true); //Petal tip
}
}
Note: Don’t forget the curly braces! The braces show where your module-specific Actions begin and end, just like in a normal Operator statement. In programming lingo, you’d say the braces define the scope of the module statement.
OpenSCAD Modules: Using Your Custom Modules

If you attempt to preview or render your code after enclosing it within the module statement, you would notice that nothing actually appears. This is because the Objects generated by the original statement are now used to define the new petal() module, and modules don’t do anything unless they’re called by an Action statement, just like cube() or cylinder().
Thus, the next step in this OpenSCAD tutorial is to make the petal visible again. Do this by adding the statement petal(); to the bottom of your code. Now you’re calling the petal() module with an Action statement, so you should be able to see your petal again after previewing or rendering your model.
OpenSCAD Modules: Parametric Modules
Now that our petal is enclosed within a Module, we can tackle another important issue with our model. In its current version, we can only make exact copies of the petal we defined in our Module. If we wanted to change the dimensions of the petal, like how long or thick it is, we would have to use Operators like scale() or resize(), or else make a new module altogether.
A much better solution is to make the dimensions of the petal parametric within the model itself. In the first OpenSCAD tutorial, you might remember that Variables allow us to make a piece of information accessible across the model. Variables work a similar way in Modules, but you define them in the module statement, and they only apply to the Actions within the Module itself. (So if you make a variable called “x” in your module, it won’t be usable by any part of your script that isn’t within the module statement.)
Modify your petal() module to look like the following (or replace your current module with this updated version):
module petal(length, width, thickness) {
hull() {
cube(thickness, center = true); //Petal base
translate([0, length/2, 0]) cylinder(r = width/2, h = thickness, center = true); //Petal middle
translate([0, length, 0]) rotate([0,0,45]) cube(thickness, center = true); //Petal tip
}
}
Notice how we’ve replaced some of the numbers within our module with variables called “length”, “width”, and “thickness”. These let us assign specific values to the three key dimensions of the petal. Also, we’ve defined these new variables in the module statement (within the brackets following the module name). Naming the variables inside the module statement lets OpenSCAD know that it should expect these variables inside the Module, and to not try to find them outside the Module code.
OpenSCAD Modules: Using Parametric Modules
The next step in this OpenSCAD tutorial is to supply our parametric module with values when we use the petal() command. In your petal() command, you need to add values to define the size of the petal for everything to render:
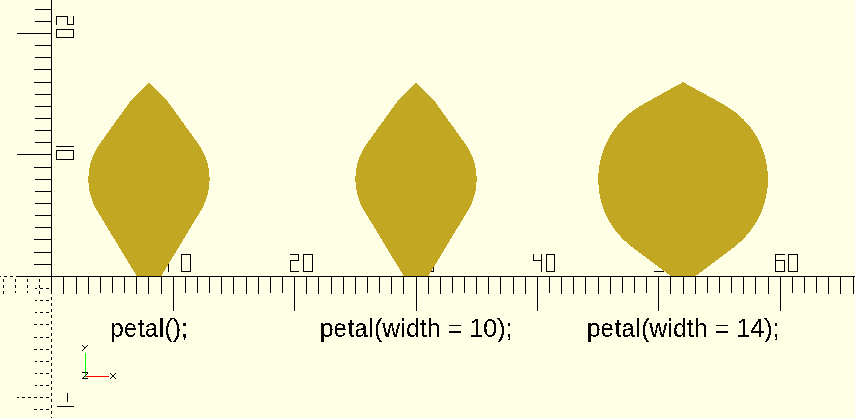
petal(length = 16, width = 10, thickness = 2);
Using these values, you’ll produce a petal that’s identical to the one we originally created.
You can also use our petal() Action statement without explicit reference to the internal variable names. That is to say, the Action statement petal(16, 10, 2); would work exactly the same as above. (If you remove the explicit references to the variable names, you need to supply the values in the same order as the variables are defined in the module statement, so be careful!)
OpenSCAD Modules: Setting Default Values for Module Variables
Try using the petal() action without defining the length, width, and thickness (i.e. with empty brackets, like before). You’ll notice that without any of its variables defined, the only thing that appears is a small cylinder. This is because the default value assigned to variables within a module is always zero, unless you set a default value to the variables. And this wouldn’t be a very complete OpenSCAD tutorial if we didn’t talk about default values.
Setting default values is simple, you just need to add ” = value” in the original module statement. Go ahead and do that now:
module petal(length = 16, width = 10, thickness = 2) {
…
Now, if you call the petal() module without defining any values, you’ll create a petal with a length of 16, a width of 10 and a thickness of 2. If you want to keep all of the default values for some variables but change other ones, you can explicitly define the ones you want to change, and leave everything else out.
For example, using these default values, you can create a petal with a length of 16 (default), a width of 14 (different), and a thickness of 2 (default) by calling petal(width = 14);.
OpenSCAD Functions
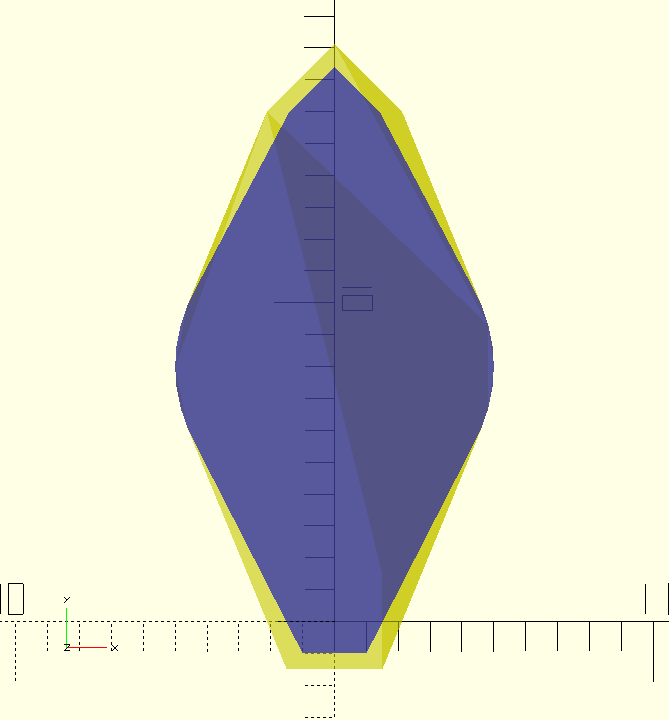
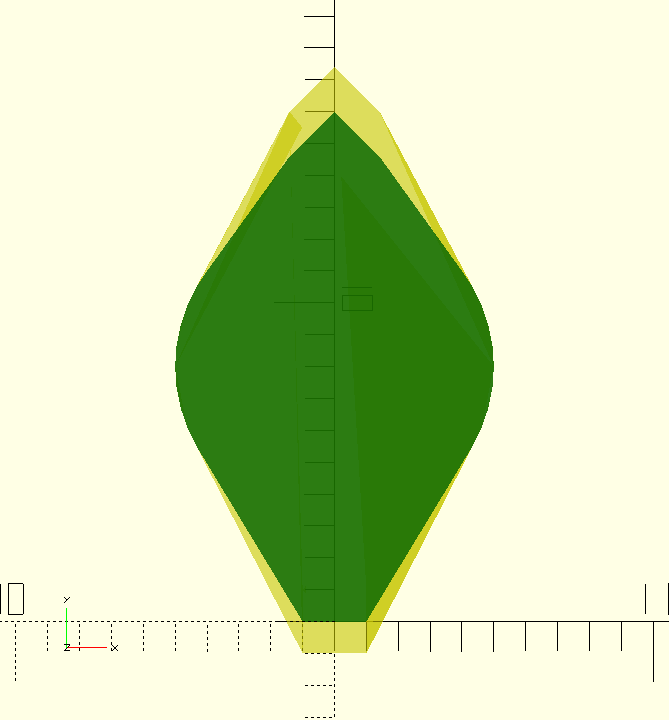
Our petal is looking good, but if you look carefully, there’s a little quirk in our module. Try calling a default petal() and a petal() with a thickness of 3. You’ll notice that the length actually increased! This isn’t a big deal for something decorative like a flower, but if you were designing something like a set of gears, this could be a major problem!
Looking at the code we generated earlier in this OpenSCAD tutorial, you’ll notice that the two cubes at both ends of the petal are called with center = true, which makes them centered around the origin (before they’re moved with a translate operator). We can fix the cube at the base of the petal by moving it by 1/2 its width:
translate([0,thickness/2,0]) cube(thickness, center = true); //Petal base
Now, the cube at the base of the petal will always be lying flush along the x-axis. But how can we fix the cube at the tip of the petal? Let’s try using a Function!
OpenSCAD Functions: Mathematical Manipulations
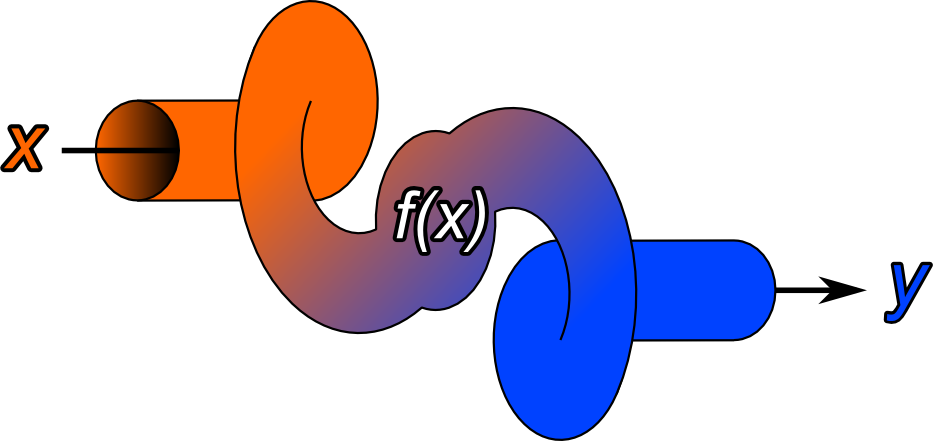
There’s a good chance you’ve come across functions during math class in school: A function takes on a variable and changes it into a different value. So if the function f(x) = x + 5 was given x = 5, the function would give you f(5) = 5 + 5 = 10.
Functions in OpenSCAD work in an identical fashion. You define the name of your function using the Function statement, define what variable(s) it needs, then write out the mathematical operation. So for the above function, you would make it in OpenSCAD using the statement:
function MyFunction(x) = x + 5;
Similar to the modules we discussed in the first part of this OpenSCAD tutorial, you can name your Functions anything you want, as long as they don’t overlap with existing Modules or Functions or built-in statements. You can also set default variables in the same way as Modules.
OpenSCAD Functions: Finding Functions that Work
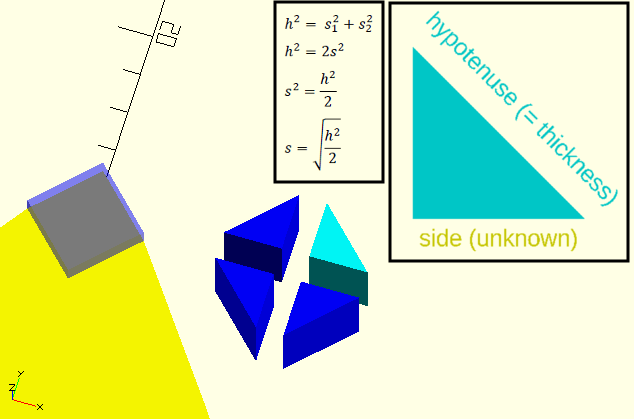
It’s relatively easy to define a function in OpenSCAD, but it can be very tricky to figure out what equations can help in any given situation. In the case of our OpenSCAD tutorial, the tricky part about adjusting the cube at the far end our our petal is that we’ve rotated it by 45 degrees. This gives us a nice pointy end but makes our adjustment a bit difficult because we need to move it back by half the length of its diagonal.
Because we’re working with a cube, we know how long each side is. In this case, it’s equal to the “thickness” value given to the module. Therefore, we can use the Pythagorean Theorem to calculate the length of the diagonal.
In a right-angled triangle, the Pythagorean Theorem relates the length of the hypotenuse — the side opposite the right angle — to the lengths of the other two sides. If you picture our cube cut into four slices, with two cuts running along the diagonals from each corner, each slice would be a right-angled triangle, with the hypotenuse equal to the side length of the cube.
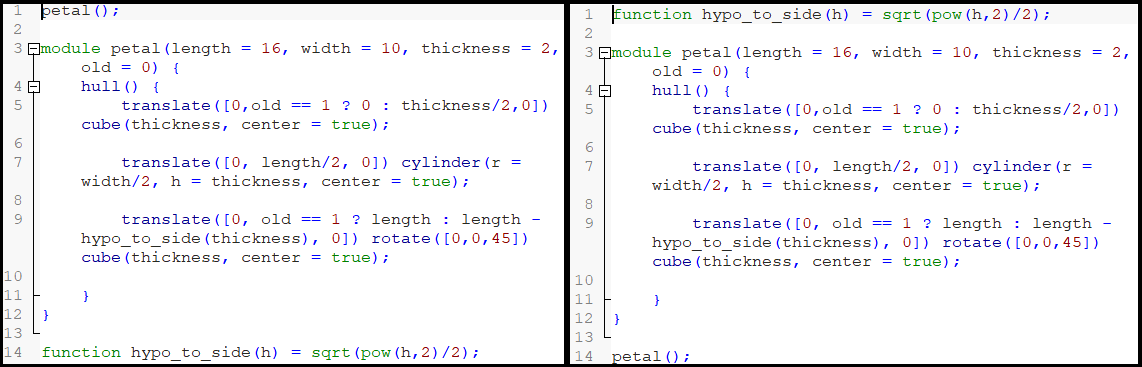
In our case, the other two sides of our triangle are equal length, so we can calculate their value by adding the following Function to our code (you can add it to the end):
function hypo_to_side(h) = sqrt(pow(h,2)/2);
This new Function, called hypo_to_side(), calculates the side of a right isoceles triangle, like the one at the tip of the petal. To do this, it uses two of OpenSCAD’s built-in Functions, sqrt() and pow():
- The sqrt() built-in Function calculates the square root of whatever is in its brackets
- The pow() built-in Function accepts two values (separated by a comma), then multiplies the first value to the power of the second value. For example, pow(3,2) = 9
In our Function, a hypotenuse value (defined as “h”) is squared using the pow() Function and divided by two, then the sqrt() Function finds the square root of that result. The result of that square root is then passed out of the Function.
OpenSCAD Functions: Using the Pythagorean Theorem
Now that we have our Function, we can use it to adjust the position of the cube at the far end of our petal by modifying the Translate statement that moves it to the end:
translate([0, length – hypo_to_side(thickness), 0]) rotate([0,0,45]) cube(thickness, center = true); //Petal tip
Now, you can change the thickness of the petal, and its length will always stay exactly equal to the length we’ve set!
Modules and Functions: Where Are They Defined?
When an OpenSCAD script is read by the program (i.e. during previews or rendering), OpenSCAD proceeds in a specific sequence:
- Everything is read through first, checking for simple errors like unpaired brackets.
- All of the Module and Function Statements are separated, and ones that are not used within the program are ignored.
- The Action commands are read in order from start-to-finish.
- The final object is generated.
Because the modules and functions are separated before the Action statements are executed, you can define your Modules and Functions anywhere in your script. So if you rearranged the script with the petal(); Action statement(s) first, the actual petal() module statement second, and the the hypo_to_side function at the end, everything would still work perfectly fine!
Lots of people like organizing their scripts so the Modules and Functions are defined at the end, with the information header, variable definitions, and Action statements at the top of the script. I prefer going Info Header, Variables, Functions, Modules and then Actions, but do whatever works best for you!
Future Steps
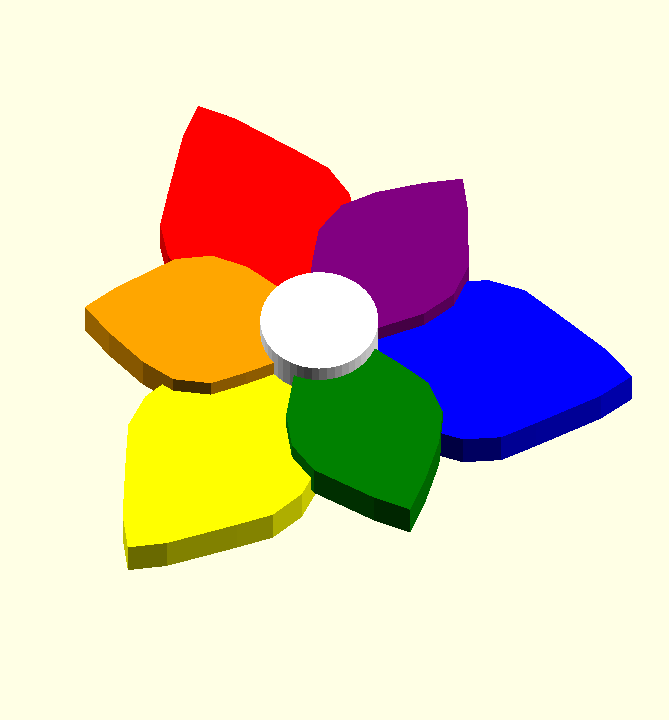
Now that we have a tidy, parametric module for a flower petal, how do we repeat them into a flower? In the next OpenSCAD tutorial, we’ll be going over one of the most important processes in an OpenSCAD script: the For Loop! Until then, try making your own Modules and Functions, and see how well you can break down your code!
License: The text of "OpenSCAD Tutorial for Advanced Users – Modules & Functions" by All3DP is licensed under a Creative Commons Attribution 4.0 International License.