Mesh Bed Leveling – Simply Explained

Get a smooth, even first layer with mesh bed leveling. We explain the leveling process and show you how to implement it yourself!
A properly leveled bed is critical for a successful print, as it directly affects how well the first layer will stick to it. Typically, bed leveling is discussed as either manual or automatic, but there’s more to it than just that.
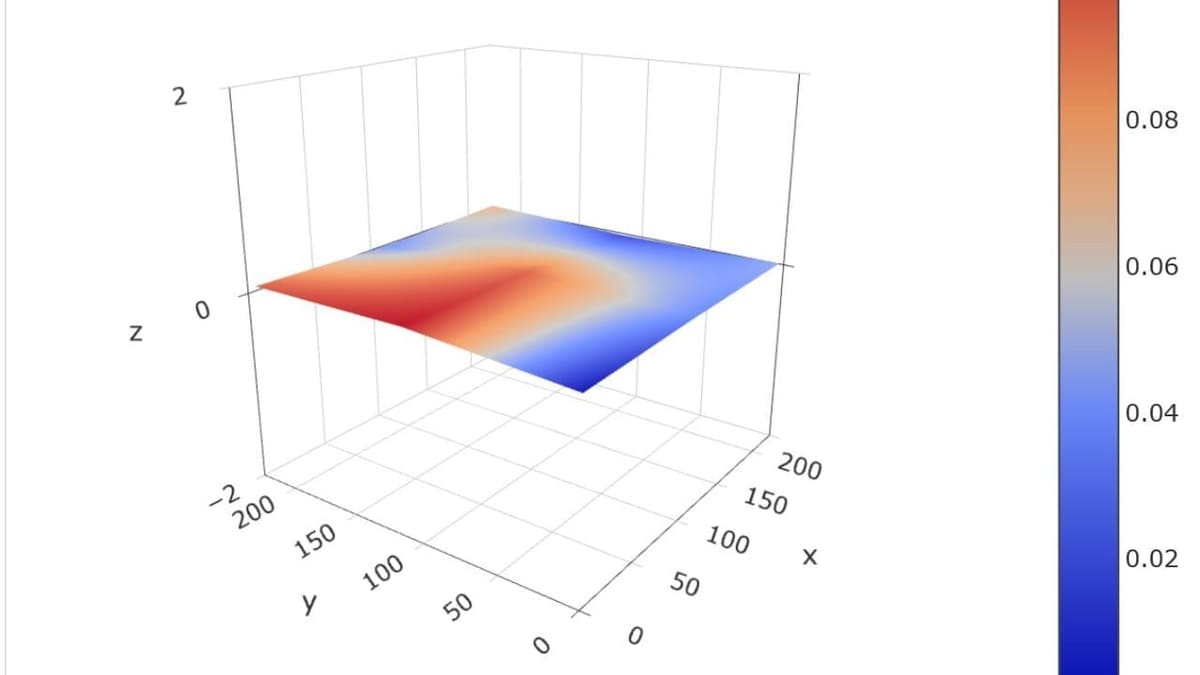
Even if a bed is not perfectly flat, mesh bed leveling can help ensure a consistent first layer. Unlike standard leveling, which assumes the bed is a flat plane, mesh bed leveling compensates for dips, bumps, and slight warping in the bed’s surface by dynamically adjusting the nozzle height during printing accordingly.
In this article, we’ll take a deeper look at mesh bed leveling – what it is, how it works, how to set it up, and how to use it effectively to achieve reliable first layers, even on imperfect print beds.
While we’ll be discussing the procedure to set up mesh bed leveling for Marlin, we also have a separate article on Klipper bed mesh setup as well, should your printer be running on it.
Let’s start by clarifying a bit more what we mean with “mesh compensation”.
Matrix vs. Mesh Compensation
Bed leveling is essential to ensure a consistent first layer, as most print beds don’t come perfectly flat from the factory. The variations are usually so minor that the bed might appear flat to the naked eye. But since typical layer heights of FDM 3D printers are between 0.1-0.3 mm, even the slightest bump can cause adhesion issues or warping.
To compensate for these imperfections in the print surface, bed leveling – whether manual or automatic – ensures that the nozzle maintains an optimal distance from the print surface throughout the print.
It’s important to note that “bed leveling” is actually not the proper term for it. The correct term would be “bed tramming”, which refers to aligning the print surface parallel to the movements of the printhead (nozzle). However, because “bed leveling” is the more widely used term in 3D printing, we’ll continue using it throughout the article.
Now, let’s take a deeper look at how the compensation process is done.
Matrix- (Tilt) vs. Mesh-Based Leveling
When it comes to compensating for the print bed, there are two main ways firmware can go about it:
- Matrix-based leveling compensates for the tilt of the bed. Specifically, the bed calculates a (perfectly flat) matrix or plane, to represent the bed, and accommodates its angle by minutely adjusting the nozzle’s Z height during printing.
- Mesh-based leveling compensates for the shape of the bed. Here, the bed is represented by a “mesh”, which can have hills and valleys according to real swells or dips in the build plate.
These two types of compensation accommodate very different aspects, and in fact, it’s good to do both kinds of bed leveling! Matrix-based leveling is no good if a built plate is warped, and mesh-based leveling can have problems at extreme tilts.
Automatic vs. Manual Bed Leveling
Manual bed leveling involves adjusting the bed height at different positions using tools, such as a feeler gauge or a slip of paper, to ensure it’s not tilted in any direction. The goal is to get the bed as level as possible by physically adjusting it – but the limitation is that it doesn’t fix the high spots or low spots on the bed itself.
Automatic bed leveling (ABL) is a firmware-based correction that compensates for remaining inconsistencies after manual leveling by utilizing either the matrix-based tilt correction or the mesh-based shape compensation method. A probe or sensor measures multiple points on the bed, and the firmware dynamically adjusts the nozzle height during printing to maintain a consistent first layer. This way, it records all the high spots and the low spots in the bed and moves the nozzle up and down accordingly while printing to compensate for them.
One might assume that auto-bed leveling is better than manual, but this isn’t necessarily the case. If the bed is tilted significantly, no amount of ABL can compensate for such a huge tilt. The best way to do it is to manually level the bed as much as possible. Then, ABL should be used to fine-tune the last 10% – the minor tweaks that would be too difficult to do manually.
Example
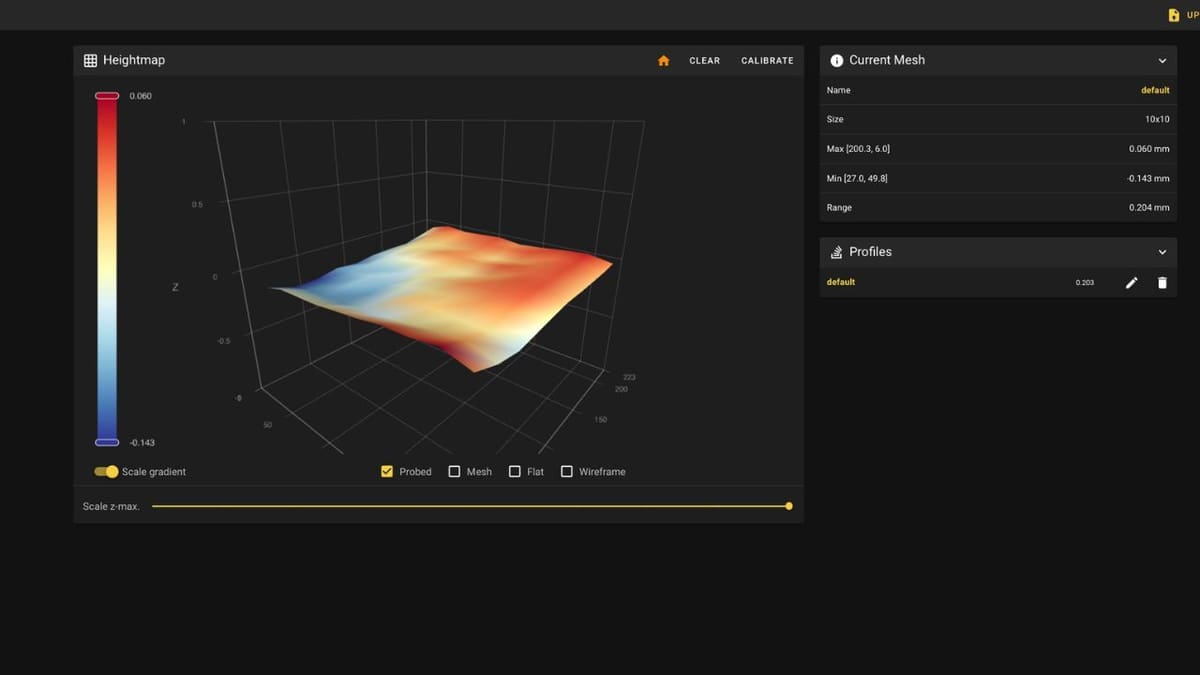
With all of the above in mind, what someone does with an Ender 3 V2 (no ABL sensor) could be called “manual matrix leveling“, which is pretty much bed leveling in its most literal sense. On the other hand, a more modern printer like Prusa’s MK4 utilizes its ABL sensor to generate a mesh before every print, to compensate for any possible high and low spots in the bed.
Mesh Bed Leveling (Manual Firmware Leveling)
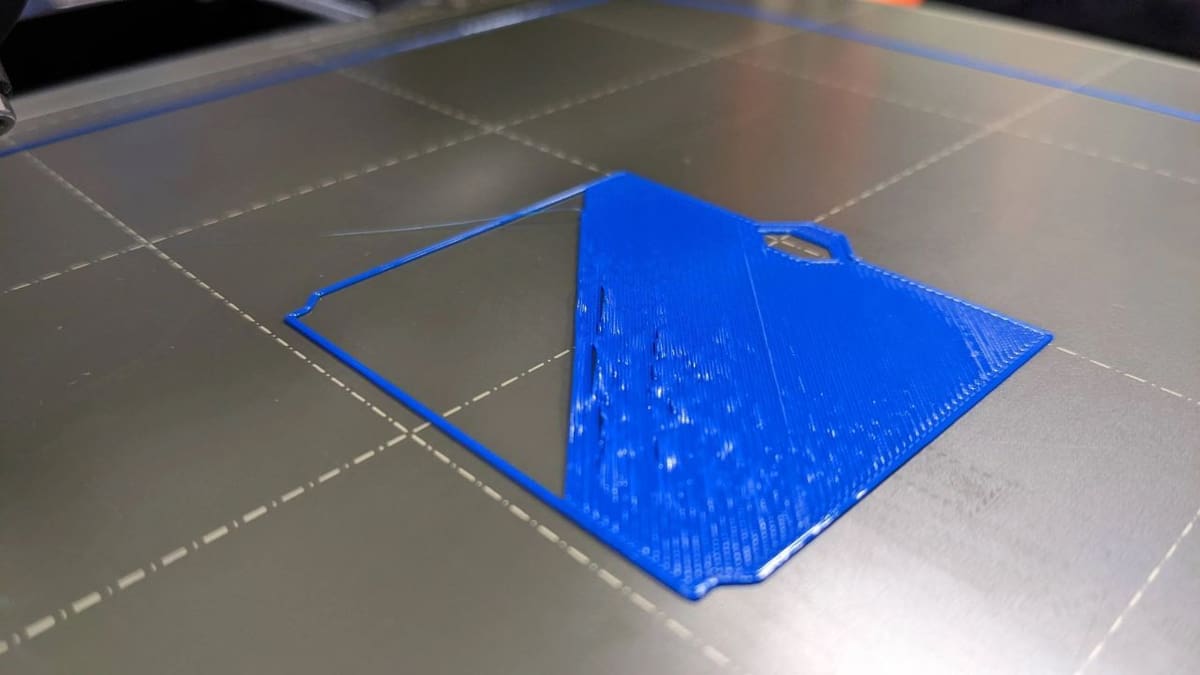
Here’s the thing: If you’ve occasionally been a bit too enthusiastic while removing a model from your bed, your bed may not be as flat as you’d like it to be. In other words, while the corners might be nice and even, the middle might still be too far from or too close to the nozzle. This means your bed is warped, and no amount of thumbscrew-twisting is going to solve the problem.
If firmware is used for bed leveling (i.e. bed compensating) but no probe is used, the method will most likely be mesh-based. That is, firmware will record the Z height set by you at various points, build a mesh, and raise or lower the printhead as necessary during printing.
The RepRap Wiki and Marlin firmware label this particular method as “mesh bed leveling”, even though there are other mesh-based techniques.
How It Works
To describe the specific process usually referred to as “mesh bed leveling”, we’ll use Marlin’s G29 command as an example.
Essentially, when instructed to perform mesh bed leveling, the firmware moves the printhead to a point above the print bed. The user must then adjust the Z height (via the printer’s LCD screen if available or with G-code commands through OctoPrint or Pronterface) so that a piece of paper is just barely able to pass between the nozzle and the build plate. This value is then recorded, and the firmware moves the printhead to a new point, with the process repeating until the Z height has been recorded at all points. The number of points to be checked is defined by a parameter in the firmware.
What It Isn’t
To help you keep everything straight in your head, it’s useful to quickly review the remaining main types of bed leveling.
Other Mesh-Based Methods
Although “mesh bed leveling” has come to refer to the above specific method, there are two other popular mesh-based bed leveling methods:
- Bilinear auto-bed leveling: There are several different ABL modes, with bilinear being one of them. If available, you typically select it by adjusting the printer’s firmware configuration file. Essentially, it works very much like mesh bed leveling, but the firmware does all the work and uses a probe instead of relying on the user to set Z height.
- Unified bed leveling: This is a somewhat more complex method that combines aspects of several others. You can learn more about it in our article on Marlin and unified bed leveling (UBL).
Non-Mesh-Based Methods
Alongside bilinear ABL, the other two main ABL modes are linear and 3-point, both of which compensate for the print bed’s tilt. Hence, they’re not mesh-based bed leveling methods.
Setting It Up
Before enabling mesh bed leveling, it’s crucial to manually level the bed as accurately as possible using adjustment knobs, a piece of paper, or a feeler gauge. Mesh leveling isn’t a replacement for manual leveling – it’s meant to compensate for minor surface imperfections that cannot be corrected by hand. If the bed is significantly tilted, mesh leveling will not work properly.
With all that said, let’s get started.
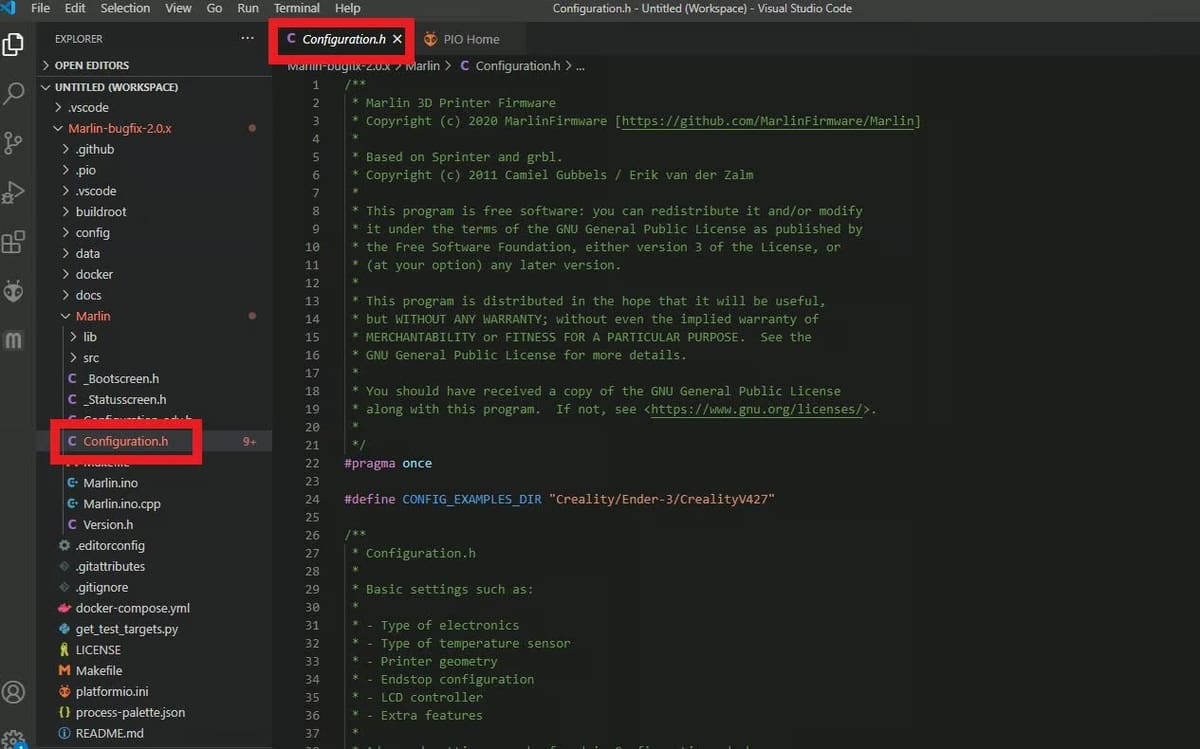
To set up mesh bed leveling, you’ll need to adjust your printer’s firmware. We’ll demonstrate this using the most recent version of Marlin (2.1 at time of writing). We only have to edit the Configuration.h file, which we can do in Visual Studio Code, for example. Remember that messing with firmware can have unintended consequences, even for a simple procedure like this, so be careful as you go along.
If your printer’s firmware isn’t capable of mesh bed leveling, it may be possible to upgrade it. For this, you’ll need the configuration file to be compatible with your printer. A suitable copy may be available in the Example Configurations folder in the Marlin package.
If you’re totally new to firmware configuration, we’ve got a beginner’s firmware guide to help get you started.
Adjusting the Configuration File

Let’s go over what you need to do and what each change does to the program.
Once you’ve opened the “Configuration.h” file in a program like Visual Studio Code, use “Ctrl + F” to find the phrase “#define MESH_BED_LEVELING”, and uncomment it by removing the two slashes (“//”) in front of the phrase. Doing this enables the mesh bed leveling method on your printer. Make sure that none of the other leveling methods (such as AUTO_BED_LEVELING_BILINEAR) are enabled or uncommented. If multiple methods are activated, the firmware may not compile or function correctly.
Next, uncomment the phrase “#define RESTORE_LEVELING_AFTER_G28”, which should be just below the previous line. This will automatically send the G28 command to your printer before every print, restoring whatever mesh bed leveling values are set on your printer. On that note, the next step is to locate and uncomment the “#define LCD_BED_LEVELING” command, which will allow you to perform mesh bed leveling operations from your printer’s LCD screen.
Lastly, as mesh bed leveling doesn’t involve the use of a probe, you need to tell your printer that you’ll be completing the leveling process manually. You can do this by uncommenting the line “#define PROBE_MANUALLY”.
You can see three of these edits in the image above. Although you’ve now activated mesh bed leveling for your printer, it won’t work without a few extra steps, which we’ll go over next.
The Leveling Process
Time to use a piece of paper! But this time, unlike manual, non-firmware leveling, we’ll be adjusting the Z height instead of twisting knobs below the build plate.
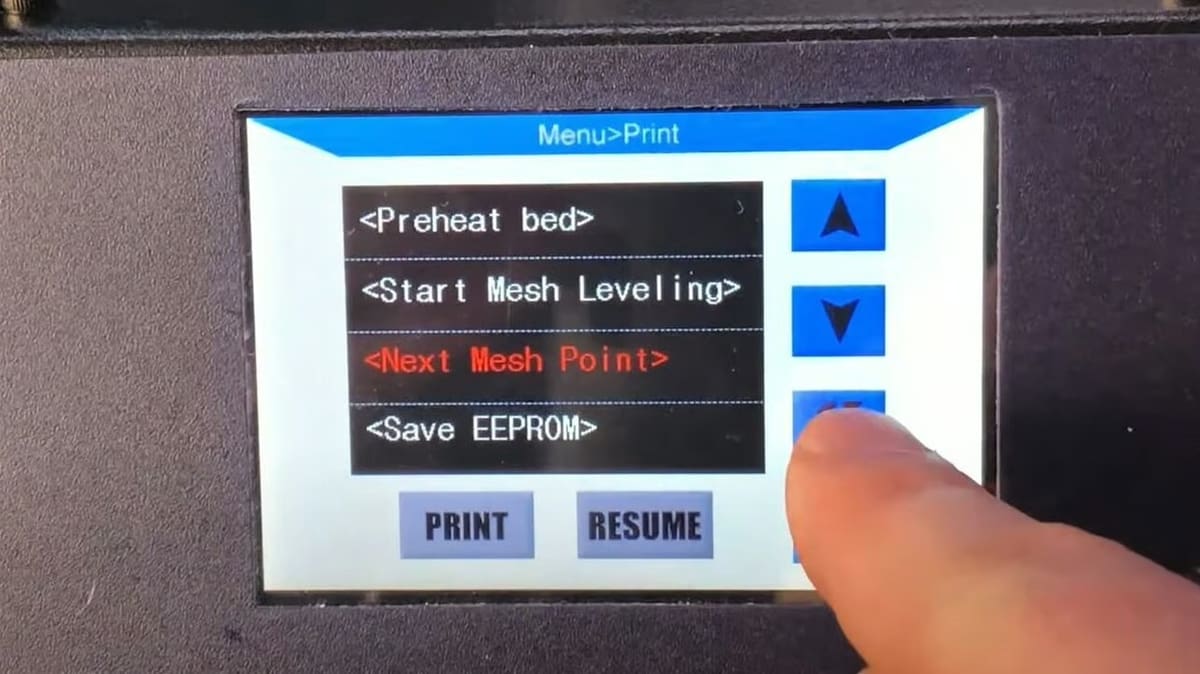
When you’re ready, heat up your printer for your filament of choice. Heating ensures that thermal expansion is accounted for – leveling with a cold bed can cause small shifts once it reaches printing temperature. Then, in the Prepare heading of your LCD display, navigate to “Bed Leveling > Level Bed”. Each click will move the carriage towards the next location in a grid of nine points, and at each point, you’ll use the knob beside the LCD screen to raise or lower the Z-axis step by step. If possible, adjust in small increments (e.g. 0.025 mm) for more precise control.
Make whatever adjustments are necessary to just allow your piece of paper to pass between nozzle and build surface. The paper should slide with slight resistance – if it moves too freely, the nozzle is too high; if it’s difficult to slide, the nozzle is too low.
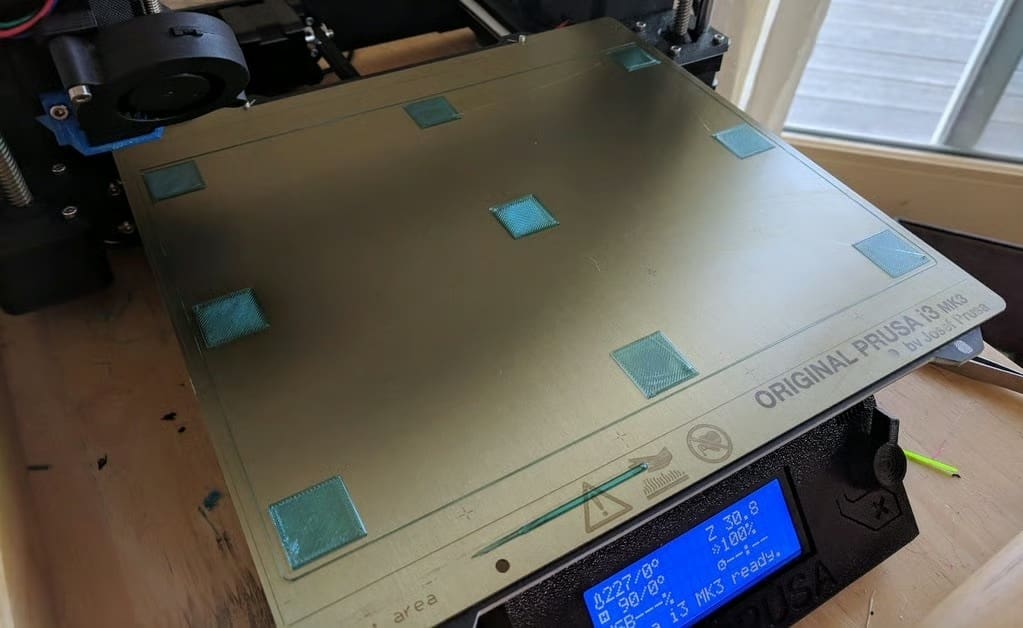
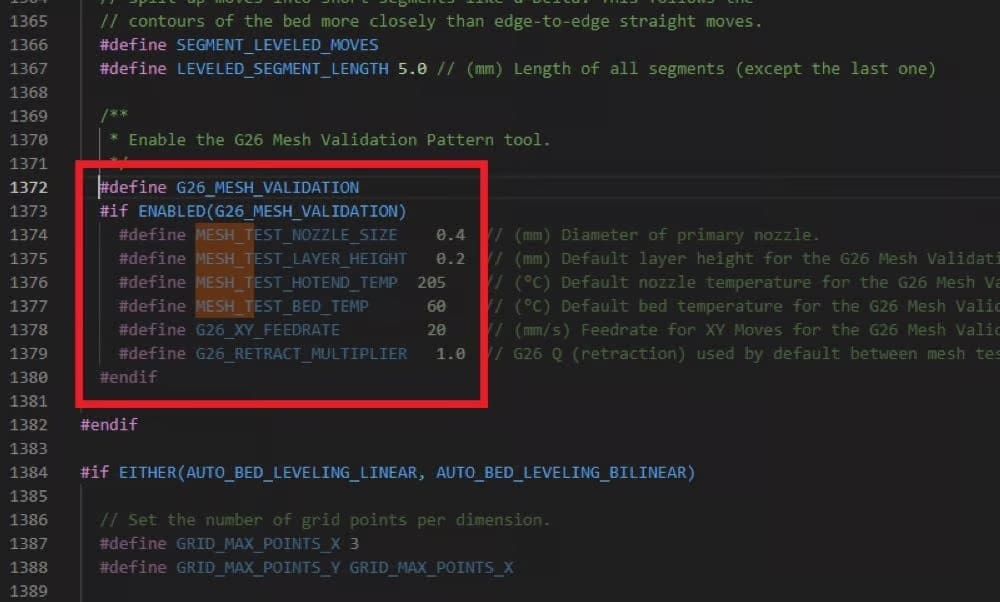
When you get the message that you’re finished, print a bed test pattern; three-by-three grids of squares seem especially popular for this method. The picture above shows how to enable a bed test pattern in your menu if you like. If some areas of the test print seem consistently too tight or too loose, double-check whether the bed itself is tilted before adjusting Z height offsets.
If your whole grid seems a touch consistently high or low, rather than doing the whole thing again, use the Z height menu option to take it up or down a little. This adjusts the offset across the bed, applying it to all points at once without needing to repeat the full leveling process. Depending on the specifics of your setup, there should be an option saying “Z Offset” or “Live Adjust Z” on the menu while printing, which should be used to adjust the Z height offset during printing.
And that’s it, you’re done!
License: The text of "Mesh Bed Leveling – Simply Explained" by All3DP is licensed under a Creative Commons Attribution 4.0 International License.