
How to Install Klipper: Step-By-Step Tutorial

You've heard about Klipper: it's fast, great, and fixes your printing problems! Here's how to join in, and how to separate hype from truth.
If you’ve been dipping your toes in the 3D printing world, odds are you’ve heard about Klipper, the open-source firmware that enables input shaping, PID tuning, and Z offset calibration, among other practical features, to improve your 3D printing experience.
Installing Klipper can be useful, to say the least, and it’s what we’ll go over in this article. That said, this tutorial is long. It has to be, because of the complex nature of the software components and the need to understand what you’re configuring to get Klipper running.
Where possible, we’ll try to give you a reason as to why you need a piece of information or to run a check before moving on. Because a walk-through of this scale can’t answer all possible questions that you may have, you can also get help from a very active Klipper Discord, the official Klipper forums, and the relevant subReddits.
Due to how long and involved the process of installing and configuring Klipper is, we recommend that you read from beginning to end first. Give yourself a chance to look up concepts you may not know in advance. This will be really helpful later on as you work your way through the installation because you won’t get distracted having to look things up, or you’ll avoid misunderstanding things and having to backtrack.
So, let’s start by taking a closer look at what Klipper is before going over what you’ll need to set it up, then walk our way through the tutorial.

What Is It?
Before we begin installing Klipper, let’s go over the basics of how it actually works. This is important to understand, as these concepts will translate into why Klipper is going to help you (or not).
So first, let’s begin with the first definition of what Klipper is: 3D printer firmware. What, exactly, is the firmware doing in a 3D printer?
You may already have an intuitive understanding of what software and hardware are. Software is code, something that can be easily modified, while hardware is anything tangibly physical, like an integrated circuit chip. Firmware is that little elusive piece of software that depends on the actual hardware. That is, it’s code that is both dependent on and provides basic functionality to electronic hardware.
In a 3D printer, firmware is responsible for managing how stepper motors, endstops, heaters, and fans all behave. All the electronically controlled features of the printer are managed through firmware code. It acts as the brain of your machine.
All open-source 3D printer firmware relies on configuration parameters to accomplish those tasks correctly for the printer’s hardware. Proprietary firmware may work differently, but unless you’re the one writing it, you can’t know that. Things to know include what microcontroller unit (MCU) is managing the real-time sequencing of events and inputs, what stepper driver parameters to use, which endstops are on which inputs, and the PID parameters of the heaters that are set as a configuration file. This is true whether your firmware is Klipper, Marlin, or RepRap. Just the form of the configuration file differs from one to the other, and the way the configuration is passed to the firmware.
Let’s take a brief look at how Klipper stands apart from Marlin and RepRap.
What Makes It Different?
Marlin, one of the main pillars of open-source 3D printing, is based on the Arduino programming framework for microcontrollers. The configuration file is normally divided in two files, “configuration.h” and “configuration_adv.h”. These files are used by the Arduino framework to write hard values in the program generated being stored in the controller’s on-board memory. So if you then want to change the direction or plug of one stepper motor, you need to modify the configuration file, recompile the firmware, and re-upload it to the board. This also means the number of features available is limited by the amount of memory the controller possesses.
RepRap firmware, used primarily on Duet boards, is a little different. The configuration is a series of custom G-code instructions that are stored on an SD card alongside the firmware, and whenever the controller starts up, it loads the firmware, and then reads the G-code instructions file to load the configuration into memory. This eliminates Marlin’s memory limit issue. That said, because the machine configuration is entirely written in G-code, it’s harder to read by someone who isn’t used to it.
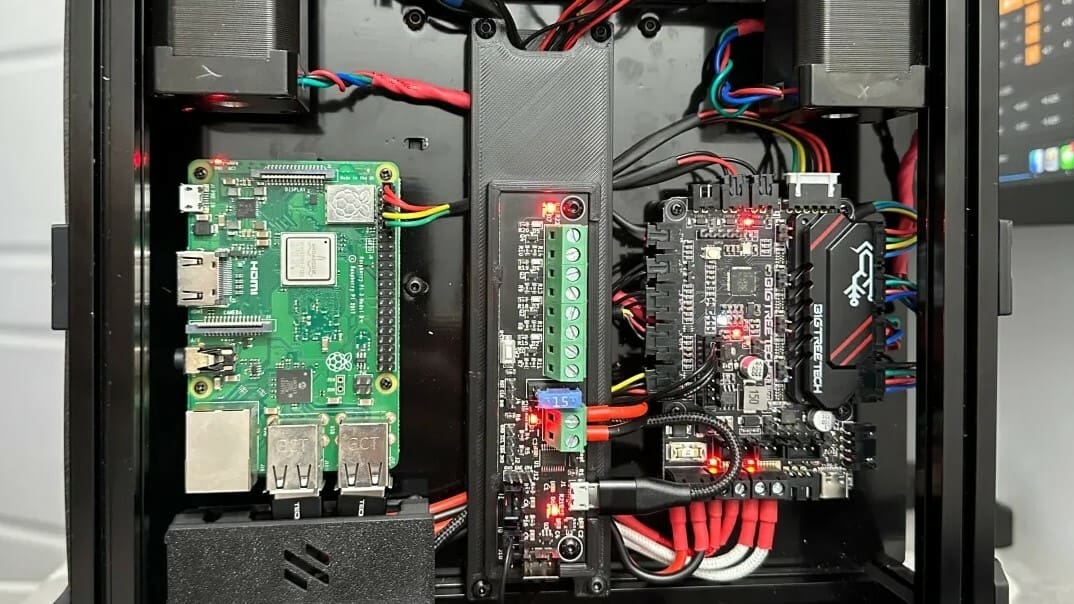
Klipper, on the other hand, is more than just firmware. It’s unique in the 3D printing world in that the most complex bits of the code run on a standard Linux installation, written in Python, which anyone can easily learn to read and modify, and that part is called Klippy. Klippy runs on any type of computer, but most commonly on a Raspberry Pi. Klipper also has a firmware component (also referred as the MCU Klipper component) that gets uploaded to the controller, but it is much simpler. The controller is always in serial communication with the Python code.
The configuration for Klipper is in a Yaml format, and is only read by Klippy. The configuration file is a lot easier to read than RepRap’s G-code, and has names that are often less confusing than Marlin’s “configuration.h” file. Because Klippy runs as a program on a computer, you can edit and restart the program really quickly, without restarting the machine or the computer, meaning configuration changes are active in a matter of seconds. When things do get confusing, the inline comments and online documentation go into a lot of depth to clarify what they actually mean and how to obtain the right value to insert for a given parameter.
Pros & Cons

Now that we understand how Klipper actually runs, let’s take a look at the benefits and limitations this brings to the firmware layer on a 3D printer.
Pros
- There’s no controller-memory limit to the amount of math needed to generate the movements. The code that computes the movements (Klippy) is only limited by the infinitely faster processor of the computer running the Python code.
- The Python code, being a lot less constrained by memory, has much better foresight, and much better acceleration computations than what a microcontroller-bound firmware can achieve.
- Klipper allows the definition of macros in the configuration, allowing users to define new commands or overwrite standard ones to insert complex synchronized motions with only a single command in the G-code file. If you want to change toolheads, run calibration, home axes in a certain order to override what a slicer’s G-code standard commands will be input in the print files, this is the way to go.
- Because of the serial connection where the microcontroller is receiving instructions from the Python code, Klippy can handle multiple microcontrollers. This means that you can easily create setups with a dozen different hot ends or when you want to have multiple steppers running together to increase acceleration and torque on your printer to go much faster than what a single motor per axis can do. In short, it’s easy to extend Klipper to run more hardware.
- When you modify the configuration file, you don’t need to reflash the microcontrollers, since the configuration isn’t read by the MCUs. The Python “brain” restarts in a matter of seconds and resends the proper configuration elements to the MCUs over the serial connection just as fast. Updating a printer’s configuration is no longer a matter of needing to dig into the electronics compartment to plug in a USB cable or extract an SD card, update and replace everything to check that the changes were correct. Not to mention the readability of the configuration file itself.
- Klipper is able to compute and compensate for machine defects to a greater extent than controller-based firmware because of the increased computation power of the processor on the computer.
Cons
- Klipper needs an extra computer to run. Few printers ship with an electronics board that can run Linux on it. Those that do generally don’t say if they do, but they will generally say they’re “cloud-connected”, or have a camera built-in in the advertisement.
- Klipper will usually require additional sensors to take full advantage of the possible defect compensation code, like an accelerometer, or an extra precise Z-probe being available to detect the amount of compensation required. One can also manually tune the printer with a G-sensor, though it will take a long time and be less accurate.
- Though getting started with Klipper can be easy, its documentation is quite long and often requires in-depth comprehension of how a 3D printer functions to bring out the best of the firmware. If your machine is well cared for and a high volume production type (i.e. there are thousands or more of the same model, with a limited amount of variation on the hardware), you can easily re-use someone else’s configuration. But if you started tinkering with your machine and make it one-of-a-kind, you need to understand what you did and how it impacts the parameters you’re giving Klipper or you might be turning away from the proper parameters.
- The included printer configurations for known printers should be seen as a role model, not an absolute “this is the only way to make the machine work”; the values are conservative to provide a reliable machine for first-time users. There are tuning guides to help you improve upon those default configurations, but they demand a lot of understanding and time to fully implement.
Klipper Installation
Having covered the basics (or as much as can be done), let’s step into the tutorial.
Preparations
Installing Klipper will require a bit of research ahead of time. What that research looks like will be different based on whether you’re using stock hardware or an upgraded system where you’ve replaced the entire controller board.
Existing Hardware
To run Klipper on existing hardware, you need to identify with certainty what hardware it is you have. For example, if you have a Creality machine, you can identify the Creality board with the version number that is printed on it. Similar methods and Google searches will help you with other brands and controllers. Some controllers may not be documented, or are documented not to work for whatever reason. In those cases, you’ll need to buy not just a single-board computer like a Raspberry Pi, but also a new electronics controller for the printer. If this is the case, you’ll want to do research for new hardware.
New Hardware
The best way to make sure Klipper runs well is to look up the best electronics to use before you start buying anything. You’ll of course need a computer running Linux – generally recommended to be a Raspberry Pi because of size and cost. Controller boards compatible with Klipper are a dime a dozen, but choosing the right one isn’t trivial. Some are good, some are bad. Search online communities, forums, and manufacturer documentation before putting money down.
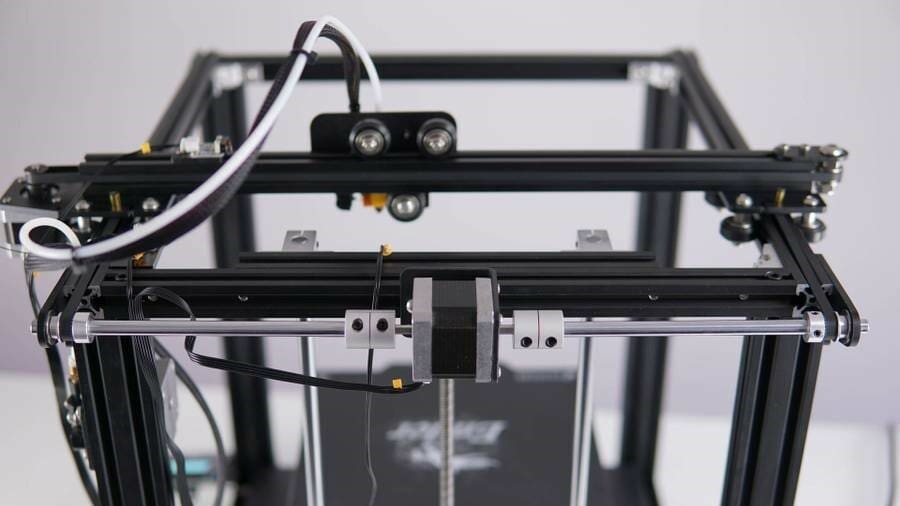
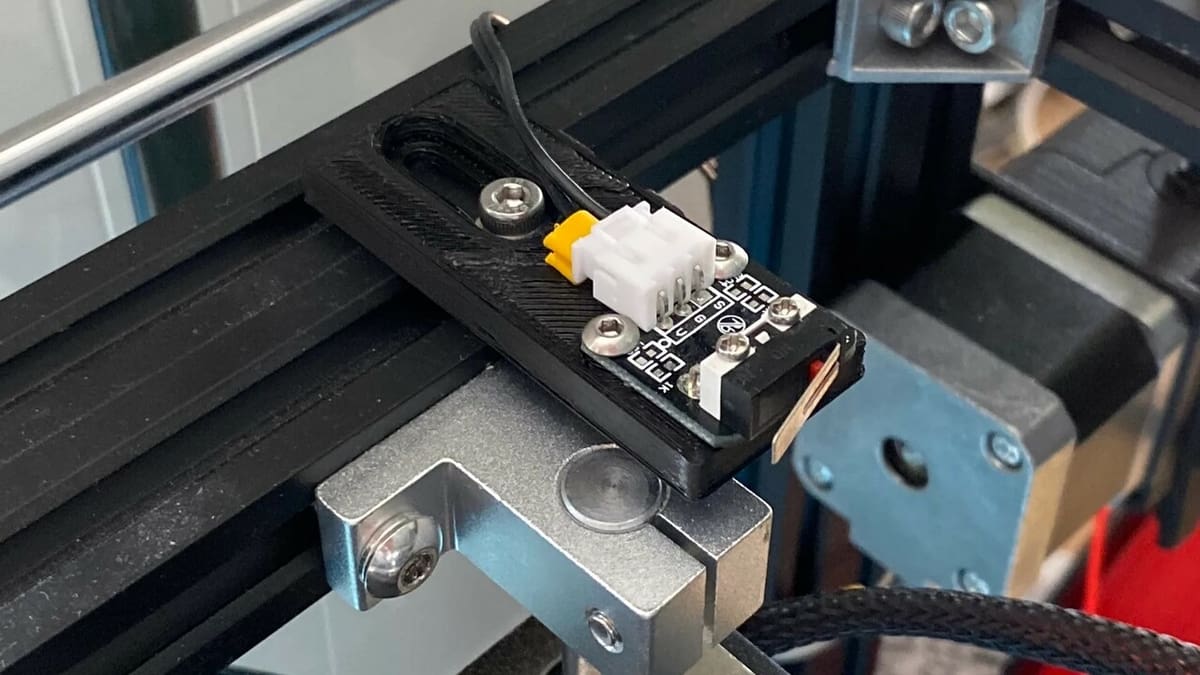
Make sure you understand how your printer is wired. For instance, some printers use two motors on the Z-axis, but with a single driver for both, instead of dedicated channels for each motor. Check the display interface compatibility (USB, single or double 8-pin connectors), and check that you know where the individual wires go on the old and new boards. Particularly important is the order of wires for your stepper motors, Z probe, and fans, as polarity matters on those components. Temperature sensors, unless you have a thermocouple or PT100 amplifier board, are polarity agnostic. Compare the type of connectors you have with the new board.
Now you know what you will run Klipper on. You’ve identified what microcontroller board it is and know how to disconnect, rewire, and connect all the elements of your printer to that new board.
Knowing Your Printer's Parameters
Next is determining what type of 3D printer you have. Is it a Prusa i3-style bedslinger Cartesian printer? Does it have a CoreXY gantry or a Delta design, or is it a more esoteric Core-XZ kinematic setup? Aside from robotic arms, Klipper supports all commercial 3D printer kinematics.
After this, you want to write down what types of sensors your printer uses; are they mechanical or optical endstops? Is there a bed leveling probe, a specific temperature sensor type for the hot end and the bed, maybe for an enclosed chamber or electronics compartment?
Check the limits of what your printer can handle hardware-wise. Beyond just speed, acceleration and accuracy, the more critical aspects are the usable temperatures – what is the maximum hot end or bed temperature? What diameter nozzle is mounted, what type of maximum extrusion flow can it handle?
Finally, you have reached the end of the information gathering after you determine how many individual axes to control. Generally you account for one axis per stepper motor. Sometimes it’s fewer than that, if two or more motors are wired together.
Preparing Your Raspberry Pi
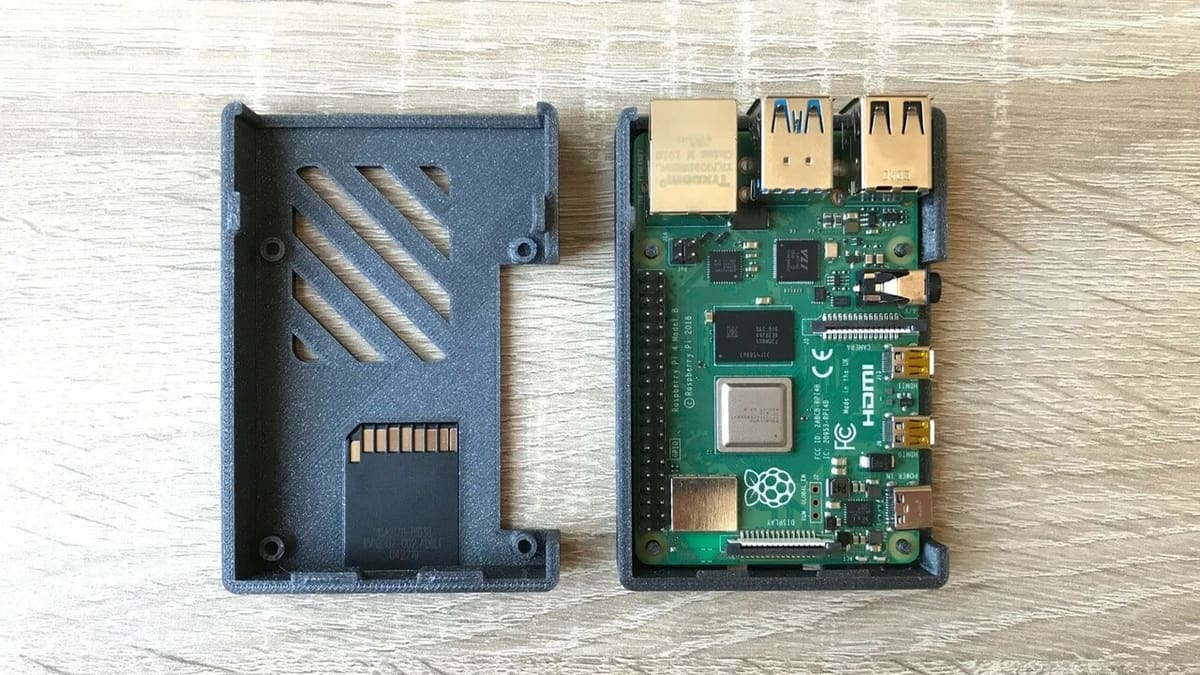
Okay, so we now have all the required knowledge in hand to start installing Klipper. How do we do this? For this set of instructions, we’re assuming the use of a Raspberry Pi 3 or 4 and a controller board of your choosing, connected over USB to the Pi. We’re also assuming the Pi is connected to your network, either Wi-Fi or ethernet, and you know how to find its IP address when it boots up (usually by looking at the admin interface on your router or using a network scanner).
- First, take the MicroSD you’ll use for your Raspberry Pi and connect it to your computer. Remember that any data on it will be lost. If it has data you want, back it up now. Then download and install the Pi Imager tool and launch it.
- When it’s started, click “Choose OS”, scroll down to “Other specific-purpose OS”, choose “3D printing”, and then select Mainsail OS. Mainsail is a web interface specific to Klipper. It is up to you whether to choose the 32- or 64-bit version, though the 32-bit is currently recommended.
- Back on the main window, click “Choose Storage”, and make sure to select the SD card.
- Before clicking “Write”, click on the settings gear wheel in the bottom right. Here, we recommend setting the hostname value to something you can recognize (we’ll use “printer.local” for the rest of this guide) and that won’t conflict with other Raspberry Pi on your network. Also, enable SSH using a password authenticator. Set a username and password, with the user being “pi”. If desired, set the Wi-Fi connection settings as well. Finally, click “Save”, and then you can press “Write” in the main window. Wait until the process is complete before pulling out the SD card.
- Insert the SD card into your Raspberry Pi and power it on.
- Once it’s started, the first boot can take some time for the file system to expand to the entirety of the SD card’s available storage. To check when it’s finished, open your browser and open a tab pointing to http://printer.local – note that Chrome and Firefox by default try to replace “http” with “https” – this will not work. It must be specified as “http://” when you type in the address. When the Mainsail interface comes up, your Pi is ready.
- Now you’ll need some to use SSH. This first paragraph is directly copied from the official Klipper documentation – only adjusting the user and hostname values:
- If using a Linux or MacOS desktop, then the “ssh” software should already be installed on the desktop. There are free SSH clients available for other desktops (e.g. PuTTY). Use the SSH utility to connect to the Raspberry Pi (ssh pi@printer.local). Keep in mind that if you are using Linux or MacOS with the terminal, when you get the password prompt, it will not display any characters being typed in. This is normal and expected, and considered a security feature to prevent others from knowing how long your password is.
- Finally connected with SSH on your Raspberry Pi? You should see a DOS-like console window with a short message of introduction to the OS, and the last line with a blinking cursor should read something like
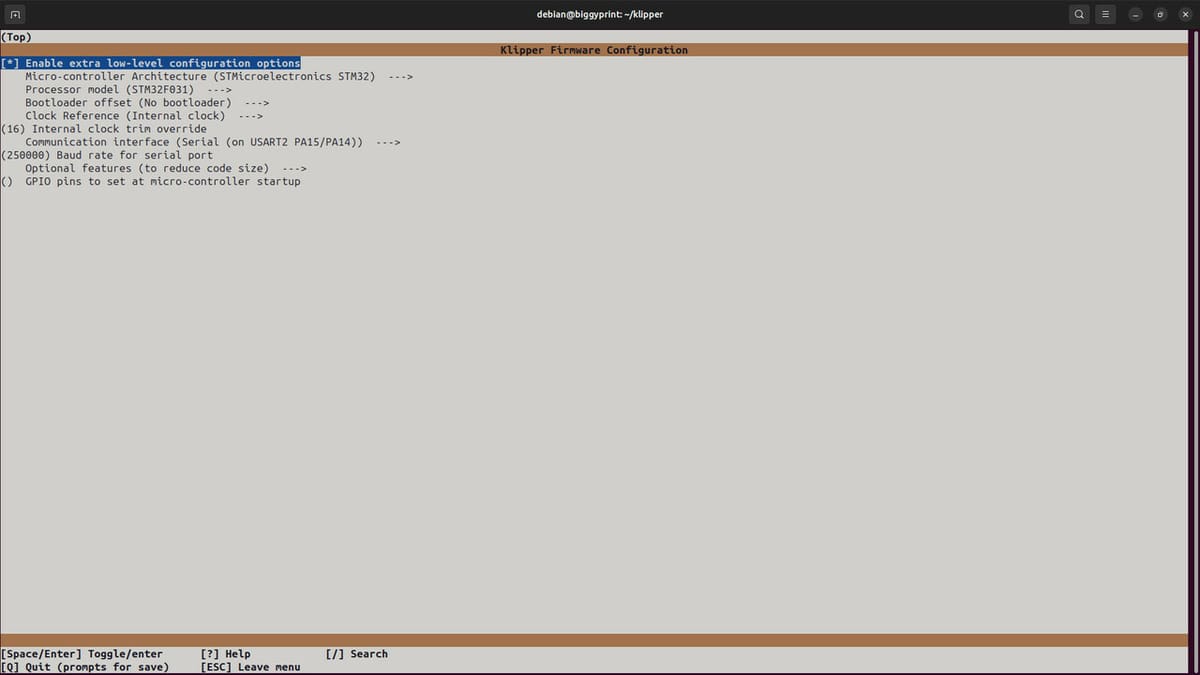
pi@printer:~ $– this is the normal Linux prompt. You will want to go into the Klipper directory with the commandcd klipper. Then, configure the parameters for the controller firmware component of Klipper. To do so, a text-based interface exists and can be launched with the commandmake menuconfig. In this interface, you’ll want to navigate the various elements to choose the type of MCU on the controller, and a few other parameters.- If you’re upgrading an existing printer’s controller for Klipper, you will often find the right values at the top of the printer’s configuration file. Otherwise, check the controller manufacturer’s documentation or the electronics board itself – STM32-series MCUs in particular will have the full MCU type printed on it. You may need oblique light and a magnifying glass to read it clearly.
- Once the parameters are properly entered, you can exit by pressing the escape key, and answer yes to save the configuration. Finally, you are ready to compile the controller firmware with the command
make -j.
Flashing Klipper onto the Microcontroller

This is where things begin to get a bit more complex. The controller boards come in two major categories: those where the bootloader is present, allowing for flashing them over a USB connection, such as the Arduino boards, and those where a bootloader was purposefully omitted, to prevent people from flashing the firmware over USB. This is commonly the case with the BigTreeTech or Creality controller boards.
Now, let’s start with the easy way, where the bootloader is there and allows flashing over USB:
- If your controller can flash over USB, you want to identify the USB device it shows up as with
ls /dev/serial/by-id/*. - Then you can tell Linux to flash the controller with the Klipper firmware using the command
make flash FLASH_DEVICE=/dev/serial/by-id/<value returned by the previous command>. - If no error returns, congratulations, it’s flashed! But now, just to be sure, run
ls /dev/serial/by-id/*and this time write down what the complete path is. You’ll want it for when we edit the configuration file.
If your controller doesn’t flash over USB, there may be custom steps required to do so. The Klipper configurations repository should have your controller board listed, and the matching configuration file will have a header explaining what steps to take to flash the MCU with Klipper. Often, the procedure will roughly follow the steps:
- Extract the klipper.bin file generated in Step #8 and put it on an SD card (not the one from your Pi!), rename it “firmware.bin”, and power the controller with the SD card inserted.
- After a few seconds, you’ll see LEDs changing and when you put the controller’s SD card back in the computer, the file was renamed FIRMWARE.CUR. This is the case for a number of BigTreeTech and Creality boards, but be sure to read up on your exact controller to be certain of how to do this. If you don’t know how to use SCP, look at what software can use SFTP on your machine, connect to your Raspberry Pi (pi@printer.local remember?) and the file you want will be “/home/pi/klipper/output/klipper.bin”.
- Once the firmware is flashed, be sure to run the command
ls /dev/serial/by-id/*and write down the output value somewhere. You’ll need it for the config file.
Okay, now we’re done with the SSH stuff, you can close the connection there. The rest we will do with the Mainsail interface directly.
Configuring Klipper to Run the Hardware
The next two sections will describe using the Mainsail web interface for Klipper machines. These last steps are technically easier, but can lead to more frustration because of simple syntax errors in the configuration file (i.e. where to enter a new value, placement of space characters etc.). Go slow, grab your favorite relaxing beverage, and read through the steps several times before hitting “Save”.
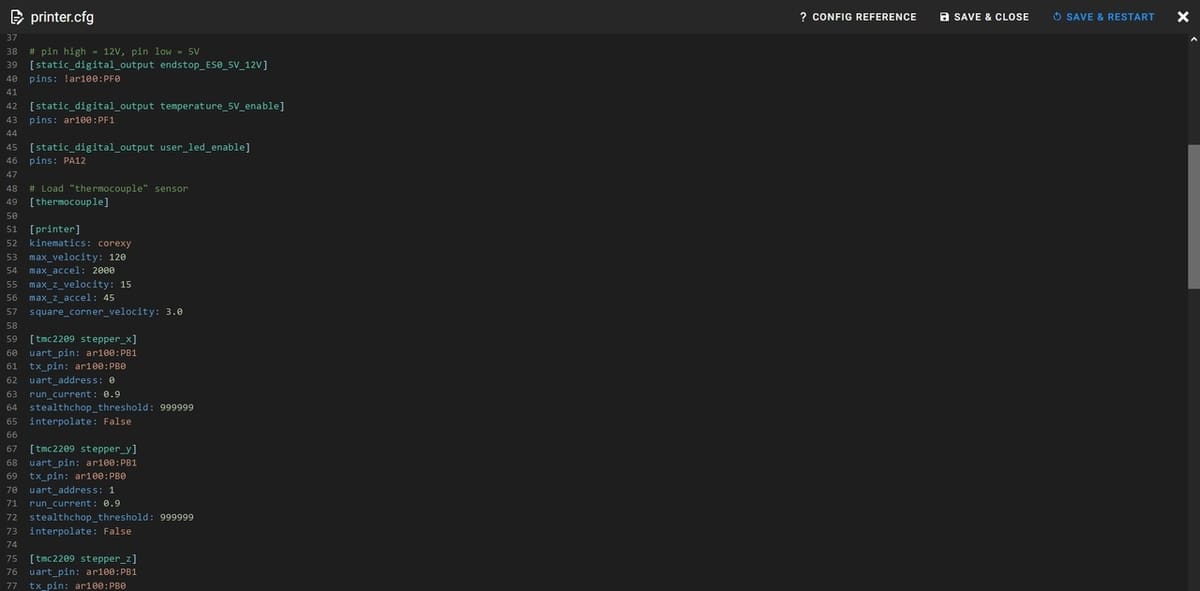
- Now, MainsailOS by default does not come with a printer.cfg file in place. This is to avoid any chance of damaging your hardware. The best way to build one is to look at a generic controller or printer config file from the Klipper configurations repository (so copy the raw contents of the file). Then in the Mainsail interface, on the left side select the Machine menu. The first panel on the left should be the config folder, and be empty or, if there is a printer.cfg file, it should be empty as well. If printer.cfg doesn’t exist, use the Create File button to create one. Once it exists, click on the entry. An editor will open, and you can paste the contents of the config in. In the text you pasted, there’s going to be a line that starts with “serial:”. Make sure you replace the value there with the output of the serial port of the controller you saved in the Flashing Klipper to the Microcontroller section above. Click “Save and Restart” to save the file and restart Klipper.
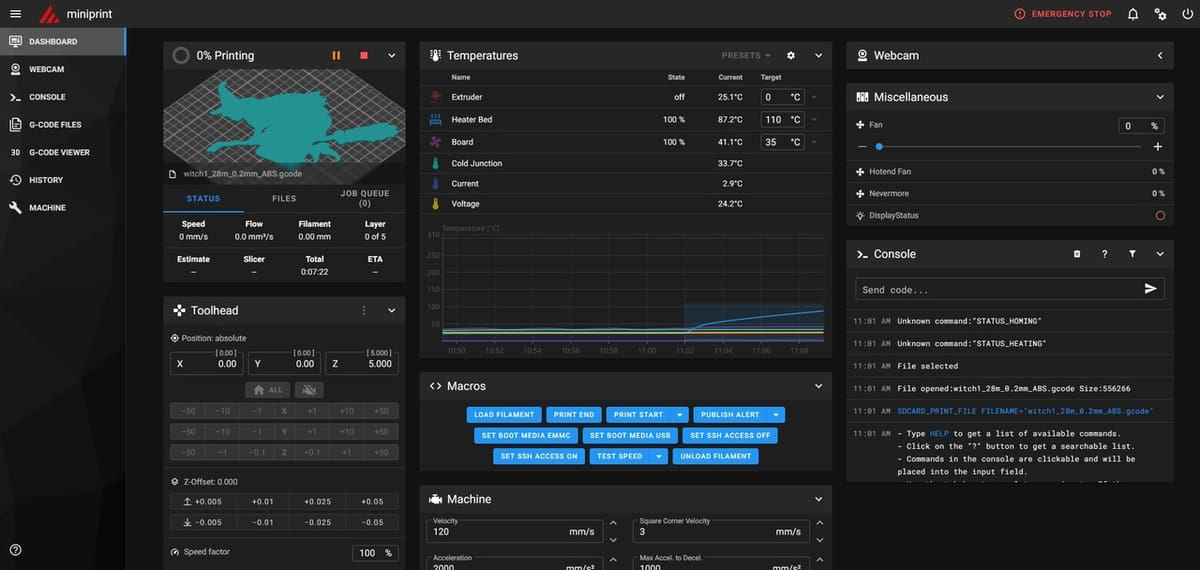
- If all goes well, Mainsail brings you back to the main dashboard, and you will see buttons to home, control the extruder, temperature controls, and a console. However, if there’s an error in the config file somewhere, and Klipper doesn’t restart, an error message will be thrown. Don’t panic, the messages are usually pretty explicit. To fix an error, just go back to the Machine tab, edit the printer.cfg file and use “Save and Restart”. One error may hide another – just keep fixing the issues one by one until Klipper can start.
- There’s only one exception to the self-explanatory error messages: “ADC value out of range” generally means a thermistor isn’t plugged in right, isn’t set to the correct pin, or is the incorrect type and returns values that Klipper reads as impossible. This last case can be when you use a PT1000 or thermocouple, usually.
- Now that Klipper runs, it’s time to check that all the endstops, steppers, and temperature controls work. Before issuing a home command and risking damage to the printer if the direction is wrong, use the console on the main dashboard. For X, Y, and Z (on a Cartesian printer; for a CoreXY it will be A, B, Z) use the command
STEPPER_BUZZ STEPPER=STEPPER_X. Make sure to have all your axes towards the center of the machine so there’s a lot of room to move in. The command will make the X stepper move 1 mm in the positive axis direction, then 1 mm back in repeat for a few seconds. This lets you check that the wiring is good and the direction is correct. If you see the nozzle going left then right instead of right then left, you need to switch the axis direction. On Z, switch the axis direction if you see the nozzle moving away from the bed, then back towards it.
- To check on the endstops, there’s a neat little GUI in Mainsail, on the Machine tab. All the way at the bottom, a frame has the title “Endstops”. The refresh button will read the current state of the endstops and display them for you. Test them out to see if they trigger correctly. Note that this won’t work for bed probes at all. For bed probe testing, use the console and the command
QUERY_PROBEto verify its correct settings. - When you’re satisfied you won’t crash the nozzle into the machine on the first try, you can home. Keep in mind where the emergency stop button on the interface is located: top banner on the right in red. If all moves correctly, it’s time to start checking the temperature controls, fans, and PID tuning.
- To verify your temperature controls, first look at the temperature graph. Then set the hot end temperature at something harmless but above room temperature, like 60 °C. If you see the hot end temperature curve increasing, congrats, it’s properly configured and wired. The hot end fan should also start at 50 °C by default. If not, feel whether the center hub of the fan is getting warm. If it is, power down the machine immediately, the wires for + and – on the fan got flipped and it’s getting negative polarity, which will damage it. Run the same temperature check on the bed, to see if it heats up correctly.
- In the main dashboard, in the Miscellaneous section is where you will find the part cooling fan. Again, if it doesn’t start when you turn that on and it gets warm, flip it off immediately and fix your wiring.
- Finally, PID tuning: in the console you want to use the command
PID_CALIBRATE HEATER=extruder TARGET=215. You can replace 215 with your preferred target temperature for the hot end PID tuning. For the heated bed, replaceextruderwithheater_bedand set the target appropriately (usually between 60 and 80 degrees).
So far, we have Klipper running, a snazzy web interface in the form of Mainsail, a printer that doesn’t destroy itself when told to move or heat up, so what’s left? A first print of course! In general, Klipper reads Marlin G-code perfectly fine. However, some printer manufacturers have implemented a few custom commands for modifying acceleration or driver current values depending on the features being printed. Those are generally ignored by Klipper, and the only thing you will notice are the occasional error message appearing in the console when they are encountered.
It’s really not a big deal, but if you want to clean up your G-code files, you’ll want to edit your slicer profile to modify the G-code flavor output to Klipper’s if it’s supported. PrusaSlicer 2.6.0 and up does, as well as SuperSlicer and Orca Slicer. There may be others that incorporate it later. So go ahead and slice that G-code, then in Mainsail, next to the emergency stop, just “Upload & print”!
Conclusion
Klipper is complex firmware, with a lot of in-depth options that affect a number of features enabling faster and more precise printing. But if you got to the end of this article, you’re likely able to get prints off your machine now.
That said, it’s only the beginning. Klipper keeps improving, and adding features. And there are many features that this article hasn’t even mentioned yet! Like how to define macros, use an accelerometer to compensate for the machine’s resonance during movements, or tune the input shaper for really fast and accurate prints. There are plug-ins to control optional NeoPixel LEDs, generate time-lapses, or get automated failure detection with Obico! In short, the Klipper community has been busy generating a lot of plugins to add extra functionality.
And what about keeping your printer’s firmware and software up to date? In the Machine tab in Mainsail we were using there’s an update frame at the bottom right which will let you automatically install updates to Mainsail, Moonraker, Klipper, and the Raspberry Pi’s system. Do note, though, that it won’t update the MCU component for you. That you’ll still need to do manually, but as the saying goes, “if it ain’t broke, don’t fix it”.
Being so complex, Klipper needs a lot of time to be tuned to perfection. And once you’ve tuned Klipper to your machine, Murphy’s law mandates that something’s going to break or that you’ll want to upgrade something on the hardware side of it. And you’ll need to tune it all over again. But as you go down this rabbit hole, keep in mind there’s a lot of community around, and if you get to the point where the printer just works well enough for you, nobody will force you to continue tweaking. You can just stop tuning and print your parts, which is presumably why you got the machine in the first place.
License: The text of "How to Install Klipper: Step-By-Step Tutorial" by All3DP is licensed under a Creative Commons Attribution 4.0 International License.