Onshape vs Fusion 360: The Differences

The Fusion 360 vs. Onshape choice isn't made any easier by the fact that they're both great CAD programs. Read on for a comparison!
Perfectly Shaped CAD

Autodesk’s Fusion 360 and PTC’s Onshape are two great and very similar computer-aided design (CAD) programs that have a wide range of applications for advanced hobbyists to professionals. They are both parametric modeling software used for designing multi-component mechanical parts and generating accurate plans that are used for 3D printing, machining, or other manufacturing.
Fusion 360 and Onshape are both popular for their wide range of tools for 3D modeling. Both programs utilize parametric modeling, so when you change one value or variable in a design, it triggers changes in other parts of the model.
Both programs also offer design workspaces for different parts and assembly. Once assembled, you can use motion tools to create a digital animation of how you want an assembly to function. You can then assign different materials to parts, a wide range of which are available in both programs.
What’s nice about Fusion 360 and Onshape is that their tools are up to the standards of design professionals while still being accessible for design enthusiasts. For example, both programs allow for real-time collaboration, a helpful feature for group projects. They also have data management and administrative control features, including making different versions and assigning responsibilities.
Both programs are rapidly evolving to compete in the increasingly crowded CAD marketplace that’s shifting towards providing more unified data and technology platforms – transforming the way products are conceptualized, designed, manufactured, and brought to market. In just the past few years, Onshape has added rendering and simulation while more computer-aided manufacturing (CAM) is coming soon. Fusion 360 has added a cloud platform, faster overall performance, and more generative design functions, and more AI feature are coming soon.
Both publishers are adding new tools, features, and functionalities at a hectic pace. It can be hard to keep up with. Although programs have similarities and differences in ease of use, price, features, tools, and support, the main deciding factor is what you need it to do. In this article, we’ll go over and compare Fusion 360 and Onshape, pointing out their differences to help you make the best choice.
Birdseye View
In a nutshell, Fusion 360 also can serve as a tool for computer-aided manufacturing (CAM), making animations, and drawings. Onshape, on the other hand, is an intuitive, fully cloud-based program for product design and development that enables teams to collaborate in real-time from any device and location. Both can render models and run simulations, and CAM for Onshape isn’t available yet (except for multi-axis machining), but is in the works, according to PTC.
Despite these similarities, there are differences. One of the most salient is how you access them. Onshape is, as we mentioned above, a cloud-native program, so you access it through a web browser. The benefits of this are that when you make designs or changes, all of your work is stored directly on the cloud, so you don’t need to download anything and it’s easy to access from anywhere or any computer, i.e. doesn’t require an investment in high-performance workstations.
Fusion is also a cloud-based CAD program, meaning that it leverages cloud services for storage, collaboration, and some processing tasks, but the core application itself runs locally on your machine so you are required to download and install the software. This can also be an advantage if you have a shaky internet connection or have strict IT security protocols at your company.

Another difference is in available tools, although that gap is getting smaller with Onshape’s new CAM, although not as robust as Fusion 360’s. Autodesk is leading the way in generative design tools and AI integrations. There’s huge potential for these features in CAD and they are already cutting down on a lot of the repetitive tasks in design work. Also, if you’d like to use your CAD program as a 3D printing slicer or build-prep program, Onshape lacks the features for this found in Fusion 360.
Thankfully, getting a grip on all these features is easy, eased by both official and unofficial resources. Onshape has a friendly user interface, lots of tool descriptions, and official support, which assists with learning the program. Fusion 360 also has excellent company and community support in the form of guides, training programs, and tutorials.
With that surface look out of the way, let’s move on to some specifics!
Prices & Licensing
Thankfully, if you’re a start-up, hobbyist or student, you can use either CAD program without paying if you choose the free plan, which comes with some limitations. Otherwise, there are a few types of licenses for each program, which we’ll go over below.
It’s important to note that this is not an apples to apples comparison when it come to price. Some features and tool included in Onshape’s base price are extra paid add-ons in Fusion 360, which could make Fusion 360 more expensive than Onshape depending on what you need. Onshape, likewise, has add-ons and integrations offering features you may have thought where only available in Fusion 360.
Fusion 360
Fusion 360 has a few different plans, three of which are free:
- Free personal plan: This free plan is meant for personal (non-commercial) and hobbyist use, containing most Fusion features, including all 3D modeling tools. Due to new rules, however, there’s a ten design documents cap and limited access to CAM features. While the free personal-use plan only provides you with a one-year license, like with all of their other plans, you can reapply every year to extend your term.
- Free educational plan: This one-year free plan is for all Autodesk applications including AutoCAD, TinkerCAD, Inventor, Fusion 360, and more. This plan is for students and educators who are looking to explore the possibilities of Fusion 360 among other Autodesk programs for educational purposes. There’s a verification process to confirm that you meet their requirements for this plan. This plan comes with same features and functionality as the full-access subscription.
- Free startup plan: This plan is meant for new startup companies less than three years old and with 10 or fewer employees, as well as other requirements (annual revenue restrictions, for example). Companies have to apply for this one-year plan and can reapply (if they still meet the requirements) to extend their license term. This plan also includes full access to the program.
- Full-access subscription: This around $550 per year (when it’s not on sale) plan, as the name indicates, provides you with full access to all of Fusion 360’s features. This plan is probably best for businesses or professional makers and includes all of the design tools as well as CAM, rendering, animation tools, and more.
Onshape
Onshape offers a few distinct plans, including their Standard, Professional, and Free plans. They also have a customizable Enterprise plan for larger businesses that need a special arrangement. Check out the full list of differences between the plans on Onshape’s pricing page.
- Free plan: The Free plan is meant for non-commercial small-time hobbyists who want to dabble in CAD but don’t want to sell or financially profit from their skills. This plan includes all the basic 3D modeling, assembly, and designing tools, but none of the business stuff. With this plan, you can design almost anything you want, but you won’t be able to keep design data private.
- Educational plan: Onshape’s Educational plan is free for all qualifying students and educators that want to use Onshape in their classroom or learning environment. Also, Onshape offers an Educational Enterprise plan with more administrative and data management features for a large-scale educational setting like an entire school or university.
- Standard plan: The Standard plan comes at $1,500 per user per year and is best for those who want all the features of the Free plan and plan on using Onshape to make money. Like the Free plan, you get comprehensive design and 3D modeling tools, but you’ll still lack features related to business and design control such as release management, IP control, part numbering, and data management.
- Professional plan: The Professional plan costs $2,100 per user per year and is meant for small- to medium-sized businesses that will use Onshape to design products to make money. This plan gives you access to even more features than the standard plan, especially ones suited for business use: bulk item management, automated part numbering, and more. This plan also grants you access to all the 3D modeling and assembly tools available in all the other versions.
- Enterprise plan: Lastly, the Enterprise plan is for larger corporations that want to use Onshape, and the exact price depends (contact Onshape’s sales team) on your organization’s needs. The Enterprise plan includes all features of Onshape, whether that’s data management, 3D modeling, or assemblies. Some features that are unique to this plan include role-based access control, advanced provisioning settings, company-specific domain, single sign-on, and more.
System Requirements
System requirements are the necessary specifications for your device to run the CAD program efficiently. Due to the differences in how you access Onshape and Fusion 360, these requirements make the two programs stand out from each other. Below, we’ll lay out the system requirements for each program:
You can learn more about the system requirements for Fusion 360 on their website.
If you’re unsure whether your computer meets the requirements for Onshape, PTC has a handy tool for checking if your browser and device are compatible with Onshape. Plus, there are a range of settings you can adjust on your computer to get the best performance from Onshape, detailed here.
UI & Learning Curve
Fusion 360 and Onshape have user interfaces (UI) and layouts that may look very distinct, but they aren’t too different. Below, we’ll go over the layout and user interface for each CAD program.
Generally, Onshape is touted as having the more streamlined layout and being a bit easier to learn from scratch. That said, Fusion 360 has more tools to do more. They are both very deep software programs that take years to master, yet, if you know one, switching to the other shouldn’t be too much of a challenge.
Fusion 360
As we said, Fusion 360’s user interface looks a little old, but its features are far from it. When you open Fusion, the default workspace is for designing, so your modeling tools are in sections across the top toolbar.
The sections include Solid, Surface, Sheet Metal, and within these categories are sub-sections with groups of tools such as the Assemble, Construct, Inspect (measuring and analyzing), and Import. Then, within these groups, there are individual editing tools such as Fillet or Shell.
If you don’t want to design, you can choose one of the other workplaces to use, including Generative Design, Render, Animation, Simulation, Manufacture, and Drawing. Unlike the Design workspace, there’s only one main category with different sub-groups in each workspace. That’s because 3D modeling is Fusion’s largest element and has the most features.
If you click the “Show Data Panel” button to the left of the Fusion interface, you can find, locate, and open files and documents. You’ll be able to open projects, libraries, samples, anything that you’re collaborating on, projects you pinned for later, and all that you’ve saved to Fusion’s cloud.
Onshape
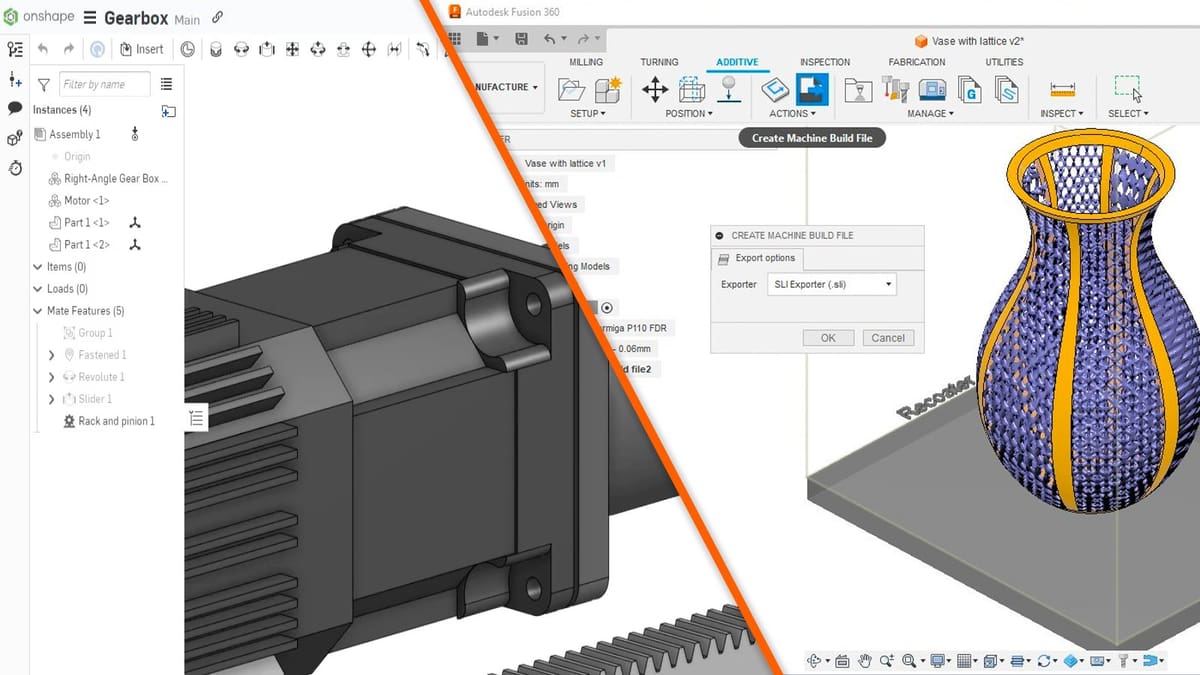
Onshape’s user interface is pretty friendly, although it may seem a little overwhelming if you’ve never worked with CAD before. When you log in, you can choose a project to open or organize your different projects into folders. Once you open a project, there are really only two main places to work when modeling anything: the Part Studio and the Assembly.
When you open a project, you’ll be placed in the Part Studio with your design toolbar at the top. Along the top bar are the available and applicable tools to whatever stage in the design process you are at (sketching or 3D editing, for example). When you’re not sketching or using another 3D modeling tool, you’ll see the generic 3D modeling tools at the top, including Chamfer, Shell, Loft, Extrude, and more.
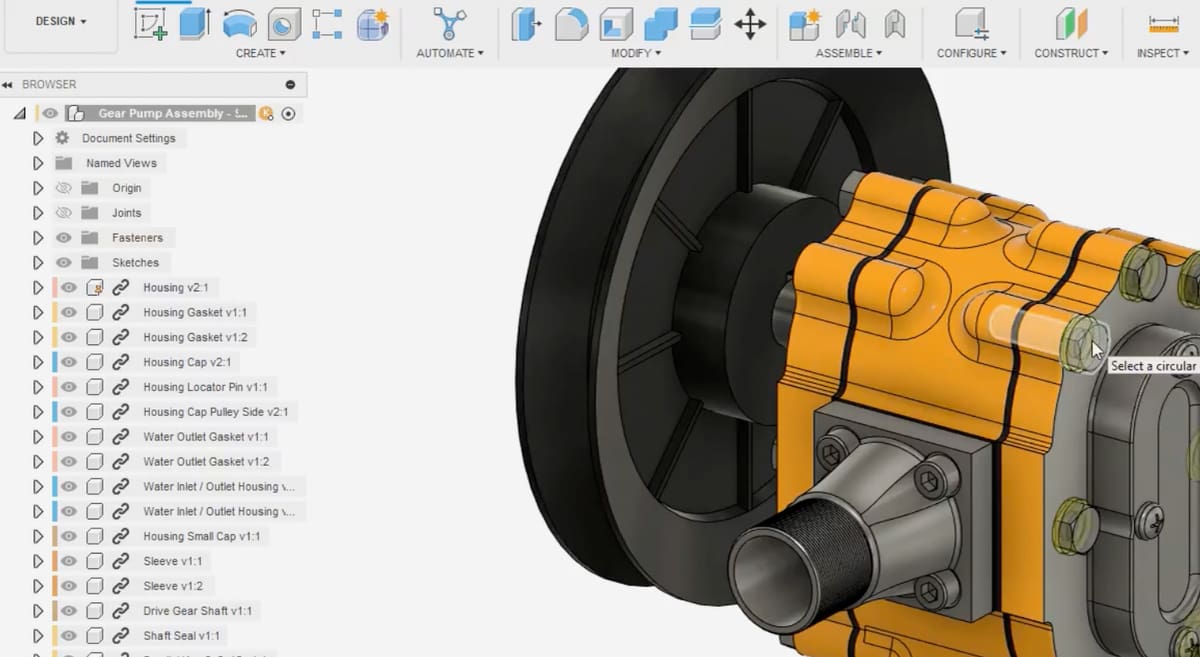
You can also switch tabs to the “Assembly” tab and build, connect, and assemble your mechanisms or a collection of Part Studios. Import models in this tab, including Part Studios you designed or other public models via Onshape’s public libraries. There’s also the possibility to assemble several models using the different Mate tools on the top bar, which define constraints and motion features such as Fasten Mate or Revolute Mate.
Now, let’s get to the features!
Features & Functions: Fusion 360
Next up, let’s go over some of the main features and functions of Fusion 360. As implied in the birdseye view, these cover a wide range of use cases, so we’ll just highlight a few from each.
- Create tools: In the Create toolbar, there are numerous tools you can use to make 3D models. Fusion’s Create tools include the basics such as extrude, revolve, sweep, and loft, as well as instant-modeling tools for shapes like a box, cylinder, pipe, or sphere. Other tools include creating a new sketch, embossing, making a pattern, mirroring, and more.
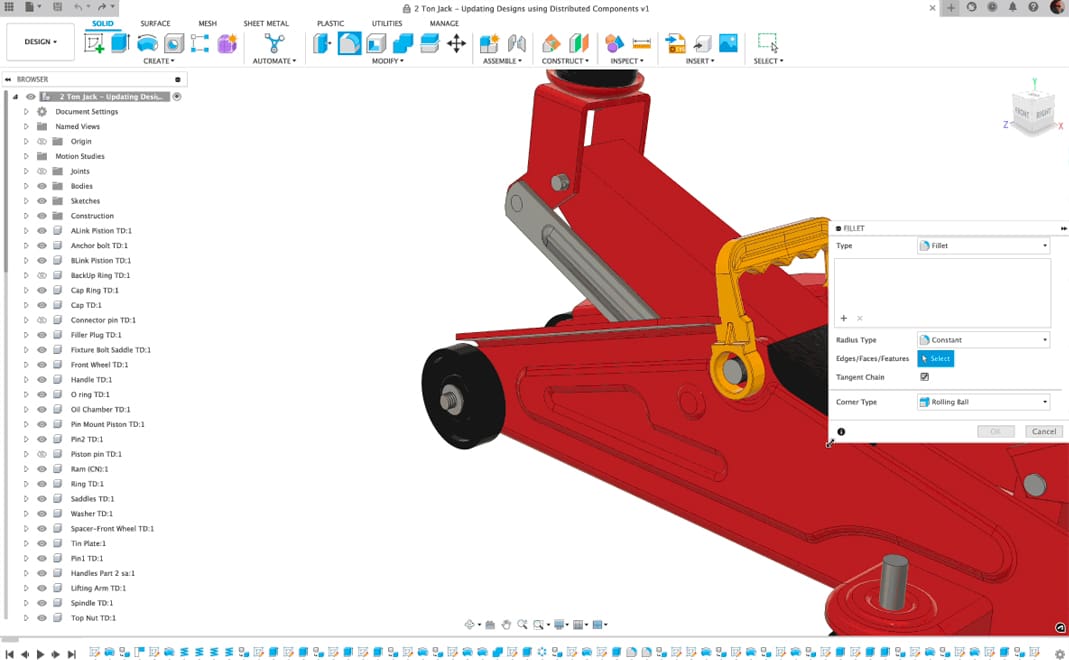
- Modify tools: The Modify toolbar allows quick edits to 3D models. Tools in this section include scaling parts, shelling them, making fillets, chamfering, and more. You can also split parts and assigned materials and colors to faces and models.
- Inspect tools: The Inspect toolbar allows you to quickly measure and analyze parts. Inspect tools include measurements, curvature comb analysis, zebra analysis, draft analysis, and more. You can also find the center of mass of parts as well as any interferences between models.
- Sketch tools: When you make a sketch using the Create tool, a new set of tools pop up in the top toolbar, specific to sketching. Good sketch tools are vital to any CAD program, and Fusion 360 excels with them. Included are basics like lines, circles, polygons, splines, tangents, offsets, and more. Once you’re done making a sketch, you have the option to continue using the other Create tools to turn them into 3D models.
- Simulation tools: In the Simulation workspace, you’ll find a plethora of simulation tools, including tests for static stress, electronics cooling, thermal tests, thermal stress, event simulation, and more. Use these simulations to find the perfect structure for your model.
- Additive Manufacturing tools: Quickly create physical prototypes to validate prior to manufacturing and build 3D printed parts using additive manufacturing in Fusion 360. Connect to a library of 3D printing machines including UltiMaker, EOS, and Renishaw. Use additive manufacturing to fabricate metal parts with powder bed fusion. Reduce material wastage and cost. Select 3D print parameters, automate part orientation and generate fully associative support structures.
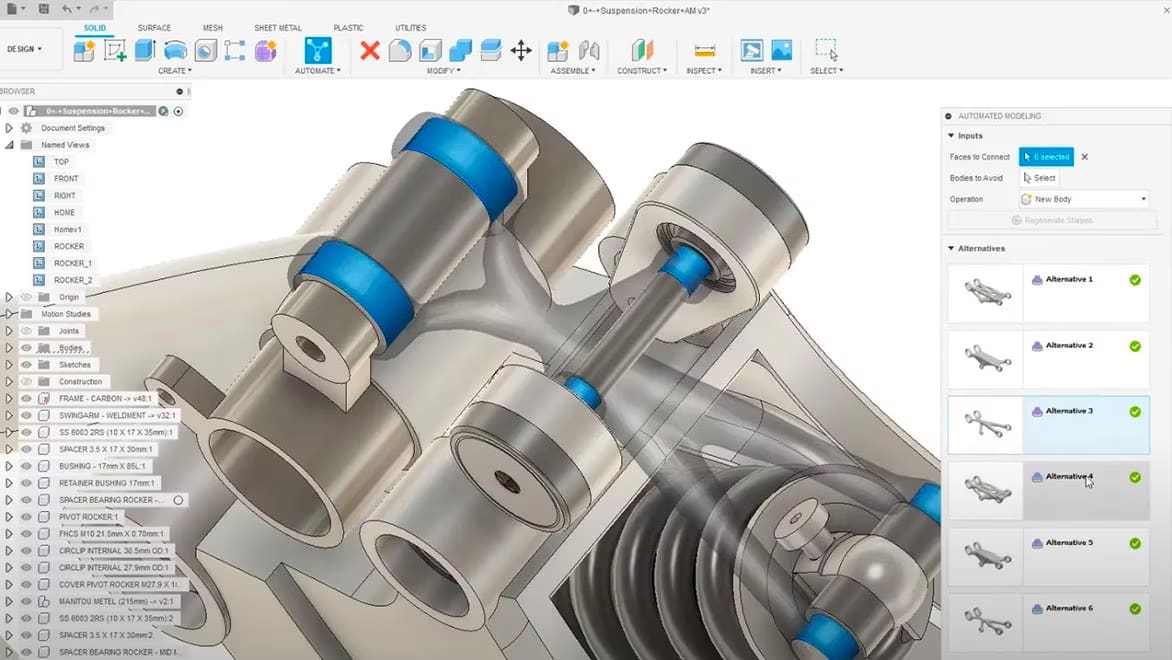
- Generative Design tools: Explore multiple manufacturing-ready outcomes that meet your design specifications while reducing weight, improving performance, and consolidating parts through generative design. Review cloud-generated design outcomes based on visual similarities, plots, and filters powered by machine learning.
- Render tools: In the Render workspace, you can use Fusion’s rendering tools to make your models look stellar. Adjust how models look (appearances) by changing colors, materials, textures, decals, and more in this workspace. It’s also possible to adjust your render settings to get models that are visually just how you want them.
- Animation tools: In the Animation workspace, you can animate models by transforming models or exploding assemblies into their individual components. Exploding assemblies gives viewers a visualization of the complexity and structure of a mechanism or part assembly. Once you’re done animating a model, you can “publish” it and save the final animation video. While the animation features in Fusion 360 suffice for small presentations and videos, they are nowhere those found in other programs, like Blender.
- Manufacture tools: The Manufacture workspace includes Fusion’s CAM tools for visualizing how a part will be CNC machined, drilled, 3D printed, or processed by other manufacturing methods. You can adjust manufacturing settings and download different templates from Fusion 360. Fusion’s CAM tools include milling, turning, additive manufacturing, inspection, fabrication, and more.
- Drawing tools: In the Drawing workspace, you can draw on either previous designs or animations. Depending on the option your select (“From Design” or “From Animation”), you’ll be taken to the respective workspace (design or animation workspaces), and from there, you can create new drawings and use different settings to draw something on a model.
Features & Functions: Onshape
Onshape doesn’t have quite as many tools as Fusion 360, but they have their fair share of features. Below is a list of some of their most useful ones.
- Sketch tools: The first part of any design in Onshape is with a sketch, and unless you use an auto-generated part from their libraries, you always have to start with a sketch. When you create a new sketch, there are many sketch tools for creating lines, rectangles, polygons, circles, splines, text boxes, in-sketch fillets, offsets, and more. You can also adjust how you make these sketch features, using their constraint tools to align, secure, and properly place sketch features. One of the latest features added to the sketch tools is hole features in Part Studios now have built-in fit class tolerances, removing the need to manually look up the required tolerance limits based on hole diameter, fit class, and chosen drawing standard.
- 3D modeling tools: Onshape offers a good bit of basic 3D modeling tools for making parts from sketches, including all the basic features like extrude, revolve, sweep, and loft. Onshape also has more advanced tools such as curved patterns, composite curves, helixes, sheet metal modeling, and more. You can even use variables for dimensions to quickly edit multiple areas and aspects of a part.
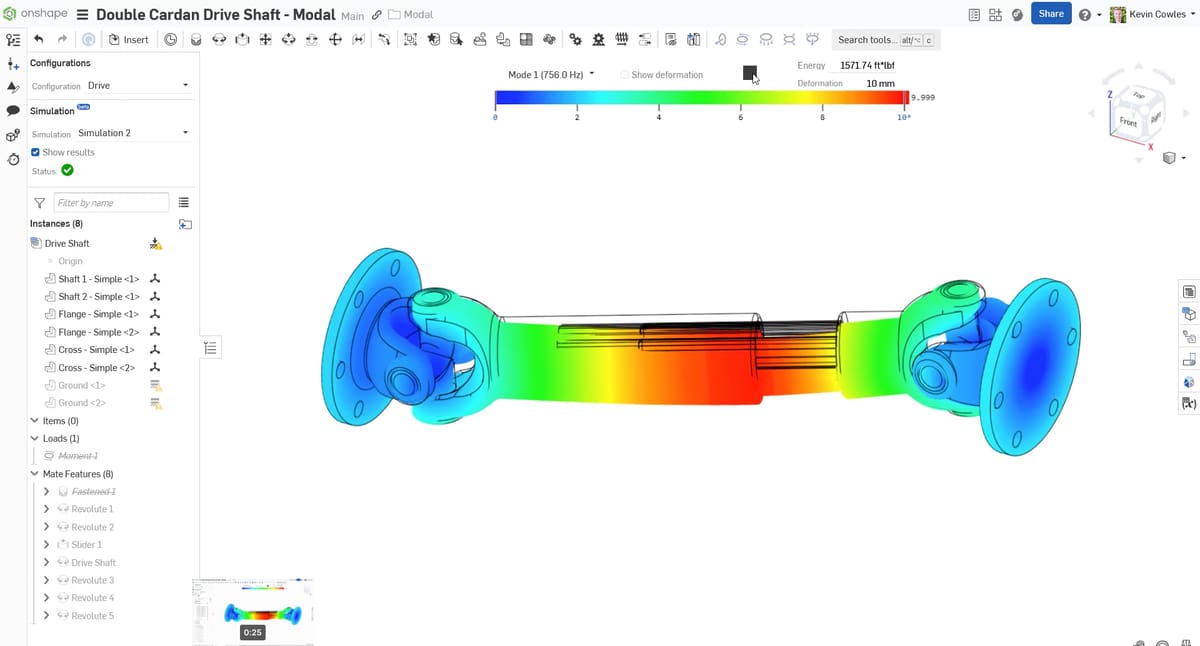
- Simulation: Onshape’s simulation tool now supports Modal Analysis, providing meaningful feedback on a design’s rigidity and vibrational characteristics. Available to all Onshape Professional and Enterprise users, Modal Analysis works alongside linear static analysis in Assemblies, staying in sync with your mate connections, changes to geometry, and Versions and history.
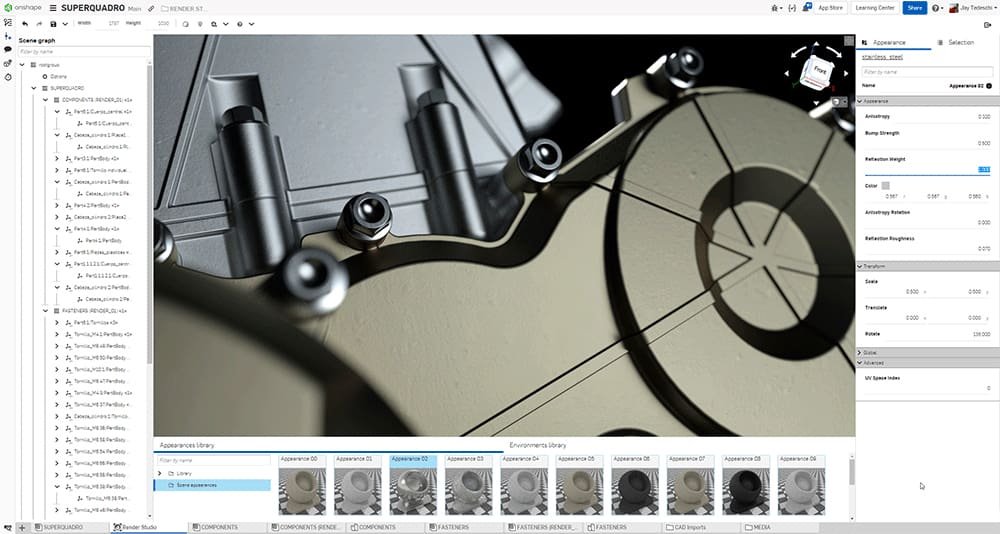
- Rendering tools: Render Studio is a new capability within the Onshape platform that allows you to create photorealistic rendering of CAD models without the need for a high-end graphics processing unit (GPU) or dedicated workstation. Bolstered by a diverse catalog of materials, textures and lighting options, designers and engineers can now create dynamic professional grade images of their Onshape models within a high-resolution, 360-degree environment.
- Custom features: A great part of Onshape being completely cloud-based is the ability to add custom features and parts that were made by other users. For example, instead of self-modeling a gear, it’s possible to just add a gear part modeled by another user and enter the dimensions and number of spokes you want to save time. You also have access to features from the public libraries, ones that were shared with you and ones that you made.
- Assembly tools: The Assembly studio is for joining parts and creating assemblies with integrated motion. There are also assembly tools like the fasten mate, revolute mate, planar mate, and more. You can even make gear ratios and use the play button on the motion mates to produce a mini animation of what the motion will look like. You can also offset these tools and mates in case you want some distance or intersection.
- App store: Similar to the ability to add custom features in Onshape, there’s also download plug-ins or apps for Onshape. For example, if you wanted to use simulations to test your 3D models’ strength, there’s a few options to choose from.
- Learning center: If you’re familiar with advanced CAD programs, you’ve probably heard about the steep learning curve that prevents many people from effectively learning CAD. To combat and prevent this problem, Onshape has a comprehensive learning center that covers different tools and features.
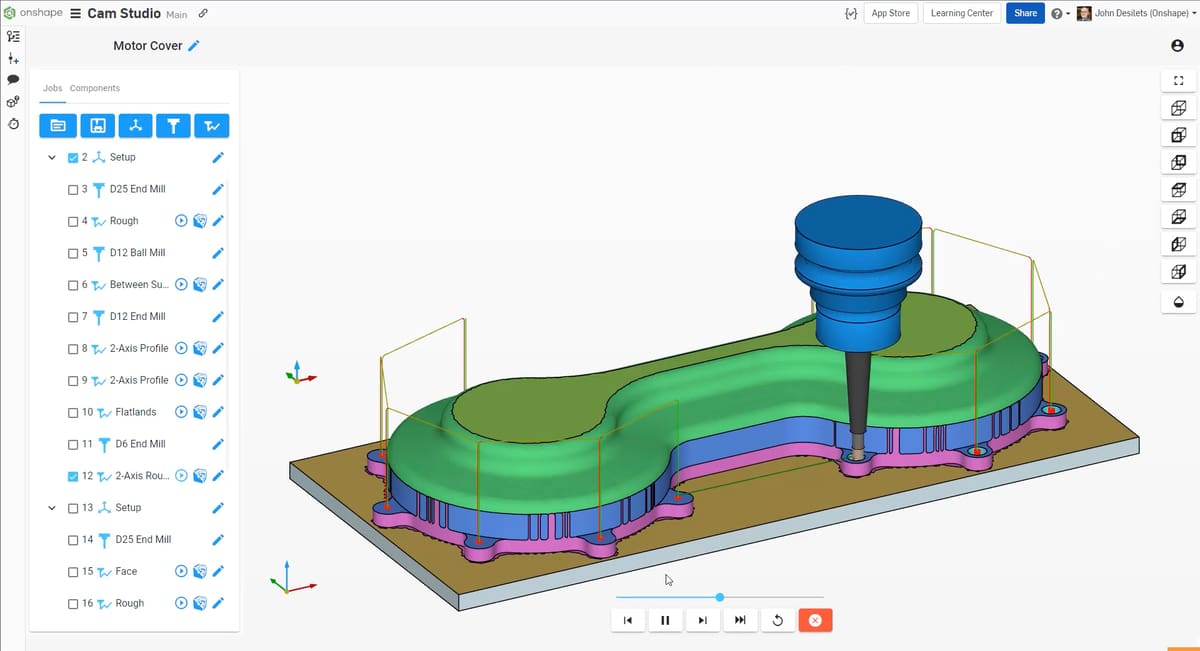
- CAM tools: Onshape’s CAM Studio offers high-quality CNC strategies to make just about any part. CAM Studio Advanced allows you to generate accurate and reliable G-Code for advanced machines and methods. Toolpath calculations and machine simulation leverage the power of cloud compute, making your CAM programming process faster and more interactive.
Applications & Use Cases
Fusion 360 and Onshape might be different in features, but they’re both CAD programs focusing on similar types of manufactured parts. Fusion 360, however, has a wider variety of features than Onshape, while Onshape has more assembly tools. For this reason, there are some differences in the programs’ end uses.
Fusion 360
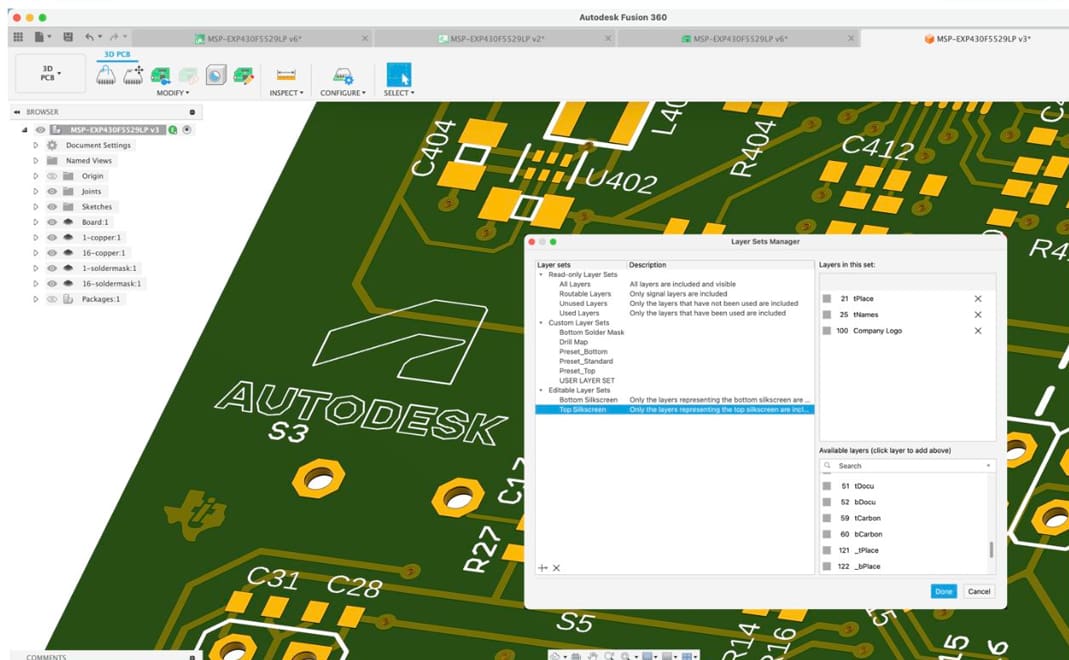
- Applications: Fusion 360 is used a lot for designing motion assemblies for mechanisms like bikes and cars. Fusion 360 is also used in other industries such as aerospace, printed circuit boards, consumer products, and electrical engineering.
- Use cases: Fusion 360 is used by many companies such as SEAM, KMP Motorsports, LifeFuels, Backhand Bikes, among many others. They have updated case studies on their Customer Stories page.
Onshape
- Applications: Onshape is used in different fields for designing multi-part assemblies like prosthetics and medical devices. Onshape is also largely used for designing automotive parts, consumer goods, electronics, consumer products, and robotics.
- Use cases: PTC highlights a few of their Onshape clients and company users on their website. These companies include Loop Medical, Delta Development Team, Nvidia, Trek, and others.
Support & Training

Both Fusion 360 and Onshape have a lot of company and community support. Below, we’ll go over the support for each program.
Fusion 360
- Company: Autodesk offers a hotline and an official forum for Fusion 360 support if you ever want a guaranteed professional’s help. On top of all this, Autodesk also has a self-paced learning program for Fusion 360 and virtual training sessions and services. There’s a lack of text-based training in favor of video-based training is that’s your preference.
- Community: Fusion 360 is very popular, so there is a lot of community support. This includes many online tutorials and forums. Its subreddit, for example, has more than 52,000 users.
Onshape
- Company: As we mentioned earlier, Onshape has an integrated learning center in their web-based interface, where you can learn about Onshape’s tools and features. PTC also has an Onshape forum that’s well monitored by Onshape staff to supply you with reliable assistance. Additionally, Onshape now has a certification training program, with self-paced training or instructor-led training courses for mastering the program.
- Community: Onshape probably has less community support than Fusion 360, but it still has a fair amount. There are numerous video tutorials on YouTube, but its subreddit, with around 3,300 users, isn’t comparatively that popular.
Final Thoughts
All in all, Fusion 360 and Onshape both have their pros and cons. Although Fusion 360 may have more features and uses, its interface is dry, and it doesn’t have as many assembly tools as Onshape. Although Onshape may have more sketch and assembly tools, it lacks additional feature add-ons, AI, and workspaces that would allow it to be useful for more than just 3D modeling.
Based on all it has to offer, most would likely choose Onshape over Fusion 360 if just looking to do 3D modeling and assemblies. That’s because Onshape is cloud-based, so you can access it from most devices. Moreover, it’s easy to use, has many basic 3D modeling tools, rendering, simulations, and can be expanded via plug-ins for additional functionality.
If you’re looking to do more than just modeling, Fusion 360 is perhaps best for you. That’s because the software has more workspaces and offers robust functionality products conceptualization and generative design.
License: The text of "Onshape vs Fusion 360: The Differences" by All3DP Pro is licensed under a Creative Commons Attribution 4.0 International License.
CERTAIN CONTENT THAT APPEARS ON THIS SITE COMES FROM AMAZON. THIS CONTENT IS PROVIDED ‘AS IS’ AND IS SUBJECT TO CHANGE OR REMOVAL AT ANY TIME.