Fusion 360: Text – Simply Explained

Adding and extruding text in Fusion 360 can be simple but requires some basic knowledge. Keep reading to see how Fusion 360 text works!
Fusion 360 is Autodesk‘s most popular CAD software among makers and professionals on a budget. It’s used for a wide range of applications, from 3D modeling to CAM, 3D rendering, generative design, and many others.
Adding text to a design is a great way of customization, especially when considering digital fabrication methods like 3D printing, laser cutting, and CNC. Being such a maker-focused software, Fusion 360 makes it very simple to do that within its design workspace.
In this article, we’ll discuss the various tools and features offered by Fusion 360 in regard to text. We’ll go over the steps of adding words and letters to 3D models in a few different ways. But first, let’s take a look at the basic tools you’ll need.
Tools
Fusion has a special feature for working with text. It’s conveniently called “Text”, and it’s only available when working on an active 2D sketch.
It was a very constrained feature until getting an upgrade in late 2020. Now, not only does it provides more control over the feature but also a new tool has been added.
As alluded to, there are two different options: “Text” and the newly added “Text on a Path” tool. While the naming is fairly self-explanatory, we’ll go into detail on each of these types later.
The fonts available in Fusion 360 are the same as those that are on the computer it’s installed on. This makes adding new fonts to Fusion is as simple as installing them on the system, although it’s required for the font to be in (.ttf) extension.
For those who have never done this before, be sure to check a detailed tutorial on installing fonts on both Windows and MacOS. Thankfully, it’s a very simple task.
Now, let’s practice a bit.
Technique #1: Plain Text
Let’s begin with the most basic of all text tools. It allows users to quickly input letters and text directly from the keyboard instead of having to manually trace them, one at a time.
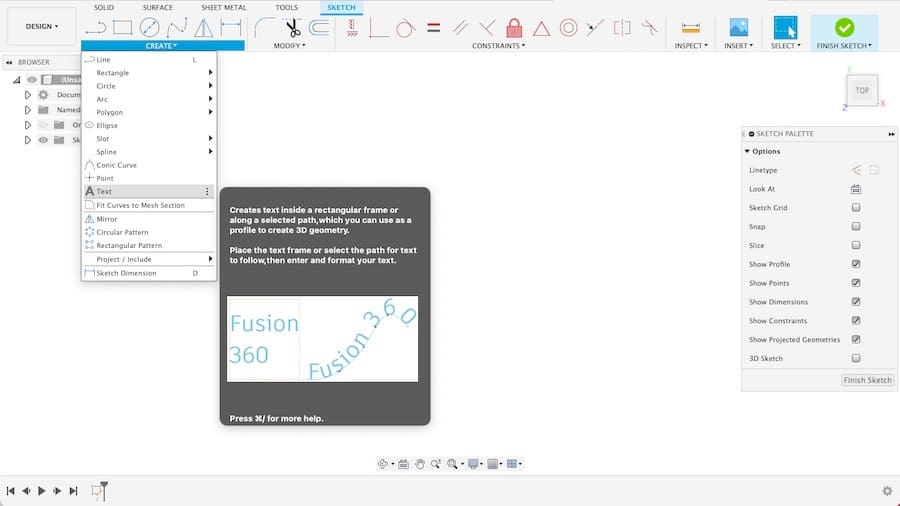
With Fusion 360 open in the Design Workspace, you can create a new sketch. Go to the “Text” feature that’s found under the “Create” menu at the “Sketch” ribbon.
The tool opened by default is the regular “Text”. To use it, you first need to define a container box where all the text will be enclosed. You can do this by selecting two points diagonally to create a boundary box. Note these corner points can snap to existing sketch entities or model references.
You’ll also see that some text will show up already and the tool window will be expanded. Use the text box on this window to add and change the text on the sketch area.
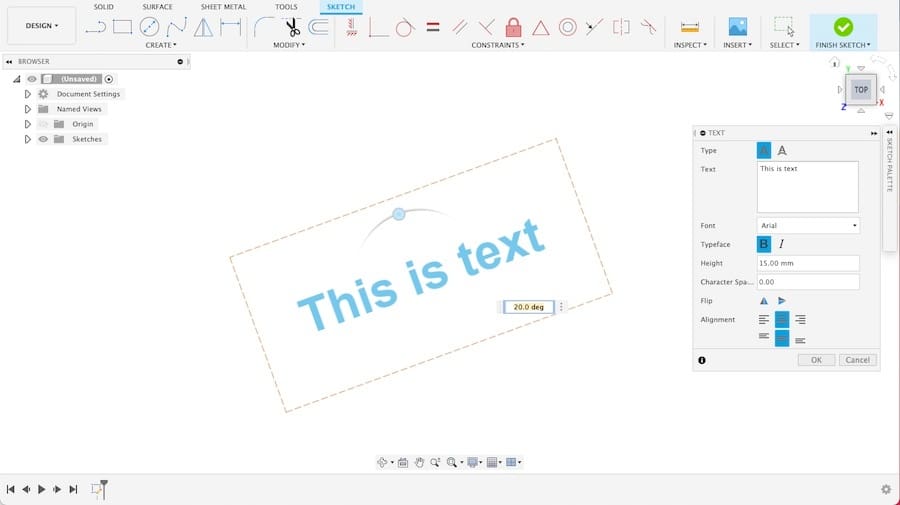
The styling settings are also located in this window, including font selection, typeface, alignment, and character spacing. The text size is controlled by the height setting, which is given in millimeters and is the actual height of the tallest letters.
The text can be rotated through its container box. Click-and-drag the angular handle to spin the text about its center axis. The rotation axis can be switched to any of the box corners by simply left-clicking on it.
Use the flip setting to mirror the text by a horizontal or vertical line, a feature particularly useful for parts in stamps and molds. All other settings work as they would in any text editor software.
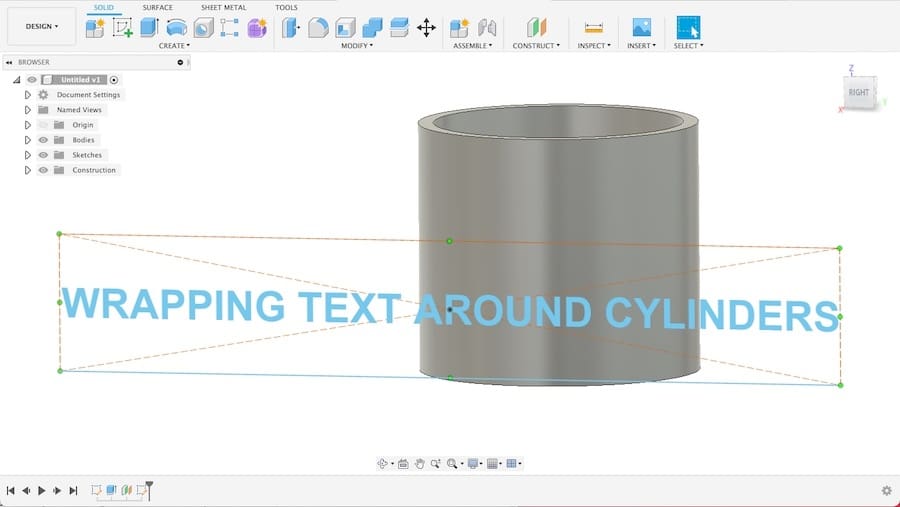
Technique #2: On a Path
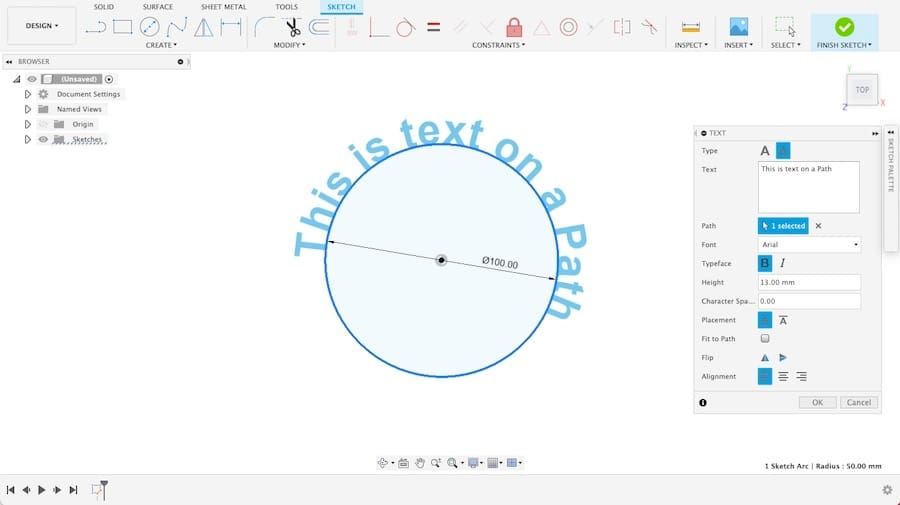
The other tool from the text feature is called “Text on a Path”, and it requires a preexisting line, trajectory, or edges. You can activate this tool at the initial “Text” window by selecting the icon on the right as shown above.
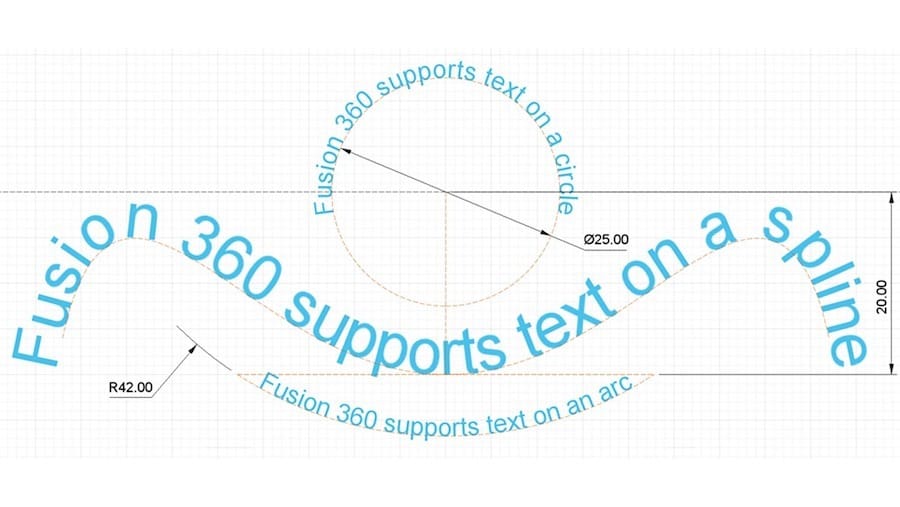
Instead of creating a boundary box, you’ll be asked to select a path from the sketch. Once selected, the sample text should follow the path instead of a straight line.
In the example above, the text is wrapped around a circle, but any path is valid for this tool: curved lines, splines, ellipses, and more.
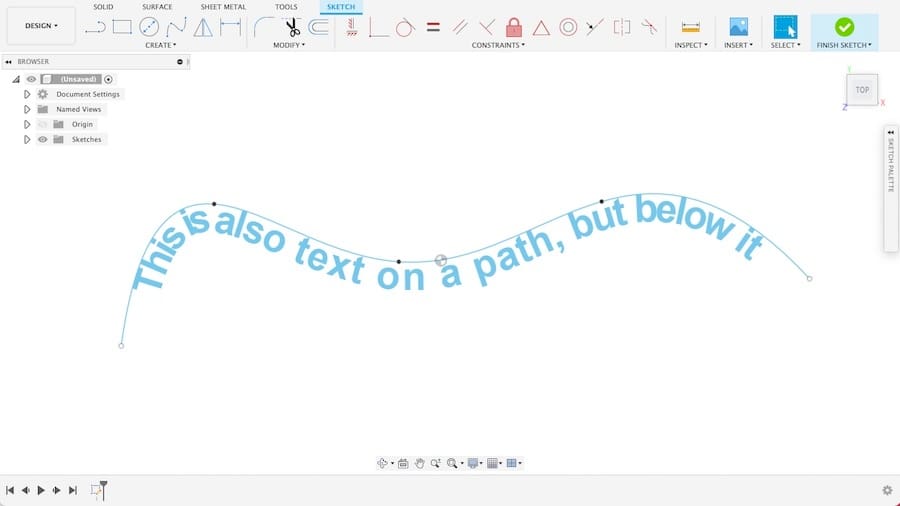
The styling settings for text on a path are exactly the same as the regular text, although positioning is a little different. The alignment (left, center, and right) isn’t in relation to the boundary box anymore, but instead to the selected path.
There are two new settings for text type: “placement”, in which the text can be placed above or below the path, and “fit to path”, in which the text is evenly distributed along the path when activated.
Technique #3: 3D
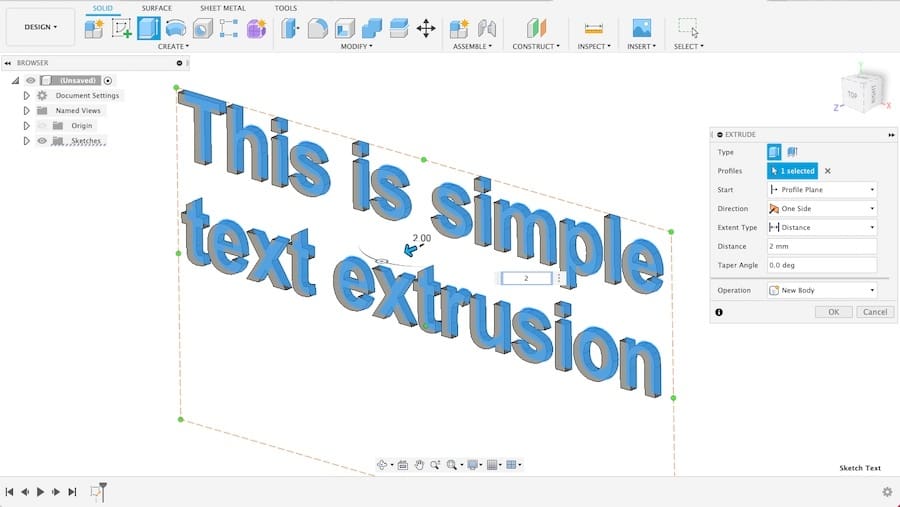
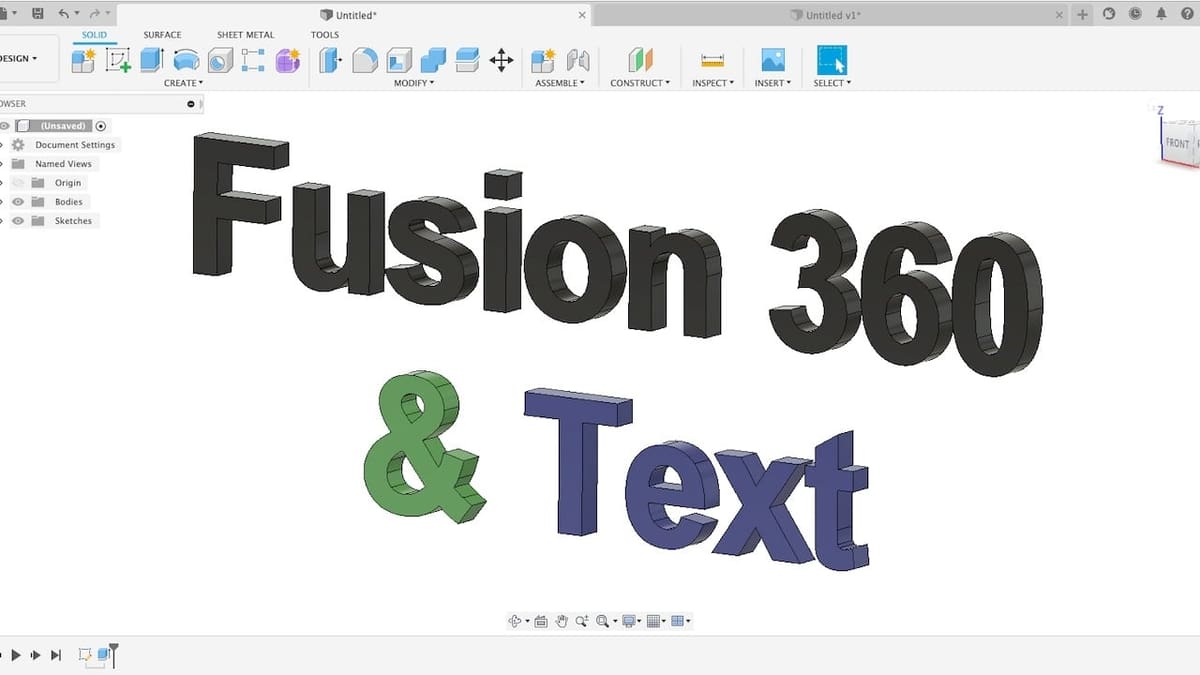
Converting text from 2D to 3D is quite easy. For the most common fonts, the Extrude command should do the job.
It basically works like with any other 2D profile: finish the sketch, select the extrude tool, and click on the text. Then, it’s just a matter of setting the extrude distance, which in this case will be the depth of the text.
And that should be it! Usually, each letter from the text is created as a separate body, so be mindful of that.
Some fonts, especially those that are more decorative or entirely customized, don’t always easily work with the Extrude feature.
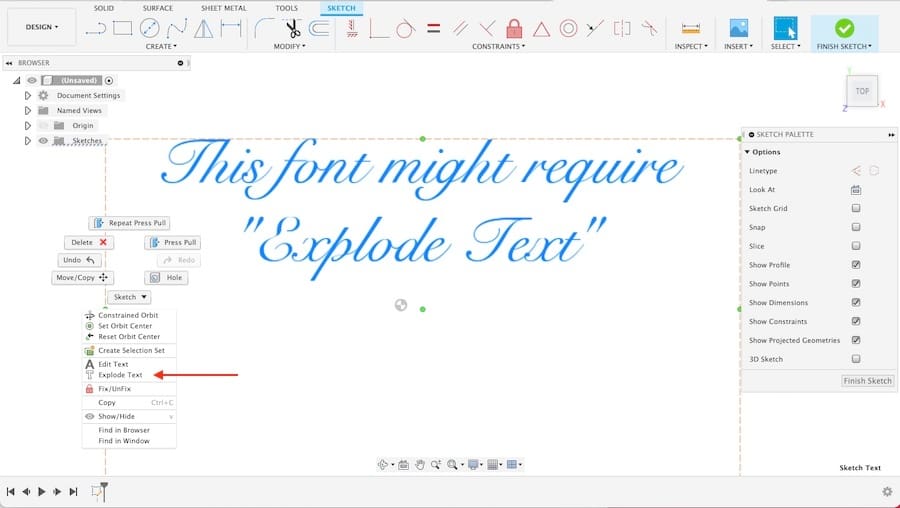
If that ever happens to you, know that there’s a workaround. For the Extrude to work, the text must be first converted to a generic path. To do that, while still in an active sketch, right-click the text and select “Explode Text”.
The text itself will be converted to a series of lines and curves while keeping the exact shape. To extrude this, simply select the shapes (letters) individually and everything should be fine.
The main difference, however, is that your text has lost all its characteristics. In other words, you can’t edit the written text because it’s now made of regular sketch lines. For this reason, try avoiding this workaround whenever possible and if you must use it, leave this step for last.
Technique #4: Embossed
While not strictly a text-related feature, the relatively new Emboss feature comes in very handy when you need the text to wrap around a cylinder.
Check the example above. We couldn’t extrude the text directly onto the cylinder here as it’s much larger than its diameter. In such cases, we must use the Emboss feature, but be aware that it only works for cylindrical and conical surfaces, but can be applied to both inner and outer surfaces.
Embossing text on other curved surfaces requires a more complex technique which involves using the sheet metal workspace as sort of a workaround solution. Be sure to check this specific tutorial if that’s what you need.
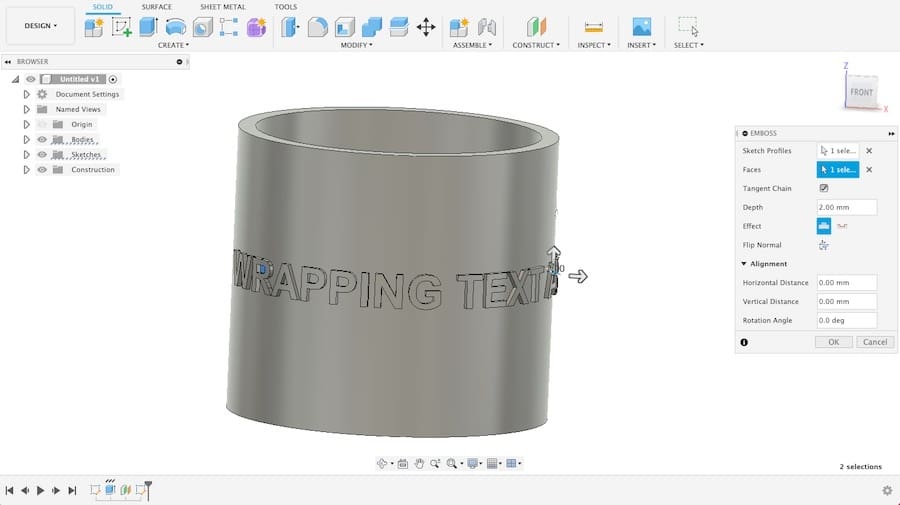
With both the 3D surface modeled and the text sketched, go to the Emboss tool at the “Create” menu under the “Solid” ribbon. First, select the text sketch and then the curved surface.
The text should instantly wrap around the 3D model. Besides alignment and orientation, some of the feature’s settings also include the option to emboss (add material) or deboss (remove material) from the selected surface.
There are literally dozens of ways to add text to a 3D model in Fusion 360. We tried to cover the basics in this article, which should be enough for most applications concerning text, including for 3D printing. Happy writing!
License: The text of "Fusion 360: Text – Simply Explained" by All3DP is licensed under a Creative Commons Attribution 4.0 International License.