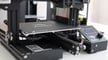
Leveling the print bed is an important step before starting a 3D print because it decreases the likelihood of issues with the first layer. Unfortunately, for most consumer 3D printers (such as the Creality Ender 3), leveling the bed is a manual process in which the user has to adjust the bed screws by hand to put the build plate at an equal distance below the printhead’s nozzle for, at minimum, five points of the bed (each corner and the center).
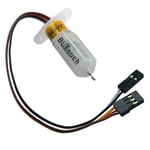
Automatic bed leveling (ABL) is a solution that takes the stress out of the bed leveling process, using a sensor to detect the distance between the nozzle and print surface at different points. These distances are then used by the printer to adjust its Z-position across the printing area as it prints. The result is a more consistent bottom layer, which means more successful prints.
ABL sensors can typically measure down to the hundredth or thousandth place of a millimeter, making this process more accurate and reliable than manual leveling, as well as easier. While your eyes and hands may deceive you when you try to level the bed the same way multiple times, an ABL sensor will consistently measure distances the same way with a high level of precision and accuracy.
In this article, we’ll go over how you can add the BLTouch to your Creality Ender 3 printer to take advantage of these benefits. We’ll go over what you need for the installation, the steps for the process, as well as some tips and tricks at the end.
Why the BLTouch?
The BLTouch is the most popular automatic bed leveling sensor on the market and is developed and manufactured by Antclabs.
The BLTouch isn’t the only leveling sensor option out there, but the reason it’s popular is due mostly to its wide compatibility with different 3D printers. While the BLTouch comes pre-installed on some printers, it’s usually an upgradable attachment. You can pick up an everything-included (except the printer) Ender 3 BLTouch kit from Creality for just $49, which isn’t too bad at all.
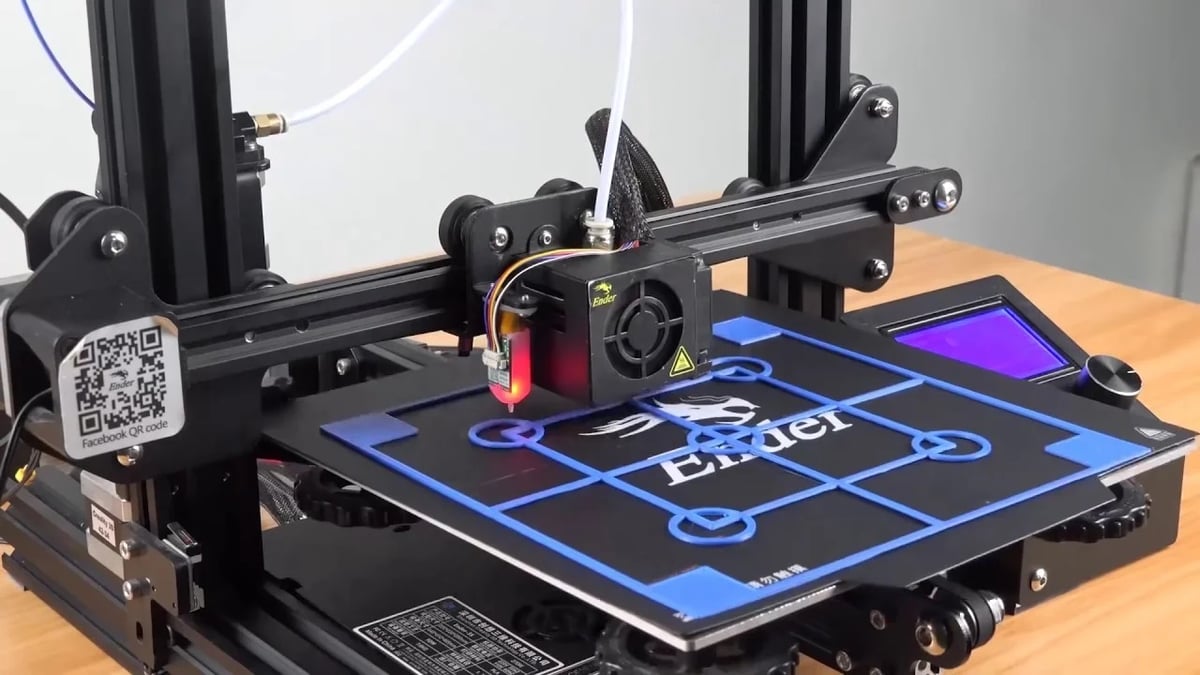
In technical terms, the BLTouch is a contact-triggered automatic bed leveling sensor that uses a retractable probe to determine how far away the build plate is from the nozzle. One of the best qualities of the BLTouch is that it’s compatible with any 3D printer bed surface (from glass to PEI) and it is also extremely accurate. Antclabs states that the sensor has a repeatable precision of up to 0.005 mm, which will yield more consistent first layers and (full) prints!
Now that you know why the BLTouch is a great option, let’s get into the materials and steps.
Gathering Materials
The BLTouch itself is just a sensor, installing it and making it compatible with your Ender 3 will require some extra components.
Before we get started, it’s worth noting that this guide is specifically for installing a BLTouch sensor on the Ender 3 or Ender 3 Pro with the stock mainboards. For users with the Ender 3 Pro, the steps are mostly the same, but you will need to choose a firmware file compatible with the Ender 3 Pro rather than the original. If you have an Ender 3 V2 and want to install a BLTouch, you can check out our guide for the process, which is different regarding wiring and firmware flashing.
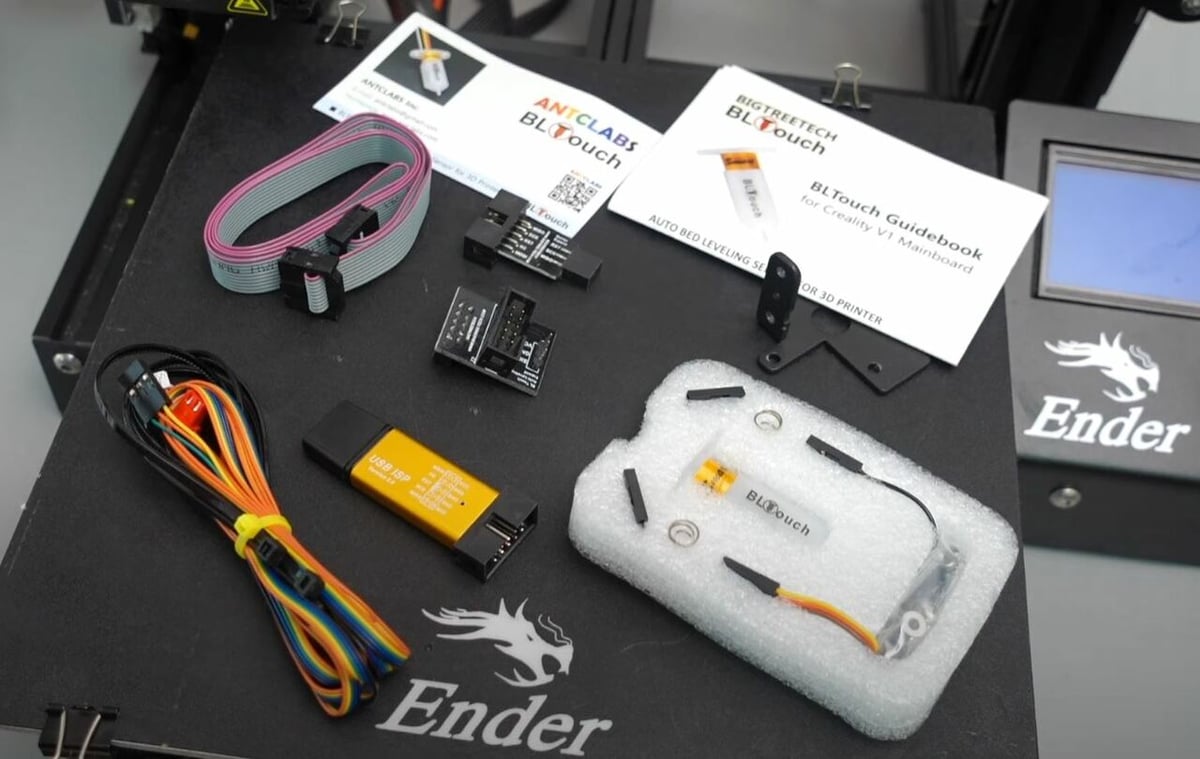
We suggest using Creality’s BLTouch upgrade kit because it includes every necessary part for the installation on an Ender 3 and it costs just under $50. However, if you prefer to buy each component individually, we’ve listed the parts below:
- BLTouch sensor
- Pin-27 adapter board for the Creality Ender 3 (for extra ports for the sensor)
- USB ISP programmer (for installing new firmware)
- DuPont-style jumper wires (for wiring the BLTouch to the mainboard)
- (for mounting the sensor to the printhead)
- 3D printed sensor mount (for holding the sensor; many other designs are also available for download)
With all of the necessary components ready, you can begin installing your auto bed leveling system.
Installation
Hardware
The first step to installing your BLTouch device is to set up the hardware. This step is relatively quick since the majority of the installation process is for wiring and updating the firmware. Follow the steps below to properly attach your BLTouch device:
- Turn your printer off and unplug the power cable from the power supply unit (PSU).
- Use an Allen key to remove the two screws that secure the printhead shroud.
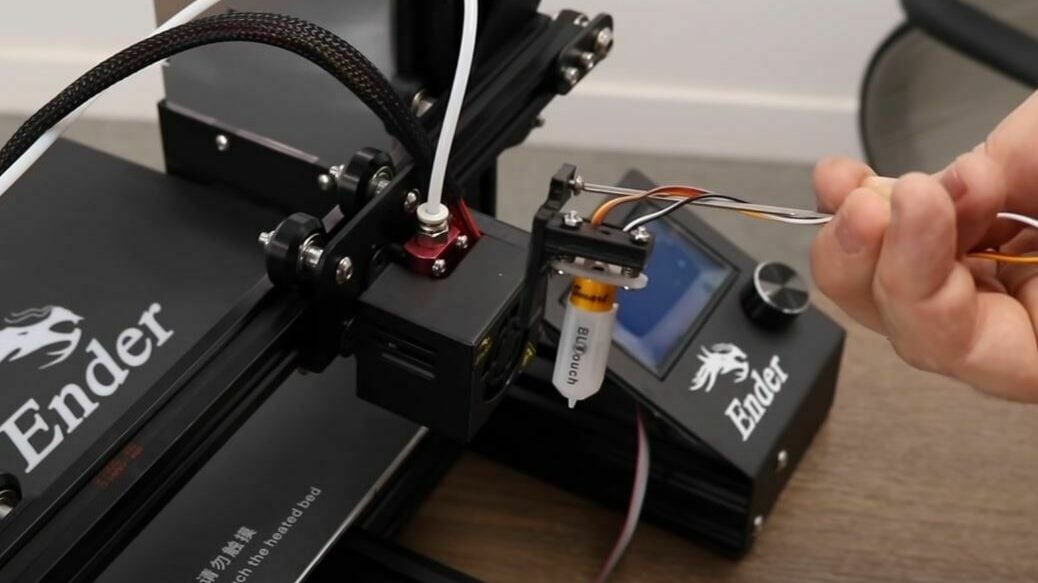
- Take your BLTouch device and attach it to your mount using the provided screws (or another way if you’re using a DIY mount).
- Insert the 5-pin cable to your BLTouch, because wiring the device now is a lot easier than trying to do it later.
- Place your BLTouch sensor with its mount on your printhead carriage. The larger hole should go over the bolt that holds the bearing on your printhead carriage.
- Use your Allen Key to reattach the printhead shroud over the BLTouch mount.
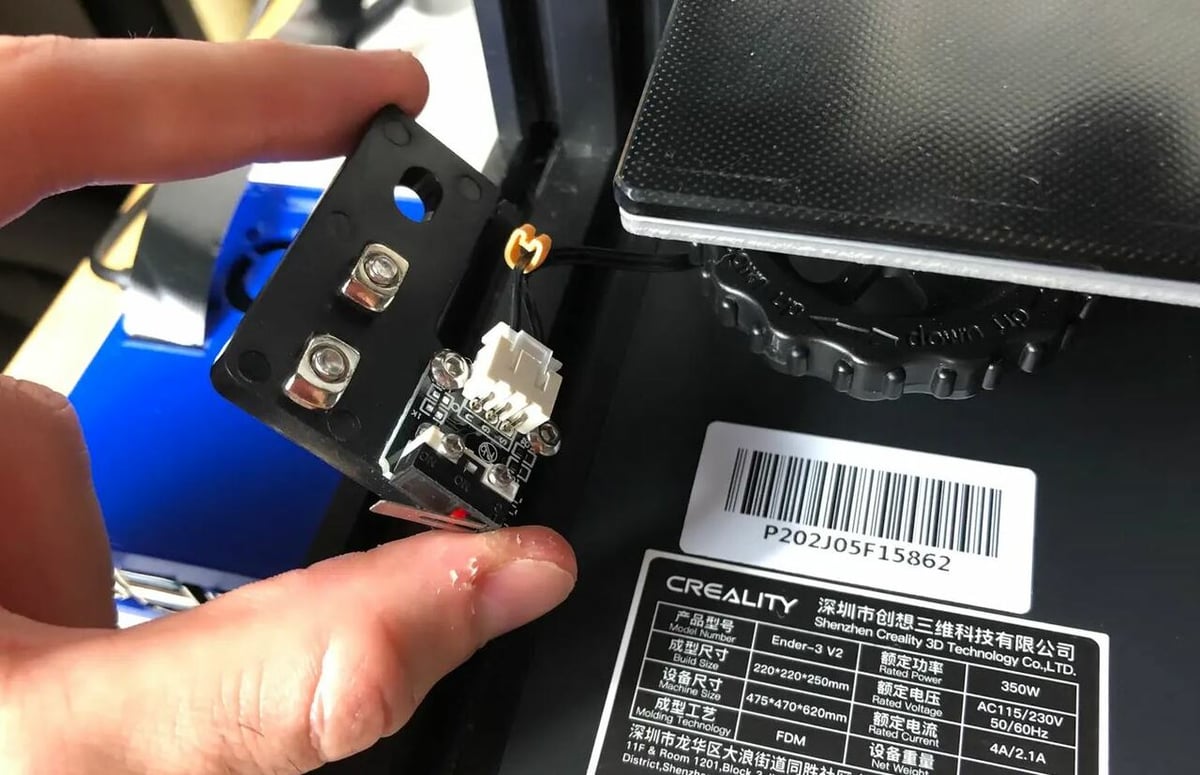
- Unscrew the two bolts that hold your Ender 3’s Z-axis endstop in place. Loosen them enough to remove the assembly from the side of your printer.
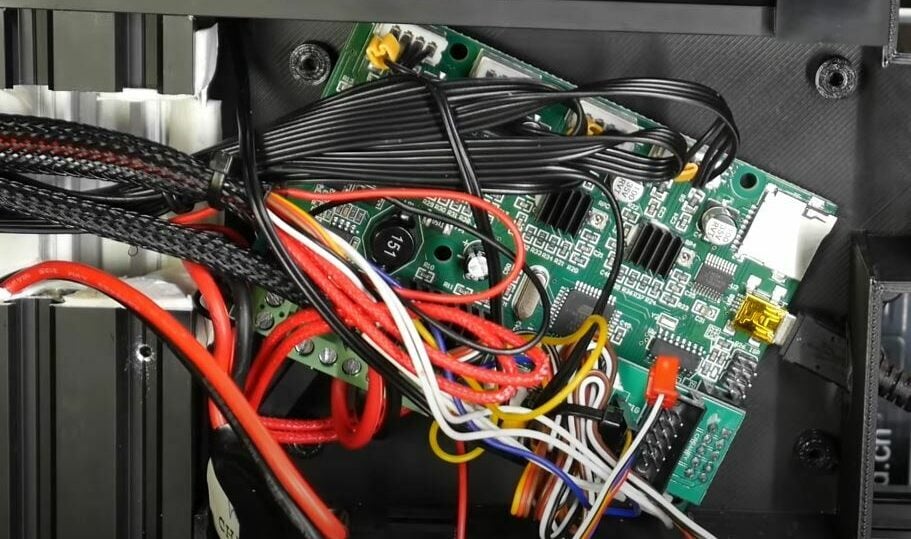
- Open your printer’s mainboard cover by removing the screws from the front and back of the cover. To open the furthest-back screw, you’ll have to move the print bed carriage all the way forward.
Initial Wiring
The next step for installing a BLTouch sensor to your printer is to connect the wiring so that the firmware can be loaded onto your board. The steps below detail what wiring steps you should take before flashing your firmware (the next step):
- Make sure that your printer is still turned off with the power cord removed, and the mainboard cover is open.
- Locate the mainboard fan wire and remove it. We will reconnect this cable later.
- Locate the Z-axis endstop port and remove the cable. You will not need your Z-axis endstop or its original cable again because the BLTouch will replace these.
- Unplug the LCD ribbon cable. We need to do this temporarily to make room for another connection.
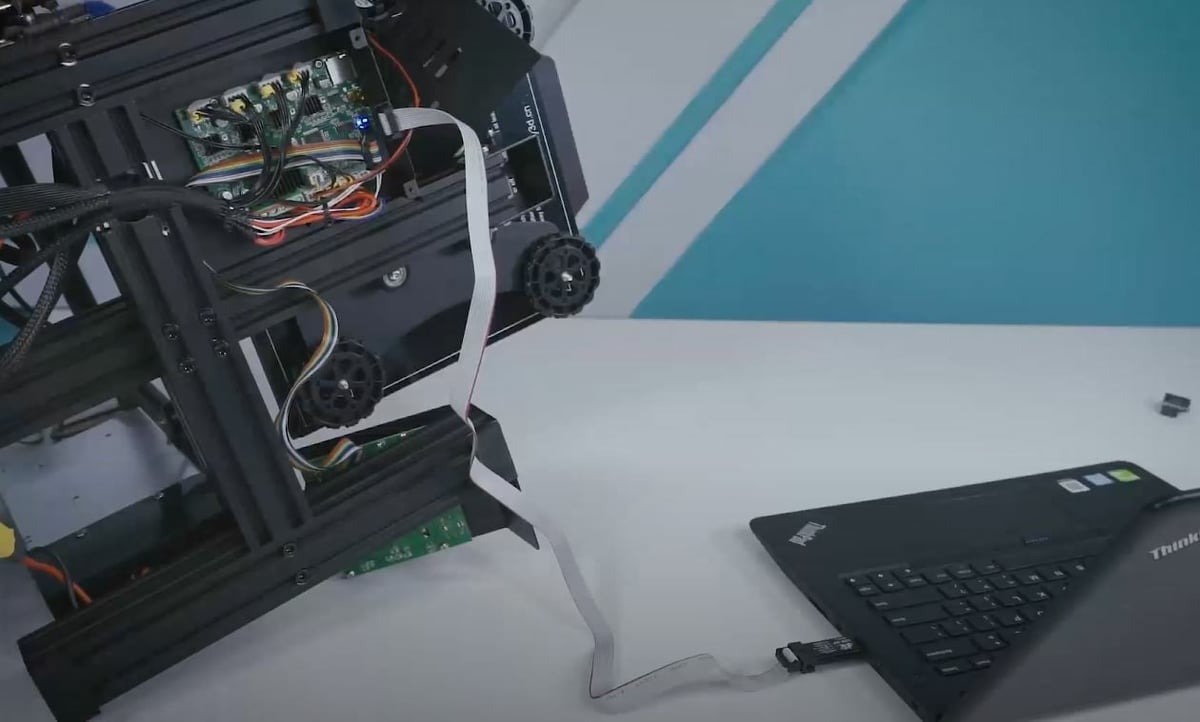
- Take the 2×3 pin ISP connector from your BLTouch kit and connect it to the other end of the included USB ribbon cable. The ISP connector allows you to communicate to your printer’s motherboard with external devices, such as your laptop.
- Look at the small writing on the ISP connector and locate which side has pins labeled “VCC” and “GND”.
- Plug the ISP connector into the corresponding 2×3 ISP port on your Ender 3’s mainboard, which is right next to the LCD connector. Make sure to plug the connector in with the side reading “VCC” and “GND” facing away from the center of the board.
- Plug the USB side of your ribbon cable into a computer. You should see a blue indicator light appear on the mainboard, even though the power to the printer is turned off.
Firmware
Now that you’ve installed the ISP-to-USB cable on the printer, we can use this connection to flash the new, BLTouch-compatible firmware to the printer without having to burn a bootloader. Follow the steps below to install the new firmware to your Ender 3’s mainboard:
- Open a web browser on your computer.
- Go to Creality’s Forum Download page and find the firmware version for your specific configuration. For example, for an original Ender 3 with the stock mainboard and a BLTouch device, the firmware is “Ender-3_8-bit_Marlin 1.1.6 BLTouch”. Click the “Download” button to download the RAR file for this configuration.
- Open your RAR-compatible file-unpacking application. If you don’t already have a program for decompressing files, you can install 7-Zip.
- Locate where your RAR file was downloaded, and double-click the file to see what’s inside.
- Open the first folder, which should contain the “ISP.rar” file and another file titled something like “Ender-3Marlin1.1.6BLTouch.hex”.
- Open the “ISP.rar” file, then the “ISP” folder, then ProgISP zip folder, as well as the duplicate folder inside of this one.
- Locate the “progisp.exe” file and double-click it to run the program. This file is the downloader for ProgISP, which is a computer application that allows your device to communicate with a board connected via the ISP connector. Once you run the program, an error message may pop up, but ProgISP should open right after.
- In the top-left corner of the screen, find the “Select Chip” section and set the chip to “ATmega1284P” which is the processor chip on the stock Creality Ender 3 mainboard.
- Click the three-dot icon to the right of the “Auto” button in ProgISP. This should automatically detect what configuration settings need to be used for the program to communicate with the connected board.
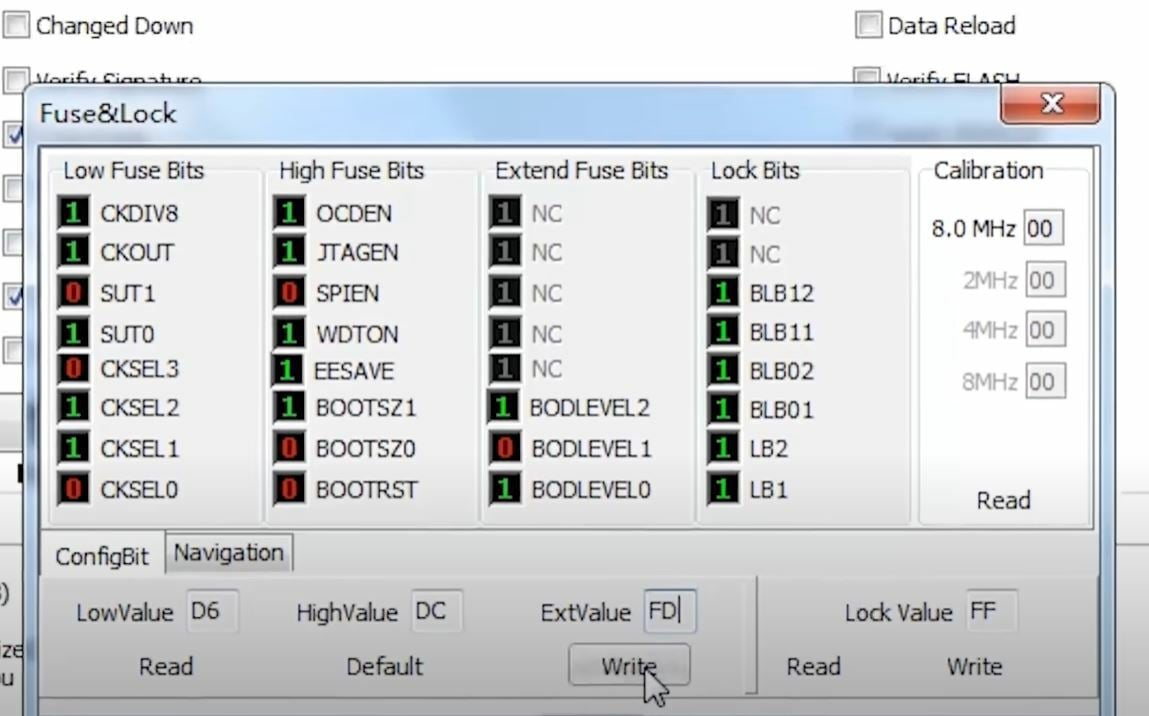
- On the “Fuse&Lock” pop-up screen, set the “LowValue” to “D6”, the “HighValue” to “DC”, and the “ExtValue” to “FD”. This should allow your board to properly communicate to your computer.
- Click “Write”.
- Switch back to your 7-Zip application.
- Click the exit folder icon at the top-left of the interface to exit the folder or file you last looked at. Do this until you’re back to seeing the “ISP.rar” file.
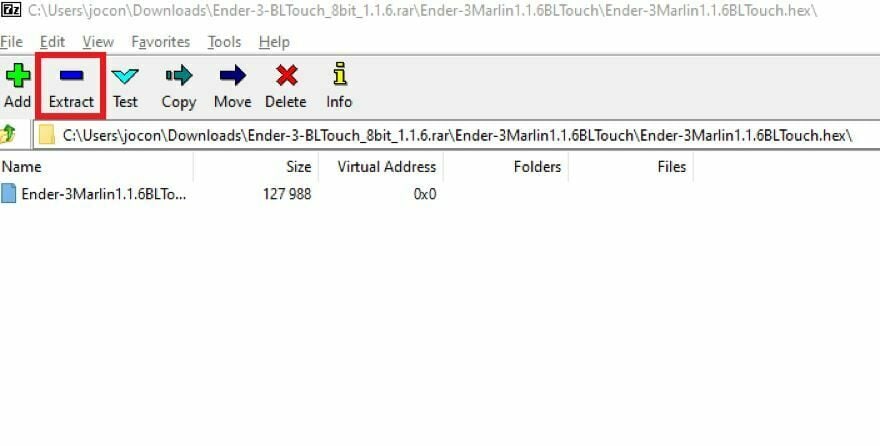
- Double-click the other file, which should be labeled “Ender-3Marlin1.1.6BLTouch.hex”.
- Inside this file, click to select the HEX firmware file and then choose “Extract” from the 7-Zip menu.
- Click “Ok” to confirm the extraction location.
- Go back to your ProgISP application and click the “Load Flash” button, located on the right side of the interface.
- In the file browser that opens up, locate, select, and open the HEX file you extracted.
- Click the “Auto” button in ProgISP.
- Wait for the firmware flashing process to complete. You’ll know when this is done if you see a success message in the ProgISP terminal at the bottom of the interface.
Final Wiring
Finally, now that your new firmware is installed, we’ll need to finish wiring your printer. Follow these steps below to do so:
- Remove the ISP connector from your Ender 3’s mainboard.
- Attach the pin-27 board to the mainboard’s LCD port. Make sure that the board plugs into every pin of the original LCD port and that the pin-27 board’s 3-pin port is facing towards the center of the mainboard.
- Attach your LCD cable to the pin-27 board. Make sure to align the cable correctly on the board according to the board’s gap.
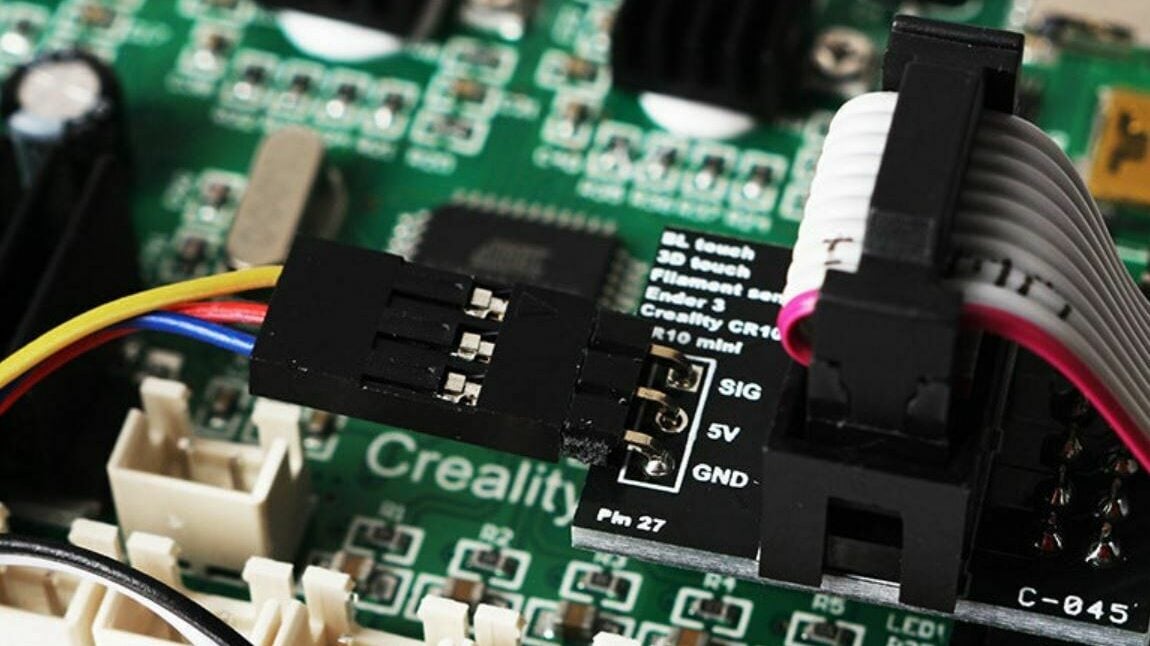
- Connect your BLTouch sensor’s 3-pin cable to the corresponding 3-pin port on the pin-27 board. Make sure to orient the cable so that the yellow wire on this cable is closest to the brown one on the LCD cable. Another way you can check that the orientation is correct is by matching the yellow wire with the pin labeled “SIG”.
- Connect the BLTouch’s 2-pin connector to the Z-axis endstop port on the mainboard. The connector should have a notch that locks the port in place in the correct orientation. However, if yours does not, make sure that the white wire is on the same side of the connector as the other white wires on the other endstops.
- Use zip-ties (included in the kit) or another type of cable tie to keep your BLTouch sensor’s wires close to the other wires. If you have more time on your hands, you can choose to run the BLTouch wires through the printhead wiring mesh.
- Unscrew the fan on your mainboard cover and reattach it to the other side of the cover. You’ll need to do this because the Pin-27 board takes up the fan’s space inside of the mainboard enclosure.
- Re-plug the mainboard fan back into the mainboard.
And that’s it! You’ve now successfully installed a new BLTouch device on your Ender 3! You can use it by running a leveling sequence before every few prints to ensure that your nozzle stays an equal distance above the bed at all points.
Troubleshooting
If you’re having issues using your BLTouch or are running into complications during the installation process, don’t worry! In this section, we’ll go over some common problems and solutions below:
- The first layer is too low or high: As we’ve explained, although the BLTouch can help keep the nozzle an equal distance above the print bed, it doesn’t necessarily make the first layer perfect. You’ll still have to adjust the Z-offset setting from your Ender 3’s LCD (or in your slicer) to perfect your first layer.
- Using a V1 silent mainboard: If you have a Creality V1 Silent mainboard, you may be wondering what the differences are in the process. As this board has different stepper motor drivers than the stock board, you’ll have to download a firmware version with “silent mainboard” at the end of the name from the Creality Forum download page.
- Sensor not probing: If you can’t get the sensor to extend or retract its probe, then your BLTouch sensor’s wires may be switched. This is sometimes the result of poor quality control from the manufacturer. You can solve this issue by switching the order of the wires plugged into the Z-axis endstop, either by flipping the connector or soldering the cable. Make sure your BLTouch is wired to your mainboard as shown in this wiring diagram.
- Inconsistent leveling: If you’re noticing that your BLTouch is yielding inconsistent leveling values and your nozzle is high in some areas and low in others, it may be because of a misaligned sensor. This can sometimes be a problem with 3D printed sensor mounts, and you can fix it by using a mount with a flatter surface for the sensor to mount on (so the probe isn’t angled).
- Leveling isn’t changing: If you noticed that running more BLTouch leveling sequences isn’t changing how high or low your nozzle is at different points, it could be because your printer isn’t saving the values. Try installing an adjusted firmware program with the “RESTORE_LEVELING_AFTER_G28” feature activated in the Marlin configuration.
License: The text of "Creality Ender 3 (Pro) & BLTouch: How to Install It" by All3DP is licensed under a Creative Commons Attribution 4.0 International License.
CERTAIN CONTENT THAT APPEARS ON THIS SITE COMES FROM AMAZON. THIS CONTENT IS PROVIDED ‘AS IS’ AND IS SUBJECT TO CHANGE OR REMOVAL AT ANY TIME.