Ender 3 (V2/Pro) Bed Leveling: Easy Step-by-Step Guide

Learn how to level your Ender 3 bed with this easy step-by-step Ender 3 bed leveling guide to ensure that the first layer is solid.
The term “bed leveling” is actually a misnomer. You’re not making the bed level with the ground, but rather placing it so that the nozzle tip is at the same, correct distance over the entire surface of the build plate. This is important because the first layer is the main support for the rest of the print. In order to achieve a solid base, the bed must be properly oriented to provide the correct adhesion and delivery of the printing material.
If the nozzle is too far from the bed, the filament won’t adhere to the build plate at all; too close and the nozzle will push past the layer height, preventing the material from extruding and sticking. Either way, the foundation will be unsatisfactory. The sweet spot is when the nozzle allows some space but applies just a little pressure to the flowing filament in order to help it adhere to the build plate. Unfortunately, there isn’t one specific measurement that can be applied to any and all printers, most users aim for between 0.06-0.2 mm, with 0.1 mm being a good starting point.
The Ender 3s don’t have an auto-leveling feature, so you have to level the bed manually. Fortunately, this isn’t too difficult and is aided by some of the printer’s features. The menu provides actions that prepare the device for leveling, and the four large knobs under each corner of the bed make the job easy.
You’ll find that, once leveled, the bed will stay that way for some time. Periodic re-leveling may be necessary but once the procedure is learned, it should take less than five minutes to re-level your Ender 3’s bed each time.
Let’s take a closer look at how to get it done!

Prepping the Plate & Nozzle

The Ender 3, Pro, and V2 require some prep work to get the machine ready for bed leveling. Note that it’s not necessary to preheat the bed or the nozzle.
- Make sure that the build plate is clean. On all Ender 3 models, you can remove the build plate and clean it.
- Clean off anything that’s sticking to the surface. Use a spatula if needed to break off loose material.
- Wash either the magnetic or glass build plate with warm, soapy water, and dry it with a clean cloth. Optionally, use window cleaner or acetone on your V2’s glass bed to clean off built-up hairspray or ABS glue.
- Make sure that the surface is dry and that no lint or particles remain.
- Re-attach the build plate to the heated bed using the supplied clips. Check carefully to ensure that the entire build plate is flat with no ripples or high spots.
- Ensure that the nozzle is clean and free of material. It shouldn’t have any plastic protruding from the tip. An easy way to do this is to heat up the nozzle to the temperature last used and gently wipe off the tip with a soft cloth. Wear a glove so that you don’t touch the hot nozzle with your fingers.
Prepping the Machine

To prepare for leveling, you have to position the nozzle and bed. The Ender 3s’ controls make this easy.
- Turn on the machine.
- Press the control knob and scroll to the PREPARE menu.
- Scroll down to AUTO HOME and press the knob. The hot end will move to the left front of the bed and stop.
- Once again go to PREPARE.
- Scroll to DISABLE STEPPERS and press the control. This will make it easy to move the bed back and forth.
- Next, rotate each of the four leveling wheels counter-clockwise to lower the bed. One or two turns each should be sufficient. The purpose of this is to make sure that the bed is lower than the nozzle tip.
Leveling the Bed
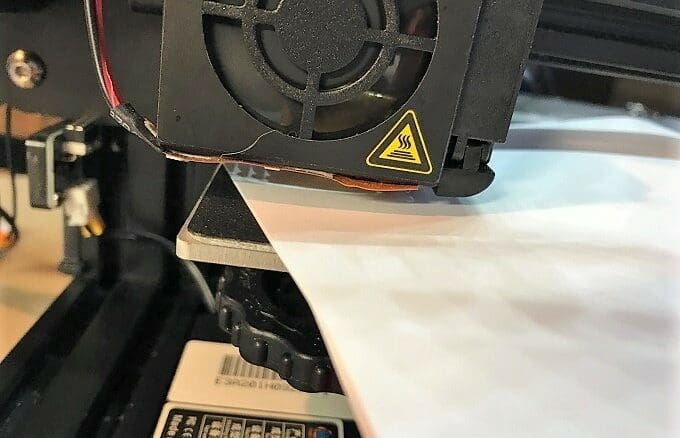
Before looking into how to level the bed, it’s worth considering what tool you’ll be using. Many users opt for printing paper as they may have some around, but there are different sizes, not just in terms of length and width, but also in thickness. Without getting too technical (grammage), using a thick piece of paper may make the distance between the nozzle and the bed too far.
Printer or photocopier paper that you may have lying around is usually ~0.1 mm (0.004 in) thick, which might be too high for accurate, successful bed leveling, especially if you’re looking for a smaller gap. Better options may be tissue or tracing paper, although be cautious as there’s a variety of types with differing thicknesses, too.
An alternative is using a feeler gauge, a device comprised of numerous steel blades, each with a varying, but precise, thickness. These are also known as leaves.
Once equipped, you’re ready to go:
- Move the nozzle so that it’s positioned over the bottom left adjustment screw of the bed.
- Slide the paper (or feeler gauge’s blade) between the nozzle and the bed. If you were able to position the nozzle, there should be some space between the two (otherwise you’ll likely have scraped the bed with your nozzle).
- Very slowly raise the corner with the adjuster. Remember: Clockwise (looking from above) moves the bed up. As you do this, gently slide the paper back and forth. The moment you feel the slightest resistance to your moving the paper, stop turning the knob. That corner is (almost) ready to go.
- Do the same for the other three corners of the build plate, positioning the nozzle above their respective adjustment screws. Always advance the hot end to a new corner slowly. This will prevent damage to the build plate in case the nozzle starts to drag. If this occurs, simply lower the next corner (before starting the leveling process) to make some room.
- After you’ve adjusted each corner once, go back and check the four corners again. You may have to do further adjustments to get all four correct.
And that’s it! You’re now ready to print on a leveled bed. Read on for some recommended test prints.
G-code Scripts & Tests
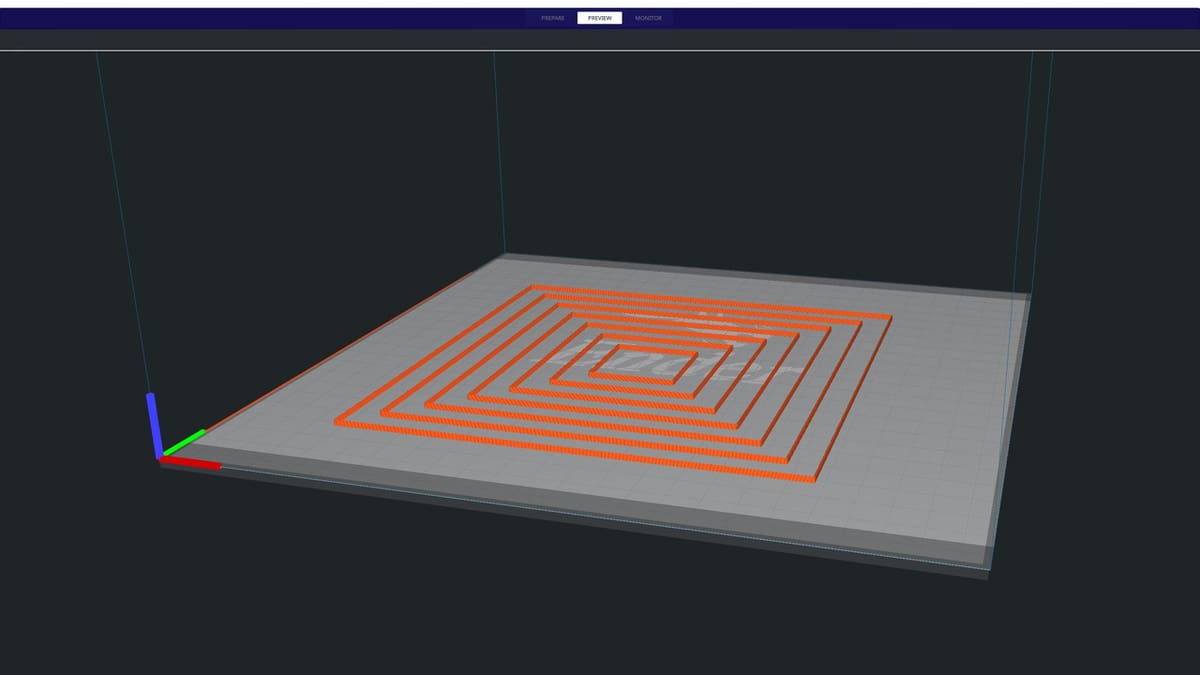
If the above sounds like a lot of messy, manual work, there’s an easier and more precise method. Essentially, you can do the same thing, but instead of manually moving the printhead and bed around, you can have G-code do it for you.
There are several of these leveling scripts available out there, but one we particularly like comes from YouTuber CHEP (or Chuck). In his video “Easy Way To Level Your Bed“, he explains how to use his G-code script and provides a nice way to test it when you’re done.
More Tests
Finding the script and tests that work for you is worth investing a bit of time. In case CHEP doesn’t do it for you, here are a few more options for scripts and tests.
- G-code from adamsiem: If you have an Ender 3 Pro, it’ll run you through a three-round bed leveling routine (using the console button to advance the nozzle) and then do a test print for you to verify that your bed is level and flat. Keep in mind that this G-code is designed to work with PLA.
- Parametric leveling test from pgreenland: Although not designed specifically for the Ender 3, you can remix the model in the Thingiverse Customizer and download the SCAD file and adjust it in OpenSCAD. Otherwise, the default STL file fits on the Ender 3 but won’t cover the whole bed.
No matter which of the above methods you choose, you can then slice and print the test to verify your now-level bed.

License: The text of "Ender 3 (V2/Pro) Bed Leveling: Easy Step-by-Step Guide" by All3DP is licensed under a Creative Commons Attribution 4.0 International License.