
How to Enable SSH on a Raspberry Pi: 3 Easy Steps

You can't always be right next to your Raspberry Pi. Learn how to enable SSH on your Raspberry Pi to access it from another device!
The Raspberry Pi is a low-cost single-board computer (SBC) that acts like a normal PC but in a much smaller package. There’s plentiful documentation and a large community of people who use the Raspberry Pi ecosystem, making the boards easy to connect with other electronics. Popular with hobbyists and makers, all Raspberry Pis (except the Pico) can be used like standard desktop computers, with a keyboard, mouse, and monitor. However, sometimes a traditional setup isn’t possible or practical. For example, robots incorporating Raspberry Pi clearly can’t have a monitor attached to them all the time!
This is where the Secure Shell Protocol (SSH) comes in. SSH is a network protocol that can be used for remotely accessing a Raspberry Pi’s terminal securely over an unsecured network. It’s especially helpful when a Raspberry Pi is built into your project with no easy way to access the ports, so your only choice is to access it remotely.
In this article, we’ll go over how to enable SSH on your Raspberry Pi, how to find your Raspberry Pi’s IP address, and then how to access your Raspberry Pi over SSH from another device.

Step 1: Enabling SSH
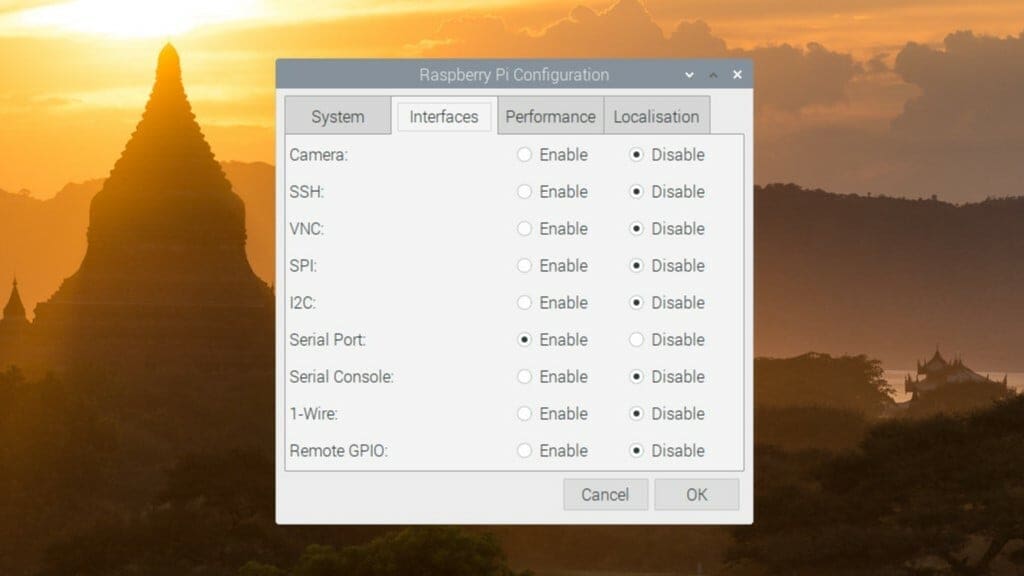
By default, Raspberry Pi OS, the official supported operating system for Raspberry Pi, comes with its SSH server disabled. There are two methods for enabling SSH on your Raspberry Pi: You can use the Raspberry Pi Configuration menu or the raspi-config command line tool. Note that if you have used the raspi-config tool before, you won’t be able to use the Raspberry Pi Configuration menu and will have to stick with the command line.
To enable SSH through the Raspberry Pi Configuration menu, you’ll need your Raspberry Pi (running Raspberry Pi OS) connected to a display. Click on “Preferences > Raspberry Pi Configuration” from the home menu. Next, click on “Interfaces”, and select “Enabled” next to SSH. (If there are any other interfaces you want to enable, this is a good opportunity to do so!) Finally, click “OK” to exit and save your changes.
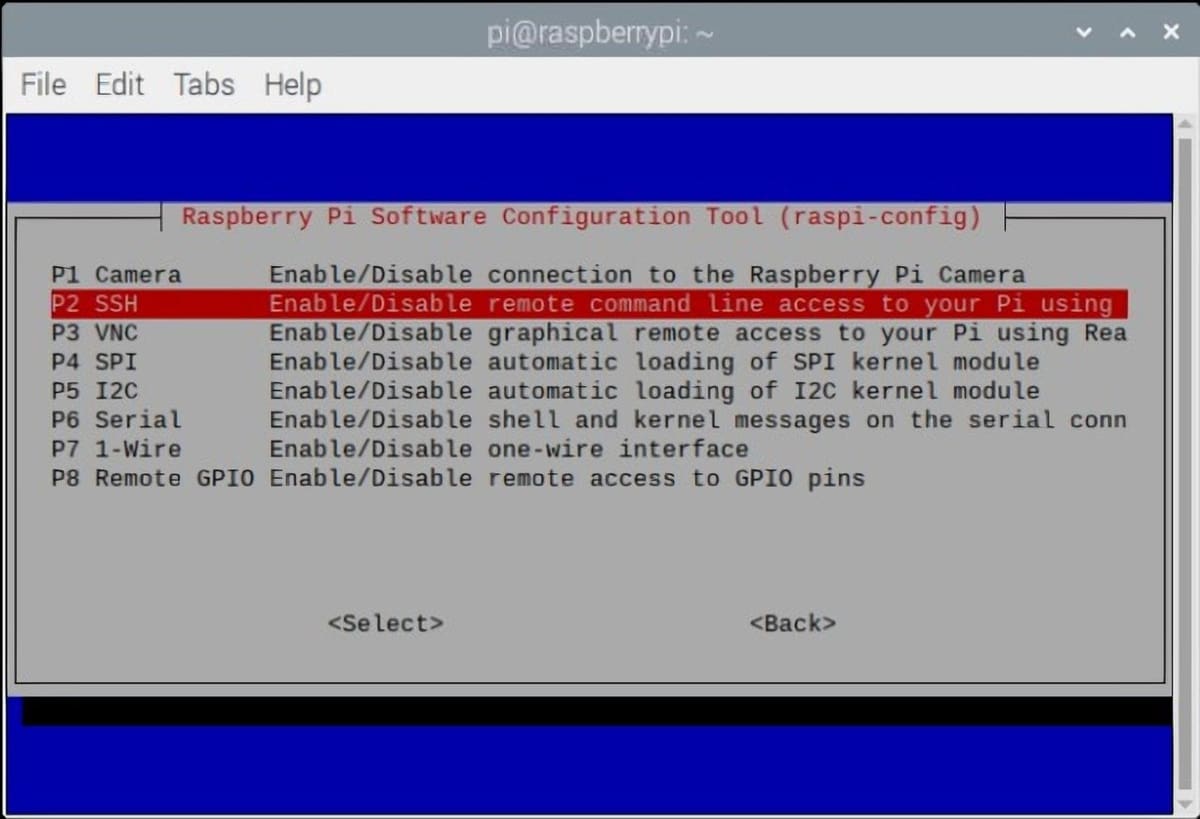
To enable SSH through the raspi-config command line tool, open up a terminal and enter sudo raspi-config. You should see a menu titled “Raspberry Pi Software Configuration Tool (raspi-config)”.
Use the down arrow to navigate to “5 – Interfacing Options” and press Enter. Then, use the same keys to navigate to “P2 – SSH”. Use the right arrow key to move the selection from “No” to “Yes”. You should see a message that says “The SSH server is enabled”. Press Enter and then navigate to “Finish” to exit the tool.
Step 2: Finding the IP Address

Now that you’ve enabled SSH on your Raspberry Pi, the next step is to connect to your Raspberry Pi over SSH from another device. However, before we do this, we need to find the Pi’s IP address.
An IP address is used to identify a device to all the other devices on a network, and also allows other computers to route information to that device. You’ll need your specific Raspberry Pi’s address to be able to access it remotely.
To find your Raspberry Pi’s IP address, open up a terminal and enter hostname -I. The first part of the output (it should look like 012.345.6.789) is your Raspberry Pi’s IP address, which you’ll need for the next step.
Step 3: Connecting to your Raspberry Pi
Now that you’ve set up SSH on your Raspberry Pi, you can access its terminal through SSH on another device. The only condition is that the device needs to be connected to the same Wi-Fi network as your Raspberry Pi.
Computers
Computers running MacOS, Windows, and Linux all have SSH built in. For Mac/Linux computers, simply open a terminal and enter ssh username@<Your Pi's IP Address>. (Substitute the IP address you found in Step 2 into the command). Windows computers with the October 2018 Creator’s Update installed also have SSH, and you can use the command specified above on the command line.
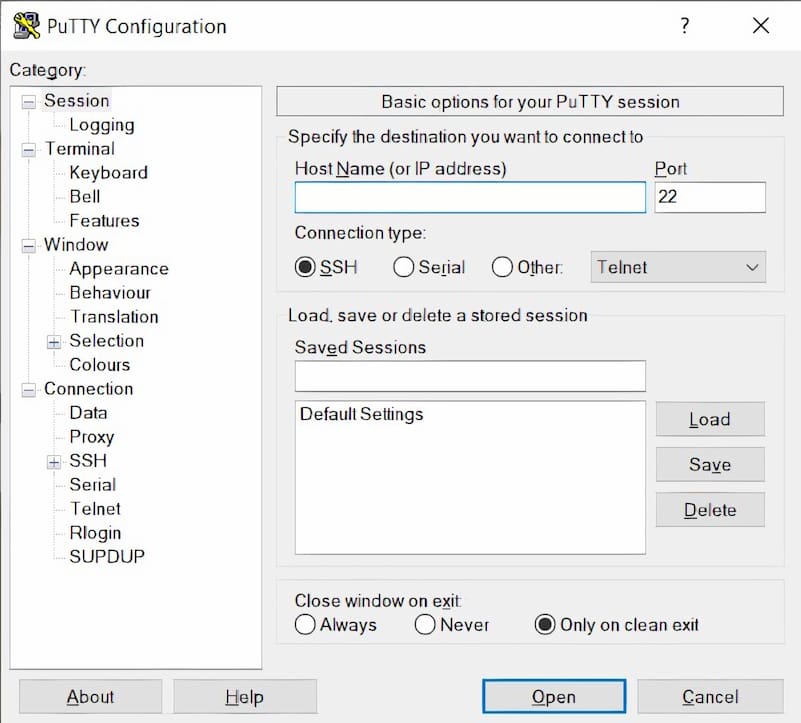
However, if your Windows computer does not have SSH, you can use the PuTTY app instead. To use SSH on PuTTY, make sure “SSH” is selected under “Connection Type”, and type your Pi’s IP address under “Host Name (or IP address)”. Then press “Open” to open the connection.
Mobile Devices

If your Pi is really in the field, you can also use SSH on a mobile device by using an app such as Termius. To connect to your Raspberry Pi using this app, navigate to “Terminals” in the app and then type in the same command you would use if you were using a computer (shown above).
And that’s it! You have enabled SSH on your Raspberry Pi and connected to it with another device! If you want to dig deeper into the possibilities, like passwordless SSH, Raspberry Pi’s official documentation page has some further tips.

License: The text of "How to Enable SSH on a Raspberry Pi: 3 Easy Steps" by All3DP is licensed under a Creative Commons Attribution 4.0 International License.