As far as slicer software goes, UltiMaker’s Cura is one of the most popular programs out there. In addition to being both free and open-source, Cura has loads of great features. Here, we’ll be looking at an often overlooked infill pattern in Cura called gyroid.
Infill, as the name suggests, is the inside of a model. In 3D printing, infill allows us to vary the density of our model while maintaining a certain amount of strength. Cura’s infill options are abundant, meaning you’re sure to find the best Cura infill pattern for whatever you wish to print.
Gyroid infill was introduced in the 3.6 version of Cura at the end of 2018. In simple terms, gyroid infill can be described as a 3D wavy pattern of sorts. It’s also mesmerizing to watch as it’s printed.
Let’s take a detailed look into the properties of the gyroid pattern, including some pros and cons of printing with it, as well as a few prints to get you inspired to give gyroid infill a try.
What Is It

Let’s have a closer look at this special infill pattern. Many 3D printing enthusiasts have carried out their own studies and testing, all pointing towards a similar result: Gyroid infill is quite strong despite faster printing times and less material usage compared to other infill patterns.
History
It’s been said that this infill pattern was inspired by a 2017 MIT study, where researchers designed one of the strongest and lightest materials available using graphene. The strength of the object wasn’t only due to its material but also to its gyroidal shape. In fact, they found it was the shape that was more responsible for its strength than the material.
This finding generated a lot of interest in the 3D printing world and, soon after, Cura added gyroid infill to its existing patterns. Again, with this pattern, users can print stronger and lighter components.
Mechanical Tests
One reason makers have loved the gyroid infill is that it gives near isotropic strength (same in all directions) due to the complex 3D nature of the pattern. Stefan from the CNC Kitchen YouTube channel observed this behavior when carrying out tests on various infill patterns. He found that the gyroid infill provided comparable compressive strength in all directions without increasing printing time compared to other patterns.
If you’re wondering about infill density, researchers have demonstrated that the flexural and compressive strength of a part printed with a gyroid pattern increases significantly with density up to about 80%, after which strength benefits are marginal relative to material consumption.
Pros & Cons

With that, here’s a summary of gyroid’s pros and cons based on findings throughout the 3D printing community:
Pros
- Uniform strength in all directions (e.g. XY- as well as Z-planes)
- Comparable, if not faster, printing time to other infill patterns despite the increased number of turns
- High compressive and tensile strength despite lower material usage in comparison to other infill patterns
Cons
- Possibility of increased printer vibration with denser infill percentages
- Increased slicing time
Now that we’ve convinced you how great this infill is, let’s check out how to implement it in Cura.
How to Print It

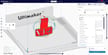
The gyroid infill pattern can be found in the infill settings tab of Cura. It’s fairly straightforward and can be printed just like any other infill. However, we’d like to mention some key points to keep in mind:
- Density: With gyroid infill, the main benefit is that you can print with a lower infill percentage and still get good results. The exact setting will depend on the end use of your parts, but a good starting point for decorative prints is 10-15%.
- Speed: With standard densities, start with an infill speed of around 50 mm/s and work your way up from there, finding the speed that best suits your needs. When you’re printing with denser infill percentages, it’s best to keep the printing speed very slow. Otherwise, the printer will vibrate rapidly and cause some problems with your print.
Finally, let’s take a look at three cool prints that incorporate the gyroid infill pattern or that could benefit from it.

Model Inspiration
Lampshade

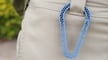
This unique lampshade puts the beautiful gyroid infill pattern on full display. To achieve this look, the creator used 8% infill, which can be adjusted to your preference, and set the “Infill Line Multiplier” to 4 in Cura in order to scale up the pattern and improve its rigidity. No advanced design skills were needed, just set the wall thickness to zero and you’ll have a brag-worthy lampshade in no time.
The creator also recommends tuning your printer’s retraction and related settings to minimize stringing and avoid the need for much post-processing.
- Who designed it? FlutemakerAotearoa
- How printable/popular is it? Over 770 users have downloaded the model, and it’s been liked 60 times.
- Where to get it? Thingiverse
Shelf Bracket

If you have a shelf that needs supports, look no further than these brackets. Not only are they visually appealing, but they also leverage the inherent strength of the gyroid pattern to hold up to a 20-kg load.
Though this design is mostly inner and outer walls, you can also set the infill to gyroid to lighten the weight of the brackets without sacrificing strength.
- Who designed it? Az3Dip
- How printable/popular is it? Nearly 400 users have downloaded these shelf brackets.
- Where to get it? MyMiniFactory

Wind Turbine

While the other models showcase the aesthetic virtues of gyroid structures, this model focuses on a more functional use case. Wind turbine blades need to be strong enough to withstand the stress of normal operation, but light enough to overcome issues related to inertia.
The use of a gyroid infill pattern for this homemade wind turbine could help to increase the strength of the blades while also keeping down their weight.
- Who made it? 3dprintable1
- Who printed it? This particular model has 22 makes and more than 126,000 downloads.
- Where to get it? Thingiverse

License: The text of "Cura Gyroid Infill: All You Need to Know" by All3DP is licensed under a Creative Commons Attribution 4.0 International License.