Blender: UV Mapping – Simply Explained

Want to bring your 3D models to life with stunning textures? Read on to learn all about the Blender UV mapping process!
Blender is powerful 3D creation software that allows you to bring your imagination to life. The intuitive interface and extensive feature set make Blender a popular choice among artists, designers, and hobbyists alike. Whether you want to design stunning visual effects, create detailed character models, or craft architectural designs, Blender has the tools you need.
Blender’s functionalities include UV mapping, which refers to the process of unwrapping a 3D model’s surface onto a 2D plane and applying textures or images to the model’s surface. This is an essential part of creating 3D models with realistic textures.
The latest version of Blender (3.4) comes packed with useful updates and features, including improvements to UV mapping and the UV Editor. Overall, the updates provide a more streamlined and user-friendly experience, enabling anyone to create accurate UV maps with ease. But more on these later!
In this article, we’ll explore UV mapping, shine a light on some helpful tools, and guide you through the process in Blender with a step-by-step tutorial. Let’s get started!
What Is It
As mentioned, UV mapping is an important part of 3D modeling that involves unwrapping a 3D model’s surfaces onto a 2D plane. “UV” refers to the two axes, U and V, representing the 2D texture. This process enables users to apply images, patterns, and colors onto the model’s surfaces, giving it a more realistic and detailed look.
UV mapping creates a map of the model’s geometry, which acts as a blueprint and guides the placement of textures onto the surfaces. By creating seams that mark where the 3D model will be cut and flattened onto the 2D plane, artists can control the texture placement, ensuring they’re applied to the correct surfaces of the model. Carefully unwrapping the model and creating seams ensures that the textures are applied accurately without any distortion or stretching.
One of the main advantages of UV mapping is that it makes texture mapping 3D models easier and faster. Without it, texturing a 3D model involves applying textures directly onto the 3D surfaces, which can be incredibly challenging and time-consuming. UV mapping simplifies this process, providing a 2D representation of the model’s surfaces that can be easily edited and textured.
Tools & Features
Now that we’ve explored UV mapping, it’s time to delve into the tools and menus that allow you to do it in Blender. These tools are crucial for accurately unwrapping and editing UVs, and ensuring that textures are applied precisely to the 3D model’s surfaces without any distortions.
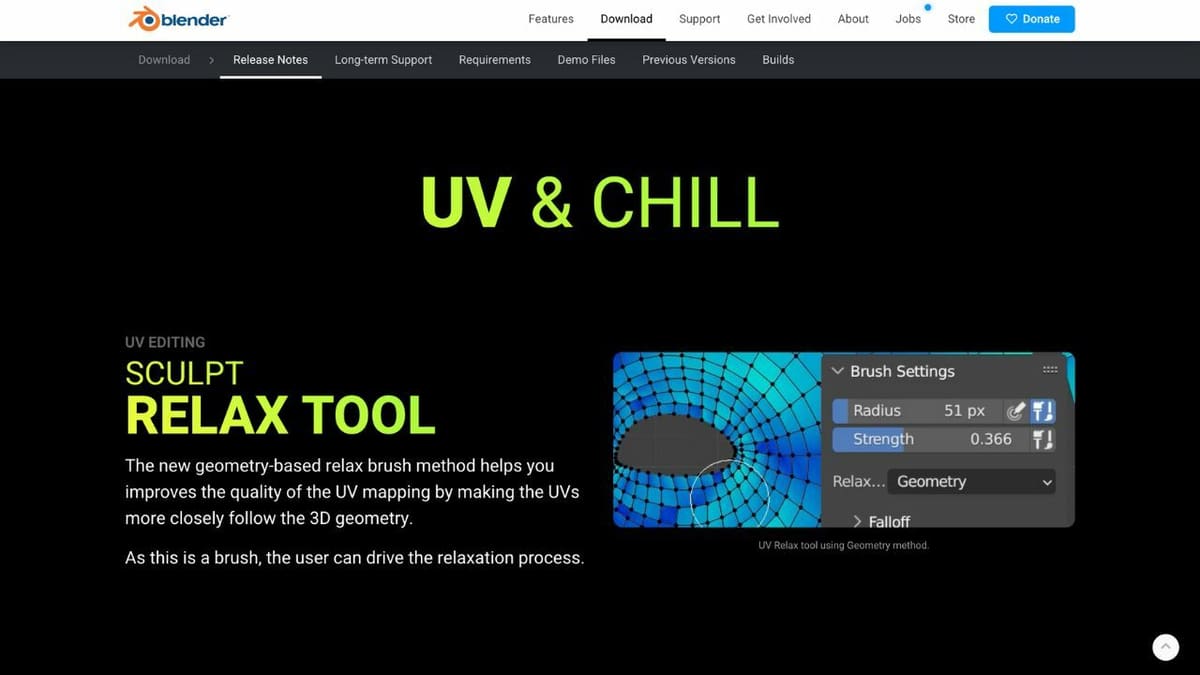
Several features will come in handy during the UV mapping process, including the geometry-based Relax brush under the Sculpt Relax tool. With it, you can achieve more accurate and detailed texturing than ever before. The geometry-based Relax brush method can easily smooth out any distortions in your UV map, resulting in precise texture application.
One of the best things about the updated Sculpt Relax tool is that it gives you a great deal of control over the relaxation process. This means that you can adjust the settings to ensure that your UVs are closely aligned with the 3D geometry of your model.
To use this tool in Blender, simply select the object you want to work on and switch to Sculpt mode. From there, you can access the geometry-based brush under the “Brush Settings.” It may take some practice to get the hang of the tool, but with some patience and experimentation, you’ll be able to achieve some truly stunning texture applications.
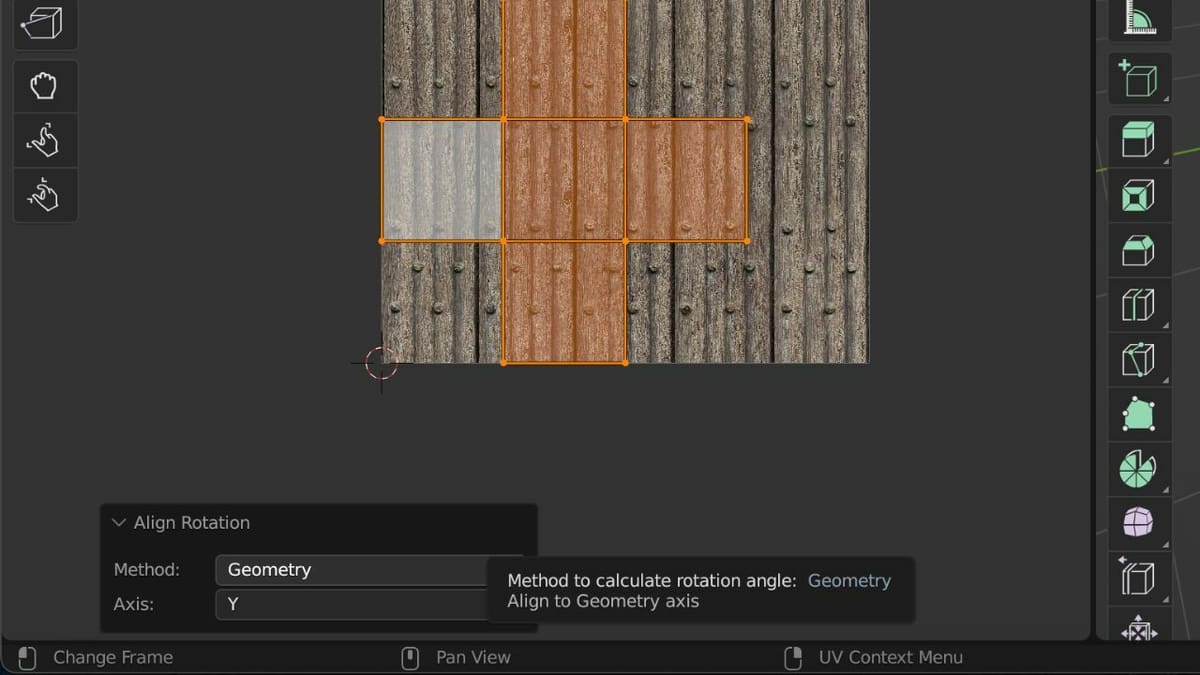
Next up is the Align Rotation tool. This tool received an update with a new Geometry Method to make UV mapping even more efficient. With this method, you can rotate UVs to follow the orientation of the geometry in the 3D Viewport. By aligning your UVs to the geometry, you can ensure that your textures look correct and natural on your 3D model without any distortions or oddities.
This is especially useful for organic models or objects with complex geometry, where manually adjusting the UVs can be time-consuming and tedious. To use this new feature, make sure you’re in the “UV Editing” workspace, then proceed as follows:
- Select the UVs you want to align in the UV Editor.
- Click “UV” on the header of the UV Editor, then “Align Rotation”.
- Choose “Geometry” as the Method from the drop-down context menu at the bottom of the editor.
You can then choose to align the UVs to any selected axis, and the tool will take care of the rest.
Besides those two tools, the UV Editor grid has also been enhanced with several new updates, including non-uniform grids, pixel spacing, and the ability to draw the grid on top of the image.
UV Editor
Knowing the different tools and menus of the UV Editor will help you successfully create and edit UVs for your 3D models. You’ll find them located in the header of the UV Editor starting with the icons on the far left. Here are the ones that we’re going to make the most use of:
- Sync Selection: If you want the 3D Viewport to reflect the same mesh selection as the UV Editor, use the sync selection to create a sync between the two.
- Selection Modes: Here, you’ll find three mesh selection modes, including vertex, face, and edge select. When the Sync Selection is turned on, switching modes on UV Editor seamlessly updates the selection in the 3D Viewport.
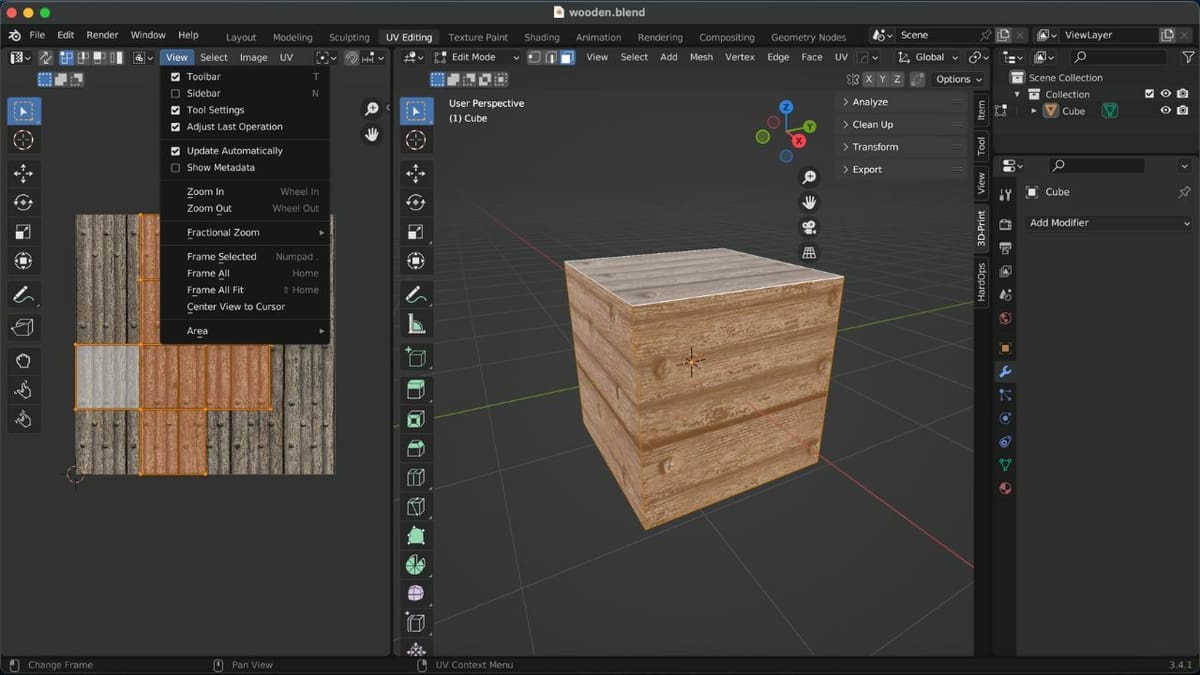
- View: Clicking this opens a drop-down menu containing tools for toggling the other menus in the workspace.
- Select: This menu contains various tools for selecting the UVs.
- Image: From here, you can open or save images.
- UV: Clicking this gives you various tools for unwrapping the meshes and editing UVs.
As you become more familiar with these tools, you should find yourself working more confidently and efficiently. Remember, the key to successful UV mapping is to keep practicing and exploring the available tools.
How to Do It
Now that you know more about UV mapping and the relevant tools in Blender 3.4, we’ll walk you through the process of UV mapping. Also, we’ll share some helpful tips and tricks to make the process as smooth as possible.
So grab your mouse, fire up Blender, and let’s get started!
Step 1: Setting the Object
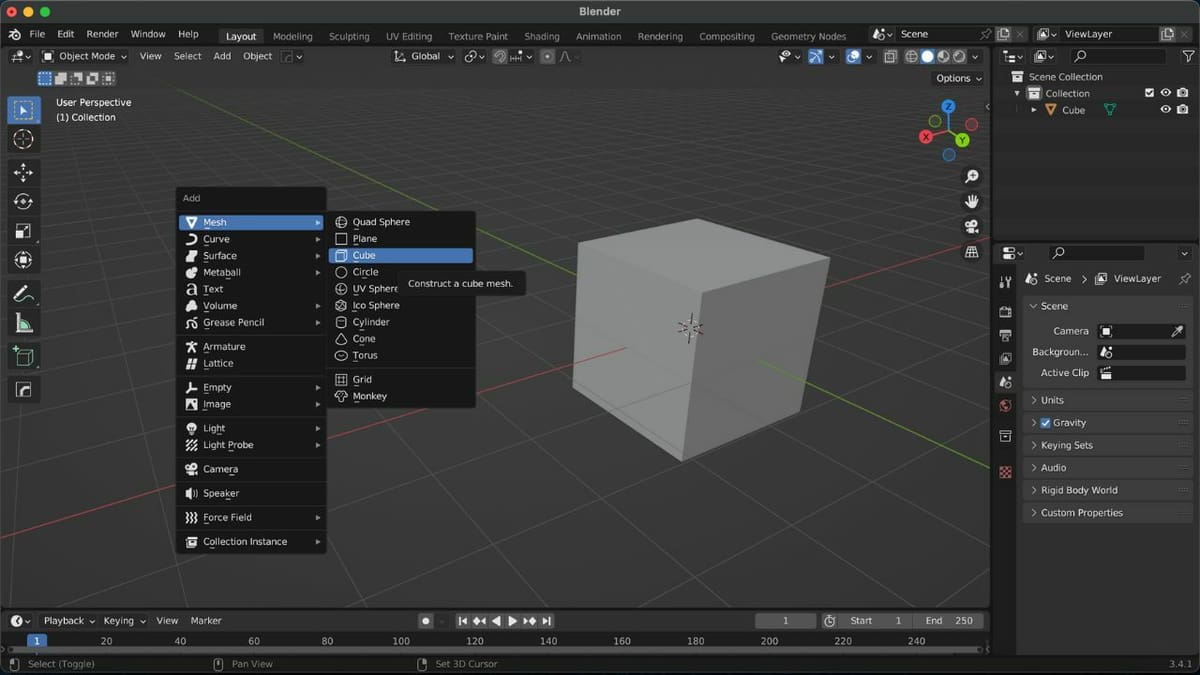
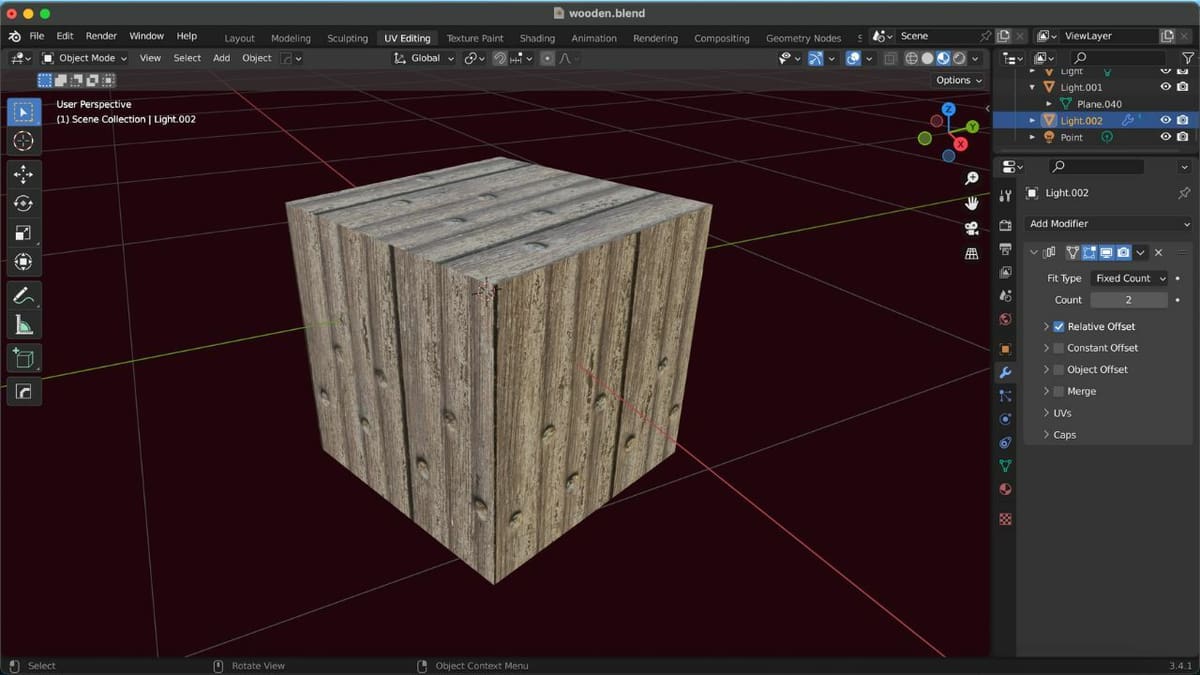
The first step is to set the object you want to UV map. For an example, we’ll be using the default cube. You can add the object of your choice as follows:
- Switch to Object Mode by selecting “Object Mode” in the drop-down list at the top left of the 3D Viewport’s header. You can also do this by simply hitting the Tab button on the keyboard.
- Press Shift + A to open the Add menu.
- Go to the “Mesh” option, then select “Cube” or your preferred object of choice.
If you have an object that you’d like to bring into your Blender workspace, don’t fret! Simply navigate to the “File” menu, then choose the “Import” option to bring the object in. If you’re looking to merge multiple objects together to make 3D models, be sure to check out our article on merging objects in Blender.
After following the above steps, switch over to Edit Mode by hitting the Tab key again.
Step 2: Marking the UV Seam
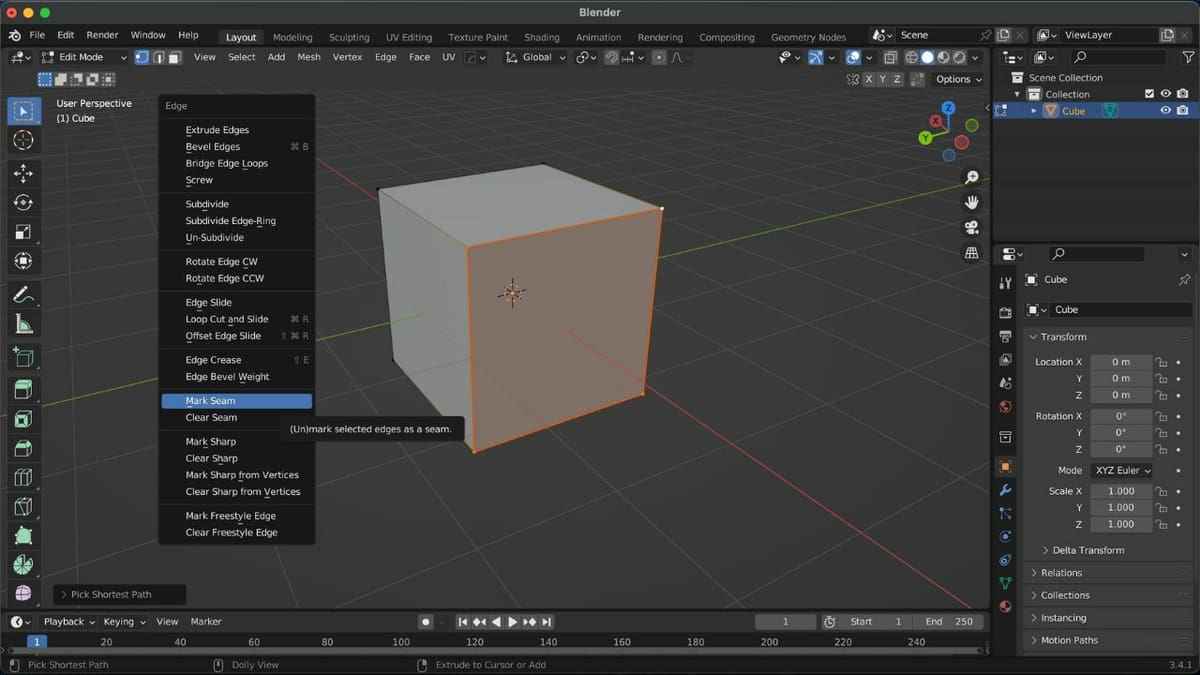
Marking the seams helps the program determine how to unwrap the object. The steps to mark the UV seams are as follows:
- With the left mouse button, select an initial vertex from an edge that you want to designate as a seam. In our case, we’ll select a random vertex at the cube’s corner.
- Press Alt on the keyboard and simultaneously click, using the left mouse button, on the vertex just beside the previously selected vertex. This selects the whole edge.
- Press Ctrl + E, then select “Mark Seam” from the “Edge” menu. This highlights the seam.
If you accidentally mark the wrong seam, you can simply clear it by pressing Ctrl + E, then selecting “Clear Seam.”
Step 3: Unwrapping the Object
Next, we’ll move on to unwrap the object:
- Click “UV Editing” on the Topbar (at the very top of the window). The display will split into two: the 3D Viewport on the right and the UV Editor on the left.
- Press A on the keyboard to select the whole object.
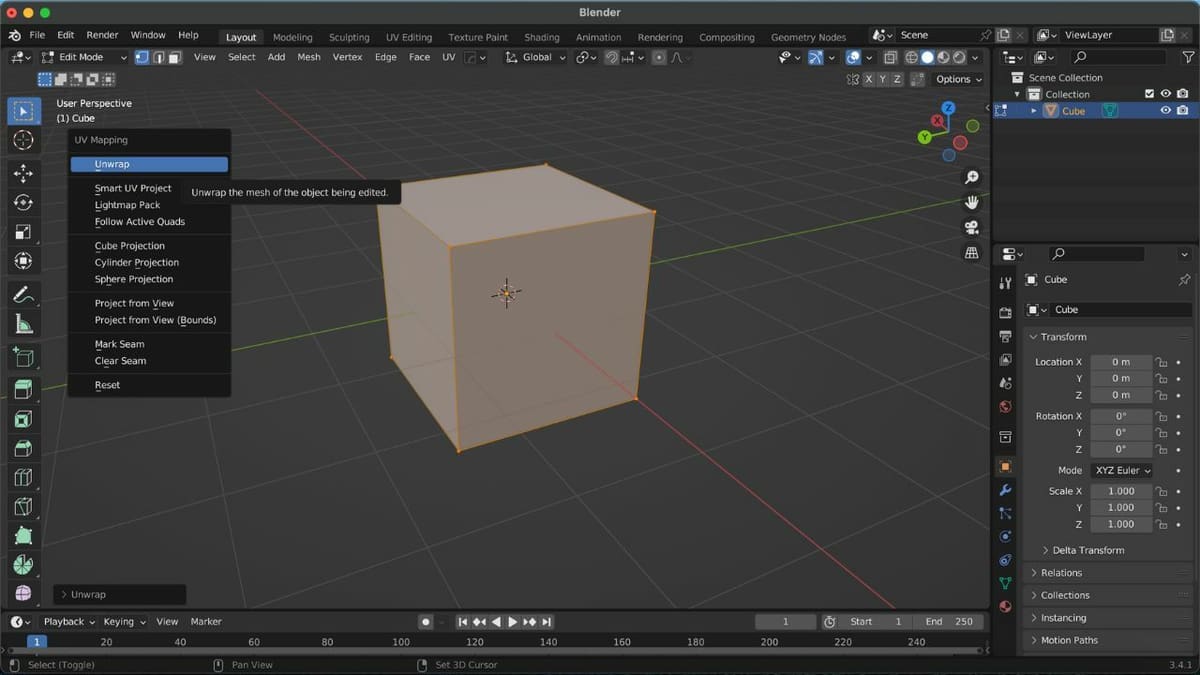
- Press U on the keyboard to open the “UV Mapping” menu.
- Then, select “Unwrap” to unwrap the object.
In the UV Editor, you’ll now see the unwrapped version of your object as distinct pieces, which are called “UV islands”.
Step 4: Checking the Unwrap
Sometimes, the UV becomes stretched during unwrapping, resulting in the object having too few seams. This can create an issue when you’re doing things like texture painting.
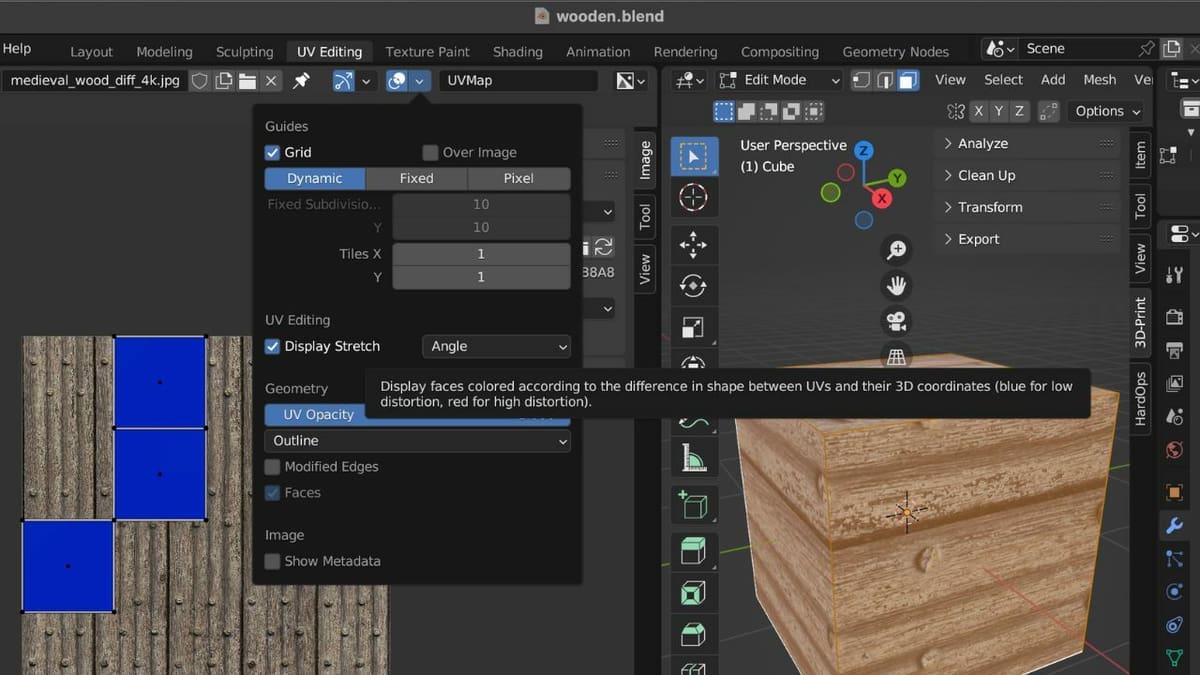
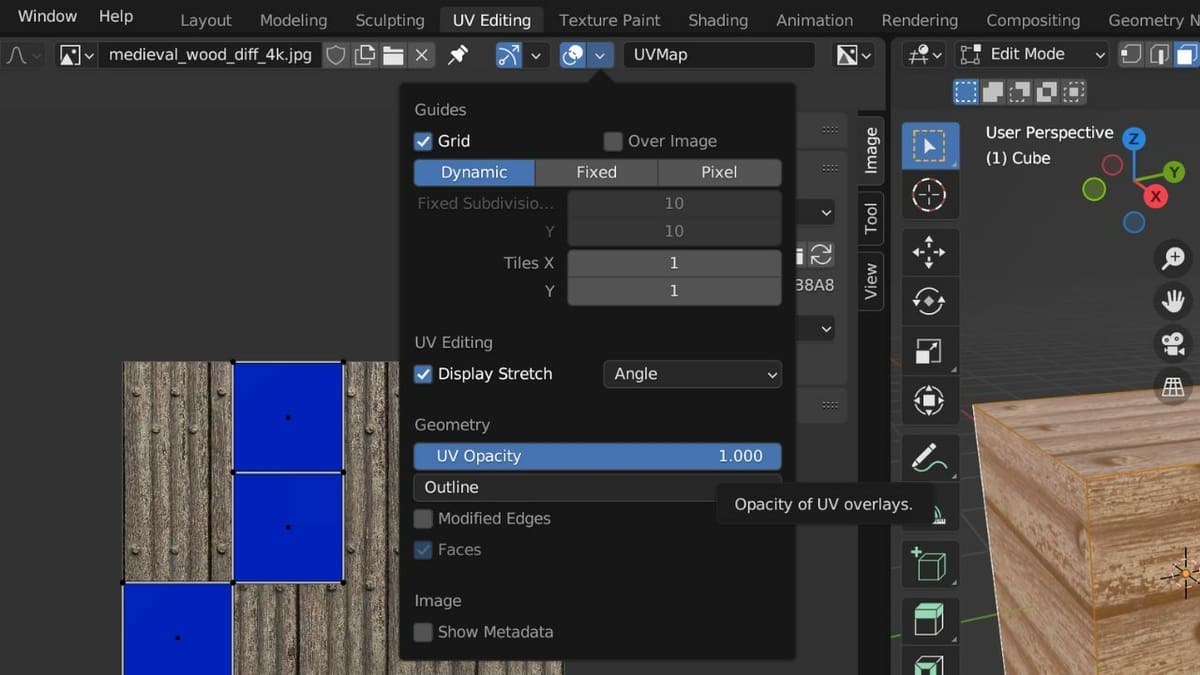
To check the unwrap, simply click on the small arrow on the top right of the UV Editor’s header to reveal a drop-down menu. Click on the “Display Stretch” option. This will display a heat map over the image editor and show where the UV is being stretched.
If the UV is entirely blue, that means it’s not stretched. However, if the UV map is already stretched, repeating the same steps may not be enough to reduce stretching. Instead, you’ll need to evaluate the UV map and identify the areas experiencing the most stretching. After identifying these areas, you can strategically add additional seams to help reduce the stretching.
Also, it’s essential to consider how the UV map will be laid out and how the seams will impact the final texture. Some areas may require more seams than others to achieve the desired level of texture quality:
- Hard edges and creases: If your model has hard edges or creases, it may be necessary to add seams to prevent distortion and stretching in the UV map.
- High curvature areas: Curved surfaces can be difficult to map accurately, so adding seams can help to reduce stretching and distortion in these areas.
- Non-uniform areas: If a part of the model has a different shape or size than the rest, adding seams can help achieve a better UV layout and reduce stretching.
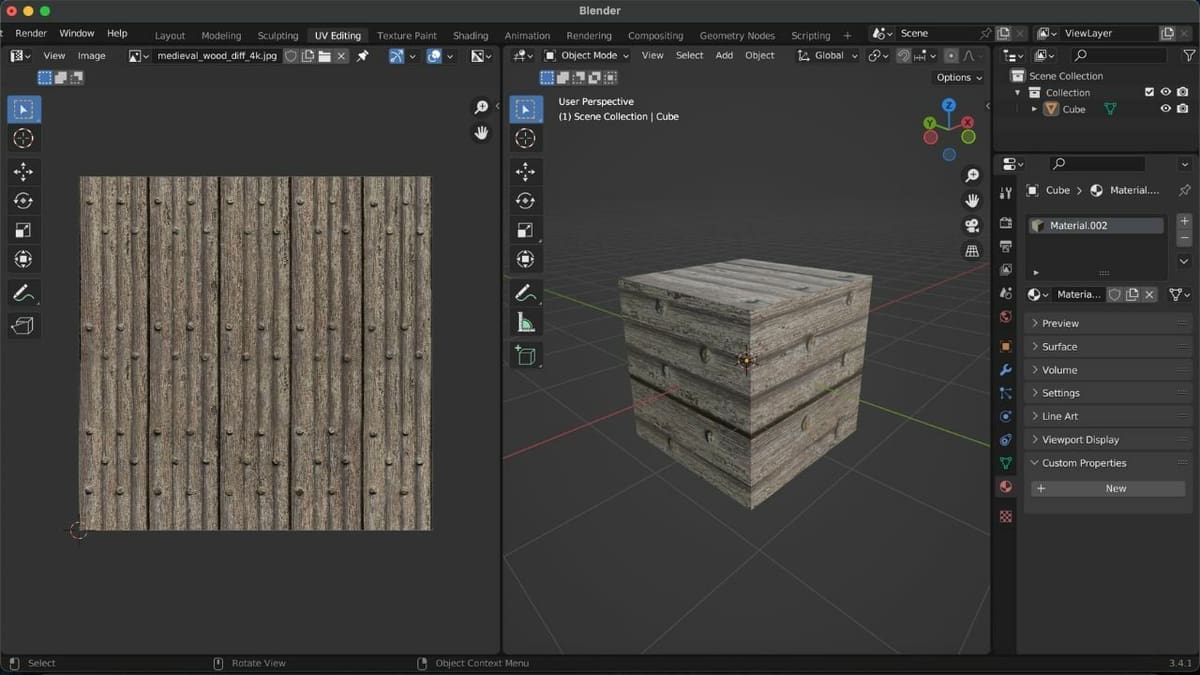
Step 5: Adding the Texture
We’ll now need to add the texture to our object. Many websites, such as Poly Haven and cgbookcase, offer free and paid textures for UV editing. For our example, we’ll use this free wooden texture from Poly Haven.
Before following the steps below, find a texture you’d like to use and download it on your device.
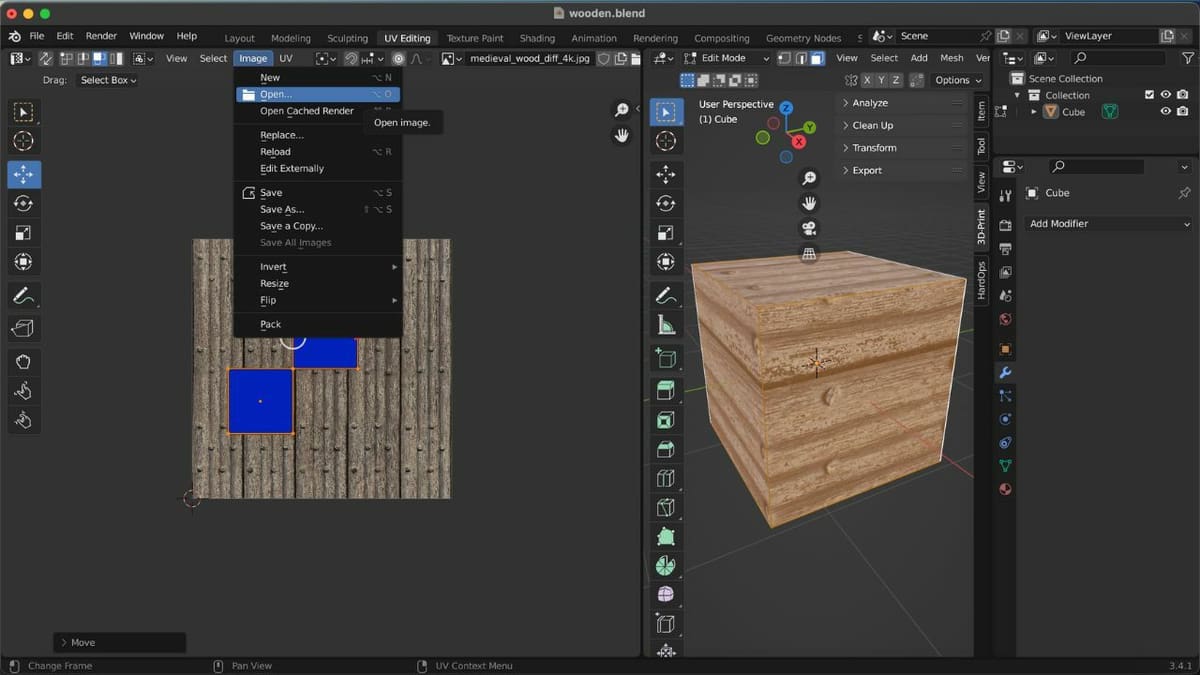
- Load the texture by clicking “Image” on the header of the UV Editor, followed by “Open Image” (or by using the hotkey Alt + O in the UV Editor).
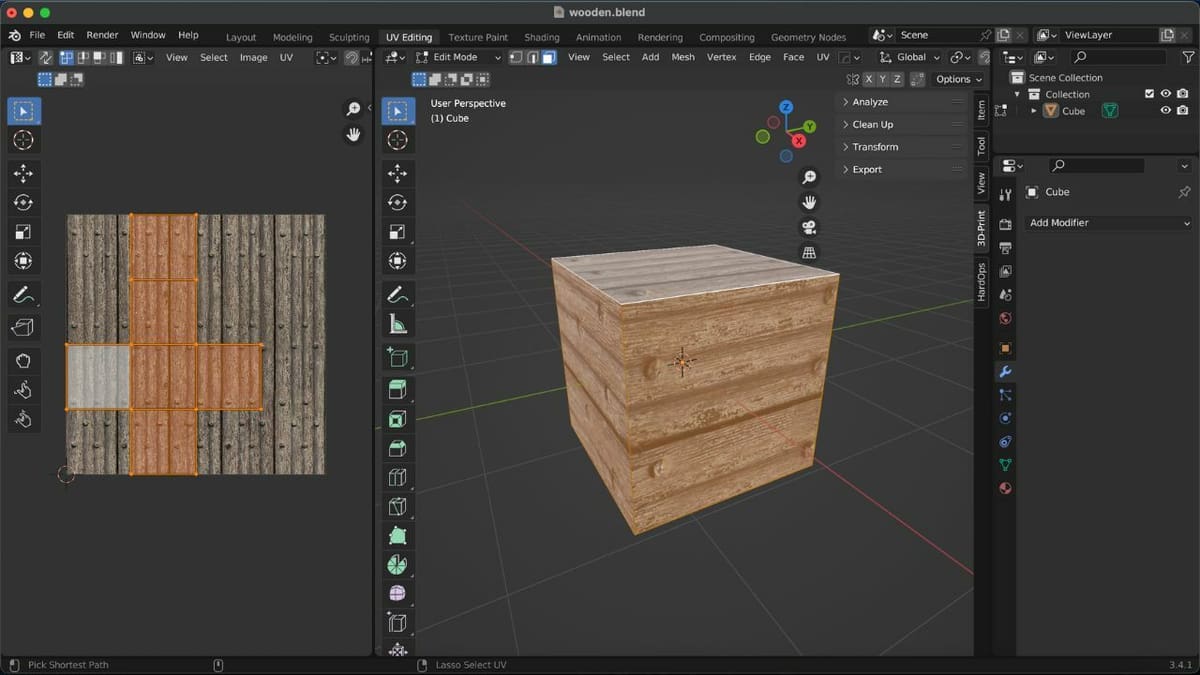
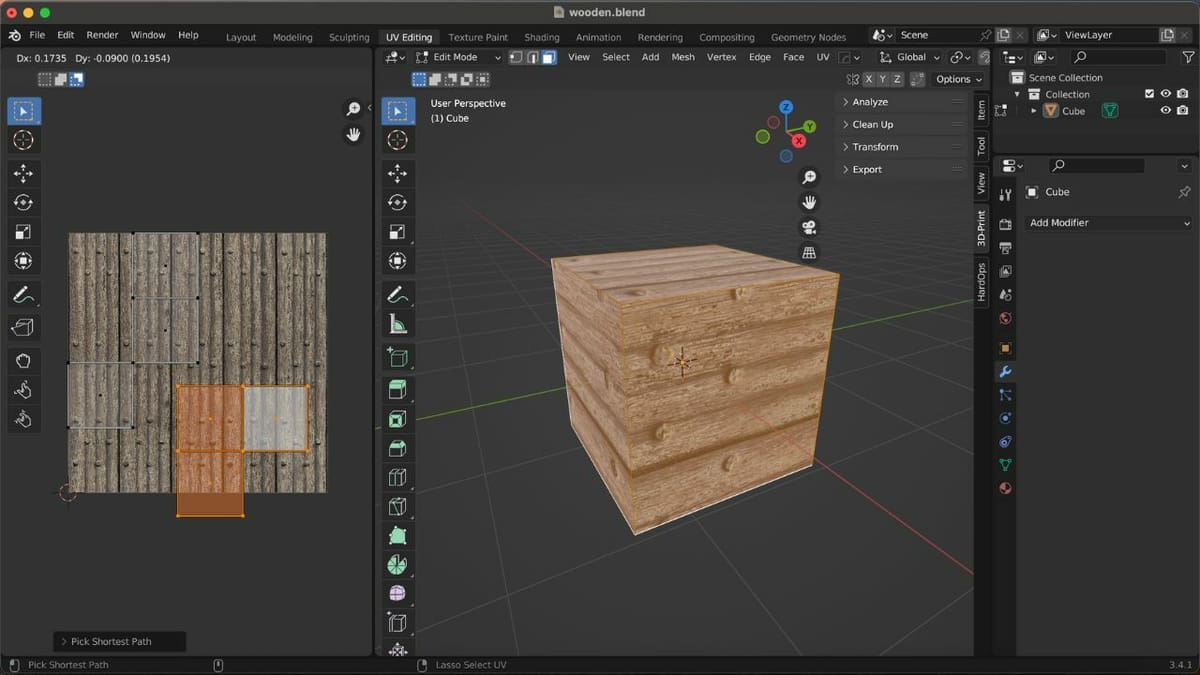
- Select the UV islands by clicking on one vertex of the island, then hitting L on the keyboard.
- Align the UV islands to the added images by using the scale, move, and rotate tools, which can be found in the left side column of the UV Editor.
UV Packing
UV mapping can be challenging, especially when you’re dealing with complex 3D models. Fortunately, Blender’s UV packing feature can help you optimize your textures and save precious UV space. The process involves arranging UV islands within a given space in a way that optimizes texture resolution and minimizes wasted space. This helps improve the texture quality and reduces stretching.
In Blender, UV packing allows users to choose from three options: Add, Scaled, and Fraction. The Add option is the oldest and adds each new UV island to the available space without considering the size of other islands. The default Scaled option uses scales of the UVs within the available space. The Fraction option is the newest and provides a more precise method by calculating the remaining UV space and distributing it proportionally.
Fraction
When using the Fraction option, Blender’s packing algorithm calculates the remaining UV space and divides it based on the total area of the islands. This method results in more precise packing of the UV islands, which can help reduce texture stretching and improve texture resolution.
However, the Fraction option can be slower than the other options due to its precise calculation process. Also, before we proceed with the steps to using the Fraction option, note that this is just an algorithm, and you may need to manually arrange the UV islands.
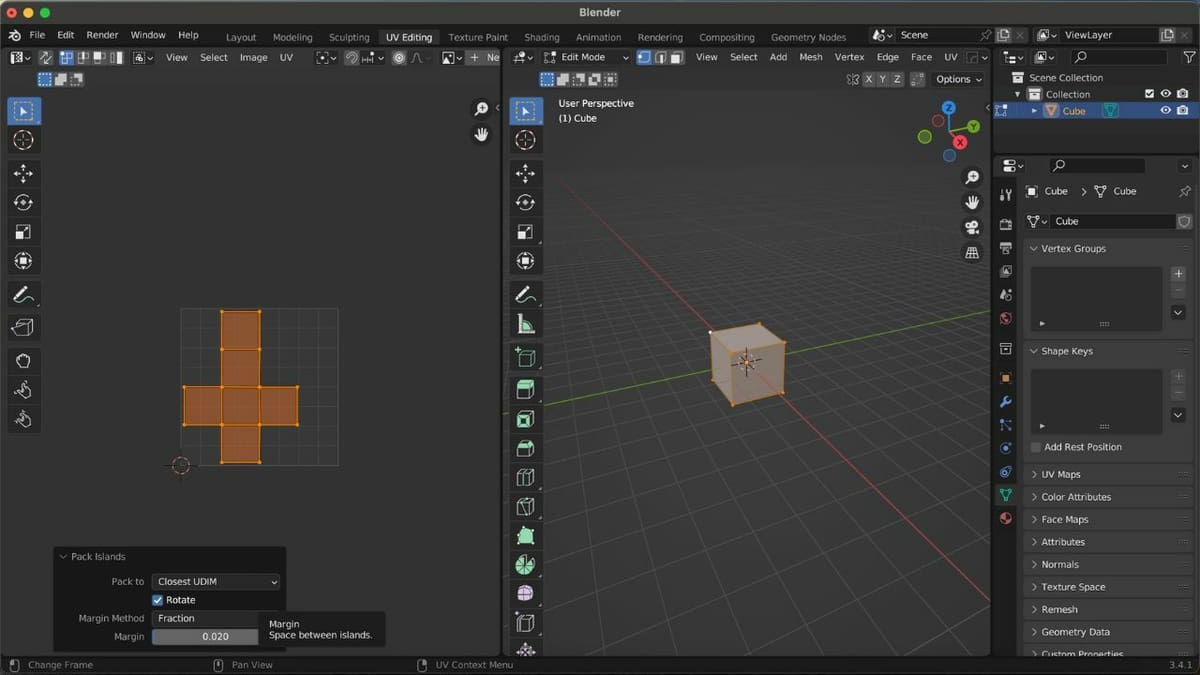
- In the UV Editor, press A to select the entire island.
- Click “UV “on the header of the UV Editor, then select “Pack Islands”. A context menu will open at the bottom of the screen.
- Select “Fraction” as the Margin Method and set the Margin to 0.02.
For most UV packings, Fraction with a value of 0.02 gives the best results. However, you can tweak it by 0.005 to find the best zone. Now that we’ve done the heavy lifting, let’s proceed to the final step!
Step 6: Finalizing the Image
How the added textures and images appear on the object can be adjusted to your preference. For example, the texture can be flipped, cropped, and extended, among various other adjustments.
If you want to see the texture in renderings, you need to add the texture as a new material. This can be done as follows:
- Click the “Material Properties” tab (the icon that looks like a red beach ball) on the Properties editor in the 3D Viewport, then click open the “Surface” panel.
- Click on the small circle just to the right of Base Color.
- Click “Image Texture”, then “Open.”
- Select the image file from the device.
- To see the newly added texture, press Z on the keyboard, then select “Material Preview.”
We’ve now successfully completed the UV mapping of the cube! To see the rendered version of the newly UV-mapped object, you’ll need to adjust the lights and the camera, too.
Troubleshooting
When it comes to UV mapping, beginners may face some hurdles along the road to success. Here are some common roadblocks related to UV mapping and the corresponding solutions to help you avoid or overcome them:
Flipped Normals
The direction of the faces of the model is defined by normals. When they’re flipped, they can confuse the software as to what direction the faces are pointing toward. To fix this issue, you can recalculate the normals.
“Object has no Uniform Scale” Error
This error can occur when the object you’re working with has a non-uniform scale. It refers to scaling an object disproportionately along its different axes, resulting in the object being stretched or compressed in different directions.
For example, if a cube gets scaled only along the X-axis and not the Y- and Z-axes, it will become a rectangular prism. To solve this issue, select the object in Object Mode, hit Ctrl + A, click on “Scale”, then try unwrapping the object again.
Duplicate Vertices
Overlapping vertices can cause issues while marking the UV seams. To ensure that this doesn’t happen, you must remove any double vertices in the object. Our article on removing doubles in Blender can help you learn how to do it.
White Background in UV Editor
This issue arises when you have overlapping faces. It can occur when two or more faces occupy the same space or are co-planar (i.e. they lie on the same plane), which can happen when unwrapping complex geometry. To solve this problem, lower the opacity of the UV. You can do this by clicking the small arrow on the right side of the UV Editor’s header, then decreasing the UV opacity.
By being aware of these common beginner problems and their solutions, you can avoid them and continue on your UV mapping journey!
Tips & Tricks
Whether you’re looking to speed up your UV mapping process, improve the quality of your UV layouts, or learn some new techniques to enhance your workflow, these tips and tricks are worth checking out.
UV Mapping Add-ons
Add-ons can help make the process of advanced UV mapping much easier. Two popular options for Blender users are Textools 1.5 and Zen UV V3.1.1. Textools is a free add-on that includes a comprehensive set of tools that offer a range of features for UV mapping. Some of the standout features include the ability to quickly pack and organize UV islands, generate seams based on curvature, and manipulate UVs with precision.
Zen UV is a professional add-on that costs around $24 for a standard license on Gumroad. It provides easy-to-use tools for fast and efficient UV creation, allowing users to perform complex UV mapping tasks with ease. Whether you’re a beginner or a pro, add-ons can save time and simplify your workflow.
Model First
It’s essential to model your object before starting the UV mapping process. Attempting to map your object before it’s fully modeled can lead to distortion and other issues that may be difficult to fix. Take the time to create a complete and accurate model before moving on to UV mapping.
Smart UV Project

This is a great tool under the UV menu that can automatically add seams to your UV layout. This tool is useful when you have simple objects with geometric forms that are time-consuming to map manually. However, this may not work well on more complex models because it uses an algorithm that automatically generates UV maps.
This algorithm works by projecting the UV islands onto the model’s surface, which can lead to distortion or overlapping UVs when the model has complex shapes or overlapping geometry. In these cases, it’s often necessary to use a combination of other UV mappings techniques, such as manual unwrapping and seam placement, to achieve a better result.
Hotkey to Split UVs
When working on a complex UV layout, it can be helpful to separate individual islands to make adjustments and modifications easier. In Blender, you can do this by selecting the UVs you want to separate, then hitting V on the keyboard. This will split the selected UVs into their own islands, allowing you to work on them independently.
License: The text of "Blender: UV Mapping – Simply Explained" by All3DP is licensed under a Creative Commons Attribution 4.0 International License.