Blender: Simplify Mesh – Simply Explained

There are so many options in Blender to simplify a mesh. Read on to learn how to clean up your mesh so you can get back to creating!
Blender is a widely used tool in the world of 3D modeling, catering to both beginners and professionals alike. This open-source software is free while still giving users robust capabilities for 3D design and creation.
In Blender, meshes are the building blocks of any 3D model. These meshes consist of vertices in a 3D space where two vertices create a line, three a triangle, and four a quad. However, as you continue with advanced model creation, you’ll soon notice how the complexity of these meshes quickly becomes overwhelming to both you and your computer’s processor.
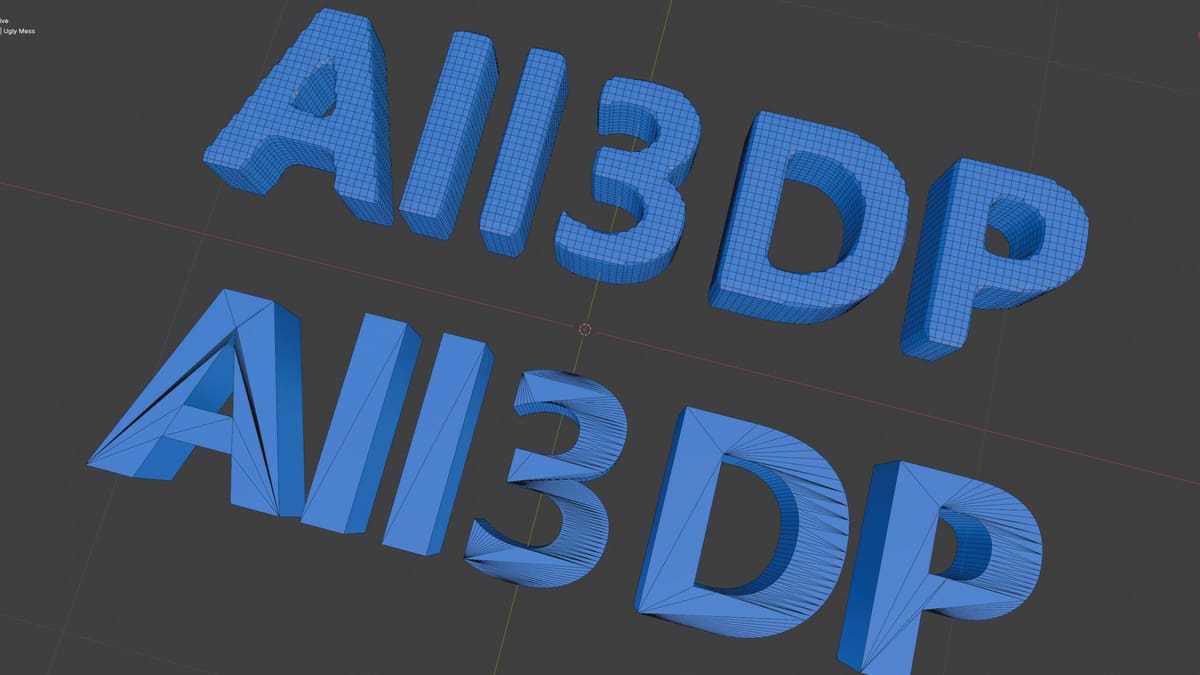
This is where mesh simplification comes in to play. It removes any unnecessary geometry by reducing the number of faces, merging vertices, or ensuring that all vertices within a polygon are on the same plane. Not only does simplifying a mesh improve the overall performance of a project, but it also leads to an easier time with other mesh modifications like texture mapping.
Blender offers several built-in tools and techniques to simplify meshes. There are also free and paid add-ons available to aid in the simplification process, sometimes offering more straightforward techniques for achieving the desired results. In this article, we’ll overview Blender’s built-in mesh simplification tools as well as some add-ons. Let’s get into it!
Making & Cleaning Meshes
Blender uses triangles and quads as the building blocks of a mesh. Each individual mesh is referred to as an “object,” and your final product may consist of multiple objects. Understanding how to work, combine, and simplify meshes is essential to creating any 3D design.
Mesh simplification is not only about removing as many faces as possible. It requires a delicate balance between reducing complexity and preserving the details that make a project unique. As an artist, understanding how simplification settings affect the mesh and experimenting with different methods and values are key to achieving the best results.
If you’re looking to 3D print your model, simplifying a mesh is just one step toward ensuring a successful 3D print. It’s equally important to verify that the mesh is manifold, as this can greatly impact the outcome of the print. More on that later!
To help you with all these, Blender 4.1 and above comes with built-in tools under the “Clean Up” option. It also includes an array of modifiers that can help you simplify meshes. In addition to these built-in tools, Blender’s add-on ecosystem offers a wider range of options for mesh simplification, from free add-ons like the 3D Print Toolbox to paid add-ons like HardOps and Machin3tools.
Warning: Exercise caution when using the simplification tools, as they can have permanent destructive effects. To avoid any potential loss of work, consider creating a backup of your mesh before proceeding with simplification.
Now, let’s dive into the exciting journey of simplifying meshes in Blender!
Modifiers
Modifiers in Blender are non-destructive operations that you can apply to your object’s mesh. With modifiers, you can create complex shapes, smooth surfaces, and more, all while keeping the original geometry intact. As a result, modifiers are not part of an object’s internal geometry. Keep in mind, though, that they can only be used in Object Mode, not in Edit Mode.
Appling a modifier is simple: Open the Modifier tab (the wrench icon) on the Properties panel, click on “Add Modifier > Generate”, then select from the many modifier options in the drop-down menu. Each modifier in Blender has its own set of “Options” that you can select and adjust to achieve the desired result. These options can range from selecting sub-options, adjusting their strength, and setting a specific number of iterations.
Let’s take a look at the ones you can use to simplify your mesh!
Decimate Geometry
Just imported a mesh with complex geometry? Have a model full of unnecessary vertices and edges? It’s time to switch to “Object Mode” and apply the Decimate Modifier.
This modifier helps you reduce the polygon count by removing the unneeded vertices and edges while maintaining a similar overall shape. As with all of the modifiers, there are specific settings or options that fine-tune the modification. The options under Decimate Geometry include the following:
- Collapse: This option lets you reduce the number of faces in a mesh while still attempting to keep the approximate shape of your object. Adjusting the slider between 0 and 1 will let you see how the mesh changes in real time.
- Un-subdivide: If you’ve applied a simple subdivision in Edit mode or are using the Subdivision Surface Object modifier, this tool removes the subdivisions you’ve applied over a given number of iterations.
- Planar: This tool moves vertices in a plane so that if one or more vertices are out of alignment, they’ll move to create a flat polygon.
Remesh
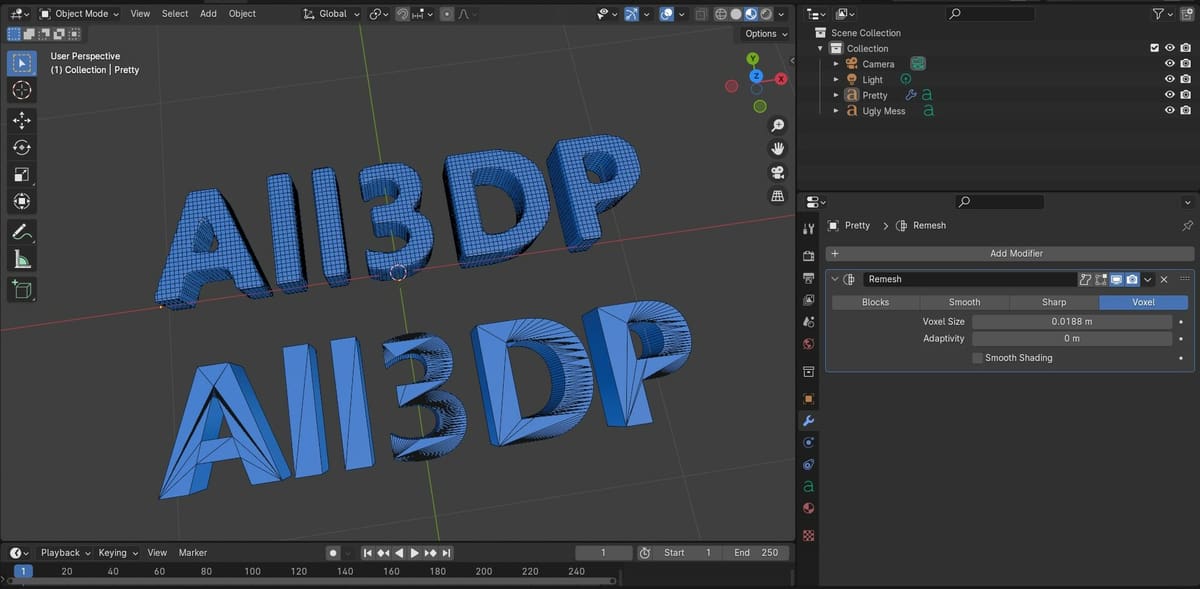
Remesh completely redefines the topology of any mesh and attempts to break it into quads. This can be a powerful tool when dealing with simpler shapes, but keeping complex geometry can be challenging. Using this tool properly with complex shapes means breaking the shape into many small, equally spaced faces.
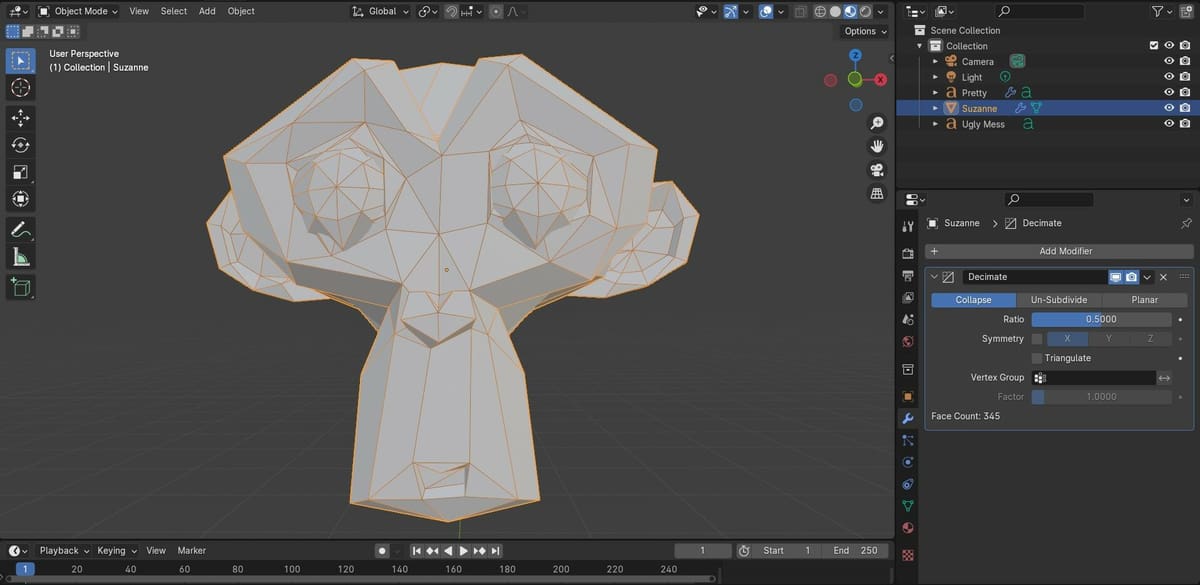
Using this tool on a complex shape – like Blender’s internal test object, Suzanne – will yield strange results. However, using the effect on something like text will provide great results if tweaked properly.
The Remesh modifier is particularly useful in cleaning up faces created when converting text objects or curves into meshes. Some of the options can be set as follows:
- Mode: There are a few options for how you can have the effect applied.
- Sharp attempts to keep sharp seams.
- Smooth creates a smoother transition between areas of sharp angles.
- Blocks turns the object into a collection of flat blocks.
- Voxel generates a new manifold mesh from existing geometry while preserving volume.
- Octree Depth: This tool sets the level of iterations and, therefore, detail in the mesh.
- Scale: This sets the size of the quads used to recreate the object.
Boolean Modifier
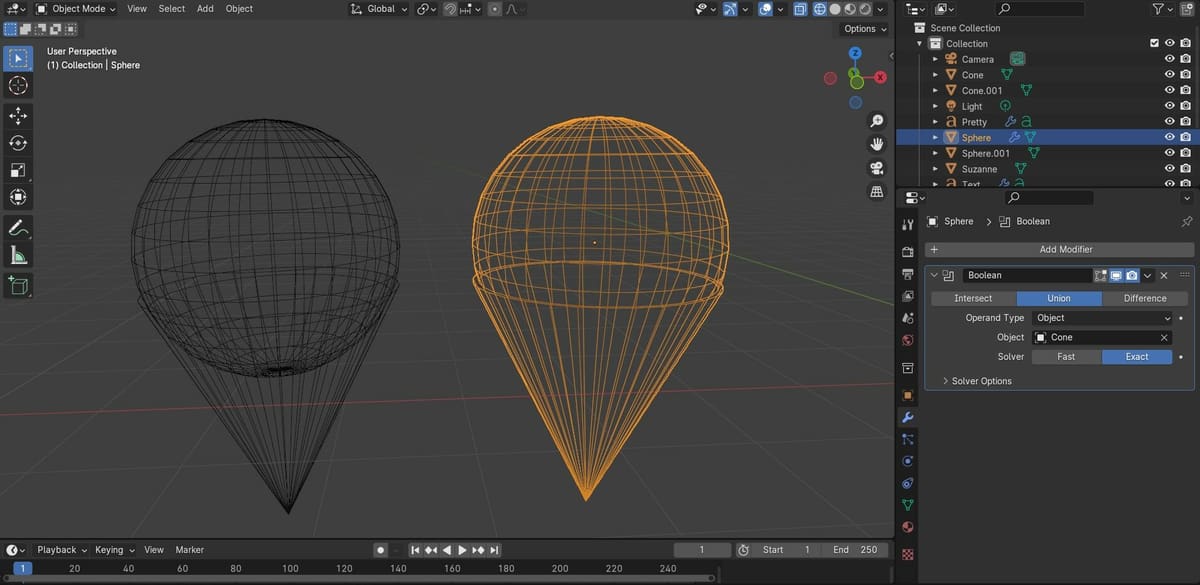
The Boolean modifier allows you to combine parts and meshes into a single object. While there are a variety of reasons a user might want a single finished mesh, one of the top reasons is 3D printing and the process of sending a finished object to a slicer.
For best results in a slicer, you may want to have any internal geometry removed. If, for example, you need to join two sphere meshes, the overlapping area will leave an internal mesh within the spheres. Blender’s Boolean modifier allows you to take separate objects and join them together in a way that removes any internal geometry.
Here are some of the different operation options under Boolean Modifier:
- Intersect: This option keeps only the inside of the two meshes or all meshes in a collection.
- Union: The meshes are added together with interior faces removed.
- Difference: One mesh is removed from the other, though the exterior faces of the target mesh are kept.
When working with the Boolean operation, you also have a choice of the algorithm the Blender uses to make the changes. If you use the “Fast Solver” option, expect faster results, but you run the risk of some unintended mistakes. The “Exact Solver” option will take longer, but it may pay off if you have a particularly complex geometry.
Clean Up Tools
Edit Mode lets you modify objects’ geometry, and switching to it is easy. All you need to do is press “Tab” on your keyboard or use the mode selector in the top left corner.
Once you’re in Edit Mode and select an object, you can use tools found under “Mesh > Clean Up” to simplify the object’s mesh. Now, let’s check out the available tools under the Clean Up menu.
Edit Mode
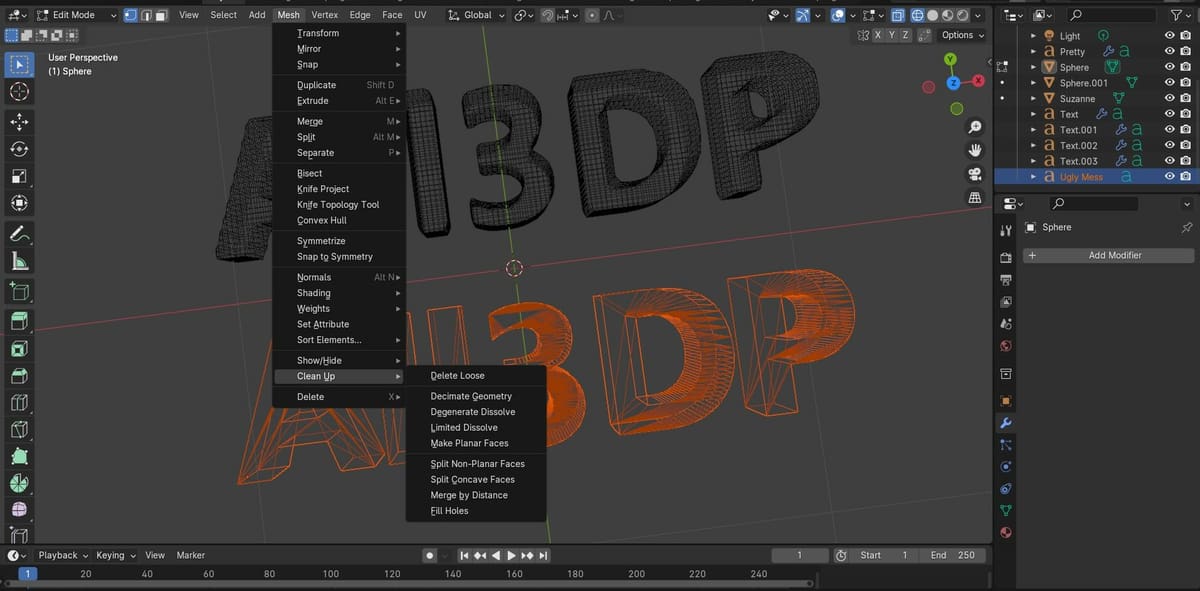
These tools can be used before or after the Remesh modifier, which we have discussed already, but using them after a Remesh operation usually provides the best results.
Let’s take a look at all the available tools:
- Delete Loose: This will only delete loose vertices that aren’t part of a face.
- Decimate Geometry: This is one of the first tools to try, as it reduces the number of polygons in a mesh.
- Degenerative Dissolve: This tool removes edges and faces with no distance or area.
- Limited Dissolve: This is another excellent tool to try first or second. It cleans up faces (quads), which create a flat or nearly flat shape as defined by a slight angle. For example, if you have a flat area that’s made up of several triangles or quads, this will reduce them to a single, flat shape as defined by a given angle. Anything less than the angle you’ve selected will be merged together into one face.
- Make Planar Faces: If you’re looking to 3D print, this step is a must. As a general rule, a face made up of four or more vertices should have all of those vertices on the same plane. This tool moves vertices in a plane so that if one or more vertices are out of alignment, they’ll move to create a flat polygon. Please keep in mind, however, that this tool only applies to faces made up of four or more vertices.
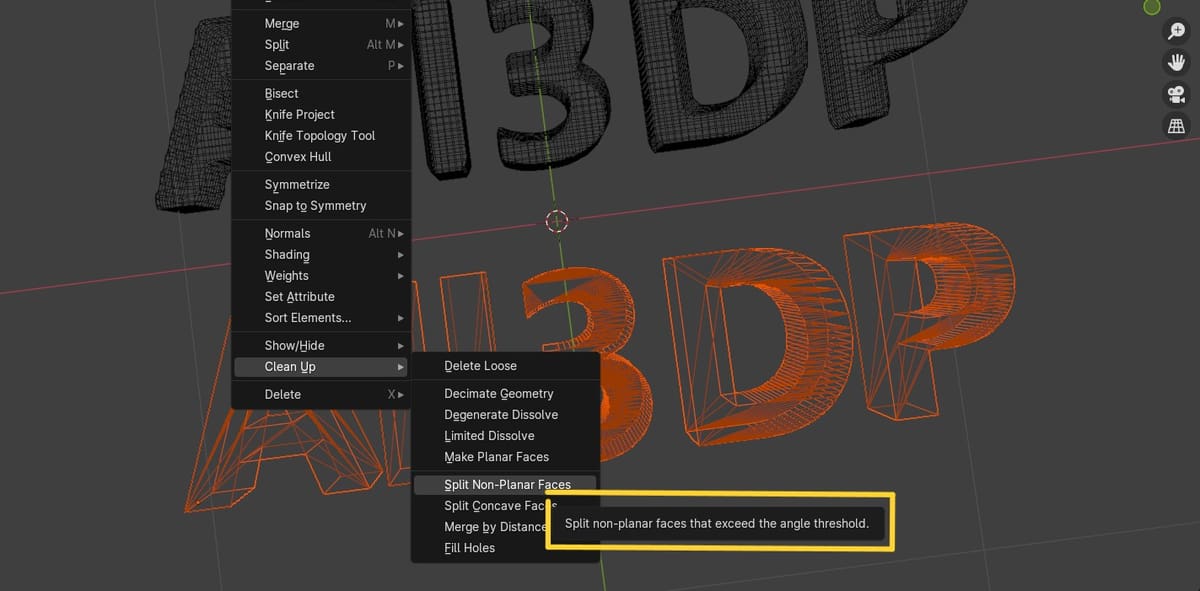
- Split Non-Planar Faces: If you want the mesh free from unclear geometry, this tool lets you do that by splitting non-flat faces that are bent too far.
- Split Concave Faces: This tool lets you easily convert concave faces to convex by simply splitting non-flat, bent faces into multiple convex faces.
- Merge by Distance: This handy tool removes vertices that may be touching one another or are very near to each other. This will weld overlapping or nearby vertices to each other as defined by your chosen distance.
- Fill Holes: If your mesh has any open holes defined by several sides, this will fill them automatically. Choose the number of sides the hole must have, and Blender will stitch a new face in between any empty, adjacent edges.
Add-Ons
Add-ons are extensions that add certain functionality to Blender, often resulting in a better and faster workflow. Some even house powerful tools specially made to clean and simplify the meshes. They can be built-in, third-party, or paid.
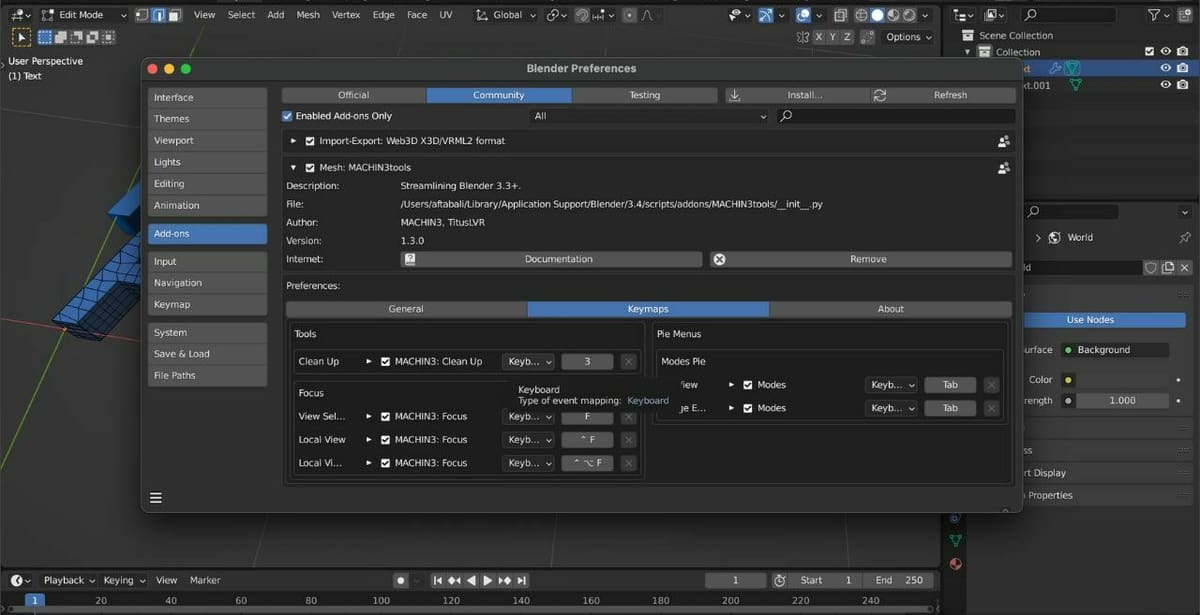
Installing add-ons is pretty straightforward: Click on “Preferences” under the Edit menu. Find the “Add-ons” section and click to enable the one you need. For third-party add-ons, click “Install” in the top right, then select the add-on you downloaded. Now, all you need to do is check the box to enable the add-on.
While the built-in add-ons are free and just a few clicks away, many third-party add-ons are also free. However, there are some paid options that usually offer better, more powerful, and advanced functionality.
3D Print Toolbox
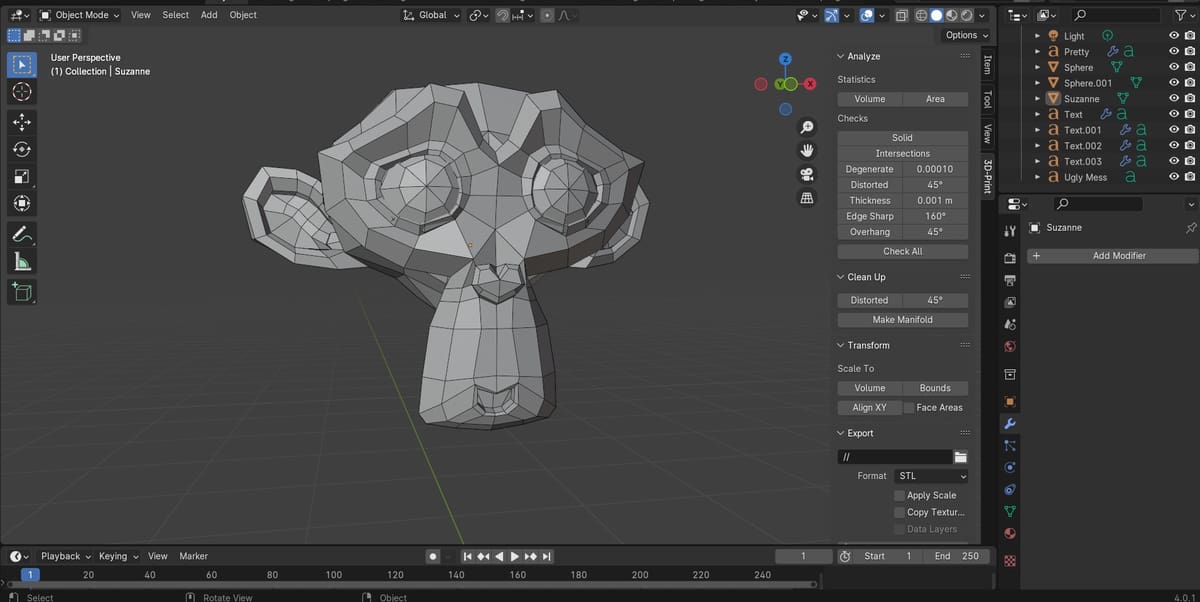
Want to analyze, identify problematic meshes, and clean them? 3D Print Toolbox is an official add-on from Blender that offers tools to help you simplify the mesh to prevent unexpected problems while 3D printing.
Whether you’re 3D printing or just looking to optimize your mesh, another essential factor to consider is if the mesh is manifold. A manifold mesh has a well-defined surface with a consistent network of edges and faces, while a non-manifold mesh has edges or vertices that don’t belong to any face or connect to the rest of the mesh in an ambiguous way. Non-manifold meshes can result in failed prints, gaps, or holes in the model. One of the great things about the 3D Print Toolbox is that it’ll help you ensure that the mesh is manifold.
Let’s check out the various options available under the 3D Print Toolbox:
- Check All: This option ensures that your mesh is ready for 3D printing. It checks for various issues like non-solid or intersecting parts; distorted, thin, or overhanging faces; sharp or zero edges; as well as non-manifold problems. Problem areas will become highlighted. You can even check for individual problems and focus on specific areas that need cleanup. You also have a few specific options:
- Solid checks for non-manifold and “Bad Contiguous” edges by ensuring the mesh has valid areas, is solid, and has no holes.
- Intersections is helpful for checking self-intersecting faces, which can be resolved using a Boolean modifier.
- Distorted will help you identify distorted (not flat) faces.
- Clean Up: These tools help simplify, clean up, and enhance your mesh.
- Distorted allows you to triangulate faces that are distorted.
- Make Manifold helps you to clean up the mesh by solving these problems related to bad normals, holes, non-manifold vertices, and empty edges.
Machin3tools
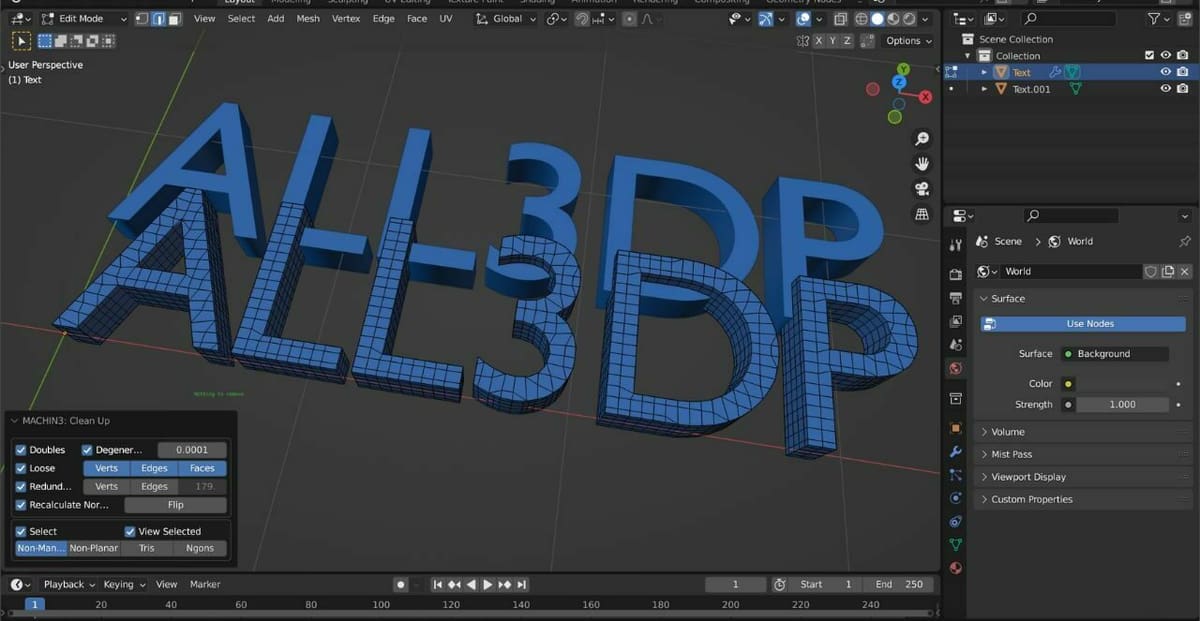
Another great add-on to simplify your meshes is Machin3tools, a third-party collection of custom tools. The tools include a Clean-Up tool that helps to quickly remove unwanted parts from the mesh for better geometry and cleaner mesh.
The Clean-Up tool in Machin3tools can effectively resolve various mesh issues such as flipped normals, two-edged vertices, loose vertices and edges, non-manifold edges, doubles, and degenerates. The tool can distinguish between two-edged vertices inside and outside the mesh and remove non-manifold edges based on an angle threshold. Moreover, it can make normals consistent, highlighting non-manifold edges for better visualization.
The entry-level version of Machin3tools is available on Gumroad for $5, which includes the Clean-Up tool. More advanced mesh editing tools are avalible with the upgraded packages.
To use this tool (after you followed the procedure to enable it), switch to Edit Mode and press ‘3’ on your keyboard to perform the clean-up. You’ll find the options to toggle default settings in the bottom section of the editor. While the “Non-Manifold” option is set as default within the tool, you should go with “Non-Planer” for curved edges.
If your mesh includes triangles (“Tris”) or N-gons, go with the respective options. However, Tris and N-gons are rare operations used for enhanced mesh simplification, and they may cause strange issues during rendering when not properly cleaned up.
The latest version of the Clean-Up tool in Machin3tools also includes a fading Head-up display for improved ease of use. This feature informs you of any geometry removal during the clean-up process, helping you keep track of changes for a more efficient simplification process. Also, it’s advised by the creator to use the Clean-Up tool during modeling to keep the mesh clean.
HardOps
TeamC, led by Masterxeon1001, has developed the HardOps add-on to provide fast and efficient modeling tools for Blender. With a focus on ease of use, the toolkit utilizes Blender’s built-in features and does not rely on custom algorithms. It can be purchased for $20 on Blender Market.
Even though it’s a paid add-on, it has received exceptionally positive ratings and reviews on all marketplaces. Some users have even suggested that HardOps should be included by default in Blender due to its high level of functionality and ease of use. The add-on provides a range of dedicated options and tools that streamline the hard-surface modeling process for both beginners and professionals alike.
This add-on uses Blender’s built-in tools and modifiers, making it easily adjustable and non-destructive as well as allowing users to quickly and easily perform complex operations. Rather than switching between multiple tools and settings, users can access everything they need from one convenient menu.
The non-destructive nature of modifiers ensures that changes made to the mesh can be easily edited or reversed at any time without permanently altering the original mesh. This is particularly useful for projects with multiple iterations or versions, as it allows for easy experimentation and exploration without fear of losing work.
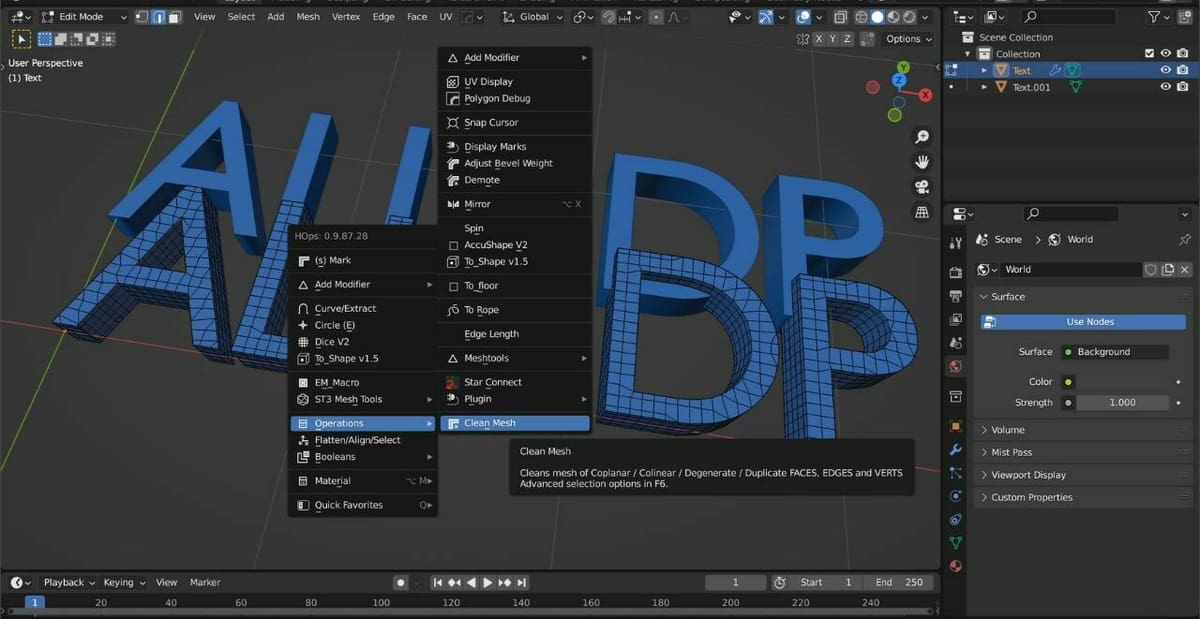
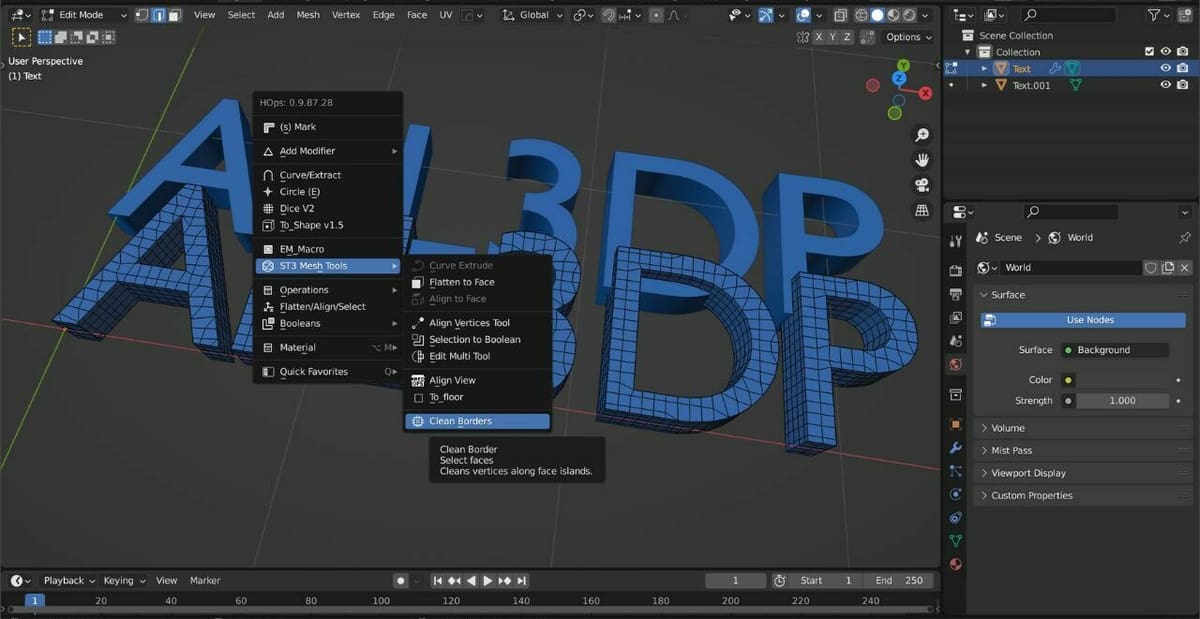
Once installed, the HardOps menu can be toggled by pressing ‘Q’ on the keyboard. The menu contains many useful options, including Clear Mesh and Clean Borders:
- Clear Mesh: This tool helps you clean up mesh by identifying and removing coplanar, colinear, degenerate and duplicate faces, edges, and vertices. Also, advanced selection options are available in the F6 menu, which gives you more control over what is cleaned up. You’ll find “Clear Mesh” under the “Operations” section within the HardOps menu.
- Clean Borders: Have a mesh that needs clean vertices along face islands? This tool can help you do that by adequately cleaning border vertices. This tool is at the bottom section of “ST3 Mesh Tools” within the HardOps menu.
Overall, HardOps is a top-rated and valuable tool for 3D modelers. While it does require a monetary investment, its usefulness and positive user feedback could make it a worthwhile investment for those seeking to improve their workflow.
License: The text of "Blender: Simplify Mesh – Simply Explained" by All3DP is licensed under a Creative Commons Attribution 4.0 International License.