
Blender: Procedural Texturing – Simply Explained

Blender's procedural texture capabilities are powerful, yet difficult to master. Read on to learn all about the basics!
Adding a texture to a 3D model helps to create realistic representations. After all, we’re not living in a perfectly smooth world! In Blender, a very powerful and open-source modeling tool, there are a couple of different ways to create textures and use them to enhance the appearance of an object.
One way is through the use of image files and UV mapping, however, the results may vary. The texture will remain the same regardless of any geometric changes to the model, such as when increasing its size or deforming it, potentially creating an artificial look.
Another way texture can be added is through procedural textures, which are computer-generated using code built into the software. Procedural textures change programmatically, allowing for greater flexibility and control over the appearance even after changes to the model’s geometry. This allows for the creation of unique and complex textures that would be difficult to do with a static image alone.
There are a number of different procedural textures, however, all can be created and controlled through the use of what is referred to in Blender as “nodes“. So to get started, let’s learn about what nodes are and the different types of nodes that can be used to create textures.
Types of Procedural Textures
A node is a visual representation of a mathematical function. If you can imagine, the surface of your material can be represented by a set of data. A node takes this data set and applies a certain mathematical operation. The data that makes up your object’s surface is now changed, and this is visually reflected in your model. Multiple nodes can be connected, with one output going directly to the input of another. It’s this arrangement of nodes in Blender that creates complex visual effects.
There are several types of procedural texture nodes in Blender. The main ones are the following:
- Noise: This creates variation in the surface height by applying a random, yet controlled set of values over the 2D or 3D domain. It can be used to create displacement maps, allowing for modification of the geometry of a surface, such as in bumps and ridges. Another use is to add detail by affecting the way light interacts with the object and can help in creating abstract patterns such as clouds, smoke, and flowing water.
- Voronoi: The mathematical algorithm behind this node divides a given space into a set of cells with a degree of randomness that the user can define. Realistic or abstract designs are possible, such as rock formations or metallic surfaces. This node can also be used to create a displacement map, making it useful for creating textured patterns.
- Gradient: Create a smooth transition between two or more colors or effects with this node. Some examples of effects it can create include color blending, shading, and atmospheric fog.
- Musgrave: This is a fractal-based texture that can be used to create organic shapes. It can be used to create organic and natural textures such as rock formations, terrain, and clouds.
- Wave: As its name implies, you can use this node to create wave patterns. Possibilities include a convincing-looking ocean surface or a ripple effect on surfaces such as a cloth waving in the wind.
- Cloud: Another intuitively named node, this creates cloud-like patterns. This can be used to create sky and atmosphere, smoke, and fog. Alternatively, it can also be used to create a displacement map, for instance, creating rough and bumpy surfaces such as sand dunes.
- Wood: Use this node to generate wood grain patterns. This can include solid wood, plywood, and more.
Using one or a combination of these different textures, users have nearly boundless options when it comes to recreating whatever kind of material they have in mind.
In this guide, we’ll demonstrate how to apply procedural textures to create a realistic-looking pretzel in Blender. Let’s get into it!
Part 1: Getting Started
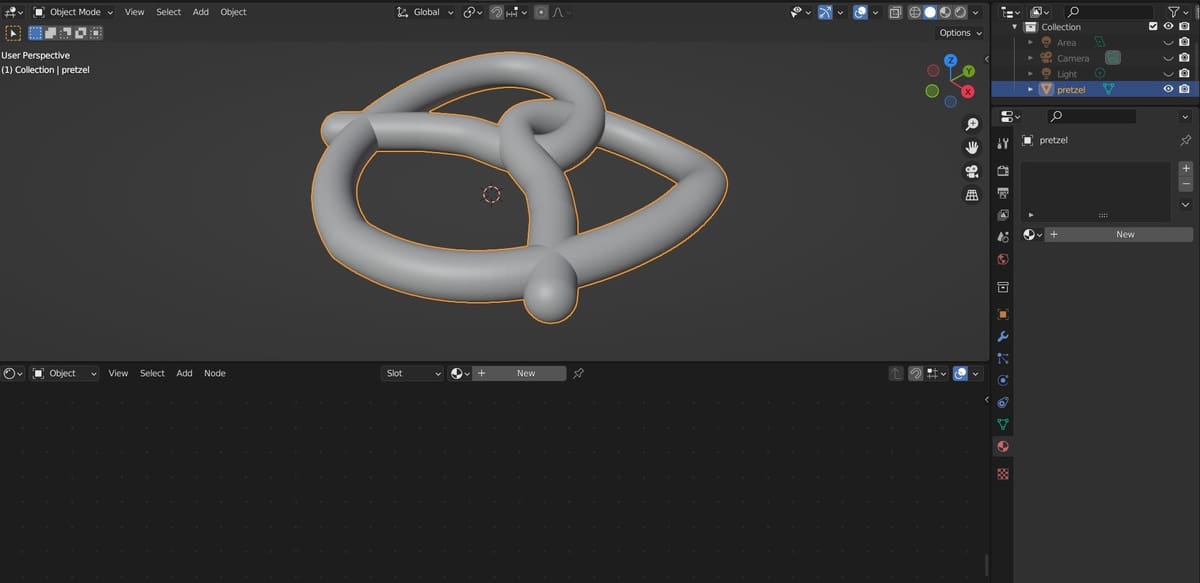
In this guide, we’ll focus on applying textures, so we’ll import a ready-made model found on Thingiverse. This pretzel model was created by the user MTB3D, who modeled it for decoration purposes for Oktoberfest. However, you’re free to start from your own model or pick another one from the several 3D model repositories online.
If you choose a ready-made model, import it into Blender by simply navigating to “File > Import > Stl (.stl)”, then selecting the desired file. You should then see the model show up in the viewport.
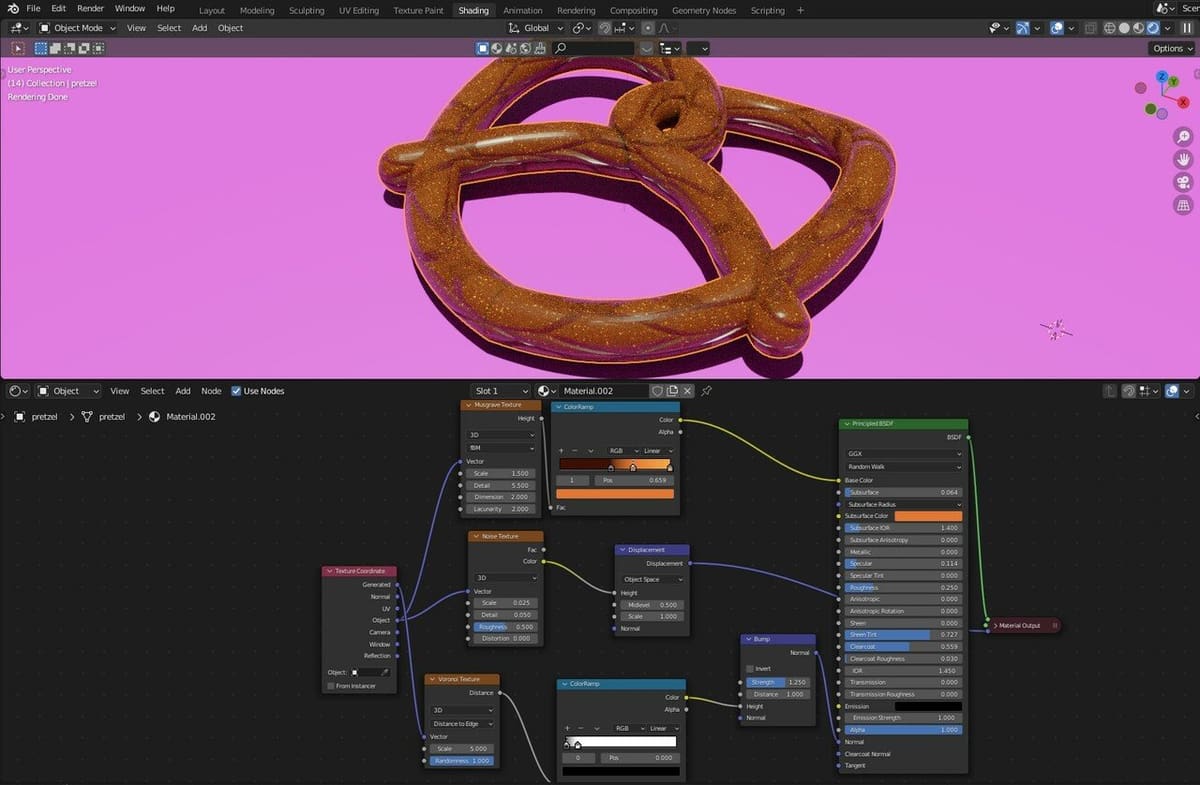
Next, let’s set up the workspace so that the Node Editor is visible. Navigate to the “Shading” tab in Blender, which is located in the topmost bar of your screen. Once you’ve clicked the tab, you should see the Node Editor at the bottom half of your screen. This is where all the node action will take place.
Lastly, let’s create a new material we’ll manipulate to create a realistic texture for our pretzel. Select the object, then go to the “Materials Properties” tab on Properties Editor. The editor is on the right side of your screen, and the tab you’re looking for is second symbol from the bottom. If the list of materials in the tab is emply, click “New” to add a new material for the pretzel object.
Now, we’re ready to create procedural textures for this model!
Part 2: Create the Base Material
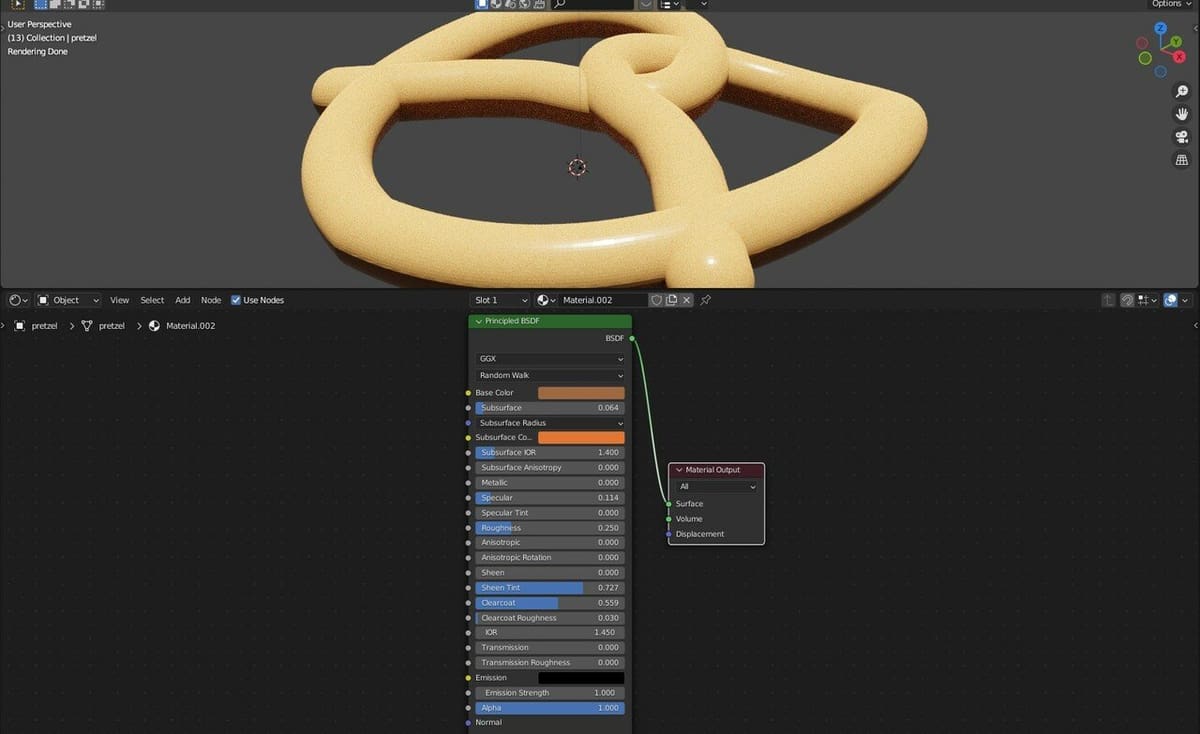
You should already have the Principled BSDF node in your Node Editor panel by default. This node is the starting point for the color and texture of the object. It’s a versatile shader node that can create a wide range of materials with accurate lighting and shading properties.
You’ll also notice that the node’s “BSDF” output (right side) is connected to the “Surface” input (left side) of a smaller Material Output node. This node will apply all of the changes to the surface of your object.
These nodes don’t create textures themselves, but we can use them to establish the color of our object:
In the Principled BSDF node, we’ll adjust some options to create your desired color:
- Set a “Base Color”. This step is optional, as we’ll override it with a node to create a more complex base color later. We use it to get an initial idea of the object’s appearance. For this model, we’ve selected a brownish-gold color.
- Adjust the “Subsurface” value to change the amount of light penetrating the surface and scattering within it before it’s emitted back out, as happens with most real objects. Increasing this value increases the amount of light. For our model, we’ve set it to 0.064.
- Add a “Subsurface Color”. We’ve chosen a rosy orange color.
Optionally, you can also adjust other values in Principled BSDF, such as “Sheen Tint”, “Clearcoat”, and “Subsurface” to give the pretzel a shiny appearance.
Clearly, one can only get so far in the creation of a realistic texture by just adjusting the surface properties. Let’s add more nodes!
Part 3: Using a Musgrave Texture Node
Now it’s time to apply procedural texture nodes to create an interesting color pattern to the model. We’ll be adding a few new nodes, and the easiest way to do that is to use the search bar in the Add menu:
- Make sure your mouse is in the Node Editor, then press “Shift + A” on your keyboard.
- Select the “Search” option, then type the name of the node you’re looking for.
- Click on the node once it pops up.
- Place it where you like within the Node Editor.
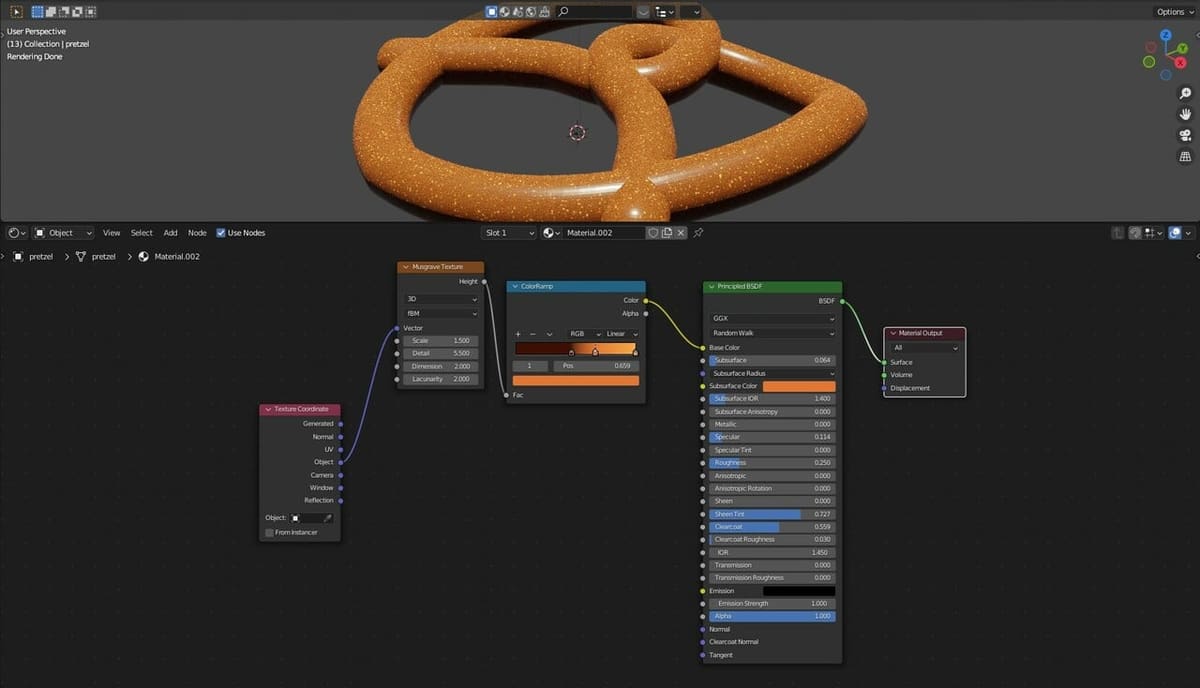
With that shortcut out of the way, let’s add ColorRamp, Musgrave Texture, and Texture Coordinate nodes:
- Using the search process described above, add the ColorRamp node. This node will create a color gradient that will be used to give the appearance of texture.
- Connect the “Color” output of the ColorRamp node to the “Base Color” input of the Principled BSDF node.
- Add colors to the ColorRamp node using the “+” button and move the sliders around to your liking. Here are the colors we used: #3E1003, #E47634, and #E4D29A.
- Add the Musgrave Texture node.
- Connect the “Height” output of the Musgrave Texture to the “Fac” input of the ColorRamp node.
- Add the Texture Coordinate node. This is the key to creating procedural textures, as it determines how the effect gets mapped onto our object.
- Connect the “Object” output of the Texture Coordinate to the “Vector” input of the Musgrave Texture. This will create coordinates centered around your model’s origin.
You should now see a randomized speckle pattern on your pretzel! Play around in the Musgrave Texture node – particularly with the “Scale” toggle – to adjust the pattern to your liking.
Great, we have the color down, but the surface of our object is still artificially smooth. We’ll fix that next.
Part 4: Using a Noise Texture Node

To add further detail to the pretzel model, we’ll add noise to the model’s surface. This effect can take your model from looking like a perfectly smooth, computer-generated object to a realistic-looking snack!
Here are the steps:
- Add a Noise Texture node. This generates randomized values that, when applied to a surface, appear as irregularities.
- Connect the “Object” output of the Texture Coordinate node to the “Vector” input of the Noise Texturenode.
- Add a Displacement node. This applies the randomized values generated by the Noise Texture node to displace the mesh’s vertices along the surface normal direction.
- Connect the “Color” output of the Noise Texture node to the “Height” input of the Displacement node.
- Connect the “Displacement” output of the Displacement node to the “Displacement” input of the Material Output node.
- Adjust the strength of the Displacement node by changing the “Scale” value. For our model, we’ll leave it at a value of 1.00.
- Adjust the “Scale”, “Detail”, “Roughness”, and “Distortion” parameters of the Noise Texture node to create a noise effect to your liking.
This may be enough texture for many objects, but let’s take it one step further.
Part 5: Using a Voronoi Texture Node
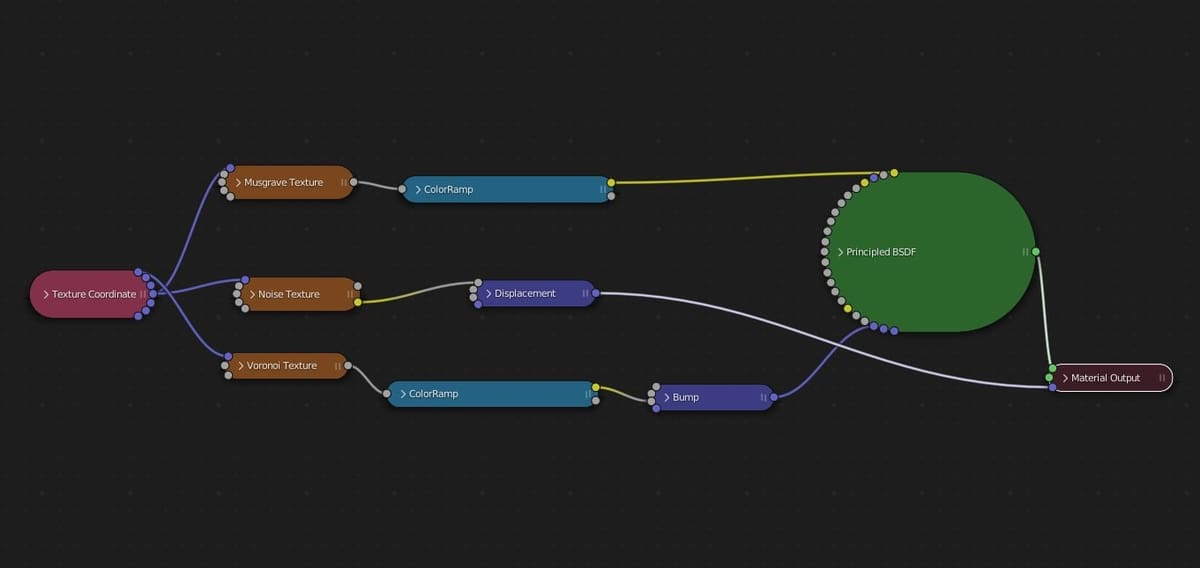
As a final step, we’ll create surface cracks on the model by using the Voronoi pattern as a displacement map. This pattern is actually a mathematical tool that partitions a plane using a defined set of rules. In our case, we’ll use it to generate a random cracked effect.
- Add a Voronoi Texture node.
- Connect the “Generated” output of the Texture Coordinate node to the “Vector” input of the Voronoi Texture node. This will give the Voronoi function coordinates relative to the surface of the object, independent of its location or rotation.
- Change the setting from the default “F1” to “Distance to Edge”.
- Add another ColorRamp node.
- Connect the “Distance” output of the Voronoi Texture node to the “Fac” input of the ColorRamp.
- Bring the white slider close to the black slider but not completely (“Pos” ~ 0.06). This will essentially be the sharpness of the cracks and can also be adjusted later.
- Add a Bump node.
- Connect the “Color” output of the ColorRamp node to the “Height” input of the Bump node.
- Connect the “Normal” output of the Bump node to the “Normal” input of the Principled BSDF node.
- Adjust the strength of the Bump node to change the depth of the cracks.
- Adjust the “Scale” of the Voronoi Texture node and the position of the white slider of the ColorRamp node to create the crack pattern to your liking.
And now you should have a delicious-looking pretzel! Remember, this is just a starting point, you may want to add next some salt or chocolate to the pretzel to really make it your own! You could even take it a step further and combine Blender with Substance Painter (or a Substance Painter alternative) to create very realistic textures.
Bon appétit!
License: The text of "Blender: Procedural Texturing – Simply Explained" by All3DP is licensed under a Creative Commons Attribution 4.0 International License.