Blender Mesh: All You Need to Know

Mesh modeling is the most used modeling method in Blender. There's a lot to know, so read on and start learning all about Blender mesh!
What Is It?
Blender is a free and open-source 3D modeling program, popular among hobbyists, with an extensive set of tools for modeling, sculpting, rigging, animating, and more. And when it comes to modeling, mesh modeling is the main method.
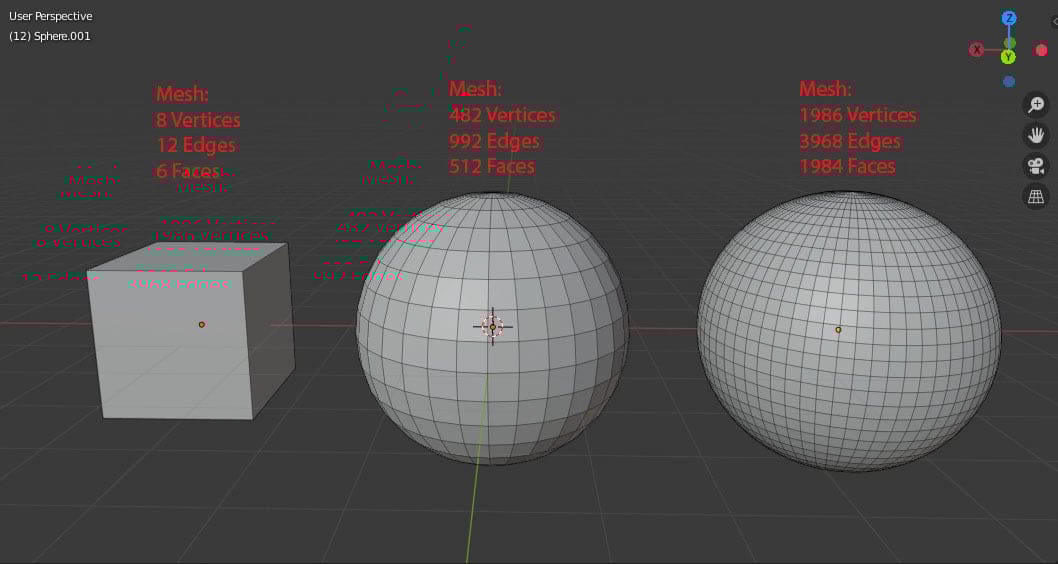
To understand what mesh modeling is we must first understand what a mesh is. Simply put, it’s a collection of faces, edges, and vertices that make up a 3D shape. For example, a cube’s mesh would have 6 faces, 8 vertices, and 12 edges. In a sphere, as it’s a curved shape, there would be many more elements.
Mesh modeling, then, refers to a method of modeling where you model by modifying the mesh of an object. You can modify faces, edges, and vertices by stretching them, pulling edges in and outwards, and so on.
A different method of modeling, also possible in Blender, would be sculpting. As the name would suggest, using this technique, you consider the object to be a soft material that can be manipulated like a ball of clay, without paying too much attention to the mesh.
In this article, we’ll take you through the most useful tools and aspects of mesh modeling in Blender. First, though, we’ll go through some essential definitions of Blender’s topology elements.
Key Terms

In mathematics, “topology” refers to the study of geometrical shapes, and in Blender, it has a similar meaning: It defines a set of mesh-related terms that help us better understand and communicate what we’re doing.
Here are few important terms:
- A loop refers to a set of adjacent shapes of the same kind. For example, a string of edges would be an edge loop, and a string of faces would be a face loop.
- Normals are perpendicular intersections with a plane or face.
- Non-manifold sounds confusing, but it doesn’t have to be! According to the Blender glossary, it’s a geometry that cannot exist in the real world. For example, it can be two objects only touching at one vertex (one point). (In real life, the objects would be touching at more than one point.) Another example is when two adjacent planes have normals defined in different directions. They can’t be recreated in real life, as they would have two sides (two normals).
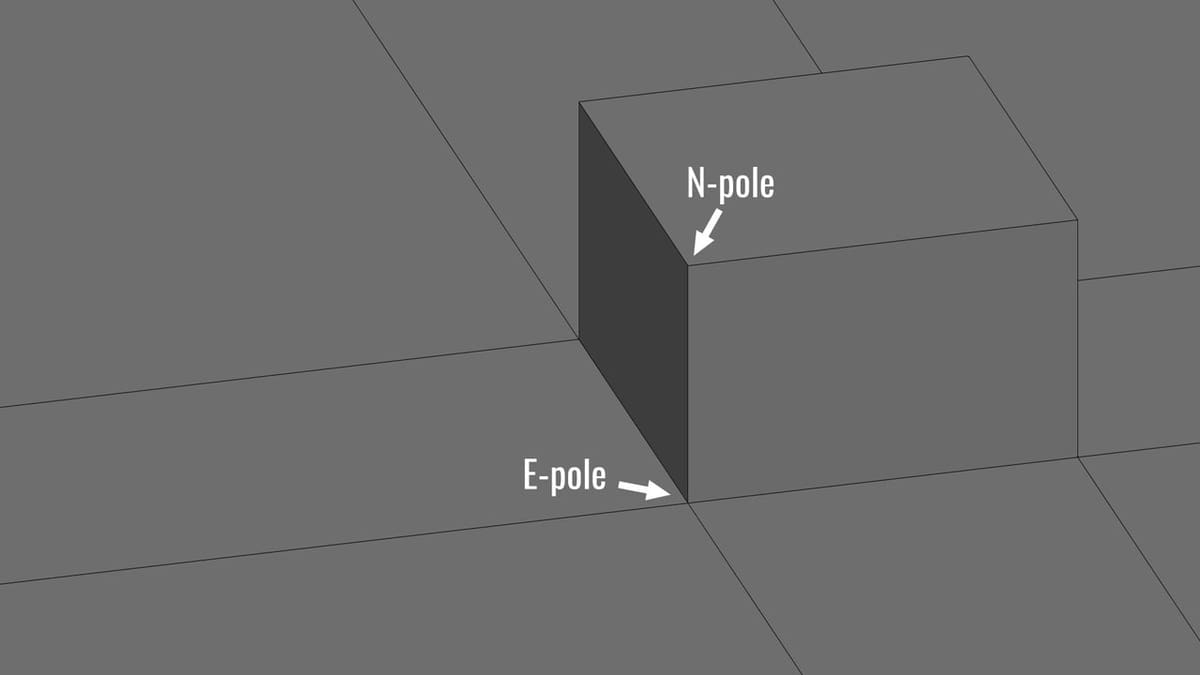
- Poles refer to intersecting edges at the center point of a curve. There are two kinds: E-poles, which refer to five edges intersecting into one vertex, and N-poles, which are three edges intersecting into one vertex.
These are things that you don’t necessarily need to know to get started, but if you’re seeking additional resources, they’ll probably use such terms when talking about meshes.
Now that we have a bit of background information, let’s really get started!
How Does It Work?
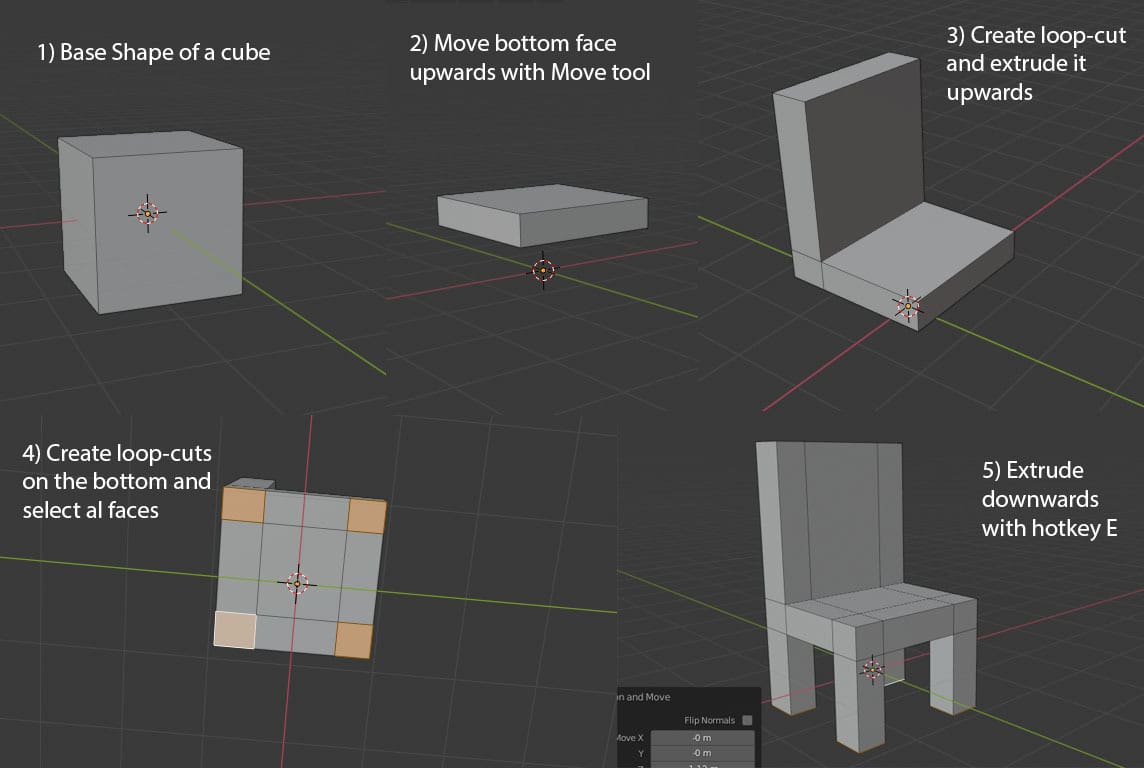
To do mesh modeling, you need to start with a base shape, and Blender has many to choose from, including a sphere, cube, and cylinder. These shapes come with a mesh, and you can change the resolution so that it consists of more or fewer elements.
The next basic step would be to modify the mesh, and there are several ways to do this. In Blender, you switch between “Modeling modes” like Object Mode and Edit Mode.
- In Edit Mode, you see the mesh and can modify the elements in it, like edges, faces, or loops, moving them around, deleting, rotating or extruding them, all to achieve the object you want.
- In Object Mode, you can use a tool called “Modifiers” that allows you to add more resolution, combine elements, cut or combine elements, two objects to make them into one, and so on. We’ll take a more detailed look at these elements and tools in the following sections.
There are also basic 2D shapes like planes, which are useful if you want to create low-poly models. Low-poly is a sub-genre of mesh modeling where you work with a smaller number of mesh elements to achieve a simplistic representation of an object while keeping modeling times short.
Useful Tools
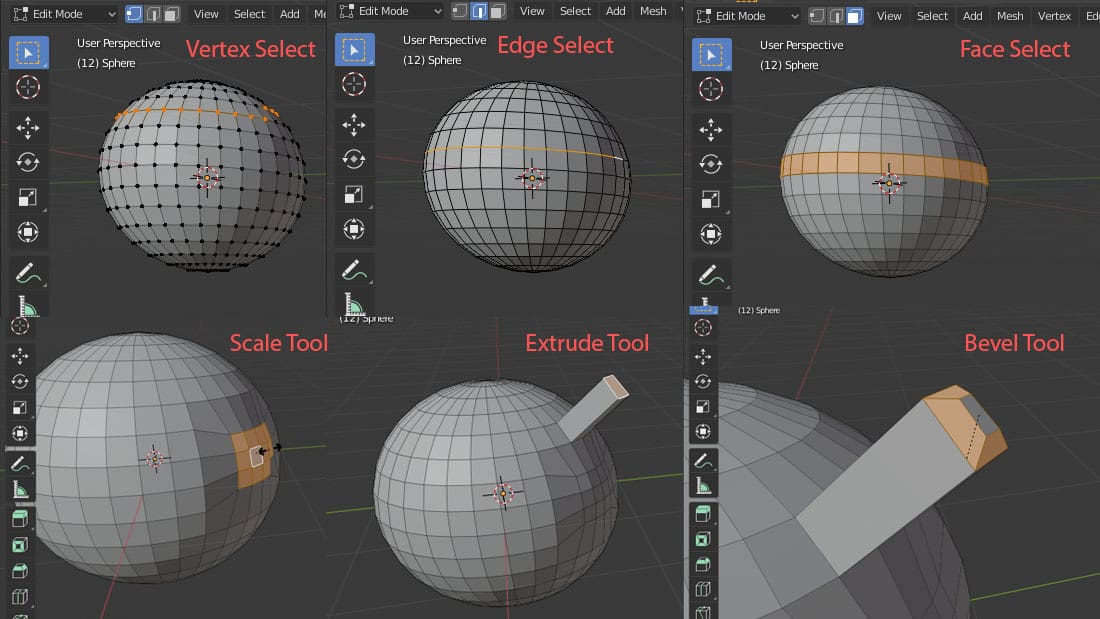
When mesh modeling in Edit Mode, you can switch between selecting edges, faces, and vertices. A simple but important thing to check is that you’ve selected the correct item, as you can also modify your model simply by moving selected elements.
Here are a few simple operations:
- With a face selected, scale it using the scale tool, whose hotkey is ‘S’.
- Select all objects present in the scene with the hotkey ‘A’.
- Extrude a region from a selected face or edge with the hotkey ‘E’.
- The Bevel tool allows you to create chamfers on selected edges, which you can access with the hotkey “Ctrl + B”.
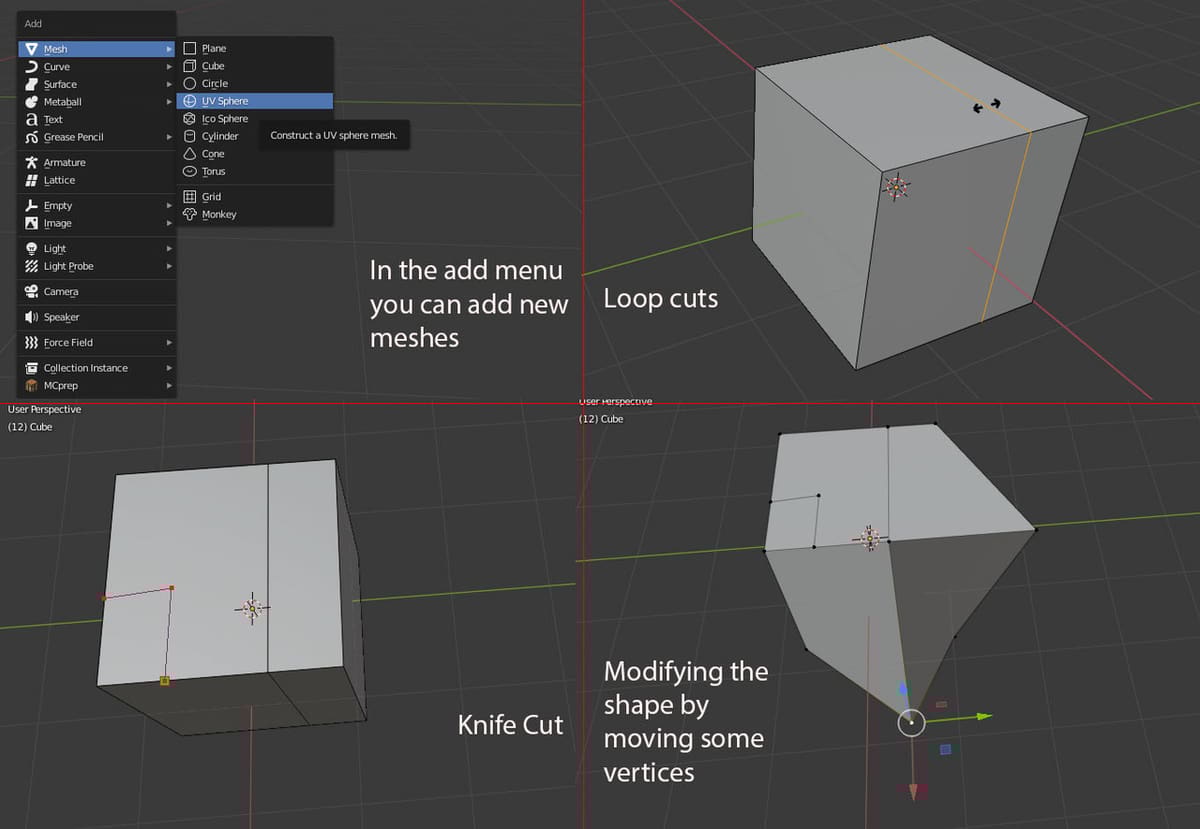
- The Add menu on top of the viewport allows you to add more base shapes. You can also view this menu at your current mouse location with the “Shift + A” hotkey.
- Loop-cut creates a subdivision in a face loop to add more elements to the mesh. In other words, it creates an edge loop inside an existing face loop. You can access it with the hotkey “Ctrl + R”.
- A knife cut allows you to manually cut a face of the mesh into more sections, basically drawing more edges inside it, which you can now modify separately. It can be useful but beware that it could make your mesh become messy. You can access it with the hotkey ‘K’.
- On the bottom right side, you can see how you can modify a mesh, without any tools or modifiers, simply by selecting elements of it and moving them around.
As an additional tip, when deleting complete objects, make sure to do so while in Object Mode. Otherwise, Blender could present errors like keeping the object as an empty object in the Scene Collection. However, to delete faces, you should do so in Edit Mode.
Modifiers
Modifiers, along with the tools previously mentioned, are the center point of modeling in Blender. They’re basically operations to easily and automatically modify an object. Here, we’ll go over the most common Blender modifiers and their usage.
Subdivision Surface
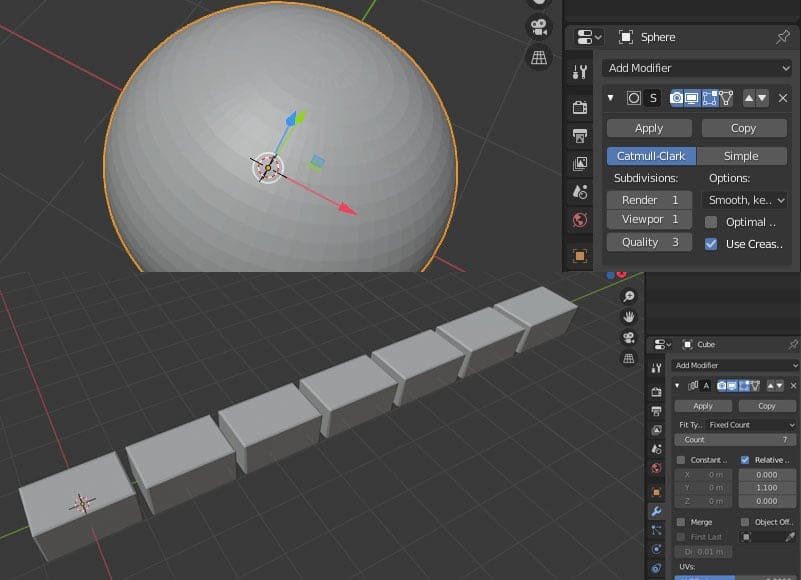
As the name suggests, this modifier subdivides the mesh, creating more elements and thereby achieving a higher resolution. In other words, you can add more details without losing quality.
This modifier also gives you the option of adding the more refined mesh directly into your viewport (although modeling might become heavier) or only in rendering. If you choose to add the subdivisions only in rendering, your model will look the same, but once you produce a render, it will look smoother because of the added mesh elements.
Array
This modifier allows you to copy an object as many times as you want in a defined direction. It’s useful because it saves you the time of remaking an object, or even duplicating said object manually over and over again, while also leaving it arranged in an orderly manner. This modifer is usually used to make bricks and other kinds of repetitive structures.
Boolean
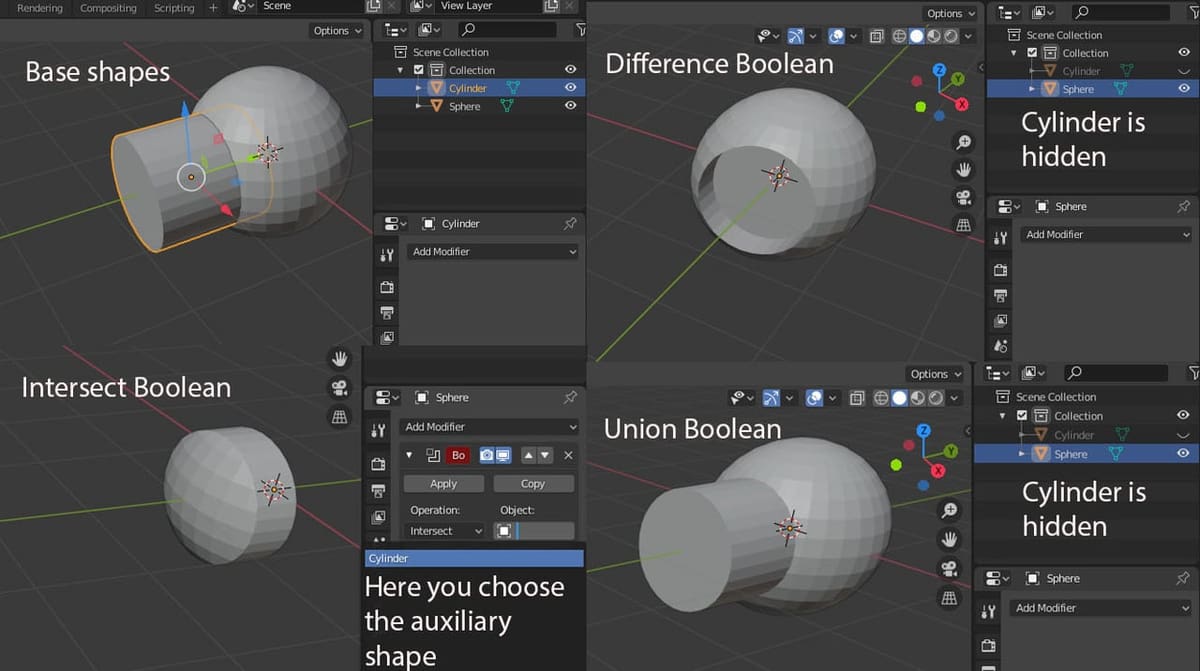
The Boolean modifier is used between two objects, preferably in contact, where you define one of them as the “main” object and the other as the “auxiliary” object. (The object you select to add the modifier to is the main object.) Then, you can choose to do one of the following three operations:
- Difference cuts the shape of the auxiliary object (where they intersect), into the main object.
- Union combines the meshes to make them a single object.
- Intersect keeps the intersection of the two objects and deletes everything else.
The Boolean modifier is very useful because, without it, certain shapes wouldn’t be possible or would become extremely troublesome to create.
In some cases, as with Difference, you may not notice a change. This is because Blender does the operation without deleting the used shapes, so you may have to hide one of the objects to be able to see the effect.
Mirror
This one is quite simple to understand. If you’re modeling something that’s symmetrical, create only half of it and then produce the other half with the Mirror modifier. You can also “clip” the mirrored parts together so that they snap at the center instead of being separate.
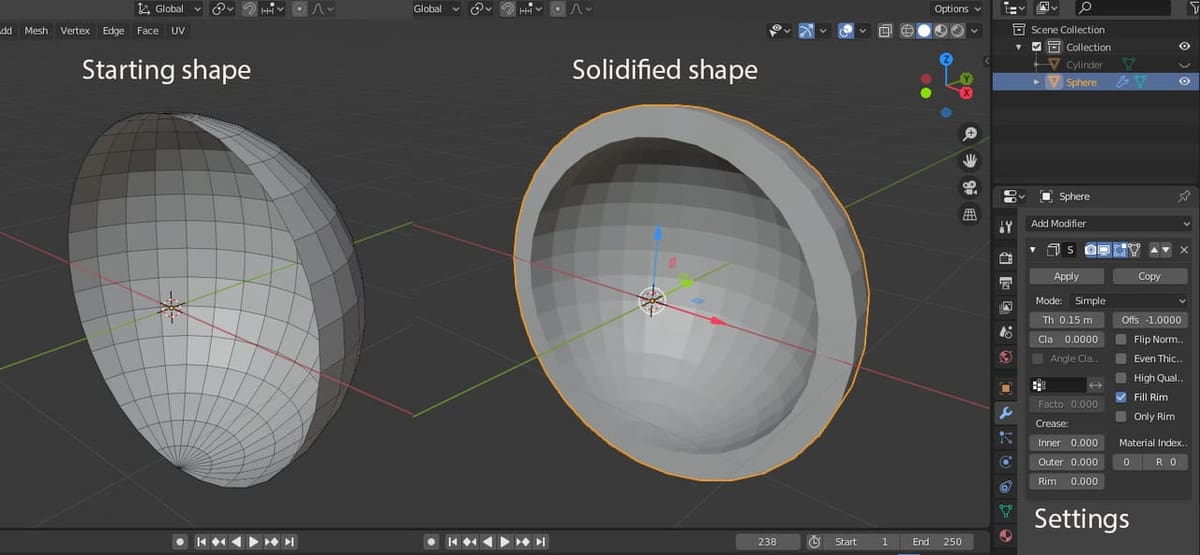
Solidify
If you have, for example, a UV sphere, and you select one of the faces and delete it, you’ll notice that the sphere is hollow on the inside. This means the sphere is just made up of planes, without thickness. This modifier allows you to give an object thickness.
Advanced Tools: Curves & Surfaces
When you look at circles in Blender, you’ll see that they’re actually a collection of small planar faces and not curved. However, there’s a way in Blender to make truly curved shapes. These shapes are defined through mathematical equations, much like a function in calculus. This is important because curves and surfaces are a great tool for hard-surface modeling, where you need clean shapes.
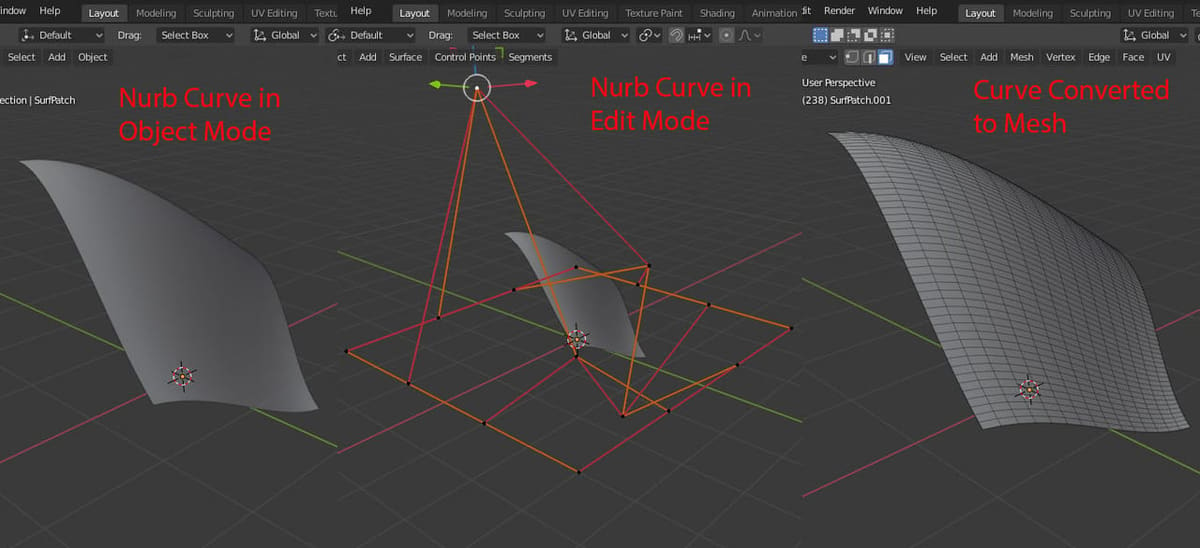
The most popular and practical method to do so is called NURBS, which stands for non-uniform rational basis spline. In this method, you use straight lines to signal the general shape of the curve, and then define a series of parameters to make those straight lines approximate a curve line.
NURBS curves have great mathematical accuracy, but they can also be a bit tricky to understand. In Blender, you can create both NURBS lines and surfaces. Once the surface of the curve is finished, you can convert it to a mesh and continue working normally.
Resources
Now that you know a lot more about meshes in Blender, it’s time for you to give them a try! Check out the tutorials below to keep learning and practicing.
- Donut Modeling by Blender Guru: This tutorial is highly recommended by the modeling community. In it, the author teaches you to model a donut from an absolute beginner standpoint. However, it goes beyond that, slowly teaching you more advanced skills such as adding a background, a cup of coffee with clear material, lighting, rendering, and so on.
- Get Good at Blender by Grant Abbitt: This is a series that takes you through practice exercises where you’ll have to use different techniques and work with various kinds of surfaces. A common issue when you’re just starting and want to practice a lot is coming up with things to model. This series proposes many ideas and walks you through how to model each of them.
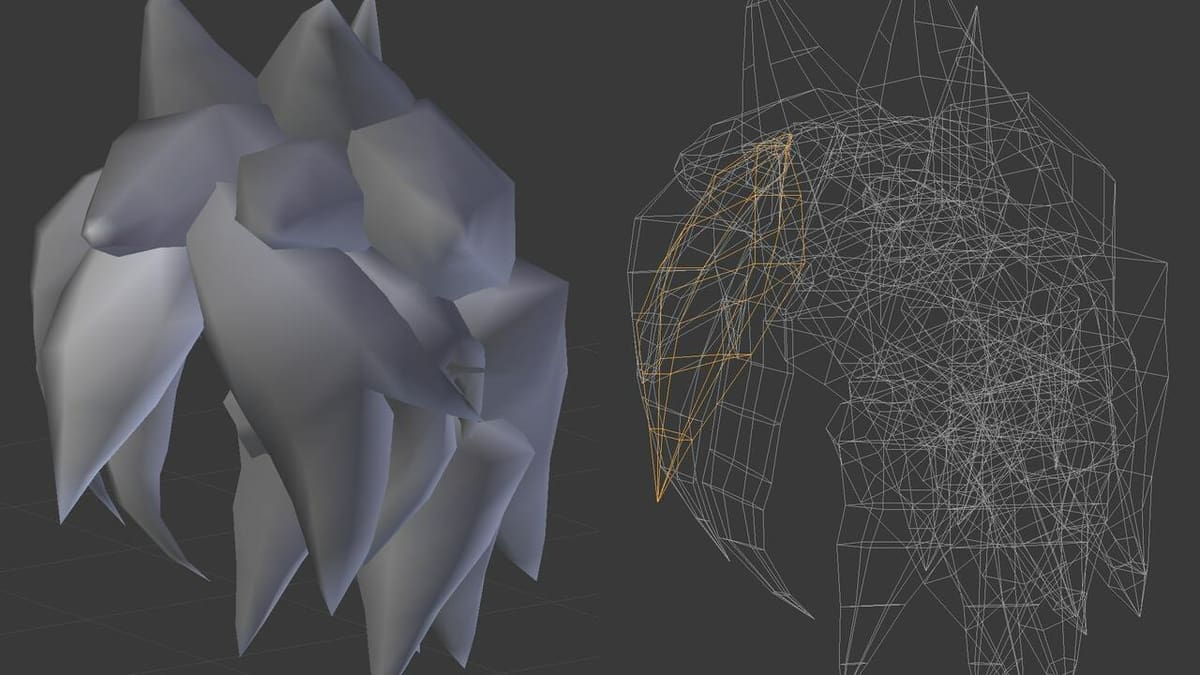
- Character Modeling by Martin Krol: In this video, you’ll see the process for creating characters based on mesh modeling. This is usually how organic models for monsters and other sci-fi creatures are created. This video is recommended for people who want to learn character modeling but have issues envisioning how to do such a process. It isn’t a tutorial, but rather is a sped-up timelapse of the process of creating a character through mesh modeling.
- Modeling for Animation by Dikko: This is another highly recommended tutorial that explains the dos and don’ts when modeling with the intention to animate later on. It explains how to model and rig a character, and how to make it stretch and compress with movement so it doesn’t look stiff, and so on.
Lead image source: Blender StackExchange
License: The text of "Blender Mesh: All You Need to Know" by All3DP is licensed under a Creative Commons Attribution 4.0 International License.