
Blender: Lighting – Simply Explained

No render is ever complete without a good lighting setup. Get familiar with all the essentials to Blender lighting and setting a scene.
Working with lights in 3D software isn’t all that different from how you would do it in real life, with the added benefits of not having to worry about real equipment and being able to create more complex setups.
Whether you’re rendering a full animation or a still shot, it’s important to ensure that your scene is well-lit to prevent loss of detail or misconstrue the overall “mood” you’re trying to go for.
Make sure you stay tuned as we will be going through the different types of lighting, as well as lighting setups you can create in Blender to further enhance your scenes. We will also be looking at how to use add-ons and HDRI with Blender as they are yet not built in natively as of its 4.0 release.
One important thing to note is that the way lighting is rendered can vary depending on the renderer used. Blender has Cycles and Eevee, and both can yield slightly different results while rendering the same scene, which is why you may need to adjust lighting if you are planning on migrating to a different renderer.
With that out of the way, let us commence by taking a look at the different types of light inside Blender in the next section.
Types of Light in Blender
Blender comes with four built-in light objects that we can add to our scenes. These are:
- Point: Light is emitted from a single point in space, similar to how it would be to hold a bulb in real life.
- Sun: This recreates the effect of having a sun inside your scene, shining light from a single direction that is adjustable, and which covers the entire space no matter how big your scene is.
- Spot: Similar to “Point” light, but rather than emitting light in all directions, it’s focused on an area similar to that of a flashlight.
- Area: This emits light from a flat area; this can be a square, rectangle, circle, and so on.
All lights share some common parameters, such as color and strength, however, they all have individual properties that can be tweaked depending on the light used.
Point and Spot lights have a “radius” property that allows you to set how large the light source is. You can picture this as seeing how big the bulb itself would be, but it doesn’t necessarily make the light stronger. Spot lights also allow you to tweak the angle and blend of the light, focusing the glow on a smaller or larger area and giving it softer or harder edges.
With Sun lights you can change the angle, making shadows sharper or softer, as well as the direction the sun is facing by rotating the light itself.
Finally, Area lights, in a similar way to Point and Spot lights, allow you to change the size and shape of the light.
Next up we will be looking at lighting setups we can create using these lights.
Lighting Setups

Now that we are familiar with Blender’s different lights, we’ll take a look at the different types of lighting setups we could use for our scenes.
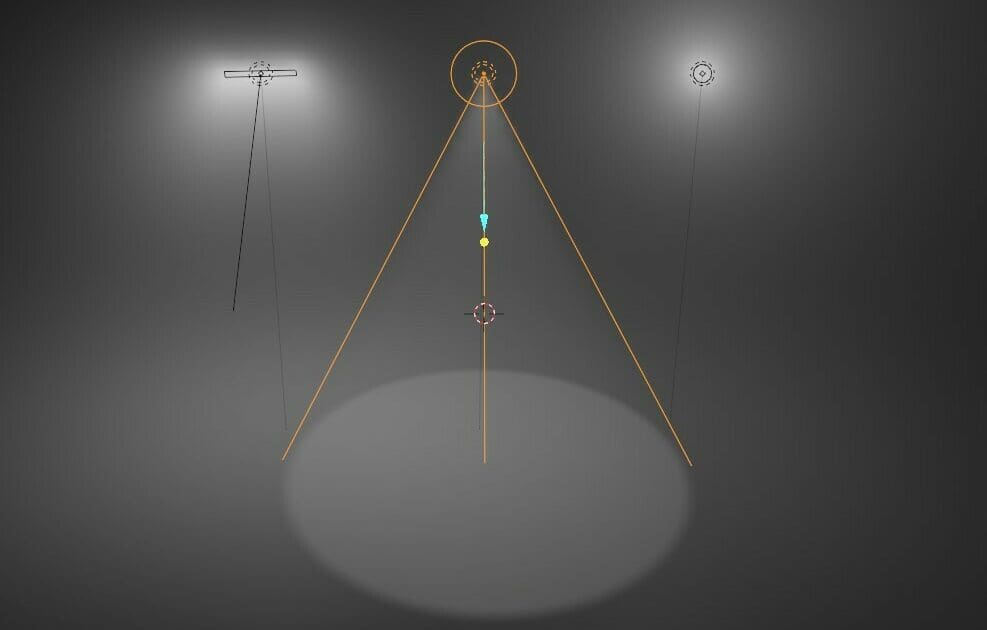
3-Point Lighting
3-point lighting is a very common setup used for still shots and sculpture or 3D model showcases, as it provides natural and balanced lighting. This setup mainly consists of two frontal lights, which are diagonally facing the object, and a third light located at the back, facing one of the frontal lights rather than being behind the object.
Area or Point lights will be great for this setup, as they are easy to position and provide the best lighting.
Studio Lighting
Unlike 3-point lighting, there’s no predetermined way of placing lights under a studio setup, which means that the lights are placed purely according to the user’s needs and how they look best. Studio lighting is also used together with a flat or curved background, which is also lit up and forms part of the lighting setup itself.
There is no need to go crazy and place 20 lights, but usually anywhere between 3-6 can make for a good setup, placed all around the object that is being lit.
Portrait Lighting
Portrait lighting offers a simpler 1-2 lighting setup where you usually want to light up a character’s face from a single direction.
For example, placing the light below the character’s face can create a creepy mood, while placing it to the side can make it look more “curious”.
These are some of the most commonly used lighting setups but you shouldn’t be limited to them. All scenes are different and, especially for more complex environments, you’ll find yourself using a mixture of the above and many more.
Creating a Dynamic Sky
Given that we’re working inside a digital environment and aren’t limited by real equipment, weather, or other conditions, we can replicate almost any imaginable lighting setup. This allows us to create effects that just wouldn’t be possible or that would be very impractical to recreate in real life.
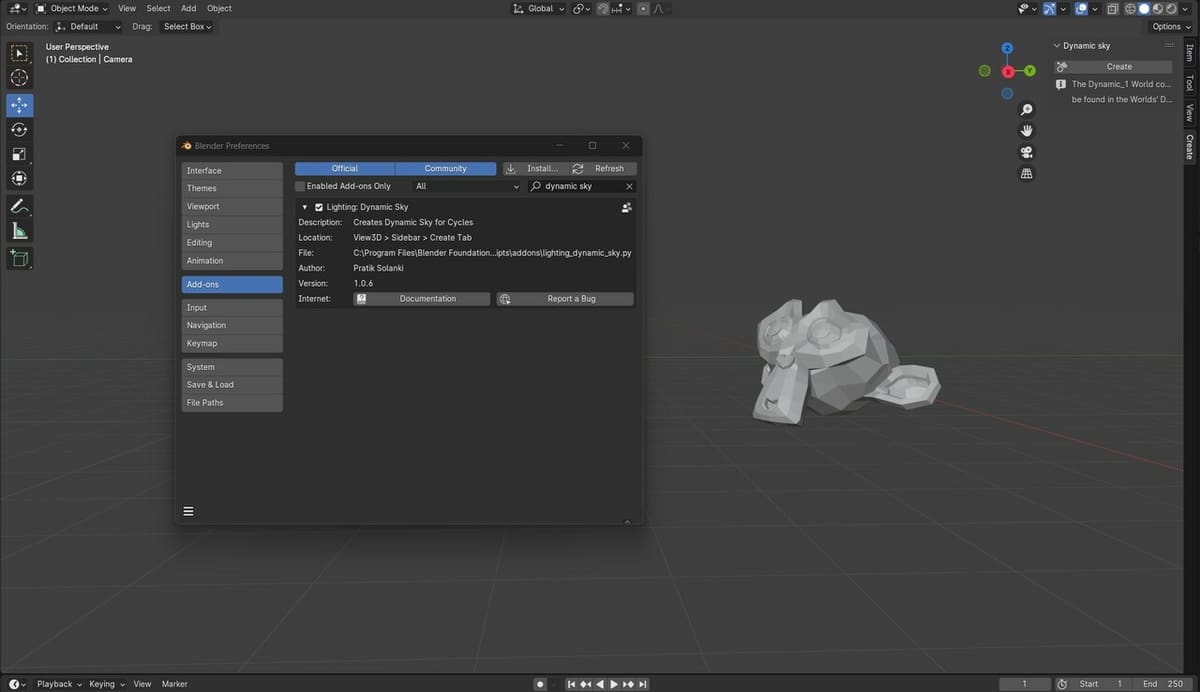
Blender has a very handy built-in add-on called Dynamic Sky. This allows us to create a full sky setup, similar to that of our own planet, with its own horizon, clouds, and sun, all the while enabling us to tweak each one of its colors, brightness, and more.
In order to enable this add-on, we will follow these simple steps:
- Open the add-ons tab by navigating to “Edit > Preferences > Add-ons” located on the top menu.
- Inside the add-ons window, search for “Lighting: Dynamic Sky” using the search tool and enable the add-on.
- Close the add-ons window.
Now that we have the add-on enabled, we will go ahead and create a sample sky. To do this, we will follow these next steps:
- On the 3D viewport, open up the toolbox by pressing ‘N’ on your keyboard.
- From the tabs to the right, select “Create”.
- Click on the “Create” button inside of the “Dynamic sky” toolbox that is now visible on the top right corner of the 3D viewport.
- Select “World” inside of the Properties Editor, which is the small planet icon located on the bottom right of Blender’s default UI.
- In the World Properties, click on the “World” symbol, which, when hovering over with the mouse, reads “Browse World Settings to be linked.” From the drop-down menu, change the default “World” to the new sky we just created, which should be called “0 Dynamic_1”.
- Once you’ve selected the new sky, you can change its settings according to what you want. For example, you can change the sky, horizon, and cloud colors (in the toolbox menu).
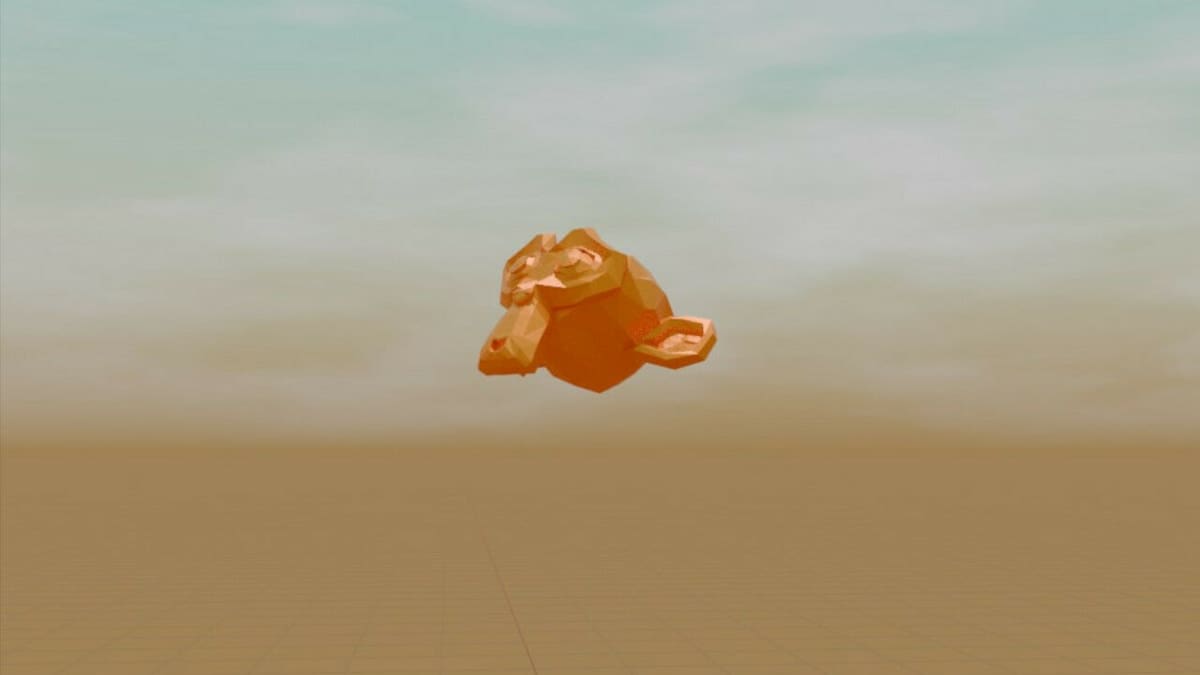
To see the new sky, you will have to switch to Render view inside the 3D viewport. To do this, from the top menu options, go to “Render > Render Image”.
This add-on can be really handy when creating natural-looking environments. Once you get used to it, it only takes a matter of seconds to use, saving you lots of time.
Volumetric Lighting
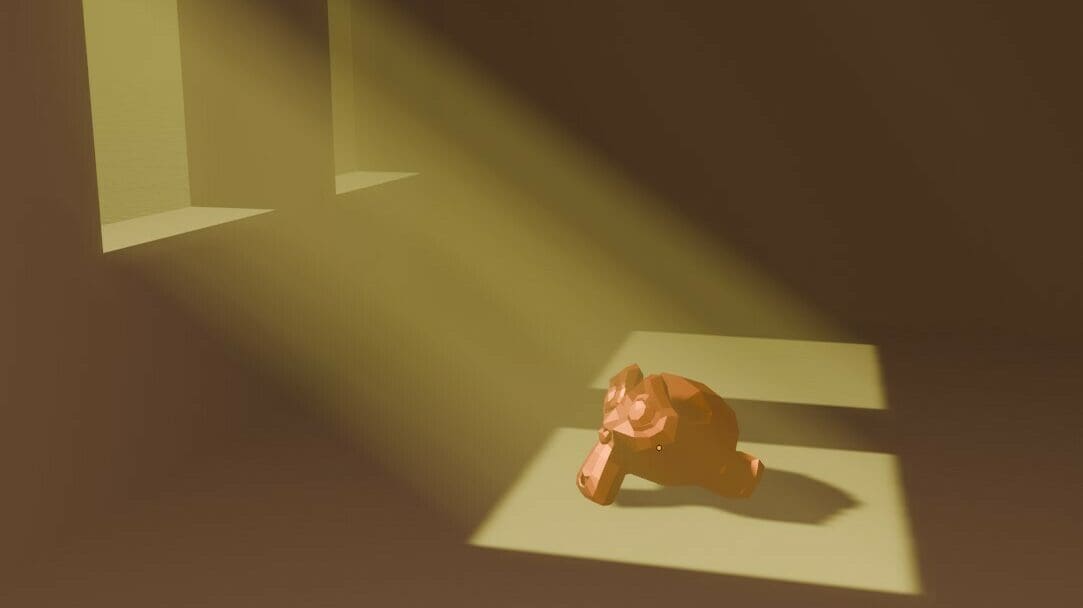
Have you ever looked at the sky on a cloudy day and seen some glorious rays of light shining through? This is the best way to describe volumetric lighting.
Luckily we don’t need to add clouds to recreate this effect, as Blender already has a few ways of allowing us to add volumetric lighting to our scene.
The easiest way to do this is by following the next steps:
- Go to the Shader editor by selecting “Shading” from the top tabs, then from the Shader Type drop-down menu (which by default will be set to “Object”), select the World.
- Create a “Volume Scatter” node by pressing “Shift + A” on your keyboard and searching for it using the search box.
- Place the node anywhere in the shader editor and link its “Volume” output to the “Volume” input of the “World Output” node. This will be possible by extending the “Volume” output, releasing it, and a drop-down menu with options should appear. Here, select “World Output > Volume”.
- Lastly, reduce the density in the “Volume Scatter” node to something such as 0.1 and you should now see a volumetric effect in your rendered lights.
- To view the rendered lights, make sure you are in the “Rendered” view inside of the 3D viewport.
You could also replace the “Volume Scatter” node with a “Principled Volume” node, as this offers a few more parameters to tweak, but for simple setups, “Volume Scatter” should be more than enough.
If you want volumetric lighting on an object, but not on your entire scene, you can do the same steps above to objects. Volumetric lighting in a cube, for example, would make any lights inside the cube appear volumetric.
Note that adding volumetric lighting will significantly increase your render times and will require lots of computing power to work with, so make sure your computer is up to the task!
Tips & Tricks

Before you go, here are three quick tips that may come in handy when working with lights in Blender.
Using an HDRI
A great alternative to the Dynamic Sky add-on is to use an HDRI map (high dynamic range image map), which you can obtain for free at Poly Haven. Here you can find a wide variety of different sky textures to better suit your lighting needs. Although they have a free CC0 license, make sure to credit the makers when using them! To set up an HDRI in Blender you can:
- In the Layout view, navigate to the World Properties tab in the Properties Editor.
- Press the yellow circle next to the Color properties in the Volume settings, then select “Environment Texture” from the list.
- Select the HDRI you just downloaded by clicking on “Open” and navigate to the corresponding folder where you’ve saved the file.
Working with Light Nodes
For more advanced users, light nodes allow you to further tweak light properties and can be handy when working with more complex lighting setups. An example of this can be seen in this video where you can set up a texture to be the light itself.
Light Linking
A recently added feature, light linking allows you to easily choose which objects are affected by a light (or not). For example, let’s say you want a light up all the assets inside your scene except for the ground. You can easily do this by excluding the ground from the list of objects that are affected by this light. We suggest taking a look at Blender’s documentation on light linking for a deeper look at it.
License: The text of "Blender: Lighting – Simply Explained" by All3DP is licensed under a Creative Commons Attribution 4.0 International License.