
Blender Texture: How to Add Textures in Blender

Blender textures show us an object's appearance independently of its shape. Learn how to add textures in Blender!
Beginners to Blender often use the terms “material” and “texture” interchangeably because they both change the appearance of an object. Technically speaking, however, a texture is an image or pattern only, whereas a material is a collection of information that defines an object’s color, shininess, transparency, and bumpiness.
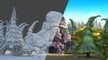
In Blender, materials are composed of image textures. A single material can contain multiple textures that alter how the material looks overall, and an object can have multiple materials assigned to different parts. The primary advantage of using image textures is the ability to make a simple object (e.g. a geometric plane) look like a more complex object (e.g. wood flooring).
Textured models have many applications. Whether it’s 3D animation, 3D video games, or 3D visual effects, learning how to texture your models is an essential skill for 3D artists. If you want to showcase your models, texturing sets them apart.
In this article, we’ll show you how to do just that in Blender 4.0, the latest release at time of writing. Let’s get to texturing!
Getting Started
Using image textures in Blender 4.0 is easier than ever. You only need two things:
- An image file that Blender supports saved to your computer
- An object that will use the material that contains the texture
We’ll use an image texture for our default material, another image texture for a new material, and the default cube as our object. We’ll also take a brief look at the new Asset Browser, which makes reusing materials (as well as other assets) really easy.
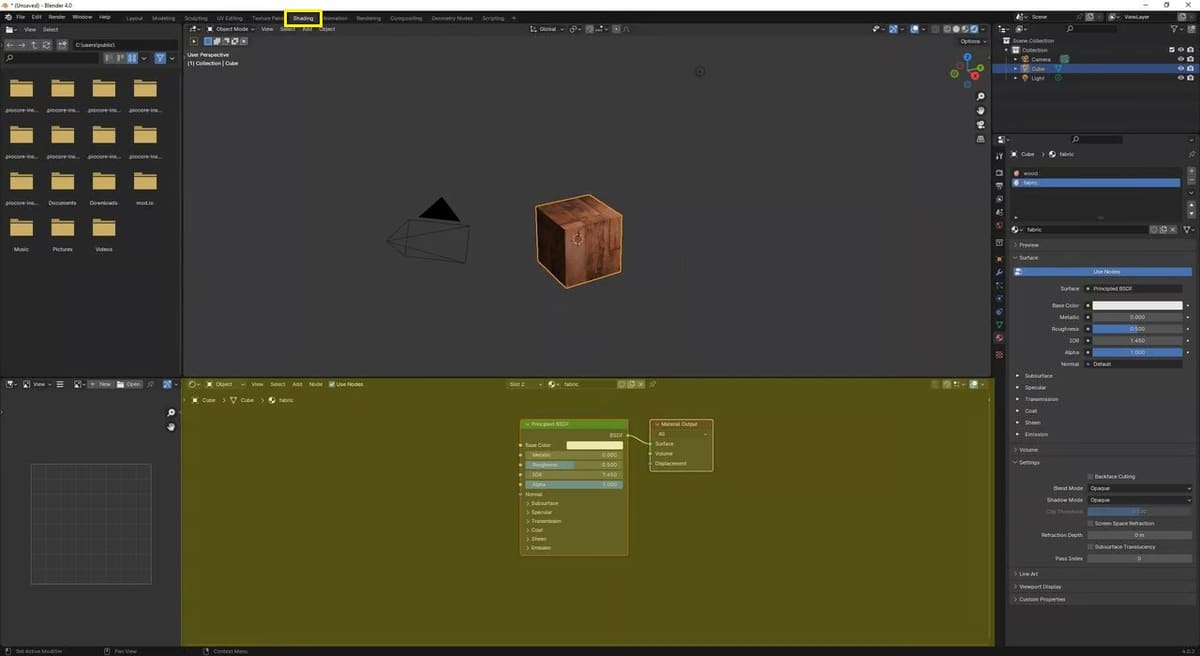
Step 1: Creating a New Material
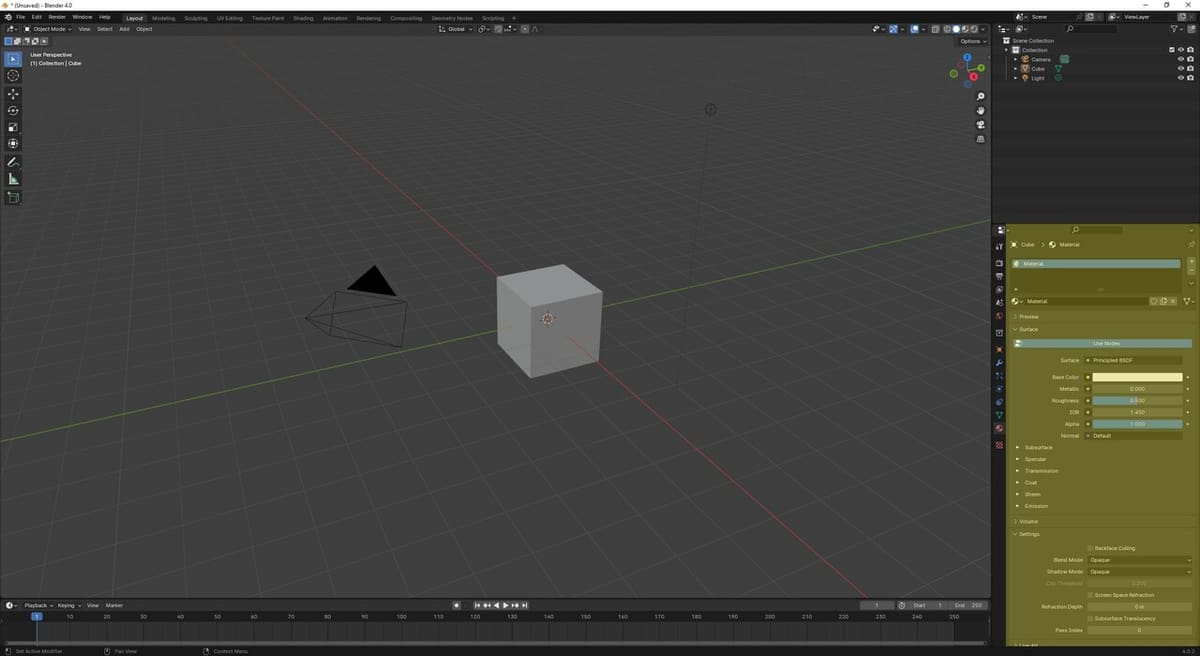
You can edit the properties of materials in either the Properties editor (the panel highlighted in the picture above) or through the Shader Editor. For now, we’ll edit the default material properties using the Properties editor.
- Make sure the default cube is selected; it should have a yellow outline. If the cube doesn’t have an outline, left-click on the cube to select it.
- Go to the Properties editor at the bottom right of the Blender screen, and click the Material Properties tab (the second icon from the bottom).
The Material Panel (outlined in the picture below) lists the materials of an object, and you’ll see that the Material Panel already has a default material called “Material”.
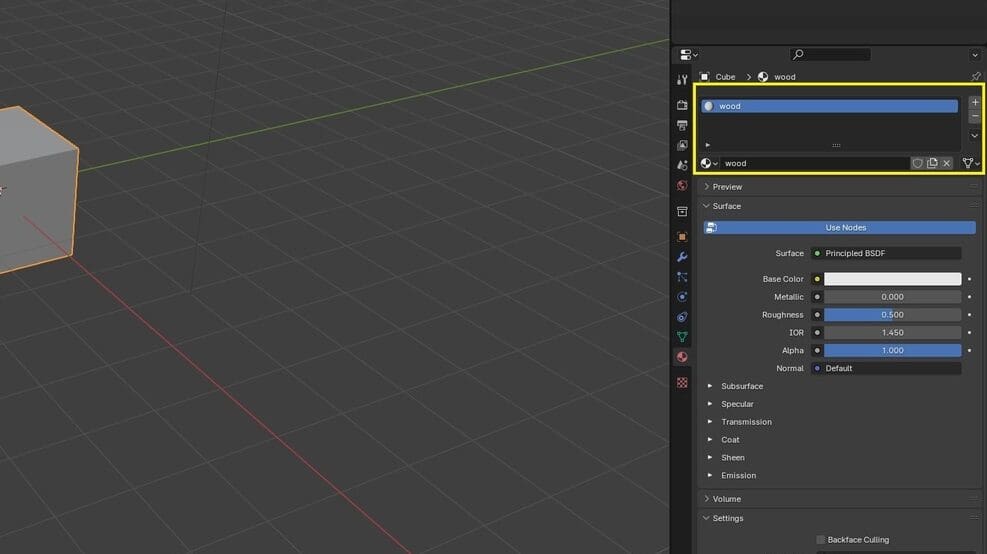
- Rename the material by double-clicking on “Material” and typing a more descriptive name (e.g. “wood”).
- Click on the plus button (outlined in yellow in the screenshot below) to add a new material slot. You’ll see a new material symbol with no name in the Material Panel.
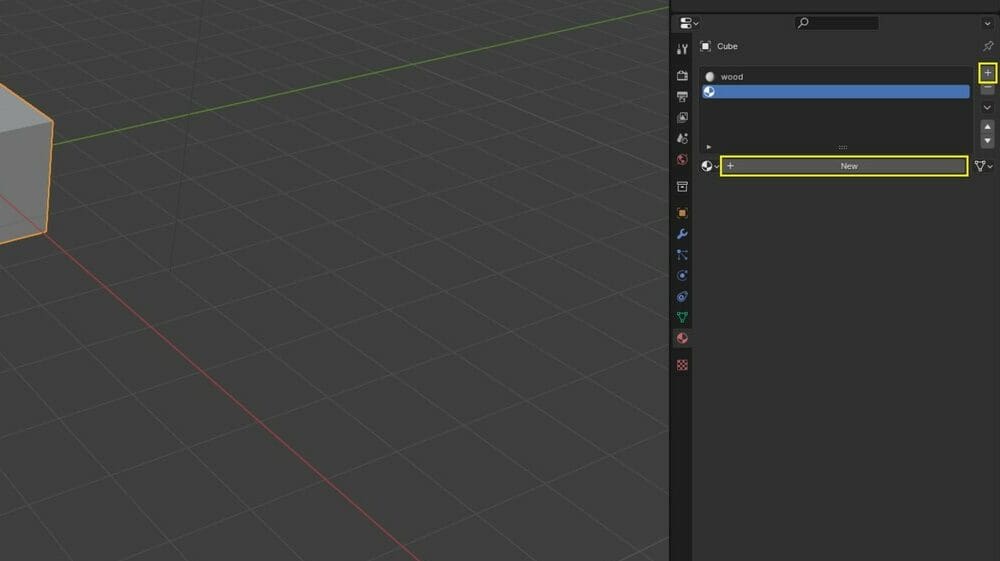
- Click on the “New” button (outlined in yellow in the screenshot above) to add a new material. You’ll see a new material called “Material.001”.
- Give the new material another descriptive name (e.g. “fabric”).
With the materials renamed, it’s time to use image textures.
Step 2: Importing Image Textures
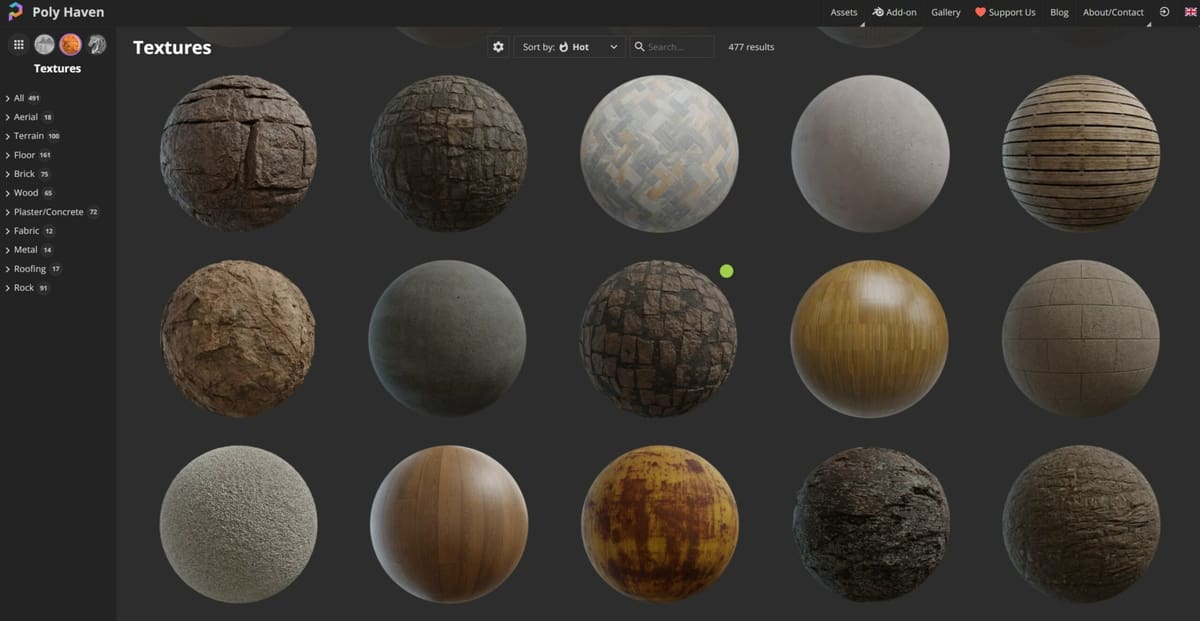
To use image textures in Blender, you must first download images. There are quite a few sites where you can find textures, but we recommend these sites for free ones:
- Polyhaven is a resource for free textures in addition to other free assets.
- Unsplash is a resource for free high-quality photographs.
- /r/blender on Reddit contains links to free texture packs posted by users.
If you want to use the same textures that will be used in this guide, you can download this fabric texture from Polyhaven and this wooden board from Unsplash.
Importing via Material Properties
With the textures saved, it’s time to import them to Blender. We’ll import an image texture using the Material Properties tab of the Properties editor as follows:
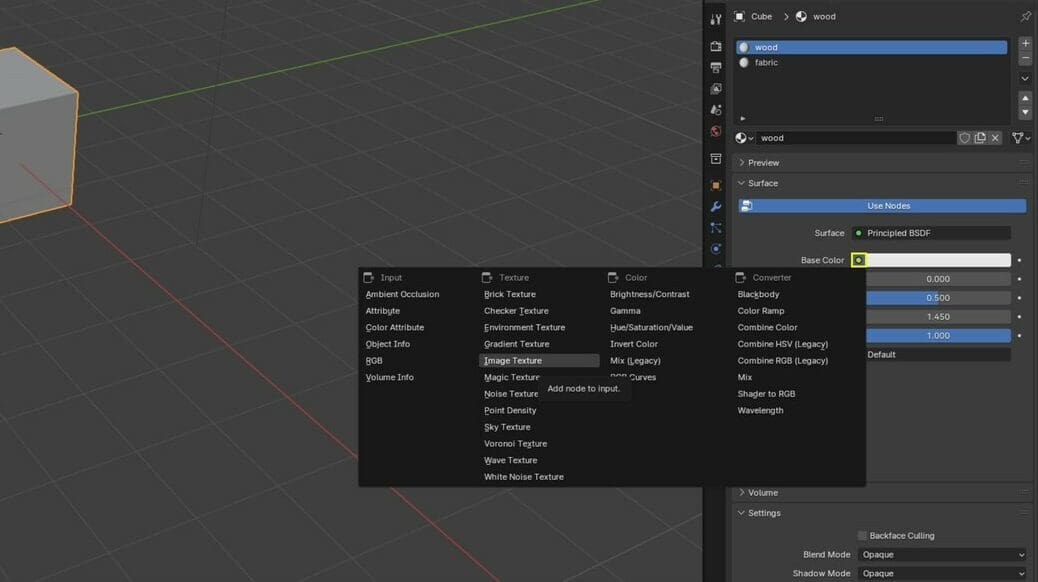
- In Material Properties, click the arrow next to “Surface” to open up the section and look for the “Base Color” property.
- Click on the yellow dot just to the right of Base Color. You’ll be presented with the menu shown in the screenshot above.
- Click “Image Texture”. You should see new menu options under Base Color.
- Click “Open” to open the Blender file explorer.
- Find your image texture (e.g. the wood texture image from Unsplash) in the file explorer, then click “Open Image”.
You won’t immediately see any changes to your object. In order to see changes, you’ll have to change the settings for the Viewport Shading in the upper right hand corner of the 3D Viewport.
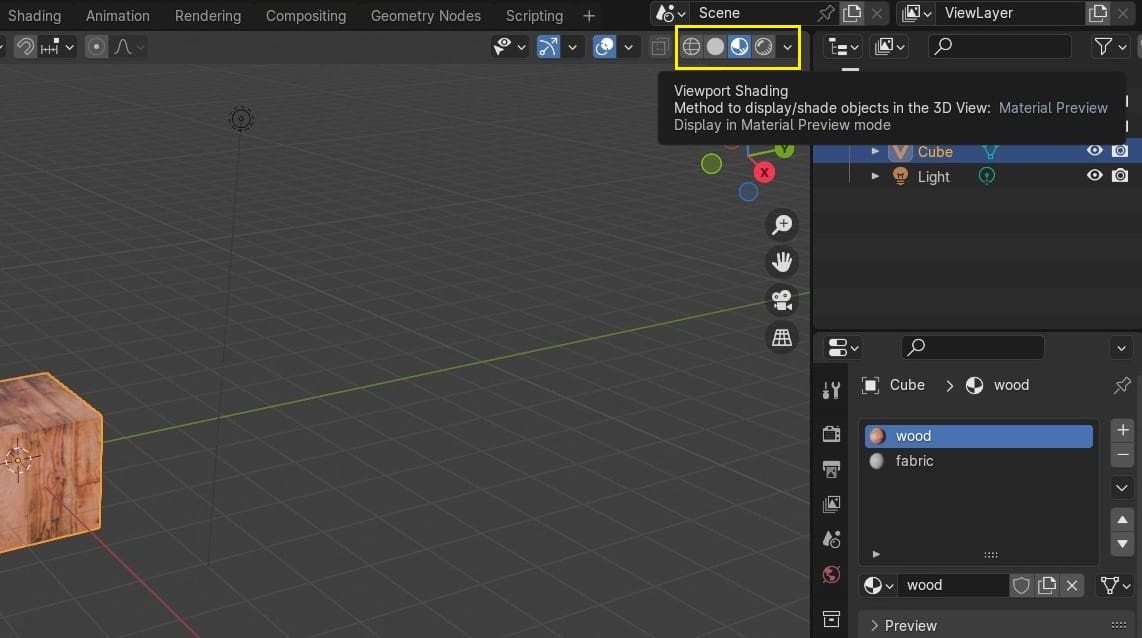
- Change the Viewport Shading from the default “Solid” setting to either “Material Preview” or “Rendered” (outlined in yellow in the screenshot above).
Node Control
We’ve successfully added image textures to newly created materials using the tools in Material Properties. With the Shader editor, we now have the opportunity to exercise finer control over editing materials. The difference between the tools in Material Properties and those in the Shader editor comes down to nodes. In simple terms, nodes are operations that change data into something else.
While the Material Properties tools only give us an overview of the material’s node tree, the Shader editor helps us visualize the relationships between the nodes. Being able to see the flow from node to node makes it easier to see which aspect of the overall system (in this case, the material) we’re changing. Materials in Blender use shader nodes, which are nodes that affect how light responds to different properties of an object.
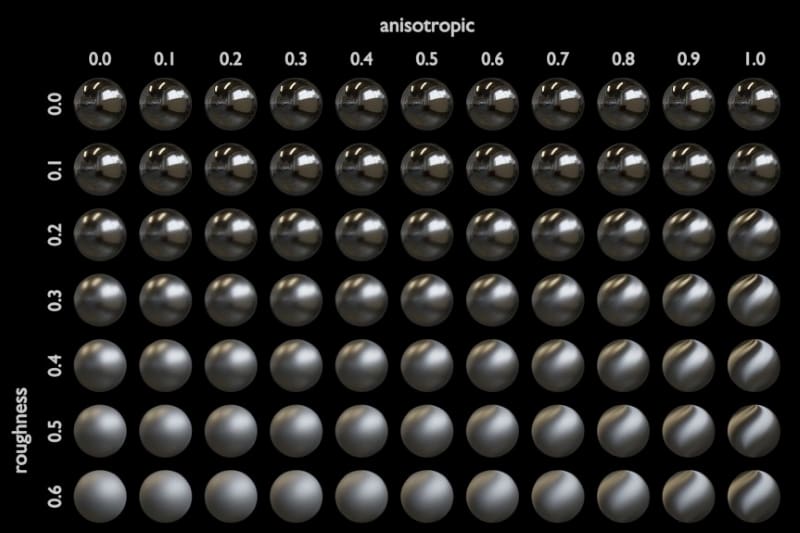
In our example, we’re using the Principled BSDF shader. The Principled BSDF shader allows us to create a wide array of materials by giving us the option to alter things like a material’s roughness and metallic values. It’s also compatible with a lot of different 3D software.
Importing via the Shader Editor
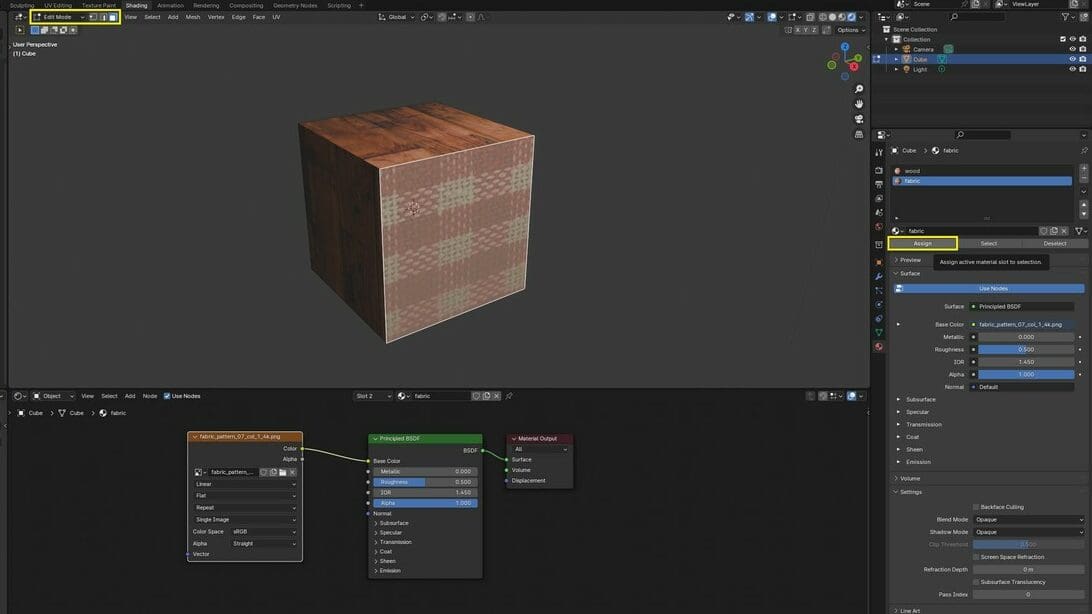
We’ll be using the Shader editor (highlighted in the screenshot above) to add an image texture to the “fabric” material using these steps:
- Click on the “Shading” workspace button on the topbar (outlined in yellow in the screenshot above). This workspace is ideal for using nodes in the Shader editor.
- Click on the second material in the Material Panel of the Material Properties tab, the fabric material.
In the Shader Editor, you’ll see that the name next to the material icon matches the name of the second material.
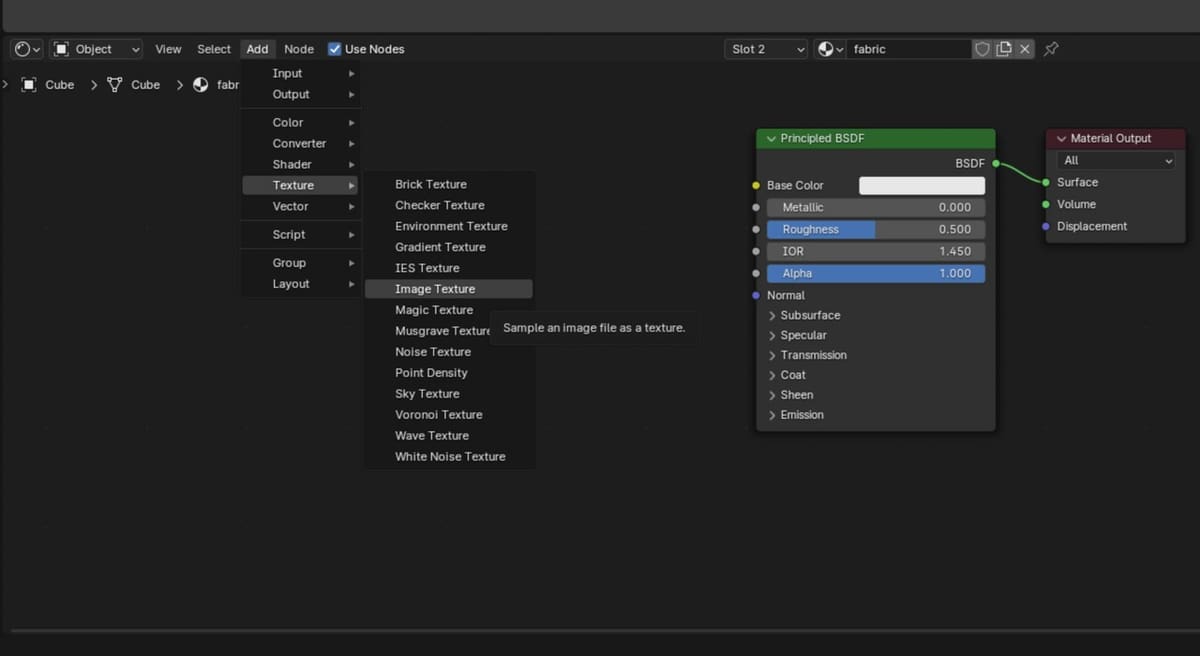
- In the Shader editor, either click “Add” on the header or use the keyboard shortcut “Shift + A”.
- Hover over “Texture”, then select “Image Texture” as you see in the screenshot above. The Image Texture node will appear as a panel.
- Drop the Image Texture node in the Shader editor.
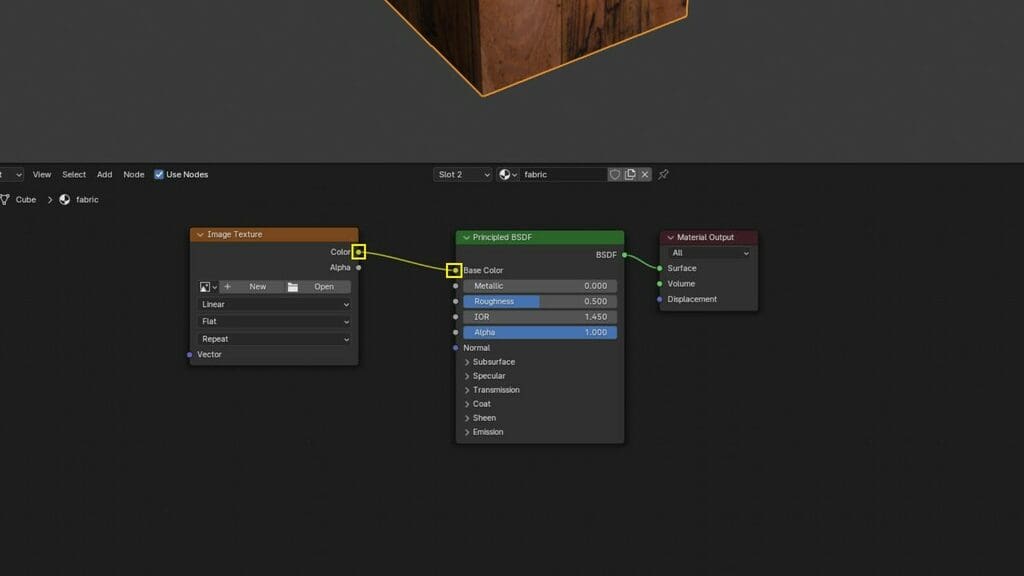
- Click on the yellow socket at the Color property of the Image Texture node, then drag the connection to the yellow socket attached to the Base Color property of the Principled BSDF node. Your node setup should look like the screenshot above.
- Click “Open” in the Image Texture node to open the Blender file explorer.
- Find your image texture (e.g. the fabric texture image extracted from the Polyhaven zip file) in the file explorer, then click “Open Image”.
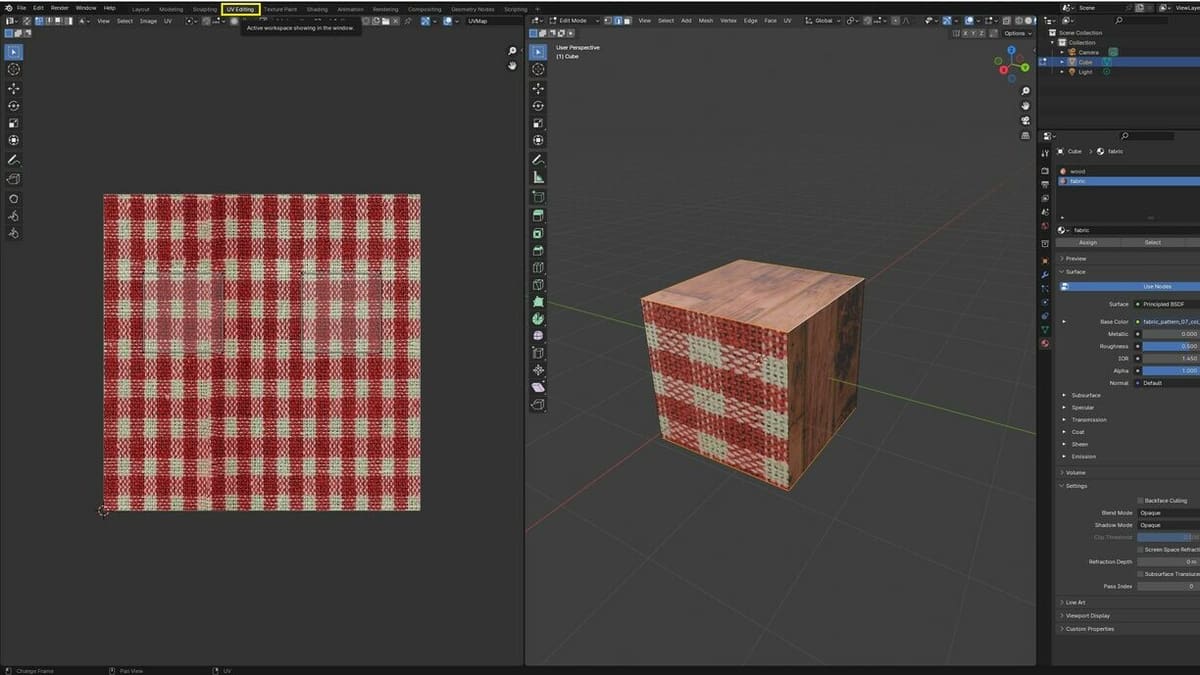
You won’t see any changes for now. To see the new material, you have to assign it to a part of the object.
- Hover over the 3D viewport and press the Tab key to switch to Edit mode.
- Press the ‘3’ key on the top row of the keyboard (not the key on the number pad). This allows you to select specific faces. (Your settings should look like the settings outlined in yellow in the screenshot above.)
- Select the faces you want to see the material on, then click “Assign” (outlined in yellow) under the Material Panel of the Materials Properties tab on the Properties editor.
You should now see your material. If you don’t see the material, make sure your Viewport Shading is set to “Material Preview” or “Rendered”, and that you selected the correct material before clicking on “Assign”.
Asset Browser

Now that we have more than one material, you might want to save it for future use. As of the release of Blender 3.0, the Asset Browser allows you to reuse objects, materials, poses, and worlds. To save a material as a reusable asset, right-click on the material in the Outliner and select “Mark as Asset”.
Alternatively, you can also mark materials as assets in the Material Panel by right-clicking on it and selecting “Mark as Asset” from the drop-down menu.
To reuse a material, follow these steps:
- Go to the “Shading” workspace, and make sure you’re in Object mode.
- In the left window where you see the file browser, press “Shift + F1” to change to the Asset Browser. You’ll see your saved assets here.
- Drag the material from the Asset Browser onto any object that you want the material applied to. It will replace the active material of the object.
If you want to add a material to the Asset Browser, it’s just a tad more complex:
- Create a new material as we did in Step 1 above.
- Select the new material in the Material Panel.
- In Edit mode, assign it to part of the object.
- Press the Tab key to go back to Object mode.
- Finally, drag the material asset onto the object.
As you can see, the Asset Browser makes applying the same material to different objects much easier than before.
Step 3: Unwrapping an Object
The image textures are now applied to the object, but what if we want to map them on the object in a certain way? This is where UV editing comes in. You can edit an object’s UV in the UV Editing workspace after unwrapping it.
Unwrapping an object is the process of taking the 3D form and converting it to a 2D shape. To get a good, uniform UV that doesn’t overlap, you can follow these steps:
- Click on the “UV Editing” workspace button on the topbar (outlined in yellow in the screenshot above).
- Hover over the 3D viewport and press the Tab key to switch to Edit mode.
- Press the ‘2’ key on the top row of the keyboard, not on the number pad. This allows us to select edges.
- Select the edges that you want to form the seam where the 2D shape of the object is separated. The seam should be placed in an area that won’t be as visible as the rest of the model because seams are visible with some textures.
- Right-click on the 3D viewport and click “Mark Seam”.
- Hover over the 3D viewport and press the ‘U’ key, then click “Unwrap”.
In the UV editor, you’ll now see the unwrapped version of your object. You have the option of selecting vertices, edges, faces, or UV islands by clicking on the “Vertex Selection Mode” icons on the left side of the Header just below the topbar.
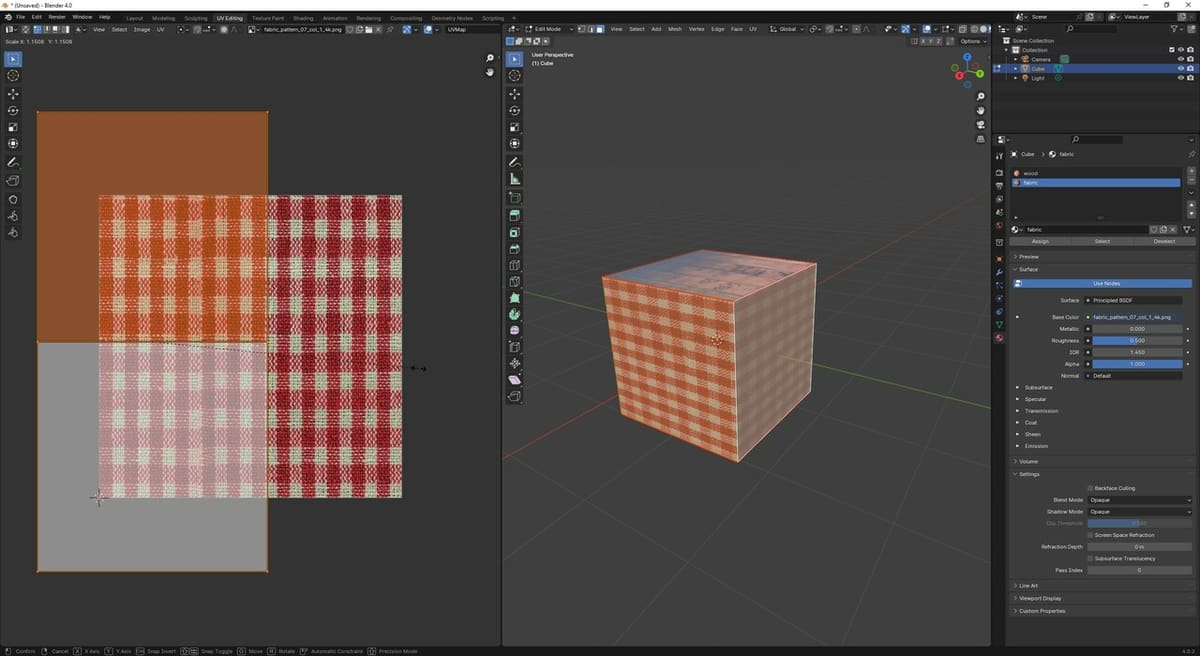
Whatever you choose to select, it can be modified using the tools in the Toolbar on the left of the UV editor. In the screenshot above, we scaled up the UV faces by using ‘S’, then dragging the mouse until the stitches were the size that we wanted.
Alternative Methods
Instead of creating seams and unwrapping, the Unwrap menu gives you other options for creating UVs, including Smart UV Project, one of the preset primitive projections (cube, cylinder, and sphere), or Project from View. Although these projection methods are easier and good enough for a simple shape like a cube, you lose control of where the 2D shape of the object is separated and how the UV is shaped.
Step 4: Final Touches

With the image textures precisely where you want them, it’s time to render your textured cube. Rendering shows us what our final textured object will look like. To render, you should first select a suitable render engine.
Blender provides three options: Eevee, Workbench, and Cycles (outlined in yellow in the screenshot above). The Workbench engine is what remains of the original Blender render engine and isn’t recommended for final renders. That leaves you with either Eevee or Cycles. A few key differences include the following:
- Eevee is faster.
- Cycles allows for more photo-realism.
- Eevee needs tweaking for transparency and shadows to render properly.

We recommend Eevee for stylistic renders and Cycles for realistic renders. Since we were going for a realistic render, we went with Cycles.
To finish up, simply press the “F12” key to render your cube.
Alternative: Using an Add-on
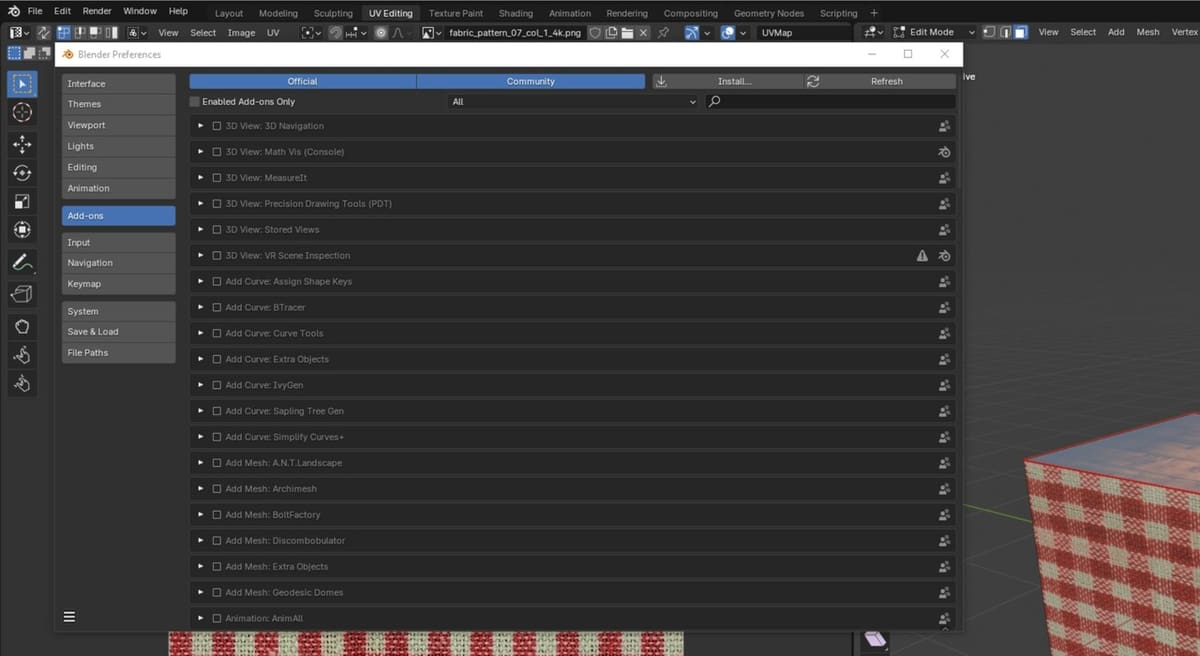
There are a lot of tools in Blender. To prevent users from being overwhelmed with options, many of these tools have been disabled by default. This lets users pick and choose which tools they want displayed on their screens to curate their creative process without cluttering the screen with unnecessary options. These additional tools are known as add-ons.
To find Blender’s add-on options, click the Edit menu at the top-left and select “Preferences…” from the bottom of the drop-down menu. Here, you will see the Add-ons section on the left. Selecting it will give you a complete list of official add-ons that come with Blender. Checking the box next to an add-on will enable it, while clicking the arrow to the left of the box will give you a brief description of what the add-on does.
Community-Made Add-Ons
While Blender has plenty of built-in add-ons for you to try, some problems can only be solved by the community. One of the most popular websites for community-made add-ons is Blender Market. You can find a range of options for all kinds of unique tools to make your workflow much easier.
For adding textures to our models, we’ll be using the Poliigon add-on because of its large library of textures, pre-made models, and HDRIs that we can import into our projects to speed things up. To install the Poliigon add-on, you first need to download the zip file from their website. Then, in the Blender add-ons menu, click the “Install…” button at the top-right. This will prompt you to find an add-on that you’ve downloaded locally. Select the Poliigon zip file inside your folder and click “Install Add-on”. Be sure to enable the Poliigon add-on by ticking the box next to it in the add-ons menu once it’s finished installing.
How to Use Poliigon Textures
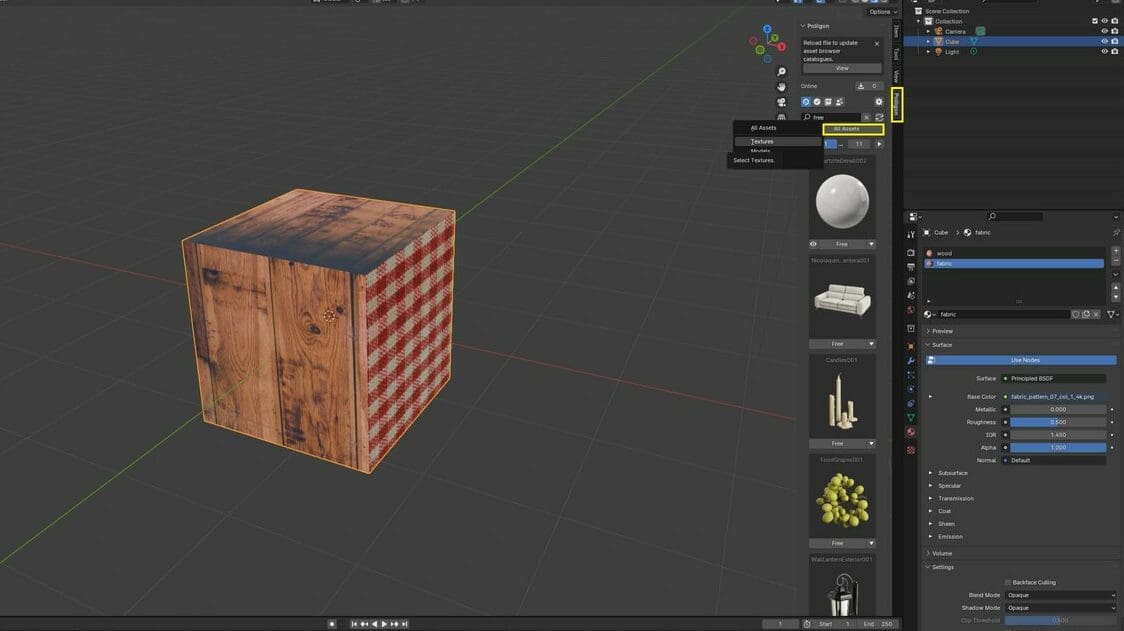
Now that we have Poliigon installed, we can use it to browse through a variety of textures to find one that suits our model. Press the ‘N’ key to make sure your side panel is open and click on the Poliigon tab. You will need to quickly log in to your Poliigon account before continuing; after this, you’ll want to change the Category from “All Assets” to “Textures”.
You can now scroll through all of the available textures and find one that you like. You can preview a texture by clicking on the eye icon to the left of it. This will temporarily apply the texture to your model before you decide if you want to purchase it. After picking a texture, click on the “Free” button to purchase it. This will begin downloading the texture.
Keep in mind that this will download the texture at a default resolution of 2K. You can change these default values by clicking the arrow next to Poliigon in the add-on menu. Under the “Asset Preferences” tab, you can select from a range of resolutions, though we recommend sticking with the default of 2K for now.
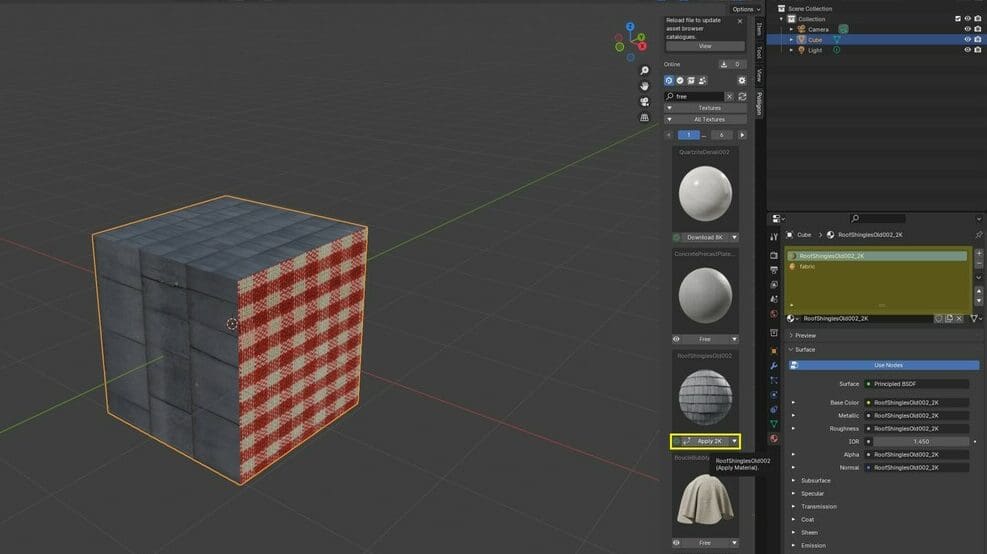
Once downloaded, you may click the “Apply 2K” button to import the texture into your project and have it applied to your selected object. Keep in mind that this will also override the material that you selected in the Materials tab. You can avoid this by creating a blank material and selecting it before importing the new Texture.
Poliigon Pricing
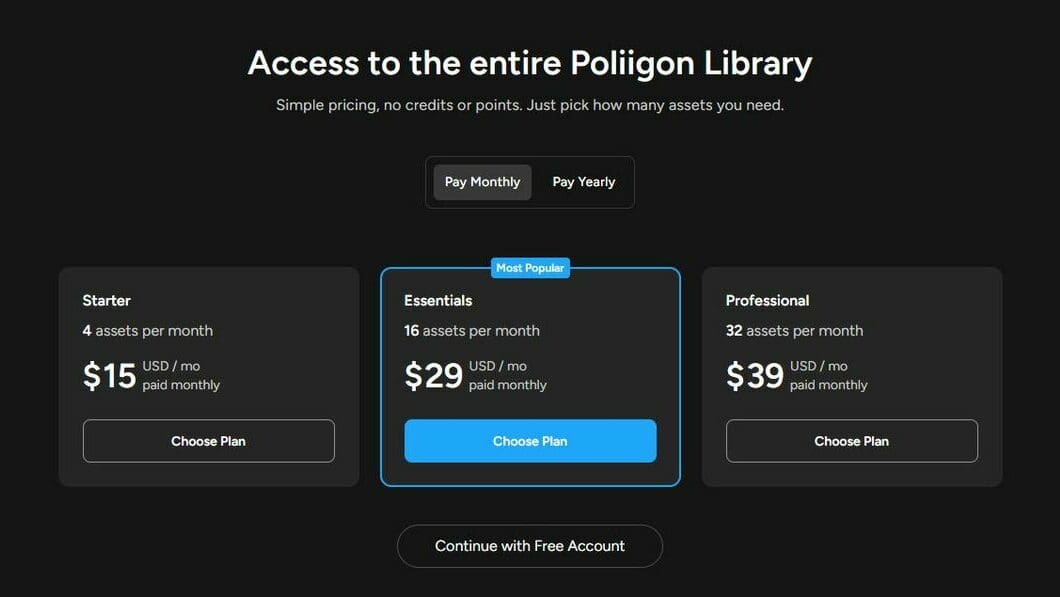
Poliigon has hundreds of free assets that you can download and use in your projects after creating a free account. It also has many assets that require a paid plan to access. These paid plans allow you to purchase access to a set number of assets per month, ranging from 4 to 32 assets.
If you attempt to purchase an asset that isn’t free, you’ll get a “Low Balance” notification. Searching “free” in the Poliigon Asset Browser will display all of the models, textures, and assets that you can use without a paid plan. Remember that you can preview every asset that Poliigon has to offer before purchasing it, giving you a good idea of what it will look like in your project before committing to it.
Overall, this is a great add-on that beginners can use to quickly add free textures to their models while giving plenty of room to grow with their library of paid models and assets.
License: The text of "Blender Texture: How to Add Textures in Blender" by All3DP is licensed under a Creative Commons Attribution 4.0 International License.