Blender: Add Bones – Simply Explained

In Blender, "add bones" is one of the necessary steps for rigging and modeling. Keep reading to learn more about bones in Blender!
Blender always comes through when a realistic scene needs to be set up. Be it character modeling, rigging, simulation of objects, UV mapping, sculpting, and more, Blender provides an all-in-one platform to design a scene from scratch, from objects to visual effects.
When it comes to preparing models for animation, Blender offers designing and rigging, structured around features called “Bones” and “Armature”. The former are made of three parts, namely the “head”, the “body”, and the “tail”. The head and the tail, which are the start and end of a bone, can be moved and scaled as required, while the body connects them.
An armature in Blender can be seen as a reflection of a real skeleton. This skeleton acts as the frame of a designed character and is used to model and animate it. The armature is made of bones, which act as the unit elements, just like bones are the unit elements of our skeletons.
Armatures and bones behave like any other object in Blender. That means their positions can be changed, they can be scaled, rotated, edited, and associated with other scenes. They’re one of the basic steps for rigging (and therefore posing and animating) models.
Now that you know a bit about the basics of bones, we’ll be delving into how to add and work with them in Blender. Plus, we’ll give you some tips and resources so your bone adventures in Blender go smoothly. Nothing spooky to see here!

Bones Toolbar
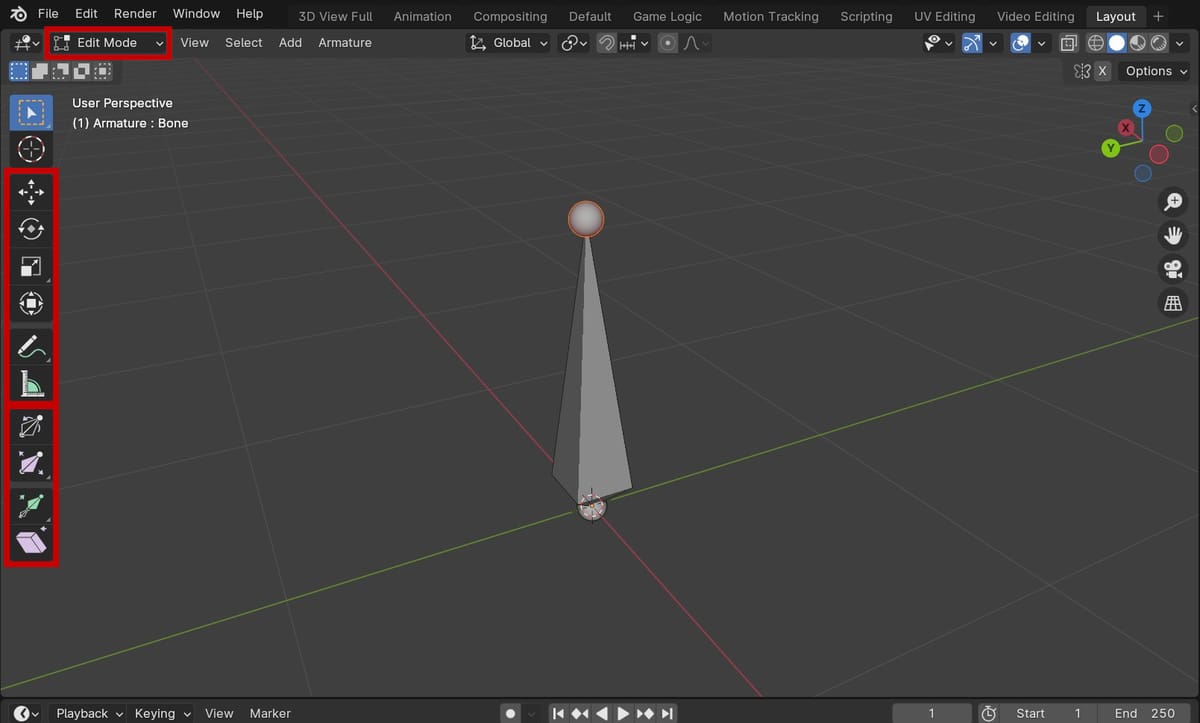
Blender offers a number of tools to change the default bones. To access the toolbar, switch over to the editing mode in Blender, which can be done by hitting the Tab key on your keyboard or by simply selecting “Edit Mode” from the drop-down list in the top-left corner of the 3D Viewport. Keep in mind, though, that you’ll only be able to view bone-related tools once an armature is added to the scene.
The tools available include the following:
- Select: Selects a bone or bone parts
- Move: Selects parts and moves them by dragging with the left mouse button (this can also be done by grabbing – hotkey ‘G’ – the selected part and moving it to the required location)
- Rotate: Rotates the selected parts around the X-, Y-, or Z-axes
- Scale: Scales the selected parts by dragging with the left mouse button
- Transform: Changes an object’s translation, rotation, or scale
- Annotate: Makes annotations around an object
- Measure: Measures the distances between objects or object parts
- Roll: Rotates a bone around the Y-axis
- Bone size: Changes a bone’s thickness relative to its length
- Extrude: Creates a new bone that will be connected to the selected bone
- Shear: Shears the selected parts horizontally
Now, let’s see the steps to add bones in Blender!
Step 1: Add Bones
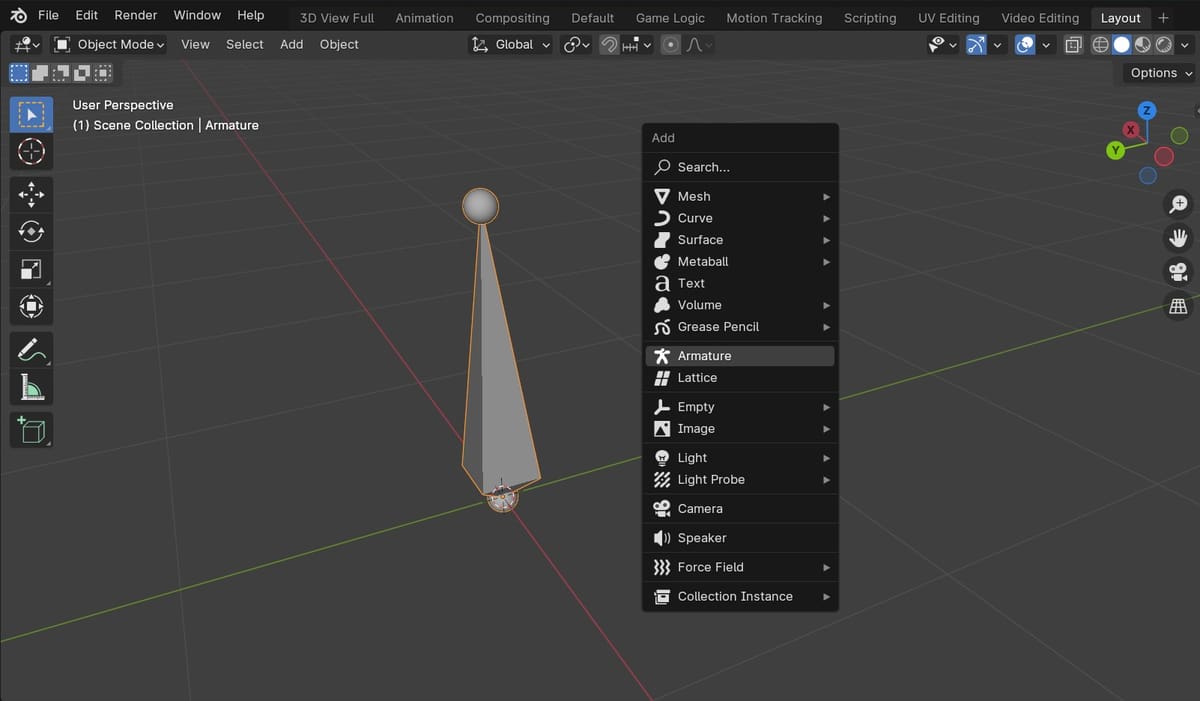
To add bones in Blender, we need to be in Object Mode, which can be changed by hitting the Tab key or by selecting “Object Mode” from the drop-down list.
After switching over to Object Mode, proceed as follows:
- Hit “Shift+A” on your keyboard to open the Add menu.
- Click on “Armature” to add a single bone to the scene.
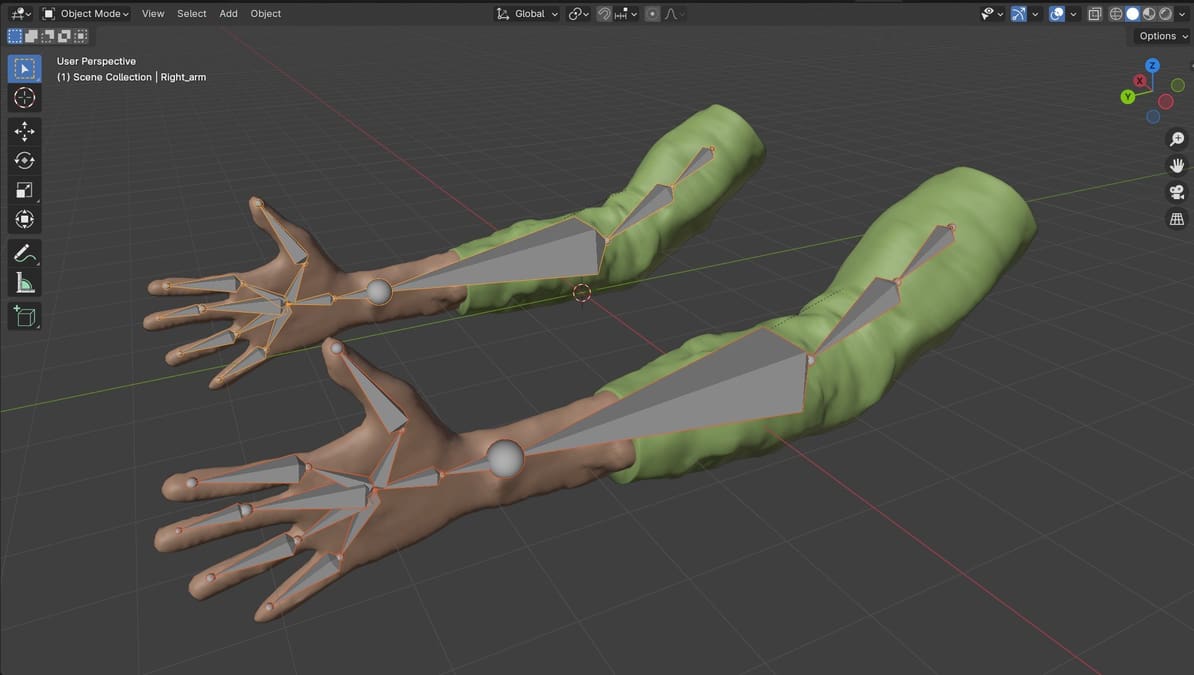
For a full demonstration, we’ll need a model to align and link the bones to. We’ve chosen an arm file from Free3D and imported that into our scene using the typical procedure.
Step 2: Frame Bones
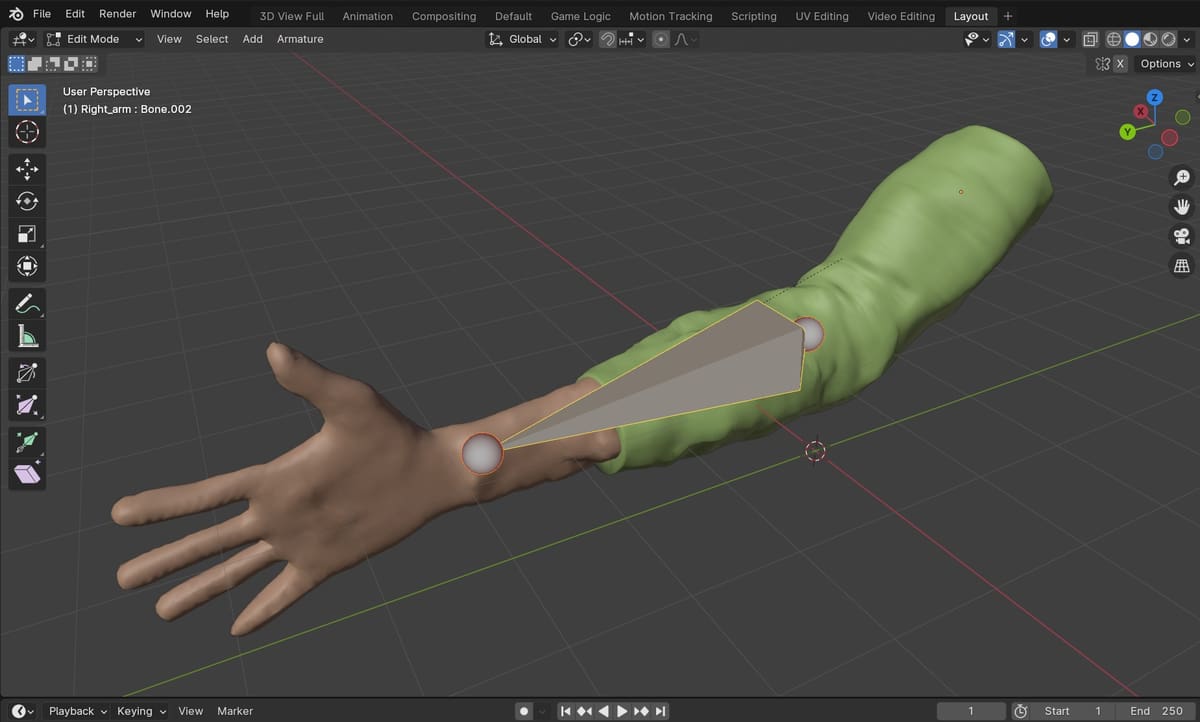
With the arm model and a single bone in the scene, we’ll want to align the bone with the arm. To do so, we need to switch back to Edit Mode (hit the Tab key). After switching over to Edit Mode, do the following:
- Hit ‘A’ on the keyboard to select the whole bone.
- Hit ‘R’ to rotate the bone, ‘G’ to grab it, and ‘S’ to scale it, aligning the bone with the model (in this case, the lower arm) as accurately as possible. The ball joints can also be grabbed individually and moved into position, which will scale the whole bone proportionally.
Step 3: Extrude Bones
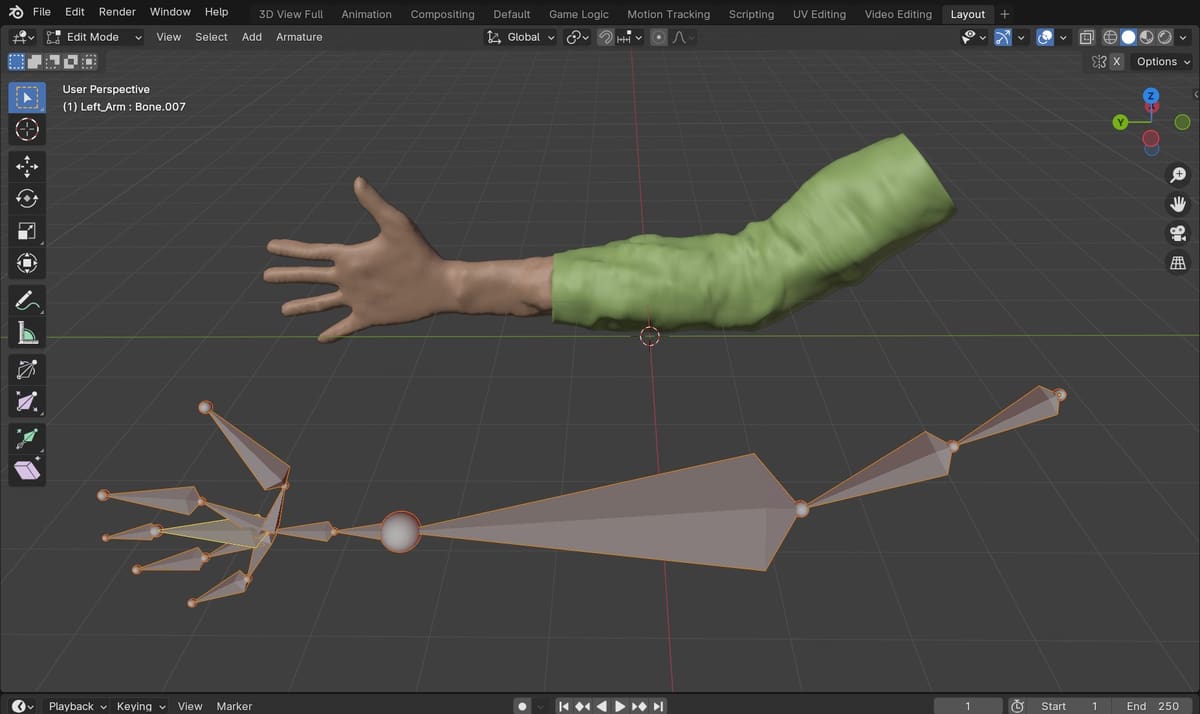
After aligning the bone to the model, we’ll now want to connect additional bones to build out the whole arm. You’ll want to stay in Edit Mode to extrude the bone:
- Click on the ball joint at the head of the forearm bone, then hit ‘E’ on the keyboard.
- A new bone connected to the joint of the forearm will appear, which can be dragged and aligned with the hand of the model. Left click to place the bone.
- Continue to extrude bones to build the rest of the hand and fingers by selecting the ball joint at the tip of a bone, hitting ‘E’ on the keyboard, dragging to align, then clicking to place the bone.
- Once all the bones are laid down, you can select each bone individually, then hit ‘S’ to scale it or use other tools to make final adjustments to the skeleton.
Switching Bone Direction
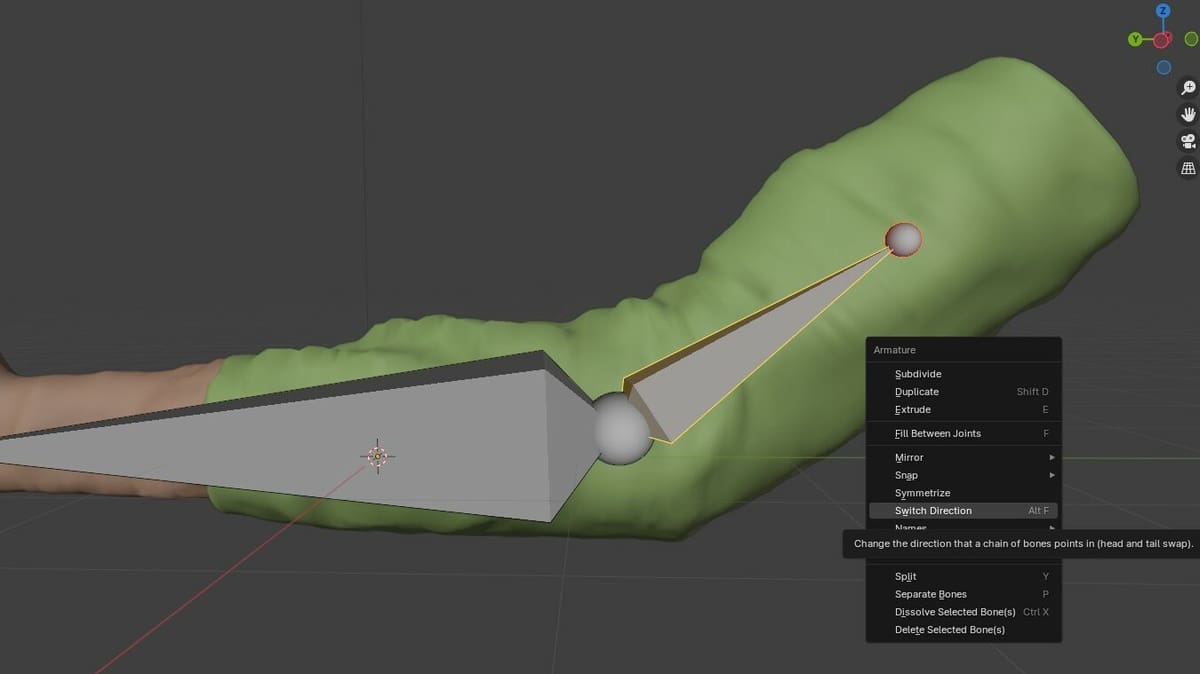
It’s generally good practice to start bones at a base and build the system outward, for example, from shoulder to finger. By default, the first bone you put down will be the “parent”, which means its movements will be transmitted to the subsequent child bones. This ensures bones are aligned on the same axis of rotation and will make the rigging process smoother.
However, sometimes we need to go back and add another bone to the base of our system, so let’s see how to change the direction of a bone and reassign the parent bone by adding the upper arm bone to our skeleton.
- Select the ball joint at the tail end of the forearm bone, and hit ‘E’ to extrude a bone. You’ll notice this bone is facing the opposite direction to the rest of our bone system.
- To change the direction of a bone, click on it, then either head to the “Armature” menu in the upper toolbar or right-click. Select “Switch Direction”. The upper arm bone should now be facing the same direction as the rest of the system, but it’s not yet connected.
- Select the forearm bone and head to the Bone Properties menu on the left-hand side of the viewport and open the “Relations” menu.
- Notice the “Parent” field is blank. Select it and choose the object that corresponds to the upper arm bone.
- Finally, check the “Connected” box directly underneath the Parent field to join the upper arm bone to the rest of the arm system.
A unit bone structure of the whole arm has now been made!
Step 4: Categorize Bones
You’ve now successfully added bones to your model in Blender! For complex models, a lot of bones can be involved, so it can become confusing while rigging to know what bone you want to change. Thus, categorization and renaming of the bones is always a good idea, if not essential! To do so, stay in Edit Mode, then do the following:
- Click on the bone that you want to rename.
- Go to the Outliner (the section of the screen that displays all the objects present in the screen as a list on the top right side of the 3D Viewport) and double-click on the highlighted bone to rename it.
- Different bones can be categorized by right-clicking on a bone in the Outliner, then selecting “New Collection” from the menu. This will create a new collection and add the selected bone to it. You can then add more bones to this or other collections.
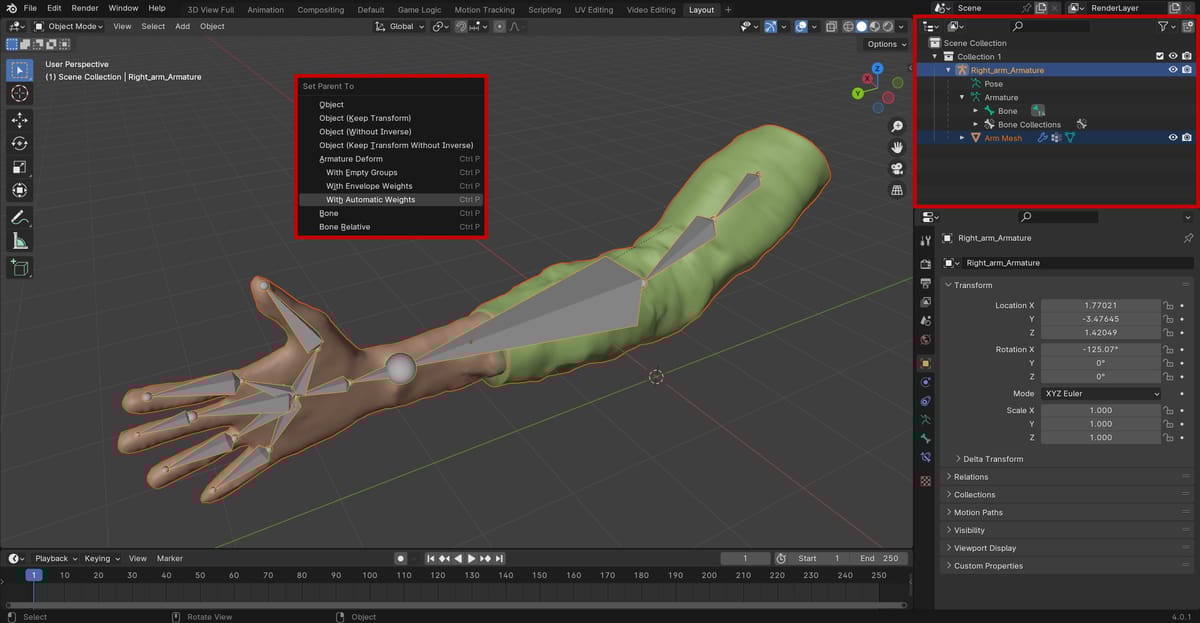
After following the above steps, switch back to Object Mode to link the bones to the arm model:
- Select both the model and armature by left-clicking and holding “Shift” on your keyboard. Make sure the armature is selected last so that it becomes the parent.
- Press “Ctrl + P” so that the “Set Parent To” menu appears.
- Select “With Automatic Weights” under the “Ameture Deform” option.
Now you have successfully linked your bones to the arm mesh. This means you can now start “posing” the bones by heading into the Pose Mode (located at the top-left, in the menu with Edit and Object Modes). If we have followed all the steps correctly we should see that the arm will move together with the positioning of the bones.
Tips & Tricks
Adding bones can be a little tricky, so here are some hints:
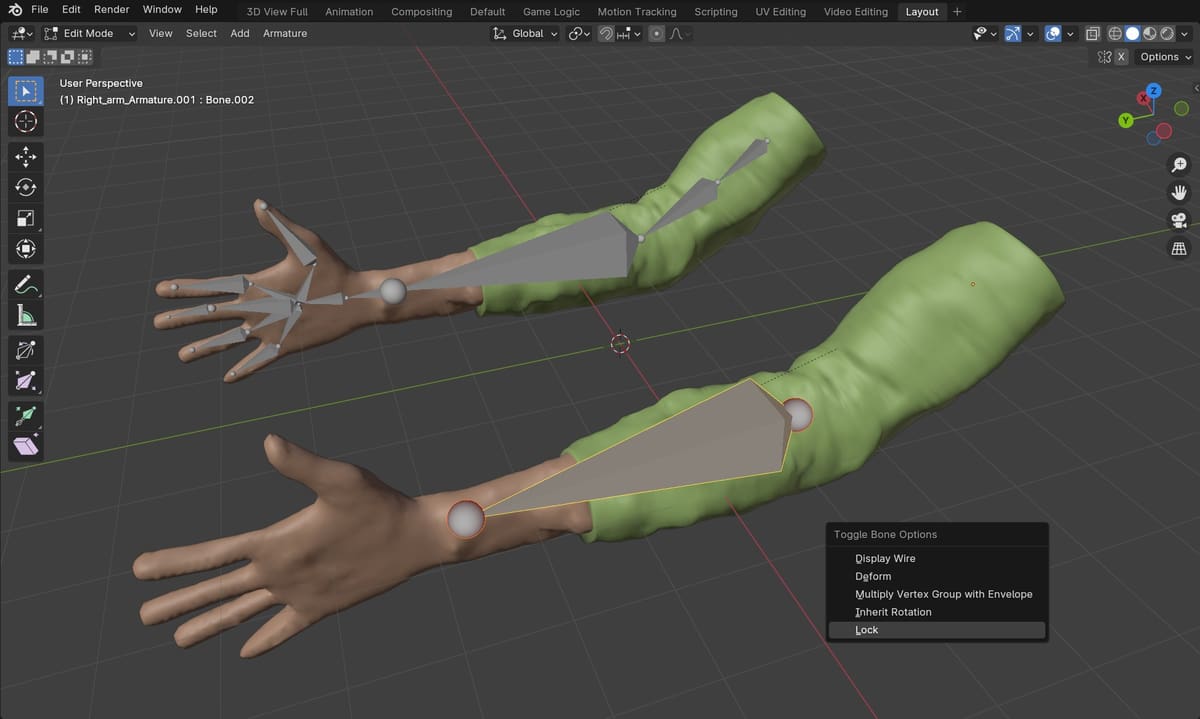
- Locking: Users can “lock” bones to prevent any accidental changes while working on other bones. To lock a bone, in Edit Mode, hit “Shift+W” and select “Lock”. The lock can be disabled later by expanding the “Context Collection Boolean Set” menu that pops up after locking the bone, then clicking “Disable” under “Type”.
- Duplicate: A bone or a connection of bones can be duplicated in Blender, which can be very useful if a model has two of the same parts (like arms). Instead of making and editing bones twice or more, simply duplicate the selected bones in Edit Mode. Hit “Shift+D”, and the selected bones will now be duplicated and can be moved and aligned with the model.
- Mirroring: While character modeling or creating symmetrical models, there’s no need to make every single bone. In fact, you can create bones for half of a model and simply mirror them. To do so, you need to be in Edit Mode. Select the bones to be mirrored, right-click to open the Armature Menu, then hover over the “Mirror” option. Here, select the axis along which you want the bones to be mirrored.
Resources
Here are some resources related to adding bones for you to refer to:
- Blender’s online manual has reference materials about every function. It also has a downloadable reference manual on the home page.
- Wikibooks also offers material about Blender functions, sparing no detail.
- Reddit has answers to everything. Answered by people around the world, all you need to do is search for the keywords related to your problems, and you’ll likely find something helpful!
- Blender has an official YouTube channel, where it posts tutorials related to various functions and videos about the latest releases and features.
- There are a number of amazing Blender-related YouTube channels like Blender Guru, CG Geek, tutor4u, Ducky3D, and YanSculpts. All you need to do is search “Blender” and start learning!
License: The text of "Blender: Add Bones – Simply Explained" by All3DP is licensed under a Creative Commons Attribution 4.0 International License.