Shapeoko 3 XXL Review: Editor’s Choice
Rating

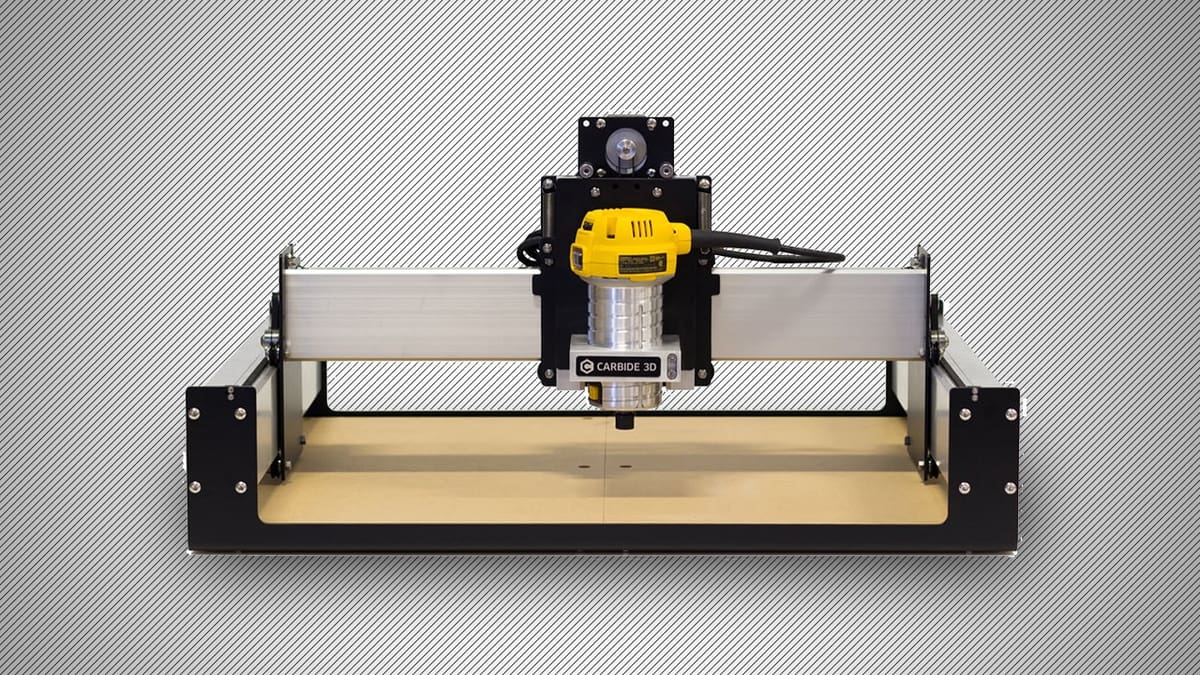
The Shapeoko 3 XXL from Carbide 3D is a large CNC router kit that is easy to assemble and use, making it the choice for us. Check out our review to find out if it could also be the choice for you.
Arguably the most popular “desktop-sized” CNC router of the day, the Shapeoko 3 from Carbide 3D has origins waaay back in 2011, when its creator Edward Ford launched Project ShapeOko on Kickstarter.
A sub-$300 open-source CNC machine kit, Project ShapeOko was an affordable entry point into the world of CNC carving, achieving the fantastic feat of simplifying the procurement of parts for an open source project.
With a build comprised of electronics, plus other sundry items such as laser cut plywood sourceable from Shapeways and Ponoko (hence, ShapeOko) and one other provider, Ford’s original machine was a trailblazer.
Fast forward seven years, and much has changed. In 2014 Ford joined forces with CNC machine and CAD/CAM software company Carbide 3D, becoming a partner and VP.
Folding the Shapeoko brand into Carbide 3D’s product line as its second CNC machine and gently nudging its open source roughness toward Carbide’s turn-key style offerings, the hackable Shapeoko 3 kit sits as the happy middle ground between the polished production line and DIY mishmashery.
We recently got the opportunity to conduct a hands-on review of the Shapeoko 3 XXL, courtesy of Matterhackers. Read on below the jump as we review this super-sized CNC machine in all its glory.
Pros & Cons
Pros
- A gigantic cutting area
- Comes with powerful DeWalt DWP-611 spindle
- Sturdy and simple design
- Compatible with a wide range of materials, including wood, plastics, and aluminum
- Hackable
- Incredibly detailed assembly guide
- Intuitive, in-house software that simplifies CNC process for users
Cons
- No real safeguard to prevent dust and particles from spreading all over
- The size could be a tad bit large for smaller workshops
- Heavy-duty machinery that requires two people to properly assemble
- You’ll need to have a large horizontal workbench ready for the machine
- Could offer more compatibility for securing material stock, such as threaded holes for clamps
Verdict
Seeing as All3DP is primarily a 3D printing-centric magazine, our face-to-face meeting with the Shapeoko 3 XXL was somewhat of a new frontier for our editorial team. At the same time, this CNC machine has been widely regarded as an ideal choice for hobbyists and makers looking to get acquainted with subtractive manufacturing technology, and thus we decided to dive right into the action.
From hardware assembly to software, everything about the latest system that Carbide3D has put together is made with the user in mind. Each section of the CNC machine is carefully and methodically packaged to make the unboxing and assembly as simple as possible. The instructions that were laid out on the manufacturer’s website came with numerous photos to help assist with the build.
Despite the well-scripted blueprint, building the Shapeoko 3 XXL took a fair amount of time, nearly eight hours to be exact. This included a bit of trial and error and also learning how to navigate the software that is used to operate the CNC machine. Upon finishing the assembly process, we found the frame to be incredibly sturdy and overall design to be well thought out.
What left the largest initial impact on us was the sheer size of the Shapeoko 3 XXL, offering a gigantic 838 x 838 x 76 mm cutting area. Once we started using the CNC machine, we soon became more enamored with the usability of the system. Not only was Carbide Create and Carbide Motion both easy to learn, but the manufacturer also shared an abundance of resources and tutorials to help master the Shapeoko 3.
After getting some initial experience with the software, using this CNC machine became a joy. Both Carbide Create and Carbide Motion offer a simple interface that is easy to operate. As you’ll see in our CNC Machining Tests, we had little trouble setting up projects and executing them.
All in all, we’d recommend the Shapeoko 3 XXL for makers and hobbyists looking for a CNC machine that offers desktop-like accessibility and industrial size. Keep in mind that the Shapeoko 3 also comes in two smaller sizes that cost less than the large version we reviewed.
At $1,699, the Shapeoko 3 XXL is fairly priced considering its capabilities, making it easy to machine large parts without an extraordinarily costly investment. The Standard version is $600 less than the XXL, while the XL is priced at $1,499 (and offers half the cutting area of the Y-axis.
Features
The Shapeoko 3 is pitched as being affordable enough for the workshop while packing the power to chew through real work. Given the router’s immense popularity and the specifications on paper, we’re inclined to take Carbide 3D’s word for it.
Starting from $1,099 for the basic kit, excluding the router motor itself, the Shapeoko is available in other configurations that boost the cutting power and area. Should you choose to you can buy the standard kit plus either a DeWalt DWP-611 or Makita RT0701C. That, or use your own.
The brains beneath the Shapeoko 3’s functional aluminum and 10-gauge steel frame is an industrial-grade motion controller, running on the open source GRBL firmware. Widespread CAM software compatibility comes with the machine accepting G-code commands.
Beefy Nema 23 stepper motors (paired to an adequate spindle) allow the Shapeoko 3 to carve its way through woods, plastics, and aluminum with ease. Carbide 3D even reports cases of carbon-fiber, steel and PCBs being cut using the Shapeoko 3, albeit with the caveat of additional preparation and safety measures.
The standard Shapeoko 3 offers a cutting area of 406 x 406 x 76 mm, meaning that 3D designs are a possibility. There are two additional variants that push the cutting boundary further, with the Shapeoko XL extending it to 838 x 406 x 76 mm and the Shapeoko XXL to 838 x 838 x 76 mm. Owners of the Shapeoko 3 can purchase upgrade kits to bump their machine the XL and XXL versions, should they wish.
Formerly a wholly granular kit, as of summer 2016 the Shapeoko 3 began shipping part-assembled. With 75% of the grunt work done already, you can expect a breezy sub-hour build time.
Bundled with Carbide 3D’s design and control software – Carbide Create and Carbide Motion – the standard Shapeoko 3 kit is designed to have all a router-touting user needs to get off the ground and cutting in no time.
Assembly
Seeing that this was (admittedly) the first time the reviewer built a CNC machine from scratch, we were eager to figure out how it would compare to a DIY 3D printer kit. Spoiler alert: it was much more intensive and challenging than your average desktop FDM machine.
Now, don’t get it misconstrued, assembling the Shapeoko 3 XXL is certainly no walk in the park. It requires around six to eight hours of your time, and while it’s technically possible to construct it on your own, having a helping hand is a major advantage and will save you an abundance of time and energy.
Another few important notes to keep in mind before embarking on the Shapeoko 3 XXL assembly process: 1) you should have a workbench prepared to house the CNC machine and 2) having 360-degree access around the area will eliminate the need to constantly reposition heavy components (we learned this last lesson the hard way).
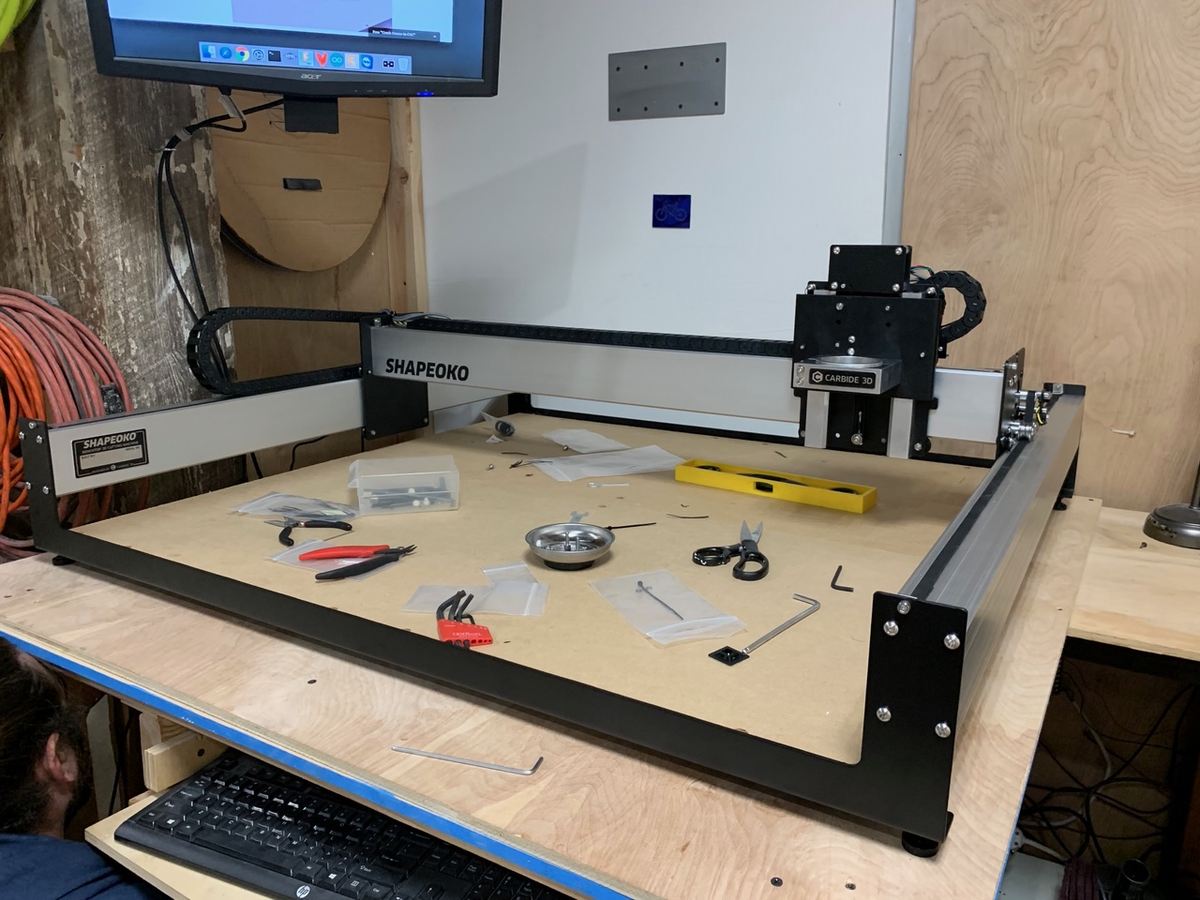
Now that we’ve finished with that brief prologue, let’s dive into the assembly. The Shapeoko 3 XXL came in a gigantic 48 x 26 x 12” shipping box that weighs just under 150lbs. Right away, we knew that this benchtop CNC would be a heavy-duty piece of machinery.
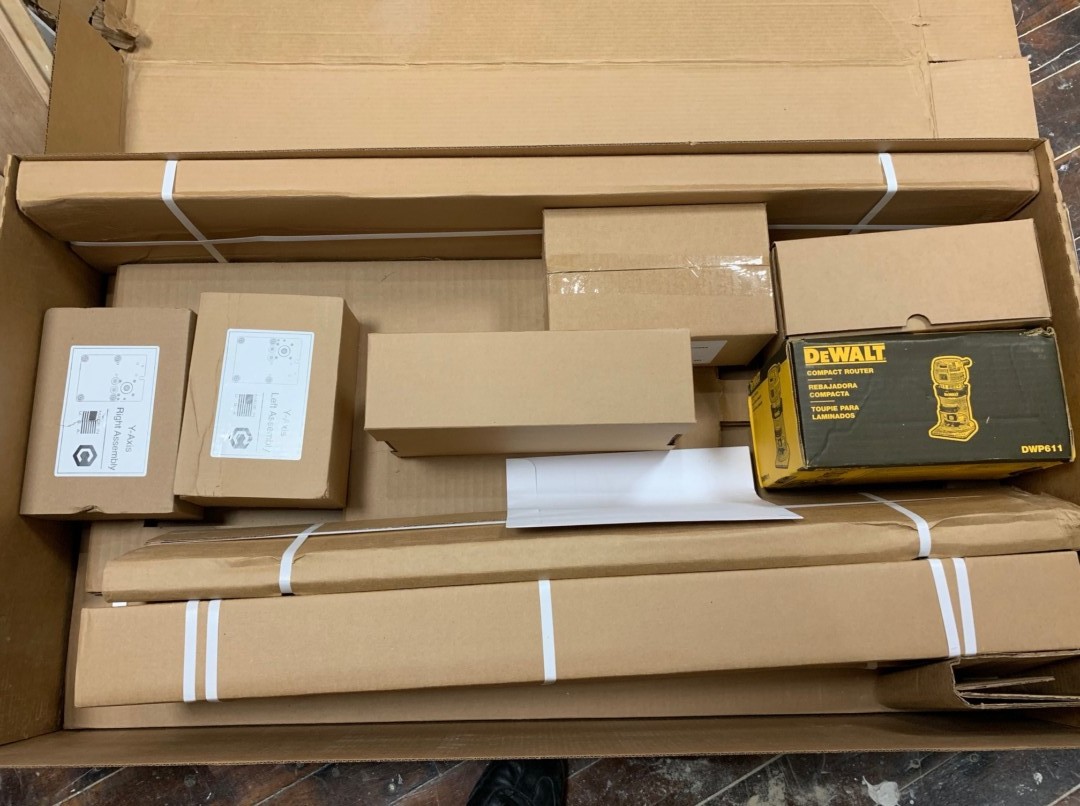
After carefully cracking open the packaging, we were greeted by a number of smaller boxes, boards, and other hardware components.
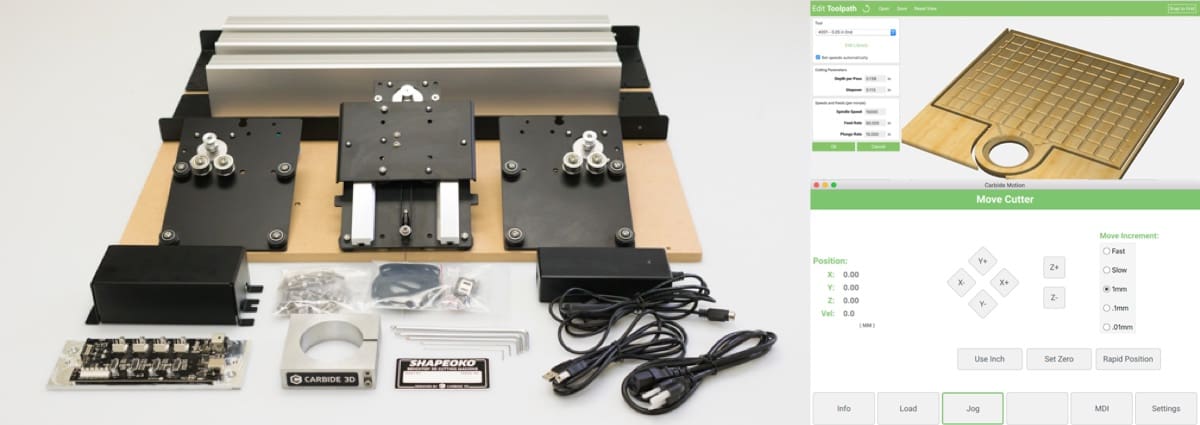
It might seem overwhelming at first, but the Shapeoko 3 XXL essentially comes in nine different parts, including the XXL Final Assembly Box, Y-Axis Left Carriage, Y-Axis Right Carriage, X/Z Assembly, MDF Pieces, Aluminum Rails, Cross Straps, End Plates, and a white envelope that contains the packing list and zip ties. The Final Assembly Box contains all of the smaller parts and tools that will be needed to build this massive CNC machine.
Unlike the earlier iterations of the Shapeoko CNC line, the Y-axis carriages and X/Y assembly come semi-assembled right out of the box. While there were no physical instructions included with the DIY kit, the manufacturer directs users to the highly detailed and easy-to-follow online manual.
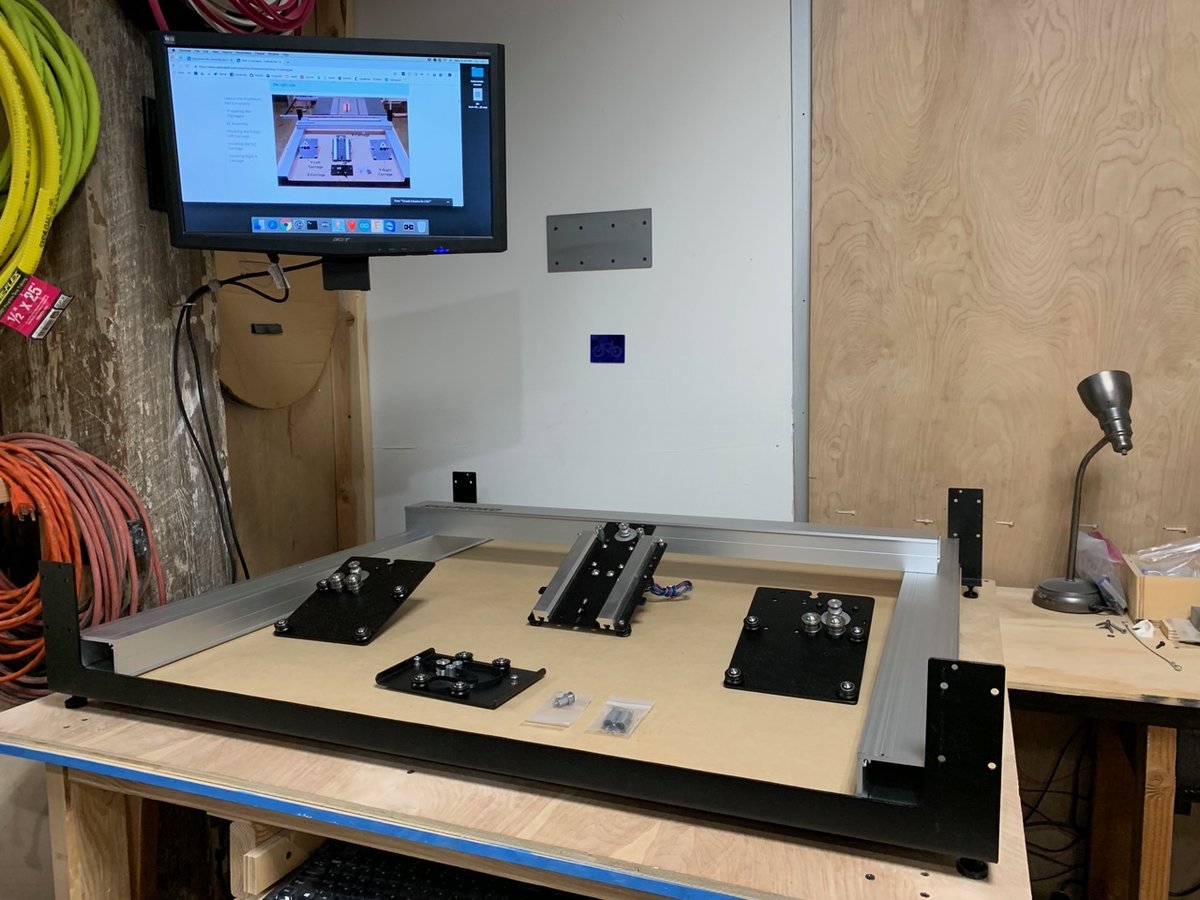
In this guide, Carbide3D lays out the assembly in simple steps with an abundance of visual aids. We found the assembly process to be surprisingly easy, especially when you consider the sheer size and weight of the XXL sized CNC machine.
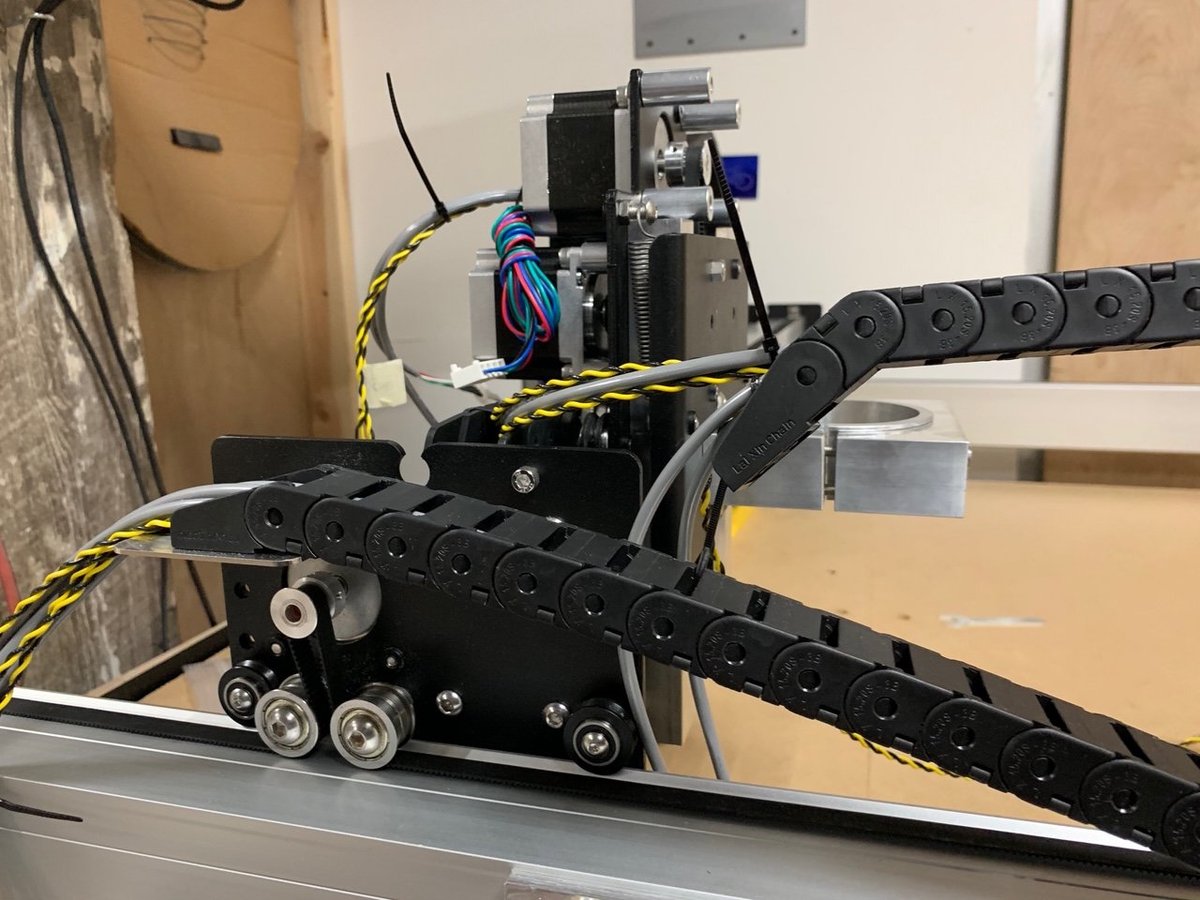
The strenuous parts of the process include mounting the rails, installing the belts, and making sure that the wiring was carefully secured. However, the study base frame and pre-assembled carriages make the initial steps a breeze, and the more difficult steps are still doable even for an entry-level hobbyist or maker.
CNC Machining Tests
After we finished the assembly process, we were eager to get started with the Shapeoko 3 XXL. Thankfully, Carbide3D was kind enough to share nearly a dozen tutorials to help users get started.
These CNC projects range from coasters to storage boxes. We found them to be an immense help in becoming more comfortable with the machine and how it operated.
Test 1 – Shapeoko Sharpie Test
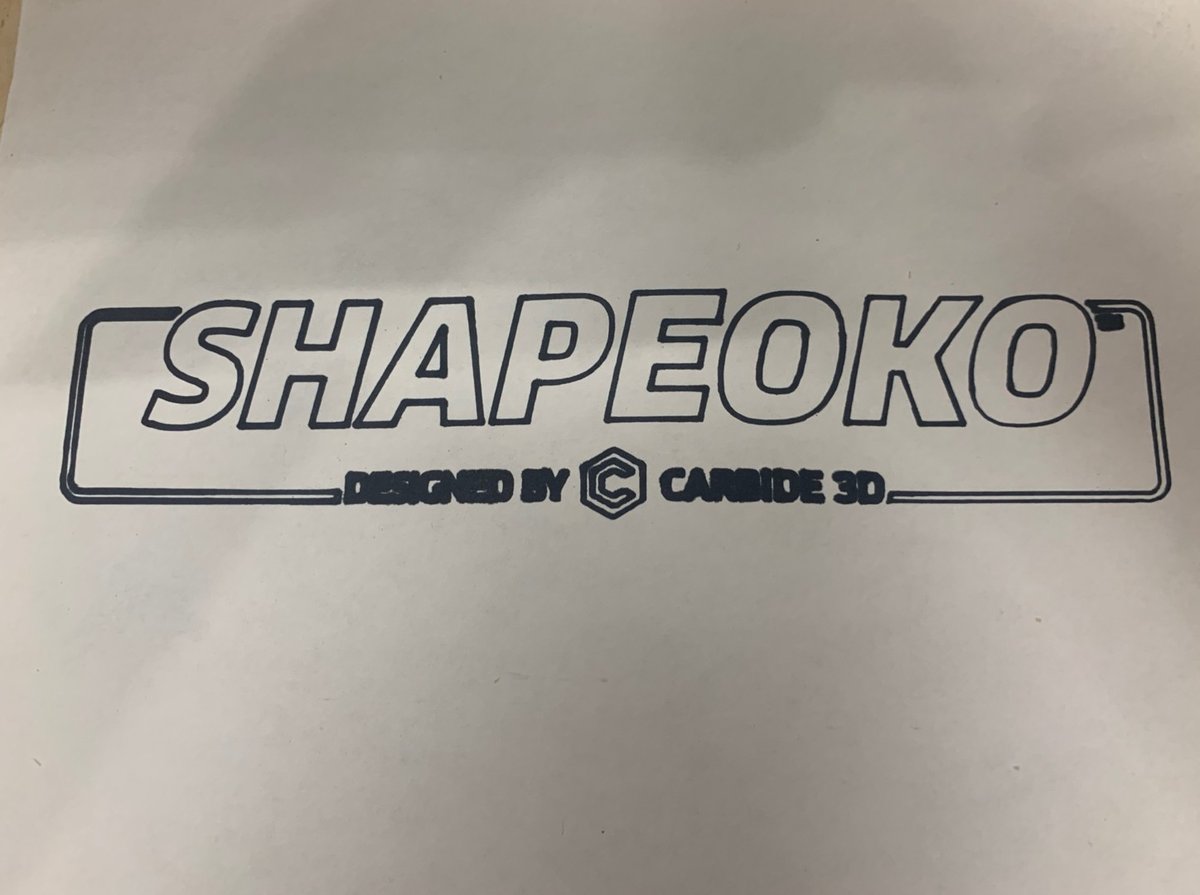
Before we attached the drill bit, we wanted to conduct the Sharpie Test that the manufacturer shared on its website. This simple and fun test consists of zip-tieing a sharpie to the spindle and watching as it traces the Shapeoko logo. It certainly helps to make sure that your machine is leveled and well-calibrated before carving into some wood.
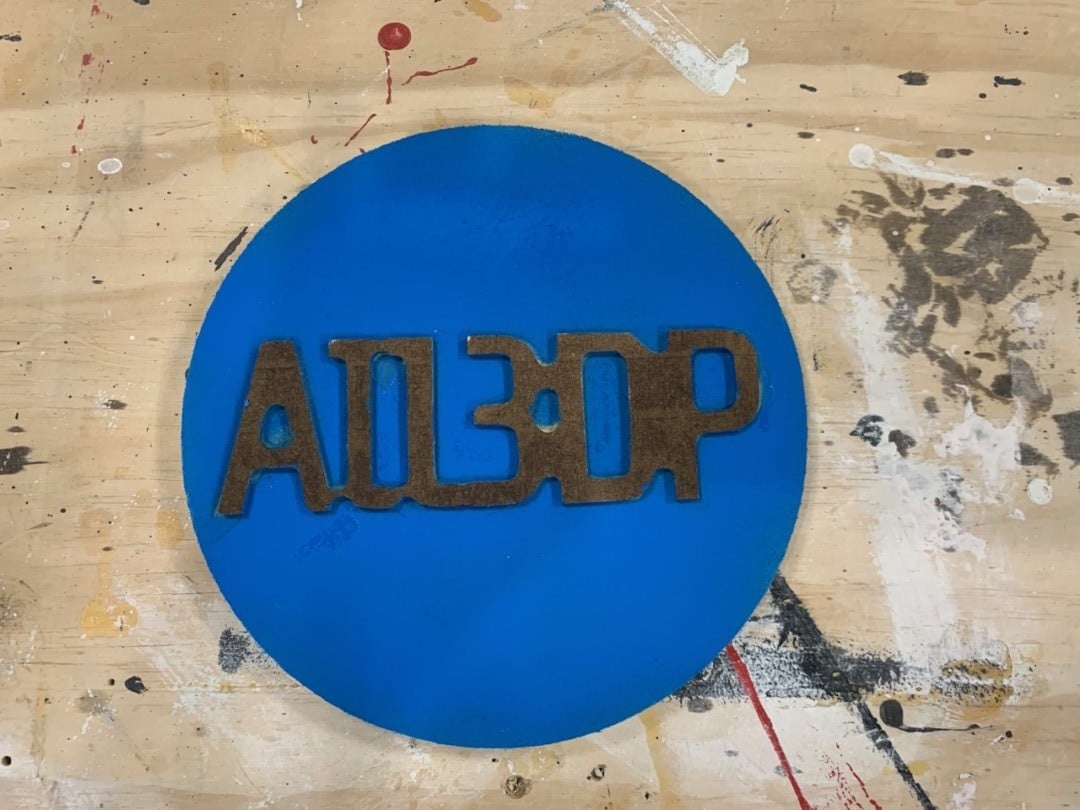
Test 2 – All3DP Coaster
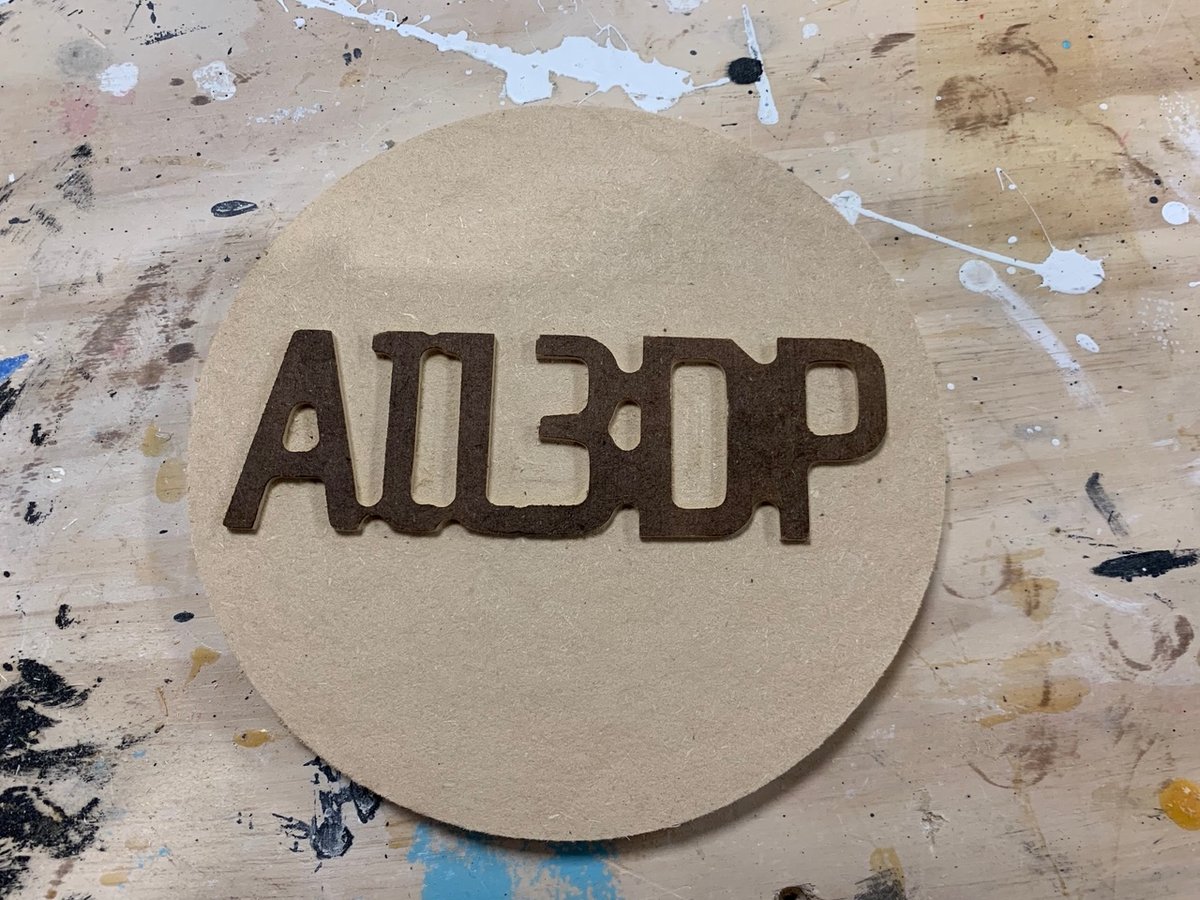
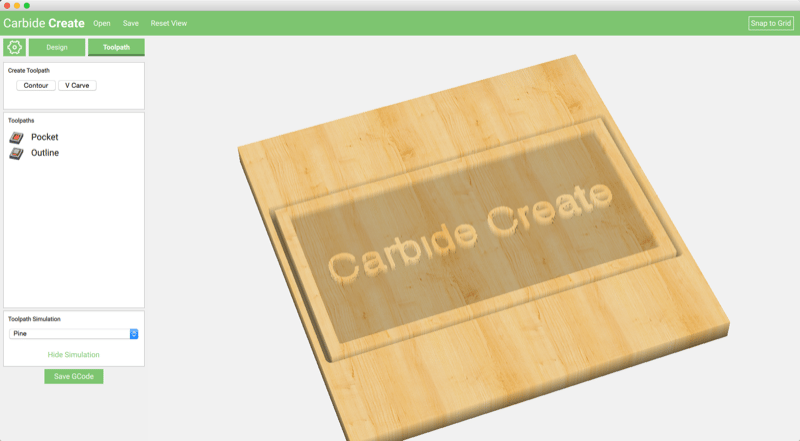
Inspired by one of the tutorials featured on the manufacturer’s website, we decided to start our CNC machining journey off with a special All3DP-branded coaster. After setting the dimensions and adding an SVG of our logo into Carbide Create, we sent it over to Carbide Motion.
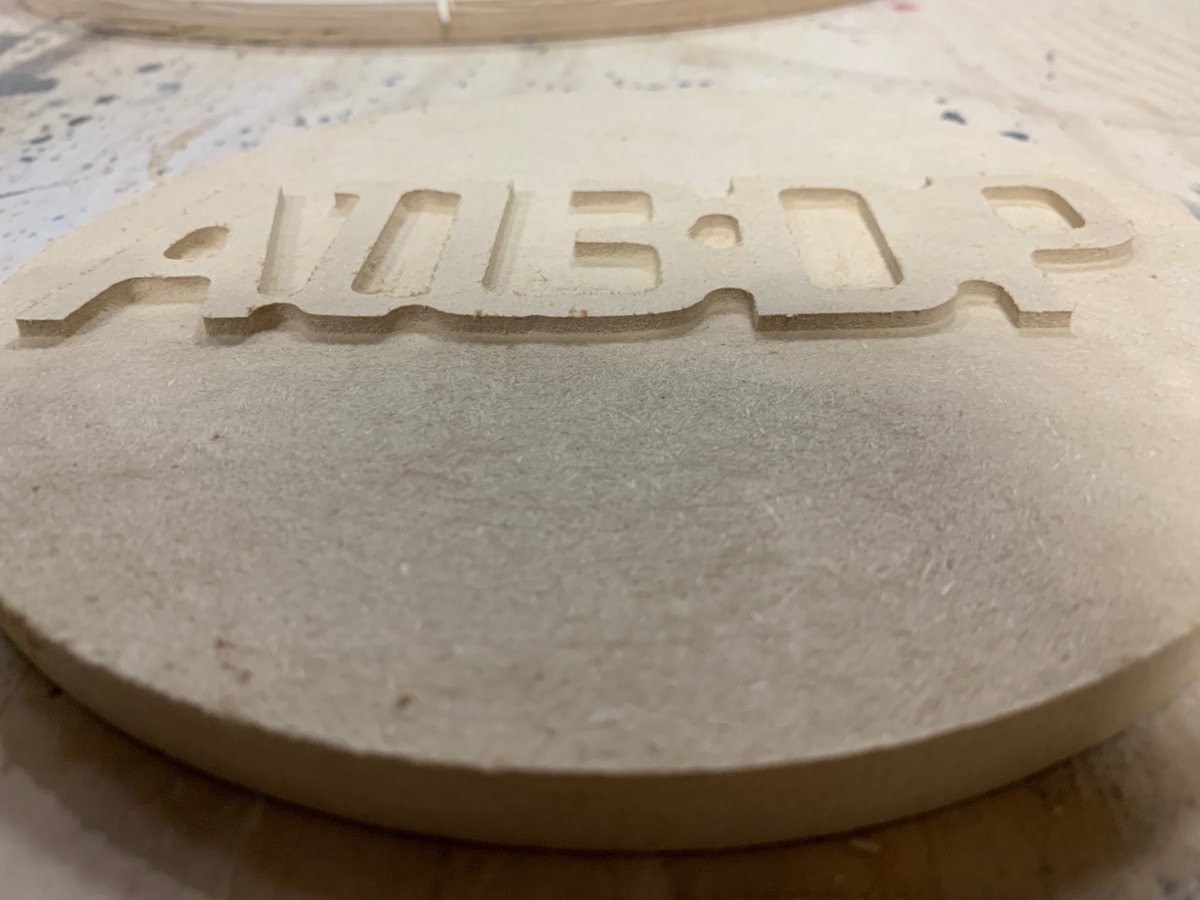
Using a 1/4″ drill bit, we watched as the area surrounding the design was quickly but carefully carved out. After that, a large square was CNC’d out of the stock material, leaving us with a smooth-edged coaster. We ended up adding some paint and wood finish to freshen up the final product.
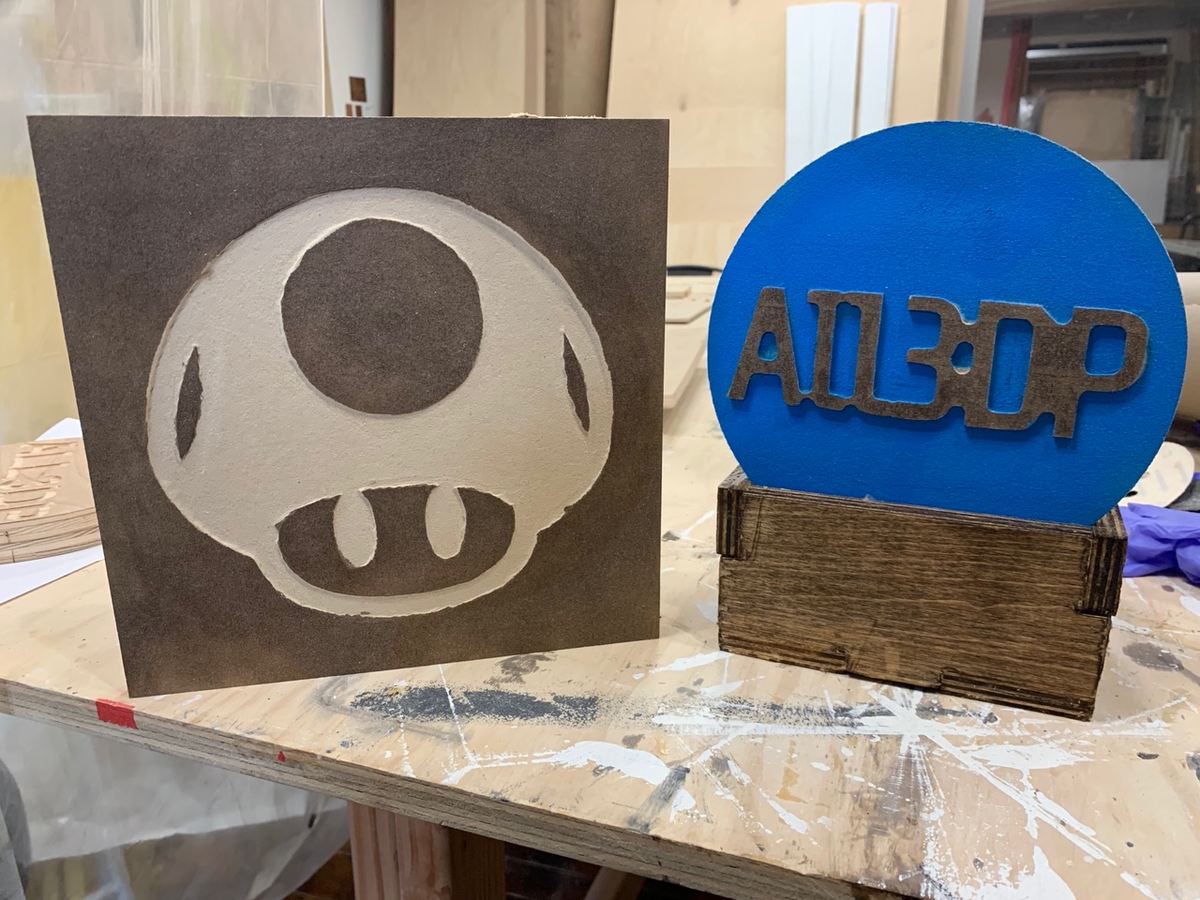
Test 3 – Super Mario Mushroom

We also wanted to see how the Shapeoko XXL dealt with engraving designs, rather than cutting out space around them. Going back to Carbide Create, we placed an image of the Super Mario Mushroom onto another square template and selected the Pockets feature, which clears out everything inside of the features.
This particular design featured more curves than the previous coaster, and so the drill bit left some rougher edges in these areas. But with a little sandpaper and patience, we were able to improve the edges dramatically.
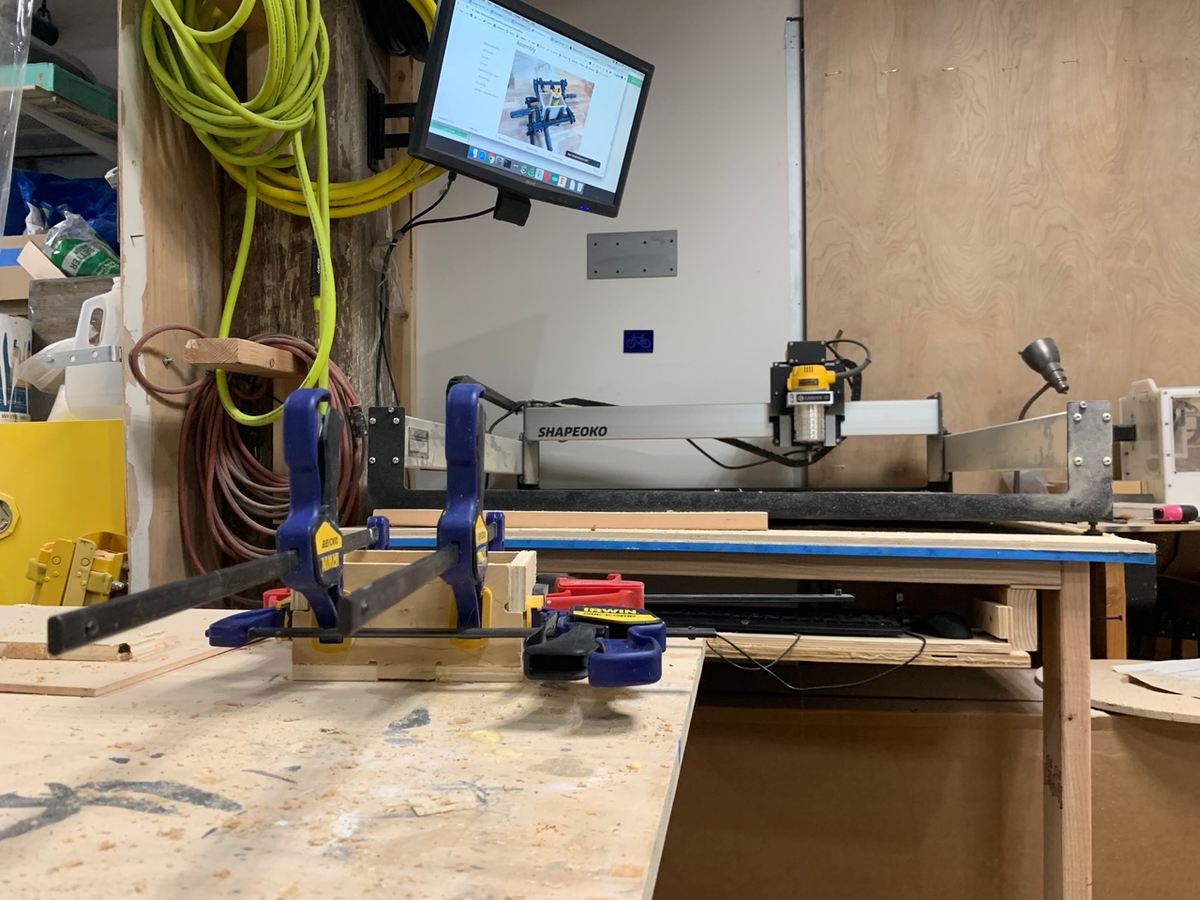
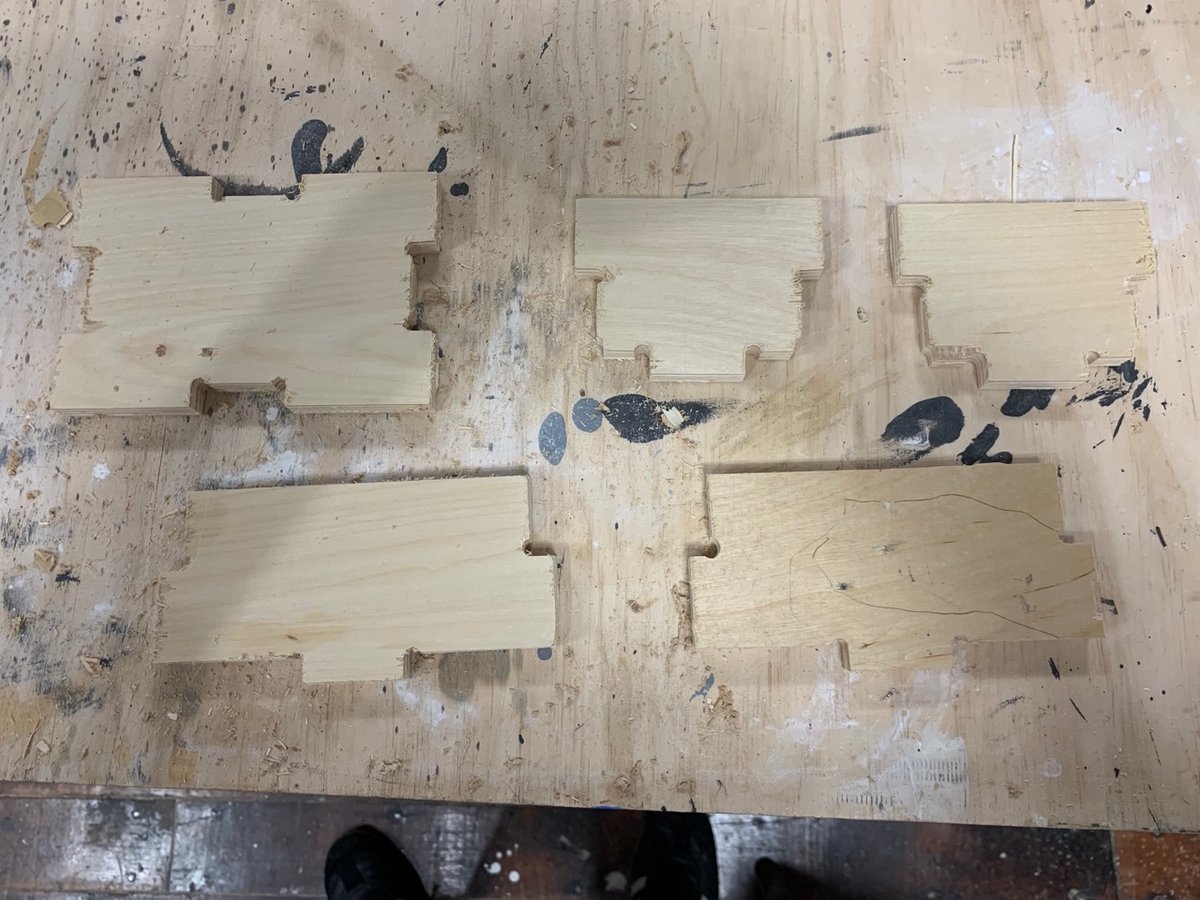
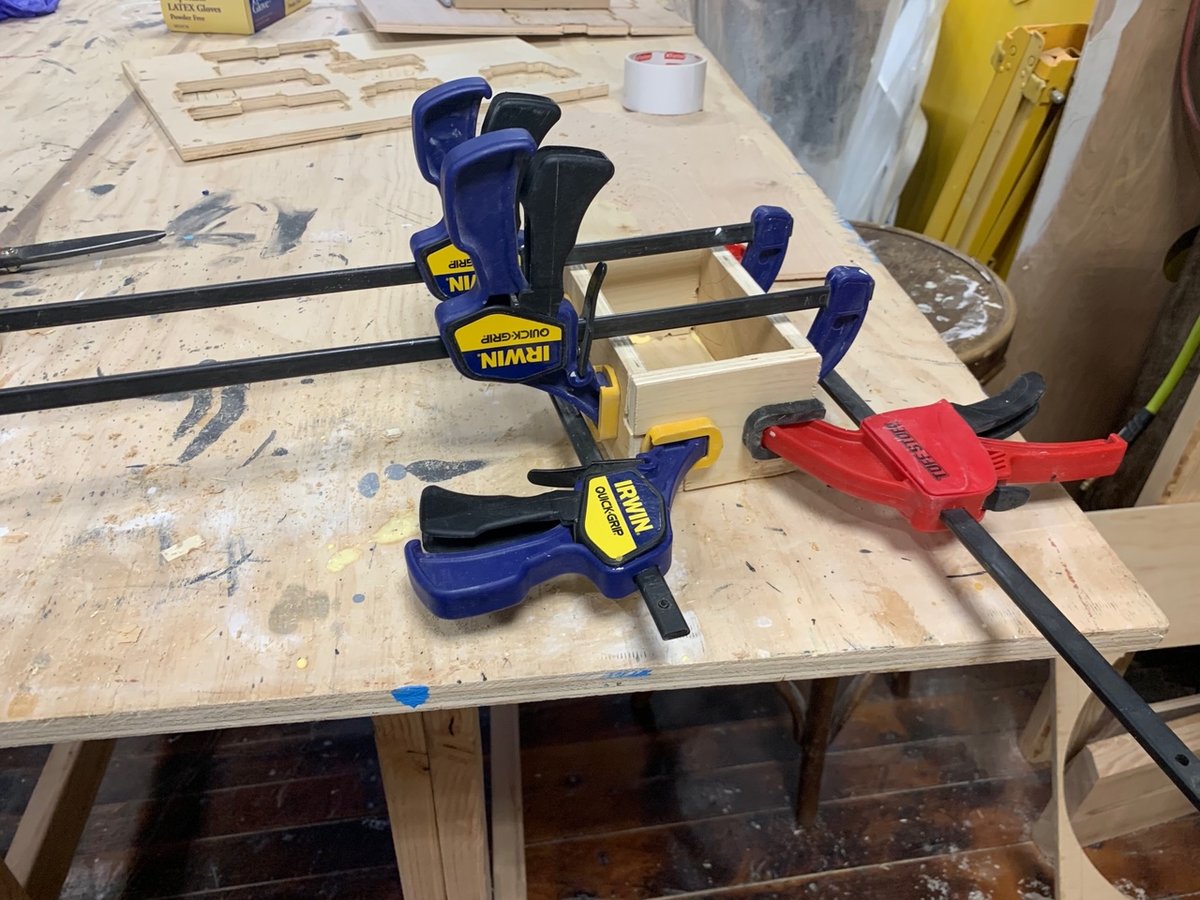
Test 4 – Wooden Box
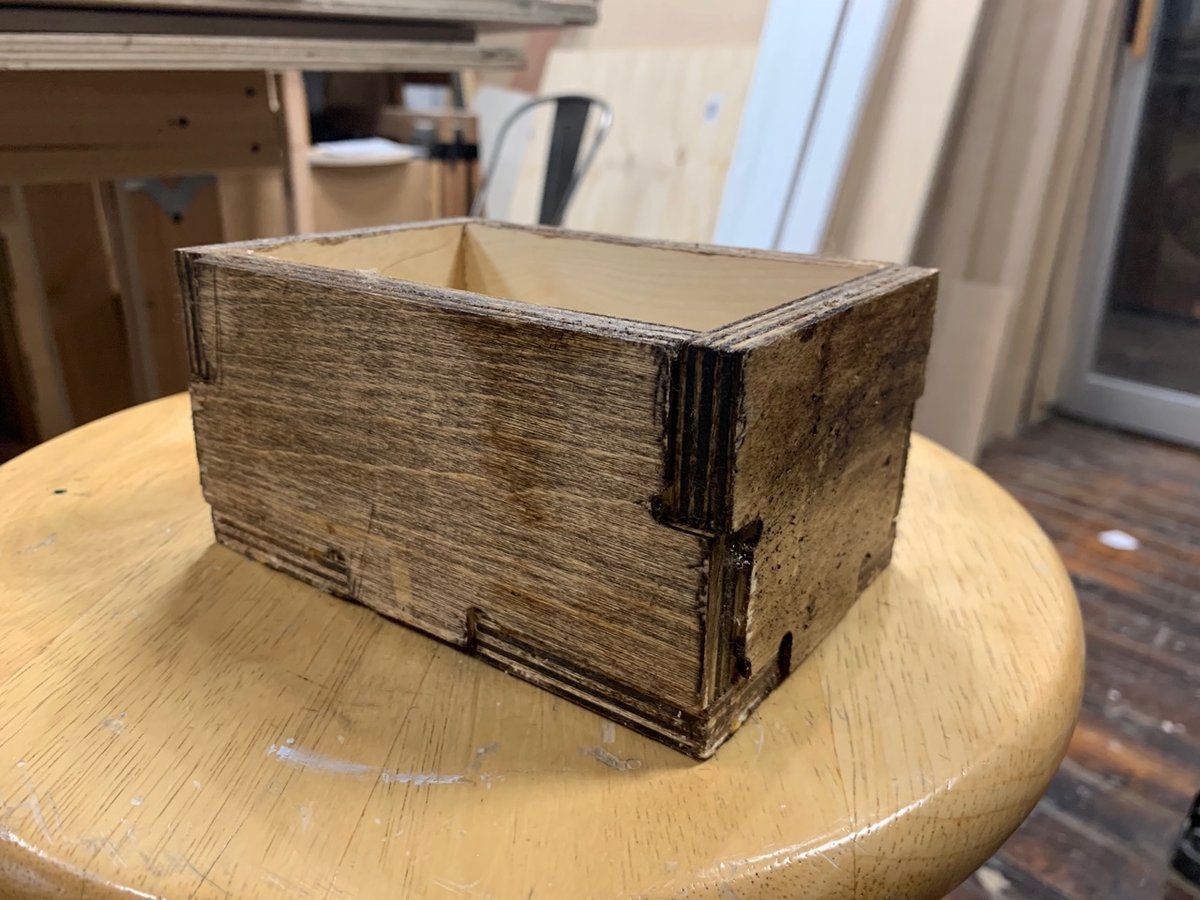
Shifting back to the list of Carbide3D’s tutorials, the next test we took on was Simple Box, a five-part wooden box that utilizes built-in construction tabs to keep the various puzzle-like pieces in place. The first attempt was unsuccessful due to the drill not cutting all the way through the wood material.
After adjusting the settings in the software, we cut out five wooden pieces, most of which came out in decent quality. Each part was held in place by a few wooden tabs. Removing the pieces, the edges had to be sanded quite a bit, but this fact was laid out in the tutorial.
We then use wood glue to connect the parts, using wood clamps to hold everything into place. It was the most intensive test we conducted on the Shapeoko XXL, but we found the machine to work diligently carving each part out of the same stock material.
Test 5 – Acrylic Test
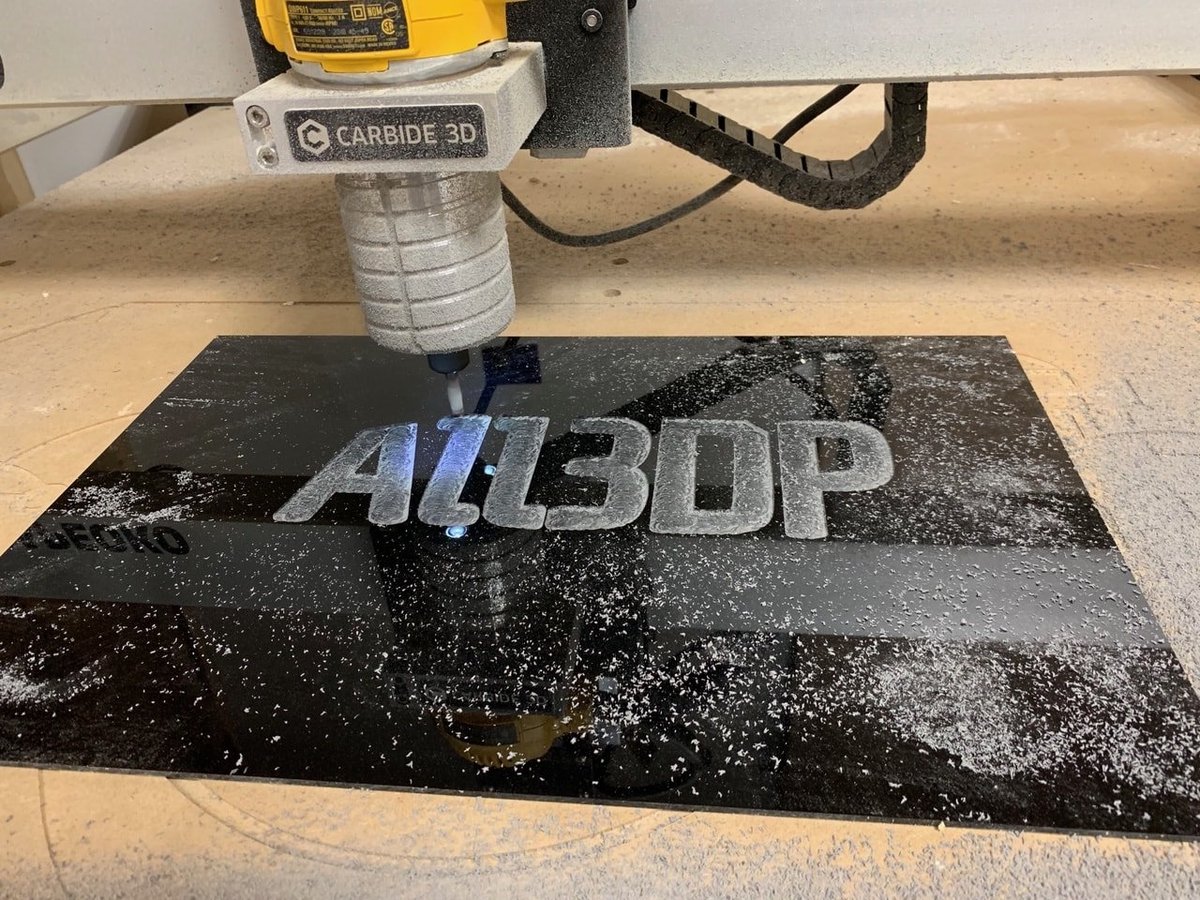
Finally, we wanted to try another material aside from wood – and also wanted to play around with the engraving feature – so we mounted some Acrylic and put the All3DP logo to the test once more. The engraving feature is much more meticulous, requiring more time than the other processes.
The resulting engraving looked great from a distance, but you could definitely notice the drill bit marks within the materials from up close. While laser engraving would provide better overall quality, a smaller drill bit would likely improve the Shapeoko’s ability.
Software
There are two different programs that are used to operate the Shapeoko 3 XXL: Carbide Create and Carbide Motion. Together, these programs, which are available for both Windows and MacOS users, enable users to create 2D designs and send them directly to the CNC machine.
Carbide Create is the manufacturer’s very own 2D CAD/CAM software, providing an easy-to-use interface and instant access to tools that make the design process incredibly simple. First, you have to input the information about the stock material, including the physical dimensions, material thickness, and material type.
Once that step is complete, users have free range over the 2D drawing, and can quickly integrate basic shapes, splines, images (DXF and SVG file format), text, and more directly into the design. In our experience, it was extremely easy to add images like the All3DP logo and mushroom from the Super Mario series.
The 2D drawing platform is set upon a bridge, which is convenient for 2D drawings that require intricate placement. There are also features that automate the alignment process, generate booleans, and create offsets within the model.
After the 2D drawing is ready, Carbide Create will ask what type of machining the Shapeoko 3 XXL will perform for each section. The primary options include:
- V-Carving – Used to create detailed 3D carvings
- Pockets/Contours – Basic CNC machining
- Engraving – Engrave text or images into the stock material
Before you can move onto Carbide Motion, you still have to select the right milling tool (which can be switched for each individual toolpath), as well as the speeds and feeds you wish to use. Finally, the software offers a terrific 3D simulation tool that will show you exactly how the Shapeoko 3 XXL will handle the job. You should always utilize the simulation to ensure that you’ve implemented the proper instructions for the CNC to follow.
So, you’ve finished the 2D drawing and exported it into the .NC file format, what’s next? Well, it’s time to open up the Carbide Motion software and prepare the Shapeoko 3 XXL for the forthcoming task. Carbide Motion can best be described as a machine control software, essentially acting as an interactive dashboard for the CNC machine.
We found this program to be intuitive and easy-to-use, despite experiencing a few minor bugs here and there. Compared to traditional CNC controllers, this software takes a unique hybrid approach that combines traditional PC control with an embedded processor that has been added onto the CNC machine.
To set up the CNC job, you first have to use the “Jog” setting to move the machine around and set the zero points, which will tell the Shapeoko 3 XXL exactly where to start the operation. Once the zero points are properly set, all you need to do is turn on the spindle and hit “Run” to get the CNC machine started.
Specs
Kit style: Partially assembled
Cutting area: 838 x 838 x 76 mm
Machine size: 1138 x 1024 x 422 mm
Weight: 150 lbs
Firmware: GRBL
OS: Mac OS X 10.9+, Windows 7+
Features: Sturdy frame, bundled control/design software, hackable/upgradable, enclosed/protected electronics, single sheet MDF table
Where to Buy
Interested in the Carbide 3D Shapeoko 3 XXL? You can pick one up from the retailers listed below.
License: The text of "Shapeoko 3 XXL Review: Editor’s Choice" by All3DP is licensed under a Creative Commons Attribution 4.0 International License.
CERTAIN CONTENT THAT APPEARS ON THIS SITE COMES FROM AMAZON. THIS CONTENT IS PROVIDED ‘AS IS’ AND IS SUBJECT TO CHANGE OR REMOVAL AT ANY TIME.