
Peopoly Moai Review: Great Value Resin 3D Printer
Rating

The Peopoly Moai is our "Best Value Pick for Resin 3D Printer" in Spring 2019. Check out our review to find out why it offers the best value for money right now.
The stereolithography apparatus (SLA) 3D printer kit is no new thing. Autodesk tried to pioneer an open SLA platform with its Ember. They soon dropped it (but its memory lives on in the open source ether).
For those with the engineering savvy, there are countless options for DIYing an SLA printer from scratch. But for the average consumer without the technological know-how, this technology is prohibitively out of reach. You could buy plug-and-play, but these SLA 3D printers often far exceed the price point of high-end desktop FDM machines.
Knocking on the door of its molten plastic spewing brethren however, is the Peopoly Moai SLA 3D printer kit. Initially, a Kickstarter campaign during the spring of 2017, the project’s goal of $30,000 dollars was cleared within 3 days. Over a 33 day funding period, it hit the lofty grand total of $254,412.
The Peopoly Moai shipped to its 266 backers over the summer of 2017 and now, this kit SLA printer is available to everyone via the company’s own site and a number of third-party resellers.
Read on for our full verdict on the Peopoly Moai SLA 3D printer kit.

Pros
- Simple assembly
- Solid, sturdy build
- Comprehensive build guide + support material
- Open to 3rd party resins
- Slick aesthetic
- Excellent print quality
Cons
- Messy print process with no official apparatus to help
- Access to bed for leveling tedious
- Claustrophobic print chamber
- Not sealed/no air filter
Verdict
The Peopoly Moai is pretty easy to sum up.
It boasts an insanely simple build and operation that would lead one to think of it as an introductory SLA 3D printer. For getting to grips with the inner workings and parts of a SLA 3D printer, you couldn’t ask for a more beginner-friendly machine in the Peopoly Moai.
On the other hand though, you are left at the deep end of working with an SLA 3D printer. There is no complementary washing station, no prescribed documentation for dealing with the mess of SLA 3D prints nor official software solution for preparing models for slicing (which is far more involved than FDM).
The Peopoly Moai is pitched as the machine for experimenters, with its openness to 3rd party resins a bold frontier for its users to collaborate and build a knowledge base on. But it’s undeniable that the Moai’s tantalizingly slight price point means total SLA newbies will come flocking to the fold. This duality could be a little off-putting for those expecting a walk in the park and instant excellent results.
Putting this quandary aside, in our experience we have found the bulk of issue with using the Peopoly Moai lies in the learning curve of SLA, not the printer itself. The kit, its build, and living with it day to day is a joy. The aftermath of printing, the crash course in SLA 3D printing (if you are new to the technology) and having to finish the job of assembling basic post-processing equipment, is not.
If you’re prepared to get your hands dirty (wear gloves!), then the Peopoly Moai is possibly the finest jumping on point for the gloopy, stinky world of SLA 3D printing.
Down to Business
The strap-line for the Peopoly Moai is that it is an “affordable laser SLA printer”. Whether you consider around $1,250 to be affordable or not is entirely between yourself and your wallet. But when compared to similarly spec’d machines such as Formlabs’ Form 2 (the de facto King of desktop SLA) and its starting price of over $3,000., the Peopoly Moai certainly operates in the ballpark of affordability.
For the prospect of superfine prints that blow most, if not all, desktop FDM machines out of the water at a price point considerably less than what such competition retails for, is a strong proposition.
Peopoly founders Shu ‘Mark’ Peng and Richard Li, boast a programming and hardware background, with Li a seasoned medical and industrial equipment developer. Pre-production units of the Moai were shipped to notable influencers and makers, makerspaces and maker fairs for user feedback.
This feedback channeled into the final unit, which Peopoly hopes will kickstart a community of experimenters and developers.
On paper, the resolution capabilities of the Peopoly Moai has it printing higher quality prints than Formlabs’ Form 2. Indeed, beating out the Form 2’s 140 micron X and Y axes and 25 micron Z axis resolutions with its 70 and 15 micron capabilities (respectively), it could be argued that the Moai offers the most detail for a desktop printer currently available.
Of course, things aren’t so simple. There are considerations like cross-curing and how well the resin you use absorbs the light. For the most part it appears that the finest recommended Z resolution for a lot of resins on the Moai is 25 microns, which at least matches the Form 2 and still results in insanely detailed prints.
So despite the winningly fine numbers on paper, much of the Peopoly Moai’s effectiveness comes down to how well you can dial in its settings for the specific resin you are using — which can be put down to a simple process of trial and error.
And not only this, but how well you can master the foibles of the Peopoly Moai’s particular style of SLA 3D printing — using a tilt bed to separate the current cured layer from the bottom of the vat, before raising the build plate one layer to cure the next. This throws up a particularly unique issue to deal with, in that as the vat of resin lowers (only from one side) a suction effect is exerted between the cured resin and the bottom of the vat.
This force can be devastating on an improperly supported print, tearing it apart. There’s a gradient across the build plate where this suction effect (known as the peel force) diminishes.
When judging the Peopoly Moai, it’s also worth considering this SLA 3D printer’s openness. Third party resins are encouraged, with Peopoly maintaining a spreadsheet of verified settings on their user forum with community members contributions feeding directly back into this knowledge base. The company’s own are well documented, as are a handful of third party resins, but the wider market of curable liquid plastics is still, mostly, a question mark.
Design
It’s interesting (if a little nerdy) to note that the Peopoly Moai shares its name with the Easter Island statues of the same name. In a nod to this, one of the Moai’s test prints is just that — four Easter Island heads, with the Peopoly moniker across their backs.
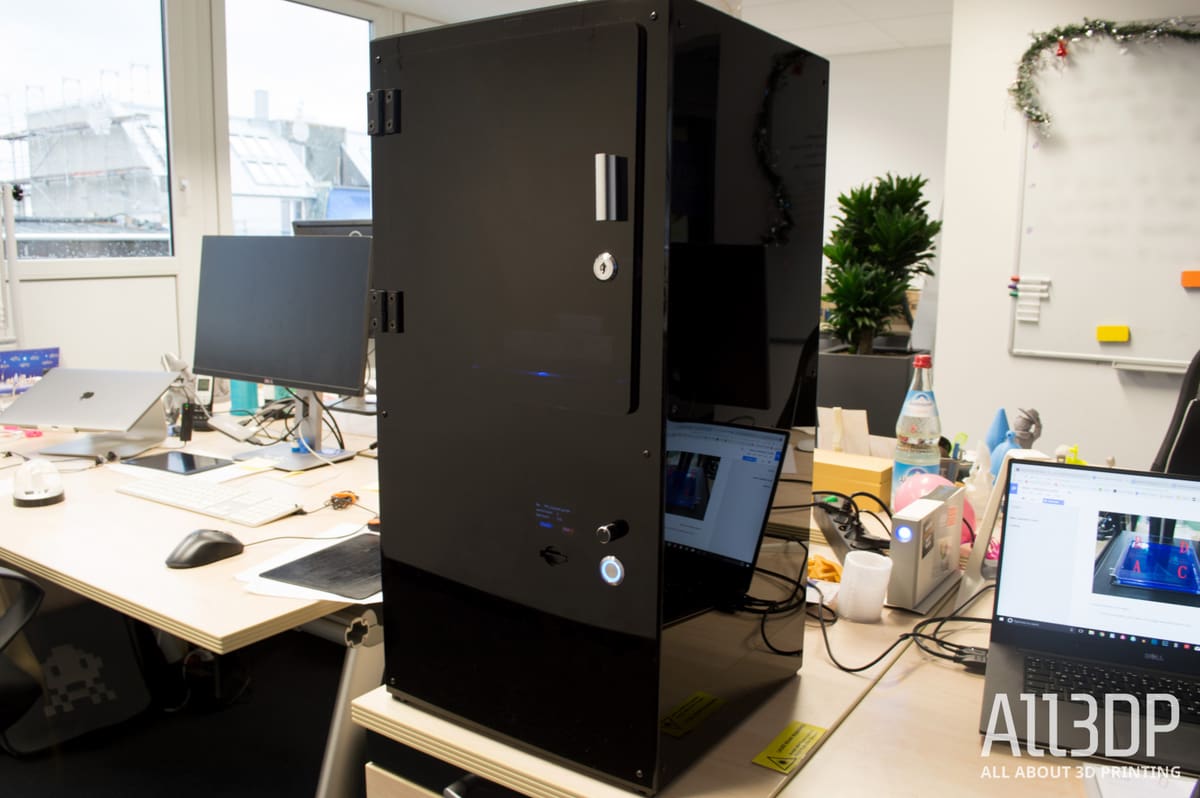
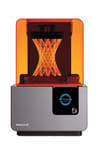
And much like these rock carvings, the Peopoly Moai cuts an imposing figure. A tall, square based slab of impenetrable glossy black acrylic, in our opinion it’s one of the more stylish printers we’ve encountered thus far.

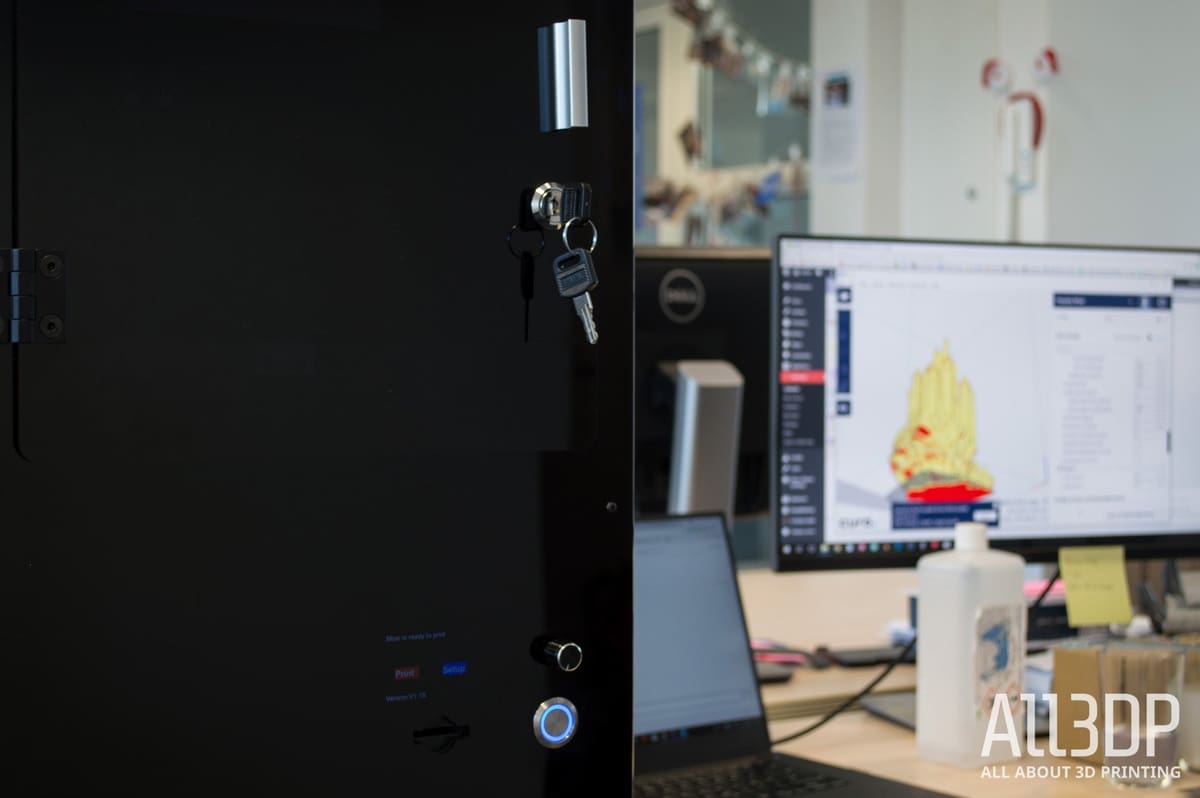
The sheer black sheet that is the Peoply Moai’s front face is interrupted by just four elements: a semi-transparent door that blocks UV light from entering the chamber (and curing the vat of resin), an SD card slot, control dial and power button.
When powered on a small LCD display is also visible on the Peopoly Moai, but in a neat design quirk it is housed behind a section of semi-transparent acrylic on the printer’s front face, disappearing to nothing when powered off. It’s a cool design choice that contributes to the Moai’s monolithic looks.
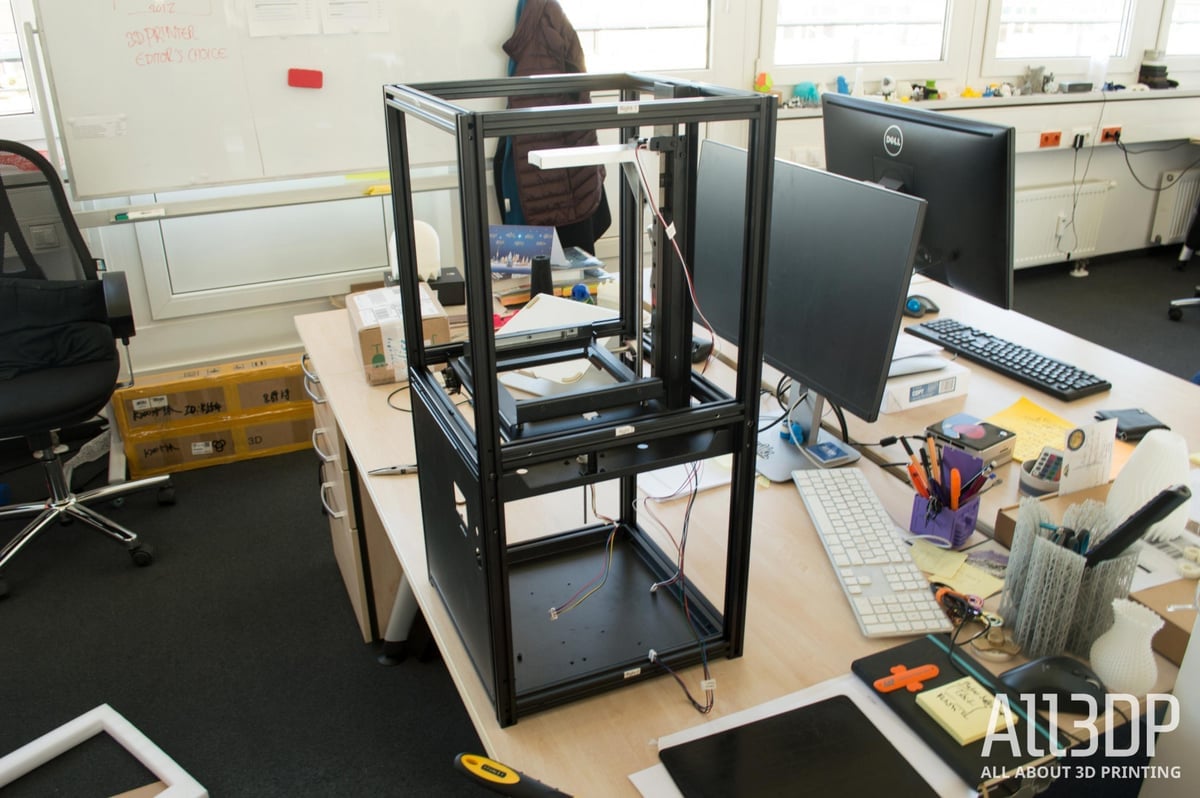
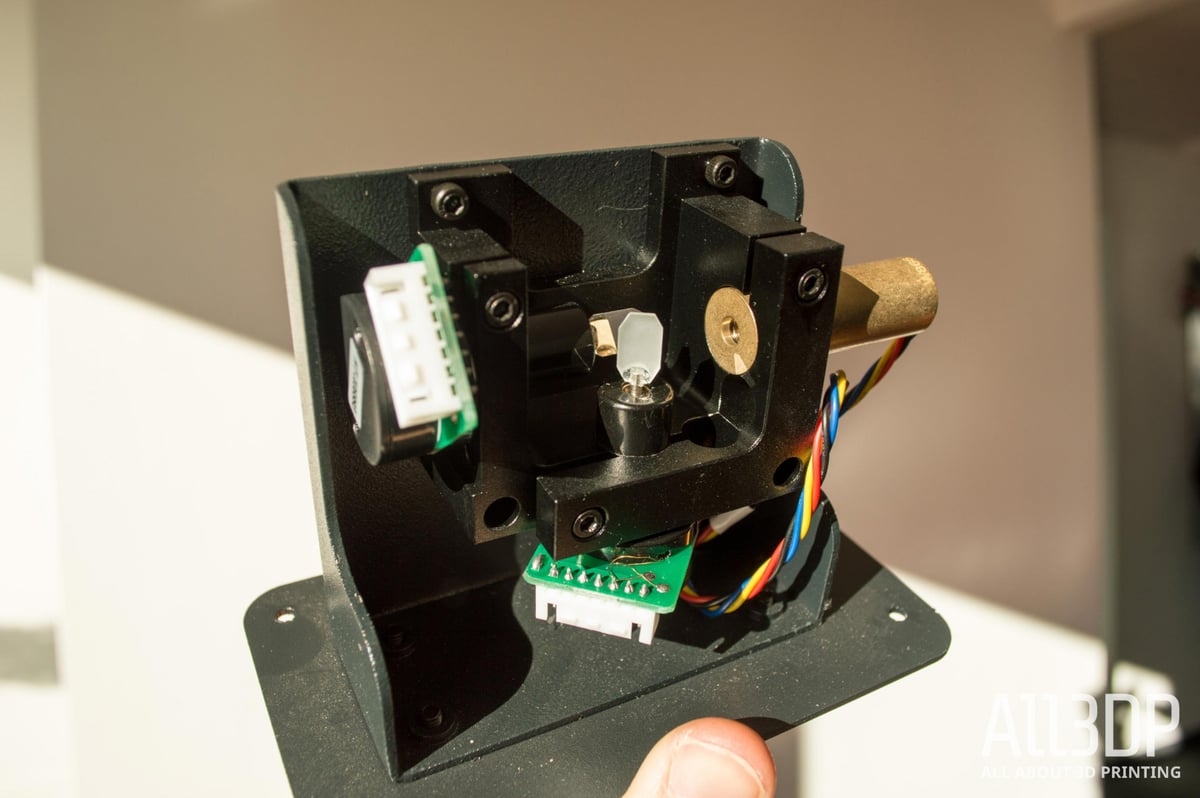
Accessibility is key for a DIY machine should any fine-tuning be required, which is exactly what the Peopoly Moai provides. Split approximately 50-50 between print chamber and “inner workings”, with the resin vat dividing them both. You are given plenty of room to make adjustments to the galvanometer controllers and tilt drive motor (after removing one of the side panels).
Similarly through the removal of a side panel are you given access to the underside of the tilt bed. Here you find the four locking nuts that you adjust to level the bed.
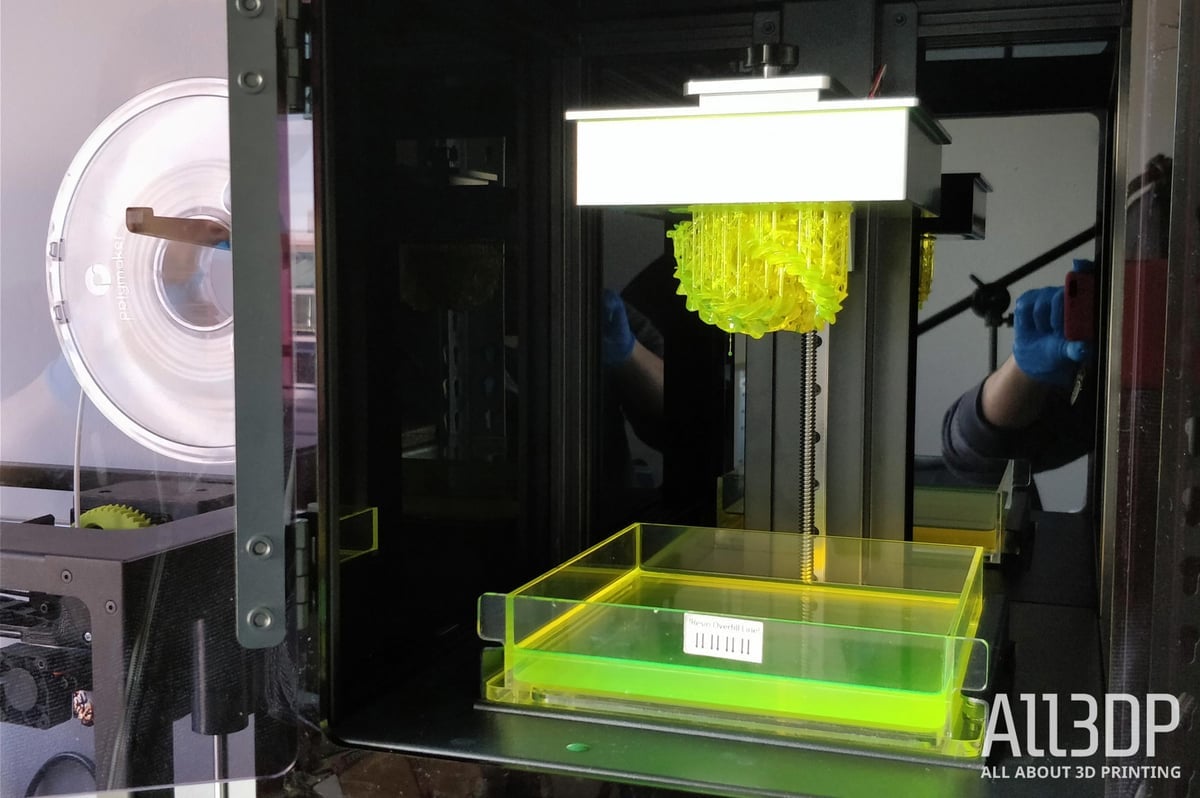
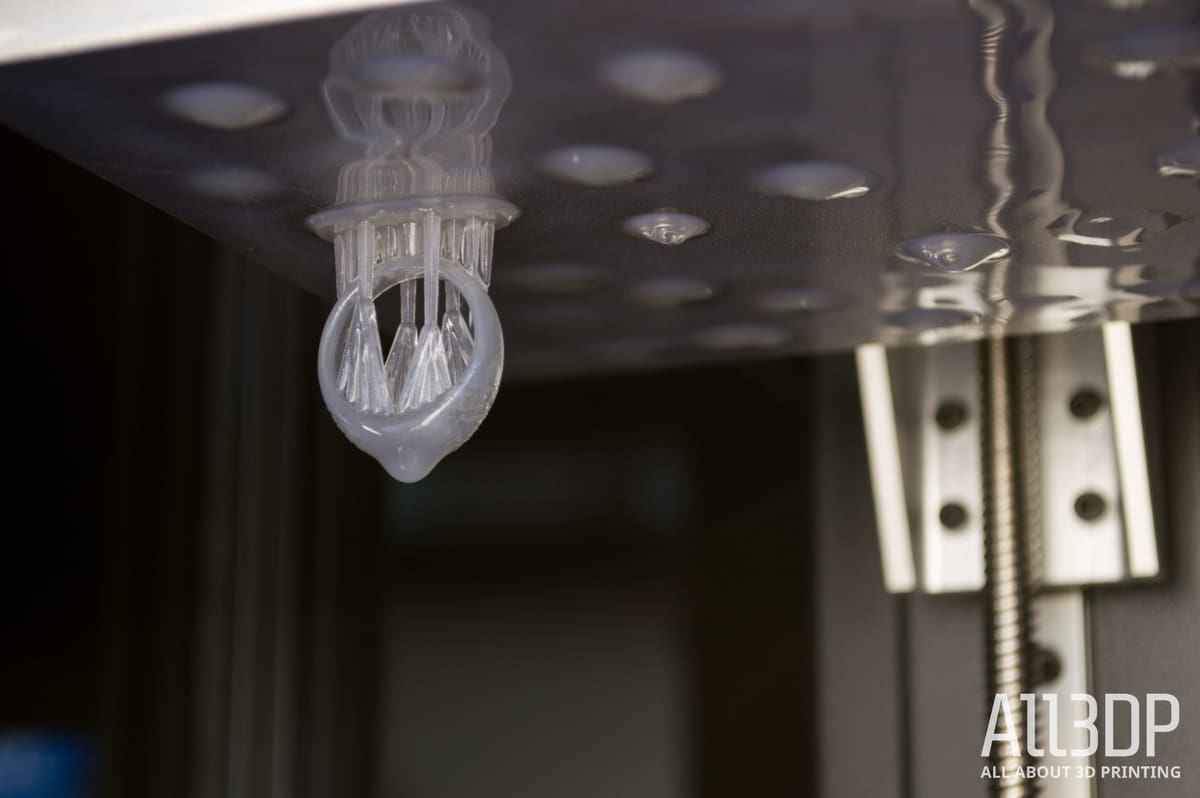
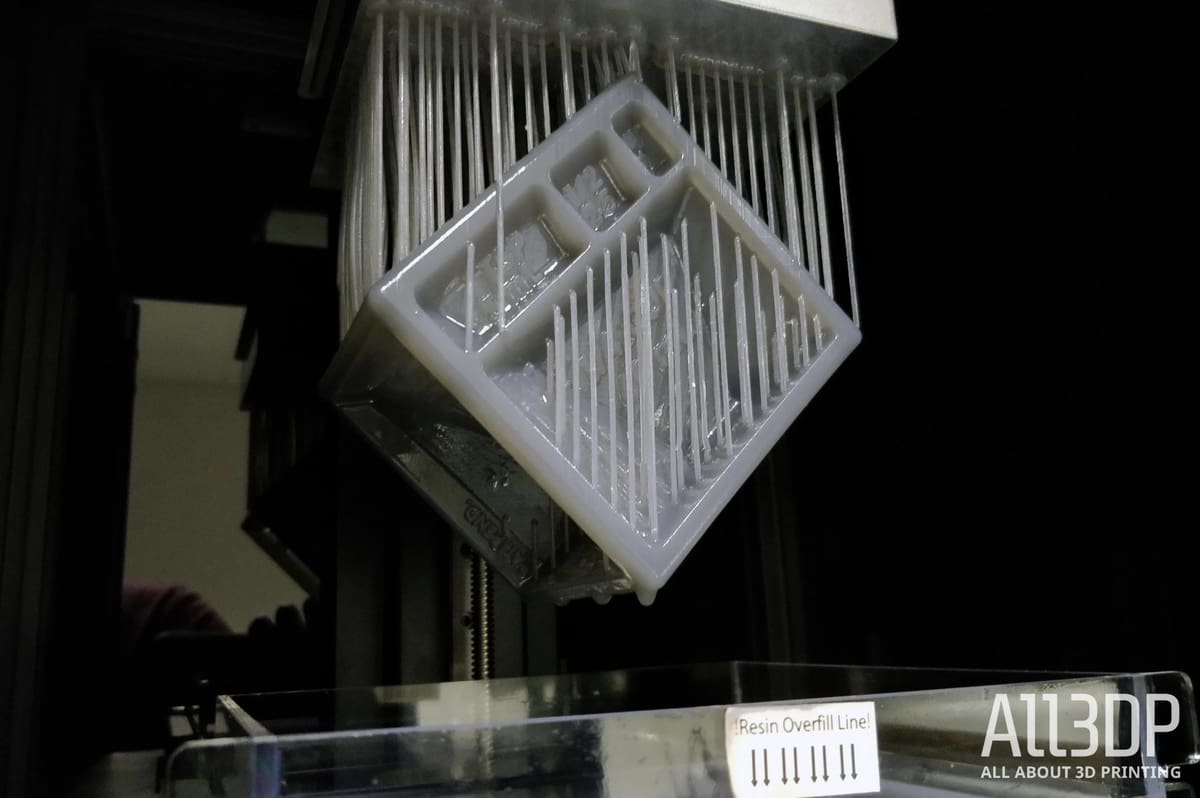
Inside the print chamber is where the majority of your interaction with the Peopoly Moai takes place. The removable resin vat clicks satisfyingly into place on the tilt bed and is held firm. The print bed itself (inverted, and lowering from the top of the machine as with any top-down SLA 3D printer) secures to its Z-axis armature with a single simple screw.
In day to day use the narrow frame the front panel that surrounds the print chamber proves a little claustrophobic when removing the print bed. The futzing it forces you to do means the occasional stray drip of resin will land outside of the vat when removing completed prints. Get used to the reality that you will have to clean up a lot with this printer.
Another thing about the Peopoly Moai’s design that we take issue with is the looseness of the door. Though it comes with a key for security (a nice touch), there is enough travel that you get a large gap even when closed and locked. More than adequate for the obnoxious stench of the exposed resin to leak into the immediate area around the printer.
Despite becoming numb to it after several hours, colleagues were vocal in expressing their displeasure at the resin’s continued presence in the All3DP office.
We imagine a magnetic seal here would go a long way to mitigating the problem. As would some kind of filter, though this would probably kill one of the Peopoly Moai’s nicest features (we say feature — every SLA machine will be like it) — silence. The only noise you hear from the Peopoly Moai in operation is the initial whir of the print plate lowering, and then the low quiet grumble of the tilt bed tipping for each layer change. It’s rather therapeutic.
Specifications
At the nitty-gritty level, here’s how the Peopoly Moai breaks down:
- Laser wave length: 405nm
- Laser power: 150mw
- Resin compatibility: Any resin designed to cure by 405nm UV light
- XY resolution: 70 micron
- Z resolution: 15 micron
- Build volume: 130 x 130 x 180mm
- Printer dimension: 250 x 250 x 630mm
- Weight: 15kg
- Processor: ST 32bit ARM processor
- Accepted files: g-code
- Power input: 100 – 240V 50/60Hz 2.0A
Unboxing and Setup
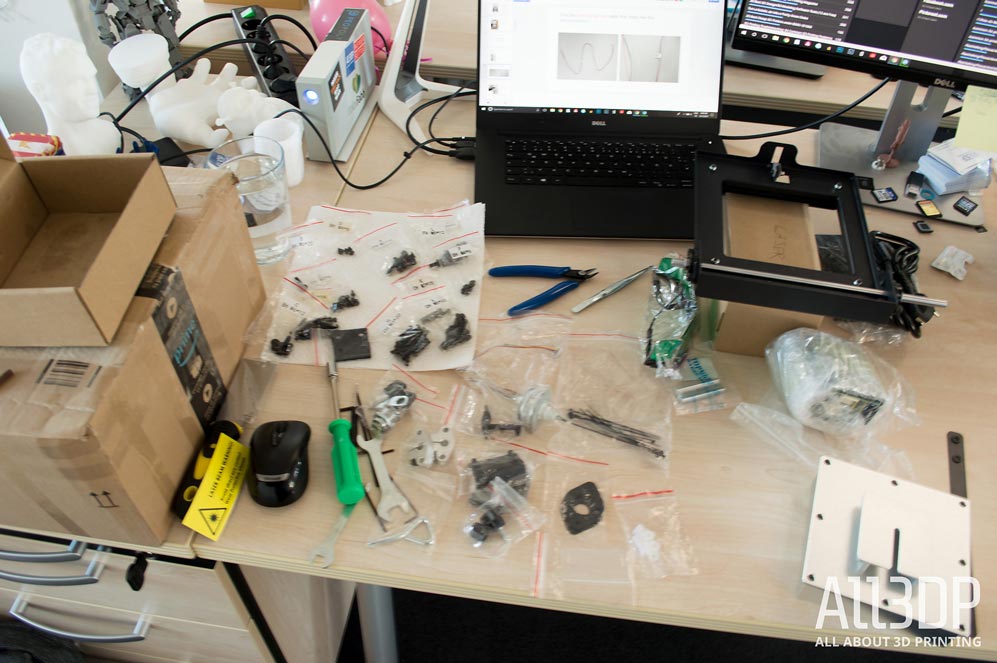
So what exactly does (approx.) $1250 dollars of Peopoly Moai SLA 3D printer kit give you? For starters, you’re getting a securely packaged box approximately 700 x 400 x 300mm with a huge “Handle with Care: This Way Up” sticker on the side. Our delivery person promptly ignored this, but the tight foam packing material inside saved the day, with all of the Peopoly Moai’s components completely unruffled from transit.
Peeling the cardboard open, you find 3 layers of parts. From large aluminum extrusions that comprise the Peopoly Moai’s frame to paper backed acrylic sheets (the printer’s case panels), labeled bags of vitamins and boxes within boxes containing the laser, galvanometers and various electronics boards.
Also included in the box is pair of protective glasses, a resin vat and SD card containing the build guide as a PDF.
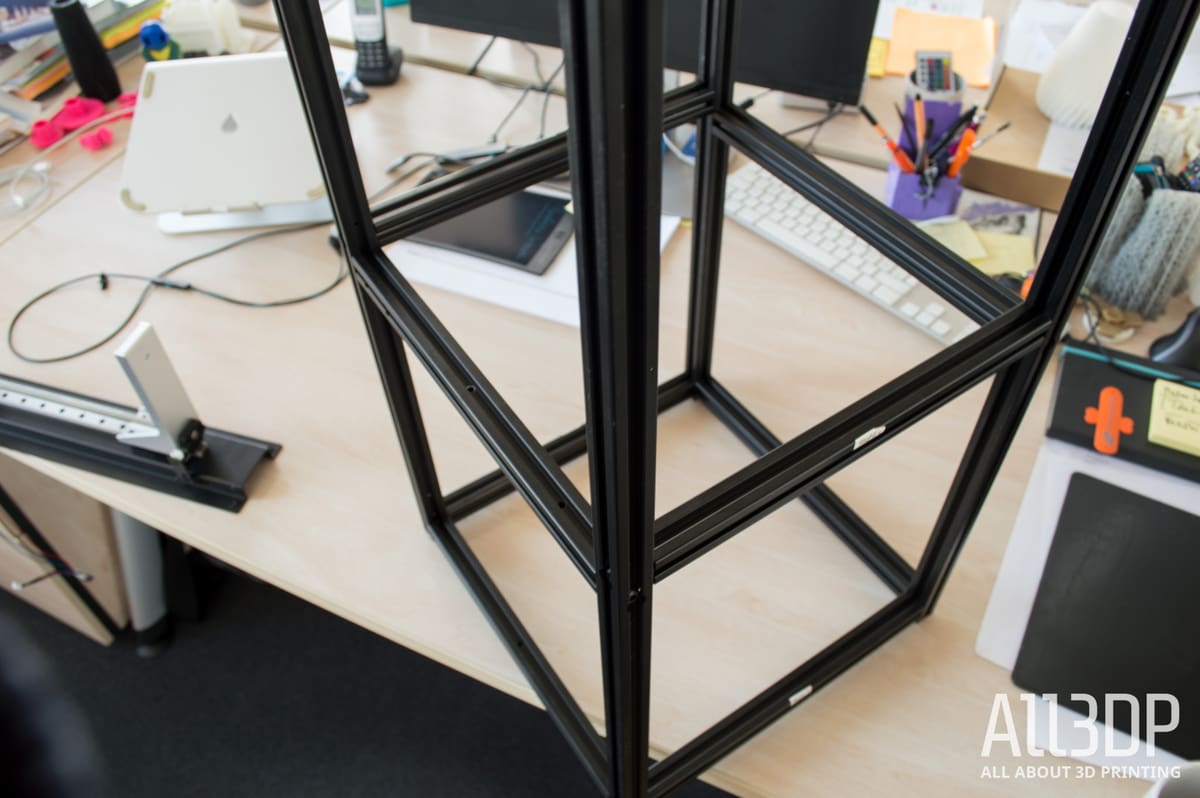
In all the “construction” side of the Peopoly Moai kit consists of mostly aluminum parts, with few acrylic sheets making up the printer’s impenetrably glossy black skin.
It’s worth noting that in our Peopoly Moai kit, some of the parts bags were drenched in what we can reasonably assume is oil from somewhere in their production. Handling the affected screws, nuts and bolts was particularly messy, and the transference of the oil to the bags’ surface effectively neutralized the labels’ adhesive, necessitating some extra homemade labeling to keep track of things during the build. We suspect this is not by design, but is by no means a deal breaker.
Building the Peopoly Moai took approximately 4 hours building at a comfortable pace. Right on the money with the estimate given by Peopoly in its build guide.
The process proved a leisurely jaunt piecing together well labeled and documented parts. Hats off to Peopoly for bucking the trend of kit 3D printers (that aren’t an Original Prusa) coming with shoddy instructions. Assembly is neat, simple and to the point. The PDF build guide (also available online as a Google Docs slideshow) gives clear instruction for the well-labeled parts in the box.
We encountered two problems though, overall. One is an easy fix, the other is something that seems to have afflicted a number of kits shipped by Peopoly.
Firstly, the threaded rod for our tilt drive motor came bent. Whether this was due to the overly snug foam packaging bending it in transit, or it slipping through quality control pre-packaging, we can’t say. It’s easy to bend back into a serviceable shape, and needn’t be perfect to do its job dipping the resin tray for each layer.
After reading the Peopoly forums, the second issue seems to be an semi-frequent problem for the company. Initially our SD card reader refused to recognize any SD card we threw at it. Checking the respective parts and pins offered no indication of the issue.
Miraculously on day two of testing the reader began working, in spite of the replacement card reader winging its way to us from MatterHackers (who kindly provided our test unit).
What exactly the issue was for us remains a mystery. However Peopoly’s solution for others’ borked SD readers is to ship a replacement. Handily, the build and arrangement of the parts of the Peopoly Moai means all of the electronics and cabling are easily accessible inside the printer. Replacing the SD card reader should be of little trouble — unscrewing a couple of screws and making the switch. Easy.
With the Peopoly Moai built, the next step is to calibrate. For this you’ll need a regular old 2D printer to print out the provided calibration sheet file. In an increasingly digital and paperless world, it’s not difficult to imagine a home without a standard printer, so Peopoly could have gained an extra point here by providing a physical sheet for users’ calibrations.
We liken it to getting a toy at Christmas and finding it doesn’t come with batteries. It’s potentially an irksome delay, stopping you from playing with your expensive toy.
With the calibration sheet printed out, you simply place it inside the Peopoly Moai’s resin vat, being careful to align the printed lines with the edges of the tank. Then, running a calibration g-code file provided by Peopoly, the printer’s laser fires. This test g-code traces the circular pattern on the sheet of paper and, all being well with your build of the printer and its parts, that’s it. If something is amiss and your laser doesn’t trace the pattern on the calibration sheet, there are adjustments and offsets to be made, which Peopoly documents well online.
For our unit though, the calibration ran without a hitch.
Software
Given the open nature of the Peopoly Moai, it should come as no surprise that open and 3rd party print analysis and slicing engines will be the software you use here.
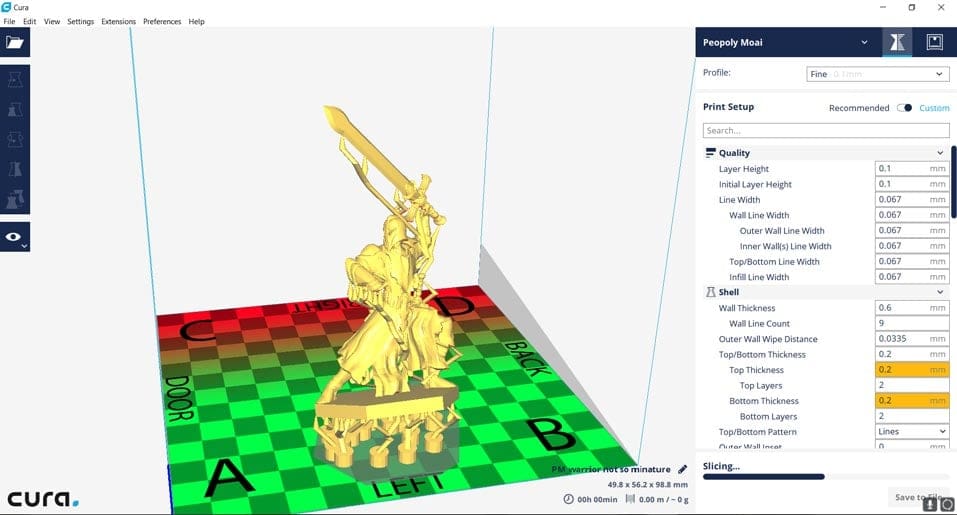
A Peopoly Moai-tailored version of Cura is available from the Peopoly web pages, which comes loaded with print profiles that allow you to easily switch between different layer heights (25, 50 and 100 microns).
This custom version of Cura also features a visualization of the print bed that helpfully reflects the top down nature of the printer (meaning the print bed is inverted), and perhaps most crucially indicates the areas of the print bed that will be subjected to the most peel forces during printing.
If you’re familiar with such things and don’t need a colorful GUI to remind you, the likes of Slic3r (and to a lesser extent, Simplify3D) are a possibility for the Peopoly Moai. Early on in the Kickstarter campaign the project leads detail using them, though for the purposes of our review we’ve found the company’s own blend of Cura more than adequate for the job.
But, the slicing and generation of G-code is the final step. Before you can even consider that, you’ll need to put time and thought into how you arrange and support the models you want to print. For this, Peopoly recommend an array of model analysis/print preparation software.
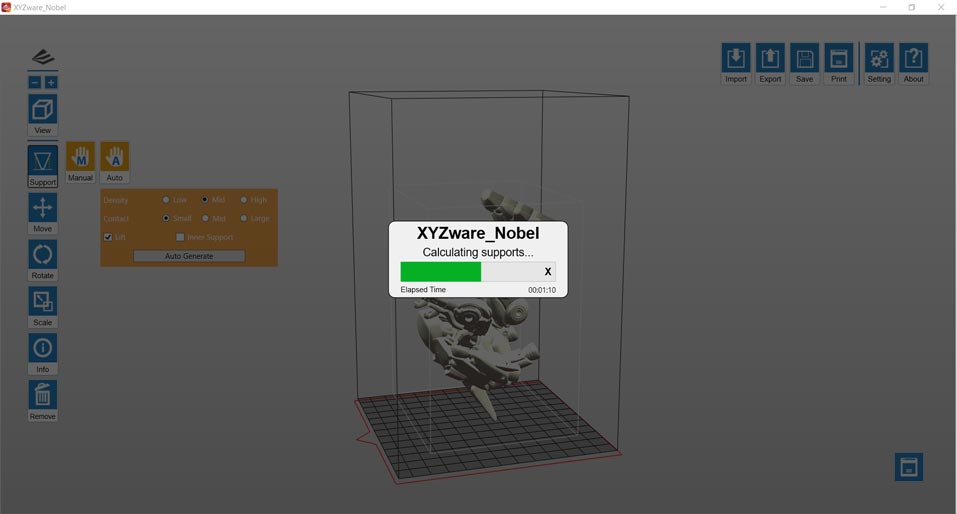
Beginners would be well suited looking at XYZPrinting’s XYZWare. Developed for use with the XYZ Nobel series of SLA 3D printers, its automatic support generation is simple to use. You’re not locked into piping models directly to XYZ 3D printers, meaning you can re-export STLs with the newly generated supports.
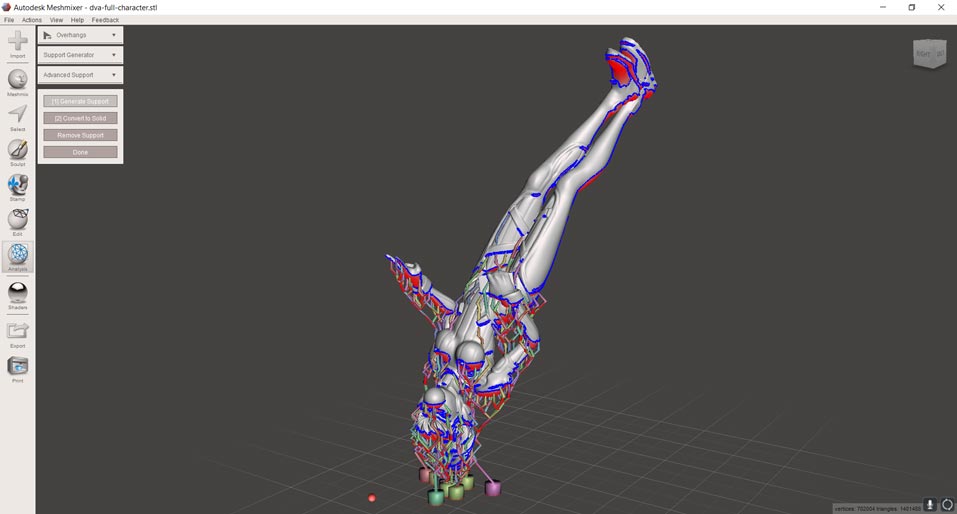
For intermediate to advanced users is Meshmixer, Autodesk’s free 3D modeling and analysis program. Here you get a number of advanced features such as hollowing and hole generation, which are essential for printing trickier models in SLA. You can also control the height of support bases and increase their durablility against peel force with struts.
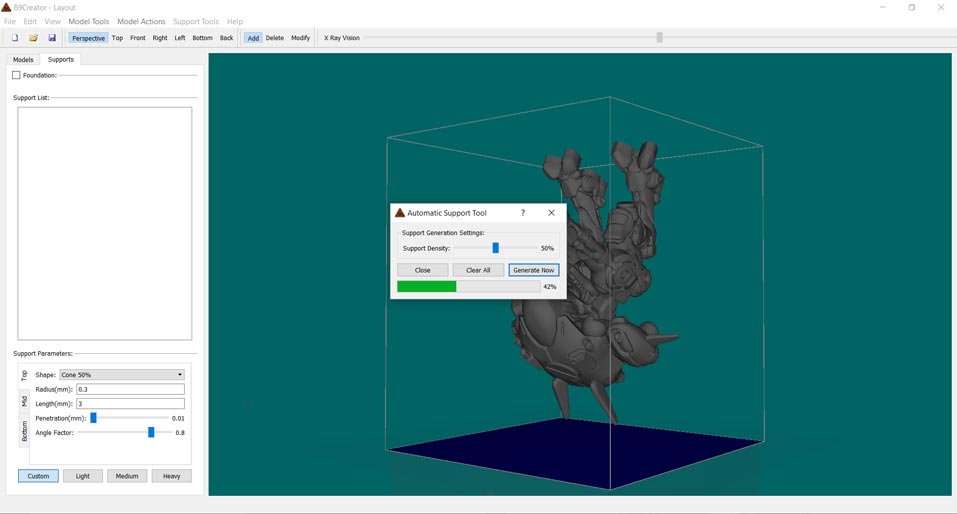
Similarly for intermediate to advanced users is B9 Creation’s B9Creator. Like XYZWare is for XYZ, B9Creator is the accompanying software for B9’s range of professional DLP 3D printers. Here you’ll find feature rich support generation — over and above that of Meshmixer — but without the supplementary analysis tools and hollowing options you may need.
Ultimately, depending on the models you’re printing, you may need a mixture of the above. Though we’d argue none are perfect, Meshmixer seems the more well rounded of the three.
Food for thought, and let us know in the comments if there are better options!
Printing
In terms of simplicity and ease of use, the Peopoly Moai is a joy. Mechanically as a machine, it is simple and gives you as the operator, confidence quickly. Paired to the Peopoly Moai printing using g-code (a concept likely familiar with users already familiar with FDM 3D printing) and Peopoly’s tweaked version of Cura handling the minutiae of slicing, as far as handling a machine goes it is comfortingly simple. In short, a great introduction to SLA 3D printing.
With that said, it can be all too easy for this confidence to take a knock, when your ambitions overtake your competence preparing the prints and setting supports. A string of failed prints on an SLA 3D printer is infinitely more of a chore than a failed print on an FDM machine. What with the mess of removing a wet heap of cured resin from your print plate and (carefully) from the delicate PDMS layer inside your vat — it’s nowhere near as easy as taking a spatula to a print bed and slinging a spaghetti of filament into the recycling bin.
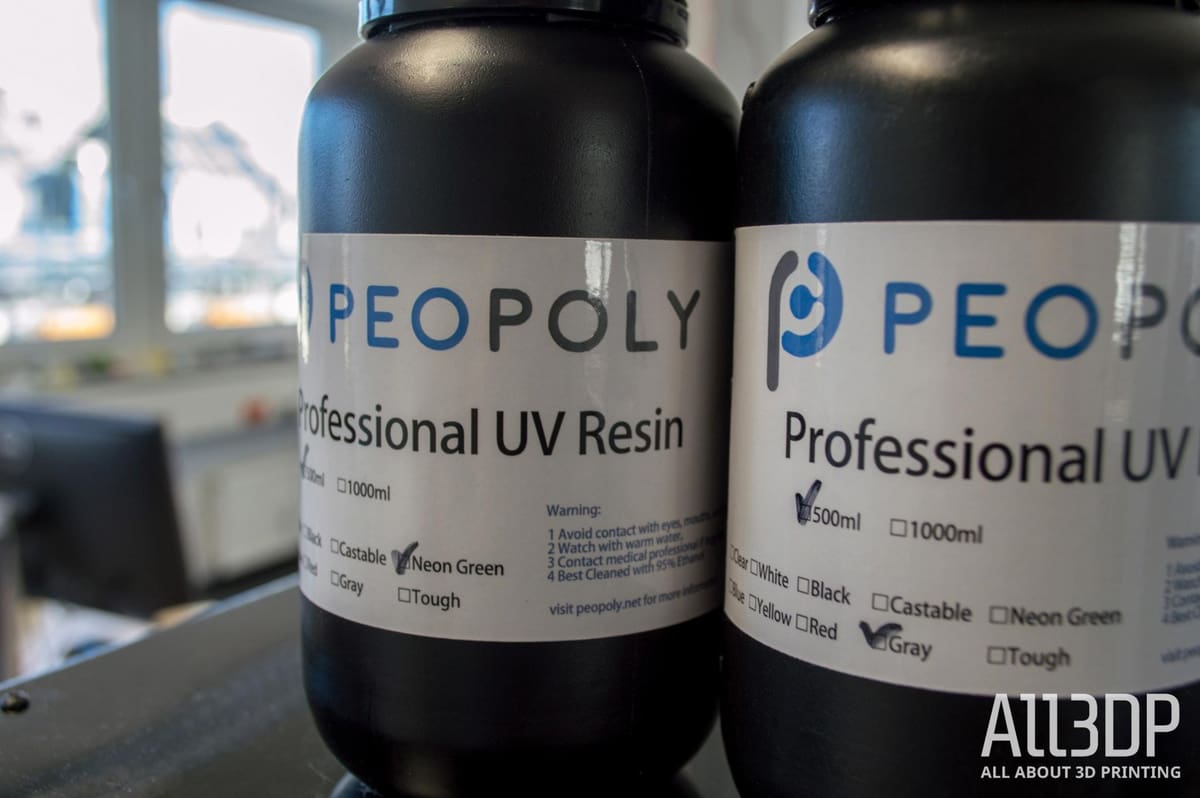
Out of the box Peopoly’s own formula of resin for the Moai (available in seven colors) come well tested enough for you to simply leave the laser power at factory setting and get decent results.
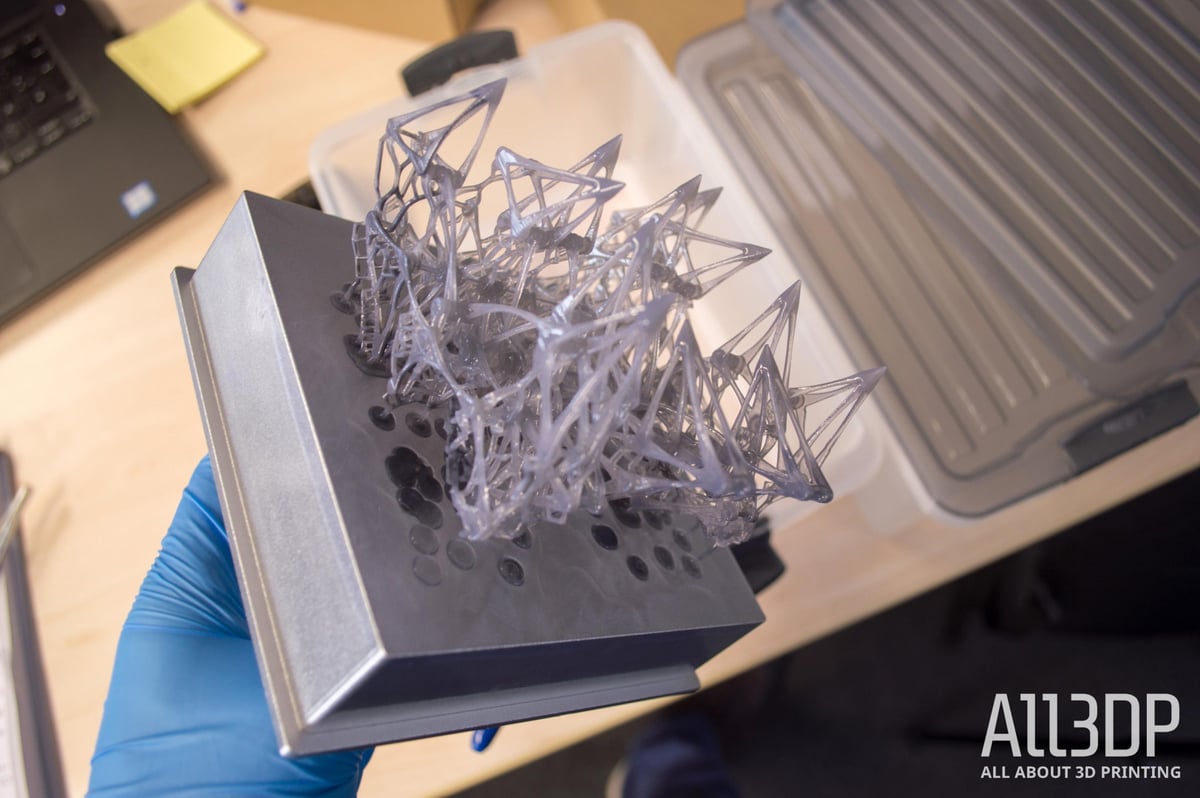
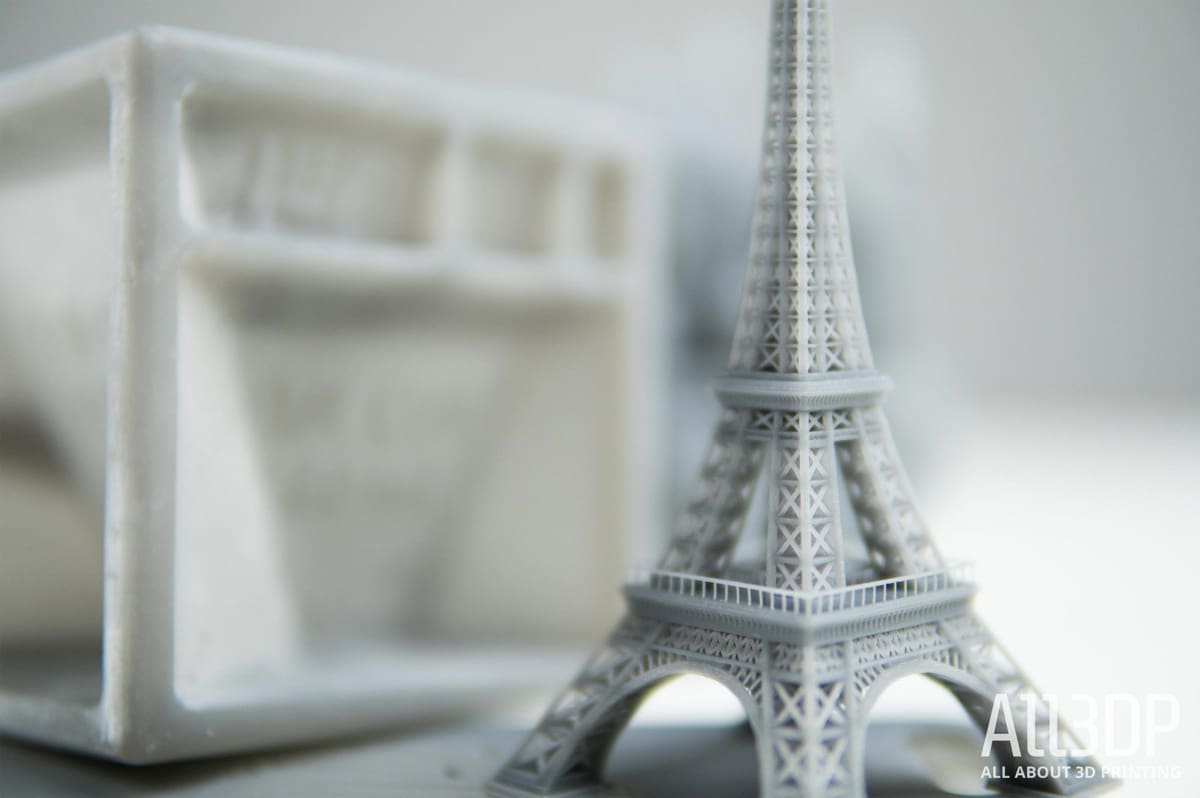
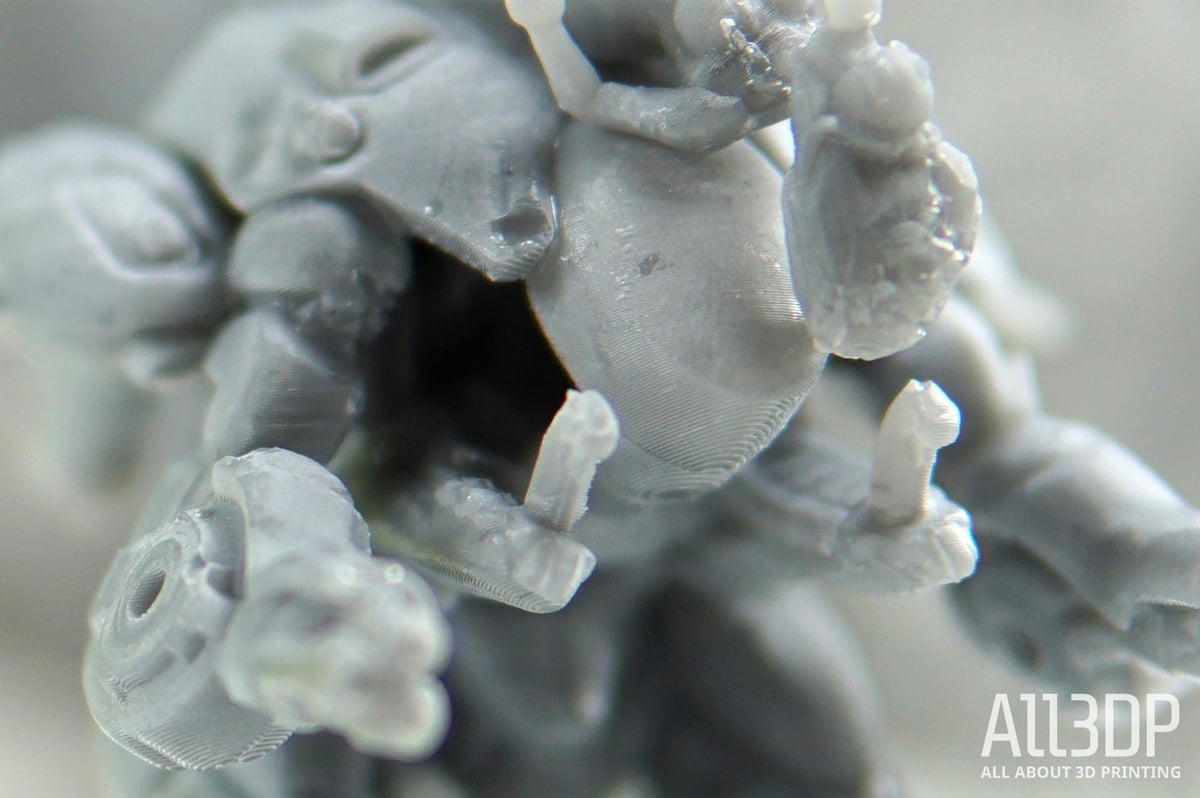
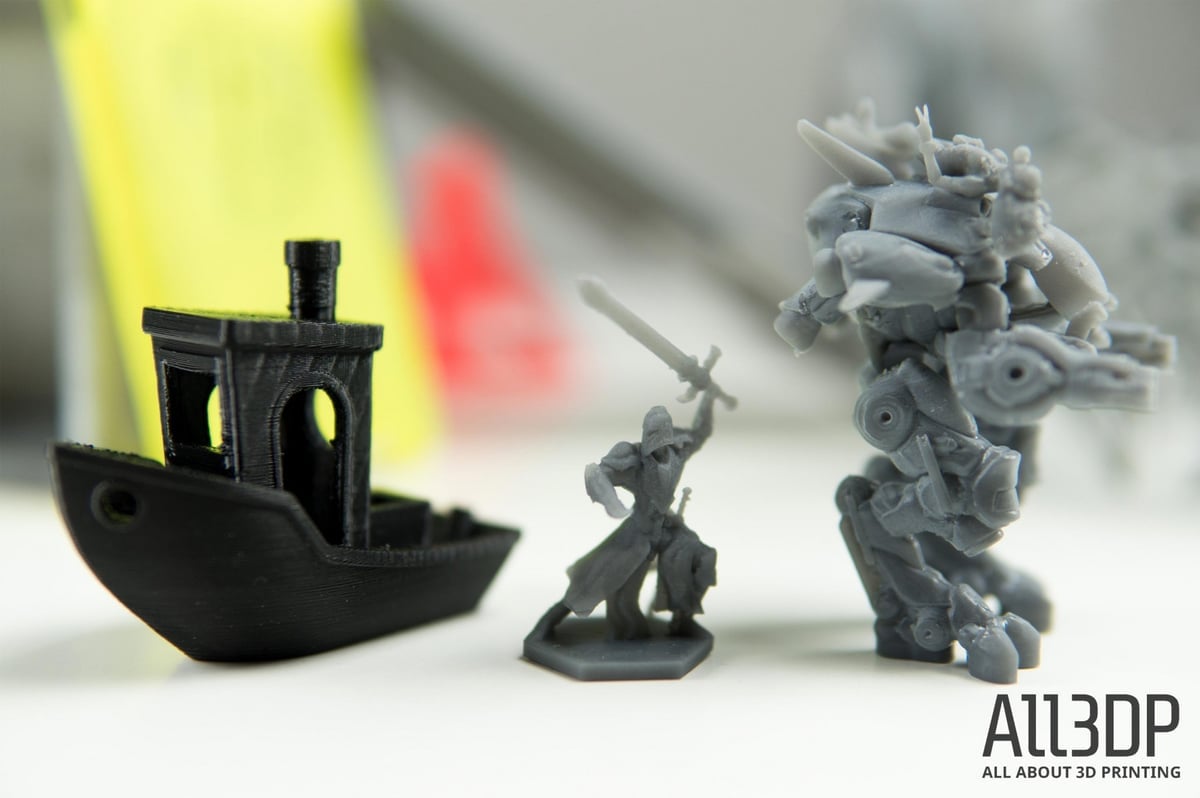
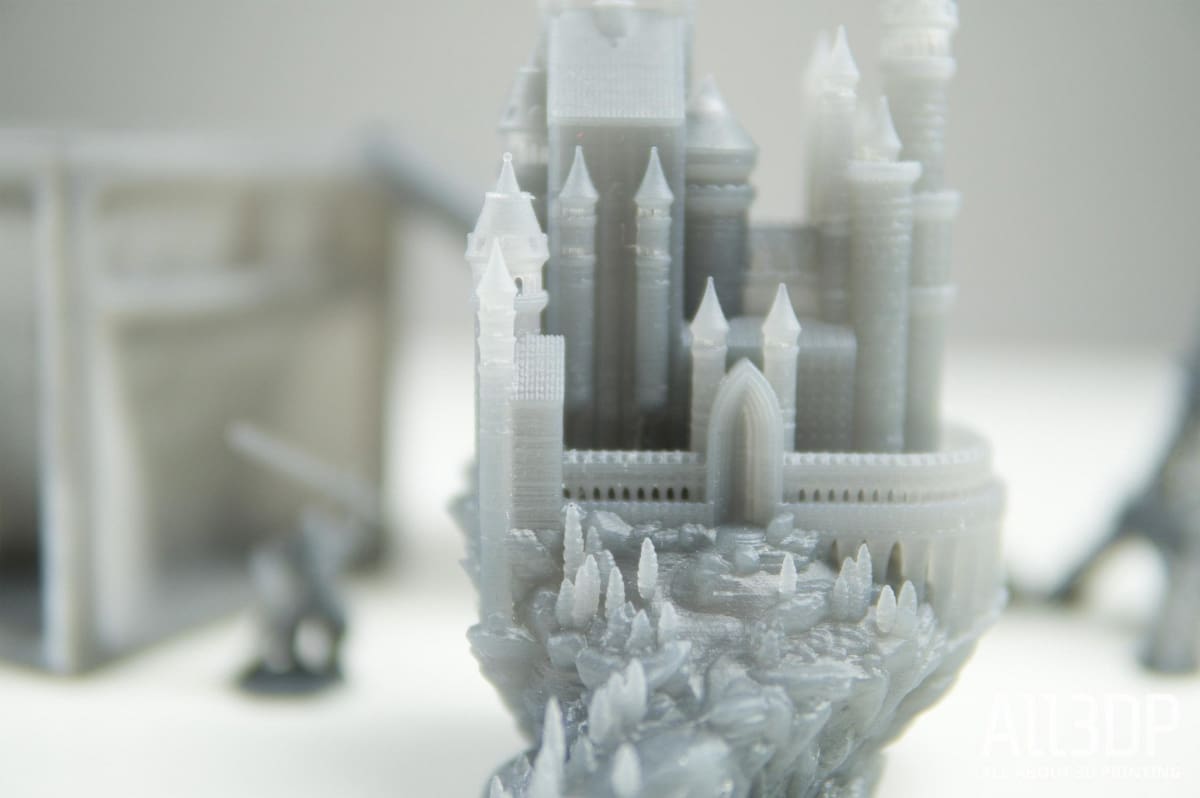
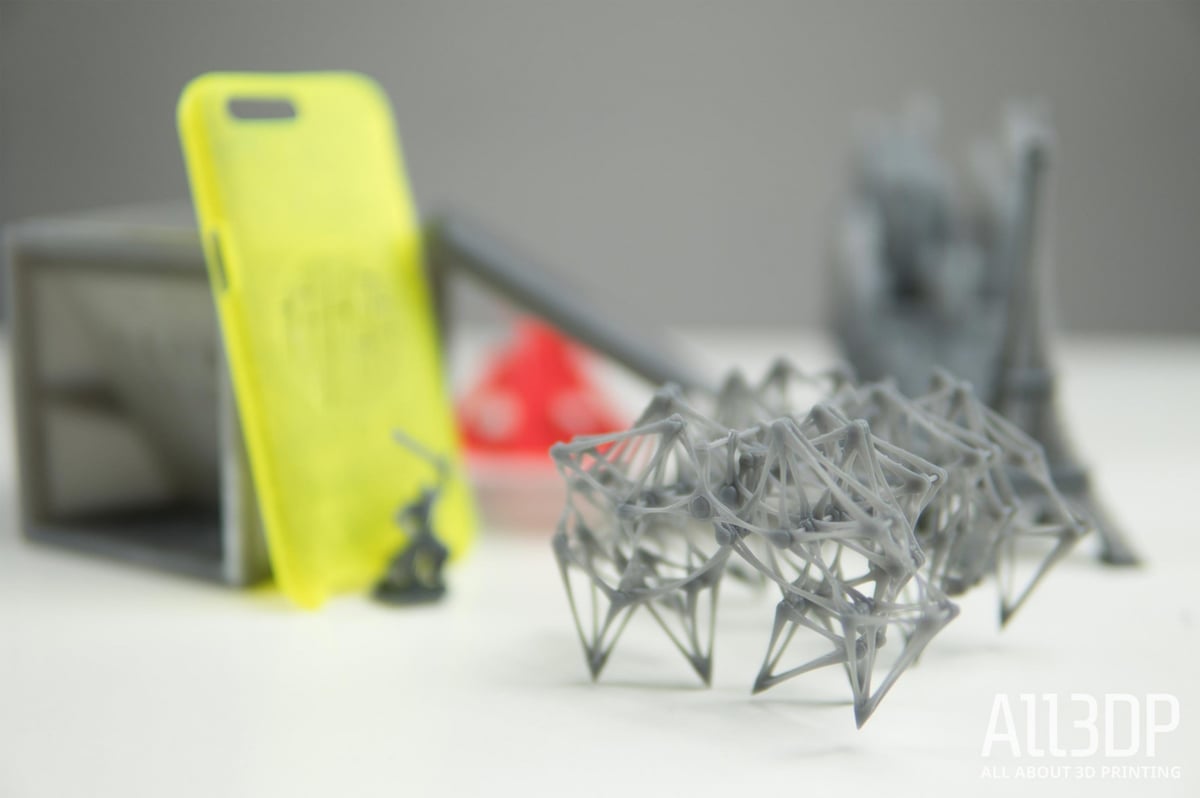
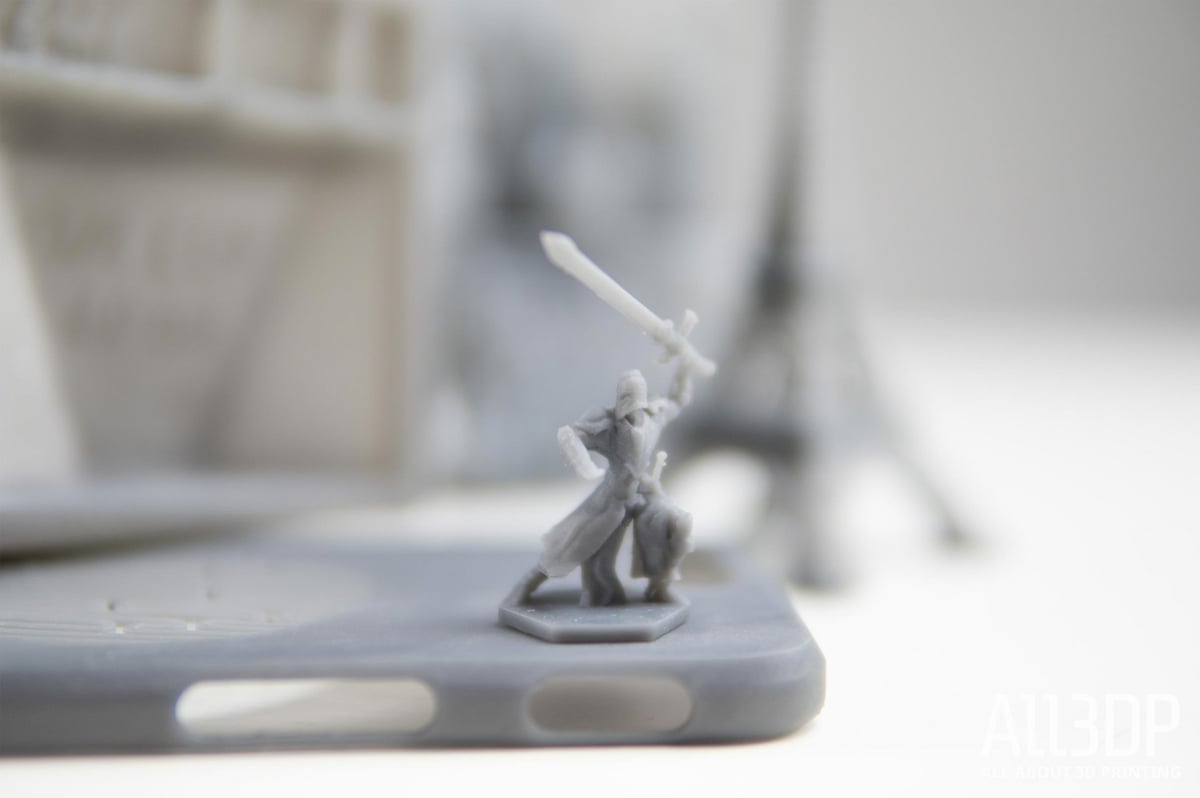
Using Peopoly’s Grey and Neon Green resins, we were able to throw a few different models with different characteristics at the Moai, from the SLA staple of the Eiffel Tower to a smartphone case, measuring cube, fantasy castle, D&D figurine and even a couple of video game models (D.Va and Meka from Overwatch).
The key feature of 3D printing using SLA is the incredible detail the technology is able to render on an object. With the pinpoint accuracy of a laser dialed in to layer heights as fine as 25 microns you achieve a look that simply isn’t possible with desktop FDM 3D printers — even those multiple times the price point of the Peopoly Moai.
Throughout our testing we stayed within Peopoly’s custom Cura profiles, printing a variety of models at the finest (0.025mm) and coarsest (0.1mm) layer heights.
With a few prints using Peopoly’s own resin under our belt, we decided to go off-piste a little with some 3rd party resins. Perhaps the best thing about the Peopoly Moai is its open nature, with any resin (provided it’s UV sensitivity is covered by the Moai’s laser) fair game for printing.
Looking to challenge ourselves and see what is possible with the Peopoly Moai and resins definitely not designed for it, we opted to test out Funtodo’s Industrial Blend DLP resin. A bright red resin created to be tough and hard (with a hardness rating akin to an industrial hard hat), it is much more photosensitive than SLA-specific resins, and is designed for use in DLP 3D printers.
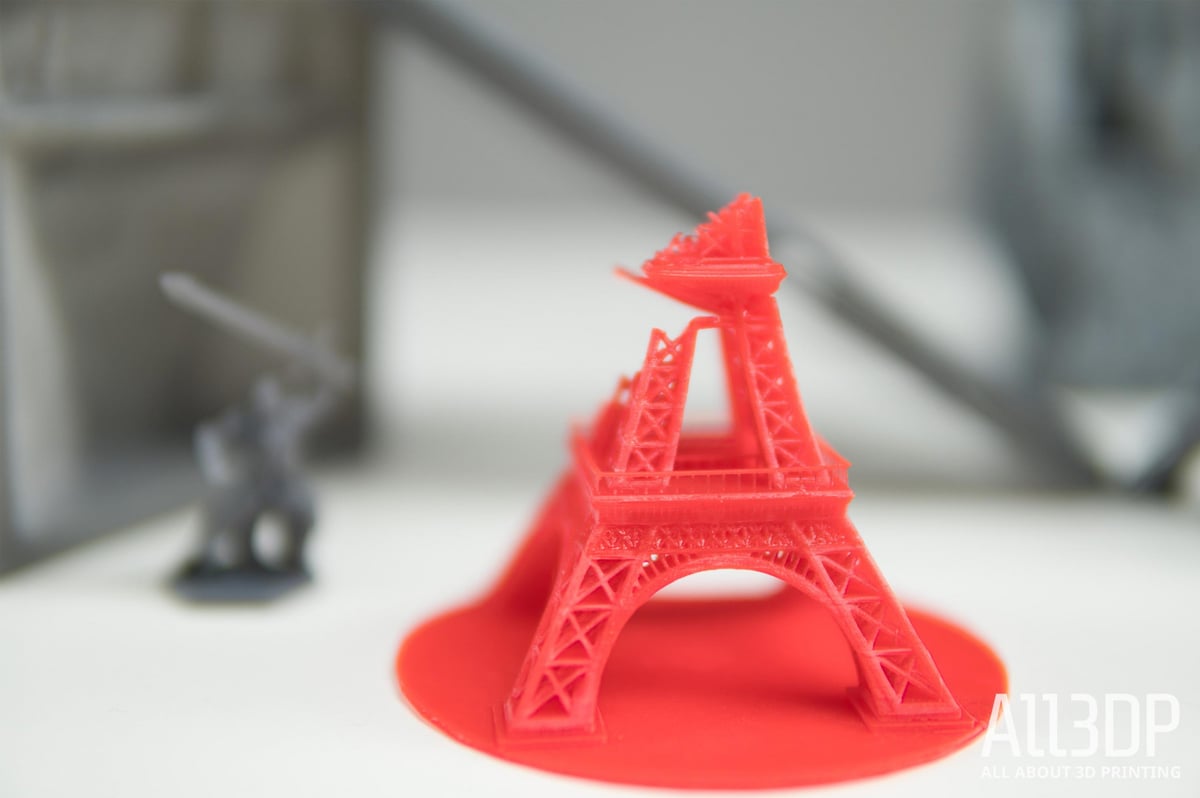
What this means for printing in the Peopoly Moai is dialing back the laser and increasing the print speed.
Sticking to the tried and true Eiffel Tower, we only got as far as the second observation platform before the print failed. The result is kind of cool in it’s own right (with a Godzilla stomping through Paris feel to it), but stands as a reminder of the sensitivities involved in nailing a resin’s print settings with SLA. Factors include peel force, temperature, laser sensitivity and print speed.
Incidentally we found setting the Peopoly Moai’s laser power to 42 for at 100 micron layer height prints and 85mm/s speed seemed to do the trick for this particular resin. We’re experimenting with others and hope to share our findings on this review soon.
If you’re brand new to SLA 3D printing, there really is nothing quite as intoxicating as seeing a solid object materialize out of a vat of thick goop. FDM 3D printing has it’s place for satisfying the inner obsessive compulsive, seeing precise lines coloring in outlines, but SLA has frikkin laser beams, turning liquids into solids. And damn pretty solids, at that.
More Printing
An important step toward getting good prints from the Peopoly Moai is something of an advanced calibration step that is not initially outlined in the printer setup procedure of the build guide: bed leveling.
Not something you’d assume to be part of a printing process that involves a tank that tips for every layer, this step is crucial to achieving dimensionaly accurate prints, and even preventing complete print failures.
When curing a layer of resin, the print plate is pushed tight against the bottom of the resin vat, with the laser tracing the layer through a thin layer of trapped resin. Since the print plate is removed frequently between prints, this interfacing of parts can become uneven in subsequent prints and will require adjustment. This is done via four spring loaded locking nuts beneath the four corners of the resin vat (or print bed, in a traditional FDM-minded sense).
Accessible only after physically removing one of the Peopoly Moai’s side panels, a provided tool allows you to turn these nuts and adjust the bed level of the printer.
To determine just how much you will need to turn each nut, a special sample g-code is provided by Peopoly. Lasting approximately 15 minutes, this print results in four pips – one to each corner of the print plate. When correctly calibrated these pips are in the region of 10.6 – 10.8mm tall. You’ll need to break out some digital calipers if you want to measure them properly.
Depending on how far over or under the target range your pips are, you can then determine how many turns anti- or clockwise each nut will require to dial it up or down (one half turn equates to 0.3mm).
In all it’s quite an involved process, and one that once again necessitates the constant washing of parts, tools and the like.
However, the effort is worth it when your print success rate takes a significant leap up.
For those curious about the models pictured throughout this Peopoly Moai review, here’s where we found them:
- Eiffel Tower, by Newcandle via Thingiverse
- Standbeest, by Tai45914 via Thingiverse
- Warrior, by MakersLabCZ via Thingiverse
- Medieval Castle, by BoldMachines via Thingiverse
- OnePlus 5 Phone Case, by MakeAnything via MyMiniFactory
- D.Va & Meka, by PrintedObsession via MyMiniFactory
- Measuring Cube, by Iomaa via Thingiverse
Perishables
We’re throwing in an extra section of the review here because there are hidden costs to 3D printing with SLA machines that are not apparent at first glance. The known and obvious cost factor is resin. That needs no explanation.
Secondary to this though is the post processing cost. When a print is complete on the Peopoly Moai, as with any SLA 3D printer, it must be washed thoroughly. This means removing the print from the bed and dousing it in Isopropanol or similar solvents, and then water. Rinse and repeat.
This solvent bath becomes saturated with cast off resin over time, losing its effectiveness in dissolving uncured resin on the surface of your prints. This means the more you print, the more you’ll need to keep your post-processing station topped up.
In addition to this, the Peopoly Moai’s resin vat is lined with a transparent layer of a material called Polydimethylsiloxane, or PDMS. Given the nature of how the Peopoly Moai prints — pushing its print plate firmly into the resin vat and up against this PDMS layer — over time cured resin will eat into it, wearing it away and eventually tearing it. Once torn, resin can leak underneath (or worse – cure onto the acrylic of the vat itself) rendering it unusable. This is the hidden consumable of the Peopoly Moai and many other SLA 3D printers.
It is possible to buy replacement sheets of PDMS for your resin vats, and industrious users of the Peopoly Moai have taken to curing their own PDMS (its initial state is a liquid) in their own vats.
Generally to prolong the life of your PDMS layers it is good practice to move your prints around on the print bed at the slicing stage to avoid over curing in the same area and wearing it out. Similarly, ensuring your Moai is correctly calibrated and the appropriate laser power is being used will help avoid wearing the PDMS out sooner than necessary.
Regardless though, you will eventually have to replace the PDMS layer in your vats.
Moddability
Unlike the RepRap based 3D printers of the world, this SLA 3D printer kit is none too handy for printing parts to make itself better. But that’s not necessarily a bad thing. Mechanically speaking there’s little to nothing to alter or improve on the Peopoly Moai. The Z-axis lead screw and cantilever arm for the print plate are sturdy, the tilt motor, bed and framing all serve their purpose with no indication of error.
For printable extras to improve the experience, you’re left looking at quality of life upgrades to make dealing with the Peopoly Moai a little nicer. Over on Thingiverse (where else), there’s a handsome collection that includes the following simple essentials: vat comb, a vat dripping bracket and drip stand.
Wrapping Up
The Peoply Moai is a simple machine. And we mean that in the most complimentary way possible.
It boasts clean, stylish but unfussy looks, features an uncluttered user interface that simply disappears at the touch of the button and, when used right, outputs excellent prints akin to its brethren that cost far more than it.
Building it is a cinch, thanks to a design that clearly had ease of use in mind, partnered to an illustrated and competent build guide.
It all paints the picture of a printer ideal for someone just dipping their toes into SLA 3D printing then, which it mostly is.
The only sticking point for us is the follow through in the resin itself and post-print processing. When we hold a candle to competitors like the Form 2, we see an ecosystem of software and stations to make the print work every single time with as little pain as possible. And that’s because Formlabs knows what the worst part of SLA printing it — the resin.
In the Peopoly Moai, you have an extremely capable tool fully deserving of the praise it receives. The only trouble is it doesn’t go far enough to minimize your exposure to the frankly horrendous materials you have to feed into the machine.
You could argue that’s not the job of the printer — it’s a scalpel, and you are the surgeon with it in hand. It’s on you as the user not to cut yourself.
But when said knife is a greasy toxic sludge that drips on everything, sticks to everything and stinks to the moon and back, the Moai falls a little short in protecting you, especially so when, as we’ve established throughout this review, it’s a great entry point machine for enjoying the quality 3D printing SLA gives.
In short, for those that don’t mind getting their hands dirty (which absolutely will happen) and can put the extra effort and expense into home-brewing a post-processing station, the Peopoly Moai is your machine.
If this doesn’t sound like you — save up and get a Form 2 instead.
The Peopoly Moai is our pick for the "Best Value Resin 3D Printer" in Spring 2019. It lets you get acquainted with the nuts and bolts of SLA 3D printing at a reasonable price.
Alternatives
Three other resin 3D printers stand out as alternatives to the Peopoly Moai. Below, we rattle off a few top line features and reasons why you might consider them, too.

The Anycubic Photon is a new entry in the affordable resin 3D printing market. Undercutting the Moai’s price by more than half, for approximately $500 you get an LCD shadow masking 3D printer with a print volume of 115 x 65 x 155mm.

Wanhao’s Duplicator 7 (commonly shortened to D7) predates the Peopoly Moai by some months, and like the Photon above uses LCD shadow masking tech for its curing of resin. Its print volume is 120 x 68 x 180mm.
The benchmark by which all desktop SLA 3D printers are measured. Championing the technology with a complete ecosystem that makes printing with resin as pain-free as possible, there’s a reason the Form 2 consistently ranks near the top of best printer lists (and boasts a price tag to match)
License: The text of "Peopoly Moai Review: Great Value Resin 3D Printer" by All3DP is licensed under a Creative Commons Attribution 4.0 International License.
CERTAIN CONTENT THAT APPEARS ON THIS SITE COMES FROM AMAZON. THIS CONTENT IS PROVIDED ‘AS IS’ AND IS SUBJECT TO CHANGE OR REMOVAL AT ANY TIME.