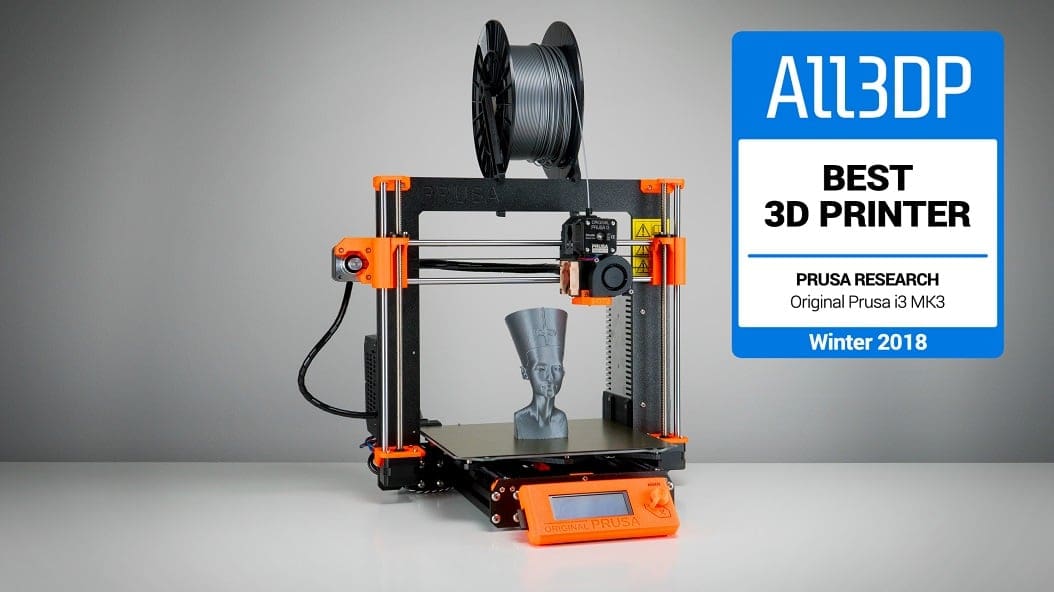
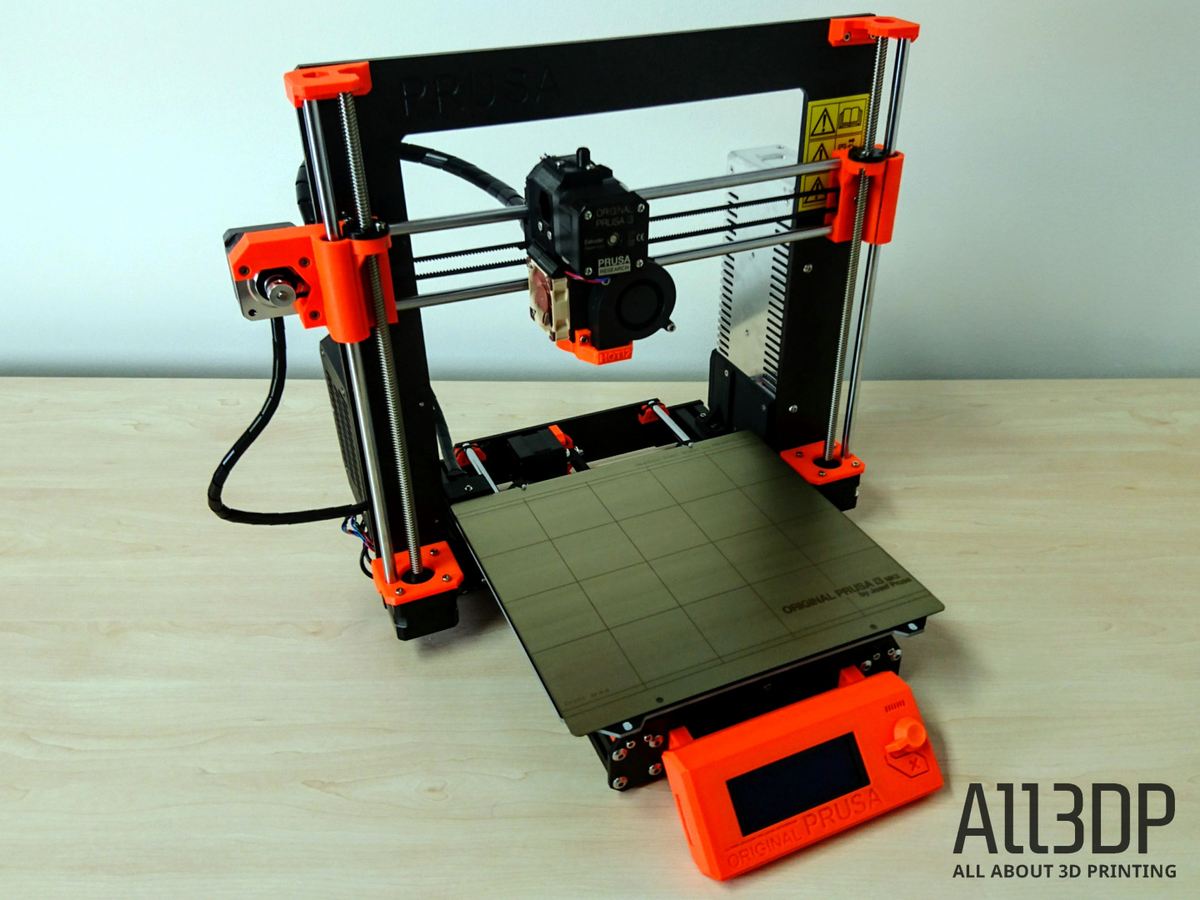
Original Prusa i3 MK3 Review: Best 3D Printer of 2018
Rating
The Original Prusa i3 MK3 has been replaced with the slightly upgraded MK3S, but that doesn't mean you can't still read about this tried and true printer. Check out our review to learn more about the machine that first stole our 3D printed heart.
Few brands have the impeccable reputation and fervent fanbase that Czech-based Prusa Research enjoys.
Manufacturer Josef Prusa’s knack to constantly improve every aspect of its open-source ecosystem, from hardware to software is part of what his community loves. The upgrades in the Prusa i3 MK3 3D printer were made after gathering feedback from this community.
Read on for our in-depth review of the Original Prusa i3 MK3, including a kit assembly guide. It’s split into two parts: The first half is a straight-up review of our experiences using the Prusa i3 MK3. The second is an account of the journey we underwent in assembling it as a DIY kit. The two parts together will provide you with a complete overview of the advantages and disadvantages of using an Original Prusa i3 MK3.

See Also: Original Prusa i3 MK3S Review: Best 3D Printer 2020
Original Prusa i3 MK3 Review: Part One
We’ve got the most comprehensive Original Prusa i3 MK3 review you will find in the galaxy, covering features, design, setup, printing, software, filament, and much more.
Verdict
Pros
- Redesigned, Stiffer Frame
- Crash Detection
- Power Failure Backup
- Excellent Documentation
- Removable Magnetic Print Bed
- 9 Points Autocalibration
- Upgradable with OctoPrint
Cons
- Filament Sensor is buggy
- Tricky Bed Adhesion
- Quality of 3D Printed Components
- Frequent Updates to Keep Track
Verdict
We’ve seen the future of fused filament fabrication; the Original Prusa i3 MK3 an intelligently designed open-source 3D printer that can anticipate a problem before it becomes a problem.
Worried about a power outage? Or perhaps idle hands bashing into the printer? Not a problem, the Prusa i3 MK3 will chew through these incidents like nothing happened.
On the less exciting level of day-to-day operation, features like the flexible, removable print bed held in place by magnets are super useful. And the extended nine points of auto-calibration mean that the machine will never go out of whack when printing something. And we appreciated how adaptable it is to multiple slicing software options.
Oh, and the assembly process for a DIY kit is totally idiot-proof. And we should know since we’re the idiots what proved it. You should definitely take the opportunity to build a Prusa i3 MK3 by yourself if you can.
Complaints? Niggles? Problems? There will always be some. We found that the quality of the 3D printed components wasn’t fully up to snuff; you can read our assessment in the assembly description below. In short, not a show-stopper, but it would be recommended you 3D print a set of backup components when as you’re able.
Elsewhere, the Prusa i3 MK3 filament sensor can sometimes be tricked by translucent filaments. And you know how we mentioned life at the bleeding edge earlier? There will be a torrent of firmware updates and component redesigns to keep track of and implement if you want to maintain optimal performance for your printer.
Summing up our Original Prusa i3 MK3 review, using this 3D printer has been a joy and an education. It’s so easy to use and produces decent prints on a reliable and consistent basis. And yet we have been surprised and delighted by the fresh, useful innovations. The execution may stumble here and there, but the ambition on display simply cannot be faulted.
The Original Prusa i3 MK3 is highly, thoroughly, and unreservedly recommended.
The Looooong Read
As a foundation for desktop fused filament fabrication, the design of the Prusa i3 dates back to 2012. Josef Prusa contributed the design to the open-source RepRap project, and it was quickly adopted and refined by the wider community.
There are a great many 3D printers on the market which carry the Prusa i3 designation. This might be confusing to some because they’re not actually endorsed by Josef Prusa or built with his involvement. They’re simply adopting the blueprints as per the RepRap ethos — open source designs for a self-replicating 3D printer — though not all these models feed back their innovations into the 3D printing community.
In 2016, Prusa himself launched a new and improved (but still open source) version of his i3. This was the Original Prusa i3 MK2. That model was a huge success, with a ratio to print quality to price that was difficult to surpass. It was soon followed by the Original Prusa i3 MK2S, which incorporated further updates and refinements.
Fast forward to October 2017, and Prusa Research announced the launch of the Original Prusa i3 MK3. This is an important new release because it continues the track of innovation begun in 2012. The range of new features are pitched as enhancing ease-of-use and reliability, and to make 3D printing even more accessible to the casual user.
In DIY kit form, the Original Prusa i3 MK3 retails for around $900 dollars. Fully assembled and tested, it retails for around $1,200 dollars.
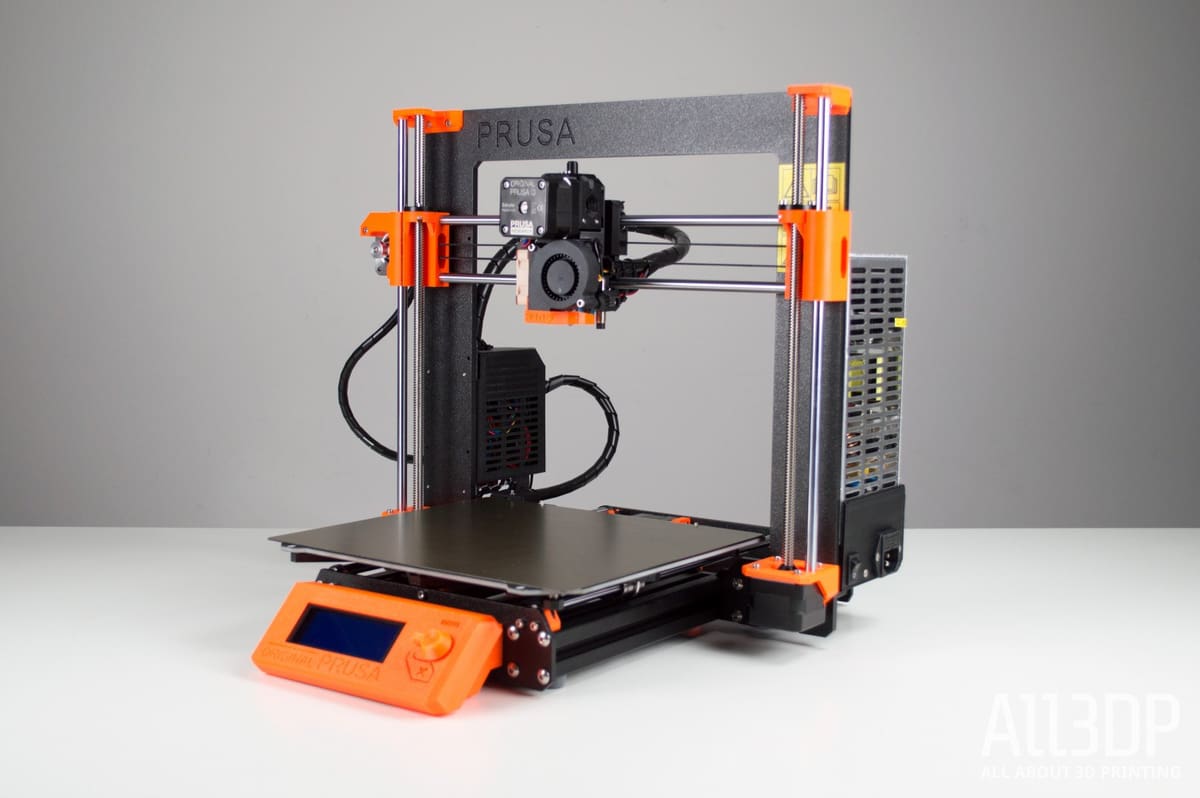
Features and Design
Drilling deeper into our Original Prusa i3 MK3 review, let’s take a closer look at the features. This unit is pitched as a refinement of everything Prusa Research have achieved to date; more than a reliability upgrade, but a new and improved desktop 3D printer packed with innovative technologies.
Where the previous models offered astonishing print quality for the price, the Prusa i3 MK3 seeks to make the discipline of FFF more intuitive and easier than before, with a plethora of sensors to alert users to potential problems and prevent failed prints.
There’s a lot to cover, but to summarize those new features:
- Filament sensor
- Power Panic
- RPM sensing fans and Noctua quieter cooling
- Ambient thermistor and P.I.N.D.A 2 with thermistor
- EINSY RAMBo motherboard
- Trinamic2130 drivers with layer shift detection, faster and silent printing
- New Y axis
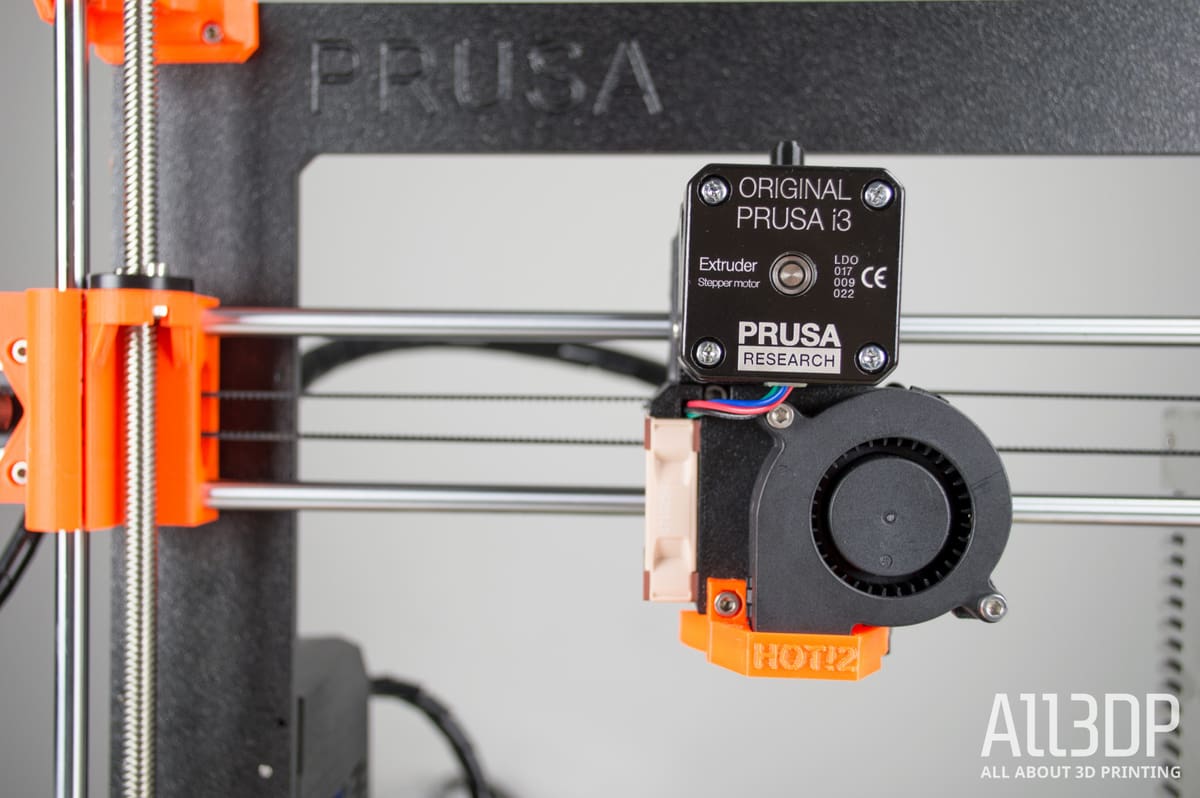
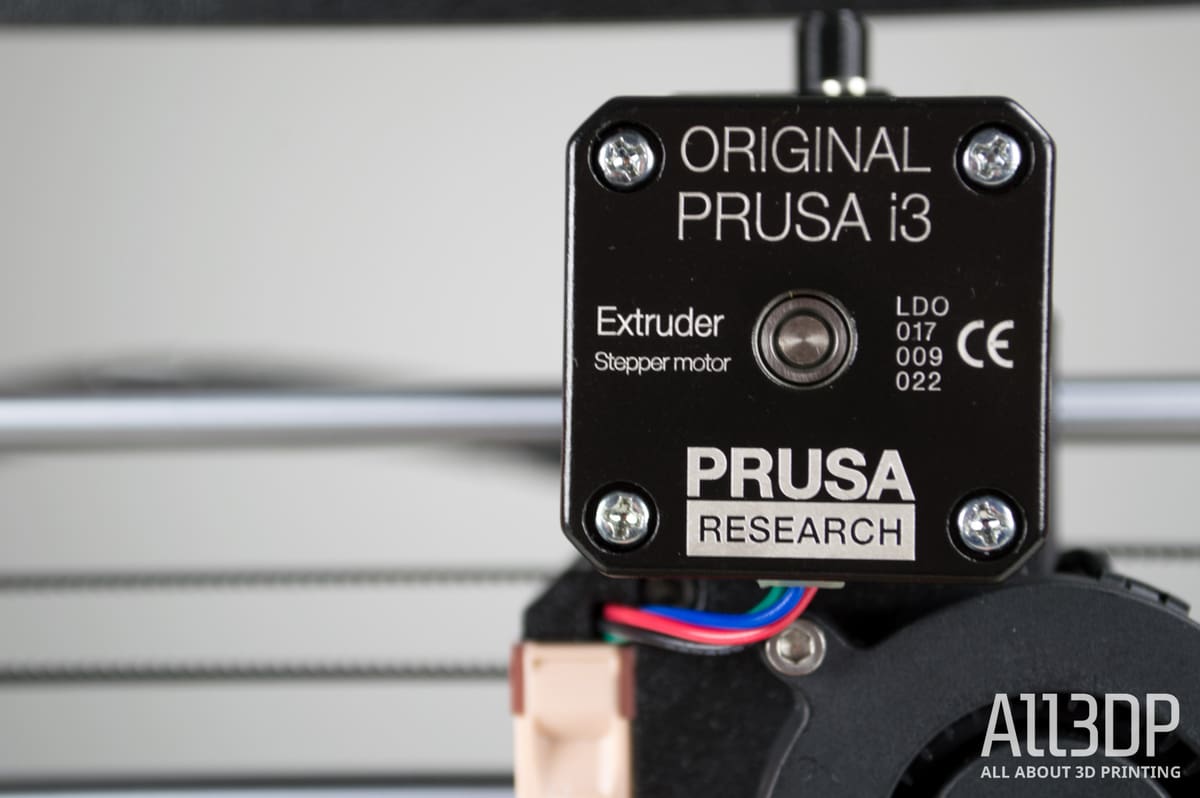
- Bondtech extruder
- Magnetic MK52 Heatbed
- Powder coated PEI spring steel print sheet
- Ready for OctoPrint
The Filament Sensor uses an optical filament encoder to detect the presence and movement of a filament. This provides early warning for when the filament is about to run out, and the machine can pause the print and prompt the user to insert a new spool. It can also detect stuck filament and recommend a “cold pull” to clean the nozzle and continue the print.
Other upgrades are Power Panic, where the Prusa i3 MK3 can recover and resume a print-job after a power loss, and a new EINSY RAMBo motherboard which is pitched as the most advanced 3D printer board currently available. How advanced is it? It can monitor power, for one, which allows for the detection of blown fuses. For another, it features Trinamic drivers which are super fast, quiet, and can detect (and correct) layer shift while printing.
Elsewhere, the Original Prusa i3 MK3 has a reworked Y axis for improved frame rigidity and an extra 10mm build volume on the Z-height. And there’s an upgraded Bondtech drive gear extruder, which grips filament from both sides to increase the push force of the filament and making it more reliable (especially for flexible filaments).
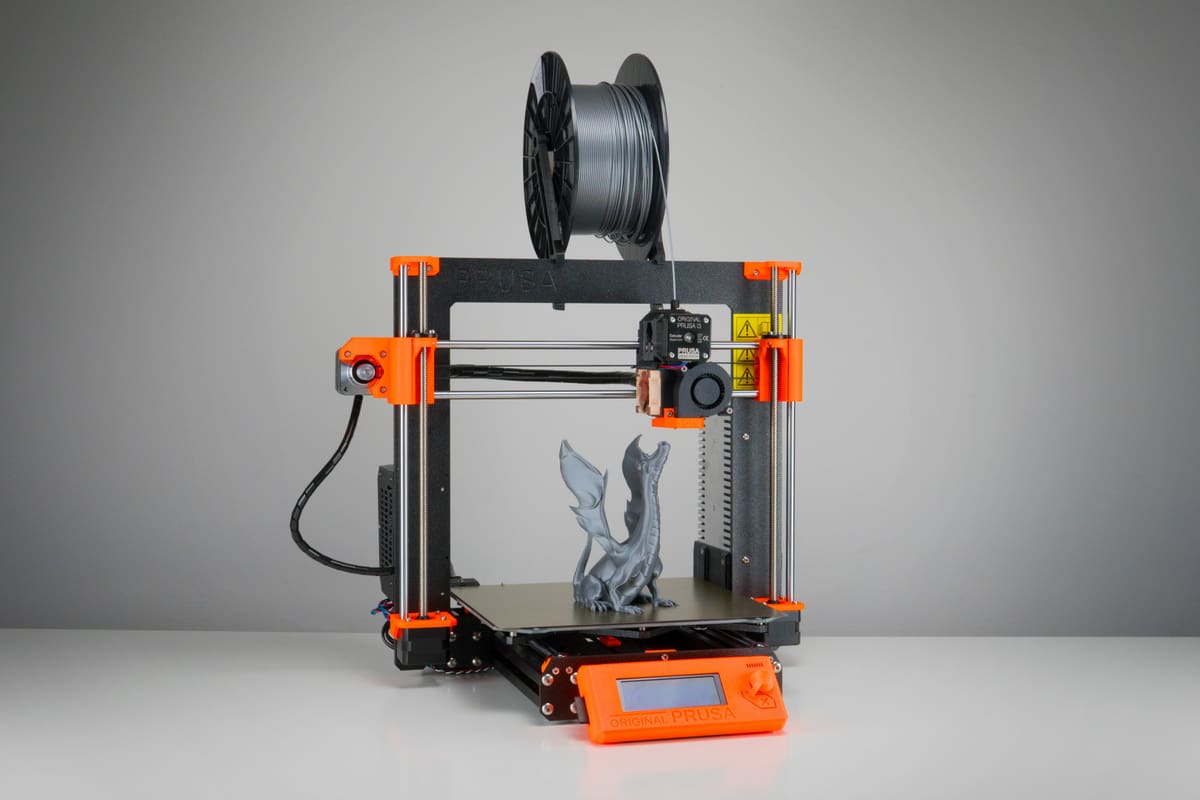
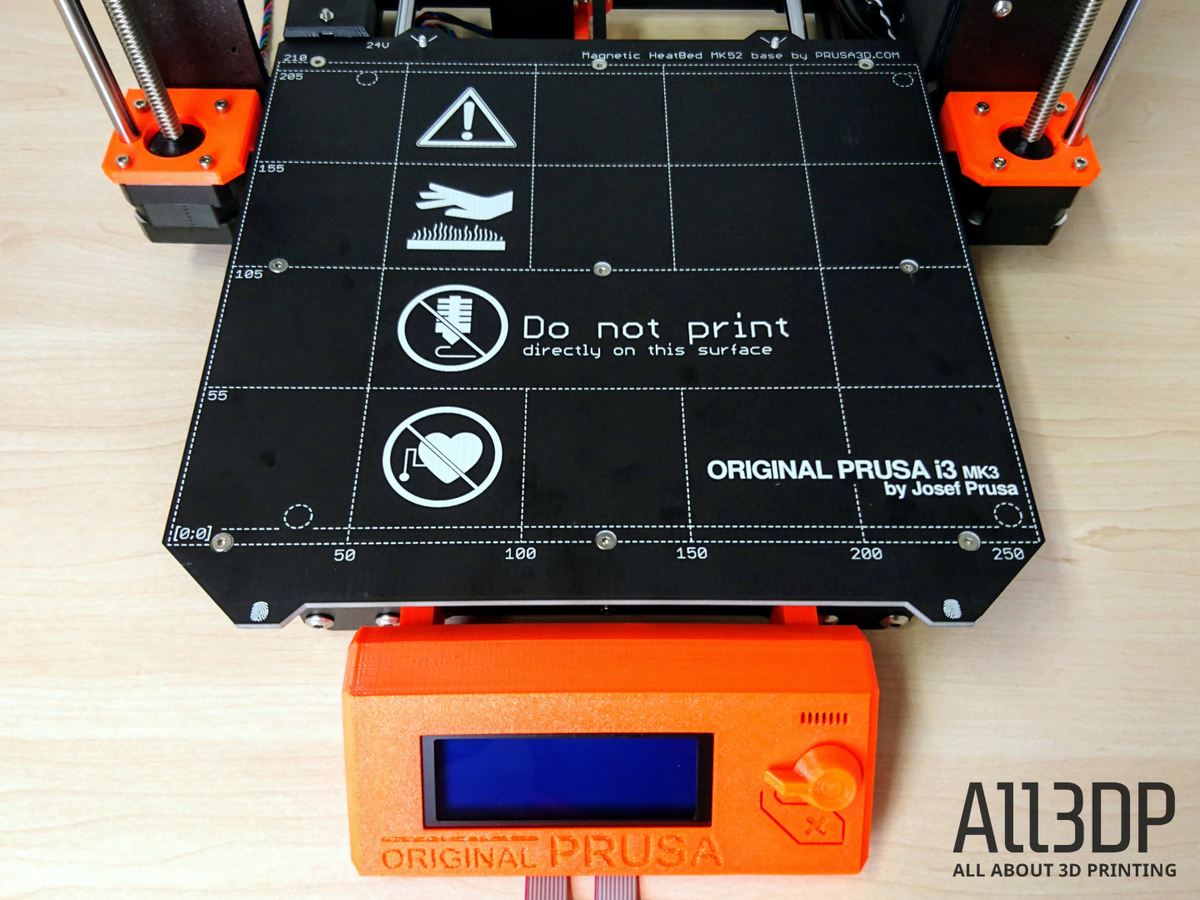
But perhaps the most obvious highlight of the Prusa i3 MK3 is the new MK52 Magnetic HeatBed, which holds detachable alloy spring steel sheets powder coated with PEI. As the sheet cools down, parts can be popped off by simply flexing the sheet inward.
Setup
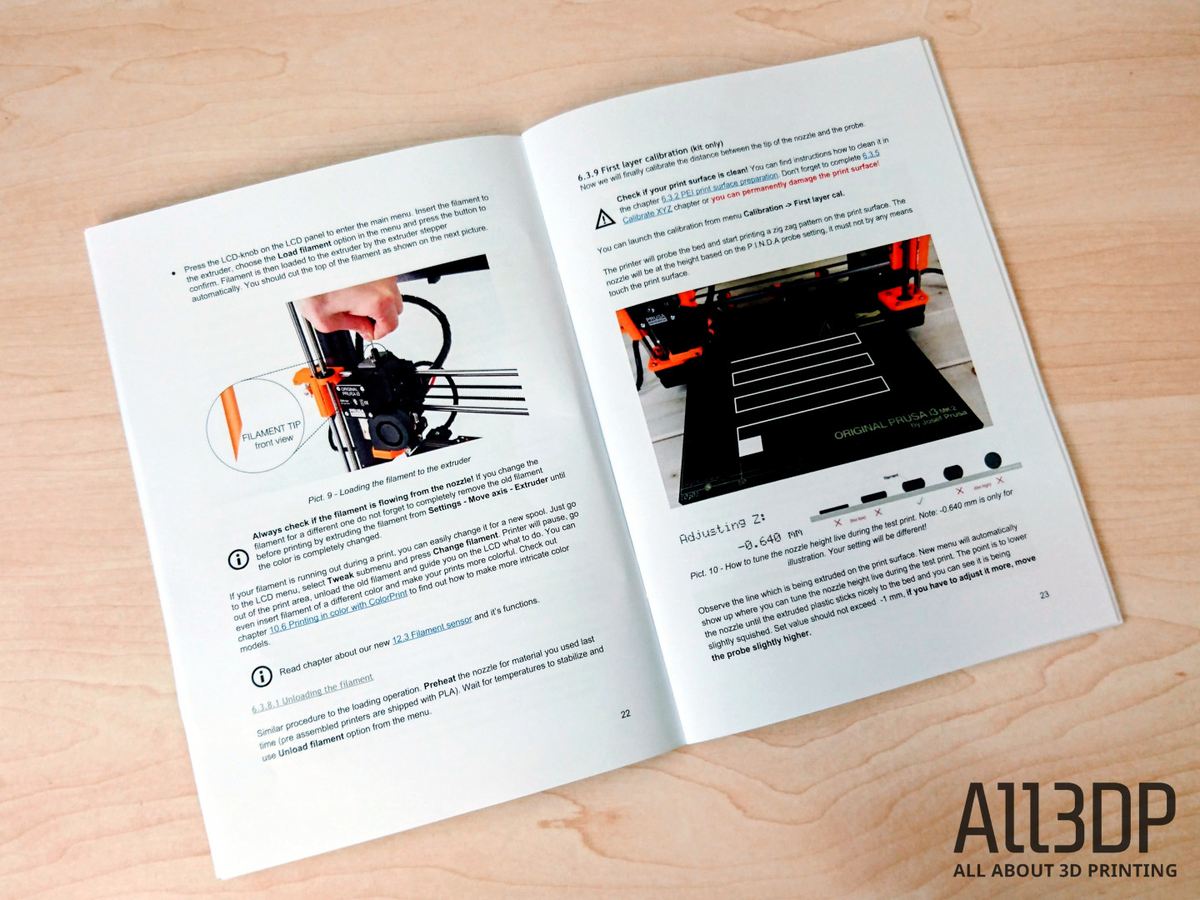
Whether you’ve bought an Original Prusa i3 MK3 in assembled or kit form, the bundled 3D printing handbook is a vital reference for your new 3D printer. It contains all the information you need regarding setup, calibration, printer materials and other FAQS.
The wizard setup and calibration stages are covered in the assembly outline below. But for advanced setup, we wanted to take a closer look at the three big draws of the Prusa i3 MK3; power panic, crash detection, and filament runout sensor.
To test these options on an ordinary 3D printer would be somewhat risky, perhaps even dangerous. So we would advise against attempting to do so on any machine other than a Prusa i3 MK3.

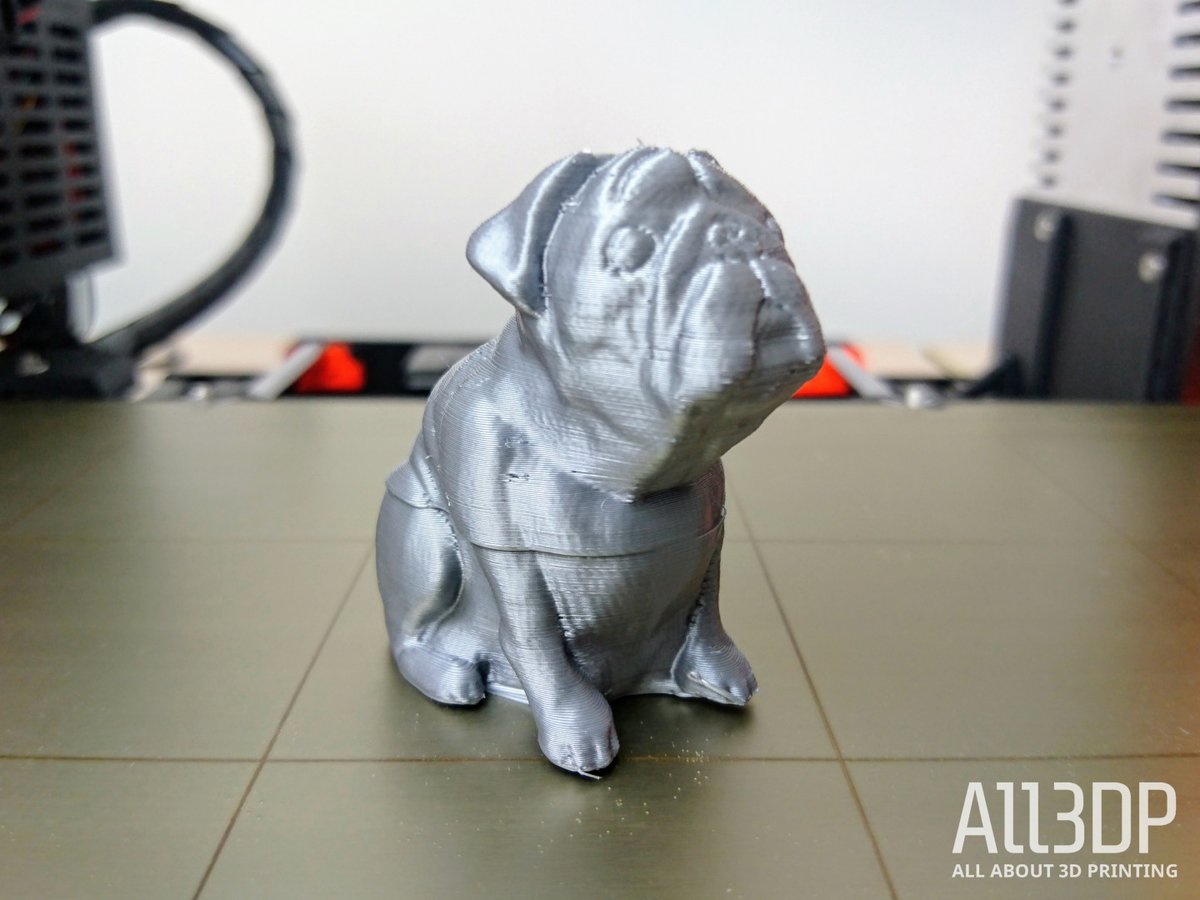
For the power panic feature, we hooked it up to a conventional power brick with an on/off switch. We commenced printing a model of Buddy, Prusa’s pet dog. After about 20 mins, we flipped the off switch and waited 30 seconds before turning it on again.
Lo and behold, the Prusa i3 MK3 immediately detected there had been a power outage and resumed printing exactly where it had left off. Impressive!
Continuing with Buddy for the crash detection, several volunteers in the ALL3DP workshop were invited to nudge, prod, or shift the print-head with their hands.
On multiple occasions, and without too much force being applied, the print-head detected a crash and immediately moved itself out of harm’s way to a corner of the bed. Moments later, it would attempt to resume where it left off. Again, damn impressive.
Finally, we subjected Buddy to one last humiliation. We snipped the filament from the spool and waited to see if the sensor would do its job. And yes, it did exactly that. In good time, the Prusa i3 MK3 paused itself with a beep, with a notification on the LCD screen that the filament needed replacing.
Some reports regarding the filament sensor are that it can be tricked into thinking there isn’t filament present if a bright light is shone overhead, or if printing with clear filaments. We weren’t able to repeat this problem by shining a torch, but the Prusa i3 MK3 repeatedly tripped up over a translucent blue filament we were using. When printing with translucent filaments, it’s better to switch the sensor off in the settings.
Poor Buddy. The final result looked a bit worse for wear. It wasn’t what you would call an optimal print. But the Prusa i3 MK3 completed the job and it was still recognizably a dog.
Printing Simple Items
During the assembly phase of the Prusa i3 MK3, we’d printed a healthy number of models that came preloaded on the SD card. These objects range from being simple, quick jobs to larger, more complex items.
They turned out very well and you can see pictures of the models in the Assembly section of this Original Prusa i3 MK3 review. But because they were preloaded and optimized for printing by Team Prusa, we have to discount them from assessment.
We feel it’s more honest to slice our own objects for printing and then presenting them as true samples of Prusa i3 MK3 capability. That said, we did stick to using the standard PLA filament that came bundled with the printer.
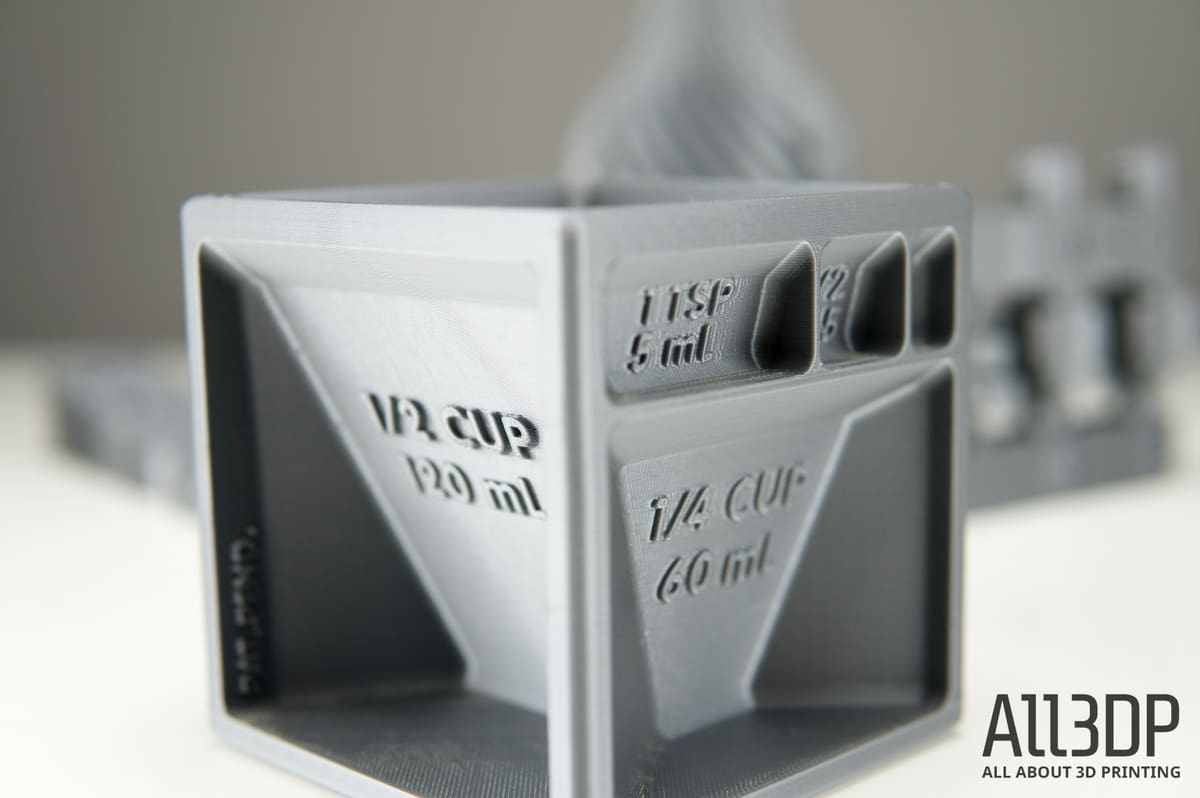
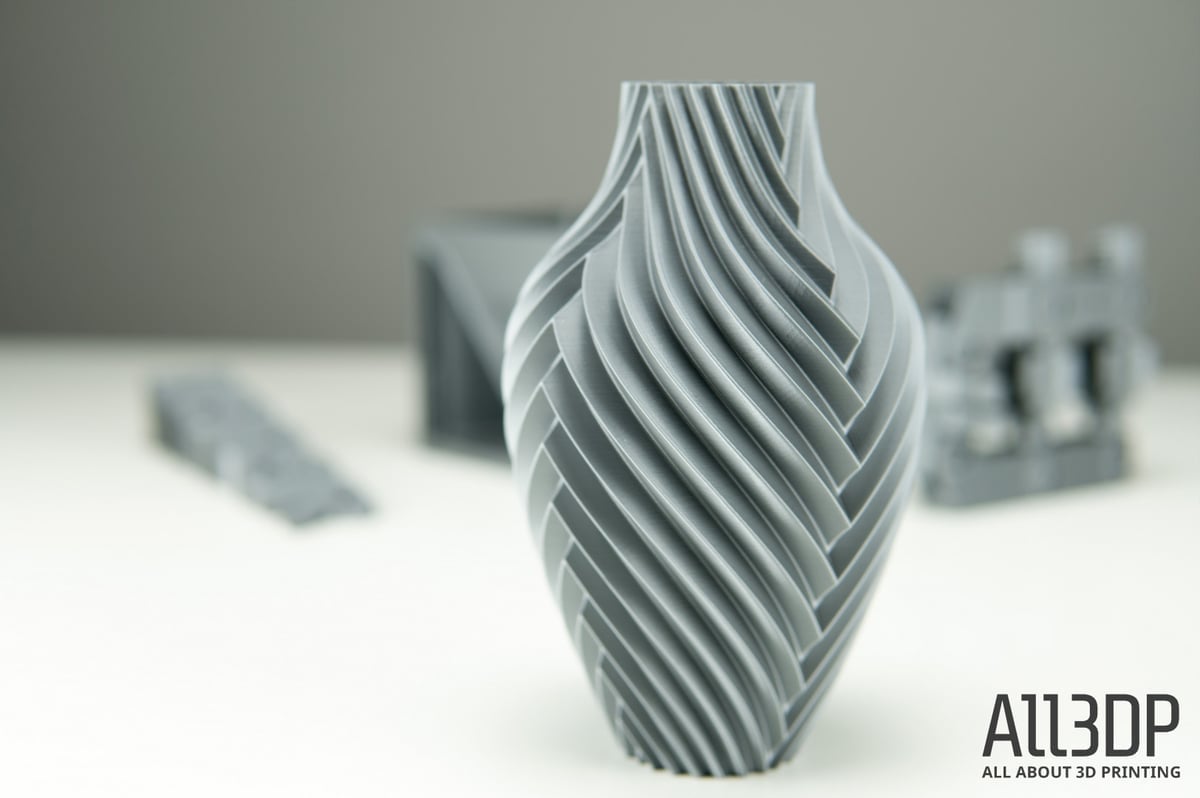
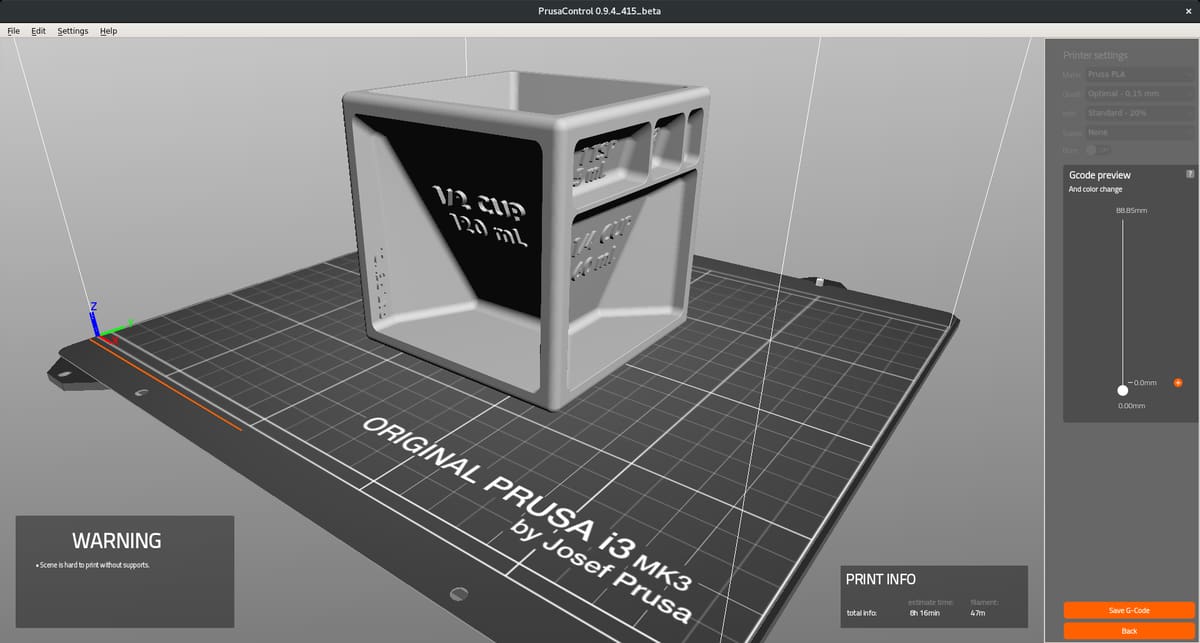
In terms of printing simple items, these are single part objects that don’t need too much precision in terms of fit and finish. We chose the Measuring Cube V3, a HODOR doorstop, and a Chromatic Vase.
Settings for all of them were 150 microns, with 20% infill for the cube and the doorstop. The print quality on all three was excellent, and in operation we found the Prusa i3 MK3 to be nimble and quiet.
The features of the cube came out in superb detail, where markings for cups and metric measurements need to be sharp and clear. We can’t really use it as a genuine kitchen aid because of food safety and objects made with FFF (microbes get stuck in the tiny crevices between filament layers), but it’s a functional proof of concept.
By comparison, the doorstop put the triangular infill to great use for enhanced strength and durability while still remaining light. The final object suffered a bit from elephant’s foot, but that’s because we had calibrated the first layer too close to the Prusa i3 MK3 print bed.
The vase is the most impressive of the bunch, a work of art that is simultaneously curvacious and angular. Except for a small first layer blemish, the result is veeeeeeeery close to being flawless.
Printing Complex Items
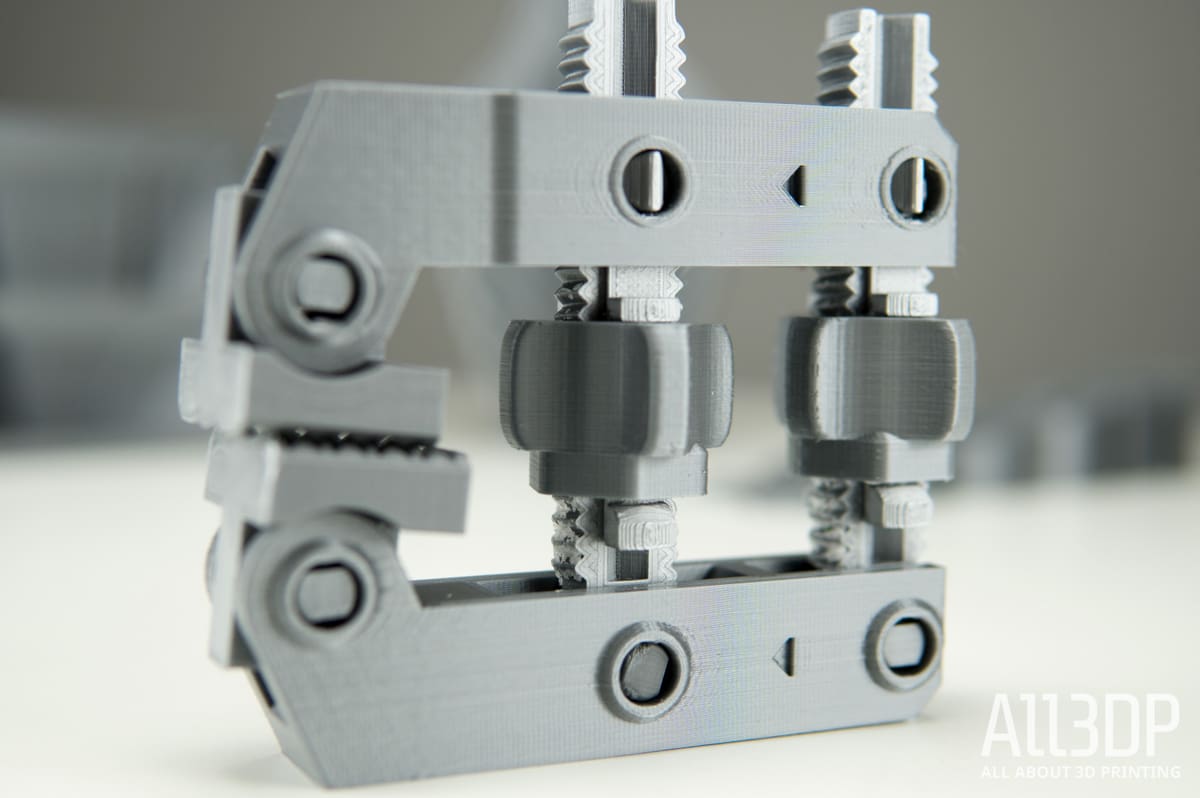
When it came to printing more complex items, we searched for multi-part objects that required assembly. This meant we could test for fit and finish of the individual components, and their dimensional accuracy.
For this task, we chose the Hand Screw Clamp. This is a 3D printable model of the type of clamp commonly used in woodworking and carpentry. It’s more of a proof of concept than a practical model for daily use. But it’s a very elegant design made from 16 parts of varying sizes, so it’s perfect for our needs.
For the initial attempt we stuffed all of the separate bits onto the Prusa i3 MK3 build plate, but this was not a successful strategy. The print job required too much time, and the chances of print failure were high with so many disparate elements on the bed.
So we opted to print one or two components at a time over a matter of days, at the standard 150 microns with 20% infill, and then assembled the object once all the pieces were done.
The finished item works exactly as envisioned by the designer. The objects fit together smoothly without a hitch. And although it’s a rather complex tool with a specialized use, it’s got us thinking about how better to improve its strength and practicality through the use of different filaments with different material properties.
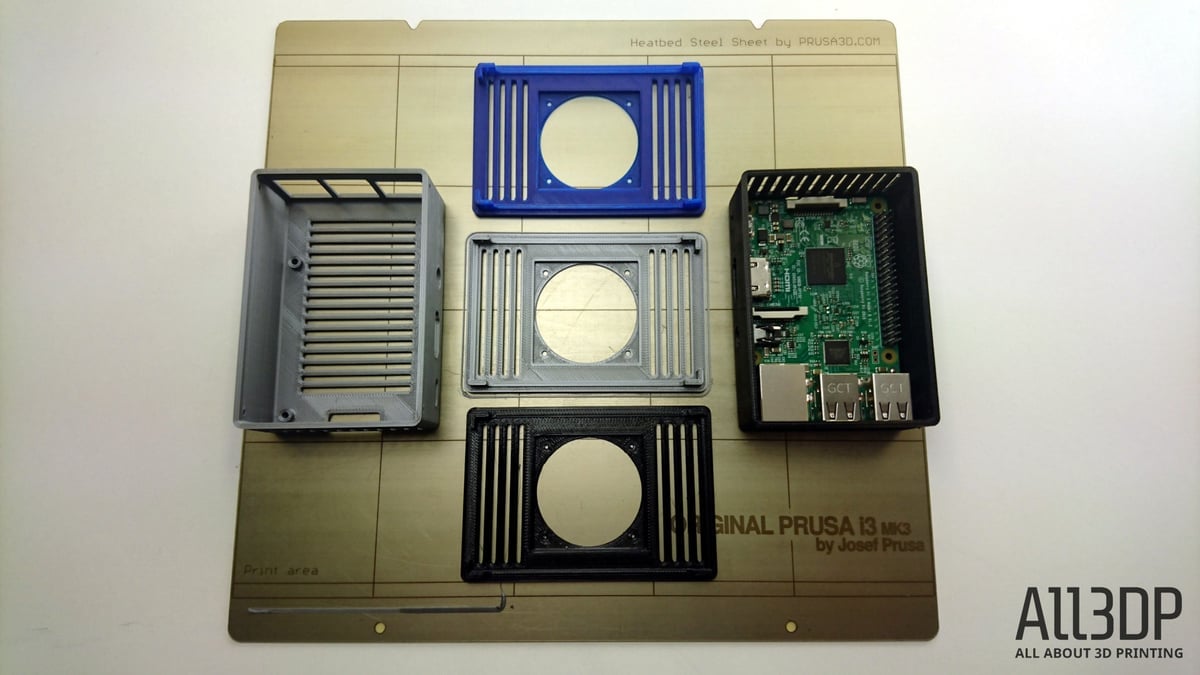
We also printed a Raspberry Pi 3 case, with a fitting for a cooling fan. This is a relatively simple two stage print job, but it requires dimensional accuracy for the components it must house and the screws holding everything in place. Happy to report, the model was fabricated as desired.
Software
Ah yes, software. Any Original Prusa i3 MK3 review wouldn’t be complete without a discussion of software.
Simply put, users have a lot of options when it comes to slicing their objects for printing.
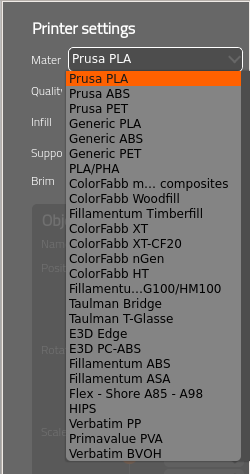
The first and simplest option is PrusaControl. This is a stripped back interface for plating your models. Pick a filament from a list of presets, tinker with the scale, orientation, line-height, and infill, and then generate your Gcode.
It’s a very good and effective solution, and it’s the software we used for the majority of objects printed for this Prusa i3 MK3 review. The only drawbacks we could see were that, if your requirements were ever so slightly more complicated, then you have to use something else.
To print the Chromatic Vase, for example, requires a special “vase mode” that’s standard in most other slicer programs. Without it, you’ll end up printing a solid object that won’t accept a flower no matter how hard you try. You won’t find this in PrusaControl, and it’s a curious omission.
Instead, we turned to the second, more complex option; Prusa3D Slic3r MK3. This open source slicing software most definitely has a vase mode. In fact, it has a hundred and one modes to toggle on and off, and it might be a little more daunting to use for absolute beginners. But it’s effectively the exact same platform as PrusaControl minus the stabilizer wheels.
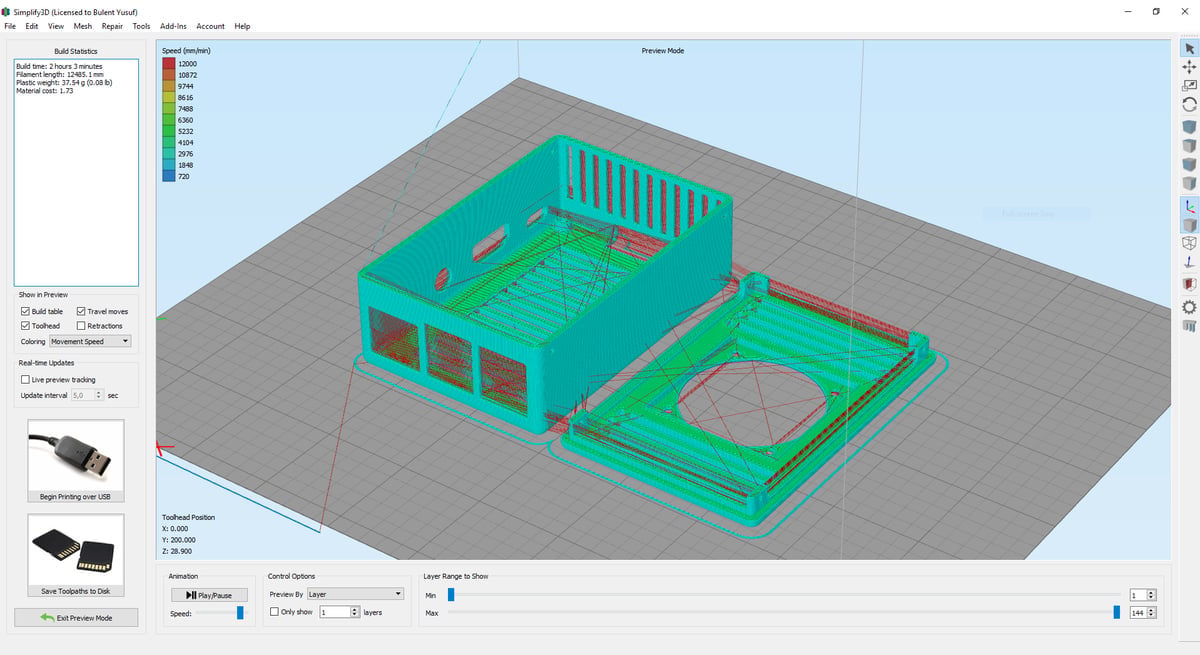
For a third option, we tested printing on the Prusa i3 MK3 using a paid software slicer like Simplify3D. It works pretty well; it has the necessary printer profile already pre-installed, and it’s perhaps more helpful if you’re experimenting with things like customizable supports.
Filaments
As mentioned already, we’ve mainly been printing with 1kg of grey PLA filament that comes bundled with the Original Prusa i3 MK3. There’s no label on the spool, so we’re not clear about the identity of the manufacturer of the filament.
After the volume of printing we’ve been doing, however, that quickly ran out. For the next stage of our testing, we’re alternating between a spool of Translucent Blue MatterHackers Build PLA and a spool of Black MatterHackers Build PETG. These materials don’t exist as a preset inside PrusaControl, so we fell back on using the generic preset for each and crossed our fingers.
Early results are promising, and not too divergent in quality from the bundled PLA. The Raspberry Pi 3 case with the cooling fan was printed several times using both filaments.
Two observations here; firstly, as noted previously, the translucent filament can trip up the filament runout sensor on the Prusa i3 MK3. It happened twice during one print job, to the point where we thought it was safer to switch the sensor off and resume printing without it.
Another wrinkle is that the first layer calibration wizard is optimized for PLA filament. Trying to calibrate with PET or ABS means the hotend temperature won’t be high enough for proper extrusion.
A small thing to pay attention to is first layer adhesion. This seemed to be hit and miss on the removable print bed with a PEI surface; but preheating the print bed and nozzle before commencing a job goes some way toward minimizing errors.
For the typcal user, you’re probably best off staying within the preset guardrails from PrusaControl to guarantee the optimal experience. These cater for a broad range of filament from reputable manufacturers like ColorFabb, Filamentum and E3D.
But then again, the combination of an E3D V6 Hotend and BondTech extruder should mean in theory that it can handle any material you throw at it. Go crazy!

Hackability

In terms of upgrades and hackability, Prusa Reseach already has a road map for the Prusa i3 MK3 at this early stage of its life-cycle.
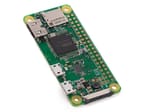
For starters, the new EINSY RAMBo board has a special accessory header for connecting aRaspberry Pi Zero W.
This is perfect for adding OctoPrint functionality to your Prusa i3 MK3; Team Prusa will provide a special firmware distribution for wifi connectivity from the printer LCD interface.
On a more ambitious scale is the multi-material extrusion upgrade, where you can feed up to four different filaments through a single print-head on your machine. Josef Prusa has been tinkering and refining this concept since the MK2, but it seems that the Prusa i3 MK3 is the more robust platform to build upon.
Briefly, the benefits of printing with more than one filament are more than purely cosmetic. Printing with secondary support materials which are soluble, for example, means that you can now fabricate objects with more complex geometry.
Finally, perhaps the greatest source of Prusa i3 MK3 hacks will come from Prusa Research themselves. The company is incredibly fast when it comes to iterating the design of the hardware or tweaking the firmware, and updates can come thick and fast.
This is because Team Prusa are their own best customers; they have a massive print-farm cranking out components for their printers, and they can immediately identify areas for improvement and know how to implement them.
Updating the firmware is always recommended. But tweaking the hardware (like a redesigned housing for the heated bed cabling) is more complex and you’ll have to make a judgment call on whether you want to make the effort to implement the fix versus your satisfaction with the way the Prusa i3 MK3 is currently working.
The Raspberry Pi Zero W extends the Pi Zero family and comes with added wireless LAN and Bluetooth connectivity.
Wrapping Up
The temptation is strong to score the Original Prusa i3 MK3 review with a perfect 10. It’s simply the best DIY 3D printer kit that money can buy. It’s quiet, it’s fast, and it’s a pleasure to use.
And its technological prowess is such that it would easily outclass a 3D printer at three times the price. Crash detection and power panic are great ideas that all 3D printers should offer as standard. And the removable print bed is something we didn’t know we needed to badly.
But we have to be objective in this Original Prusa i3 MK3 review, and there are one or two little problems that hold it back. The chief issue is that the filament sensor being fooled by translucent filaments undermines our confidence in its operation.
Granted, it’s an optional extra and certainly doesn’t prevent the printer from producing quality objects. And we fully expect the problem to be corrected in future production runs. But in the here and now, an error is an error and it shouldn’t be dismissed.
Are there any viable alternatives to the Original Prusa i3 MK3? At this price point and feature set, it would be pointless to even try. This is the 3D printer to buy if you’re looking for an affordable, sophisticated, and market-leading fused filament fabrication machine.
Original Prusa i3 MK3 Assembly: Part Two
We’ve had the pleasure to unbox and assemble a brand-spanking new Original Prusa i3 MK3 kit.
We want to share with you our experience of assembling it. And also, as we go along, to point out the key differences and improvements from the MK2S that we noticed. It’s been a wild ride.
We’ve taken pictures for each stage of the build. Please forgive us for the crappy lighting and out of focus shots. The immediacy of the build took priority over professional studio conditions.
Unboxing
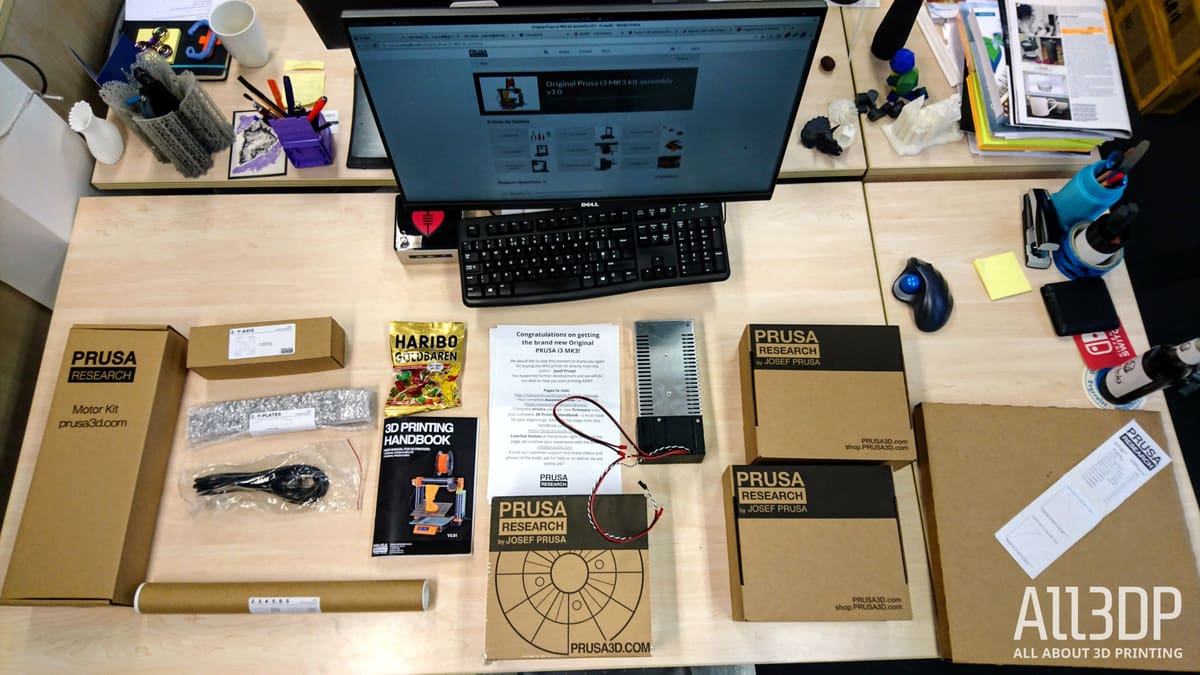
Excuse the messy desk. All the necessary components for the Original Prusa i3 MK3 kit are clearly labeled, securely packaged, and stamped with the Prusa Research logo.
Cracking open the boxes, you’ll find the components for each specific stage of assembly even further itemized. Some of them also carry QR codes, serial numbers, or ID stamps for the individual doing the picking and packing.
This kit is clearly the product of a thorough and complex operation at Prusa Research, and it’s hard not to feel daunted. Where to begin, exactly? What goes where? Can we start absent-mindedly start popping the bubble wrap yet?
Fortunately, there are two important items you’ll immediately find at the top of the box. The first is a packet of Haribo candy. The second is a note offering you congratulations on your purchase, plus information on where to find your instruction manual.
Also included are a set of essential tools for the task; a pair of needle-nose pliers, a set of hex keys, plus two screwdrivers and a large packet of plastic zip-ties (you’re going to be using a lot of them).
These instructions and these tools are everything you need. However, in building the Original Prusa i3 MK3 we would also suggest you source a pair of tweezers for handling the smaller components, and — don’t laugh — a dry towel for wiping sweaty fingers.
Y-axis Assembly
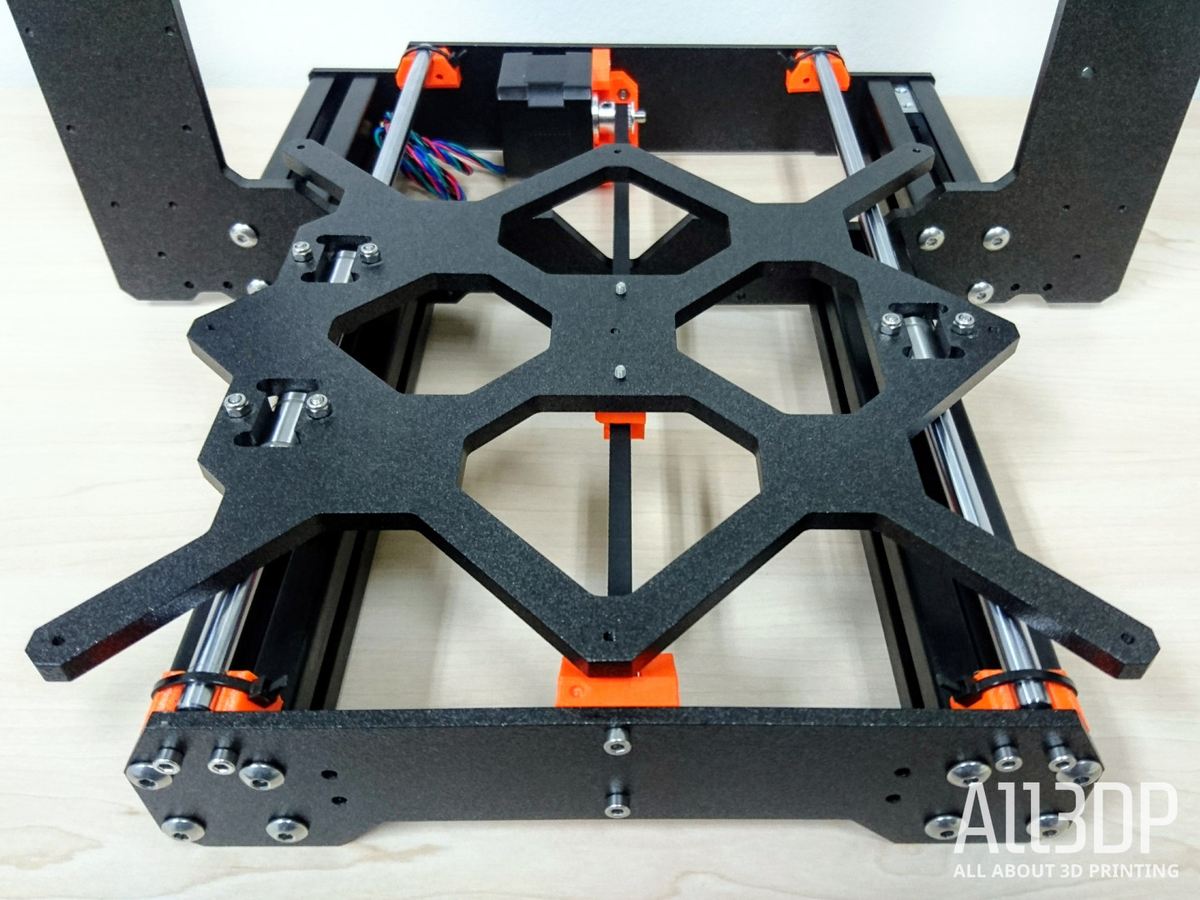
The first stage is to assemble the Y-axis frame, and this is where you notice one of the most obvious improvements over the MK2. The base of Prusa i3 MK3 is constructed from extruded aluminum rails and aluminum front and back plates.
This is a major step forward in frame stability and provides an extra 10mm of Z-height when printing.
This design change also means a new set of printed parts for the linear rails and the belt pulley, though the system of u-bolts to keep the linear ball bearings in place remains the same.
Most intriguingly, the end-stop switches are entirely absent from the Prusa i3 MK3. They’re no longer required for X/Y axis homing, thanks to the Trinamic2130 drivers on the new EINSY RAMBo motherboard. This is very welcome, not least because it simplifies the build process considerably.
One thing we noticed at the end of this stage was a handful of leftover nuts. According to comments on the instruction manual, other users have experienced the same. This isn’t a showstopper, however; the nuts are simply surplus to requirements.
X-axis Assembly

This second stage of assembling the Original Prusa i3 MK3 is perhaps the easiest, but some delicacy is required.
Putting together the X-axis involves a pair of linear rods, seven linear bearings, and an X-axis motor. What holds it all together are the 3D printed components, nuts and bolts, and judicious application of zip-ties.
Where you have to be absolutely careful is the rods and bearings themselves. They’re precision items, and any bending or careless handling will impact on the performance of the printer later on.
Comparing this stage of the build to the MK2S, meanwhile, we couldn’t see any huge differences in design or assembly. The only key change is the X-carriage itself, which has been redesigned to accommodate the new bells and whistles (not literally) of the Prusa i3 MK3.
At this point, we should mention quality control about the 3D printed components. While the surface of the new parts have a nice texture where they were printed face down on (we presume) the new magnetic beds, we noticed some niggling flaws here and there.
The redesigned X-carriage has a channel on the back to tuck away cables from the filament sensor, and here there are discernible fissures at the bottom of the channel. Since we’re talking about fused filament fabrication here, our diagnosis is that it’s not a problem with layer adhesion but with bridging.
It’s not so bad as to give us concerns about impact on performance, but it’s something to keep an eye on.
Z-axis Assembly
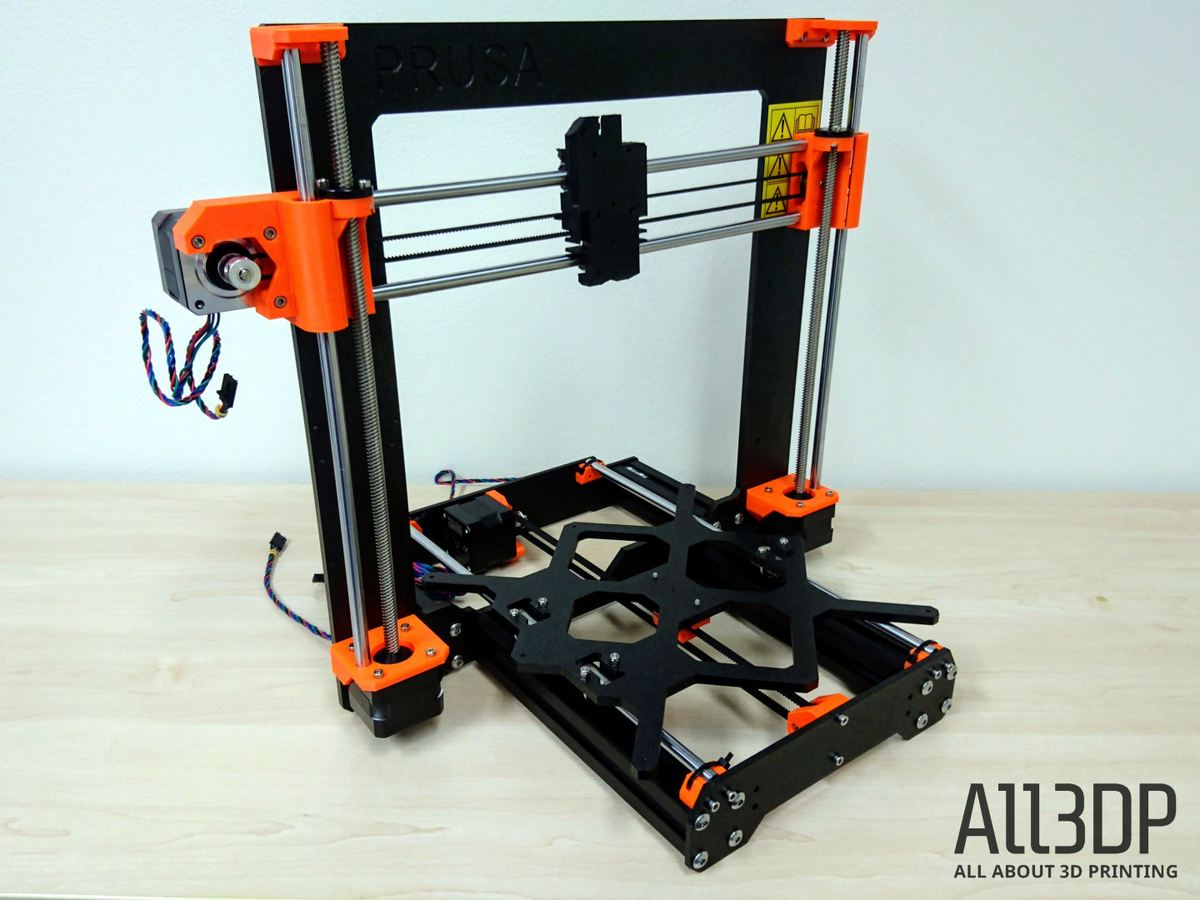
This is the juncture where we commence the Z-axis assembly, and this is the point where our labors start to resemble an Original Prusa i3 MK3.
What you have to do here is mount the X-axis from the previous stage to the Z-axis. That requires first mounting the X-axis motors on either side of the frame, and then the threaded rods and bearings, and then slapping the X-axis rails on top.
Well, not slapping exactly. The threads on the metal frame are very stiff and require a firm hand to screw the bolts in without breaking the 3D printed components.
That, plus ensuring the X-axis rails are perfectly level. Threading it too far in one direction would be catastrophic for the 3D printed components, causing them to crack.
Let’s replace the word “slap” with “gingerly mounting” shall we?
E-axis Assembly
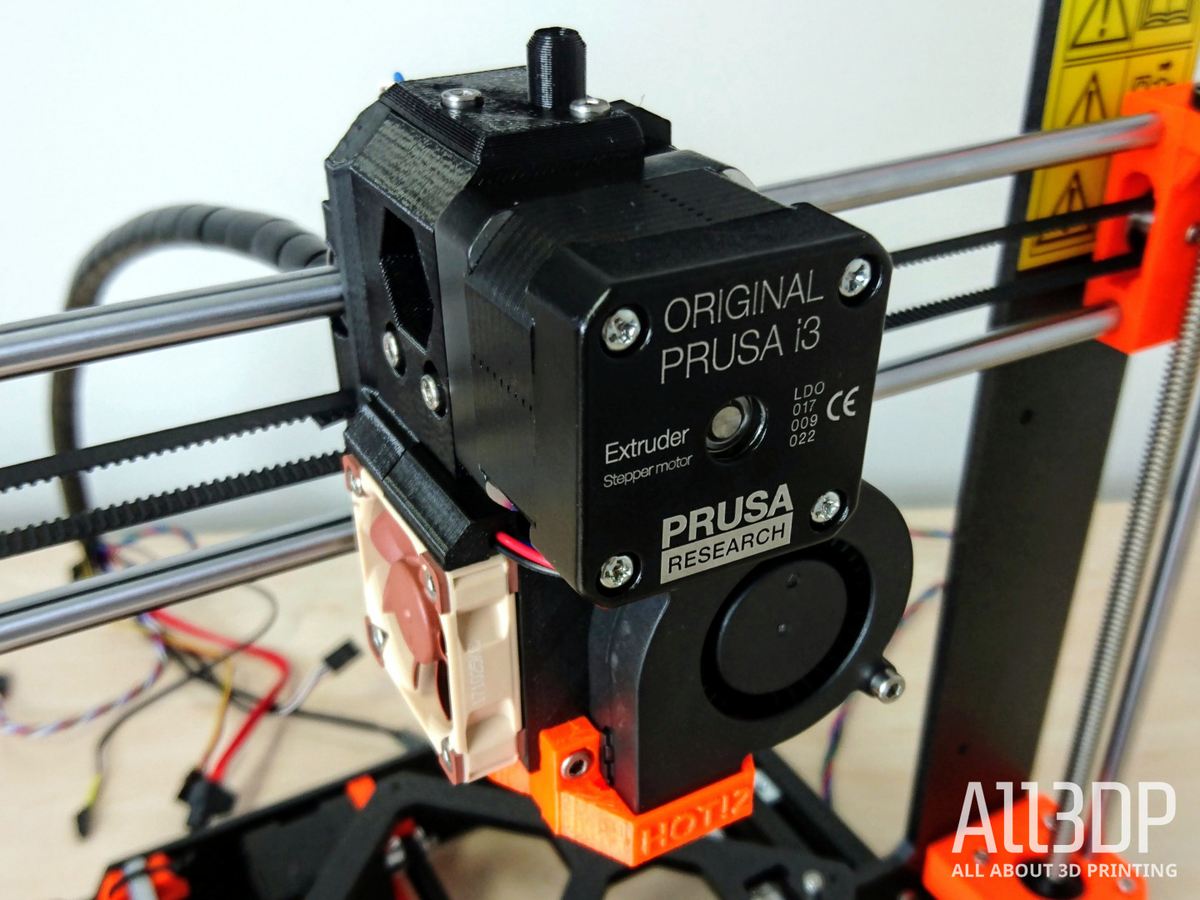
This fourth stage is the most labor-intensive and the most delicate, with the Prusa i3 MK3 manual specifying 48 steps.
One immediate gripe we had is that a lot of time was spent on the idler assembly stages. The tolerances for several components were extremely tight.
And wowee, if you have a fetish for proper cable management, then from here on out you’re going to be giddier than a swine in fertilizer. The guidance is extremely thorough.
All that said, the E-axis assembly is also our absolute most favorite part of building the Original Prusa i3 MK3. This is the point where you can really marvel at the design genius of Jo Prusa and his team, where so many disparate elements come together in harmony.
Just comparing the Prusa i3 MK3 version with the MK2S version, you can discern how much more elegant and yet more complicated it is, accommodating proven components like a Bondtech extruder, the E3D V6 hotend and the PINDA probe together with the filament sensor and the quieter fans.
At this stage of the Original Prusa i3 MK3 review, we can’t tell yet precisely how well things like the new filament sensor or the new fans are going to work. But the engineering is truly extraordinary.
LCD Assembly
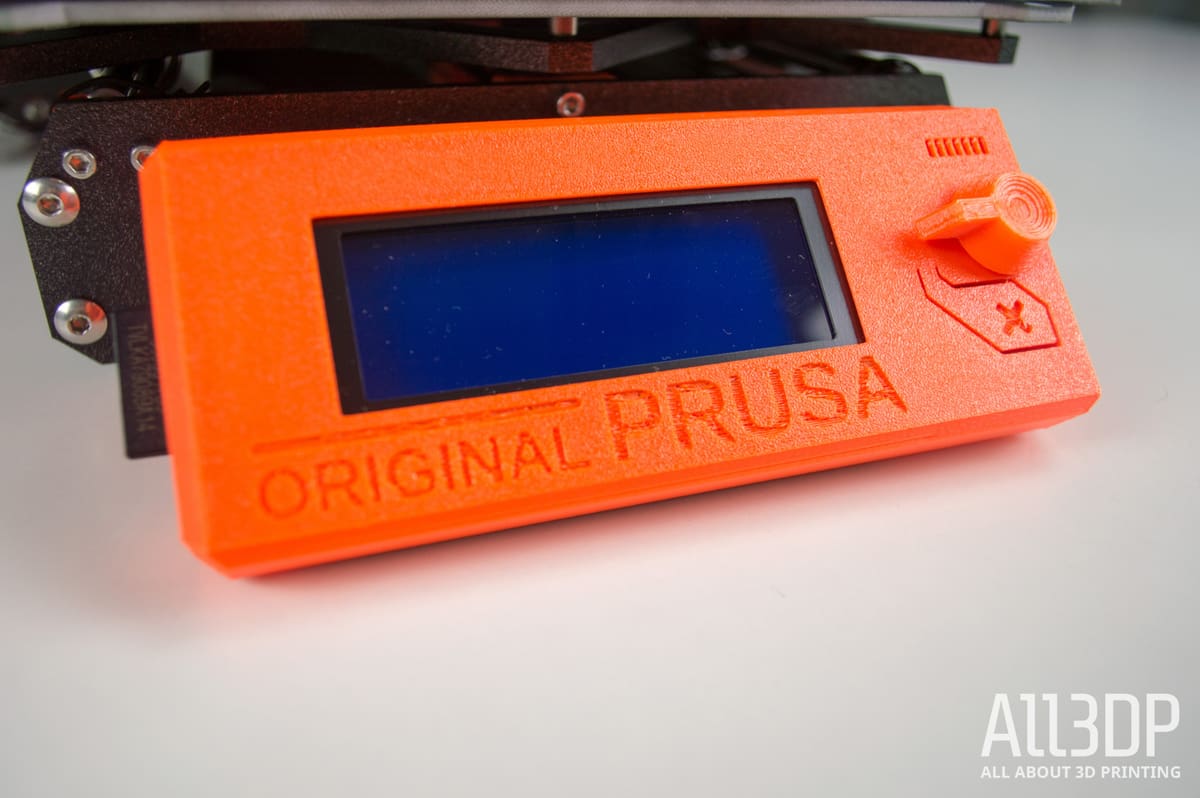
After the epic bout with the E-axis assembly, we move on to something considerably more relaxing.
The Prusa i3 MK3 LCD control panel is virtually identical to the version supplied with the MK2S. It’s a simple matter of inserting a combined circuit board and LCD screen into a plastic case, adding a button, and then mounting it to the front.
But for the second time during this build, we felt that the quality of the printed parts was lacking somewhat.
It’s the same problem as before; the control panel has been 3D printed face down, with a nice texture on the surface. But where the “Original Prusa” engraving is located, the bridging between the embossed characters is ugly. Holding this part up to a light source, you can clearly see through it.
We would guess that the remedy would be to print it again, but thicker. Or slower. Or we might just swap out the case from the MK2S instead. This should be a very easy thing to fix.
Heatbed and PSU Assembly
The most important thing about tackling a DIY 3D printer kit by yourself is to maintain a good sense of humor. And it certainly helps when the kit itself provides some entertainment of its own.
Tucked away on the underside of the heated bed of the Original Prusa i3 MK3 are lots and lots of magnets. Super-strong magnets, to hold the removable metallic print bed in place, which is another new feature of the Prusa i3 MK3.
At this juncture, we were delighted to find a nice little Easter Egg.
“STRONG MAGNETIC FIELD. NO PACEMAKERS, METALLIC IMPLANTS OR NEUROSTIMULATORS.”
Not quite sure what a neurostimulator is; but you don’t want to handling this item whilst wearing a mechanical wristwatch.
The rest of this stage is nice and easy; affix the heated bed and power supply unit to the frame. Some basic cable management comes into play. No problems to report.
In terms of design changes, the big difference here is that the Prusa i3 MK3 now has 9 screw points to hold the bed flat, compared to 6 screw points on the MK2S.
Electronics Assembly
Phew, this stage is the second most complicated after the E-axis assembly. Taken together, the cable management and wiring the electronics board is very much akin to performing open heart surgery (we would imagine).
For the first part, liberal applications of zip ties are needed for wrestling the cables into submission, but there’s a logical (and lengthy) process outlined in the instruction manual.
For the second, you need to plug the ends of those cables into the board and do so without pinching the cables or plugging it into the wrong sockets. Of particular importance are the cables from the power supply unit and the heated bed.
A steady hand is required, as is a rigorous observation of the guidelines, so dial back on the caffeine a notch.
Key differences in the Prusa i3 MK3 from the MK2S are that the RAMBo cover has been subtly redesigned with more cooling vents.
And of course, the RAMBo board itself, which is completely brand new. There are actually two versions of this board in the wild; our version of the motherboard has a daughterboard attached, to accommodate new connectors from the LCD control panel.
Once we were done, it took some effort to close the lid on the whole tangle of wires. Considering that you’re supposed to be able to add a Raspberry Pi Zero W at a later stage for OctoPrint and wireless connectivity… Well, we’re not sure how we could get one to fit in there, regardless of how tiny it is.
And with that, the build of the Original Prusa i3 MK3 is now complete. But there’s still calibration and test prints to come.
Calibration
It’s squeaky bum time. Because while building a Prusa i3 MK3 is definitely an achievement in itself, the calibration and self-test is where you learn that everything has been assembled correctly. And if you find that it isn’t, then that’s the cue for a bit of head-scratching where you try and troubleshoot.
First are the preflight checks; before you plug in and power-up the Original Prusa i3 MK3, you have to adjust the PINDA probe to the correct height in relation to the hotend.
This bit is delicate, because it requires you manually lower and move the hotend on the Z and X axes, and you have to be careful not to score a deep groove into the heat-bed with the hotend.
Next, you power up the machine and check that you have the latest firmware. If you don’t, then you must source the latest drivers and firmware from Prusa Research and follow the instructions for the update process.
A curious wrinkle here is that Windows and MacOS users are well catered for, but Linux users have to jump through a few more hoops. Since this is open source hardware, we expected the open source software support to be more sophisticated.
Finally, you can initiate the setup wizard from the LCD control panel. This is where the Prusa i3 MK3 runs a series of self-tests and calibrates itself on the XYZ axes. Once those are passed, you’re prompted to load up the supplied filament and run some real-time adjustments.
All in all, the process is rather painless. If you’ve followed the build guide properly AND if there isn’t a catastrophic failure with the electrical components — and there won’t be, since every kit is issued with a testing protocol — then you’re going to be okay.
Simple Test Prints
So now we’re ready to print. The SD card comes preloaded with lots of models that have been pre-sliced by the team at Prusa Research, so it’s a case of taking your pick from what’s available.
We opted for three small but simple models for the first stage of test printing. We just need to ensure that the Prusa i3 MK3 is operating in principle. So all that’s required is printing something fast and easy.
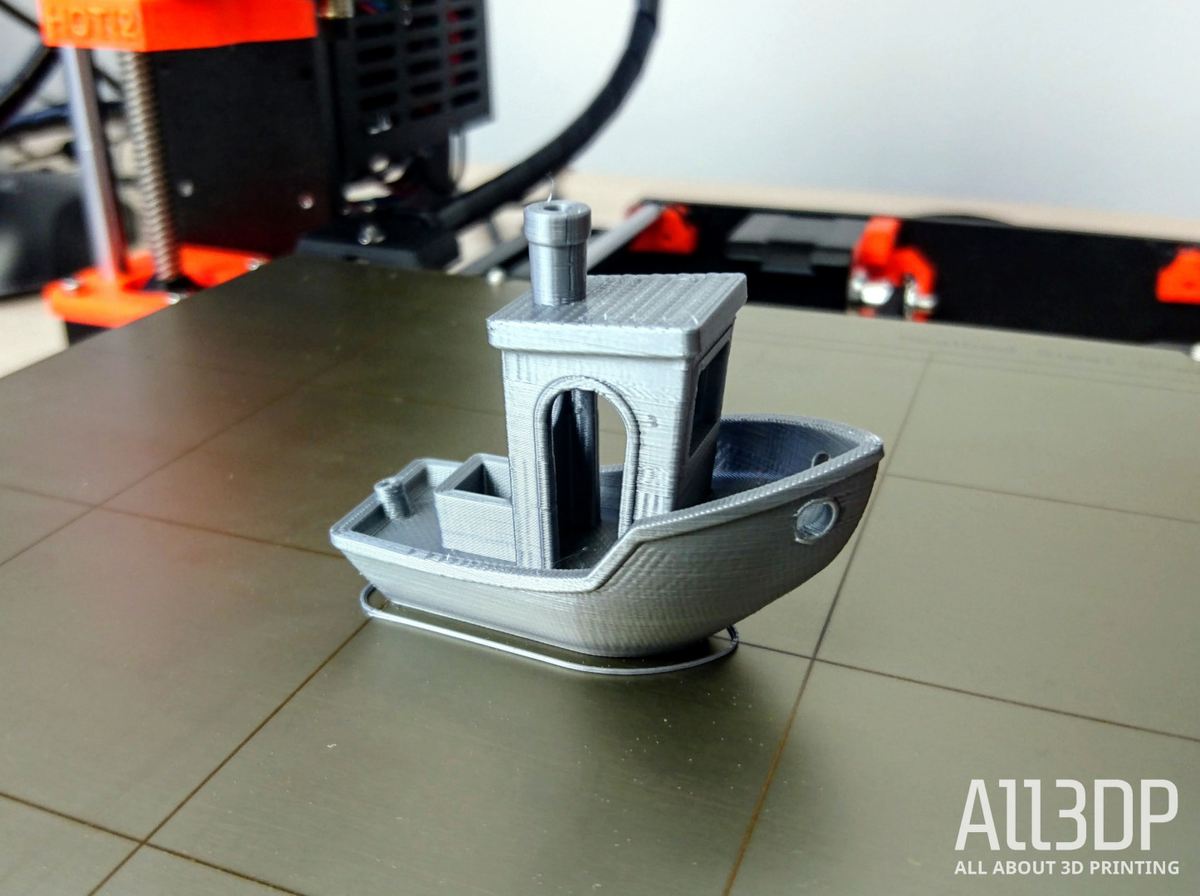
So what have we made? First is a simple Prusa badge. Second is a 3DBenchy, pictured above. Third is a small but cute model of Buddy, Josef Prusa’s pet dog.
Seeing the printer in action is a real delight, and some primary observations are as follows; firstly, the Prusa i3 MK3 is very very fast; secondly, it’s very very quiet; thirdly, the removable bed makes popping off the prints an absolute breeze.
The 3DBenchy wasn’t totally perfect; there was some warping on the prow. And little Buddy is suffering from layer shifting. We suspect the latter happened because we activated “stealth” mode in the settings; this provides the benefit of silent operation but also deactivates the shifted layer detection in the Trinamic drivers.
Not perfect, but the important thing right now is that it works. High fives all round.
Advanced Test Prints
A-ha! Bet you though were done with test printing, eh? So were we, truth be told. But a string of firmware and driver updates came down the pipe from Prusa Research, so we felt obliged to run a few more.
We decided to be a bit more ambitious this time out, and opted to print some bigger, more detailed models that took longer to make.
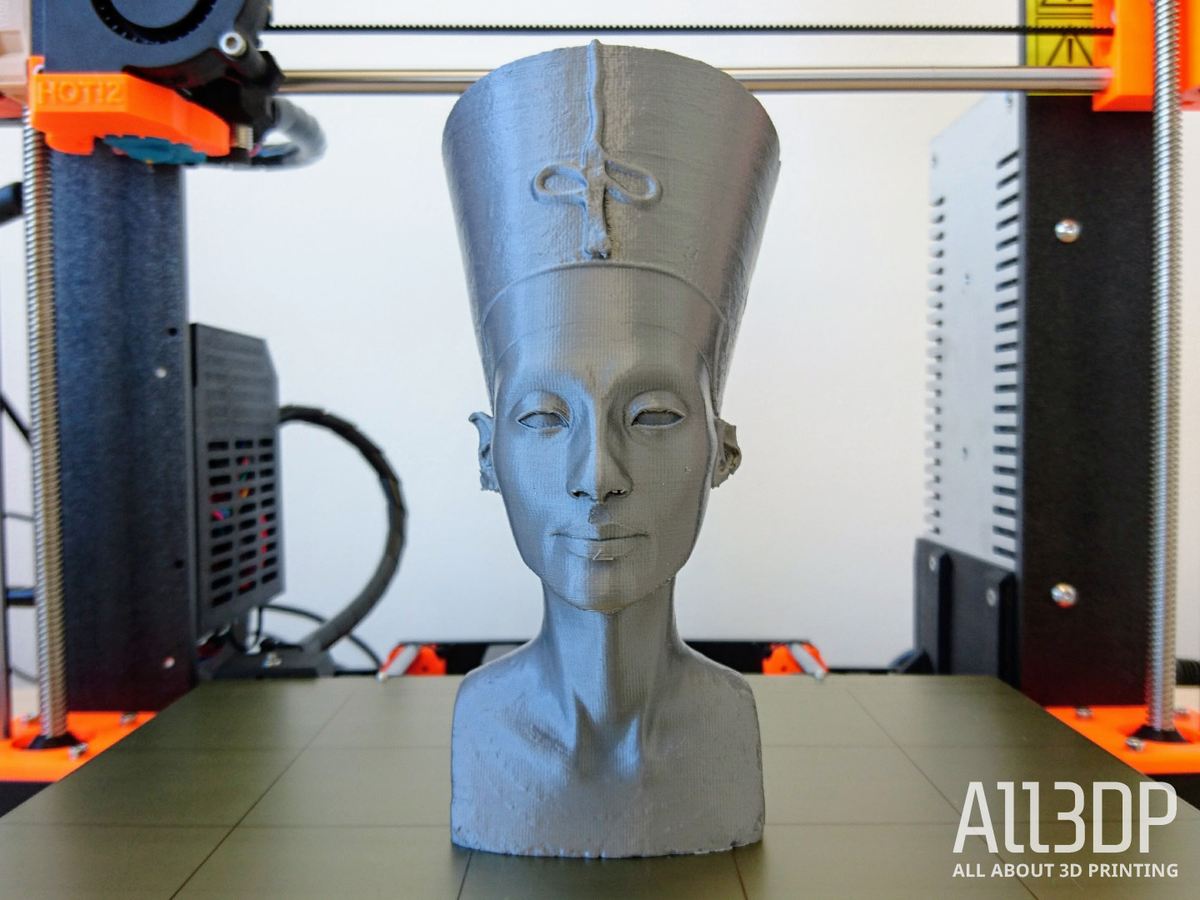
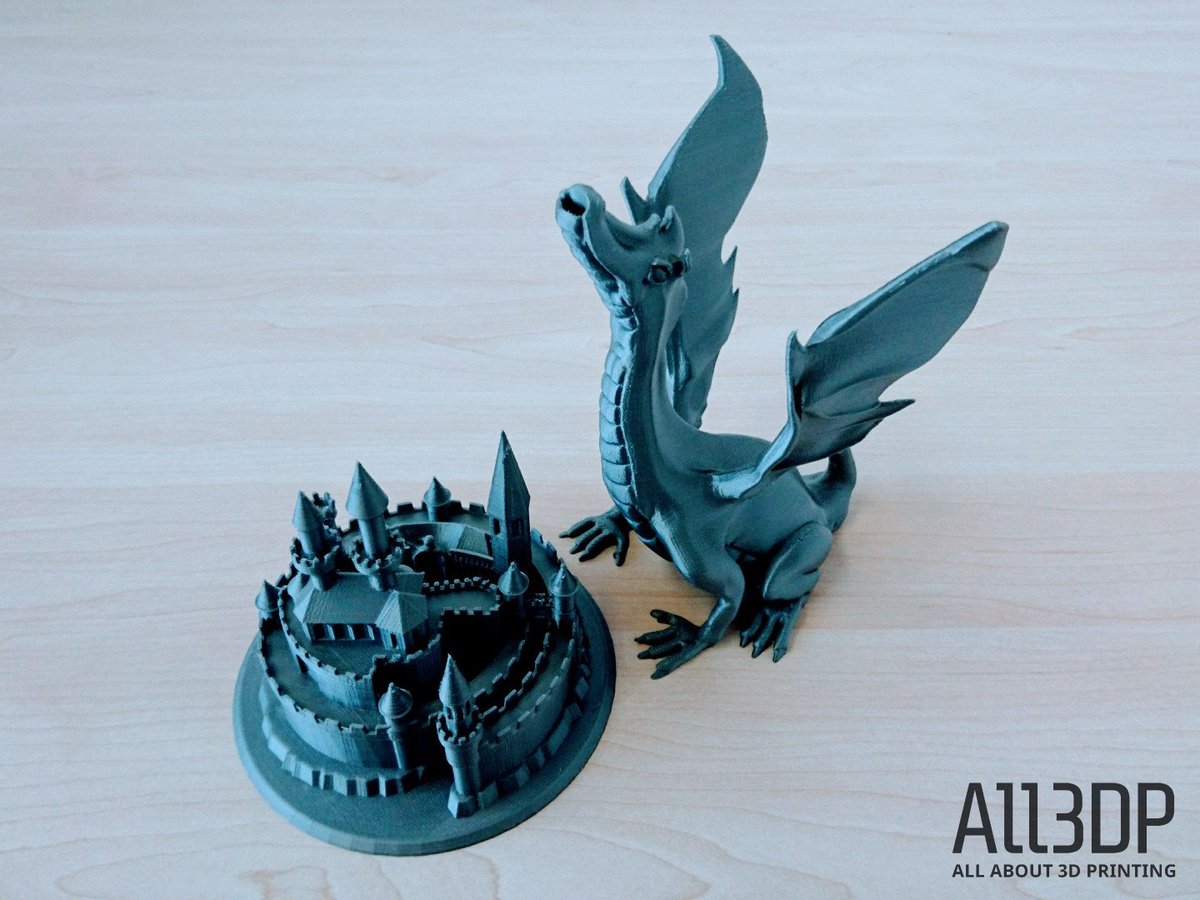
Preloaded on the SD card is the bust of Nefertiti (a 3D scan of the real thing obtained by dubious means), a beautiful singing dragon named Adalinda, and a fairy-tale castle straight outta Disneyland.
Interesting to note is that, since the Prusa i3 MK3 firmware update (and despite these prints being much more demanding), the quality of the results were outstanding. Prints were fast, clean and quiet.
Also worth mentioning is the infill being employed; it’s a three-dimensional triangle pattern we haven’t seen before, which is engineered to be strong and durable. Watching it being formed layer-by-layer is hypnotic.
Fine-tuning and slicing our own models using the PrusaControl software comes later in the full Original Prusa i3 MK3 review.
Pricing and Upgrades

In terms of pricing, the Original Prusa i3 MK3 retails in kit form for around $900. Its predecessor the MK2 is also available in kit form for around $725.
Prusa Research is also offering a series of upgrade kits for owners of the MK2 and MK2S models. You can review the full set of options here.
Referring to our specific experience, potential upgrades for the Prusa i3 MK3 would concern the 3D printed parts themselves. We’re not suggesting that the parts that come with the kit are faulty, but there were some minor quibbles over quality control. And there’s always a chance of breaking a piece during the assembly process if you apply too much force.
Fortunately, if you already have access to a 3D printer you can easily print off a spare set. And with the new version control system implemented with this generation, you’re always going to know whether you have the most current set of parts for the Original Prusa i3 MK3.
We’ve been given to understand that the factory parts are printed in PETG material, so you probably want to stick with that. Though ABS is also a viable material since that was used in previous models. And if you have money to burn, you could even get them made with laser-sintered nylon. That would be awesome.
Another suggestion would be to swap the linear ball bearings on your Prusa i3 MK3 for polymer ones. Doing so will dramatically cut down on the amount of noise generated by your 3D printer. They can also be used dry without the need for lubrication. It’s a very simple but effective upgrade.
Finally, a small upgrade to the E3D V6 hotend would be to procure one of those blue silicon socks. It’s really good for keeping the hotend clean and prevents grimy bits of charcoal from futzing up your prints.
Final Thoughts

First and foremost, we’d like to raise a glass to Jakub Dolezal for his fantastic work as a technical author. He’s produced a set of instructions to assembling the Original Prusa i3 MK3 that are legible, clear and free from error. Thank you, Jakub!
At no point where we left scratching our heads or wondering what to do next. Moreover, the structure of the guide is such that other users can contribute comments or feedback; more often than not, this feedback goes upstream into either improving the guide or improving the design of the printer.
Which brings us to another important point about building the Original Prusa i3 MK3; witnessing iteration in action. In studying the construction of both the MK2S and the MK3, it’s clear that there is some serious design evolution at work.
Josef Prusa and his talented team are not content to rest on their laurels, they’re constantly striving to deliver the best 3D printer they possibly can. Here at ALL3DP, we’re cautiously optimistic that the Original Prusa i3 MK3 may well be that printer.
License: The text of "Original Prusa i3 MK3 Review: Best 3D Printer of 2018" by All3DP is licensed under a Creative Commons Attribution 4.0 International License.
CERTAIN CONTENT THAT APPEARS ON THIS SITE COMES FROM AMAZON. THIS CONTENT IS PROVIDED ‘AS IS’ AND IS SUBJECT TO CHANGE OR REMOVAL AT ANY TIME.