This article is free for you and free from outside influence. To keep things this way, we finance it through advertising, ad-free subscriptions, and shopping links. If you purchase using a shopping link, we may earn a commission. Learn more
Best Budget 3D Printer
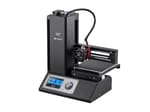
Monoprice MP Select Mini Review – Great Value for Money
You love the Monoprice Select Mini. We love the Monoprice Select Mini. Everyone loves the Monoprice Select Mini.
The price-tag is the most delightful thing about this 3D printer, where it can be often bought for around $219 or less. But the feature-set is pretty awesome too, providing some modestly decent prints with push-button operation.
So to provide a comprehensive and detailed overview of this excellent little machine, we’re splitting this article into two parts.
The first half is a straight-up review of our experiences using the Monoprice Select Mini. The second is a set of tips and tricks for getting the most out of it in daily operation.
The two parts together will provide you with a complete overview of the advantages and disadvantages of using a Monoprice Select Mini.
Important to note: the contents of this article are expressly concerned with the first iteration of the Monoprice Select Mini, officially known as the Monoprice MP Select Mini V1. There are some minor differences from the Monoprice MP Select Mini V2, which are detailed later in this review.
Monoprice Select Mini V2
Commissions EarnedCheck price at
and
Part One: Monoprice Select Mini 3D Printer Review
The most detailed Monoprice Select Mini 3D printer review in the whole wide world ever, covering features, design, setup, printing, software, filament, and much more.
The Monoprice Select Mini 3D printer is very impressive for the price. It has a heated print bed; it’s very simple to operate; and it produces reliable and consistent prints.
The machine isn’t perfect, of course. There’s a curious anomaly with variable temperatures while the hotend is in use, and it tends to fail if printing at high speeds. The calibration process of Monoprice Select Mini is a bit of a pain in the bum. And the supplied AC power brick died within 12 hours.
But once it’s up and running, the Monoprice Select Mini is a marvelous little machine that packs in a great many features. It generally works as described, and the quality of the models we printed surpassed our expectations.
The Monoprice Select Mini is also hackable, for those who are brave enough to pop it open and make some upgrades. Changing the hotend and upgrading the firmware would be the first priority, and then perhaps laying down some glass for the print bed. You could add those features and still have change from a more expensive 3D printer.
Would we recommend the Monoprice Select Mini to a first-time user? Yes, definitely. Approach this 3D printer with an open mind, and you’ll be pleasantly surprised.
The price of a desktop 3D printer just keeps on tumbling. Once upon a time, we would gibber with excitement if a decent 3D printer carried a price tag less than $600. But as the technology continues to mature, designers and manufacturers continue to find ways to bring the price even lower. Case in point is around $200 for a Monoprice Select Mini.
Important to note is that this micro-budget 3D printer bucks the prevailing trend in one critical way. The Monoprice Select Mini didn’t start life as a Kickstarter project.
Other 3D printers like the M3D Micro, Snapmaker and Trinus have all flourished on crowdfunding platforms, where their asking price was the cornerstone of their marketing plan.
It’s an effective strategy, with backers eagerly making pledges for early-bird specials. But there is often a substantial gap between the completion of the campaign and the delivery of the final product (or the establishment of a customer service team).
Monoprice, by comparison, is a US technology company that didn’t even bother to design and manufacture their own 3D printer. They simply imported the Malyan M200 3D printer from China, rebadged each unit to carry their logo, and then offered them for sale at an incredible $199 price tag. And if you got yourself a buggy machine? No problem, send it in for a replacement.
Can such a cheap 3D printer hold its own against the Ultimakers and Printrbots of this world? Is it even a fair comparison? To find out, we bought a Monoprice Select Mini and put it through its paces.
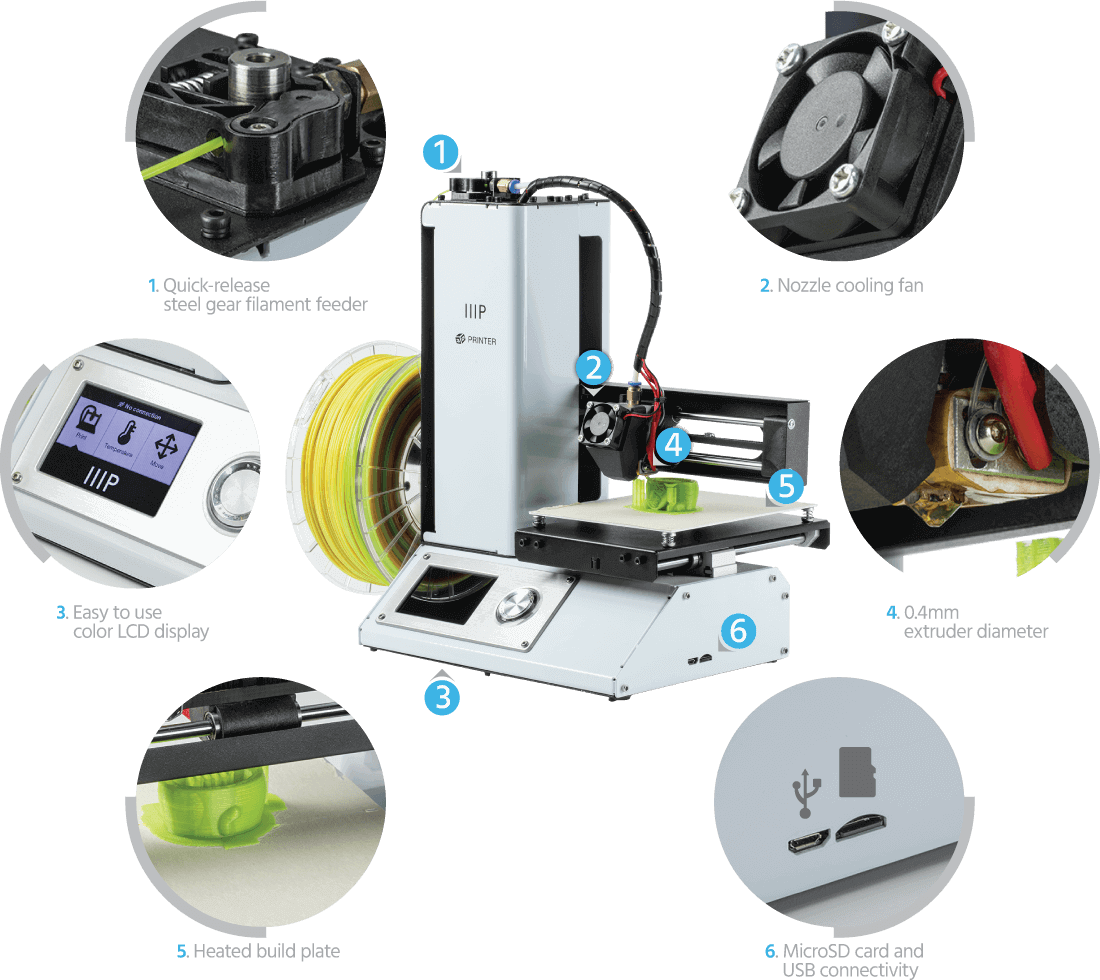
The topline specs for the Monoprice Select Mini 3D printer are a build area of 120 x 120 x 120 mm, which is roughly the height of a can of Coke. The highest print resolution is 100 microns, with a heated build plate, and a printing speed of 55 mm per second.
Files can be uploaded to the Monoprice Select Mini via a microSD card slot or a USB connection. The manual says that compatible slicing software — the application you’ll need to use to prepare objects for printing — is Cura, Repetier-Host, ReplicatorG, and Simplify3D.
What this means is that the Monoprice Select Mini can parse standard GCode, and is not confined to proprietary software. For the purposes of this review, we used Cura.
Similarly, the Monoprice Select Mini doesn’t require special filament and can accept any standard 1.75 mm spool of PLA or ABS thermoplastic. For our testing, we opted to use ColorFabb PLA in sky blue.
The two aspects concerning software and filament are incredibly rare at this price level. Other 3D printing manufacturers like M3D Micro and XYZprinting tend to impose closed software or filament, which locks you into their operational ecosystem for the long-term.
The setup of the Monoprice Select Mini 3D printer is fairly easy. You should be up and printing within 20 minutes or less.
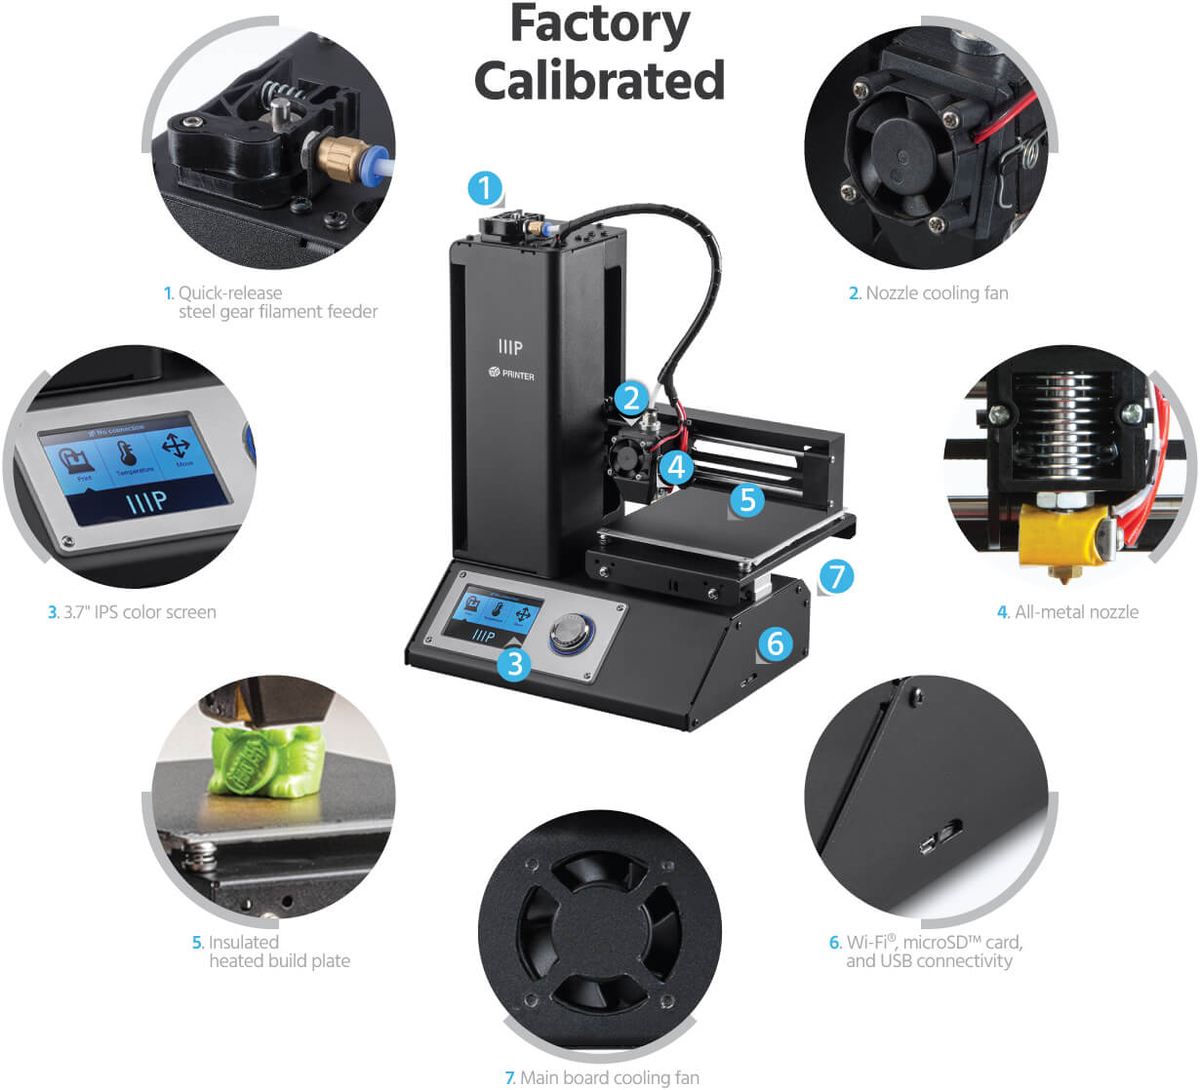
Inside the box you’ll find the printer, an AC power adapter, a hex key for leveling the bed platform, a dinky plastic spatula for scraping prints off the bed, a microSD card with 256mb storage capacity, and a micro USB cable.
A scrap of paper has basic setup instructions and then points you towards a URL where you can download the full manual for Monoprice Select Mini.
There’s also a rectangular length of folded sheet metal inside Monoprice Select Mini, and its purpose is not immediately clear. Turns out it’s a spool holder that clips onto the side of the main unit.
Important to note is that the Monoprice Select Mini doesn’t come with any filament. Make sure you have a 1.75 mm spool of your favorite material ready to go, or order it at the same time as the printer.
For setup stage, you have to navigate a full-color LCD interface with a click-wheel. The menus are clearly structured and well thought out. Via the interface, you initiate the process of calibration, preheating the hotend, and then loading up your filament.
The calibration is a bit tricky; this is supposed to have been set at the factory, and you should be able to slide a sheet of paper between the print bed and the hotend. If you can’t, you have to use the hex key to tweak the springs at each corner of the print bed. This can take some time before you get it juuuuust right.
Which brings us the first quirk (of many); the heated bed of the Monoprice Select Mini is an aluminum plate with no protective covering except for a sheet of builders tape. This tape is quickly going to degrade over prolonged use, so you should ensure you have a roll of tape ready to replace it as and when you need to.
The next quirk is that the AC power adapter on our Monoprice Select Mini died within 12 hours of use. This was incredibly annoying, but relatively easy to replace with a generic power adapter for around 30 bucks or so. Something to be aware of in case it happens to you…
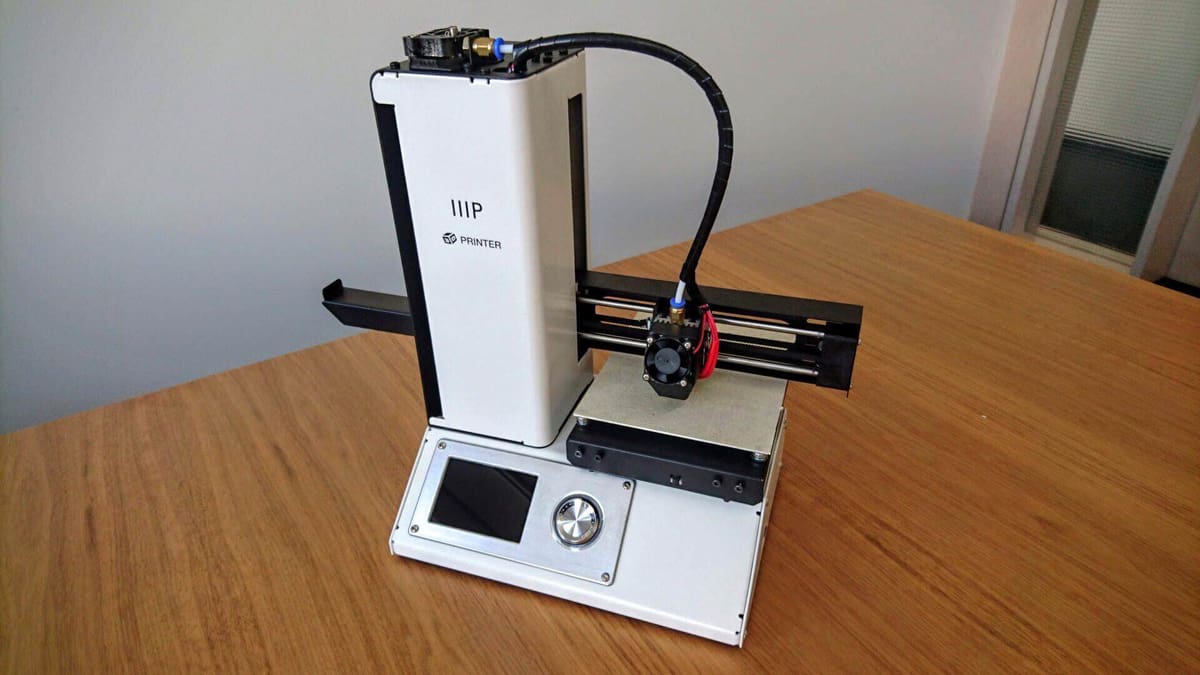
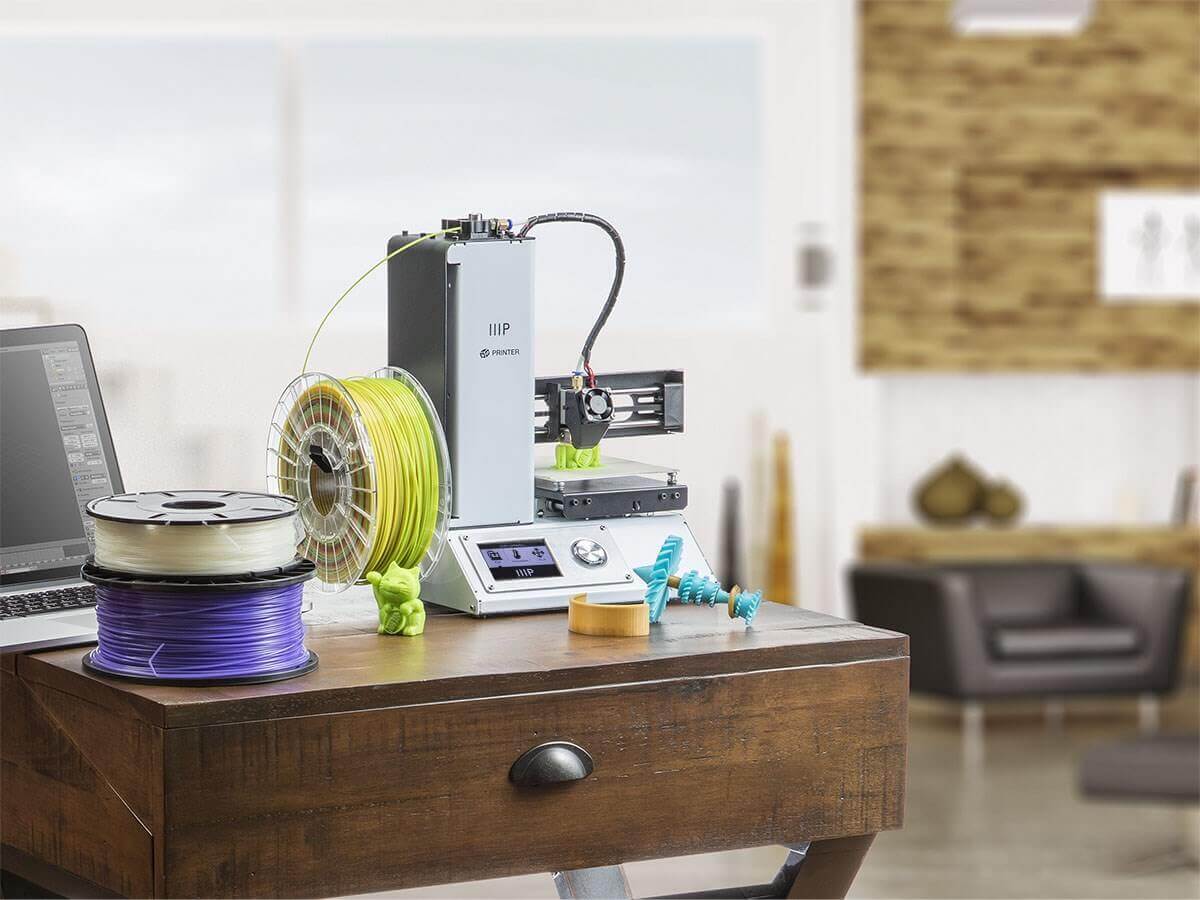
One of the most appealing things about the Monoprice Select Mini 3D printer is the build quality; it’s sturdy and robust, with a folded sheet metal enclosure housing the electronics. It’s built like a tank, but also compact and portable, so you won’t be concerned about damaging it in transport.
This is a Cartesian style fused filament fabrication (FFF) printer, with a one-sided arm holding the print head in the style of a Printrbot Simple. The Monoprice Select Mini only has a single fan for cooling the nozzle, however, which may limit your options for exotic filaments.
At the top of the main pillar is a spring-loaded “quick-release” extruder with a steel gear. It’s a nice design, and it feeds the filament to the hotend using a Bowden cable setup. Again, this may limit your options, especially if you were hoping to print with flexible filaments.
The Monoprice Select Mini hotend has an extruder diameter of 0.4 mm and can reach temperatures of 230°C. We weren’t able to ascertain how easy it would be to replace the nozzle, and this is an important factor in the long-term. Nozzles are prone to degrade over time and will need replacing.
Some more quirks we noticed on the Monoprice Select Mini; the print head has an auto-leveling probe attached, so in theory it should have intelligent positioning feedback. The extruder will know when it’s hit the build plate, in other words, and can adjust itself accordingly to make calibration more simple.
In practice, however, the probe only checks one corner of the build plate, as opposed to all four. On that basis, the auto-leveling of the Monoprice Select Mini doesn’t seem all that intelligent!
UPDATE: We’ve been told in the comments that the Monoprice Select Mini doesn’t actually have an auto-leveling probe, but a Z-home microswitch that lets the printer know when to stop lowering the head so it doesn’t crash into the build plate. Apologies for the confusion!
The next quirk is that the control interface tells us that wi-fi has been deactivated, and there’s no way to switch it on. It appears that wireless connectivity is an available feature of the printer, but Monoprice have chosen to deactivate it in the firmware.
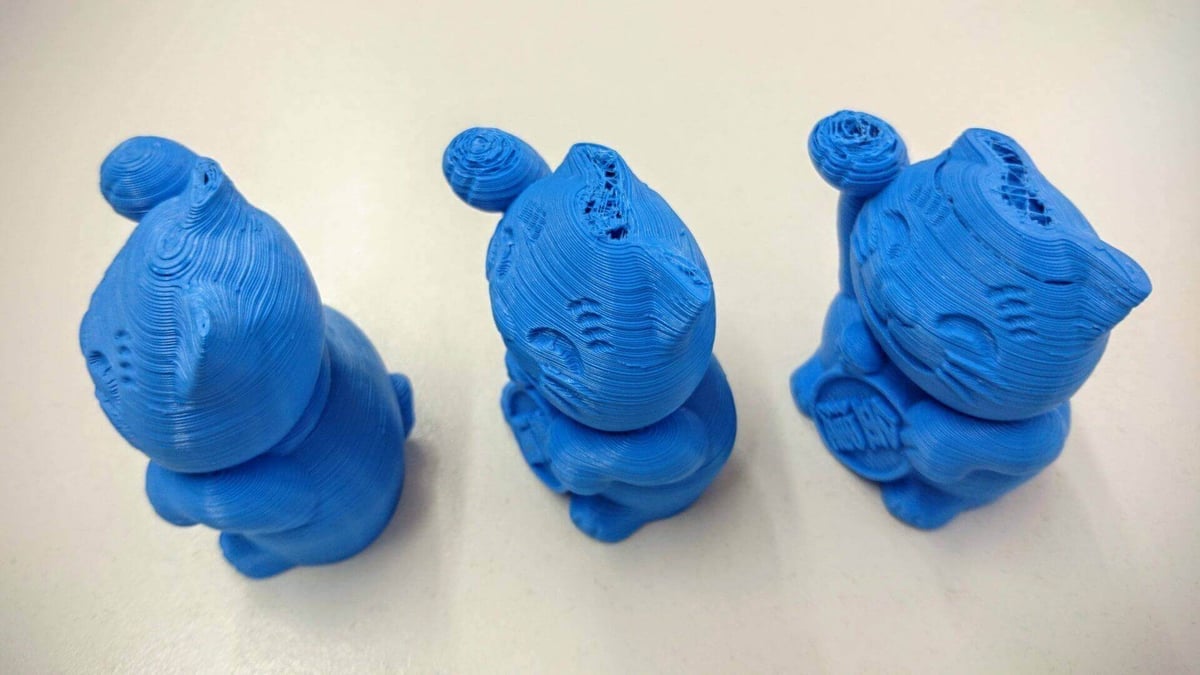
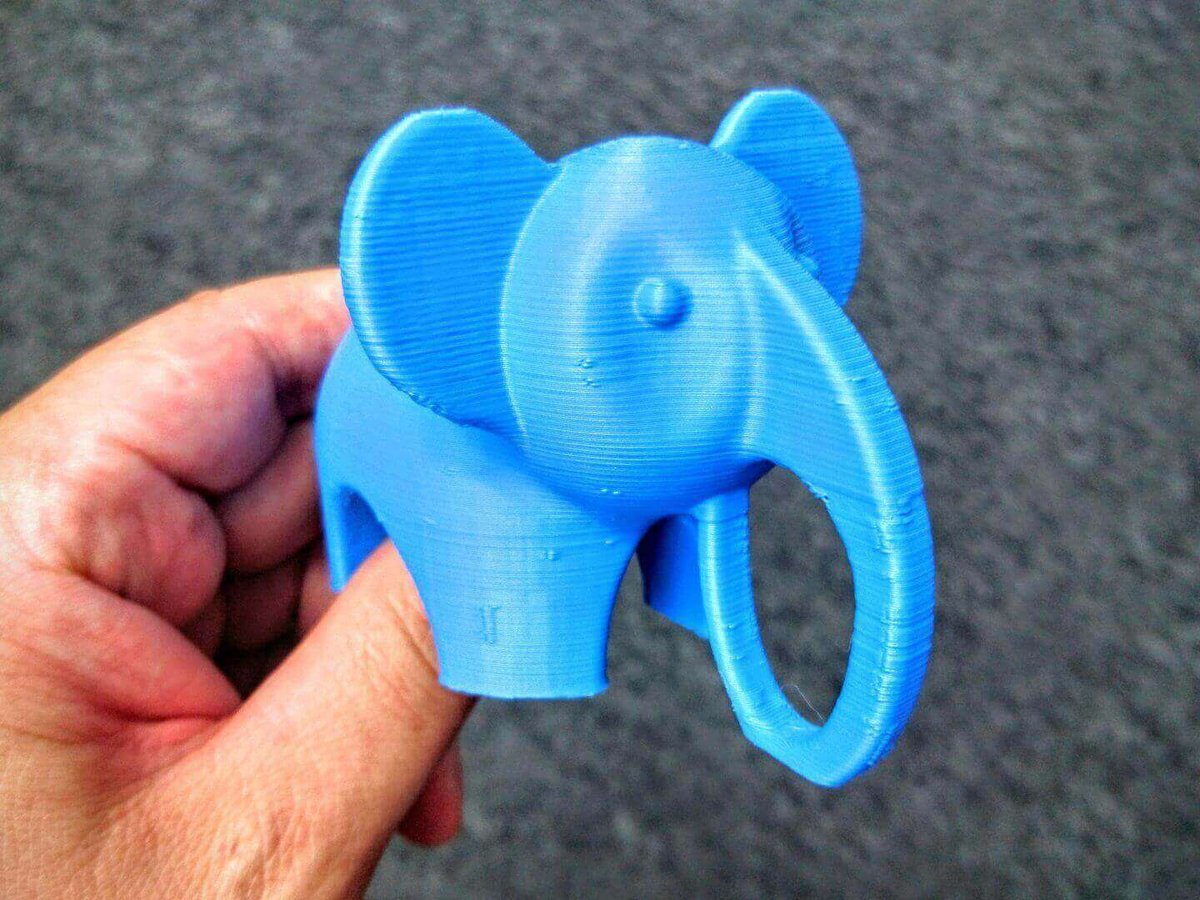
Preloaded on the microSD card are a pair of models for printing; a cat and an elephant. Presumably, these have been optimized to best show off the Monoprice Select Mini performance. With that in mind, we started on these models before slicing some of our own.
The first thing we printed was a the cat, with a resolution we’re guessing was 200 microns. Details came out fine and clear right up until the final layers, whereupon the tips of the cats paw and ears became garbled. This happened three times on three separate attempts.
Analysing the G-Code in Simplify3D, it appears that the print head is speeding up at the final layers, right at the limits of 55 mm/s, hence the repeated failure. It has to be said, the fact that the Monoprice Select Mini is supplying a sample model that’s doomed to fail — and to a potential audience of first-time users no less — is pretty strange.
The second thing we printed was the elephant, at 200 microns and 10% infill, and there were no problems here. The Monoprice Select Mini did an admirable job with things like bridging and overhangs, and the retraction was tight enough that stringing was non-existent.
Moving on to slicing our own models, we opted to use Cura software as per the manufacturer recommendation. John Biehler has supplied some excellent Cura settings in his review of the Monoprice Select Mini, so we used the same.
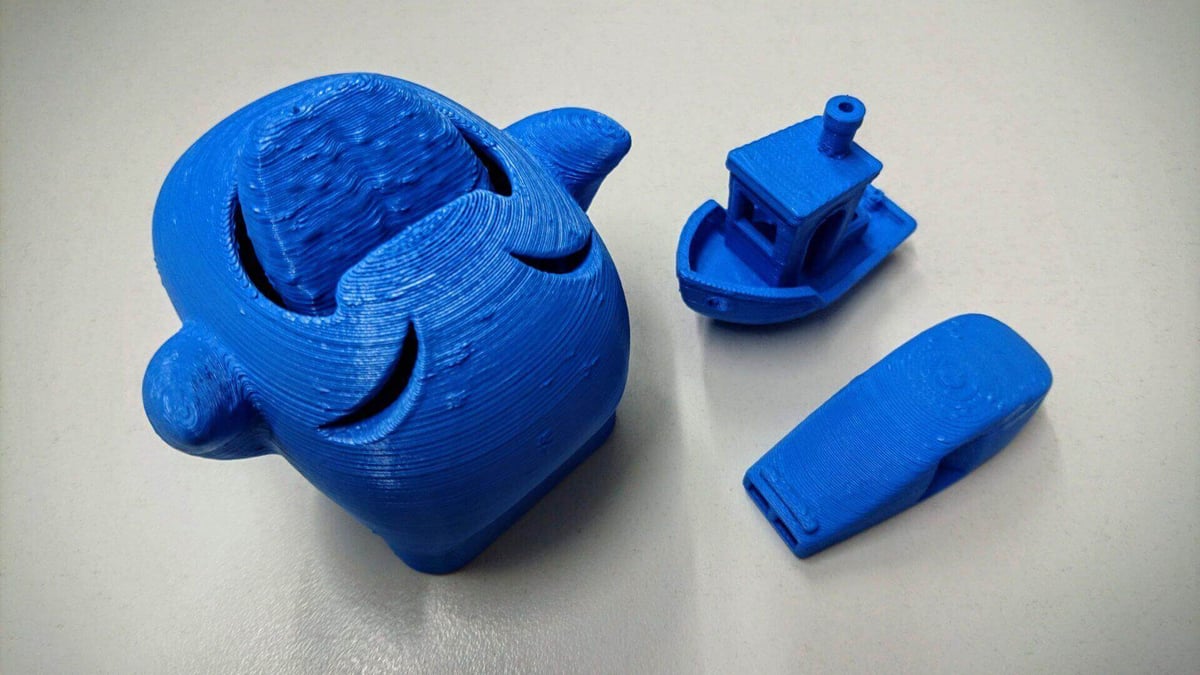
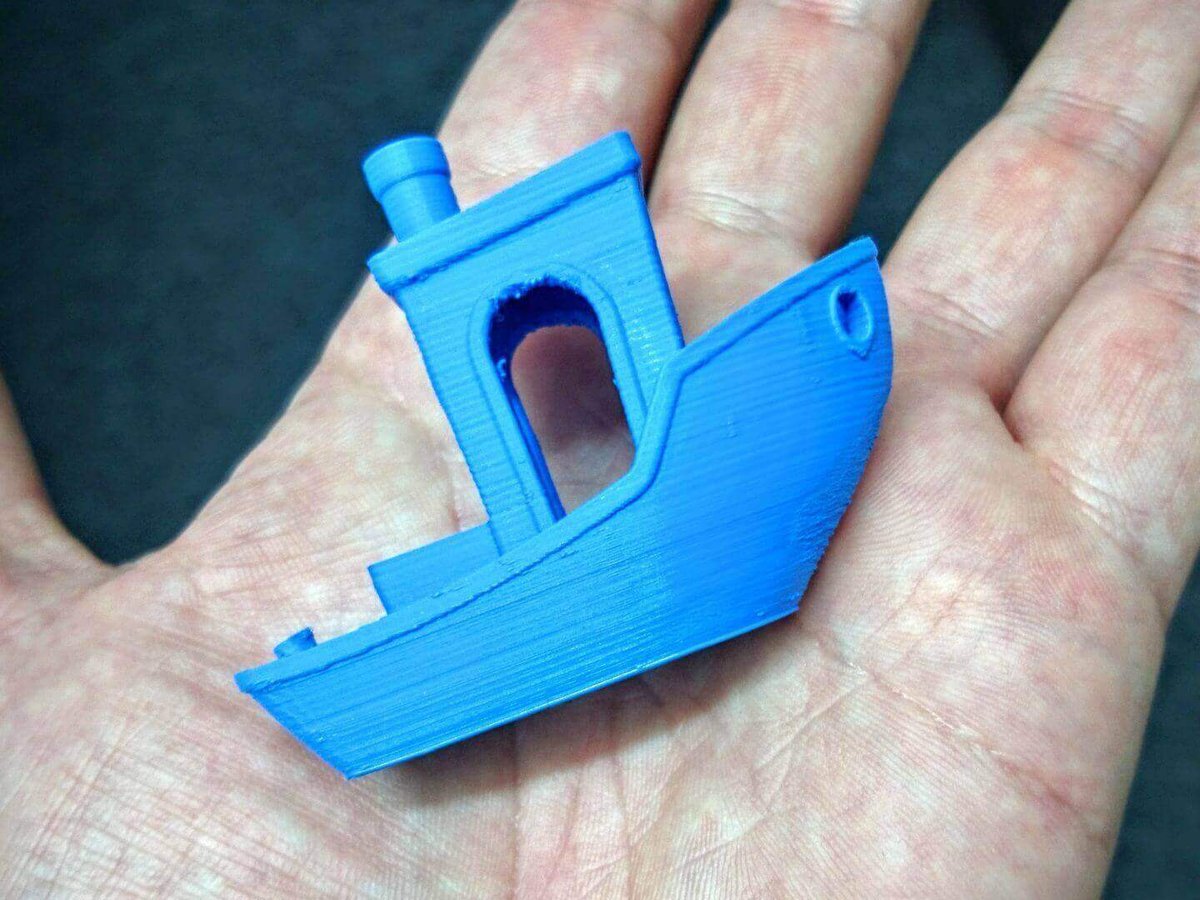
The models we printed were a 3DBenchy and a Graphica Mega Ghost at 200 microns and 10% infill, a V29 whistle at 200 microns and 100% infill, and another 3DBenchy at 100 microns and 10% infill.
Basic details came through pretty well on all of the 200 micron models. The Monoprice Select Mini didn’t seem to struggle too much with small unsupported spans and overhangs, although there is the noticeable occurrence of blobs and zits. Layers also remained fairly consistent along the X and Y axes.
The V29 whistle sounds exactly as loud and irritating as intended, which means the hollow chambers were printed clean without obstructions. The Graphica Mega Ghost and its obscenely long tongue also printed intact, where the hinge for the tongue was printed in one piece and glided smoothly.
The 3DBenchy at 100 microns also printed intact and the quality of the detailing was impressive. This is a $219 machine, remember. The only major error was the prow of the boat, where there was some significant “wurfling” of the layers.
In general operation, prints tended to fail when the filament spool snagged itself, or when we failed to apply enough adhesive glue to the print bed. We can’t attribute these issues to the Monoprice Select Mini itself — it’s an occupational hazard of FFF printing — but it’s still frustrating when it does happen.
A minor niggle is that during operation the print bed slides forward towards the front of the machine, which can obstruct access to the click-wheel controls.
One more quirk is that the temperature of the hotend seemed to have a margin of error of about 5°C. For example, if the temperature was set to 215°C, the control panel indicated that it was hovering between 213°C and 217°C.
This didn’t impact too badly on our PLA-based test prints, but such inconsistency will cause problems when using the Monoprice Select Mini to print with materials more sensitive to temperature changes.
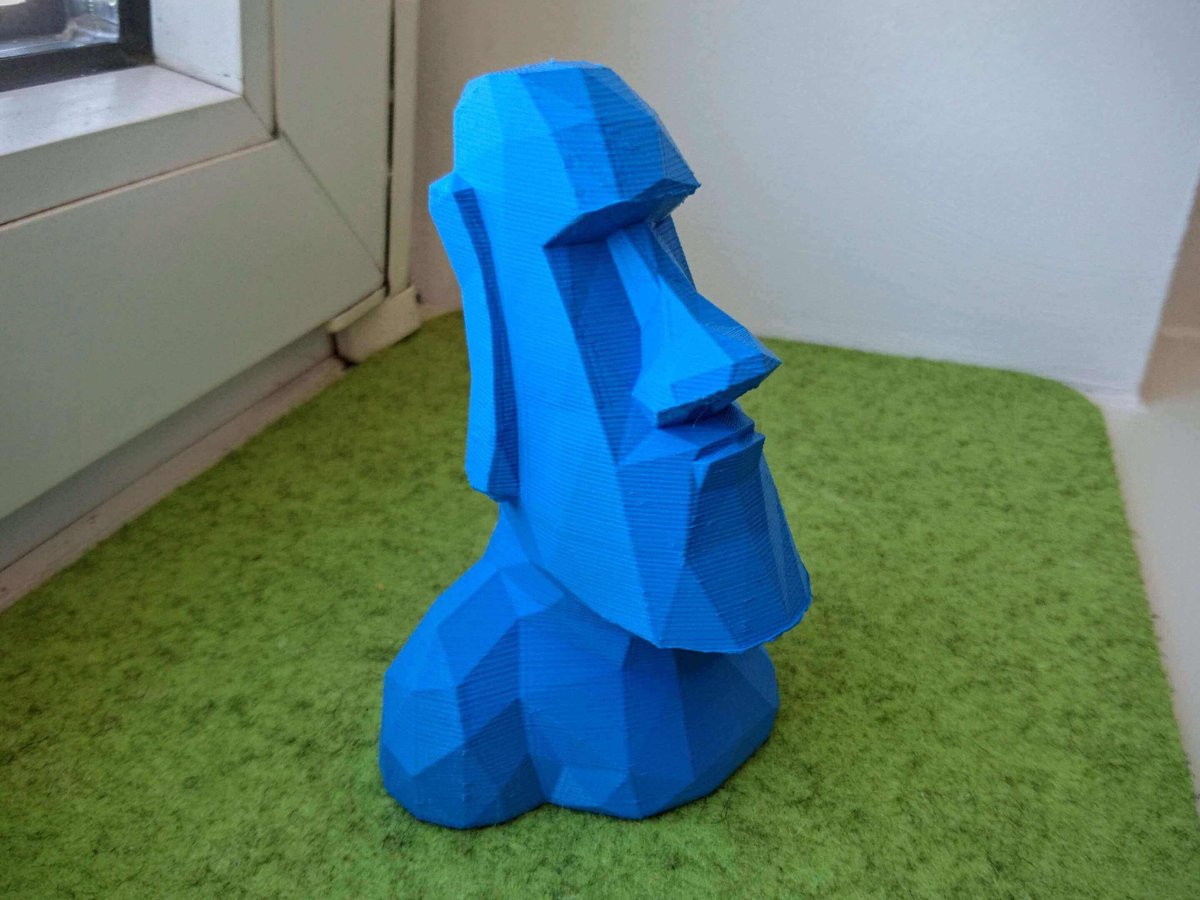
UPDATE: We’ve been asked to supply more examples of printing at 100 microns. Here’s a low-poly Maoi bust, scaled up by 50% from the original size, and printed at 100 microns with 30% infill. It turned out beautifully, with the exception of the overhang on the chin; it has the same wurfling effect as the 3DBenchy at the same resolution.
Some notes about the upgrade options for the Monoprice Select Mini 3D printer. Officially, there aren’t any! But a great many makers are excited about the possibilities of hacking this printer to improve performance.
Hackaday has listed some of the best fixes to date, including adding an adaptor for an E3D V6 hotend — widely considered the industry standard for desktop 3D printing.
To our mind, perhaps the most critical is implementing a fix for temperature control. Hackaday has detailed instructions for tuning the proportional–integral–derivative (PID) controller for more consistent behavior.
You can also activate the wireless connectivity by downloading the original Malyan M200 firmware and installing it, but proceed with caution. There is the risk of bricking your Monoprice Select Mini entirely (at worst), or voiding your warranty (at best).
After testing the Monoprice Select Mini for the past few weeks, we can say with confidence this is the best 3D printer you can buy for under $250.
But it’s very important to understand that this machine most definitely cannot compete for print quality with the likes of an Ultimaker 2+ or a BCN3D Sigma.
If you’re looking for a versatile desktop 3D printer for use in a small business or studio environment, you should continue looking. The small build volume and catalog of strange quirks in the Monoprice Select Mini will make you wish you’d purchased something more advanced.
But if you’re a beginner looking for a low-cost and low-risk way to explore the wonderful world 3D printing, this is the perfect choice.
There are the flaws we’ve discussed, but for just $219 the Monoprice Select Mini will provide plenty of entertainment and education. It’s very easy to use and is capable of print quality to easily rival 3D printers costing three times as much.
This makes the Monoprice Select Mini an ideal choice for beginners, students and teachers looking for an easy way to learn the fundamentals of 3D modeling and 3D printing.
In January 2017, Monoprice brought a V2 version of the Monoprice Select Mini to the market. This is essentially the same desktop 3D printer as the V1, but with a handful of small changes:
The V2 is offered in two colorways, black and white.
The V2 has a fan on the bottom of the unit to help airflow across the mainboard.
The V2 comes with an added build surface, similar to BuildTak, and added insulation below the build plate.
The V2 has an all-metal hotend, which is a clone of the E3D V6 hotend.
The V2 comes with a larger, more tactile rotary dial for the LCD controls.
The V1 of the Monoprice Select Mini is now discontinued from sale, but rest assured that the V2 is the better printer for the same price.
Tips for Better Prints on the Monoprice Select Mini
ALL3DP reader Kirk Burrill is a Monoprice Select Mini 3D printer superfan, and he’s generously supplied us with these essential tips to get the most out of your machine.
1
Monoprice MP Select Mini Review
Lower the Print Speed
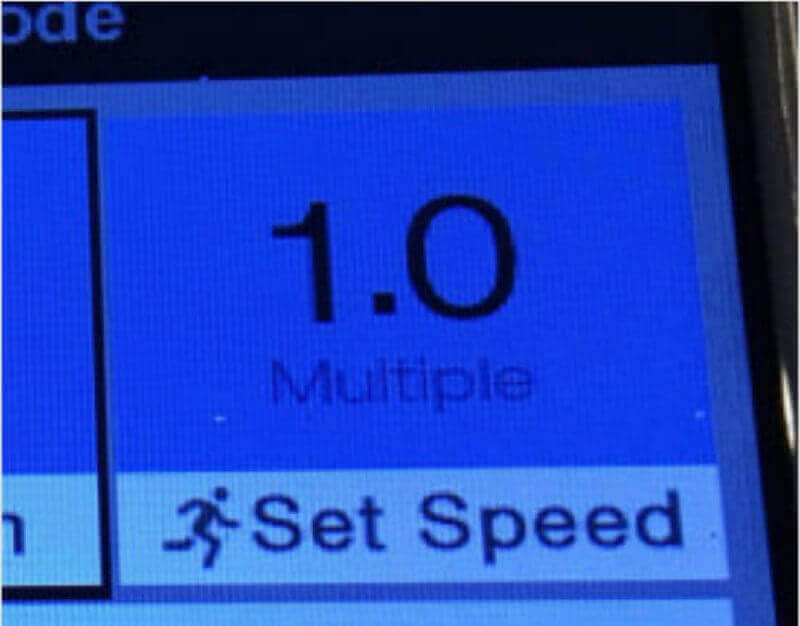
The Monoprice Select Mini 3D printer can produce objects with amazing quality, but only if used correctly. One of the first things you can do to optimize this 3D printer’s potential is to print things at a reasonable speed.
There is a significant drop in quality when printing at high speeds on the Monoprice Select Mini. Even though it can be set to 2x speed, we recommend using 1x speed for large objects — or .5x speed for small or high-quality objects.
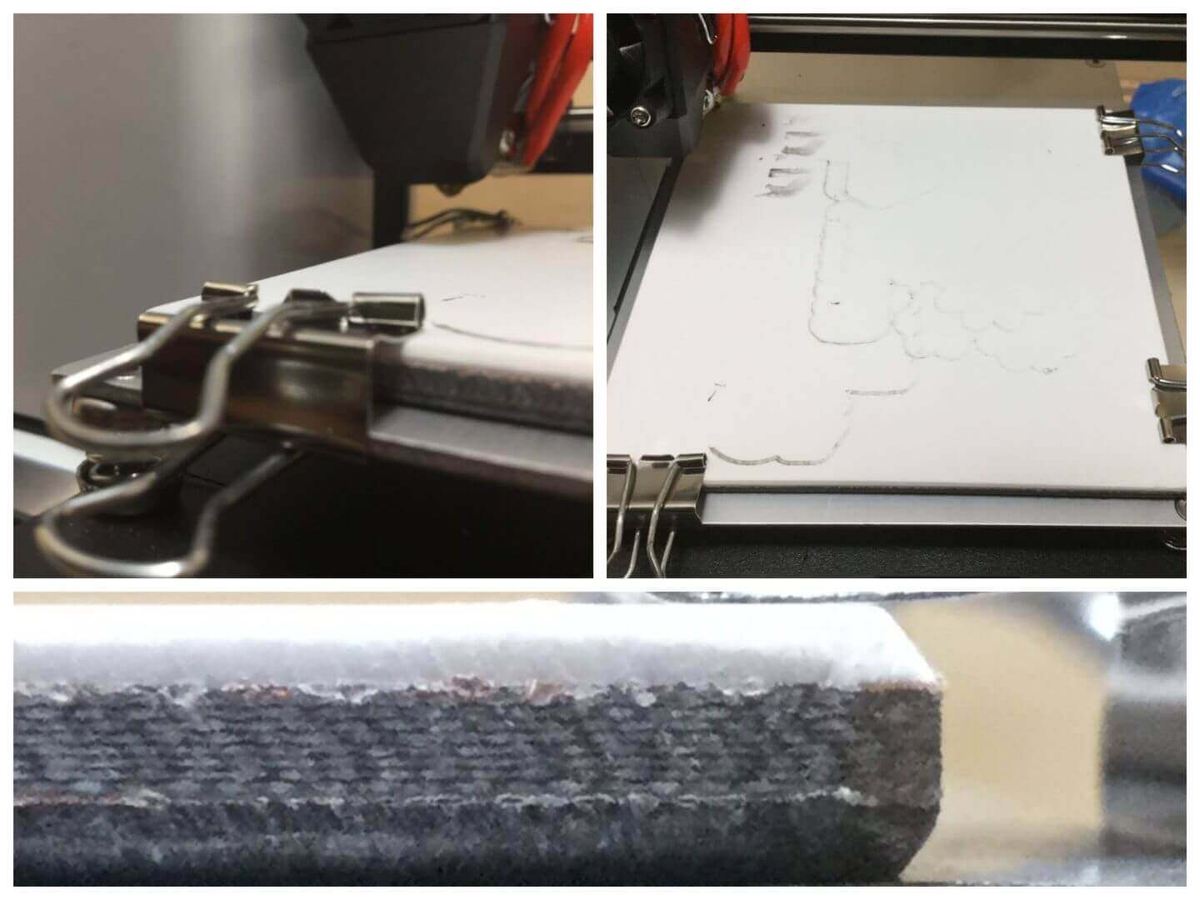
Another issue you may encounter with the Monoprice Select Mini 3D printer is insufficient layer adhesion. This means that the first layer of a build can turn out to be spaghetti, even with tape.
But this can be resolved easily. In this example, we used a PrintInZ build flexible build plate for the Monoprice Select Mini. It’s okay to have some residue from previous prints, just as long as the plate feels smooth.
There are other options out there, such as glass. But you should have an extremely high print success rate with the PrintInZ. It’s nice because you can order two, and start a job on one while cleaning the other. This also makes it easier to remove jobs, as you can bend the plate and they will pop right off.
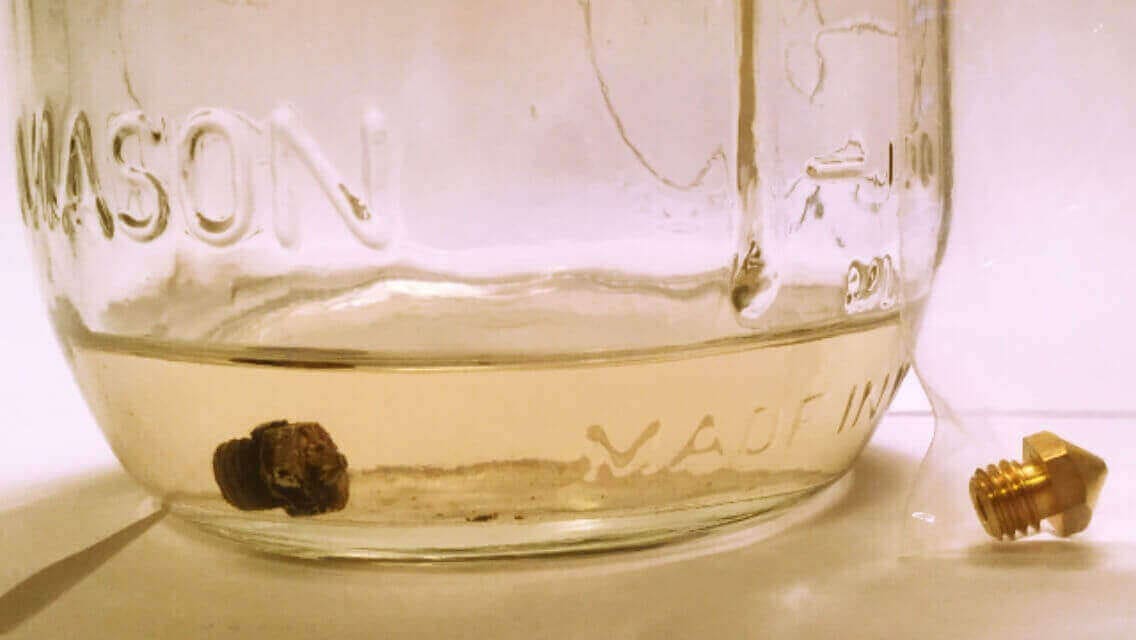
Two weeks of use with the Monoprice Select Mini 3D printer, you may find that the extruder nozzle gets clogged.
A clogged nozzle will result in the printer making a “thump” noise every fifteen seconds, and the filament will come out at a lesser flow. You can tell if you have a clog by extruding filament from the move menu while heated up. If it curls, you have a clog.
This is very easy to fix, however. All you need to do is remove the nozzle and soak it in acetone for several days.
To remove the nozzle; first, make sure any filament is out of the printer, then heat the Monoprice Select Mini up to 200 degrees. Once the printer is heated, twist off the nozzle with pliers.
Once you’ve finished soaking the nozzle, dry it and then twist it back on (you do not need to heat the printer to reattach the nozzle). Lastly, relevel the bed.
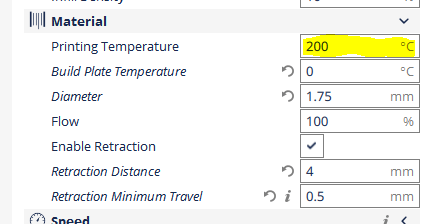
To improve print quality on the Monoprice Select Mini, we like to print at a temperature just above the minimum for the material.
Because this printer works best with PLA, the temperature we use for that material is 200 degrees. Anything higher, and you’ll run into stringing. Lower, and the nozzle will clog.
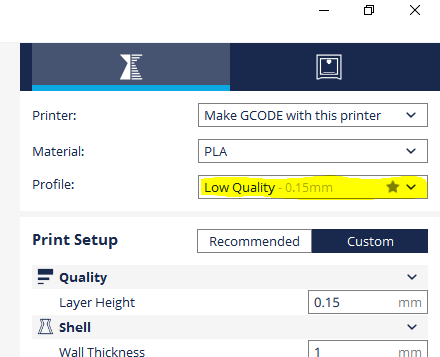
One thing that we love about slicing software Cura is that there are three options for quality. This makes it extremely easy to perform quick prints or complex projects.
We try to avoid printing anything on a Monoprice Select Mini with layer height above 150 microns. This can cause issues because the filament will curl between the nozzle tip and the previously printed sections. Curling will result in rougher edges and worse layer adhesion.
If you stick to the profile options available for the Monoprice Select Mini, then you should be okay.
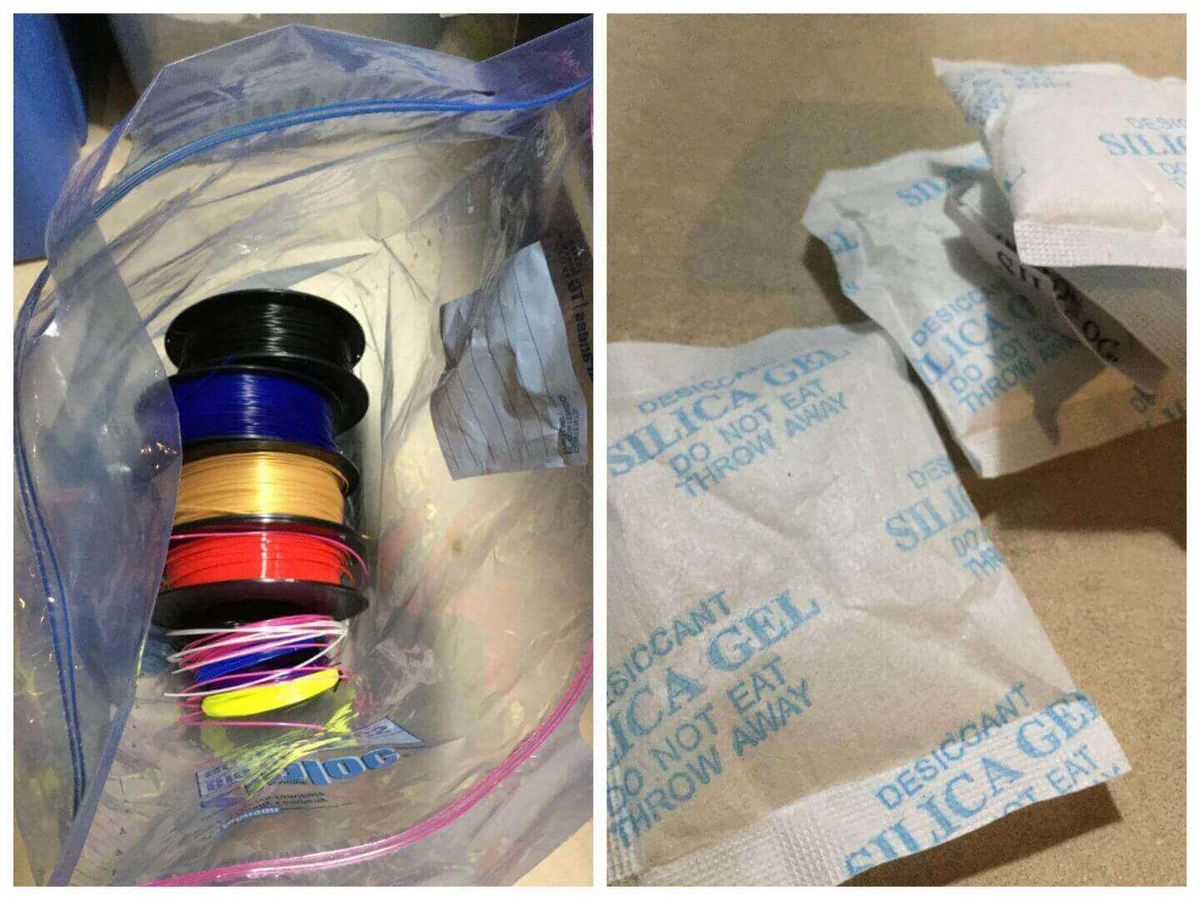
One last thing that doesn’t necessarily have to do with the Monoprice Select Mini itself is the optimal storage for 3D printing filament. Folks have speculated that humidity can negatively impact properties of the filament. For this reason, we prefer to keep our filament in an enclosed area.
This will help achieve maximum print quality because any moisture in the filament can make it expand or contract, therefore leading to a wider tolerance in the filament. Using filament with the lowest tolerance is best for accomplishing great results with your Monoprice Select Mini 3D printer.