Creality Ender 3 V2 vs Ender 3 (Pro): The Differences
Mainboard
Facing a choice between the Creality Ender 3 V2 and the Ender 3 (Pro)? Learn the differences to find out which version is best for you.
Affordable, influential, and hugely popular, the Creality Ender 3 is one of the most important 3D printers ever to be released. The Ender 3 played a huge part in popularizing 3D printing and continues to do so today.
Given the machine’s popularity, Creality has produced a few upgraded versions, including the Ender 3 Pro, the short-lived Ender-3X, and the Ender 3 V2. The company even recently announced another one – the direct-extruder packing Ender 3 S1.
Since being first announced in 2020, the Ender 3 V2 has established itself in the 3D printer landscape as a highly capable and affectionately regarded machine. It holds a steady price of $262 so it doesn’t break the bank, and produces quality results on a consistent basis. On top of that, it’s easy to use, upgrade, and troubleshoot with. But is it the horse to back in the Ender 3 derby?
We’ll explore this in the following 3D printer shootout. Read on to find out which machine we think is best.
It’s all well and good looking at a small table of statistics comparing one Ender 3 to another, but let’s get into a bit more detail and dig into the features of these machines.
As we’re going to discover, there are numerous small but significant differences between the Ender 3 family.

Here we have some of the most popular 3D printers ever to print it. The Creality Ender 3 and its ensuing offspring changed the 3D printing landscape by putting a quality, filament-extruding machine into the hands of interested parties for a pretty low price. Compared to similar machines of the time (such as the notorious Anet A8) they were far easier to assemble and operate, safer, more reliable and easier to work on. Better than that though, they consistently printed good stuff, and that’s what we all want, right?
The Ender 3 family has become a kind of template for other 3D printing companies too, with firms like Voxelab, Biqu, Artillery, and many more tracing the Ender 3 form and delivering printers of their own. The Ender 3 has become a recipe for others to emulate, but as with real recipes, each chef makes it a little different, even if the fundamentals are the same.
Structurally, the Creality Ender 3 and its later upgraded derivatives consist of a main base unit within which the mainboard and power supply unit are integrated into, putting weight towards the bottom of the machine and thereby improving structural rigidity, which is a good thing in a 3D printer. X and Y-axes have good connections to this sturdy base and the control panel is also attached to the base, while a single Z-motor and leadscrew controls the vertical work.
Considered a semi-assembled 3D printer, the Ender 3, Pro, and V2 are considered easy to assemble machines that shouldn’t prove too much of a task to get together, though a word of caution: Creality’s instruction booklets are famously trash, so you may have to rely on some YouTube videos. The Ender 3 Pro got sturdier 40 x 40 aluminum extrusions on the Y-axis base which aided stability for printing and was a welcome upgrade to the Ender 3. The Ender 3 V2 kept those extrusions and also added a little tool tray into the base of the printer, something that All3DP uses almost exclusively for snacks, but that normal people seemingly use as intended.
Community strength is a big plus to these machines, with many enthusiastic owners sharing stories, pictures, troubleshooting tips, videos, upgrades, and romantic fiction connected to the Ender 3. Ok, perhaps not the last one but we wouldn’t rule it out, Ender 3’s have a huge following, which can be very helpful if you’re new to the 3D printing gig.

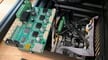
The mainboard, sometimes referred to as the control board, is the electronic heart of your 3D printer and the place where everything happens, electronically speaking. This is where G-code is read, temperatures are controlled, and motion commands are generated.
In the Creality Ender 3, Ender 3 Pro and Ender 3 V2, all the mainboards have been the same, making use of Creality’s 32-bit V4.2.2 board in silent or non-silent configurations. If you’ve an Ender 3 or Ender 3 Pro, it’ll be a non-silent 4.2.2, but if it’s a Ender 3 V2 it will be silent.
“Silent” needs a bit of context here, as this refers to stepper motor drivers on the mainboard. Silent ones help make the printer produce a little less noise, but no 3D printer we’ve tested so far has actually been silent, there are simply louder or quieter machines. Realistically, a silent board is going to be better to live with, but if your 3D printer is in a workshop or a space away from a living area then there’s probably no issue with it being on the louder side, you can always close a door, after all. You probably wouldn’t want a non-silent in your bedroom, however.
The V4.2.2 is Creality’s “global” mainboard for the Ender 3 printers in this article, but if you’re one of our Korean readers, firstly, hello to you, secondly, you may notice a different number on your mainboard. Creality, for reasons unexplained, has a different mainboard for Korea, badged V4.3.1. As with the 4.2.2, the Ender 3 and 3 Pro are both non-silent, but the 3 V2 is silent.
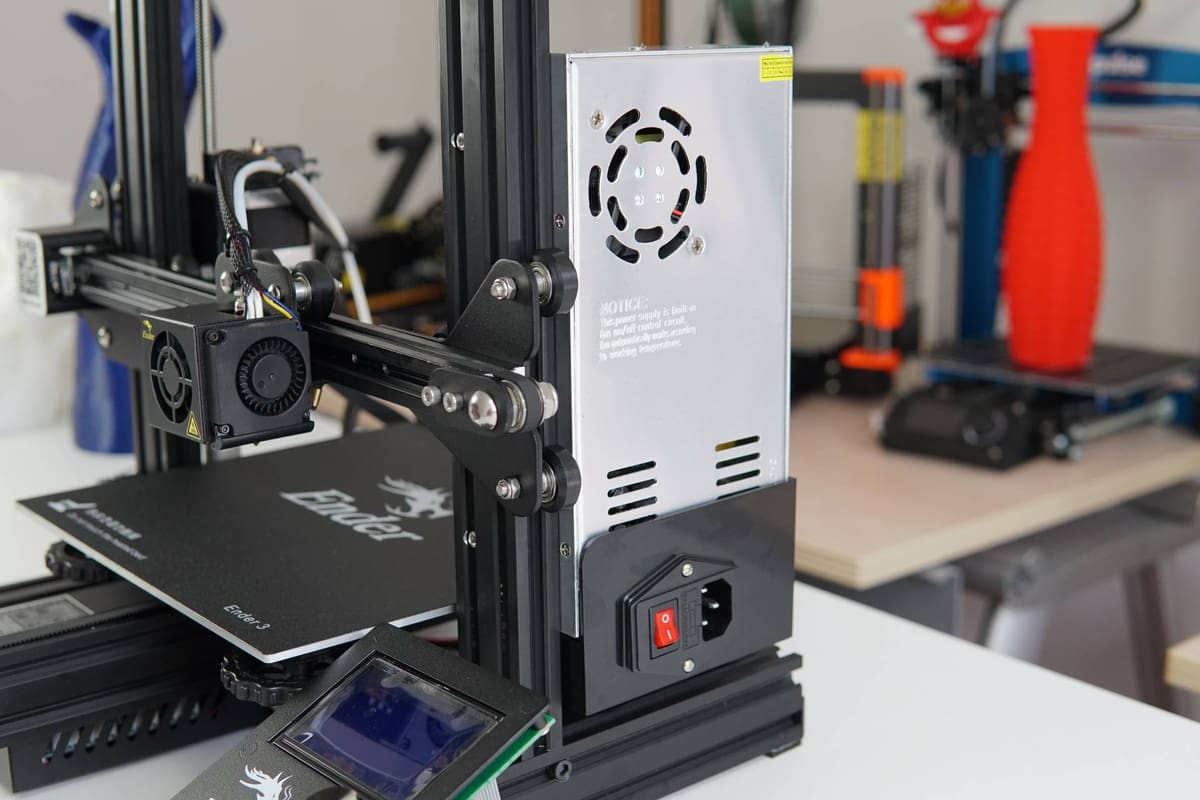
A quality power supply is important for any mainboard to give its best, and the base Ender 3 comes with a generic supply. The Ender 3 Pro and Ender 3 V2 both feature Mean Well power supplies, thinner, quieter units from a company with a great reputation for providing solid, dependable power. On the Ender 3 V2, if there’s a disturbance in the power for any reason, the print should resume once power has been restored. Unfortunately that facility isn’t there on the Ender 3 and Ender 3 Pro, so if you live in an area with a dodgy connection, the V2 might be the one for you.
Should you wish to, Creality does provide a mainboard upgrade named V4.2.7 which is a silent board. It should improve overall performance and is an easy recommendation to anyone with a base Ender 3.

All Creality Ender 3 variants in this list feature a 220 x 220 x 250 mm build volume, which is about average for a 3D printer of this class. So, not a great deal to report on here in terms of differences.
For most people, a build area of this size is going to fit the bill for a lot of 3D printing projects. Larger volumes can be found in other printers, sure, but this medium-sized space to create is often all that’s required and measurements around this figure are common in other 3D printers.
If you did need something larger than this, there are still plenty of other options out there.

So, while there wasn’t much to report on in terms of the build volume of the Ender 3s, there is a lot more to say about the build plates.
On the Ender 3, the build plate features a BuildTak-style print bed sticker, which is a bit outdated now in 2022 and often the site of upgrades from Ender 3 users. It’s not a bad solution by any means, it’s just not all that good either and there are better solutions out there.
With that in mind, it’s perhaps no surprise that Creality wanted to try something different with the Ender 3 Pro that followed, and switched to a magnetic “C-MAG” sheet. Its trick was that you could pop it on and off the aluminum heated bed and flex to remove prints, usually with little fuss. This didn’t hit the mark with everyone though, and while the textured surface improved print adhesion a little, it was a bit flimsy and frustrating to use.
Creality came up with something else for the Ender 3 V2 then, opting for a carborundum glass bed which is solid lump of glass, textured on one side and smooth on the other, with both sides being printable upon. It’s removable, though not as quickly as the Ender 3 Pro’s. We thought it was a welcome change from the frustrations of the beds on the other Ender 3s, but it also wasn’t perfect either. Over time, filament residues could build up on the glass bed and that could leave you with a mucky piece of glass that had a direct result on first layer quality. With trickier filaments such as ABS and PETG, you may also still need the help of a glue stick to get good adhesion.

Back to the build volume situation as there’s no differences to really reflect on here. The Ender 3, Ender 3 Pro, and Ender 3 V2 all come with manual bed leveling, which, in short, is sub-optimal.
Manual bed leveling is a papery pain in the proverbial, but at least Creality provides large knobs underneath the build plate to take care of that, making it easier to find the correct level. If you’ve not done it before, it can also be a bit tricky. Despite that, many users love to upgrade to automatic bed leveling at the earliest opportunity and space is provided on the mainboards to do just that.

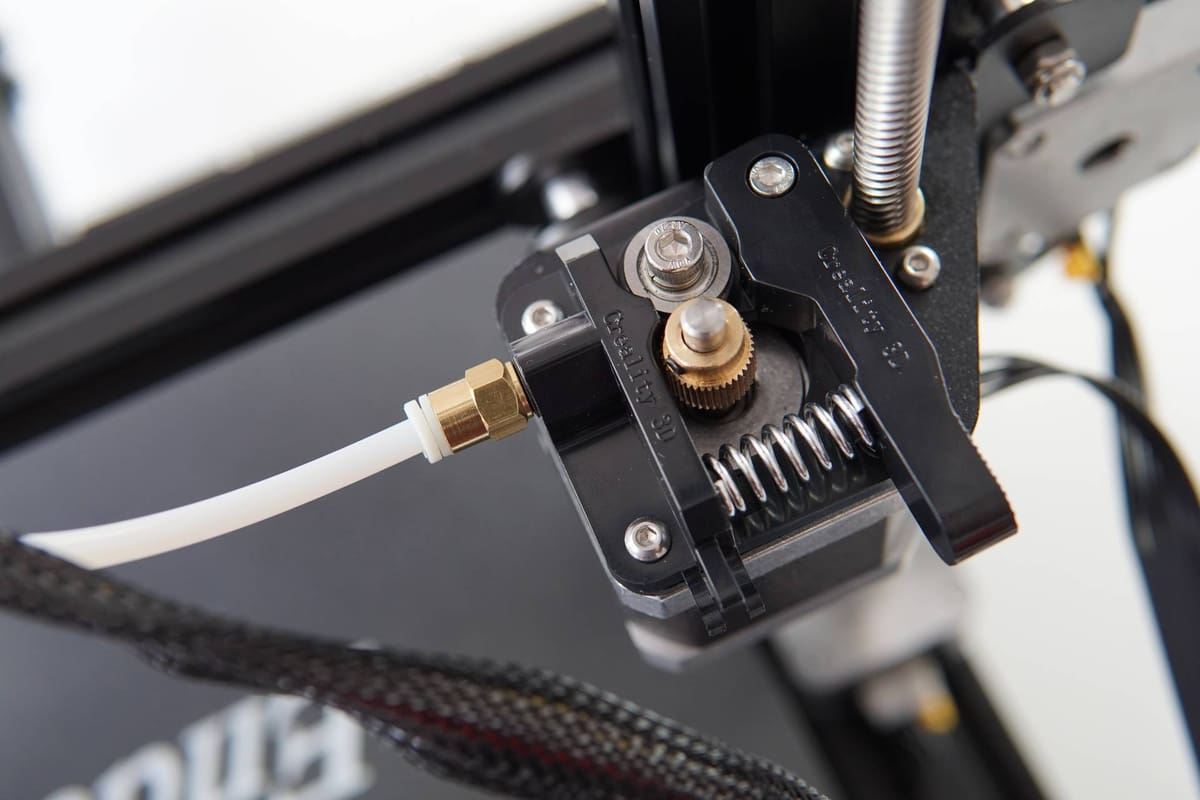
The Creality Ender 3 and its Pro and V2 friends all have Bowden extruders. That means the extruder is mounted to the frame of the printer, feeding filament to the hot end remotely through a PTFE tube. Many users of Ender 3 systems like to upgrade to a direct extruder because of the potential benefits that particular system brings, but in truth, both setups have their own benefits and drawbacks, and there’s certainly nothing wrong with the base Bowden setup in the Ender 3, Pro and V2 machines.

The extruder itself on the Ender 3, Pro, and V2 is Creality’s MK8 style extruder, an old, but widely used extruder that dates back to the early days of consumer 3D printing. This can be swapped out with Creality parts if necessary, or better, alternative third-party items. It’s another area looked at by users eager to tinker, but the base setup is strong and a narrow filament path makes this particular Bowden setup slightly better suited to flexible filaments.
In terms of printing temperatures, there’s not a great deal of difference between the models here, a base Ender 3 will reach 240 °C, but the Pro and V2 models have the potential to reach 255 °C, which isn’t a huge increase but may open the door to a few more filaments.
On the Ender 3 V2 Creality also added a handy manual filament feeding knob allowing you to manually feed filament, purge the nozzle and enjoy watching during printing sessions.

When it comes to tightening the belts of the Ender 3 and Ender 3 Pro, it’s best to take a look at some 3D printable upgrades, as the method can be a real pain in these earlier models, a mess of loosening screws, using hex keys, holding things in place, and, you get the idea.
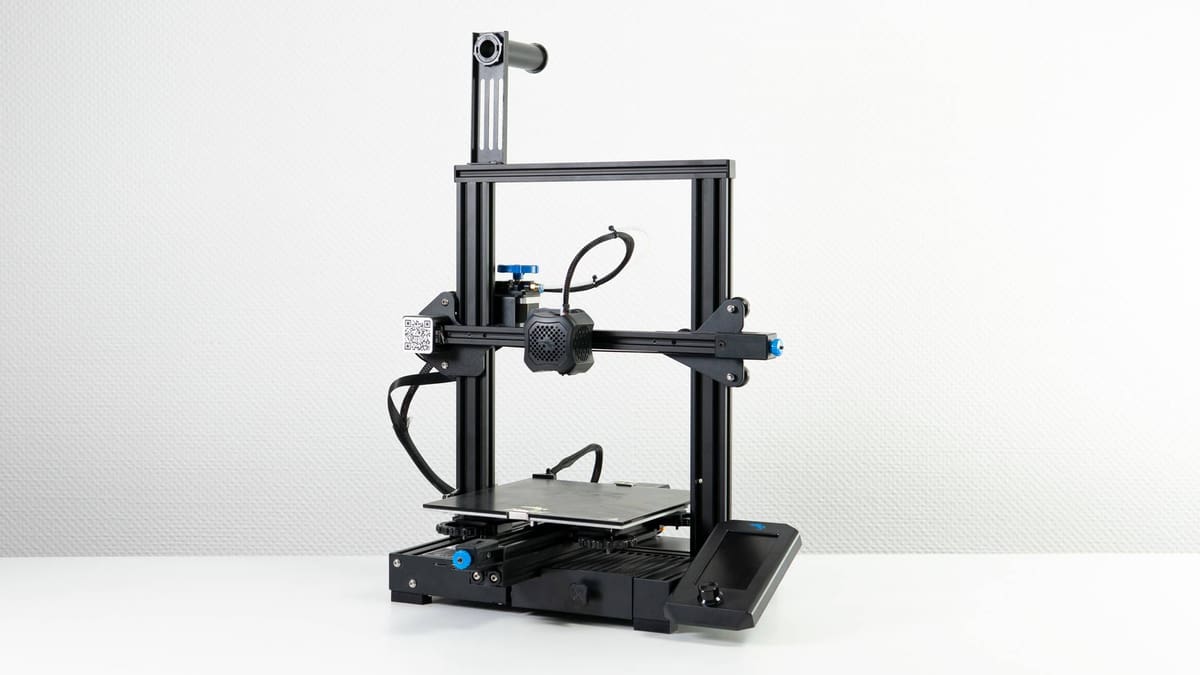
When the Creality Ender 3 V2 came along, Creality looked to its huge userbase and adopted a popular 3D printable mod that introduces easily tweakable knobs that made tightening belts as easy as turning on a tap. Injection-molded and coming as standard, this was a big quality of life upgrade for new users of the machine and something appreciated by, we’re sure, almost anyone who uses the Ender 3 V2 on a frequent basis.

Using an Ender 3 or an Ender 3 Pro is very simple thanks to their UIs. Connected to their bases you’ll find a simple LCD screen displaying a lovely shade of blue. You can control the printer from here via a nearby rotary knob and all in all, it’s a simple easy to use UI that won’t take very long to get to grips with. Modern, it is not, but effective it most definitely is.
Things changed when the Ender 3 V2 came along, as Creality equipped this printer with an HD color screen. It’s not a touchscreen and is controlled also by a rotary knob, but that’s fine by us. A bad touchscreen is a pain to live with, and getting around the UI with a knob is hardly a chore. There’s a clear winner in this category, but really only for aesthetic reasons. If they don’t matter to you, plow on with the LCDs.

There’s no shortage of software to choose from to operate an Ender 3, Ender 3 Pro or Ender 3 V2. Mostly, users seem to prefer using Cura or Prusa Slicer. Both programs are pretty comprehensive slicers that offer plenty of depth for tinkering and tweaking settings to find the best setup for your printer and filament.
Creality has its own version of Cura called Creality Slicer. Once upon a time the manufacturer provided slicer would be an unthinkable option, but Creality’s effort comes with profiles for all its machines, and isn’t too far behind mainline Cura. It is, today, comfortably good enough.
There are options beyond these, too. Simplify3D and ideaMaker are also respected pieces of slicing software, and we can even point you towards modeling and other software that can make working with an Ender 3 fun and exciting, regardless of which model you end up with.
As we all know, prices can fluctuate a little bit and that’s been especially true during this age of inflation, supply chain problems, material costs and general global messes that continue to frustrate. The good news though, is that for the most part, Creality’s prices for the Ender 3 series of machines remain stable.
An Ender 3 will set you back $189 at the time of updating this article (February 2022). Stepping up to an Ender 3 Pro will set you back $219, while the Ender 3 V2 is the most expensive of the trio at $262.
Personal budget plays a big role in choosing a machine from these three of course, but all three are pretty good value for the package you get and whichever machine is chosen, you’re unlikely to have a disappointing experience.
It’s worth keeping in mind also that these machines can be picked up for less when special offers come around, especially at busier times of the year, national holidays, special events, and the like. Keep an eye on our deals page where we track printers, materials, and other printing goodies for decent discounts that’ll save you money.

All this information is great, but which machine is right for you? The answer depends on a few factors: Your budget, how much you value newness, and how much effort you want to put into printing. While the original Ender 3 offers good value, it’s an unquestionably dated machine now. All three machines can print the same materials, but the Ender 3 V2 might be better suited to some PETG that needs a slighter higher temperature to print.
If you already have an Ender 3, we’d suggest simply upgrading your existing machine to have these same features, like swapping out the old build plate for a glass one, for example.
But if you don’t own any version of an Ender 3 yet, you have to decide whether the improvements and extra features in the V2 are worth the additional cost. For example, though great, the carborundum glass print bed is something you can always purchase separately and upgrade an existing Ender 3 with. Other features, like the color screen and toolbox, are nice to have but not a game-changer in terms of print quality, nor even useability.
As for the tensioners and rotary knob to load filament in the V2, they are handy features. Don’t discount the inclusion of a Mean Well brand power supply and Creality’s 32-bit motherboard, either. Stable power and snappier performance improve the printing experience in their own ways.
Ultimately, if you want a machine with all kinds of bells and whistles and are fine paying extra for that, you’re probably going to be pulled towards the Ender 3 V2. But, if you’re happy with paying less and potentially upgrading your machine as you go, there’s no reason you shouldn’t pick up the Ender 3.
License: The text of "Creality Ender 3 V2 vs Ender 3 (Pro): The Differences" by All3DP is licensed under a Creative Commons Attribution 4.0 International License.
CERTAIN CONTENT THAT APPEARS ON THIS SITE COMES FROM AMAZON. THIS CONTENT IS PROVIDED ‘AS IS’ AND IS SUBJECT TO CHANGE OR REMOVAL AT ANY TIME.