Artillery Hornet Review: A Flashy Printer for Beginners
Rating

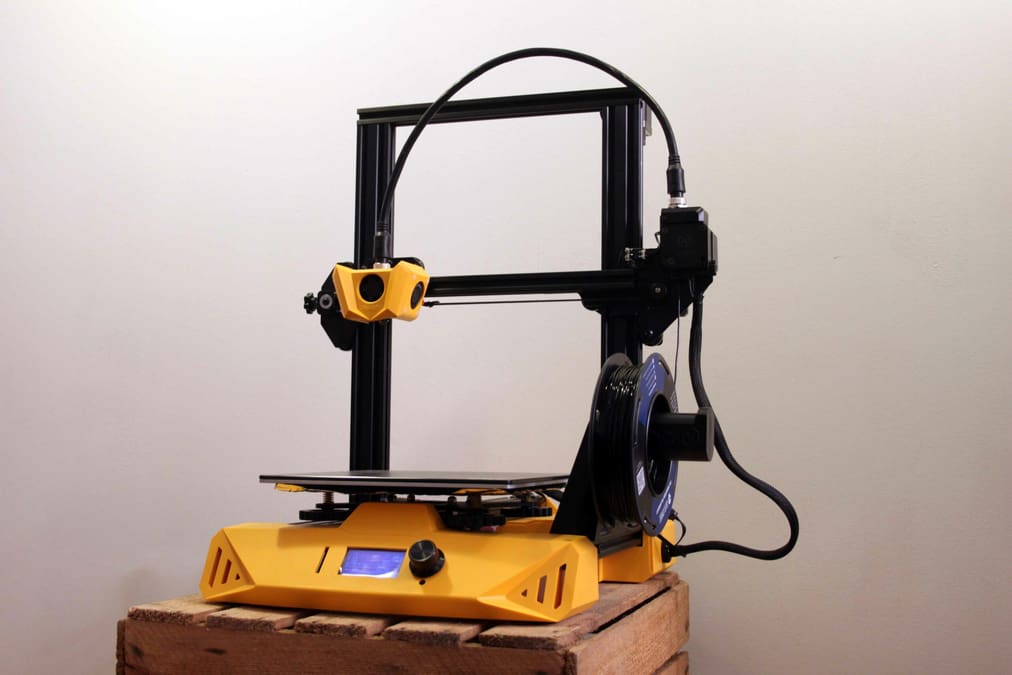
In our Artillery Hornet review, we look at the company's third and most affordable 3D printer with a dazzling yellow exoskeleton.
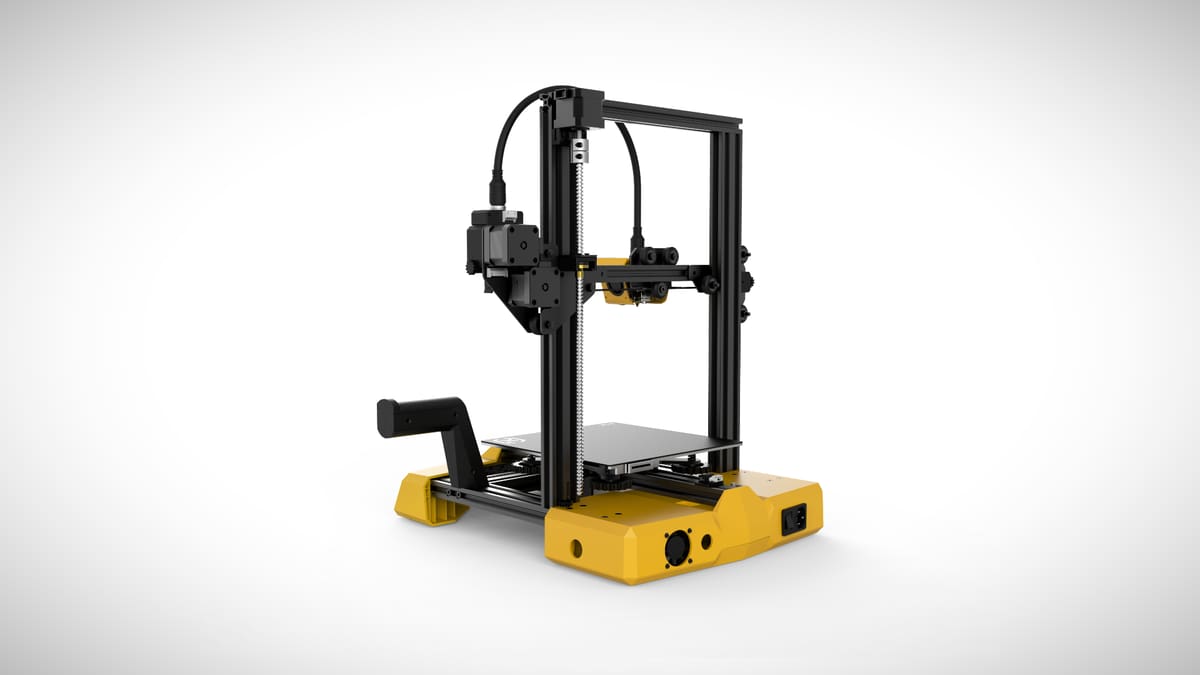
Bidding to get in on the entry-level consumer and education markets, Artillery has come out with a flashy, budget-friendly 3D printer: The Artillery Hornet.
In under three years, the company has come out with three different impressive and affordable 3D printers that easily contend against Creality in their budget markets. The Hornet was released in late 2020 and goes for just $199. That is, if the “sale” across Artillery’s website holds. It’s “marked down” from $419 right now which, frankly, is not a realistic price for this machine.
The Hornet manages to do very well for the ~$200 price, with just a few tradeoffs and limitations for an ultimately satisfying 3D printing experience.
Verdict
Pros
- Very affordable
- Clean, sleek look
- Super easy assembly
- Great quality prints
Cons
- Difficult to clean
- All-in-one cable makes feeding problems difficult to identify
- Can be finicky about temperature settings outside PLA
- Prone to jams from PTFE gaps and Bowden extruder
Artillery has squeezed in some desirable features, mostly hardware that’s also present on its other products, that make the printer easy to use for new entrants into the 3D printer scene. It does come at the cost of limited (or at least difficult) upgradability and expensive replacement parts. But, at the low total system cost, it should still be appealing to newbies who are hoping to limit the amount of hardware tweaking needed to get their printer in good working order.

The Tech
The Artillery Hornet is a Cartesian system with a build volume measuring 220 x 220 x 250 mm. The company has stripped many of the bell and whistles from its other offerings, the Sidewinder X1 and Genius, shedding the touch screens, AC heating (in favor of DC), USB connectivity, direct drive extruders, filament sensors, and resume print functions to leave a simple but effective printer at a respectable budget price with a few nice features left on.
The company tried some new approaches with the Hornet, going with a Bowden extruder for the first time, submitting a patent for its unique all-in-one cable design, and developing in-house mainboards they’ve ramped up to 32-bit.
Flashy Casing
Bright, bright yellow! The Hornet is nothing if not attractive. Artillery says the printer’s design was inspired by high-end sports cars, saying it’s a “mix of modern and classic.” We won’t argue. Artillery says the design is intended, at least in part, to attract younger makers to it.
All major components are tucked away in the Hornet’s base and a dust cover shields the power supply, which we think is a nice touch. The frame and case design combined with neat cable organization makes this printer pretty darn appealing and inoffensive outside workshop contexts.
The Gantry
The bed and Z-rails are made of 40 x 20 aluminum. This size of extrusion has become standard and typically does a good job of providing a rigid frame to limit print-ruining vibrations. Z-motion is carried out with a single lead screw, and the bed – along with the rest of the frame – moves with V-slot wheels. The X-axis makes do with a slightly smaller 20 x 20 aluminum V-rail but considering the printer’s Bowden system results in a very lightweight hot end, it’s steady enough.
Tension adjustments are all suitably accessible. The X-axis has an easy adjustment knob for toolless belt tweaking, but others will need a hex key to get at.
The Build Surface
The Hornet inherited the porous tempered glass print surface from Artillery’s Sidewinder X1 and Genius. Like the other products, this bed is glued to the aluminum heat plate below. Unlike Artillery’s other products, however, the Hornet uses more common DC heating rather than AC.
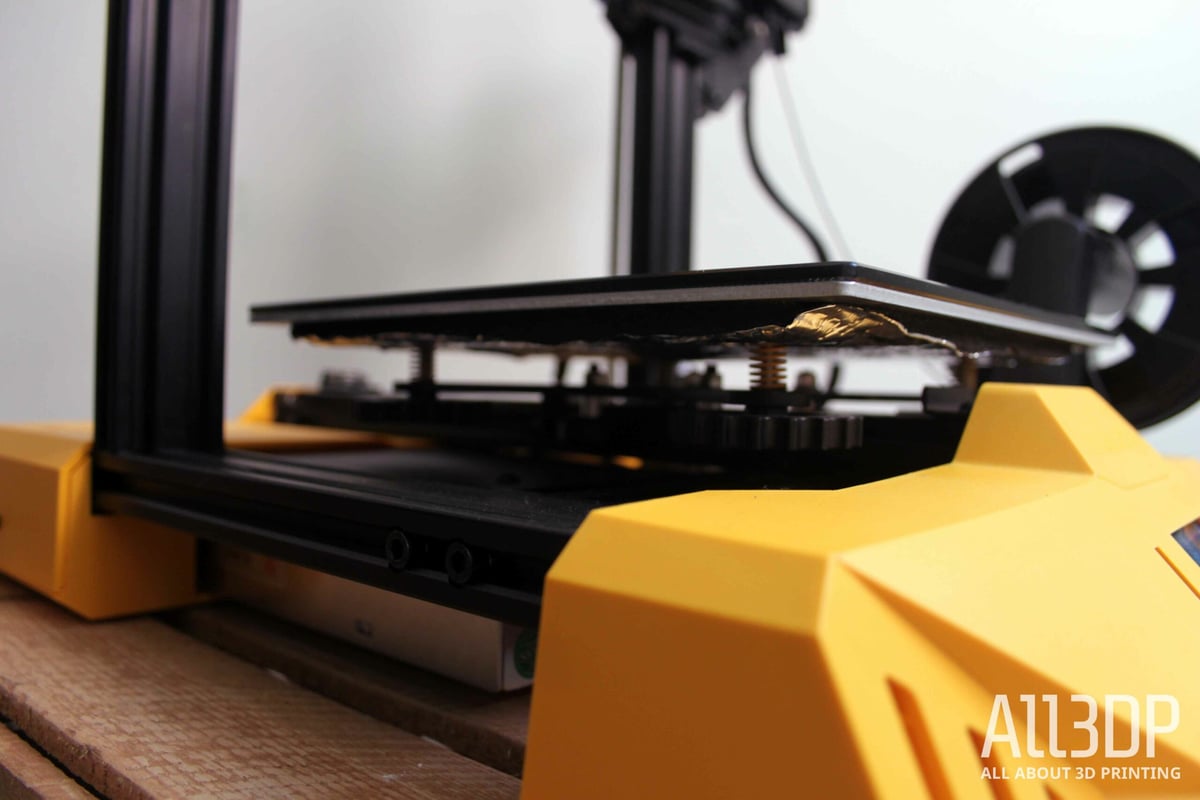
Tempered glass is our preferred print surface, and the Hornet’s porous top helps first layers to adhere well when heated. Prints pop off easily once the bed is cooled, so there’s no need to scrape a spatula across it. If you do end up needing to do some scraping, you won’t need to worry about damaging the hard top.
With that said, being inseparably attached to the heat plate does pose some problems. First, it makes the surface difficult to clean should you ever need to aid adhesion with glue or tape. Second, you can’t swap out a print bed without also changing the heat plate, which makes replacing a damaged print bed much more expensive – demonstrated by Artillery’s $76.15 price for a replacement. Finally, you won’t be able to adjust slightly warped heat plates with tape under the print surface.
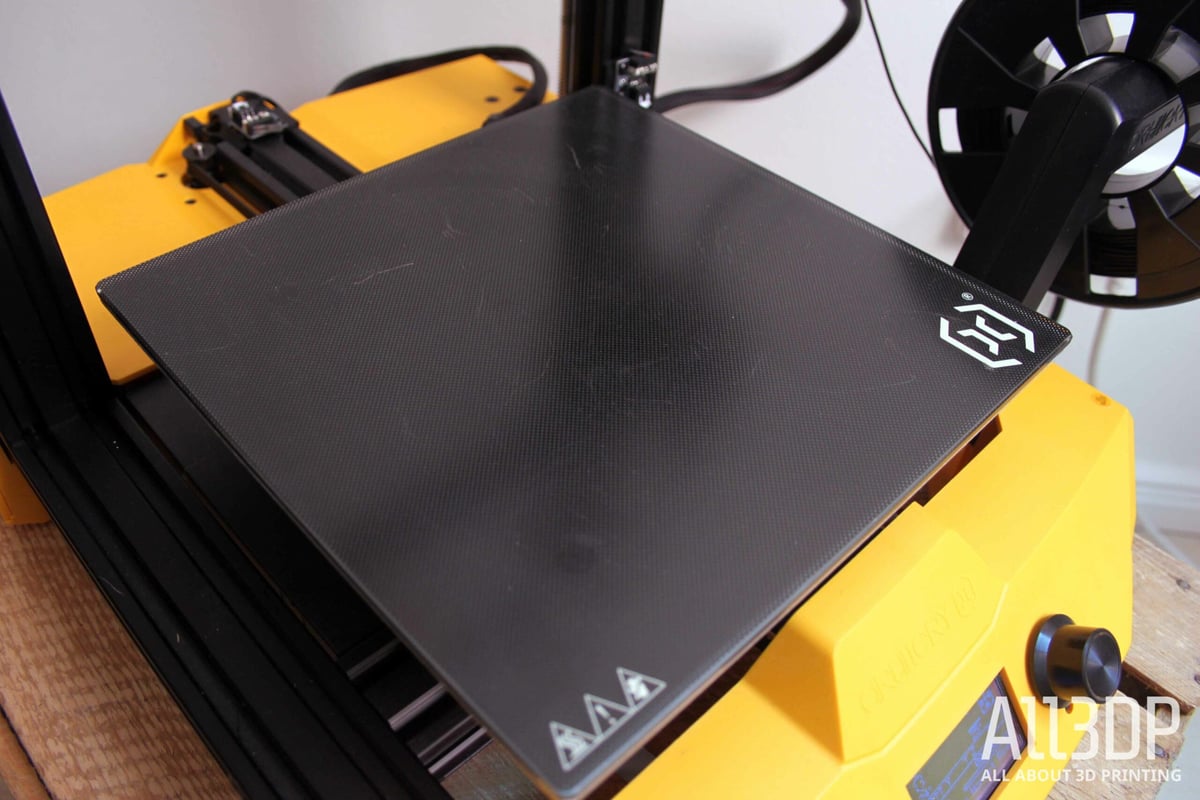
Overall, the Hornet’s print bed is great quality for the product’s low price and feels like the sort of surface we’d upgrade many printers of the same cost to.
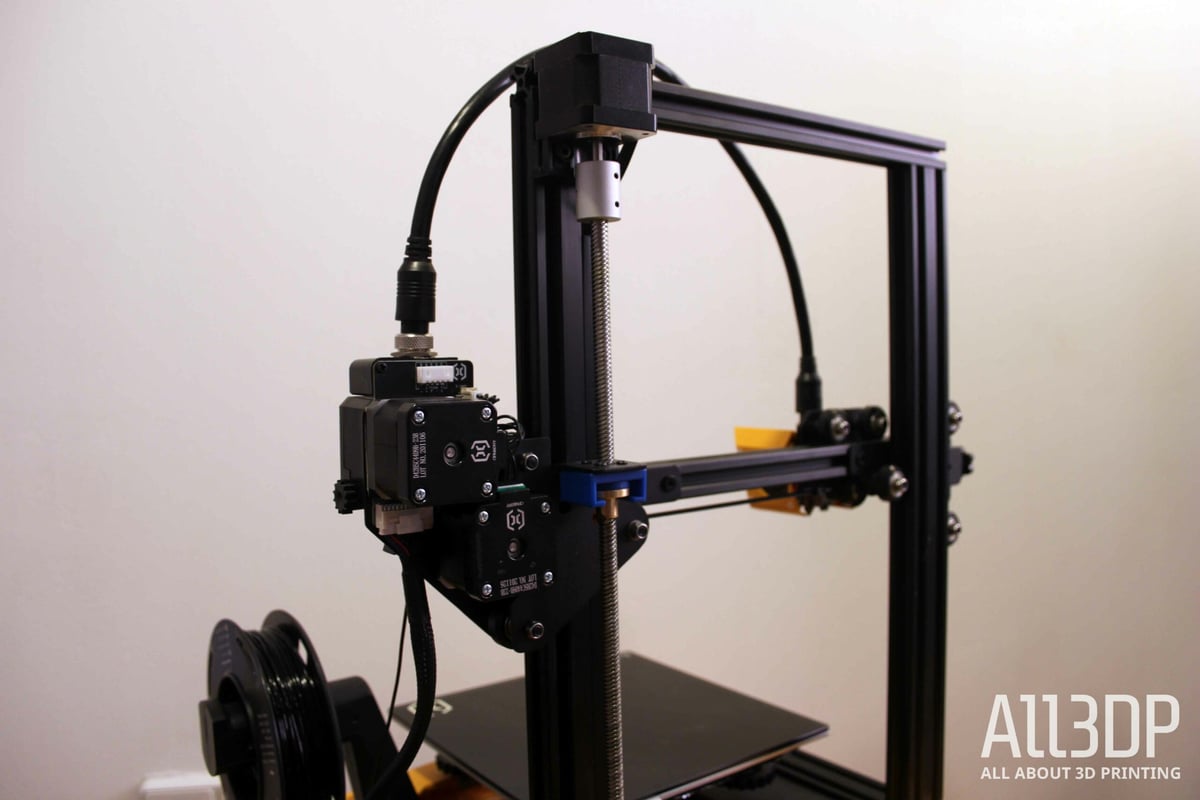
All-In-One “Aviation” Cable
Artillery has a history of designing products with cable management in mind, a consideration we appreciated on the Sidewinder X1. With the Artillery Hornet, the company has used a new patent-pending all-in-one cable, called the Aviation Plug GX18-8 Integrated Molding Line, that encases the PTFE filament pathing in the system’s cabling.
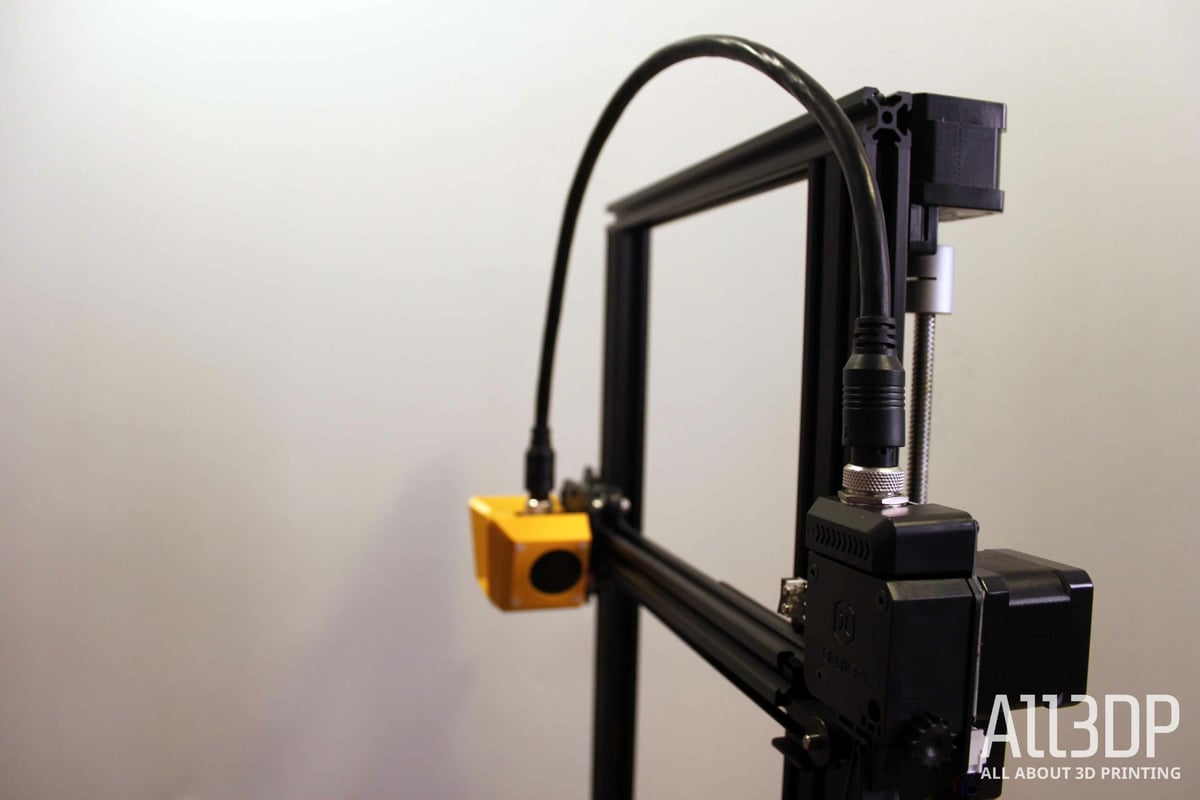
The all-in-one cable keeps things neat but presents some limitations. The all-in-one cable lends a clean look to the printer immediately poses some problems. For one, it makes hot end cleaning methods like a cold pull impossible since the hot end can’t be powered without also inserting the filament pathing. This can present a problem for cleaning, but methods like a cold pull might be too daunting for the entry-level consumer market that Artillery is targeting with the Hornet anyways. It’s not impossible to work around, either. We recommend keeping acupuncture needles and nozzle cleaning filament to deal with loose debris in the nozzle. But bear in mind that tough clogs will be more difficult to clean.
The unique cabling system also makes sourcing replacements pretty limiting. With no conceivable workaround, Artillery can pretty much name their price. And they have. The Aviation Plug is going for $68.65 at time of writing. At about a third the price of the Hornet itself, and combined with a history of cable problems from the company, that’s a concerning restriction and not very consumer friendly.
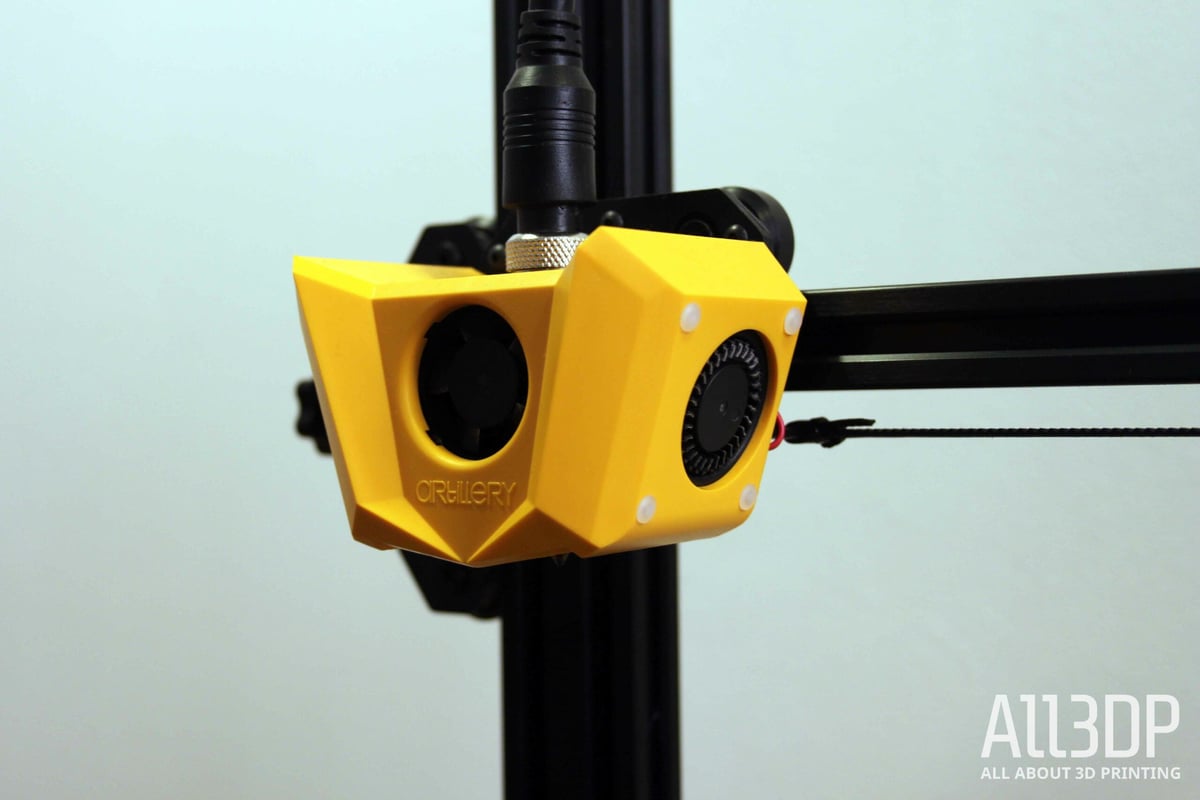
The Extruder & Hot End
Which came first, the all-in-one cable or the Bowden? We might never know. Regardless, the Hornet’s all-in-one cable wouldn’t have been very desirable with Artillery’s usual direct drive extruder setup, but fits in with the company’s first try at a Bowden with their Titan extruder. The hot end has three fans: an axial fan up front to cool the hot end and two blower-type fans on either side for part cooling. If you do fancy an upgrade, Artillery said the Hornet is compatbile with the E3D V6 all-metal hot end — though we didn’t try the upgrade ourselves.
Beyond fitting with the hidden filament pathing, the Hornet’s Bowden extruder helps achieve the clean look that Artillery seems to have been going for. Many makers like to help direct drive extruders along by placing filament spools on top of the printer frame, but that raises the printer height. No good if you’re going for compact. The Bowden system draws filament from the bottom, keeping spools within the same width as the printer itself to take up as little room as possible.
We also saw the usual Bowden issues in the Hornet, hindered further by its unusual filament pathing. Out of the box, we found the Hornet to suffer jams again and again, and the opaque cable stopped us from being able to identify where the pathing went awry. We unloaded and reloaded filament often between prints and would have jams come up mid-print with seemingly no clogging to cause it. There’s a known issue with the hot end PTFE being cut too short, discovered by other Hornet reviewers. Though ours didn’t have such a glaringly obvious flaw, we expect the source was the same. It’s likely a simple issue of manufacturing tolerances.
Artillery was ahead of this issue, however. They reached out to us ahead of this review to inform us of a known pathing issue between the all-in-one cable’s PTFE and the short hot end PTFE past it. Artillery explained that there’s a short gap in the channel that users were finding to cause jams. They suggested replacing the hot end PTFE to fix it. And indeed, after replacing the hot end PTFE the issue was and we got some very impressive prints with no more jam failures.
While replacing the PTFE, we found that the modular hot end met Artillery’s claims of being easy to disassemble. Good too, it’ll be necessary for any chance at thorough cleaning with the cable combo.
In-House Ruby Mainboard
With this new printer, Artillery decided to take controllers in house. They developed a new 32-bit mainboard for the Hornet called the Artillery Ruby. It seems self-developed boards will be the company’s standard moving forward, as it’s now also offering 8-bit Ruby replacements for the Sidewinder X1 and Genius.
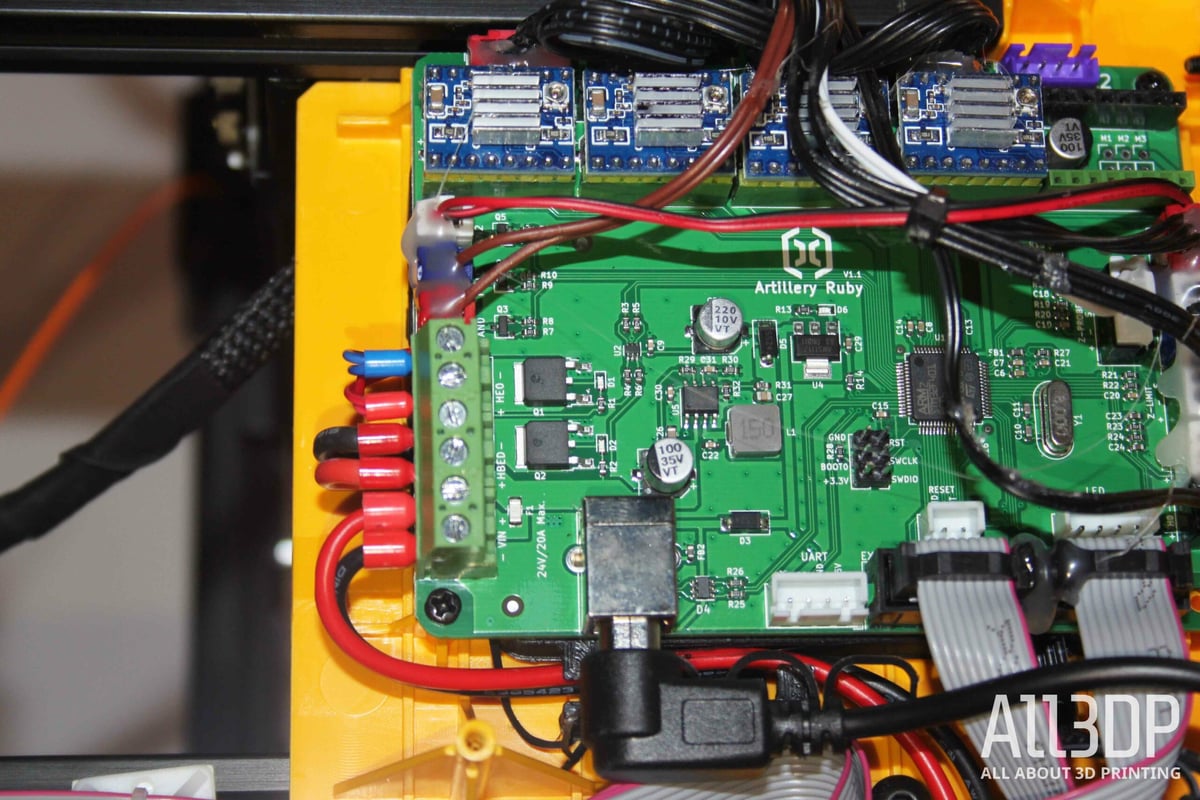
We’re happy to see the industry at large moving towards 32-bit, even in more budget-friendly printers, and expect any future Artillery products will also include this controller.
The mainboard’s cabling is glued down for travel and heater cables are secured safely with ferrules. Artillery did go a little heavy with the hot glue, which could be annoying if replacements are needed, but the mainboard is, like the Hornet’s cabling and print bed, relatively expensive to replace anyways at $68.79. At the printer’s ~$200 price, it probably isn’t worth it.
For some very high praise, the mainboard and stepper driver are incredibly quiet. The power supply fan is the loudest part of this machine and is itself a reasonable volume. It’s an easy system to recommend for proximity to your workspace.
Connectivity & UI
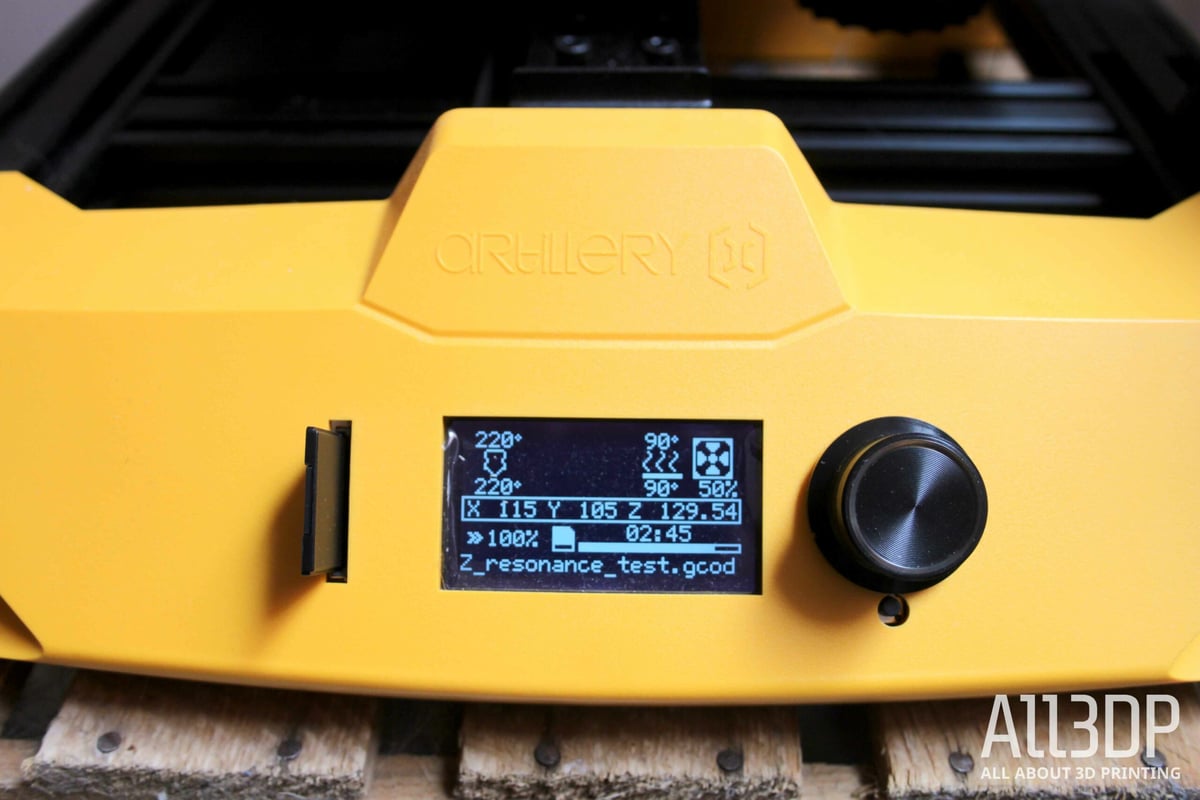
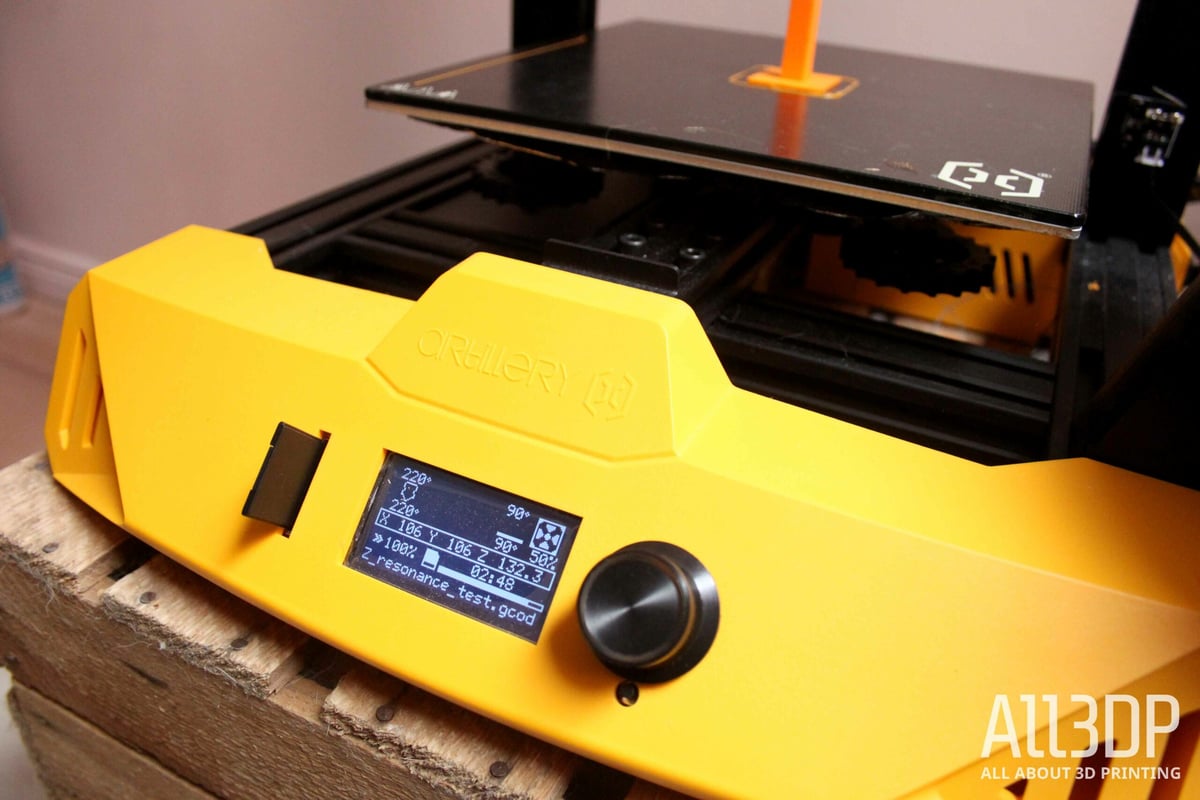
The display keeps things simple with a 12864 one-key knob mini-LCD display. The typical Marlin interface is easy to navigate. Nothing to complain about here, it’s a simple and familiar system.
For input, the Hornet takes an SD card or USB-B. Perfectly fine for a low-cost printer, but USB-A would have been nice.
Printing and Usability
Assembly & Preflight Settings
The Artillery Hornet is packaged tight and secure on delivery, with the extruder tucked away in foam with a sticker signaling its location. It comes pre-assembled: users just need to attach the framework with four base screws and the extruder carriage to the X-axis with another 4. The included injection-molded spool holder snaps to the base frame easily and is roomy enough for reasonably large spools. After tightening up the belts and V-slots, you’re pretty much ready to dive into printing.
As mentioned previously, the Artillery Hornet requires manual bed leveling, so that will probably be the most time-consuming part of the setup. We found the center of our print bed to be somewhat higher than the corners. This is likely just due to some mild warping, which is not unusual for a printer at this price but is unfortunate considering the adhered bed makes it impossible to get the bed more level. Don’t take that too seriously, though, with a little finesse, we dialed the print settings in and achieved great first layers.
The Hornet takes SD cards but shipped with a microSD pre-loaded with Cura 4.6.2, a free and popular slicer by Ultimaker that’s very approachable for new users, and a microSD card adaptor. The SD card also has Cura profiles for fine, fast, and normal Hornet settings, as well as start and end code, and an Artillery test print both pre-sliced and in STL format so you can slice it yourself.
The Prints
Now for what you really want to know. How does it print? The answer: for a printer at this price? Really well. the Hornet puts out very finely detailed prints at a reasonable pace.
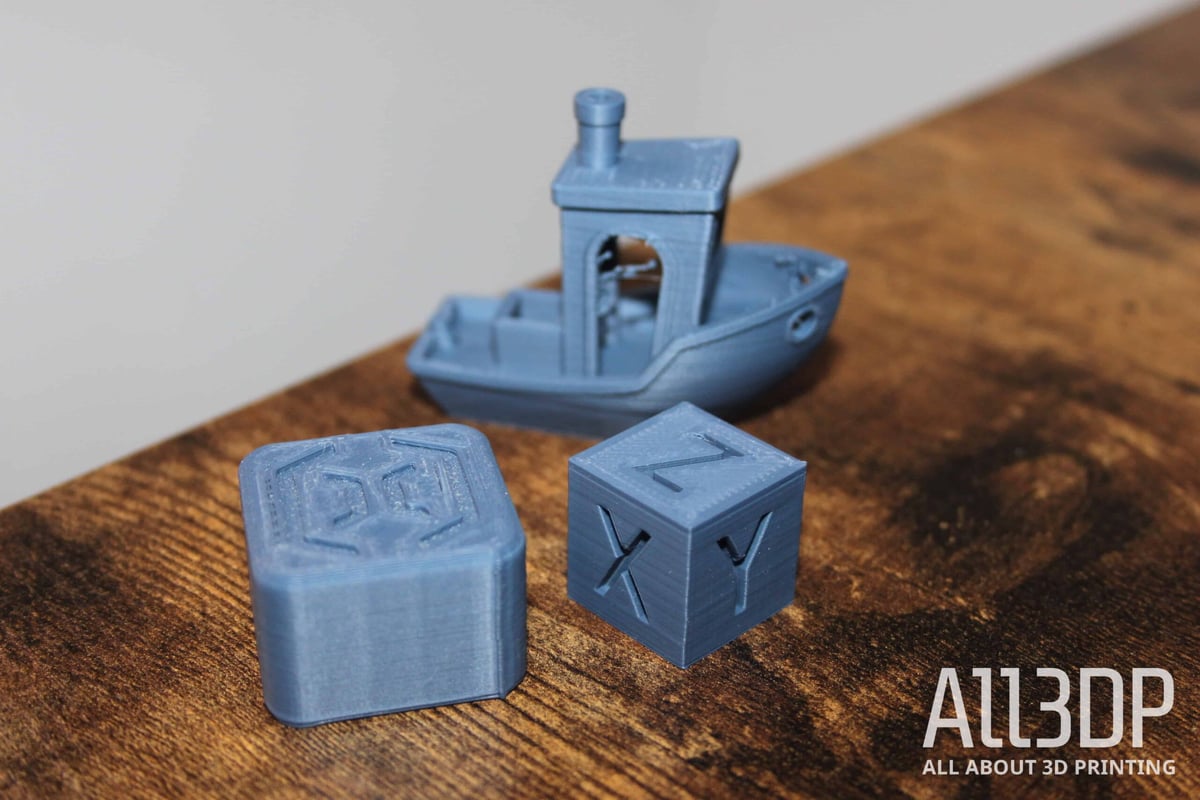
That’s not without a caveat or two. As mentioned previously, we ran into show-stopping jams between and mid-print – likely due to a short hot end PTFE. It was a quick and easy fix, and we didn’t run into the issue again after swapping it out. From there on we got good prints out of the Hornet for a machine around $200.
With PLA, print-in-place models came out well, even with higher layers. Poor overhangs did hurt some of the hinges, but the issue is less present with finer layers.
It’s worth noting that, with materials other than PLA, we found the Hornet’s first layers to be rather unforgiving – both in the case of PETG and TPU. It can take some work to dial in the print settings, with excessive drooling causing blobs that would tear the first layer if things aren’t just right. But once you’re there, it’s off to the races.
PETG fared okay, but heavy stringing prevented the Hornet from achieving some finer details. Still, it was far from the worst case of stringing we’ve seen and with further tweaking in slicer, you’d likely be able to reign it in more.
Where the opportunity for heavy stringing wasn’t present, the Hornet performed exceptionally. Really impressively, actually. Using vase mode, we produced a print quickly and with stunning detail out of PETG.

TPU printed surprisingly well for a Bowden setup. It was prone to even more drooling and blobbing than PETG, but once dialed in for a perfect first layer the problems subsided and stringing was even less present than with PETG. Some overhangs performed noticeably worse with the flexible material (the 40° bow), but nothing egregiously beyond our expectations.
However, we didn’t notice any excessive over/under-extrusion – which was expected from a Bowden system. For simple flexible prints, the Hornet is definitely suitable.
Usability
With a standard Marlin one-knob interface there’s not much to say about the Hornet’s UI. Straightforward in the RepRap ways of yore. We like the touchscreen interfaces on Artillery’s other products, but if a company it looking to cut manufacturing costs for a budget offering, simplifying the interface is a fine place to do it.
The Hornet also cuts costs by doing away with some of the quality-of-life features offered in Artillery’s other products. Lack of a filament sensor means that running out of material won’t pause your print, and there’s no print resume function in case of power loss. If you’re fine with the occasional failed print, or at least a few more ready checks, and don’t consider these features a must have, the Hornet is a straightforward budget machine that does what it’s supposed to.
Is it Worth it?
The Artillery Hornet is a straightforward 3D printer that’s easy to put together and easy to use. The quality of its prints is pretty impressive for a printer that goes for about $200, and it’s quiet enough that this writer happily worked away with it next to his desk for a couple weeks.
Ultimately, whether the Hornet is worth it will depend a lot on context. If you’re new to 3D printing or generally not looking to tinker much with your machine, the Hornet does provide you with some quality features, a clean aesthetic, and good quality prints. That said, the Hornet’s print settings weren’t especially forgiving, and there may be some small fixes you need to make – like swapping out hot end PTFE – that make it un-ideal for a first printer. Ultimately, other printers are in the sub-$250 price range that don’t suffer these issues and leave more opportunity for modifications in the future.
Where the Hornet might fit very well is in education. Because of the glued and otherwise neatly-kept parts, there’s not really a lot that can be shifted incorrectly by a steady stream of young 3D printing newbies. To top it off, its flashy looks might make it approachable to those who might be intimidated by more conventional-looking printers. With an instructor to take care of any out-of-box fixes and dial the system in, it’s an otherwise smooth experience that produces great results for what is an admirably low price.
Features
Pretty Case
Just look at it. The sporty looking bright yellow Hornet is easy on the eyes compared to most 3D printers out there, like the result of a cheeky little love-in between a Sidewinder X1 and a Lamborghini. Ain’t nothin’ wrong with that.
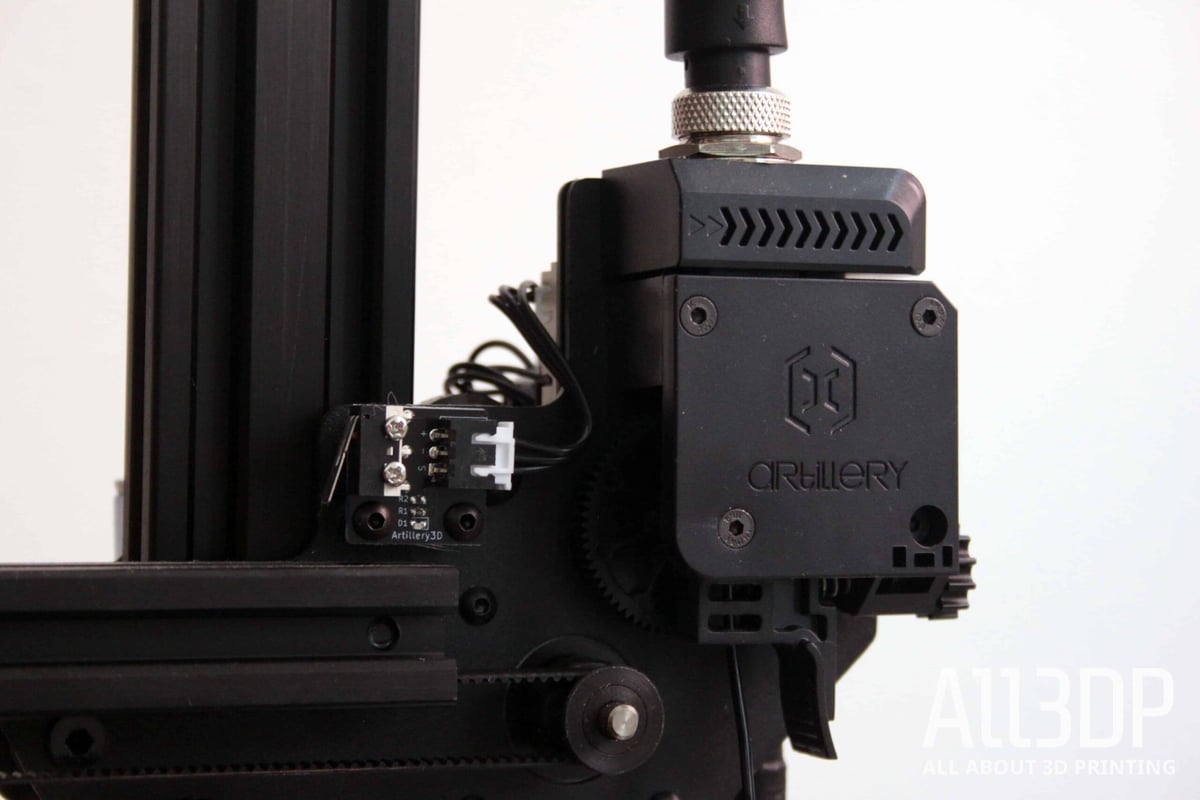
Aviation Connectors
It really does look as if Artillery decided to use some aviation connectors on this Hornet. They’re neat, tidy, sturdy, and very unlikely to come undone. Unfortunately, they could make cleaning and diagnosing an issue in the future. It’s impossible to do a cold pull since the hot end can’t be connected without the filament pathing, and when we ran into filament pathing issues the cable made it harder to diagnose. Still, they do look good.
Artillery Ruby Mainboard
Perhaps the most interesting piece of tech that jumps out at us with the Hornet is its Artillery Ruby 32-bit mainboard. According to Artillery, a self-developed mainboard was always part of the plan right from its first step into 3D printer manufacturing. The mainboard works well combined with Artillery’s stepper driver, delivering a quiet printing experience. Artillery seems to be betting that this is the right road to walk down for its future creations, since it’s also selling replacement 8-bit Ruby mainboards for its other printers.
Delightfully Average Build Space
At 220 x 220 x 250 mm, the Artillery Hornet’s build space is exactly what we would hope to see on a modern budget 3D printer. It matches both the Creality Ender 3 and the Artillery Genius down to the millimeter.
The build plate is one of Artillery’s own and can heat up to 140 °C. Artillery isn’t touting fast heating as a feature with this one, presumably because they swapped AC heating for DC, but we found it suitably speedy regardless.
A Proper Filament Holder
Yeah, this isn’t usually something we’d make a note of, but seeing as the filament holders on both the Sidewinder X1 and the Genius were so roundly hated, this ordinary filament holder goes down far better.
Modular Hot End
The lightweight hot end gets up to 260 °C in good time. We found it straightforward to disassemble, which made it easy to replace the contact PTFE. Good that it is, because the cable could make cleaning tough.
Bowden Titan Extruder
Unlike Artillery’s other products, the Hornet uses a Bowden extruder. We had some filament pathing issues at first, likely due to a gap in the hot end PTFE, but otherwise found extrusion to be steady. Even flexible materials worked well, which is admirable.
Marlin Rotary Knob mini-LCD UI
Nothing special with the UI, but it’s more than sufficient. Marlin is simple and familiar, and the one-key knob works fine.
Tech Specs
General Specifications
- Technology: Fused deposition modeling (FDM)
- Year: 2020
- Assembly: Pre-assembled
- Mechanical arrangement: Cartesian-XY-Head
- Manufacturer: Artillery
3D Printer Properties
- Build volume: 220 x 220 x 250 mm
- Feeder system: Bowden drive
- Print head: Single nozzle
- Nozzle size: 0.4 mm
- Max. hot end temperature: 260 ℃
- Max. heated bed temperature: 140 ℃
- Print bed material: Tempered glass
- Frame: Aluminum, ABS
- Bed leveling: Manual
- Connectivity: SD card, USB Type-B
- Print recovery: No
- Filament sensor: No
- Camera: No
Materials
- Filament diameter: 1.75 mm
- Third-party filament: Yes
- Filament materials: PLA, PETG, TPU
Software
- Recommended slicer: Cura
- Operating system: Windows, Mac OSX, Linux
- File types: G-code
Dimensions and Weight
- Frame dimensions: 470 x 410 x 450 mm
- Weight: 8 kg
Similar Machines
Artillery Genius
This new Hornet has some noticeable differences to the Genius that came before it, even if it does have the same print volume. If you’re willing to spend $100 more, the Genius comes with some very desirable features like an AC heated print bed, filament sensor, and a nice touchscreen interface.


Creality Ender 3 V2
A popular and affordable printer that really changed the way budget 3D printers were perceived. It’s not perfect, but there aren’t many printers that are and the Ender 3 V2 can give you a lot for the price that is being asked for it.


Original Prusa Mini+
Currently our top pick for beginner 3D printers. The Original Prusa Mini+ is a stellar machine with a reliable company behind it. The DIY kit is just $150 more than the Artillery Hornet and comes with the best documentation we’ve seen, so you’ll have no trouble building your own printer. Any trouble you might run into, there’s a giant Prusa community eager to lend a hand.


License: The text of "Artillery Hornet Review: A Flashy Printer for Beginners" by All3DP is licensed under a Creative Commons Attribution 4.0 International License.
CERTAIN CONTENT THAT APPEARS ON THIS SITE COMES FROM AMAZON. THIS CONTENT IS PROVIDED ‘AS IS’ AND IS SUBJECT TO CHANGE OR REMOVAL AT ANY TIME.