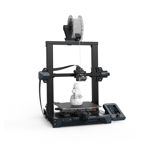
Artillery Genius Pro: All Brain, No Brawn
Rating

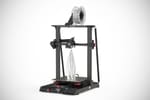
Artillery's Genius Pro is a new version of the successful printer with a tempting feature set. Read our review to find out how it performs.
The Artillery Genius Pro, an update to the manufacturer’s successful Genius 3D printer, was released alongside the Sidewinder X2 in August 2021. We gave the original Genius a brief 10-hour test when we did our hands-on back in the cursed year of 2020 but given Artillery’s ever-growing relevance in the space, we’ve been excited to put the Genius Pro through its paces.
As the name would suggest, the Genius Pro is an upgraded Artillery Genius, with some of those upgrades making it a little smarter and a couple more improving safety. The original Genius was a great printer itself and Artillery has shown it’s keen to listen to users when upgrading its systems. It’s added a lot of hardware value to the Pro for just a ~$60 price bump compared to its predecessor.
The Genius Pro is loaded with a lot of our favorite features, the best of which already appeared on the first Genius. The fast-heating AC print bed is truly quick to get up to temperature and the low-noise experience we’ve had with other Artillery products held true with the Genius Pro. Other feature upgrades were certainly meaningful, but, despite this, we found the Genius Pro struggled to meet our expectations.
Because of the hardware parity between the Genius Pro and Artillery Sidewinder X2, we will, at times, mention our previous review of the latter printer. If you’re considering the Sidewinder X2 for a larger build volume, we suggest you also read our review of that machine, as our experiences with the systems differed greatly.
The Verdict
Pros
- Excellent feature set
- Consistent results at higher print speeds
- Fast heating AC tempered glass print bed
Cons
- Print surface quality well below expectations
- Subpar and poorly secured cooling duct
- Included manual missing crucial instructions
The Genius Pro ticks our largest boxes for hardware features – and does so while being pretty aesthetically pleasing for a 3D printer. Unfortunately, what we expected to be a smooth experience was stifled by subpar print quality that we couldn’t find a solution to through regular calibration and maintenance.
As seen on other Artillery printers, the AC print bed gets up to temperature fast — we usually saw our prints starting in under two minutes. Unfortunately, also like other Artillery printers, the tempered glass bed continues to suffer from poor thermal uniformity, which was problematic on more demanding and spread out prints.
When it comes to print quality, we found the Genius Pro wanting. Given the all-star hardware lineup, we expected clean prints with minimal calibration. The results were definitely passable, but we found them wanting. Persistently poor layer alignment had us tinkering with and recalibrating the Genius Pro for an inordinate amount of our time with the system; chasing results, we were confident the printer was capable of. Unfortunately, our experience doesn’t seem to be an isolated one, and we feel the unusually involved adjustments to accomplish truly quality results are out of line with what’s delivered from many budget 3D printers today with just routine calibration.
All told, if you find the hardware set appealing and are willing to spend some time tinkering with a potentially unwieldy machine, the Genius Pro is an exceptional deal at ~$340. Unfortunately, what would have been a seamless experience was tainted by disappointing results.

The Tech
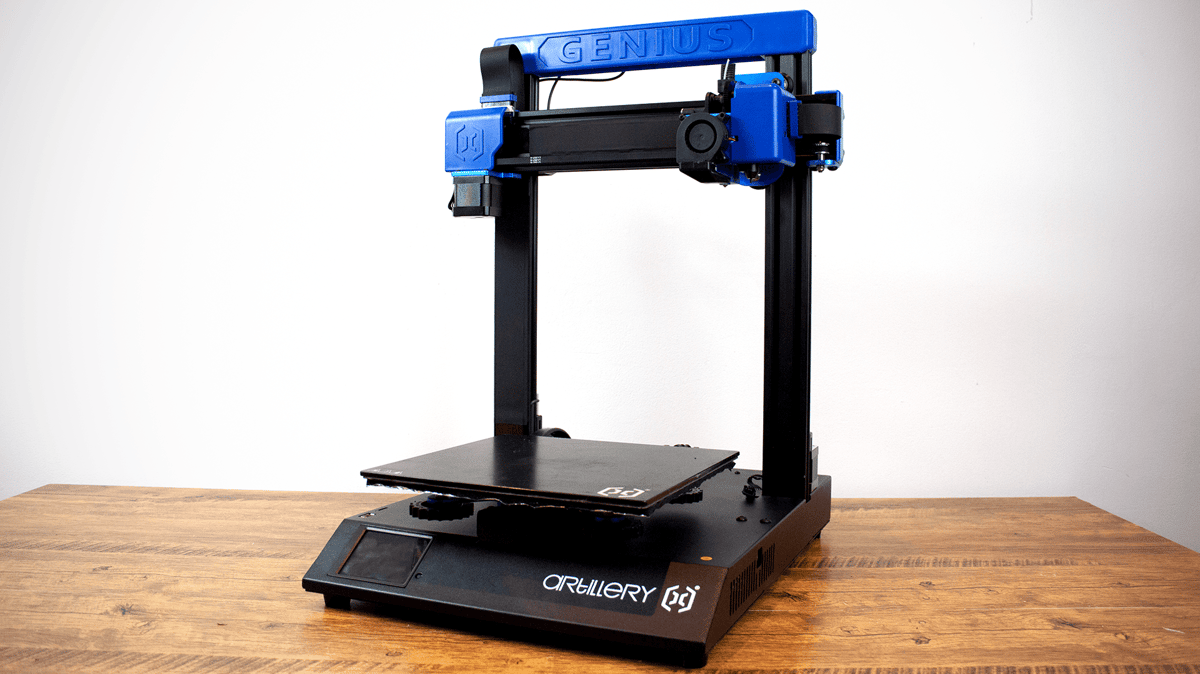
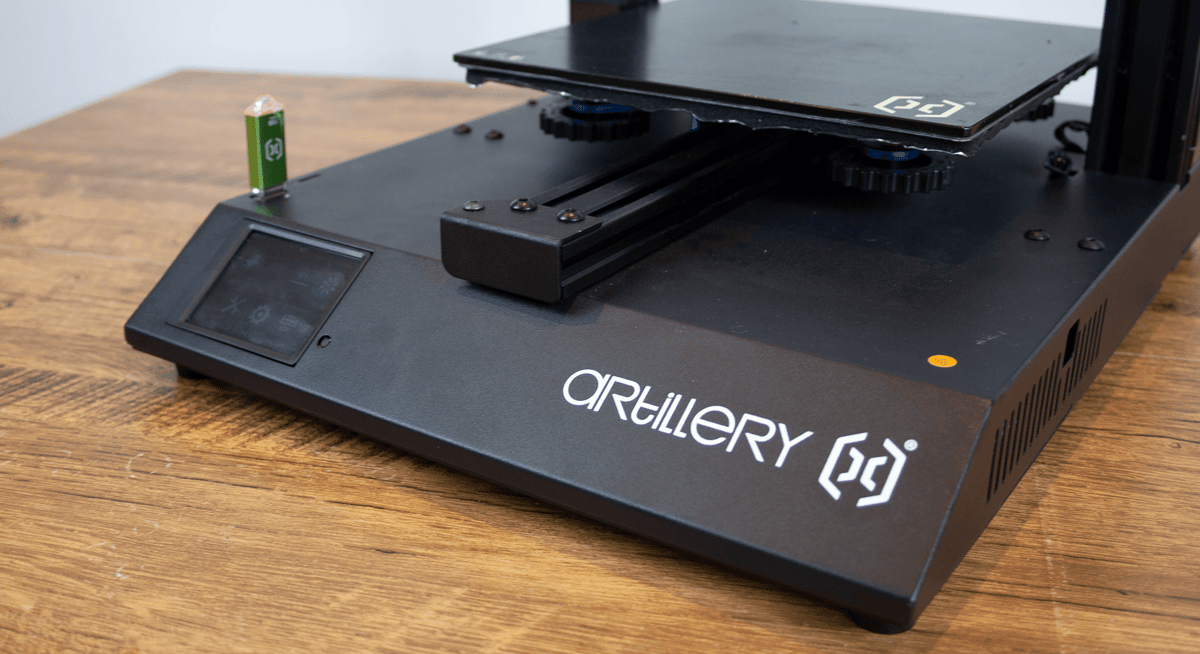
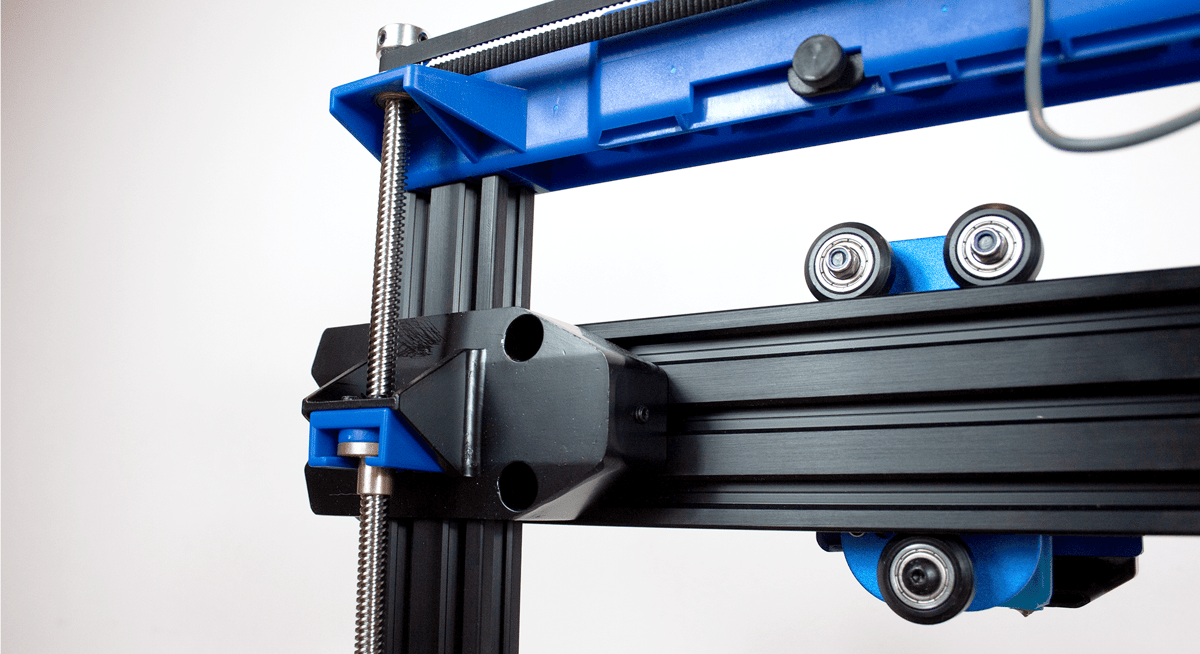
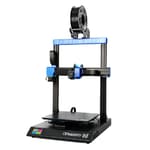
The Artillery Genius Pro is a Cartesian-XY-Head 3D printer that comes loaded with a great set of features surrounding its 220 x 220 x 250 mm build volume. It’s mostly a straight continuation of the preceding Artillery Genius with some added quality-of-life hardware like stock auto bed-leveling (ABL) and Artillery’s new 32-bit in-house “Ruby” mainboard. Also, importantly, dramatically improved cabling with pre-installed strain relief and metal Z-carriages.
If you take a peek at Artillery’s Sidewinder X2, you’ll notice there’s hardware parity between the printers – which differ only in size. Don’t take that to mean these printers perform the same, though. The varied sizes came with some serious tradeoffs that led to problems not existent in this smaller version.
Good-Looking Build
Artillery’s Genius Pro continues the original Genius’ clean, colorful look. Its black aluminum base is appealing and serves as great housing for its mainboard and power supply. We’re fans of the blue injection-molded casing that makes the printer look like consumer hardware that can fit into any room without being too jarring.
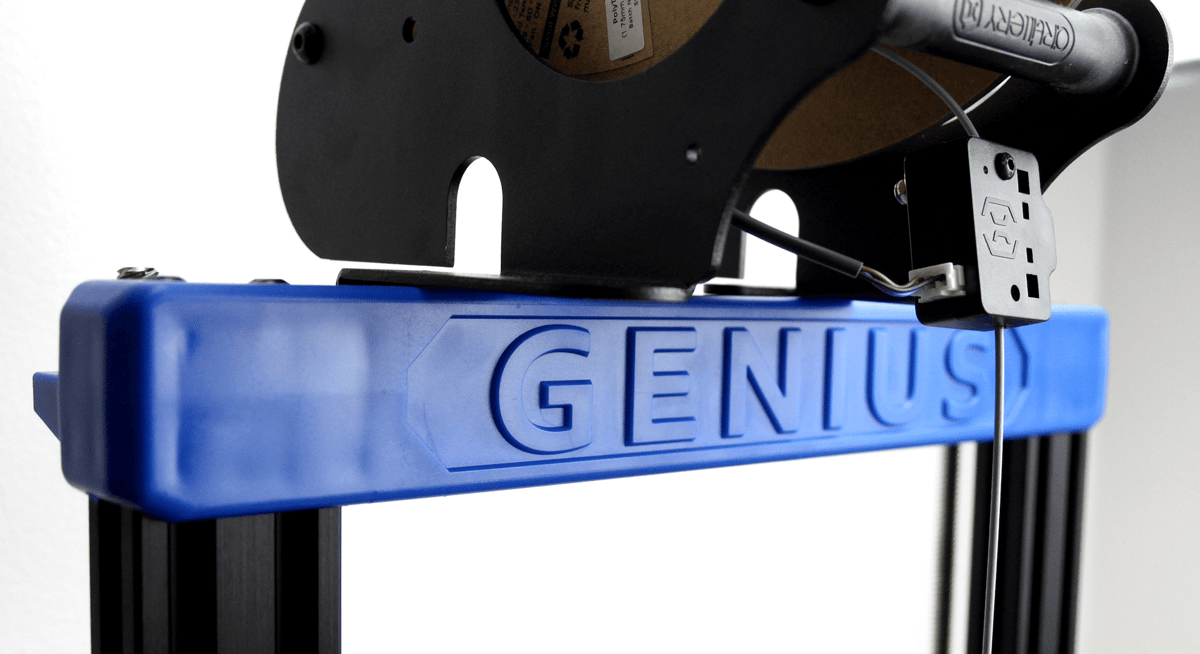
Clean cabling also serves the printer’s quality aesthetics and is one way the Genius Pro has improved on its previous iteration. The original Genius had the clean-looking wide cables along the left Y extrusion and the X-axis that have carried over to the Pro, but they were of concern. Though the issue wasn’t as notable as it was on the Genius’ bigger sibling, the Sidewinder X1, cable wear and strain were still concerns. The Genius Pro has addressed those concerns with injection-molded strain reliefs that come pre-installed and a thick but flexible cable for the fast-heating AC print bed with a guide sunk into the printer’s base to ensure it only moves as intended. Top marks for thoughtful and safe cable solutions.
One concern about the Genius Pro’s outward appearance came in the form of a sticker. Artillery’s latest printers seem to have a sticker reading “warranty void if seal is broken” attempting to deter users from getting into the electronics… on a 3D printer. What?
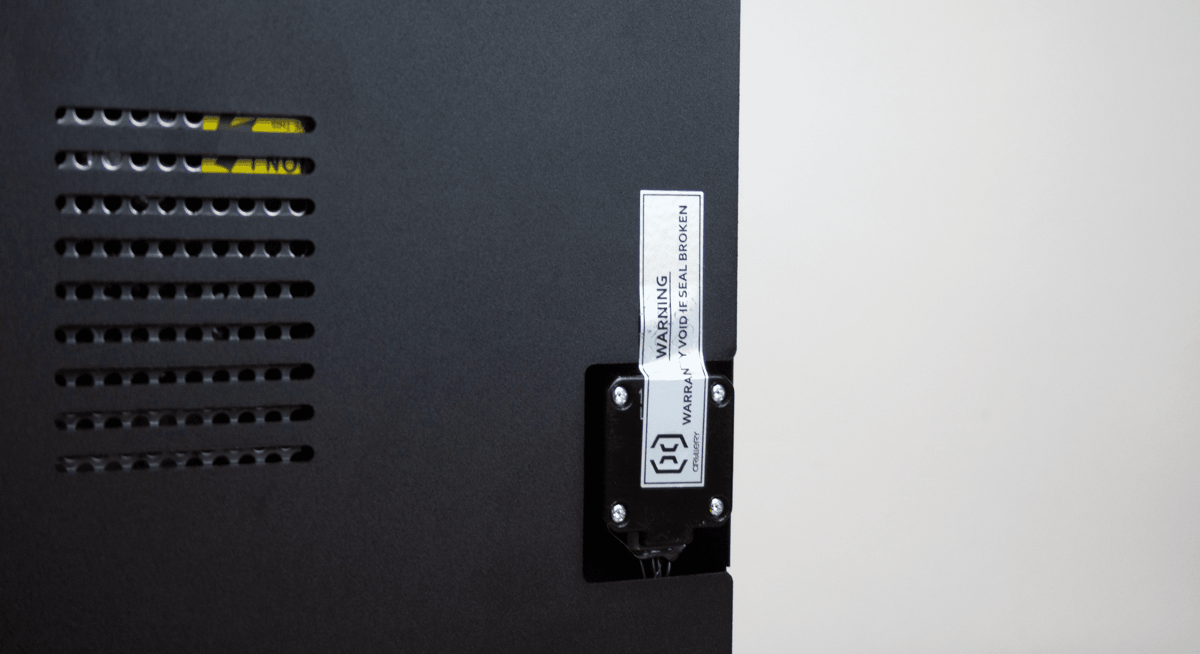
In many places, these warranty restrictions aren’t enforceable but still show up as a ploy to deter would-be tinkerers from taking a look inside. As far as we’re concerned, this is a huge faux pas for the 3D printer industry. At All3DP, we firmly support the right to repair and, beyond that, it’s important for 3D printer users to have access to the mainboard and power supply to verify solid connections and the absence of fire hazards. We couldn’t think of another 3D printer we’ve seen these stickers on, and it’s a huge disappointment to see from a manufacturer making waves in the industry.
Up-To-Date Hardware
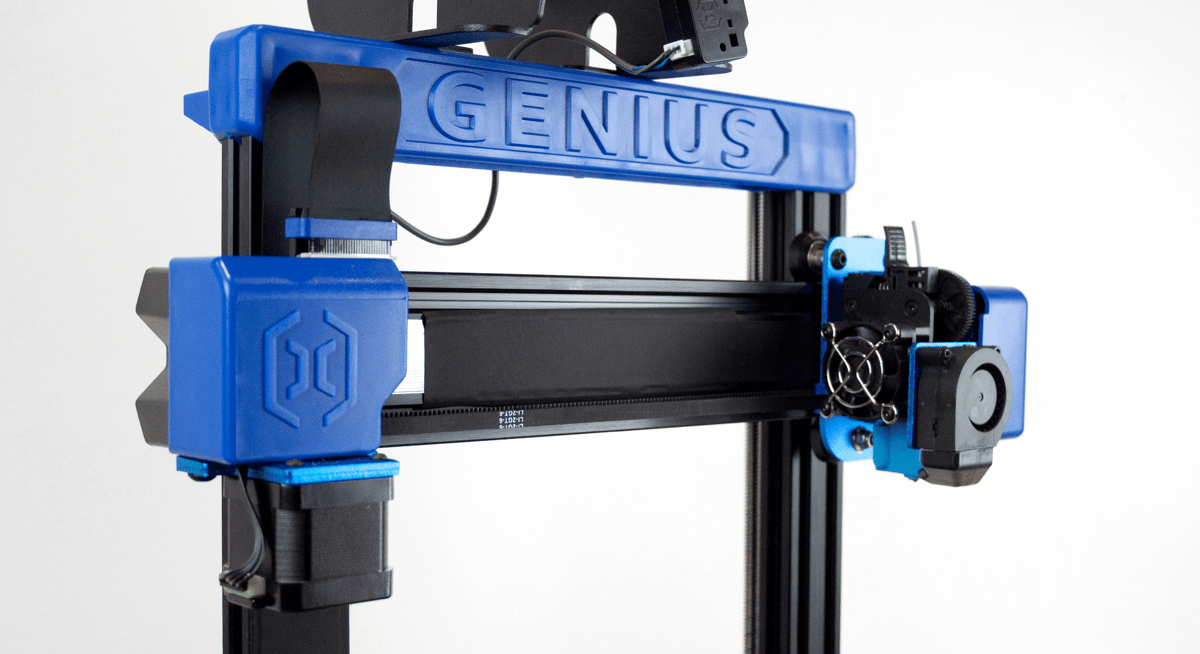
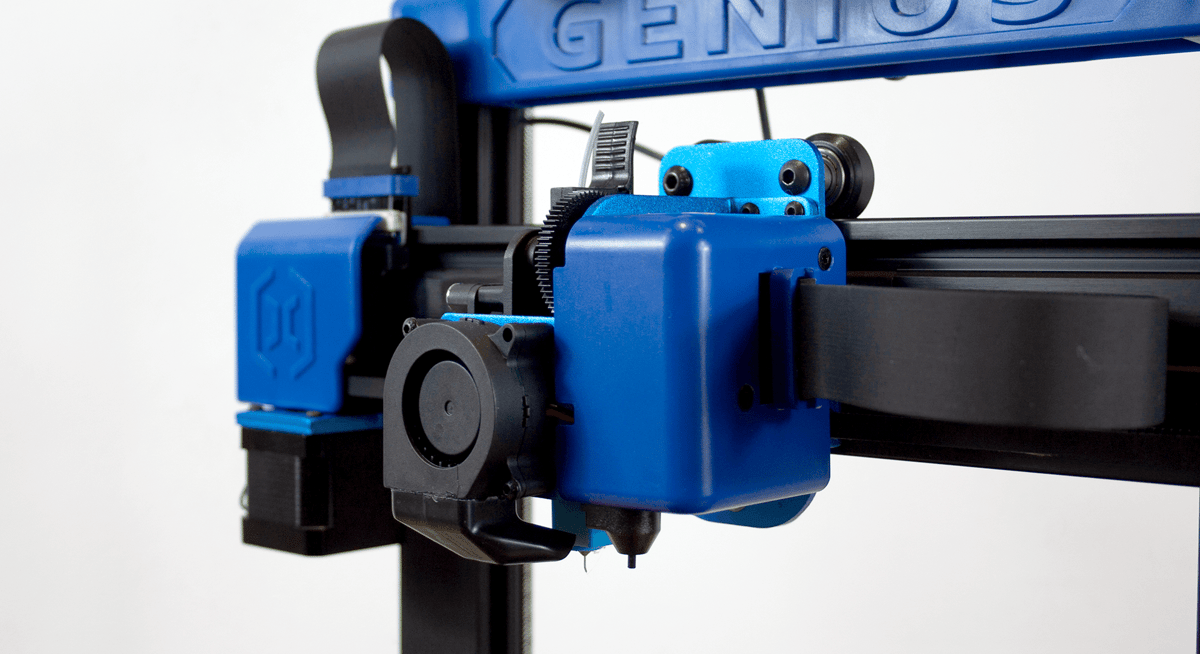
The Genius Pro has everything you could expect from hardware in today’s budget systems, and the fast-heating AC print bed is a welcome cherry on top. The printer uses a direct Titan-style extruder with a cloned Volcano nozzle that can keep up when printing at high speeds, and the included touch probe adds ever-helpful ABL from stock.
Artillery’s AC-powered fast-heating print bed with a tempered glass build surface makes a return on the Genius Pro. We’re fans of how quickly these beds get up to temperature, reaching 70 °C in about two minutes, but that’s really the only highlight for these beds. They have consistently suffered from poor thermal uniformity across Artillery’s products, and the issue is compounded by the surface itself being adhered to its heat pad — making it difficult to both clean and replace. To remove these glass tops, you need to heat the bed and peel the padding off. Not ideal. What’s wrong with an aluminum heat plate and some good ol’ clips?
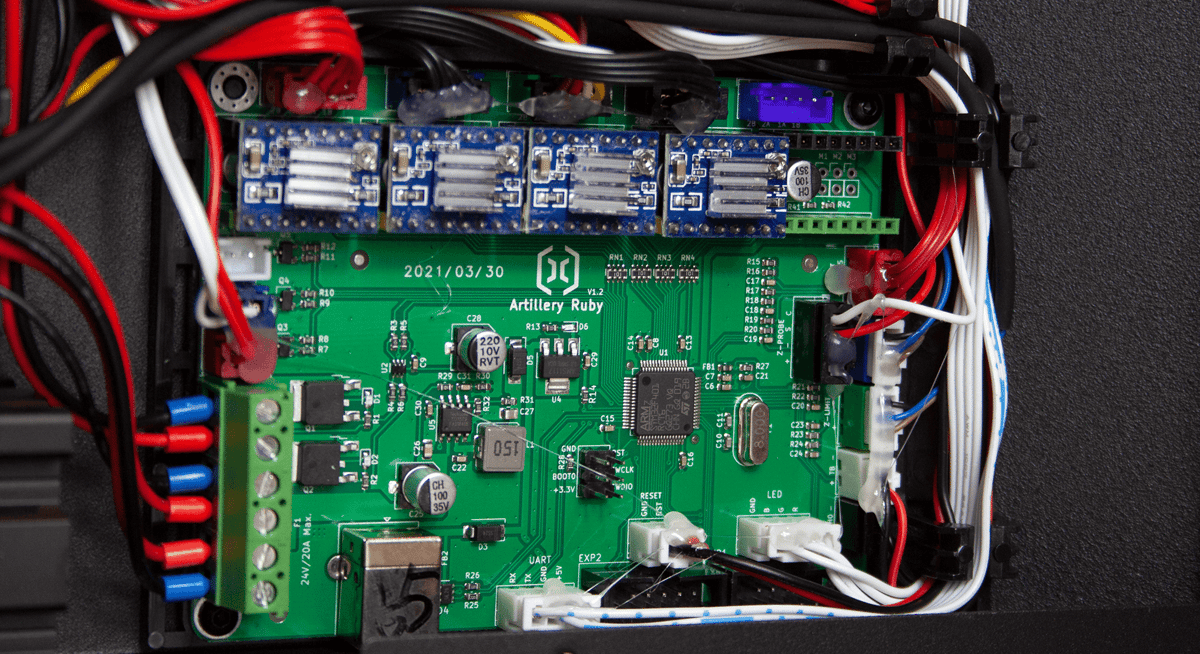
The Genius Pro’s mainboard has received a notable upgrade in the form of Artillery’s 32-bit “Ruby” mainboard. The last Genius was only 8-bit, but that’s simply too slow for the number of commands 3D printers are processing these days. Artillery opted to develop its own mainboard with an ARM processor for this, and it’s finding use in all its new products. It’s a fine board, and we’re happy to see 32-bit becoming a standard feature. Though, we do wish Artillery used this power to include a few more Marlin features like linear advance — which may have helped where the Genius Pro struggled most.
The Genius Pro is missing a few features that would have made our troubleshooting a little easier, key among them being belt tensioners. It’s honestly baffling that this is missing from an otherwise premium feature set. To adjust belt tension, users must loosen the two screws attaching the belt pully to the X or Y axis and push the pulley to tense the belt. As you might imagine, there’s little play and, in our case, it didn’t create enough tension in either belt. For the print head’s belt, we had to loosen the pulley again, remove the print head’s casing and electronics to access the cable tie that attached the belt to the print head, cut the tie and re-tighten the belt on the print head before finally tensing and resecuring the belt pulley. A simple knob should be available to adjust tension, and third parties have provided a solution for this since the original Genius.
Printing & Usability
Setting Up
The Genius Pro was well packaged and easy to set up. Its gantry comes pre-assembled with its cables already connected to the print head and stepper motors – including strain relief. Four simple screws secure the gantry to the printer’s base from below in a horizontal alignment. Users need only hook three cables into mainboard connections at the base’s top.
Artillery’s instructions are mostly good. We’d always prefer detailed instructions, which the Genius Pro’s weren’t exactly, but it’s a fair guide to get users up and running and makes a point of advising users to adjust the V-slot wheels – which some instructions miss. We did find the Genius Pro’s manual is still being shipped out with an important mistake. The leveling and slicer sections of the manual fail to instruct users to enable the printer’s ABL with start G-code. Since Artillery instructs users to select the previous Genius model’s slicer profile in Cura, users need to add a line reading M420 S1 Z10 following the line with G28 in machine settings. Artillery didn’t include these instructions in the manual.
We first ran into this problem during our review of the Sidewinder X2 and gave it some leeway since the printer was shipped to us before release, but we acquired the Genius Pro well after launch and the issue has remained. Be sure to get an updated digital manual from Artillery’s download page if you buy a Genius Pro.
Speaking of the Genius Pro’s touch probe, it performed exactly as intended. No complaints regarding this BLTouch clone. Our initial layer-height calibration was easy with minor tweaks using the firmware’s +/- 0.025 mm command. During our Sidewinder X2 review, we had some dumbfounding trouble with the touch probe on this same print head, but the Genius Pro’s probe gave us no trouble at all. As such, if you do have some odd behavior from your Genius Pro or Sidewinder X2 ABL, get in touch about a replacement – we expect some are flawed.

The Prints
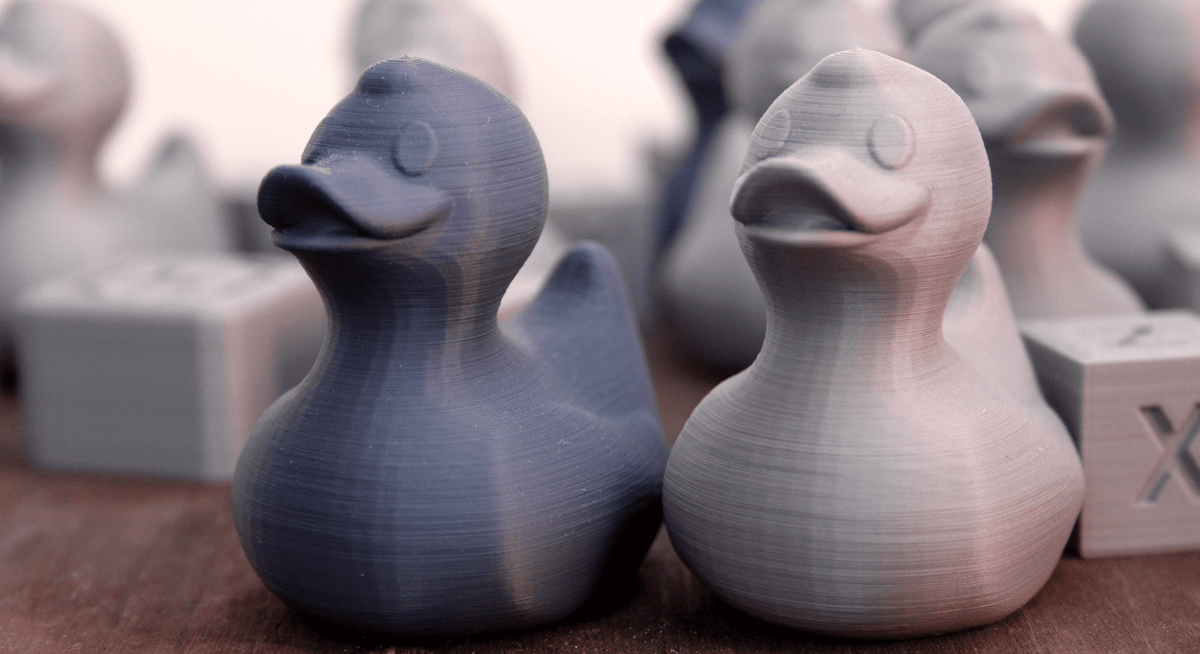
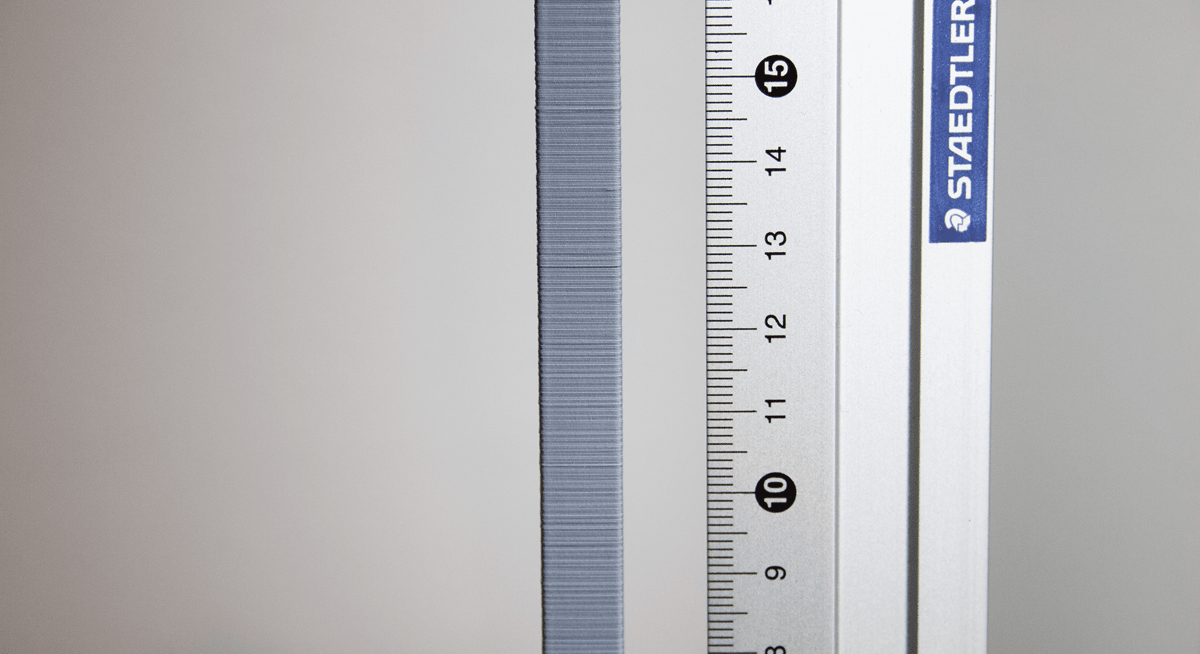
The prints that came out of the Genius Pro were… okay. With the right model and material, they were even impressive. But any good results were overshadowed by a persistent issue with layer alignment on the vast majority of prints. Any smooth surfaces printed on the Genius Pro came out with quality well below what we would expect from a 3D printer with its feature set. We tried to address it with calibration and mechanical fixes well beyond the regular scope of our reviews but to no avail.
Though the parts produced by the Genius Pro were certainly passable prints, they were well below the quality delivered by much less feature-rich printers sold at lower prices. Some members of the community seem to have tamed the Genius Pro and have shown off very impressive results but, in our experience, the amount of troubleshooting required before crossing the line to truly quality results was inordinate.
After churning out Benchys, we wanted to check whether the Genius Pro was affected by our major qualm with the Sidewinder X2 — stability. Whipping out a quick z-resonance tower, we were happy to find the Genius Pro didn’t have unreasonable Z-wobble like its bigger sibling.
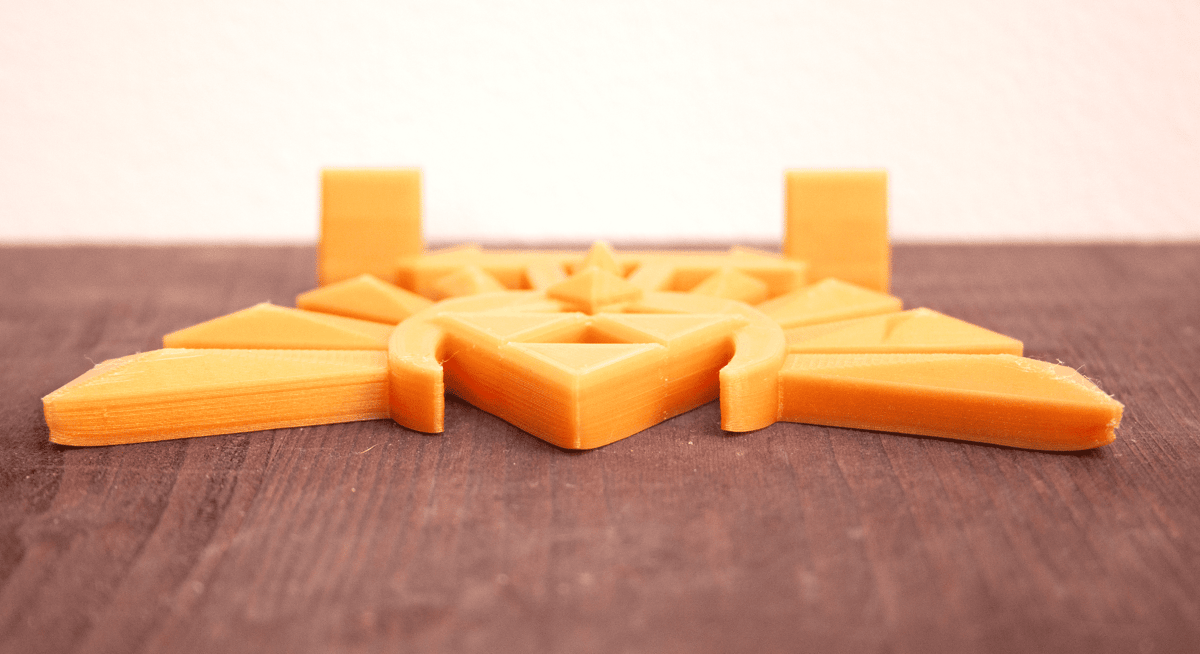
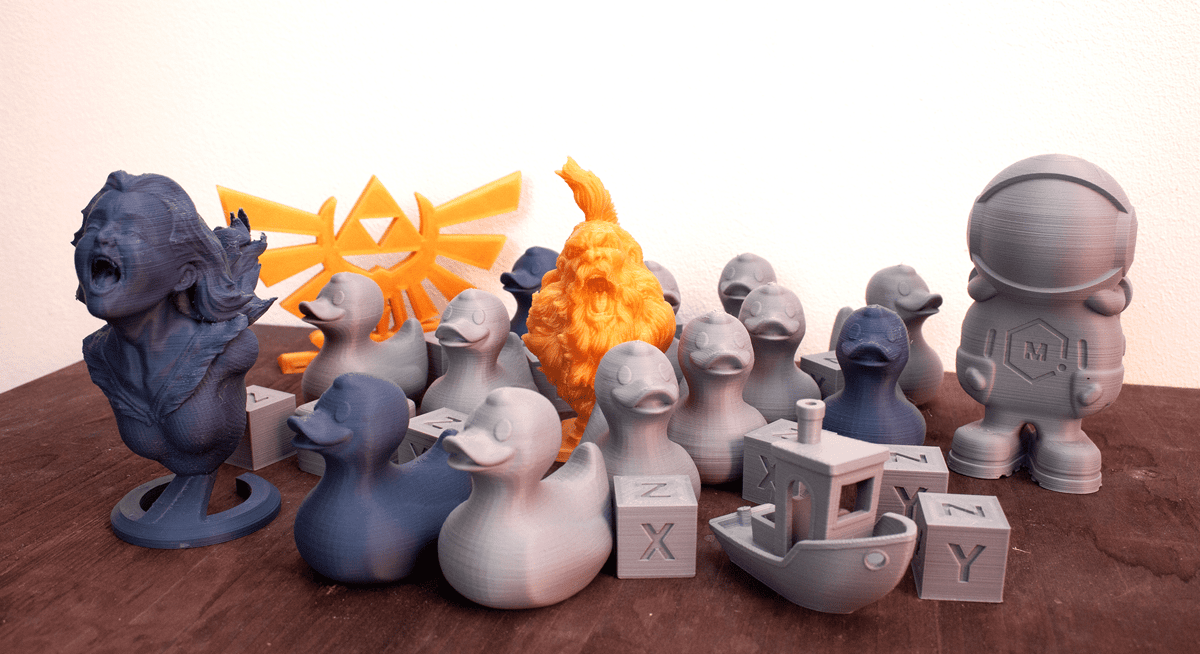
We took some issue with build plate adhesion. The Genius Pro was the first tempered glass build plate in some time that we’ve felt inclined to go at with a glue stick, and models that spread out much distance beyond the middle of the print bed, such as the Zelda Hyrule Crest by Trezhunter, inevitably ended up warping in corners. A result of the uneven heat dissipation, most likely.
One demanding print-in-place model, the Ancient Guardian Articulated from Zelda BOTW by Crafty Sven, failed numerous times as a result of adhesion issues. The articulated model’s first layer is difficult given the numerous small and separate details and we just kept having small pieces pop off in the print’s early stages.
Getting into the groove of things, we reprinted a model we were impressed with on the Sidewinder X2: The Bearded Yell by Ben Dansie (specifically a supportless remix by iczfirz). The model worked well for the Genius Pro too, with our glossy gold ecoPLA from 3DJake hiding some of those layer flaws.
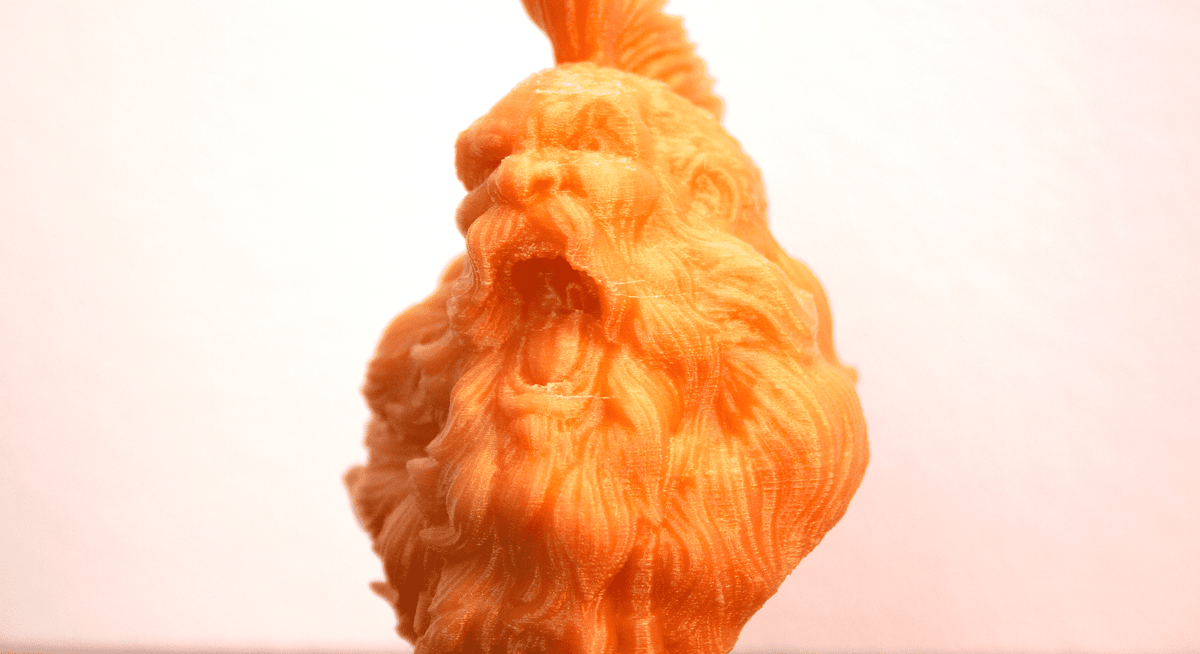
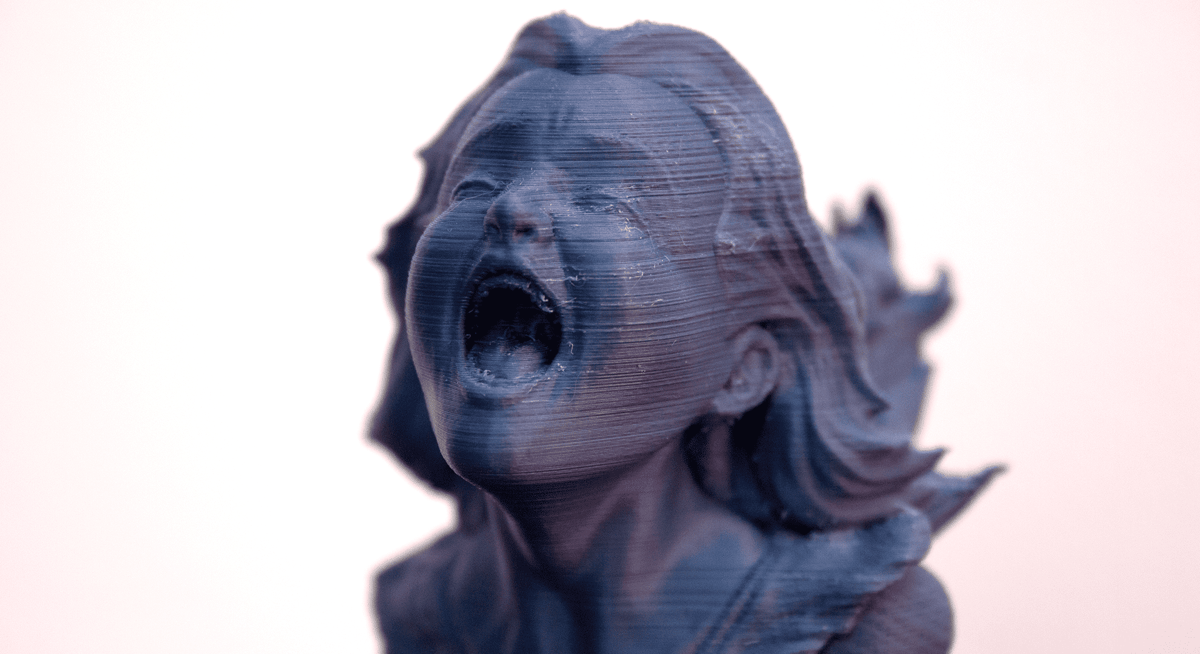
Figuring our Viking-esque man deserved a friend, we printed The Joyful Yell (again, a supportless remix by iczfirz). This model brought the Genius Pro’s harsh layer alignment issues to the surface. Printed with a layer height of 0.12 mm, the model’s smooth facial features were riddled with odd layer lines that absolutely ruined the print’s appeal.
After far more troubleshooting and calibration than we typically commit to reviews, our final print, 3D Phil, showed the same surface problems. In the end, we believe the problem’s source is beyond a reasonable measure of calibration and maintenance.
Though its poor layering was a persistent and frustrating issue, the Genius Pro also does a lot well. Its handling of more difficult materials like PETG and TPU was stellar and felt as easy as printing with PLA. Our only complaint is that the cooling didn’t seem to keep up with TPU very well and resulted in deformations from very small overhangs. But, overall, the level of control from the printer’s direct extruder resulted in prints consistent with PLA results in both flexible materials and PETG.
The Experience
When we started using the Genius Pro, we shuttled G-code over with the included 1GB flash drive and ran our jobs through the responsive touchscreen. Eventually, we swapped that manual labor out for a Raspberry Pi running Octoprint, plugged into the right-side USB-B port. Setting and resetting the bed level when necessary was straightforward and fast with the help of the system’s effective touch probe.
Idler tension is adjusted easily with the tension wheel tucked into the back of the print head. Metal idlers seem to be a popular upgrade for Artillery printers like the Genius Pro since the plastic idlers are often a point of failure, but our experience with the stock plastic idler was fine. However, we would like to see a metal drive gear on the extruder. The plastic extruder gear is sure to wear over time, especially if you’re using abrasive materials.
While we wish the AC-powered fast-heating print bed performed with greater uniformity and was easier to remove or replace, it does reach temperature fast. We found the Genius Pro’s bed to reach 70 °C in about two minutes and 100 °C in three-and-a-half. The Genius Pro gets up to speed and gets to work fast, so you can easily hang around to stare at the first layer.
Though we have some qualms with the construction of the Genius Pro’s cooling, we were surprised to find it performed much better than the Sidewinder X2 did in our time with it – which uses the same print head and cooling. We’re not sure whether this was a fluke or a result of the Genius Pro’s superior stability, but it performed better at printing harsh overhangs in tests with the same material.
That said, we found its fan duct’s design and assembly left something to be desired. Within our first few short prints, the poorly secured fan duct fell off and got stuck under the fan’s casing, causing a minor break to said casing when the extruder pinned the duct to the print bed. Though the Genius Pro did perform very well on overhangs, we’re still not convinced the duct is pushing air into the best positions anyways – and even think replacing it could help with its lacking layer alignment.
As far as noise goes, Artillery’s printers are among the quietest we’ve used, and the Genius Pro is no exception. It’s quiet as a mouse.
Is It Worth It?
Artillery’s Genius Pro is a feature-rich 3D printer for a reasonable budget price of ~$340 with an average-sized build volume of 220 x 220 x 250 mm – which is not tall enough to suffer from too much shaking due to the horizontally aligned screws on its unbraced frame as we found the taller variant of this printer did.
Where the Genius Pro suffers is its ununiform bed temperature and poorly aligned layers.
Artillery’s otherwise standout fast-heating AC tempered-glass print beds have suffered from poor thermal uniformity across all Artillery’s products and are further hindered by the build plate’s adhesion to the printer’s heat pad – making the surface difficult to clean and replace. Artillery could benefit from swapping the single-piece tempered glass top out in favor of an aluminum heat plate and clipped glass that allows users to swap out surfaces and clean more easily.
Layer misalignment was by far the worst issue we experienced with the Genius Pro. Worse yet, we failed to identify the cause. We have a few remaining suspicions but, having already spent an inordinate measure of time with this product, stopped ourselves from pursuing it further. Normal and more involved calibrations failed to resolve the issue, and we are left with the necessary assumption that this is a QA problem. Given the unrelated but otherwise odd behavior we experienced with our other recent Artillery 3D printer review, we suspect QA is a larger issue at Artillery.
Insofar as cooling is concerned, its construction needs work. The Genius Pro’s stock vents fall out easily and may cause damage to the surrounding fan casing, as it did in our case. More still, we feel the duct could be directing air better. Though we have no complaints about its performance with overhangs, some members of the community have blamed the system’s layer issues on the duct and its poorly directed airflow.
Ultimately, the Genius Pro may be worth it – if you’re comfortable with a large amount of troubleshooting and disassembling your new 3D printer should you need to. If that’s the case, the price is right for a great set of features and you can easily mod what’s missing.
Features
Automatic Bed Leveling
Though the original Genius left room for a touch probe to be attached, the Genius Pro is a little smarter out of the box with its included BLTouch-like probe.
It doesn’t quite “free you from complex manual leveling,” given that the bed isn’t fixed, but it will help to minimize maintenance by easily creating a 9-point digital mesh that helps the printer keep a consistent distance from the print bed. But, if you prefer a hard switch, Artillery has left a spot to easily install a Z-end stop.
Filament Sensor and Power Interruption
The Genius Pro also includes a filament sensor and power-loss print recovery. If you’re running a ton of prints – like in a print farm – and can’t spare the time to check your remaining filament, these features should keep you running reliably.
Both these features were included on the original Genius and aren’t something we consider especially high priority — if the power is out for any significant amount of time, your print is likely to be ruined anyway. That said, it can save you from the wasteful frustrations of power flickers. The security here rises exponentially the more printers you’re running, so it’s a nice feature for those with larger operations.
In-House 32-Bit Mainboard
Artillery has answered the call to move on from the 8-bit boards of yesteryear and developed its own in-house 32-bit “Ruby” mainboard. The board has become a staple in its new products, having originally launched with the low-priced Artillery Hornet.
These new brains should leave ample room for more user upgrades, should you choose to add any.
Rigid Z-Axis Carriage
The original Genius was plagued with a weak Z-axis. Artillery had introduced some proprietary Z-couplers on it that managed the issue somewhat, but didn’t eliminate it. It has tackled that problem again with the Genius Pro, having added a rigid aluminum casing to the Z-axis V-slot wheels in a bid to beef up the system’s stability. We quite like the Z-carriages and feel they do their job effectively.
Fast-Heating Print Bed
Artillery’s trademark fast-heating AC print bed makes a return on the Genius Pro. We continue to like the fast-heating, which we find to more or less hold up to the company’s claims, having clocked it reaching 70 °C in about two minutes and 100 °C in three-and-a-half.
The bed enables a rapid start to print jobs but does, unfortunately, continue its legacy of suffering from poor thermal uniformity.
Further Features
Additional features of the Artillery Genius Pro include:
- Titan direct drive extruder – The Genius Pro comes with an Artillery Titan-style direct extruder. Excellent if you’re looking to print with a range of interesting materials, which the Genius Pro excels at.
- Touchscreen UI – The system has kept the colorful touchscreen UI from its last iteration, which we’ve found to be suitably intuitive. It’s a small feature, but very nice to have.
- Quiet Operation – The printer’s “ultra-quiet stepper motors” deliver. Artillery is consistently good at making very low-noise printers, and we continue to be immensely impressed by just how quiet they are.
- Clean Cabling – One of the things Artillery has quickly become known for is the clean look of its 3D printers. The Genius Pro has well-managed ribbon cabling with pre-installed strain relief, resolving some past cable issues.
- Voltage Switch – Probably more of a manufacturing efficiency than a useful feature but interesting nonetheless, the Genius Pro comes with a new power supply sporting a switch to change the voltage between 100 and 240 volts. It won’t change how you print but does mean you won’t mistakenly be given the wrong unit.
Tech Specs
General Specifications
- Technology: Fused deposition modeling (FDM)
- Year: 2021
- Assembly: Pre-assembled
- Mechanical Arrangement: Cartesian-XY-Head
- Manufacturer: Artillery
3D Printer Properties
- Build Volume: 220 x 220 x 250 mm
- Feeder System: Direct
- Print head: Single nozzle
- Nozzle size: 0.4 mm
- Max. hot end temperature: 260 °C
- Max. heated bed temperature: 130 °C
- Print bed material: Tempered Glass
- Frame: Aluminum
- Bed leveling: Automatic Touch Probe
- Connectivity: USB, microSD
- Print recovery: Yes
- Filament sensor: Yes
- Camera: No
Materials
- Filament diameter: 1.75 mm
- Third-party filament: Yes
- Filament materials: PLA, ABS, Flexible PLA, Wood, PVA, HIPS
Software
- Recommended slicer: Cura
- Operating system: Windows, Mac OSX, Linux
- File types: STL, OBJ, AMF
Dimensions and weight
- Frame dimensions: 430 x 390 x 590 mm
- Weight: 9.6 kg
Similar Printers
Like the look of the Genius Pro, but want to consider some alternatives? We’ve read your mind. Here are a few to consider:
Ender 3 S1
If the Genius Pro’s feature set it to your liking, but you’re not quite sold on it, Creality has a very similar offering in the Ender 3 S1.
This printer trades the tempered glass print bed for a flexible magnetic sheet that we quite liked. All it does away with is the touchscreen in favor of an Ender V2-style color screen with a knob, but you can spring for the Pro version if you really miss that. Otherwise, you still get the dual Z-axis lead screws, auto bed-leveling, and a new “Sprite” direct extruder that we found to perform very well.
The price is quite a bit higher at ~$430, but this fully-loaded update on an old favorite is certainly worth a look.

Artillery Sidewinder X2
If you like the Genius Pro’s feature set but are looking for a little more build volume, Artillery has you covered with the printer’s big sibling: the Sidewinder X2.
The original Sidewinder was actually Artillery’s debut 3D printer. It went through several iterations before reaching a stable version that became a popular and budget-friendly choice. A lot of those learnings went into the original Genius, and now the Genius Pro has been released alongside the Sidewinder X2 with hardware parity.
CR-10 Smart Pro
If you want the same features, a bigger build volume to play with, and a stable gantry to boot, then Creality’s CR-10 Smart Pro may be worth a look.
We haven’t gotten our hands on this 300 x 300 x 400 mm printer yet, but it has piqued our interest as a truly fully-loaded system. Not only does it have Creality’s impressive new “Sprite” direct extruder, but it also comes with stock Wi-Fi capabilities and a camera to boot.
At ~$800, it is a steep ask — even compared to the larger Sidewinder X2 — but if feature-rich is what you’re after, it delivers.

License: The text of "Artillery Genius Pro: All Brain, No Brawn" by All3DP is licensed under a Creative Commons Attribution 4.0 International License.
CERTAIN CONTENT THAT APPEARS ON THIS SITE COMES FROM AMAZON. THIS CONTENT IS PROVIDED ‘AS IS’ AND IS SUBJECT TO CHANGE OR REMOVAL AT ANY TIME.